Delicious Keto Reuben Casserole for Busy Weeknights

Easy Keto Reuben Casserole: A Simple One-Dish Wonder

⚖️
Difficulty
Easy
⏲️
Prep Time
15 mins
🕒
Cook Time
20 mins
⏱️
Total Time
35 mins
🍽️
Servings
6

Growing up in Morocco, my mother’s kitchen was always alive with the scent of tagine and fresh mint tea. But when I moved to Paris for culinary school, I discovered a whole new world of flavors. Now, living in the melting pot of New York City, I love blending these global influences with classic American comfort food. That’s why I’m so excited to share this keto Reuben casserole recipe with you today. It takes everything you love about a classic deli Reuben – the savory corned beef, tangy sauerkraut, and creamy dressing – and transforms it into an easy keto dinner that’s perfect for a weeknight meal or a cozy gathering. It’s a true one-dish wonder, saving you time without sacrificing any of that delicious flavor!

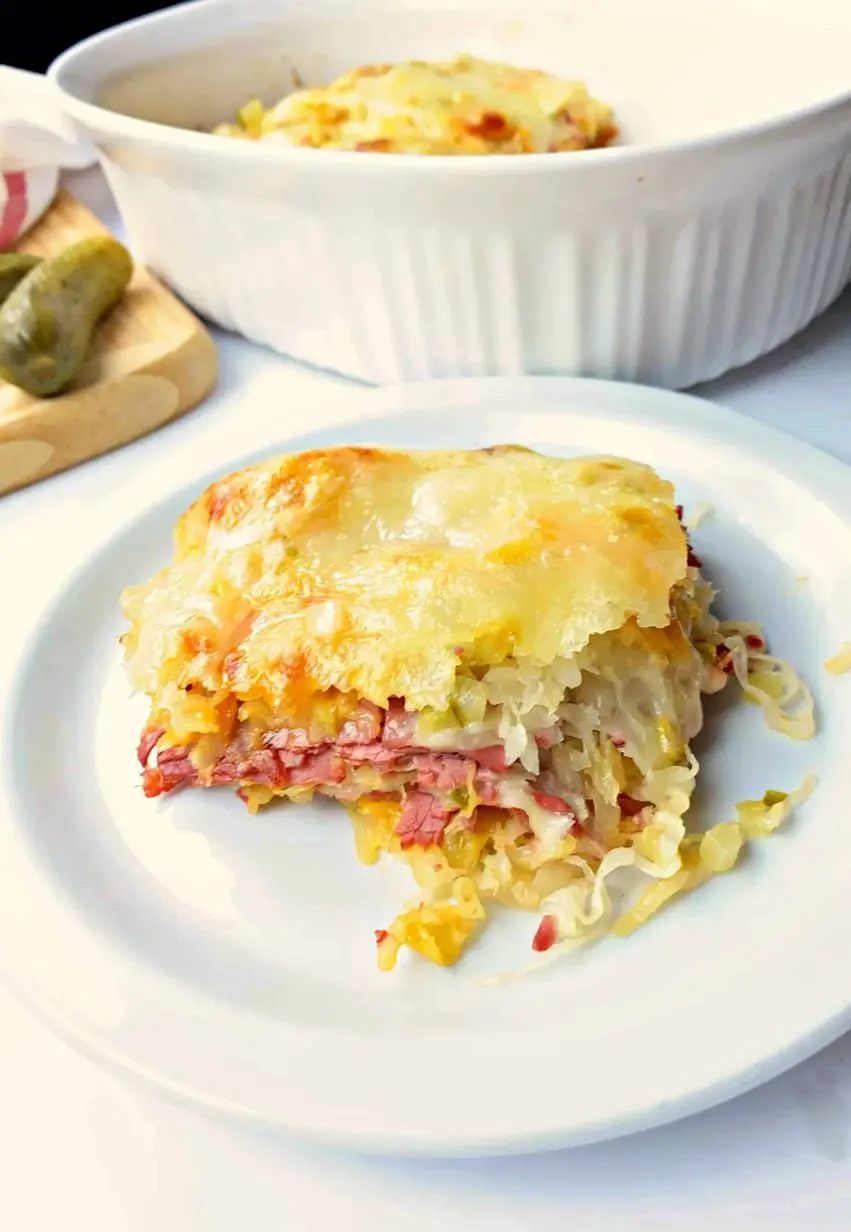
Imagine pulling this bubbling casserole from the oven: the rich aroma of thinly sliced corned beef mingling with the sharp tang of sauerkraut, all blanketed under a golden-brown crust of melted Swiss cheese. The vibrant green of the dill pickles peeks through, adding a fresh counterpoint to the deep, savory notes. Each spoonful offers a symphony of textures – the tender meat, the crisp-tender cabbage, and the gooey, stretchy cheese, all bound together by a creamy, piquant Russian dressing. It’s truly a hearty, satisfying dish that warms you from the inside out, reminiscent of the robust flavors I learned to appreciate in the grand brasseries of Paris, but adapted for a modern, low-carb lifestyle.

I’ve tried countless versions of low carb Reuben casserole over the years, and I promise you, this one is a winner. My unique angle? It’s all about maximizing flavor with minimal fuss, transforming a classic sandwich into an effortless, hearty bake. I’ve refined the layering technique to ensure every bite has the perfect balance of ingredients. Stick with me, and I’ll share my pro tips for draining the sauerkraut properly (a crucial step!) and how to achieve that irresistibly crispy, cheesy topping. We’ll also dive into a common mistake many make that can leave your casserole watery – but don’t worry, I’ll show you how to avoid it!

Why This Easy Keto Reuben Casserole Recipe Is the Best

The secret to this casserole’s incredible flavor lies in its careful balance. I’ve always believed that great food doesn’t need to be complicated, but it does need attention to detail. This recipe focuses on quality ingredients and a specific layering technique that ensures every forkful contains that perfect harmony of savory corned beef, tangy sauerkraut, and creamy, cheesy goodness. It’s a testament to the classic flavor profile I honed in my Parisian culinary training, now reimagined for your home kitchen.

Texture is just as important as taste, and that’s where this recipe truly shines. Achieving a tender yet structurally sound casserole can be tricky, especially with moisture-rich ingredients like sauerkraut. My method ensures the sauerkraut is properly drained, preventing a soggy outcome, while the Swiss cheese melts into a luxurious, bubbly layer that beautifully binds everything together. The final broil adds that irresistible, slightly crispy top, a technique I often emphasize when teaching about gratins.

This easy keto dinner is designed to be foolproof, whether you’re a seasoned chef or just starting your keto journey. The steps are straightforward, and the prep time is minimal, making it an ideal choice for busy weeknights in NYC. I’ll guide you through each stage, highlight potential pitfalls, and empower you with simple tips to ensure your casserole turns out perfectly every single time. It’s about bringing gourmet results to your everyday cooking.

Keto Reuben Casserole Ingredients

Living in NYC, I’m lucky to have access to some of the best delis and international markets, so finding quality ingredients is a joy. For this casserole, I like to visit my local butcher for thinly sliced corned beef – just like those iconic deli sandwiches that are a hallmark of this city. The quality of your ingredients really shines through in a simple dish like this, much like selecting the finest olive oils for my mother’s Moroccan dishes.

Ingredients List

  • 1 Pound Corned Beef (sliced or shredded)
  • 8 oz sauerkraut (drained well)
  • 12 oz Swiss cheese (shredded or sliced)
  • 1/2 cup diced dill pickles
  • Butter or cooking spray (for greasing)
  • 1/2 cup Russian dressing (sugar-free for keto)

Ingredient Spotlight

Corned Beef: This is the star of our keto Reuben casserole. Look for good quality, thinly sliced corned beef at your deli counter or pre-packaged. If you can only find thick slices, you can shred it yourself. The rich, salty flavor is essential. You could substitute with pastrami or even leftover roast beef, though the classic Reuben taste will be slightly altered to a more general savory flavor.

Sauerkraut: The tangy crunch of sauerkraut is non-negotiable. Choose a brand with minimal ingredients – just cabbage, water, and salt. Make sure to drain it exceptionally well; excess moisture is the enemy of a good casserole. If you’re not a fan of sauerkraut’s strong flavor, you could use a very mild, quick-pickled cabbage, but be prepared for a less authentic Reuben profile.

Swiss Cheese: The nutty, meltable quality of Swiss cheese is what ties this casserole together. I prefer using a block and shredding it myself for a better melt, but pre-shredded works too. Gruyère is an excellent, more flavorful substitution if you want to elevate the dish, adding a richer, more complex cheesy note, as we often use in French gratins. Monterey Jack or even cheddar can work in a pinch for a milder, more generic cheesy flavor.

Russian Dressing: This creamy, zesty dressing delivers that iconic Reuben flavor. It’s crucial to use a sugar-free or home-made keto-friendly version to keep this casserole low-carb. I often whip up my own with mayo, sugar-free ketchup, a touch of horseradish, and a dash of Swerve for sweetness. A good alternative, if Russian isn’t available, is a sugar-free Thousand Island dressing, which shares a similar flavor profile.

Original IngredientBest SubstitutionFlavor / Texture Impact
Corned BeefPastramiSimilar savory, salty profile; slightly leaner, less traditional “Reuben” flavor.
SauerkrautQuick-pickled cabbage (mild)Less intense tang, milder flavor; can be a good option if you find sauerkraut too strong.
Swiss CheeseGruyère or ProvoloneGruyère adds a deeper, nuttier flavor; Provolone is milder but melts beautifully.
Russian DressingSugar-Free Thousand IslandVery similar flavor profile, often interchangeable in a Reuben context.

Keto Reuben Casserole

How to Make Easy Keto Reuben Casserole — Step-by-Step

Making this keto Reuben casserole is surprisingly simple, and I’ll walk you through each step to ensure your dinner is a success. Just follow along, and you’ll have a delicious meal ready in no time!

Step 1: Preheat Oven and Prep Sauerkraut

Preheat your oven to 400 degrees Fahrenheit (200°C). This ensures a nice even cook. While the oven heats, it’s crucial to properly drain the liquid from your sauerkraut. I typically use a fine-mesh strainer, pressing down firmly to extract as much moisture as possible. If you don’t have a strainer, a cheesecloth works wonderfully, or even a few layers of paper towels in a pinch.

💡 mia’s Pro Tip: Don’t skip the sauerkraut draining! Excess liquid will make your casserole watery, diluting the flavors and ruining the texture. Really squeeze it dry!

Step 2: Grease Your Casserole Dish

Using butter or a nonstick cooking spray, generously grease your casserole dish. This prevents sticking and ensures your beautiful casserole comes out cleanly for serving. This is a simple step, but vital, much like seasoning your tagine pot properly before cooking.

⚠️ Common Mistake to Avoid: Not greasing the dish enough can lead to a sticky mess, especially with melted cheese. Be thorough here!

Step 3: First Layer of Goodness

Spread half of your corned beef evenly across the bottom of the greased casserole dish. Top this with a layer of the well-drained sauerkraut, then sprinkle half of the diced dill pickles. This forms the foundational flavor layer of your low carb Reuben casserole.

Step 4: Sauce, Cheese, and Repeat

Drizzle half of your sugar-free Russian dressing over the sauerkraut and pickles. Then, sprinkle about one-third of your Swiss cheese. Repeat the layers with the remaining corned beef, sauerkraut, pickles, and dressing. This ensures even distribution of all the components, leading to a perfectly balanced bite every time.

💡 mia’s Pro Tip: For an extra depth of flavor, marinate your shredded corned beef in a tablespoon of the Russian dressing for 15 minutes before layering. It really infuses the meat with flavor!

Step 5: Bake to Perfection

Cover the casserole dish tightly with aluminum foil. Bake for 10-15 minutes, or until the cheese is bubbling excitedly and the casserole is heated through. The foil helps to steam the casserole, ensuring everything is tender and moist before the final browning.

Step 6: Broil and Serve

Remove the foil and sprinkle the remaining Swiss cheese over the top. Broil for 2-3 minutes, watching carefully, until the cheese is beautifully golden brown and lightly crispy. Serve immediately and enjoy your delicious easy keto dinner!

⚠️ Common Mistake to Avoid: When broiling, stay by the oven! Cheese can go from perfectly golden to burnt in seconds. A watchful eye is essential for that perfect crust.

StepActionDurationKey Visual Cue
1Preheat oven & drain sauerkraut5 minsOven reaches 400°F; sauerkraut noticeably drier.
2Grease casserole dish1 minDish coated thoroughly with butter/spray.
3First layer (corned beef, sauerkraut, pickles)3 minsHalf of ingredients evenly spread.
4Sauce, cheese & repeat layers5 minsAll ingredients layered, top with 1/3 cheese.
5Bake covered10-15 minsCheese bubbling, casserole heated through.
6Broil2-3 minsCheese golden brown and slightly crispy.

Serving & Presentation

When this keto Reuben casserole emerges from the oven, it’s a sight to behold! I love to let it rest for a few minutes before serving, allowing the flavors to meld and the cheese to set slightly, which makes for cleaner portions. You can cut it into squares directly in the dish, or if you’re feeling fancy, carefully lift out individual servings onto plates. For a simple garnish that pops, a sprinkle of fresh chopped parsley or a few extra dill pickle slices brings a vibrant touch and fresh aroma, reminiscent of the meticulous plating in Parisian bistros.

To truly complete the experience, think about what complements those rich, tangy flavors. A crisp side salad with a light vinaigrette is always a winner, cutting through the richness of the cheese and meat. Or, for something a bit more substantial yet still low-carb, some steamed green beans with butter and a pinch of French sea salt would be delightful. I sometimes serve it with a side of extra sugar-free Russian dressing for those who love to dip!

In my NYC kitchen, I often embrace the spirit of communal dining, and this casserole is perfect for that. Place the hot dish directly on the table for everyone to serve themselves, family-style. It’s comforting, satisfying, and evokes that feeling of sharing a special meal, much like the warmth of my mother’s table in Morocco, albeit with a distinctly American twist.

Pairing TypeSuggestionsWhy It Works
Side DishCrisp Green Salad, Steamed Asparagus, Roasted Cabbage WedgesOffers a fresh, bright contrast to the rich casserole; roasted cabbage plays on the sauerkraut flavor.
Sauce / DipExtra Sugar-Free Russian Dressing, Sugar-Free Dijon MustardEnhances the classic Reuben flavors; adds a piquant kick.
BeverageDry White Wine (Sauvignon Blanc), Light Lager, Unsweetened Iced TeaCuts through richness, complements tanginess without overwhelming.
GarnishFresh Chopped Parsley, Extra Dill Pickle Slices, Dill SprigsAdds freshness, visual appeal, and reinforces dill flavor.

Make-Ahead, Storage & Reheating

As a busy chef in New York City, meal prepping is my secret weapon, and this keto Reuben casserole is perfect for making ahead. It can save you so much time during the week, and honestly, sometimes the flavors meld even better overnight. Just assemble it, pop it in the fridge, and bake when you’re ready!

MethodContainerDurationReheating Tip
RefrigeratorAirtight container3-4 daysMicrowave individual portions, or oven at 350°F (covered) until hot.
FreezerFreezer-safe dish, well-wrapped2-3 monthsThaw overnight in fridge, then reheat in oven at 350°F (covered).
Make-AheadAssembly in casserole dishUp to 24 hoursCover and refrigerate, then bake as directed (may need 5-10 min extra bake time).

When reheating this keto casserole recipe, I find the oven method to be the best for retaining that delicious texture. For a whole casserole, cover it with foil and bake at 350°F (175°C) until it’s heated through, usually about 20-30 minutes. If you’re just reheating a single portion, a microwave works fine, but be prepared for a slightly softer texture on the cheese.

From my experience in busy restaurant kitchens and my own bustling NYC life, I always advocate for having a plan. This casserole freezes beautifully, making it an excellent option for those last-minute dinner emergencies. Just pull it out, thaw, and reheat for a comforting meal that tastes just as good as fresh. It’s a lifesaver when you need a hearty, easy keto dinner!

Variations & Easy Swaps

VariationKey ChangeBest ForDifficulty Impact
Turkey Reuben CasseroleSwap corned beef for sliced deli turkey.Lighter, leaner protein option.None
Dairy-Free Keto ReubenUse dairy-free Swiss cheese alternative.Those with dairy sensitivities.None
Spicy Reuben KickAdd sliced jalapeños or a dash of hot sauce.Heat lovers, adds a vibrant flavor dimension.None

Turkey Reuben Casserole

If you’re looking for a lighter take on this classic, swap out the corned beef for thinly sliced deli turkey. This variation still delivers all the beloved Reuben flavors but with a leaner protein choice. The turkey’s mildness allows the tang of the sauerkraut and the creaminess of the dressing to shine through even more. It’s a delightful alternative, perfect for when you want a delicious keto casserole recipe that feels a bit lighter on the palate, much like how a delicate French rillettes can be a refreshing change from a heavier pâté.

Dairy-Free Keto Reuben

For those with dairy sensitivities, it’s absolutely possible to enjoy this keto Reuben casserole! Simply swap the Swiss cheese for your favorite dairy-free shredded cheese alternative. There are some fantastic plant-based options on the market now that melt beautifully. Ensure your Russian dressing is also dairy-free (most are mayonnaise-based, so just check for milk products). The texture will be slightly different, perhaps a bit less gooey, but the core flavors will remain intact, just as robust and satisfying.

Spicy Reuben Kick

For those who appreciate a little heat, add a spicy kick to your easy keto dinner! You can easily incorporate a sprinkle of red pepper flakes into the Russian dressing, or layer in some thinly sliced jalapeños or pickled cherry peppers with the pickles. The spice will add a vibrant, zesty dimension that complements the savory and tangy components beautifully, creating a more dynamic flavor profile. In NYC, we love to experiment with bold flavors, and this is a fantastic way to customize your casserole.

How do you make a keto Reuben casserole without corned beef?

While classic corned beef is essential for an authentic Reuben flavor, you can absolutely make a keto Reuben casserole without it! My favorite alternative is thinly sliced deli turkey or even pastrami. Both offer a savory, peppery flavor that complements the sauerkraut and Swiss cheese beautifully. You could also use shredded leftover roast beef, thinly sliced, which provides a rich, comforting base. Just ensure whatever meat you choose is low-carb and adds a hearty element to your casserole. The goal is to capture the spirit of the Reuben, even if you swap out main proteins.

What is the best low-carb substitute for thousand island dressing in a Reuben casserole?

The best low-carb substitute for Thousand Island dressing in a Reuben casserole is a sugar-free Russian dressing. Many stores now carry keto-friendly versions. If you prefer to make your own (which I often do!), simply combine mayonnaise, sugar-free ketchup, a touch of horseradish, a dash of Worcestershire sauce (check for sugar), and a tiny pinch of a sugar substitute like Swerve or erythritol to taste. This homemade version gives you complete control over the ingredients and carb count, ensuring your keto Reuben casserole stays perfectly within your dietary goals while retaining that signature tangy-sweet creaminess.

Can you make a keto Reuben casserole ahead of time and reheat it?

Absolutely! This keto Reuben casserole is fantastic for meal prepping. You can assemble the entire casserole, cover it tightly with plastic wrap or aluminum foil, and refrigerate it for up to 24 hours before baking. When you’re ready to bake, you might need to add an extra 5-10 minutes to the covered baking time to ensure it heats through completely. Leftovers also store well in an airtight container in the refrigerator for 3-4 days. For reheating, I recommend covering and baking in the oven at 350°F (175°C) until hot, or simply microwaving individual portions if you’re in a hurry.

What side dishes go well with a keto Reuben casserole?

For a complete keto dinner, I love pairing this casserole with fresh, light sides to balance its richness. A crisp green salad with a simple vinaigrette is always a winner and helps cut through the savory flavors. Steamed asparagus or green beans with a squeeze of lemon and a sprinkle of sea salt also work wonderfully. If you want to lean into the cabbage theme, roasted cabbage wedges can be surprisingly delicious and complement the sauerkraut beautifully. You could also offer extra dill pickle spear on the side for an extra tangy bite. The key is to keep the side dishes low-carb and refreshing.

How do I prevent my Reuben casserole from becoming watery?

The most crucial step to prevent a watery keto Reuben casserole is to thoroughly drain your sauerkraut. Sauerkraut holds quite a bit of liquid, and if you don’t remove it, it will release into your casserole during baking, making it soggy. I recommend using a fine-mesh strainer and pressing down firmly with the back of a spoon to squeeze out as much moisture as possible. You can even use a clean kitchen towel or cheesecloth to wring it out effectively. A few minutes invested in this step will make a big difference in the final texture of your casserole.

Can I use fresh cabbage instead of sauerkraut in this recipe?

While theoretically possible, using fresh cabbage instead of sauerkraut would drastically change the flavor profile of this keto Reuben casserole. The tangy, fermented flavor of sauerkraut is a signature component of a Reuben, and fresh cabbage wouldn’t provide that characteristic zest. If you absolutely can’t find sauerkraut or prefer a milder taste, you could try a very quick pickle of thinly sliced cabbage with vinegar and salt, but it won’t replicate the true sauerkraut experience. For an authentic Reuben taste, stick to well-drained sauerkraut.

What kind of corned beef is best for a keto Reuben casserole?

For this casserole, I recommend using thinly sliced deli-style corned beef. You can usually find it at the deli counter, or sometimes pre-packaged in the refrigerated meat section. Look for a brand that is already cooked and sliced thin, as this makes layering much easier and ensures faster heating. If you have a larger chunk of cooked corned beef, you can shred it or slice it thinly yourself. The key is to choose a lean cut to maximize the flavor without adding unnecessary fat, ensuring a delicious and satisfying keto casserole recipe.

Is this casserole suitable for gluten-free diets?

Yes, this keto Reuben casserole is inherently gluten-free, which is one of the reasons I love it so much! All the primary ingredients – corned beef, sauerkraut, Swiss cheese, dill pickles, and a properly made keto Russian dressing – are naturally gluten-free. It’s a wonderful option for those following a gluten-free diet who are craving those classic deli flavors without the bread. Always double-check your Russian dressing label, as some brands might contain hidden gluten, but generally, this is a safe and delicious choice for gluten-free eating.

Share Your Version!

I poured a lot of love and culinary experience into perfecting this keto Reuben casserole, and I truly hope you enjoy it as much as I do. Your feedback means the world to me, so please, after you’ve tried it, come back and leave a star rating and a comment below! I love hearing how my recipes turn out in your kitchens.

Did you make any delicious swaps or add your own unique twist? Share a photo of your creation on Instagram or Pinterest and tag @exorecipes – I get such a thrill seeing your culinary masterpieces! And tell me, what’s your favorite comfort food from your own childhood that you’d love to see reinvented as a keto-friendly dish?

From my NYC kitchen to yours — I hope this recipe brings as much warmth to your table as it does to mine. — mia 🧡

📌

Love This Recipe? Save It to Pinterest!

If you enjoyed this Keto Reuben Casserole recipe, don’t let it get lost in your browser tabs! 😄 Pin it now so you can find it again anytime — and explore hundreds more tried-and-tested recipes waiting for you on my Pinterest boards.

👉 Follow mia on Pinterest @chefrecipes2

📌 Pin this recipe · 🔁 Re-pin your favorites · 💬 Tag me when you make it — I love seeing your creations!

Print

clock clock iconcutlery cutlery iconflag flag iconfolder folder iconinstagram instagram iconpinterest pinterest iconfacebook facebook iconprint print iconsquares squares iconheart heart iconheart solid heart solid icon

Easy Keto Reuben Casserole

  • Author: Chef Mia

Description

If youre a fan of the classic Reuben sandwich, then youre gonna LOVE this Easy Keto Reuben Casserole!


Ingredients

Scale
  • 1 Pound Corned Beef
  • 8 oz sauerkraut
  • 12 oz swiss cheese
  • 1/2 cup diced dill pickles
  • Butter or cooking spray
  • 1/2 cup Russian dressing

Instructions

  1. Preheat oven to 400 degrees
  2. Drain liquid from sauerkraut. I used a mesh strainer but you can also use a cheesecloth and in a pinch paper towels will work too.
  3. Grease your casserole dish with a nonstick cooking spray or butter.
  4. Layer half of the corned beef and top with sauerkraut, and pickles.
  5. Top with 1/2 the sauce mixture and top with 1/3 of the cheese. Repeat layers (meat, sauerkraut, sauce, pickles, and cheese) with remaining ingredients.
  6. Cover with aluminum foil and Bake casserole for10-15 or until cheese is bubbling.
  7. Broil for 2-3 minutes and serve!


Nutrition

  • Calories: 345 kcal


Keto Reuben Casserole

ph">For more delicious inspiration, follow me on Pinterest!

Authentic Vegan Polish Sauerkraut Soup Kapusniak

Polish Sauerkraut Soup (Kapusniak) – A Hearty Vegan Classic

⚖️
Difficulty
Easy
⏲️
Prep Time
20 mins
🕒
Cook Time
50 mins
⏱️
Total Time
70 mins
🍽️
Servings
6

Growing up, my mother’s kitchen in Morocco was always fragrant with simmering tagines and aromatic spices. But after training in Paris and living in New York, I’ve discovered a deep love for hearty, comforting soups from cultures around the world. One such revelation has been this incredible Polish sauerkraut soup, known as Kapusniak. It’s a beautifully warming dish, perfect for those chilly NYC evenings, and surprisingly, my vegan version captures all the depth and soul of the traditional recipe without the meat. This healthy cabbage soup is not only naturally vegan but also incredibly satisfying and easy to customize to your palate, making it a true cold-weather champion.

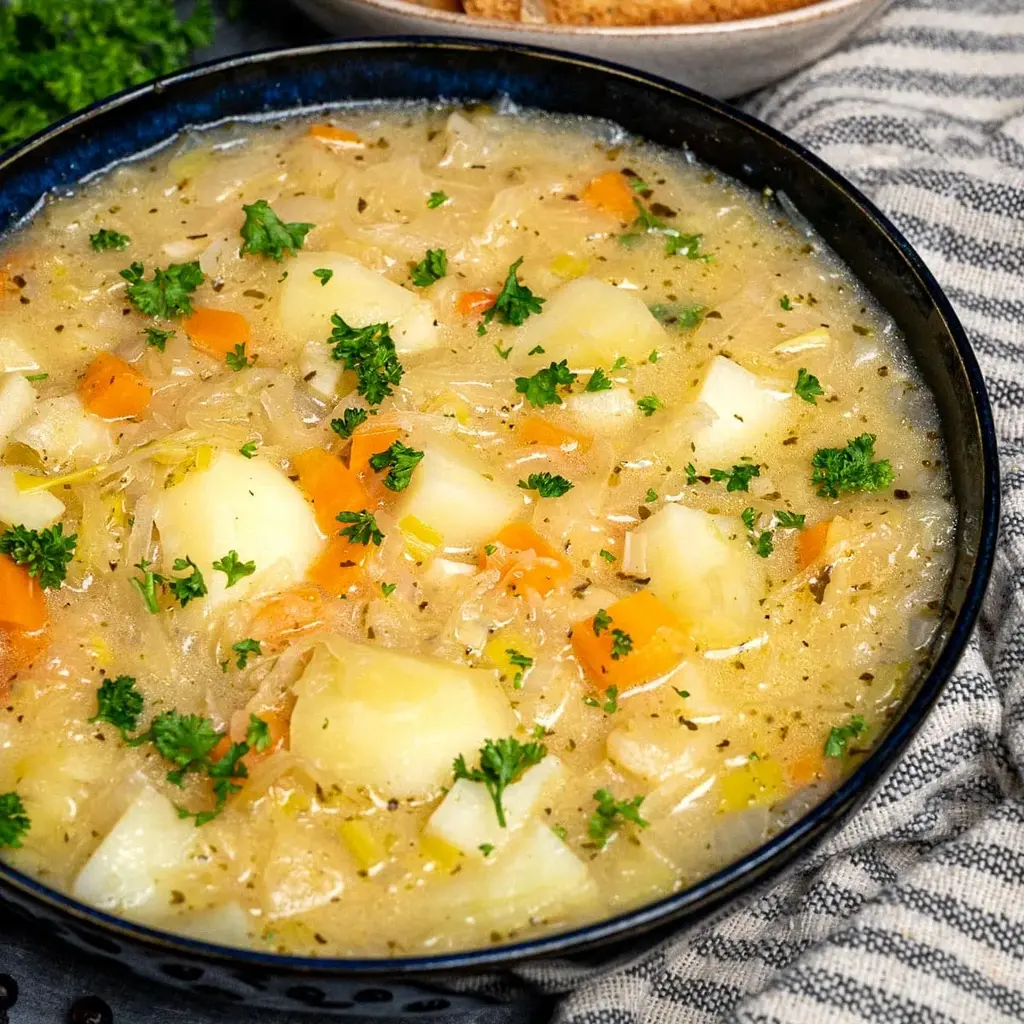
What makes this Kapusniak recipe so special are the layers of flavor that develop with each step. We start with a base of tender leeks, carrots, and parsnips, then introduce an aromatic bouquet of caraway seeds, marjoram, allspice, and juniper berries that truly sing with the piquant sauerkraut. The texture is a delightful dance between the tender shredded cabbage, soft potato cubes, and the slight bite of the roasted vegetables. The rich vegetable stock brings everything together into a wonderfully balanced and deeply flavorful broth that smells absolutely divine as it simmers on the stove, filling your home with an inviting aroma.

As a professional cook, I’ve refined this traditional Kapusniak into a truly foolproof recipe that anyone can master. My approach emphasizes building flavor gradually, ensuring each ingredient has a chance to shine. I’ve found that many recipes rush the cooking of the sauerkraut, but a little patience here makes all the difference! I’ll share a pro tip on how to achieve the perfect balance of tanginess without it overpowering the other ingredients, and I’ll also highlight a common mistake to avoid when cooking with sauerkraut to ensure your soup is always a success. Get ready to discover your new favorite easy Polish soup!

Why This Polish Sauerkraut Soup Recipe Is the Best

My rendition of Polish sauerkraut soup truly stands out thanks to a specific blend of cooking traditions. While I honor the Eastern European roots of Kapusniak, I bring in techniques from my French culinary training, focusing on slow-building flavor profiles. The addition of parsnip, a tip I picked up from a farmer at a Brooklyn farmers market, adds an unexpected hint of sweetness and earthiness that beautifully balances the sauerkraut’s tang, making it uniquely delicious and robust. This healthy cabbage soup feels both deeply traditional and refreshingly modern.

The perfected texture in this easy Polish soup comes from a careful layering process. By sautéing the aromatics and root vegetables until deeply softened before adding the sauerkraut and stock, we ensure they contribute fully to the body of the soup, rather than just floating through it. The potatoes are added later, preventing them from becoming mushy and allowing them to retain their delightful cube shape and tender-firm texture. It’s all about timing and respect for each ingredient’s role, much like the precision I learned in pastry school.

This Kapusniak recipe is designed to be foolproof and fast enough for a weeknight meal, while tasting like it simmered all day. The active cooking time is minimal, mostly involving chopping and stirring, with simmering doing most of the work. I’ve broken down each step clearly, from how to perfectly drain your sauerkraut to seasoning “to taste,” so even if you’ve never made a Polish dish before, you’ll feel confident creating a delicious, traditional kapusniak. It’s a testament to how simple ingredients can yield extraordinary results with a little guidance.

Polish Sauerkraut Soup Ingredients

When I head out to pick up ingredients for this hearty Polish sauerkraut soup, I love browsing the specialty stores in my diverse NYC neighborhood. It’s a treat to find the perfect bay leaves or fresh, firm parsnips, reminiscing about the vibrant spice markets of my childhood in Morocco. This Kapusniak recipe truly benefits from quality ingredients, but don’t worry, everything listed is readily available at your local grocery store.

Ingredients List

  • 2 tablespoons sunflower oil
  • 1 large onion, diced
  • 1 medium leek, white and light green parts only, finely sliced
  • 1 medium carrot, diced
  • 1 medium parsnip, diced
  • 2 large garlic cloves, finely chopped
  • 1/2 teaspoon caraway seeds
  • 1 teaspoon dried marjoram
  • 1 teaspoon allspice
  • 6-8 juniper berries
  • 2-3 bay leaves
  • 400 g (1 lb) sauerkraut, drained
  • 3 potatoes, peeled and cut into 1-inch cubes (about 500 g)
  • 1.5 litres (6 cups) vegetable stock
  • Salt and freshly ground pepper to taste

Ingredient Spotlight

Sauerkraut (400g / 1 lb): This is the star of our Kapusniak recipe! Look for refrigerated, unpasteurized sauerkraut, often found in the produce or dairy section, as it has the best flavor and probiotics. Avoid canned or jarred varieties that have been heavily processed, as their flavor can be overly sharp or bland. Ensure you drain it well to control the sourness in your soup.

Juniper Berries (6-8): These small, dark berries add a wonderfully unique, slightly piney and peppery aroma that is classic in Eastern European cooking and truly elevates this healthy cabbage soup. They are often found in the spice aisle with other whole spices. If you can’t find them, you can omit them, although the soup will have a slightly less complex and traditional flavor. There isn’t a direct substitute for their specific flavor profile.

Parsnip (1 medium): Parsnips bring a subtle sweetness and earthy depth that beautifully balances the sourness of the sauerkraut. When buying, choose firm, unblemished parsnips that feel heavy for their size. If parsnips are unavailable, you can substitute with an extra carrot, though you’ll miss that unique sweet-earthy note. Alternatively, a small turnip could also work, adding a slightly more peppery flavor.

Caraway Seeds (1/2 teaspoon): These seeds are frequently paired with cabbage and sauerkraut in Eastern European cuisine, lending a distinctive warm, slightly anisy, and nutty flavor that is essential to an authentic Kapusniak. They are usually found in the spice rack. If you absolutely can’t find caraway seeds, you could try a pinch of fennel seeds, but the flavor profile will be noticeably different.

Vegetable Stock (6 cups): A good quality vegetable stock forms the flavorful base of this vegan Polish sauerkraut soup. Look for low-sodium options to control the seasoning yourself. If you don’t have vegetable stock, water can be used but the soup won’t be as rich or deeply flavored. A homemade stock would be ideal if you have it on hand!

Original IngredientBest SubstitutionFlavor / Texture Impact
Sunflower OilOlive oil or other neutral cooking oilSlightly different flavor profile depending on the oil, but generally fine.
Leek1/2 cup chopped celery with a small amount of onionSimilar aromatic base, but without the leek’s subtle sweetness and tender texture.
ParsnipExtra carrot or a small turnipExtra carrot adds sweetness, turnip adds a slightly peppery note; neither quite captures the parsnip’s unique earthy sweetness.
Juniper BerriesOmit (no direct substitute)Loss of unique piney, slightly peppery, traditional flavor.
Caraway SeedsPinch of fennel seeds or omitFennel seeds introduce an anisy flavor, but caraway’s complex earthiness will be missed.

Polish Sauerkraut Soup (Kapusniak) – Skinny Spatula

How to Make Polish Sauerkraut Soup — Step-by-Step

Making this easy Polish sauerkraut soup is a journey of building flavors. Take your time with each step, and you’ll be rewarded with a truly comforting and delicious Kapusniak!

Step 1: Sauté the Aromatics

Heat the 2 tablespoons of sunflower oil in a large stockpot or Dutch oven over medium heat. Add the diced onion and sauté for 2-3 minutes, stirring occasionally, until it starts to soften and become translucent. This initial step builds the aromatic foundation of your healthy cabbage soup.

💡 mia’s Pro Tip: Don’t rush the onions! Allowing them to soften properly creates a sweet, complex base that will deepen the overall flavor of your Kapusniak, similar to starting a classic French mirepoix.

Step 2: Soften the Root Vegetables

Add the finely sliced leek, diced carrot, and diced parsnip to the pot. Continue to cook for another 8-10 minutes, stirring occasionally, until all the vegetables are tender-crisp. You want them softened but not browned, allowing their natural sweetness to emerge.

Step 3: Infuse with Spices

Stir in the 2 finely chopped garlic cloves, 1/2 teaspoon caraway seeds, 1 teaspoon dried marjoram, 1 teaspoon allspice, 6-8 juniper berries, and 2-3 bay leaves. Continue to cook for 1-2 minutes, stirring constantly. This brief toasting of the spices in the hot oil helps release their full aromas and flavors, a technique my mother always used in her Moroccan kitchen.

⚠️ Common Mistake to Avoid: Overcooking the garlic at this stage. Garlic can burn quickly, turning bitter and spoiling the flavor of your Polish sauerkraut soup. Add it towards the end of the vegetable sauté and cook just until fragrant.

Step 4: Cook the Sauerkraut

Add the 400g (1 lb) of drained sauerkraut to the pot. Continue cooking for 1-2 minutes, stirring well to combine it with the vegetables and spices. Next, add just one ladle of vegetable stock (about 1/2 cup) to the pot. Bring it to a gentle simmer and let it cook for 10 minutes. This controlled simmering helps to temper the sauerkraut’s sourness and integrate its flavors without making the final soup too sharp.

Step 5: Simmer with Potatoes

Add the 3 peeled and 1-inch cubed potatoes (about 500g) to the pot, followed by the remaining 1.5 litres (6 cups) of vegetable stock. Bring the soup to a very gentle simmer, then reduce the heat to low, cover, and let it cook for 25 minutes, or until the potatoes are fork-tender. Ensure the liquid is just barely bubbling to prevent the potatoes from breaking down too much.

Step 6: Season and Serve

Carefully remove the bay leaves and juniper berries (if you prefer not to eat them) from the soup. Season the Polish sauerkraut soup generously with salt and freshly ground pepper to taste. Taste and adjust seasonings as needed, perhaps adding a touch more salt or pepper. Ladle the hot Kapusniak into bowls and serve immediately with a side of rye bread or your favorite crusty bread for dipping.

StepActionDurationKey Visual Cue
1Sauté onion2-3 minutesOnion translucent and softened
2Sauté root vegetables8-10 minutesVegetables tender-crisp
3Infuse spices1-2 minutesGarlic fragrant, spices aromatic
4Cook sauerkraut12-13 minutesSauerkraut integrated, flavors melding
5Simmer with potatoes25 minutesPotatoes fork-tender
6Season and serveAs neededFlavors balanced to taste

Serving & Presentation

Serving this Polish sauerkraut soup is all about embracing its rustic charm and comforting nature. Ladle generous portions into deep, warm bowls. I love to garnish my Kapusniak with a swirl of fresh dill or parsley for a pop of color and a contrasting herbaceous note. A dollop of vegan sour cream (or regular if you’re not strictly vegan) also adds a creamy richness that beautifully complements the tang of the sauerkraut.

For me, the perfect accompaniment to this healthy cabbage soup is a thick slice of hearty rye bread, perhaps lightly toasted, or a crusty sourdough baguette. It’s wonderful for soaking up the flavorful broth. On a cold New York evening, I sometimes even serve this with a side of crispy roasted potatoes, or a simple green salad with a light vinaigrette to cut through the richness. It’s a complete meal in a bowl, but these additions make it even more special.

When I was a student in Paris, we learned that presentation is key, even for the most humble dishes. While Kapusniak isn’t a “fancy” soup, arranging the vegetables nicely in the bowl and adding a thoughtful garnish elevates the experience. Imagine the aroma filling your dining room, a comforting embrace that takes you back to simpler times, or perhaps introduces you to a new culinary tradition from Eastern Europe.

Pairing TypeSuggestionsWhy It Works
Side DishHearty rye bread, crusty sourdough, roasted potatoes, simple green saladPerfect for dipping, adding textural contrast, or a refreshing palate cleanser.
Sauce / DipVegan sour cream or regular sour cream, a swirl of extra virgin olive oilAdds creamy richness and balances the soup’s tanginess.
BeverageCrisp lager, dry white wine (e.g., Sauvignon Blanc), sparkling water with lemonRefreshes the palate and complements the soup’s robust flavors.
GarnishFresh dill, chopped parsley, thinly sliced scallions, a sprinkle of smoked paprikaAdds freshness, color, and an extra layer of aroma or subtle smokiness.

Make-Ahead, Storage & Reheating

As someone with a busy schedule in NYC, meal prepping is essential, and this Polish sauerkraut soup is a dream for make-ahead meals. It actually tastes even better the next day as the flavors have more time to meld and deepen – a true culinary gem!

MethodContainerDurationReheating Tip
RefrigeratorAirtight containerUp to 4-5 daysGently reheat on the stovetop over low-medium heat, stirring occasionally. Add a splash of water or stock if too thick.
FreezerFreezer-safe containers or bagsUp to 3 monthsThaw overnight in the refrigerator, then reheat on the stovetop.
Make-AheadCook up to 2-3 days in advanceFlavors deepen over timePrepare completely, store, and just reheat when ready to serve. Perfect for busy weeknights.

When freezing this Kapusniak recipe, make sure to cool it completely before transferring it to freezer-safe containers. Leave a little headspace in your containers as the soup will expand slightly when frozen. This healthy cabbage soup holds up beautifully in the freezer, making it a fantastic prep-ahead option for those cold winter months.

For reheating, my preferred method is always on the stovetop. This allows for even heating and you can easily adjust the consistency. If the soup has thickened too much in the fridge or freezer, a small splash of vegetable stock or even water can bring it back to its perfect consistency. Avoid microwaving large batches, as it can heat unevenly and sometimes dull the vibrant flavors of the spices and sauerkraut.

Variations & Easy Swaps

While this traditional Kapusniak recipe is vegan, it’s incredibly versatile! Here are some variations and easy swaps inspired by my culinary journey from Morocco to Paris to NYC farmers markets, letting you tailor this healthy cabbage soup to your taste and dietary needs.

VariationKey ChangeBest ForDifficulty Impact
Smoky Kapusniak (Meat Lover’s)Add smoked paprika or smoked sausageAdding depth and traditional meatinessSlightly more complex if cooking meat, but still easy.
Creamy KapusniakStir in plant-based cream or pureed cannellini beansRicher mouthfeel, less sharp tangNone (easy addition at the end).
Spicy KapusniakAdd red pepper flakes or a pinch of harissaFor those who love a kickNone (simple spice addition).

Smoky Kapusniak

For those who appreciate a smoky depth, you can easily adapt this Polish sauerkraut soup. Before adding the stock, stir in 1 teaspoon of smoked paprika alongside the other spices. If you’re not keeping it vegan, you could also sauté some diced smoked Polish sausage (kielbasa) with the onions at the beginning of the recipe. This adds a beautiful, savory layer that complements the sour notes of the sauerkraut.

Gluten-Free Kapusniak

This Kapusniak recipe is naturally gluten-free, which is fantastic! Just ensure that your vegetable stock is certified gluten-free, as some brands might contain hidden sources of gluten. All the other ingredients are inherently gluten-free, allowing you to enjoy this easy Polish soup without any modifications. It’s always good to double-check labels, a habit I picked up from scrutinizing ingredients for my French patisserie desserts.

Spicy Kapusniak

If you’re like me and love a little heat, adding some spice can transform this healthy cabbage soup. Stir in 1/2 teaspoon of red pepper flakes when you add the rest of the spices, or for a Moroccan twist, a small dollop of harissa paste at the very end of cooking. This brings a lovely warmth that contrasts beautifully with the tangy sauerkraut, creating a truly exciting flavor profile.

What is the best way to make Polish sauerkraut soup (Kapusniak) less sour?

To reduce the sourness in your Kapusniak, there are a few tried-and-true methods. Firstly, ensure you thoroughly drain your sauerkraut before adding it to the pot. Rinsing it briefly under cold water can also help, but be careful not to rinse too much, as you’ll lose some of its distinctive flavor. During cooking, a “pro-tip” I often use is adding a pinch of sugar or a grated apple along with the sauerkraut – the sweetness will balance the acidity without making the soup taste sweet. Simmering with a small portion of the stock first, as in my recipe, also helps to mellow the tang over time, allowing it to integrate more smoothly into the soup.

Can I make a vegetarian version of Kapusniak, and what can I use instead of meat?

Absolutely, my Kapusniak recipe is already a delicious and hearty vegan (and therefore vegetarian) version! Traditionally, Kapusniak often includes smoked pork ribs or sausage, but omitting them and using a rich vegetable stock still yields an incredibly flavorful result. Instead of meat, I rely on a robust base of slow-sautéed onions, leeks, carrots, and parsnips, combined with aromatic spices like caraway, marjoram, and juniper berries. If you want more ‘umami’ or a meatier texture, you could sauté some sliced mushrooms (like cremini or shiitake) with the initial vegetables, or even add a can of drained and rinsed cannellini beans or lentils towards the end of cooking for extra protein and body. Smoked paprika also adds a wonderful, subtle ‘meaty’ flavor.

How long does it take to cook Polish sauerkraut soup from start to finish?

This easy Polish sauerkraut soup will take you approximately 70 minutes from start to finish. The prep time, which primarily involves chopping vegetables and draining sauerkraut, is about 20 minutes. The active cooking time on the stovetop is around 50 minutes. This includes sautéing the aromatics and root vegetables, infusing the spices, briefly cooking the sauerkraut, and then simmering the entire soup with potatoes until they’re fork-tender. While the simmering takes a good chunk of that time, it’s mostly hands-off, allowing the flavors to develop beautifully, similar to how I let my Moroccan tagines slowly come to life. It’s truly a rewarding process for a weeknight masterpiece.

What are traditional sides or breads to serve with Kapusniak?

Traditionally, Polish sauerkraut soup is often served with hearty, rustic breads that can soak up the delicious broth. Thick slices of rye bread or a good crusty sourdough are classic choices and make for a wonderfully comforting meal. In my New York kitchen, I sometimes even serve it with a fresh, lightly dressed green salad to add a refreshing contrast to the rich soup. Sometimes people opt for boiled potatoes on the side, but since this recipe already has potatoes in it, a simple bread is usually sufficient. A dollop of vegan sour cream (or regular, if preferred) and a sprinkle of fresh dill or parsley are also customary and enhance both the flavor and presentation of the Kapusniak.

Can I use fresh cabbage instead of sauerkraut for Kapusniak?

While you certainly can use fresh cabbage to make a delicious cabbage soup, it would no longer be considered classic “Kapusniak.” The defining characteristic and flavor profile of Polish sauerkraut soup comes from the fermented sauerkraut, which provides a distinct tang and depth that fresh cabbage simply cannot replicate. Fresh cabbage would make a delicious, healthy cabbage soup, but it would be a milder, sweeter dish. If you want to use fresh cabbage while still retaining some tang, you could add a splash of apple cider vinegar or lemon juice at the end, but it’s not a direct substitute for the complex flavor developed through fermentation.

Is Kapusniak considered a healthy cabbage soup?

Absolutely! Especially this vegan version, Kapusniak can be a very healthy cabbage soup. It’s packed with vegetables like cabbage (sauerkraut), onions, leeks, carrots, parsnips, and potatoes, providing an abundance of vitamins, minerals, and fiber. Sauerkraut, being a fermented food, is also rich in beneficial probiotics which are great for gut health. By making it vegan, we avoid the saturated fats often found in traditional meat versions, keeping it lighter yet still hearty and satisfying. It’s a nourishing, low-fat, and flavorful choice that will leave you feeling good, much like the wholesome meals my family enjoyed in Morocco.

What kind of potatoes are best for Polish sauerkraut soup?

For this Kapusniak recipe, I recommend using waxy or all-purpose potatoes. Varieties like Yukon Gold, red potatoes, or even new potatoes work wonderfully. These types of potatoes hold their shape well during simmering, giving you nice, discernible cubes of tender potato in your soup without turning mushy. Starchy potatoes like Russets tend to break down too much, making the soup cloudy and affecting the texture. I prefer to cut them into 1-inch cubes so they cook evenly and are a good size for each spoonful of this healthy cabbage soup.

Can I make this Kapusniak recipe in a slow cooker?

Yes, you can adapt this Polish sauerkraut soup recipe for a slow cooker! While I’m partial to the stovetop for better control over flavor development, a slow cooker offers convenience. For best results, I still recommend sautéing the onion, leek, carrot, parsnip, and garlic in a pan before transferring them to the slow cooker with the spices. This step builds crucial flavor that you’d miss otherwise. Then, add the sauerkraut and vegetable stock, and cook on low for 4-6 hours or on high for 2-3 hours. Add the cubed potatoes during the last hour of cooking to prevent them from becoming too soft. Finish with seasoning to taste.

Share Your Version!

I poured my heart into perfecting this healthy cabbage soup recipe, and I truly hope you enjoy it as much as I do! There’s nothing more rewarding than seeing my recipes come to life in your kitchens. If you make this easy Polish sauerkraut soup, please come back and leave a star rating and comment below to let me know how it turned out. Your feedback is so valuable!

Don’t forget to share your culinary creations with me! Snap a photo of your traditional Kapusniak and tag @exorecipes on Instagram or Pinterest. I love seeing your beautiful versions and hearing about any personal touches you added. Did you try the smoky variation? Or perhaps added a unique NYC market find? Let’s connect and share our love for good food!

From my NYC kitchen to yours — I hope this recipe brings as much warmth to your table as it does to mine. — mia 🧡

📌

Love This Recipe? Save It to Pinterest!

If you enjoyed this Polish Sauerkraut Soup (Kapusniak) recipe, don’t let it get lost in your browser tabs! 😄 Pin it now so you can find it again anytime — and explore hundreds more tried-and-tested recipes waiting for you on my Pinterest boards.

👉 Follow mia on Pinterest @chefrecipes2

📌 Pin this recipe · 🔁 Re-pin your favorites · 💬 Tag me when you make it — I love seeing your creations!

Print

clock clock iconcutlery cutlery iconflag flag iconfolder folder iconinstagram instagram iconpinterest pinterest iconfacebook facebook iconprint print iconsquares squares iconheart heart iconheart solid heart solid icon

Polish Sauerkraut Soup (Kapusniak)

  • Author: Chef Mia

Description

Polish sauerkraut soup is a simple yet hearty recipe thats just perfect to enjoy on a cold day. Also known as kapusniak, this sauerkraut soup is naturally vegan and can be easily customized to your liking.


Ingredients

Scale
  • 2 tablespoons sunflower oil
  • 1 large onion, diced
  • 1 medium leek, white and light green parts only, finely sliced
  • 1 medium carrot, diced
  • 1 medium parsnip, diced
  • 2 large garlic cloves, finely chopped
  • 1/2 teaspoon caraway seeds
  • 1 teaspoon dried marjoram
  • 1 teaspoon allspice
  • 68 juniper berries
  • 23 bay leaves
  • 400 g (1 lb) sauerkraut, drained
  • 3 potatoes, peeled and cut into 1-inch cubes (about 500 g)
  • 1.5 litres (6 cups) vegetable stock
  • Salt and freshly ground pepper to taste

Instructions

  1. Heat the oil in a large stockpot or Dutch oven and sauté the onion for 2-3 minutes over medium heat.
  2. Add the leek, carrot and parsnip and continue to cook for 8-10 minutes until the veggies soften.
  3. Stir in the garlic, caraway seeds, marjoram, allspice, juniper berries and bay leaves and continue to cook for 1-2 minutes, stirring occasionally.
  4. Add the sauerkraut and continue cooking for 1-2 minutes. Next, add a ladle of veggie stock and simmer for 10 minutes.
  5. Add the potatoes and the rest of the stock and simmer on a low heat for 25 minutes or until the potatoes are fork-tender.
  6. Season to taste and serve with rye bread or your favourite crusty bread.


Nutrition

  • Calories: 189 calories
  • Sugar: 6 grams sugar
  • Fat: 5 grams fat
  • Carbohydrates: 33 grams carbohydrates
  • Protein: 5 grams protein


Polish Sauerkraut Soup (Kapusniak) – Skinny Spatula

ph">For more delicious inspiration, follow me on Pinterest!

Easy Skillet Zucchini and Mushrooms with Garlic Herbs

Pan-Fried Zucchini and Mushrooms with Garlic & Herbs: An Easy Vegetable Side Dish

⚖️
Difficulty
Easy
⏲️
Prep Time
10 mins
🕒
Cook Time
15 mins
⏱️
Total Time
25 mins
🍽️
Servings
4

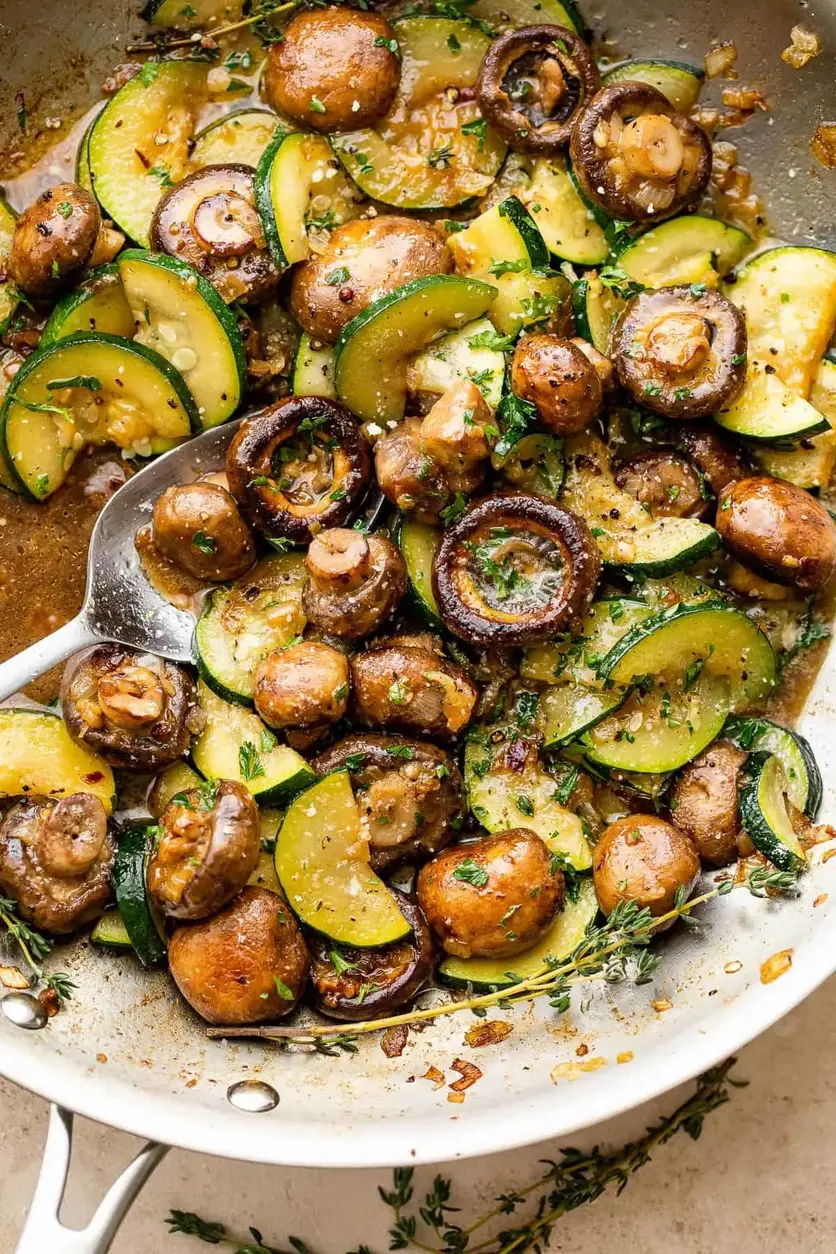
Growing up in Morocco, fresh vegetables were always the star of the show. We’d go to the market, and my mother would pick the freshest produce, ready to transform it into something magical with just a few simple spices. That philosophy has stayed with me, even here in my bustling New York City kitchen. Today’s recipe, pan-fried zucchini and mushrooms with garlic & herbs, reminds me of those days—simple, seasonal, and utterly delicious. It’s truly an easy vegetable side dish that comes together quickly, turning humble ingredients into a star. The secret? A quick sear on the zucchini and then building layers of flavor with the mushrooms, garlic, and fresh herbs.

The aroma alone when you make this is enough to transport you. Picture this: the earthiness of the mushrooms, deeply browned and savory, mingling with the subtle sweetness of tender zucchini. Then comes the pungent kick of fresh garlic, softened and fragrant, uplifted by the bright, aromatic dance of thyme and oregano. The butter and olive oil create a rich, golden glaze that coats each piece, enhancing their natural flavors. It’s a symphony of textures too – the slight crispness of the pan-fried zucchini giving way to its yielding interior, and the juicy, meaty bite of the perfectly cooked mushrooms. This isn’t just a side dish; it’s a celebration of fresh, vibrant produce, cooked with care and a touch of chef’s finesse.

What sets my skillet zucchini and mushrooms apart is the technique: we give each vegetable its moment to shine before bringing them together. This ensures perfect texture and flavor, preventing them from becoming a watery mess – a common pitfall in vegetable sautés. I’ll show you how to achieve that beautiful browning, teach you the best way to handle your mushrooms (a tip I picked up in Paris!), and highlight why using fresh herbs makes all the difference. Expect perfectly tender, never soggy, vegetables that are bursting with flavor. This vegetarian skillet recipe is going to be your new go-to.

Why This Skillet Zucchini and Mushrooms Recipe Is the Best

My approach to this pan fried zucchini and mushrooms recipe is all about maximizing flavor and texture. Growing up, my mother taught me to treat each ingredient with respect, allowing it to cook to its potential. By searing the zucchini separately and then truly browning the mushrooms, we’re not just cooking them—we’re caramelizing their natural sugars and developing deep, rich flavors that a simple stir-fry often misses. This layering of cooking processes creates a complexity that elevates this easy vegetable side dish from good to unforgettable.

The texture is paramount. There’s nothing worse than soggy vegetables! My technique, honed through years in culinary school in Paris and countless experiments in my NYC kitchen, ensures that your zucchini retains a slight bite while being tender, and your mushrooms are beautifully browned and meaty, never rubbery. It’s about controlling the heat, not overcrowding the pan, and understanding how each vegetable reacts. This attention to detail results in a dish that feels sophisticated yet remains incredibly approachable for the home cook.

This recipe is designed to be foolproof and fast, perfect for a weeknight dinner or a last-minute addition to a special meal. The steps are straightforward, and I guide you through each stage, explaining the ‘why’ behind each action. With minimal fuss and readily available ingredients, you’ll feel like a professional chef coaxing incredible flavor from simple produce. It’s a healthy, quick, and satisfying vegetarian skillet recipe that delivers on taste every single time.

Pan-Fried Zucchini and Mushrooms Ingredients

For me, cooking in NYC means having access to some of the freshest produce, whether it’s from a weekend farmers market or a specialty grocery store. These ingredients for pan-fried zucchini and mushrooms are simple, but choosing good quality ones makes all the difference. It reminds me of the vibrant Moroccan souks, where every vegetable was bursting with life. Here’s what you’ll need to create this delicious, easy vegetable side dish.

Ingredients List

  • 1 tablespoon olive oil
  • 3 tablespoons butter (divided)
  • 2 small zucchini (cut into thin, half-moon slices)
  • Salt and black pepper (to taste)
  • 1 small yellow onion (finely diced)
  • 1 pound small button mushrooms (cleaned and patted dry)
  • 3 to 4 cloves garlic (minced)
  • 2 teaspoons fresh chopped herbs, use what you have on hand (or use 1 teaspoon dried herbs (thyme and oregano are great in this dish))
  • ¼ cup vegetable broth
  • Chopped fresh parsley (for garnish)
  • Grated Parmesan (for garnish)

Ingredient Spotlight

Zucchini: Look for firm, shiny zucchini without soft spots or blemishes. Smaller zucchinis tend to be sweeter and have fewer seeds. Their mild flavor and ability to soak up other tastes make them perfect for this skillet dish. If you can’t find small zucchini, use regular ones and perhaps scoop out the very seedy center before slicing to avoid excess moisture. Cucumber is not a good substitute here as it releases too much water and lacks the right texture.

Mushrooms: Small button mushrooms are fantastic for their tender texture and earthy flavor. Ensure they are clean and dry before cooking to encourage proper browning. Cremini mushrooms (baby bellas) are an excellent substitute, offering a deeper, more robust umami flavor. Avoid using larger, very watery mushrooms like portobellos in this specific recipe as their moisture content can make the dish soggy if not handled carefully.

Garlic & Herbs: Fresh garlic is key here, adding a sharp, aromatic punch. Always use fresh cloves, minced just before adding to the pan for maximum impact. For herbs, fresh thyme and oregano are my go-to for their classic pairing with mushrooms and zucchini. Dried herbs can be used in a pinch, but remember that dried herbs are more potent, so use about half the amount. For a Moroccan touch, a pinch of cumin or coriander could be added with the garlic.

Vegetable Broth: This adds a lovely layer of moisture and flavor, helping to deglaze the pan and create a light sauce. Choose a low-sodium vegetable broth to control the overall saltiness of the dish. If you don’t have vegetable broth, a splash of white wine or even just water can work, though the flavor won’t be as rich. A homemade chicken broth, if you have it, also makes an excellent substitute.

Original IngredientBest SubstitutionFlavor / Texture Impact
Small ZucchiniYellow Squash, Cucumber (carefully)Yellow squash offers a similar mild flavor and texture. Cucumber is high in water; needs extra draining to prevent sogginess.
Button MushroomsCremini (Baby Bella) MushroomsCremini mushrooms provide a deeper, more intense umami flavor and slightly firmer texture.
Fresh Herbs (Thyme, Oregano)1/2 amount Dried Herbs (Italian Seasoning), Fresh RosemaryDried herbs are more concentrated. Fresh rosemary offers a stronger, piney aroma; use sparingly.
Vegetable BrothDry White Wine, Water (with a dash of soy sauce)White wine adds acidity and complexity. Water is a plainer option; soy sauce can boost umami but alters flavor profile.

Pan-Fried Zucchini and Mushrooms Recipe

How to Make Skillet Zucchini and Mushrooms — Step-by-Step

Making this pan fried zucchini and mushrooms dish is truly a breeze, and I’m going to walk you through each part to ensure you get perfectly cooked, flavorful results every time. Follow these steps for an utterly delicious easy vegetable side dish.

Step 1: Sear the Zucchini

Add 1 tablespoon olive oil and 1/2 tablespoon butter to a large skillet and set over medium-high heat. Once the butter is melted and sizzling, add the zucchini slices to the hot oil. Season them with a good pinch of salt and black pepper. Cook for 3 to 4 minutes, stirring occasionally, until the zucchini is fork-tender and has a nice golden-brown sear on both sides. Remove the zucchini from the skillet and set it aside. If there’s any liquid in the skillet, quickly wipe it out with a paper towel to ensure the mushrooms can brown effectively in the next step.

💡 mia’s Pro Tip: To get that beautiful sear on your zucchini without it becoming watery, make sure your skillet is hot before adding them and avoid overcrowding the pan. Cook in batches if necessary, giving each slice enough space to brown. This is a technique I learned in Paris to lock in flavor and texture!

Step 2: Sauté Onions and Mushrooms

Return the skillet to the burner and add the remaining 2.5 tablespoons of butter. Melt the butter over medium-high heat until it’s fragrant. Stir in the finely diced yellow onions and cook for 2 minutes, or until they just begin to soften and become translucent. Add the cleaned and patted-dry button mushrooms to the skillet. Cook the mushrooms for 5 to 7 minutes, stirring occasionally. The key here is patience; let them release their moisture and then brown beautifully, developing a rich, savory flavor. They should be tender and nicely browned, which signals a delicious umami depth.

⚠️ Common Mistake to Avoid: Don’t wash your mushrooms under running water! They’re like sponges and will absorb too much water, preventing them from browning properly. Instead, wipe them clean with a damp cloth or a soft brush. My mother always taught me to keep mushrooms as dry as possible for the best results.

Step 3: Add Garlic, Herbs, and Finish

Once the mushrooms are browned to perfection, stir in the minced garlic and your fresh or dried herbs (thyme and oregano are excellent choices). Cook for just 20 seconds, or until the garlic becomes fragrant. You don’t want it to burn! Immediately return the cooked zucchini to the skillet and mix it gently with the mushrooms and aromatics. Cook for 1 minute, or until everything is heated through. Pour in the ¼ cup of vegetable broth and cook for another 2 minutes, allowing the broth to slightly reduce and create a light, flavorful glaze. Taste for salt and pepper and adjust as needed. Remove the skillet from the heat, sprinkle generously with fresh chopped parsley and grated Parmesan cheese, and serve immediately.

💡 mia’s Pro Tip: The broth isn’t just for moisture; it helps deglaze the pan, picking up all those delicious browned bits (fond) from the bottom of the skillet. This adds an incredible depth of flavor to your pan-fried zucchini and mushrooms.

StepActionDurationKey Visual Cue
1Sear Zucchini3-4 minutesFork-tender, golden-brown sear
2Sauté Onions & Mushrooms7-9 minutes totalOnions translucent, mushrooms tender and nicely browned
3Add Garlic, Herbs, Finish3-4 minutes totalGarlic fragrant, broth slightly reduced, heated through

Serving & Presentation

When it comes to serving, this pan-fried zucchini and mushrooms recipe is wonderfully versatile. The vibrant green of the zucchini contrasts beautifully with the deep brown of the mushrooms, making it an attractive dish on any table. I love serving this family-style in a rustic ceramic bowl, reminiscent of the communal meals my family shared in Morocco. A final flourish of fresh parsley and a generous sprinkle of grated Parmesan cheese adds both color and an extra layer of savory goodness, making it feel special yet effortless.

This easy vegetable side dish truly shines alongside so many main courses. Think of it as a sophisticated upgrade to your everyday vegetables. Its rich, earthy flavors make it a fantastic companion to roasted chicken, grilled fish, or even a simple steak. In my NYC apartment, I often pair it with a quick pan-seared salmon for a healthy, balanced weeknight meal that feels wonderfully indulgent. The tender texture and rich savory notes perfectly complement lean proteins without overpowering them.

Don’t limit this to just a side! I sometimes turn this into a light vegetarian main course by spooning it over a bed of quinoa or couscous – a nod to my Moroccan roots. You can also mix it into scrambled eggs or an omelet for a delightful breakfast or brunch. The subtle hint of garlic and fresh herbs makes it feel gourmet, no matter how you serve it. It’s a dish that adapts to your needs, always delivering on flavor and satisfaction.

Pairing TypeSuggestionsWhy It Works
Side DishRoasted Chicken, Grilled Salmon, Pan-Seared SteakThe earthy flavors complement roasted meats and fish beautifully, adding a fresh, savory component.
Sauce / DipA dollop of plain Greek yogurt or sour cream, Balsamic GlazeCreamy yogurt balances richness, while balsamic glaze adds a tangy-sweet counterpoint.
BeverageCrisp Sauvignon Blanc, Light-bodied Pinot Noir, Sparkling Water with LemonWine selections enhance the earthy notes, and a refreshing sparkling water cleanses the palate.
GarnishFresh Basil, Toasted Pine Nuts, Lemon ZestAdds brightness, textural crunch, and aromatic lift to the finished dish.

Make-Ahead, Storage & Reheating

Life in NYC moves fast, so having healthy, delicious dishes ready to go is a lifesaver. This skillet zucchini and mushrooms recipe is fantastic for meal prep. I often make a larger batch on Sunday to enjoy throughout the week, saving precious time on busy evenings. It holds up beautifully, making it an ideal candidate for those seeking an easy vegetable side dish that doesn’t compromise on freshness or flavor even after a day or two in the fridge.

MethodContainerDurationReheating Tip
RefrigeratorAirtight glass containerUp to 3-4 daysGently reheat on the stovetop over medium heat until warmed through; avoid overcooking to maintain texture.
FreezerFreezer-safe bag or containerUp to 1 monthFreeze flat for quicker thawing. Thaw overnight in the fridge before reheating; texture may be slightly softer.
Make-AheadPrepare vegetables, cook separatelyChop veggies 1 day in advance.Cook zucchini and mushrooms just before serving for best results. Combine and finish step 3 when ready.

For reheating, my preferred method is always on the stovetop. A quick sauté in a little olive oil or butter for a few minutes will bring it back to life, ensuring the zucchini and mushrooms retain some of their original texture. Microwaving is an option for convenience, but be mindful that it can sometimes soften the vegetables more than desired, potentially leading to a slightly watery consistency. If you do microwave, use short bursts and stir frequently.

Freezing is possible, especially if you plan to incorporate the reheated dish into a soup, stew, or casserole, where a slightly softer texture won’t be an issue. However, for serving as a standalone side, I always recommend enjoying this within a few days of preparation for optimal texture and flavor. The fresh herbs and vibrant vegetables are at their best when they’ve just been cooked, so if you’re making it for a special occasion, fresh is always superior.

Variations & Easy Swaps

One of the things I love most about cooking is how easily a recipe can transform with just a few tweaks. This pan-fried zucchini and mushrooms recipe is a fantastic canvas for creativity. Whether you’re looking for a different flavor profile, catering to dietary needs, or simply using what you have on hand, these variations ensure this easy vegetable side dish remains fresh and exciting.

VariationKey ChangeBest ForDifficulty Impact
Spicy Moroccan TwistAdd Harissa and a pinch of CuminThose who love bold, warming spices and a little heat.Minimal change, just adding more spices.
Dairy-Free DelightSwap butter for extra olive oil, omit ParmesanLactose intolerant or vegan diners.No impact really, replaces ingredients directly.
Umami-Rich Asian-InspiredAdd soy sauce, ginger, sesame oilA flavor adventure, pairs well with Asian main dishes.Slightly more complex flavor profile.

Spicy Moroccan Twist

To infuse this dish with the warm, complex flavors reminiscent of my Moroccan heritage, add a teaspoon of harissa paste along with the garlic and herbs. A pinch of ground cumin or coriander can also deepen the aroma. The harissa will bring a gentle heat and a vibrant, smoky undertone that pairs beautifully with the earthy mushrooms and fresh zucchini. This variation transforms the dish into something truly exotic, perfect for serving alongside grilled lamb or chicken tagine. It’s a taste of Marrakesh brought straight to your plate!

Dairy-Free Delight

If you’re avoiding dairy, this recipe can easily be adapted. Simply substitute the butter with an additional 3 tablespoons of good quality olive oil for cooking. For the garnish, omit the Parmesan cheese or use a plant-based alternative. The dish will retain its wonderful savory flavors and rich texture thanks to the olive oil, but without any dairy. I’ve tested this many times over for friends with dietary restrictions here in NYC, and it’s always a hit, proving that wholesome cooking doesn’t need to sacrifice flavor or satisfaction.

Umami-Rich Asian-Inspired

For a completely different twist, imagine a bustling street food stall in Asia! After adding the garlic, stir in about 1 tablespoon of low-sodium soy sauce or tamari, a teaspoon of grated fresh ginger, and a few drops of sesame oil. Omit the Parmesan cheese in this version. This combination will give your sauteed zucchini mushrooms a distinctly savory, umami-packed flavor that would be incredible with rice, noodles, or alongside any Asian-inspired main course. This is a favorite variation when I’m looking for something quick and flavorful from my NYC kitchen.

How long does it take to pan fry zucchini and mushrooms?

Pan-frying zucchini and mushrooms is a relatively quick process, making this an ideal easy vegetable side dish for busy weeknights! The zucchini typically takes about 3 to 4 minutes to become fork-tender with a nice golden sear. The mushrooms will require a bit more time, usually 5 to 7 minutes, to properly brown and become tender after the onions have softened for 2 minutes. Including the garlic and herb sauté, and a quick finish with vegetable broth, the total active cooking time for this skillet zucchini and mushrooms recipe is about 15 minutes, not including prep. My goal is always maximum flavor in minimum time, a skill I perfected in busy Parisian kitchens!

What are the best seasonings for pan-fried zucchini and mushrooms?

For this pan-fried zucchini and mushrooms recipe, I find that simple yet high-quality seasonings truly let the natural flavors shine. Classic salt and freshly ground black pepper are essential for enhancing the vegetables’ inherent sweetness and savoriness. Fresh garlic, minced and added towards the end, provides a wonderful aromatic warmth. My favorite herbs for this dish are fresh thyme and oregano; their earthy, slightly peppery notes complement both zucchini and mushrooms perfectly. A final sprinkle of fresh parsley brightens everything up, and grated Parmesan cheese adds a lovely salty, umami finish. For a Moroccan touch, a pinch of cumin or smoked paprika can be a delightful addition.

Can I use other types of mushrooms in this recipe?

Absolutely! While small button mushrooms are fantastic for this easy vegetable side dish, you can certainly experiment with other varieties to change the flavor profile. Cremini mushrooms (also known as baby bellas) are an excellent choice; they’re slightly more mature than button mushrooms and offer a deeper, more intensely earthy flavor. Shiitake mushrooms, with their distinctive umami, would also be delicious, just be sure to remove the tough stems. For a more gourmet touch, oyster mushrooms or thinly sliced portobello caps could work. The key is to ensure they are cleaned and patted very dry before cooking to achieve that crucial browning. My rule from culinary school in Paris: dry mushrooms make happy mushrooms!

What should I serve with pan-fried zucchini and mushrooms?

This versatile pan-fried zucchini and mushrooms dish pairs beautifully with a wide array of main courses. It makes a fantastic, healthy easy vegetable side dish with roasted chicken or turkey, grilled salmon or cod, or a perfectly seared steak. The earthy flavors complement lean proteins wonderfully. For a vegetarian meal, I often serve it over fluffy couscous or quinoa, inspired by my Moroccan roots, or alongside a hearty lentil soup. It also brightens up a simple pasta dish, especially if you toss it with a light garlic and olive oil sauce. Don’t forget that a sprinkle of fresh herbs and Parmesan for garnish elevates any pairing!

How do I prevent my pan-fried zucchini and mushrooms from becoming soggy?

Preventing sogginess is key to a delicious skillet zucchini and mushrooms recipe! First, ensure your vegetables are dry before they hit the pan—especially the mushrooms, which should be wiped clean, not washed. Second, use a large skillet and avoid overcrowding it. Overcrowding lowers the pan’s temperature, causing the vegetables to steam rather than sear and brown. This is a common mistake and one I always warn against in my NYC cooking classes. Cook the zucchini first and remove it, then cook the mushrooms separately to allow each to release its moisture and caramelize properly. High heat and adequate space are your best friends here. Wiping out any liquid from the pan between cooking cycles of vegetables helps too!

Can I make this pan-fried zucchini and mushrooms recipe vegan?

Yes, absolutely! This skillet zucchini and mushrooms recipe can very easily be made vegan without compromising on flavor or texture. Simply swap out the butter for an equivalent amount of olive oil or your preferred plant-based butter alternative. For the garnish, omit the grated Parmesan cheese, or use a good quality dairy-free Parmesan substitute. The vegetable broth is already vegan, so no changes are needed there. The essential flavors from the garlic, herbs, zucchini, and mushrooms will still shine through beautifully, making it a fantastic and healthy vegan side dish. It’s a staple in my kitchen for friends who follow a plant-based diet!

What’s the best way to cut zucchini for pan-frying?

For pan-frying zucchini in this recipe, I recommend cutting them into thin, half-moon slices. Aim for about ¼-inch thickness. This size allows them to cook quickly and evenly, achieving that desirable fork-tender texture with a slight sear without becoming mushy. If your zucchini are particularly large, you might cut them into quarters lengthwise before slicing into half-moons. Consistency in slicing is crucial for even cooking, a detail emphasized in classic French culinary technique. It ensures every piece is perfectly cooked and absorbs the delicious flavors of the butter, olive oil, and herbs.

Can I make this dish ahead of time?

While this pan-fried zucchini and mushrooms dish is best enjoyed immediately after cooking for optimal texture, you can certainly prepare it a day or two in advance. Store any leftovers in an airtight container in the refrigerator for up to 3-4 days. To reheat, I suggest doing so gently on the stovetop over medium heat with a tiny bit of extra olive oil or butter, stirring occasionally until warmed through. This helps prevent the vegetables from becoming overly soft or watery, which can happen with microwave reheating. The flavors will still be delicious, making it a great option for meal prepping an easy vegetable side dish.

Share Your Version!

I poured my heart into crafting this pan-fried zucchini and mushrooms recipe, a delightful blend of simple ingredients and sophisticated technique, and I truly hope it brings a burst of flavor to your table. Your culinary journey is as important to me as my own, so please don’t hesitate to share your experiences.

Did you try a Moroccan spice twist or discover a new favorite herb combo from your local NYC market? I’d love to know! Leave a star rating and a comment below with your thoughts or any creative variations you came up with. Don’t forget to snap a picture and tag @exorecipes on Instagram or Pinterest – seeing your beautiful creations truly makes my day. Tell me, what main dish did you pair this easy vegetable side dish with?

From my NYC kitchen to yours — I hope this recipe brings as much warmth to your table as it does to mine. — mia 🧡

📌

Love This Recipe? Save It to Pinterest!

If you enjoyed this Pan-Fried Zucchini and Mushrooms recipe, don’t let it get lost in your browser tabs! 😄 Pin it now so you can find it again anytime — and explore hundreds more tried-and-tested recipes waiting for you on my Pinterest boards.

👉 Follow mia on Pinterest @chefrecipes2

📌 Pin this recipe · 🔁 Re-pin your favorites · 💬 Tag me when you make it — I love seeing your creations!

Print

clock clock iconcutlery cutlery iconflag flag iconfolder folder iconinstagram instagram iconpinterest pinterest iconfacebook facebook iconprint print iconsquares squares iconheart heart iconheart solid heart solid icon

Skillet Zucchini and Mushrooms

  • Author: Chef Mia

Description

Fresh, healthy, and absolutely delicious side dish of sauteed mushrooms and zucchini!


Ingredients

Scale
  • 1 tablespoon olive oil
  • 3 tablespoons butter (divided)
  • 2 small zucchini (cut into thin, half moon slices)
  • salt and black pepper (to taste)
  • 1 small yellow onion (finely diced)
  • 1 pound small button mushrooms (cleaned and patted dry)
  • 3 to 4 cloves garlic (minced)
  • 2 teaspoons fresh chopped herbs, use what you have on hand (or use 1 teaspoon dried herbs (thyme and oregano are great in this dish))
  • ¼ cup vegetable broth
  • chopped fresh parsley (for garnish)
  • grated parmesan (for garnish)

Instructions

  1. Add olive oil and 1/2-tablespoon butter to a large skillet and set over medium-high heat.
  2. Add zucchini slices to the hot oil; season with salt and pepper and cook for 3 to 4 minutes, or until fork-tender. Remove zucchini from skillet and set aside. If there's any liquid in the skillet, wipe it out.
  3. Return skillet to the burner and add remaining butter; melt butter over medium-high heat.
  4. Stir in the onions and cook for 2 minutes, or until just softened.
  5. Add mushrooms and cook for 5 to 7 minutes, or until tender and nicely browned. Stir occasionally.
  6. Stir in garlic and herbs; cook for 20 seconds.
  7. Return zucchini to the skillet and mix with the mushrooms; cook for 1 minute, or until heated through.
  8. Pour in the vegetable broth and cook for 2 minutes.
  9. Taste for salt and pepper and adjust as needed.
  10. Remove skillet from heat.
  11. Sprinkle with parsley and parmesan; serve.


Nutrition

  • Calories: 161 kcal
  • Sugar: 5 g
  • Fat: 13 g
  • Carbohydrates: 9 g
  • Protein: 5 g


Pan-Fried Zucchini and Mushrooms Recipe

k">

Tried This Recipe? Leave a Comment!

Did you make this recipe? I’d love to hear how it turned out! Please leave a comment and a rating below. Your feedback helps other home cooks and supports cheerychop.com!
For more delicious inspiration, follow me on Pinterest!

Perfect Grilled Zucchini Wrap with Herbed Yogurt Sauce

Grilled Zucchini Feta Chickpea Wrap with Herbed Yogurt – The Perfect Summer Lunch

⚖️
Difficulty
Easy
⏲️
Prep Time
15 mins
🕒
Cook Time
10 mins
⏱️
Total Time
25 mins
🍽️
Servings
4

Growing up in Morocco, our meals were always vibrant, fresh, and bursting with flavors from the garden. While my mother’s kitchen often centered around the tagine, some of my fondest memories involve simple, seasonal vegetable dishes. This grilled zucchini wrap, elevated with creamy feta, hearty chickpeas, and a bright, herbed yogurt sauce, brings that same spirit of fresh Mediterranean eating right to your table. It’s truly one of my favorite vegetarian wrap recipes, transforming humble zucchini into a star, and it showcases how a little grilling can add incredible depth to a simple meal, making it a perfect healthy lunch wrap for any day.

Imagine those perfectly charred zucchini slices, tender with a slight crunch, mingling with salty, briny feta and earthy chickpeas. The aroma alone, especially when those fresh herbs in the yogurt sauce hit your nose, is utterly intoxicating. I still remember the first time I made a similar sauce in my Parisian culinary school – the emphasis on balancing acid, fat, and fresh herbs truly stuck with me. Here, the dill and mint in the yogurt sauce provide that essential herbaceous lift, cutting through the richness and tying all the textures and tastes together into a harmonious bite. It’s a sensory experience that’s both comforting and exciting.

What sets my grilled zucchini feta chickpea wrap apart is not just the fresh ingredients from my local NYC farmers market, but the emphasis on proper grilling technique and a perfectly balanced herbed yogurt sauce. I’ll walk you through how to achieve that ideal char on your zucchini without overcooking it, ensuring every bite is a textural delight. You’ll also learn a pro tip for making your herbed yogurt extra creamy, and I’ll point out a common mistake many people make when assembling wraps that leads to a soggy mess. Trust me, with these tips, you’ll be making the best healthy lunch wraps around.

Why This Grilled Zucchini Feta Chickpea Wrap Recipe Is the Best

The Flavor Secret: This recipe captures the essence of Mediterranean flavors with a Moroccan twist. The grilling of the zucchini isn’t just about cooking; it’s about caramelizing its natural sugars and adding a smoky depth that can’t be achieved otherwise. This simple step elevates the humble zucchini, making it a flavorful counterpoint to the sharp feta and the robust chickpeas. My French culinary training taught me that even the simplest ingredient can shine with the right technique, and grilling is key here.

Perfected Texture: A great wrap isn’t just about taste; it’s about a symphony of textures. You’ll get the satisfying bite of perfectly grilled, slightly firm zucchini, the crumbly yet creamy texture of feta, and the hearty chew of chickpeas. This textural balance, combined with the smooth, cool embrace of the herbed yogurt sauce, prevents any bite from being monotonous. It’s a technique I learned from appreciating the layered textures in a traditional Moroccan pastilla – every component has its place and purpose.

Foolproof & Fast: As a busy professional in NYC, I appreciate recipes that deliver maximum flavor with minimal fuss. This grilled zucchini wrap is incredibly straightforward, perfect for a quick weeknight dinner or a meal-prep lunch. My instructions guide you through each step, ensuring that even a novice cook can achieve delicious results. I’ve refined this to be as efficient as possible, proving that healthy, gourmet-tasting food doesn’t require hours in the kitchen.

Grilled Zucchini Wrap Ingredients

For these vibrant grilled zucchini wraps, I love to source my produce from the Union Square Greenmarket here in NYC. There’s nothing quite like fresh, peak-season ingredients. A lot of these staple items, like olive oil and chickpeas, also remind me of the pantry essentials my mother always had in her Moroccan kitchen.

Ingredients List

  • 2 medium zucchinis, sliced about 1/4-inch thick
  • 100g (about 3.5 oz) feta cheese, crumbled
  • 1 can (15 oz) chickpeas, drained and rinsed
  • 1 cup plain Greek yogurt (full-fat for best creaminess)
  • 2 tablespoons fresh herbs (such as dill and mint), finely chopped
  • 1 tablespoon extra virgin olive oil
  • Salt and freshly ground black pepper to taste
  • 4 whole wheat wraps (large size)

Ingredient Spotlight

Zucchini: When selecting zucchini, look for firm, unblemished vibrant green ones. Avoid any that feel soft or have visible cuts. Their high water content makes them perfect for grilling, as the water evaporates and leaves behind concentrated flavor. If you can’t find fresh zucchini, a good substitute would be eggplant, sliced thin and grilled similarly. The texture will be slightly different, but the smoky flavor will still be present.

Feta Cheese: For the best flavor, I always recommend seeking out Greek or French feta, preferably purchased in a block packed in brine. This type offers a tangier, creamier profile than pre-crumbled varieties, which can sometimes be dry. If feta isn’t your preference or you need a dairy-free option, a good quality goat cheese or even a plant-based feta substitute can work. The flavor will change, but you’ll retain a lovely creamy, tangy element.

Chickpeas: Canned chickpeas are a convenience I truly appreciate in my busy NYC life. Make sure to rinse them thoroughly to remove excess sodium and any canning liquid, which can affect the flavor. If you have time and want to make them from scratch, soaking and cooking dried chickpeas yields a slightly creamier texture. For a different twist, cannellini beans or even black beans could be used, offering a slightly denser texture and a different flavor profile.

Greek Yogurt: This forms the base of our delicious herbed yogurt sauce. I opt for full-fat Greek yogurt because its richness and thickness create a superior sauce that won’t make your wraps soggy. For a lighter version, low-fat Greek yogurt works, but you might want to add a touch more olive oil or even a spoonful of tahini for silkiness. If you’re dairy-free, a thick, unsweetened plant-based yogurt (like almond or oat) can be an excellent substitute, just be sure it’s plain and quite thick.

Fresh Herbs: Dill and mint are my absolute favorites here, bringing a bright, refreshing note that balances the rich ingredients. Look for vibrant, unwilted bunches at your local market. While dried herbs can be used in a pinch, their flavor is less potent, so you’d need less (about 1/2 teaspoon dried per tablespoon fresh). Other great fresh herb options include parsley, cilantro, or even a touch of fresh oregano if you’re looking for a bolder Mediterranean twist.

Original IngredientBest SubstitutionFlavor / Texture Impact
ZucchiniEggplant, Bell PeppersSlightly different texture, similar smoky char flavor.
Feta CheeseGoat Cheese, Halloumi (pan-fried), Dairy-Free FetaGoat cheese for tang/cream, Halloumi for squeaky texture, DF feta for similar crumbly texture.
ChickpeasCannellini Beans, Black Beans, LentilsDifferent flavor notes, but still offer protein and bulk.
Greek YogurtThick Plant-Based Yogurt (unsweetened), Sour CreamPlant-based for dairy-free, sour cream for richer tang.
Dill/MintParsley, Cilantro, Fresh OreganoDifferent aromatic profile, choose based on desired Mediterranean twist.

Grilled Zucchini Feta Chickpea Wrap with Herbed Yogurt

How to Make Grilled Zucchini Feta Chickpea Wrap — Step-by-Step

Making these wraps is a breeze, and I’m here to guide you to perfectly grilled zucchini and a truly delicious herbed yogurt sauce for a healthy lunch wrap.

Step 1: Prepare the Grill

Preheat your outdoor grill to medium-high heat. If you’re using an indoor grill pan, place it over medium-high heat until it’s nicely hot. The key is consistent heat to get those beautiful char marks without burning.

💡 mia’s Pro Tip: Ensure your grill grates are clean and oiled to prevent the zucchini from sticking. A bit of oil on a paper towel, held with tongs, works wonders for this.

Step 2: Season and Grill Zucchini

Brush the zucchini slices evenly with 1 tablespoon of olive oil. Season liberally with salt and a good few grinds of fresh black pepper. Place the seasoned zucchini on the preheated grill. Grill for 3-4 minutes per side, or until they are tender-crisp and have lovely char marks. Don’t overcrowd the grill; work in batches if necessary.

⚠️ Common Mistake to Avoid: Don’t slice the zucchini too thin (it will get mushy) or too thick (it won’t cook through). 1/4-inch is ideal for tender but firm results.

Step 3: Make the Herbed Yogurt Sauce

While the zucchini is grilling, prepare your amazing herbed yogurt sauce. In a small bowl, combine 1 cup of Greek yogurt with the 2 tablespoons of finely chopped fresh herbs (dill and mint). Season with salt and pepper to taste. Stir well until everything is thoroughly combined and the herbs are evenly distributed. Give it a taste – this is where you can adjust the seasoning to your liking.

💡 mia’s Pro Tip: To enhance the brightness of the herbed yogurt sauce, add a squeeze of fresh lemon juice – about 1 teaspoon. It’s a trick I picked up in Paris for balancing creamy sauces.

Step 4: Combine the Filling

Once the grilled zucchini is cool enough to handle, transfer it to a large bowl. Add the 100g of crumbled feta cheese and the 1 can of drained and rinsed chickpeas to the bowl with the zucchini. Gently toss everything together. Be careful not to mash the chickpeas or zucchini too much – we want distinct textures in our grilled zucchini feta chickpea wrap.

Step 5: Assemble the Wraps

Lay out your 4 whole wheat wraps on a clean surface. Spread a generous layer of the herbed yogurt sauce evenly over each wrap, leaving a slight border around the edges. Spoon the zucchini, feta, and chickpea mixture down the center of each wrap. Fold in the sides snugly, then roll up the wraps tightly from the bottom. Serve your vegetarian wrap recipes immediately for the best texture and flavor.

⚠️ Common Mistake to Avoid: Overfilling the wraps is tempting but leads to tears and spills. Start with a moderate amount of filling; you can always add more to subsequent wraps rather than losing your delicious creation!

StepActionDurationKey Visual Cue
1Prepare the Grill5-10 mins (preheating)Grill grates visibly hot, lightly smoking.
2Season & Grill Zucchini6-8 mins totalTender-crisp zucchini with distinct char marks.
3Make Herbed Yogurt Sauce3-5 minsSmooth, creamy yogurt with flecks of green herbs.
4Combine Filling2-3 minsZucchini, feta, chickpeas gently mixed.
5Assemble Wraps5-7 minsTightly rolled wraps with filling neatly encased.

Serving & Presentation

Presentation matters, even for a simple wrap! To serve these grilled zucchini feta chickpea wraps, I often slice them in half diagonally – it makes them easier to eat and showcases the vibrant filling beautifully. A light sprinkle of extra fresh mint or dill on top, or even a tiny drizzle of your best extra virgin olive oil, adds a professional touch inspired by my Parisian pastry days where every detail counted.

In my NYC kitchen, I love to pair these wraps with a simple side salad, perhaps dressed with a light lemon vinaigrette, or a bowl of creamy homemade hummus. Sometimes, if I’m feeling particularly nostalgic for Moroccan coastal flavors, I’ll prepare a side of marinated olives with a hint of orange zest and harissa. The freshness of the wraps makes them incredibly versatile.

Don’t be afraid to get creative with garnishes! Toasted sesame seeds or a tiny pinch of red pepper flakes can add visual appeal and an extra layer of flavor and texture. Think about it like a canvas – the wrap is your base, and the toppings are your art. Enjoy this delicious vegetarian wrap recipe!

Pairing TypeSuggestionsWhy It Works
Side DishQuinoa Salad, Simple Green Salad, Hummus with PitaAdds healthy grains, fresh crunch, or creamy complement.
Sauce / DipExtra Herbed Yogurt, Tahini Dressing, Spicy Harissa MayoEnhances creamy texture, adds depth, or a kick of spice.
BeverageIced Mint Tea, Sparkling Water with Cucumber, Dry RoséRefreshing and light, complements Mediterranean flavors without overpowering.
GarnishFresh Parsley, Toasted Sesame Seeds, Red Pepper FlakesAdds visual appeal, aromatic freshness, or a subtle spicy finish.

Make-Ahead, Storage & Reheating

As a busy cook in NYC, I’m always looking for ways to streamline my kitchen routine. These grilled zucchini wraps are fantastic for meal prep because many components can be prepared in advance, making your healthy lunch wraps even easier to assemble when hunger strikes.

MethodContainerDurationReheating Tip
Refrigerator (Components)Airtight containers for zucchini mix and sauce (separately)3-4 daysAssemble just before eating, no reheating needed.
Refrigerator (Assembled Wrap)Wrapped tightly in plastic wrap or foil1-2 daysEnjoy cold. Wrap might soften slightly, but still delicious.
Make-AheadPrepare zucchini/chickpea/feta mix and yogurt sauce separatelyUp to 3 days in advanceStore components in the fridge; assemble immediately before serving to prevent sogginess.

I usually prepare the grilled zucchini and the chickpea-feta mixture a day ahead, and I always make a double batch of the herbed yogurt sauce. Storing them separately is crucial; this prevents the wraps from becoming soggy before you even get to enjoy them. When I’m ready for lunch, I just grab a wrap, spread the sauce, add the filling, and roll it up. It takes literally minutes and tastes incredibly fresh, almost like I just made it.

While these wraps are best enjoyed fresh or at least assembled just before serving, they hold up reasonably well in the fridge for a day or two if already rolled. Just be aware that the wrap itself might absorb some moisture and become softer. I wouldn’t recommend freezing them, as the textures of the zucchini, feta, and yogurt won’t hold up to thawing gracefully.

Variations & Easy Swaps

VariationKey ChangeBest ForDifficulty Impact
Spicy Harissa Zucchini WrapAdd harissa to yogurt, grilled veggiesThose who love heat and bold, North African flavors.Marginal (just involves adding a paste).
Dairy-Free Chickpea WrapSubstitute dairy with plant-based alternativesIndividuals with lactose intolerance or vegan diets.Marginal (finding suitable substitutes).
Mediterranean Garden WrapAdd extra fresh veggies like cucumber, tomatoMaximizing freshness and crunch, a seasonal delight.Marginal (simple chopping).

Spicy Harissa Zucchini Wrap

Embrace some North African heat by adding 1/2 to 1 teaspoon of harissa paste to your herbed yogurt sauce. You can also brush a little harissa mixed with olive oil onto the zucchini before grilling for an extra smoky, spicy kick. This brings a beautiful depth and vibrancy, reminiscent of the bold flavors from my childhood kitchen in Morocco.

Dairy-Free Chickpea Wrap

To make this recipe dairy-free and vegan, simply swap the Greek yogurt for an unsweetened, thick plant-based yogurt (like almond or coconut). For the feta, use a good quality plant-based feta substitute or omit it altogether and add extra chickpeas or a sprinkle of nutritional yeast for a cheesy flavor. I’ve tested this myself, and with the right plant-based yogurt, the creamy texture of the herbed yogurt sauce is surprisingly close to the original.

Mediterranean Garden Wrap

Maximize the fresh factor by adding finely diced cucumber, cherry tomatoes, or thinly sliced red onion to your zucchini and chickpea mixture. These ingredients add extra crunch and a burst of juicy freshness, perfect for a hotter day. It’s what I love to do with the bounty from my local NYC farmer’s markets, making each wrap a little different depending on what’s in season.

Can I make the grilled zucchini feta chickpea wrap without a grill?

Absolutely! If you don’t have access to an outdoor grill, you can easily use an indoor grill pan or even roast the zucchini in your oven. For a grill pan, simply follow the same instructions, ensuring the pan is hot to achieve those lovely char marks. If roasting, toss the zucchini slices with olive oil, salt, and pepper, then spread them in a single layer on a baking sheet. Roast at 400°F (200°C) for about 15-20 minutes, flipping once, until tender and slightly caramelized. The flavor will be a little different without the smoky char, but it will still be delicious.

What can I use as a substitute for feta cheese in this wrap?

Feta cheese provides a delightful salty and tangy creaminess. If you need an alternative, goat cheese is a fantastic option; it offers a similar tang and a wonderfully soft texture. For a dairy-free or vegan version, look for a good quality plant-based feta substitute. You could also try pan-fried halloumi cheese for a unique, squeaky texture and salty flavor, though it will change the overall profile a bit. Alternatively, simply increase the chickpeas for extra protein and creaminess, or add some olives for that briny kick.

How long does it take to grill the zucchini for this wrap?

Grilling zucchini doesn’t take long at all! On a preheated medium-high grill, the zucchini slices will typically be perfectly cooked in about 3-4 minutes per side. You’re looking for them to become tender-crisp, with clear, appetizing char marks. The exact time can vary slightly depending on your grill’s temperature and the thickness of your zucchini slices, so keep a close eye on them. Overcooked zucchini can become watery and mushy, so pull them off just as they reach that sweet spot of tenderness and char.

Can I prepare the herbed yogurt sauce ahead of time?

Yes, absolutely! The herbed yogurt sauce is perfect for making ahead. In fact, I often prepare it a day in advance, as it allows the flavors of the herbs to meld beautifully with the Greek yogurt, leading to an even more nuanced and delicious taste. Just store it in an airtight container in the refrigerator for up to 3-4 days. When you’re ready to assemble your wraps, simply give the sauce a good stir to reincorporate everything, and it will be ready to go. It’s a fantastic time-saver for meal prep!

Are these grilled zucchini wraps suitable for a low-carb diet?

While this recipe is quite healthy, the whole wheat wraps do contribute significantly to the carbohydrate count. If you’re following a strict low-carb diet, you can easily adapt this grilled zucchini feta chickpea wrap. Instead of traditional wraps, consider using large lettuce cups (like romaine or butter lettuce), collard green leaves, or even large slices of grilled bell pepper as your “wrap” vehicle. You’ll still get all the incredible flavors of the grilled zucchini, feta, chickpeas, and herbed yogurt, just without the added carbs from the tortilla.

What’s the best way to prevent the wraps from getting soggy when packed for lunch?

Preventing soggy wraps for lunch is a common challenge, but easily avoided with a little forethought! The best strategy is to pack the components separately and assemble the wrap just before eating. Keep the grilled zucchini, feta, and chickpea mixture in one airtight container, and the herbed yogurt sauce in a small separate container. Bring your whole wheat wraps along, and at lunchtime, simply spread the sauce, add the filling, and roll. If you must assemble ahead, spread the yogurt sauce thinly and place a layer of large lettuce leaves between the filling and the wrap to create a moisture barrier, then wrap tightly.

Share Your Version!

I poured my heart into crafting this grilled zucchini feta chickpea wrap, and I can’t wait to see your creations! If you’ve tried this recipe, please leave a star rating and a comment below – your feedback means the world to me. And if you snap a photo, share it on Instagram or Pinterest and tag @exorecipes! I love seeing my recipes come to life in your kitchens.

Did you try the harissa variation? I’d love to know how you think it compares to the classic! Tell me in the comments below.

From my NYC kitchen to yours — I hope this recipe brings as much warmth to your table as it does to mine. — mia 🧡

📌

Love This Recipe? Save It to Pinterest!

If you enjoyed this Grilled Zucchini Feta Chickpea Wrap with Herbed Yogurt recipe, don’t let it get lost in your browser tabs! 😄 Pin it now so you can find it again anytime — and explore hundreds more tried-and-tested recipes waiting for you on my Pinterest boards.

👉 Follow mia on Pinterest @chefrecipes2

📌 Pin this recipe · 🔁 Re-pin your favorites · 💬 Tag me when you make it — I love seeing your creations!

Print

clock clock iconcutlery cutlery iconflag flag iconfolder folder iconinstagram instagram iconpinterest pinterest iconfacebook facebook iconprint print iconsquares squares iconheart heart iconheart solid heart solid icon

Grilled Zucchini Feta Chickpea Wrap with Herbed Yogurt

  • Author: Chef Mia

Description

A fresh and flavorful wrap featuring grilled zucchini, feta cheese, chickpeas, and a creamy herbed yogurt sauce.


Ingredients

Scale
  • 2 medium zucchinis, sliced
  • 100g feta cheese, crumbled
  • 1 can (15 oz) chickpeas, drained and rinsed
  • 1 cup Greek yogurt
  • 2 tablespoons fresh herbs (such as dill and mint), chopped
  • 1 tablespoon olive oil
  • Salt and pepper to taste
  • 4 whole wheat wraps

Instructions

  1. Preheat the grill to medium-high heat.
  2. Brush the zucchini slices with olive oil and season with salt and pepper.
  3. Grill the zucchini for 3-4 minutes per side until tender and charred.
  4. In a bowl, mix the Greek yogurt with chopped herbs, salt, and pepper to make the herbed yogurt sauce.
  5. In another bowl, combine the grilled zucchini, feta cheese, and chickpeas.
  6. Lay out the wraps and spread a layer of herbed yogurt sauce on each.
  7. Add the zucchini mixture to the center of each wrap.
  8. Roll up the wraps tightly and serve immediately.


Nutrition

  • Calories: 350 calories
  • Sugar: 5g
  • Fat: 15g
  • Carbohydrates: 40g
  • Protein: 20g


Grilled Zucchini Feta Chickpea Wrap with Herbed Yogurt

Quick 35-Minute Ground Beef Zucchini Boats

Easy Ground Beef Zucchini Boats in 35 Minutes: A Healthy & Delicious Weeknight Meal

⚖️
Difficulty
Easy
⏲️
Prep Time
15 mins
🕒
Cook Time
20 mins
⏱️
Total Time
35 mins
🍽️
Servings
4

Growing up in Morocco, my mother’s kitchen was always alive with the scents of fresh herbs and simmering spices, but when I moved to New York City, I quickly learned the value of a quick, satisfying meal. That’s why I absolutely adore these easy ground beef zucchini boats. They’re a revelation for busy weeknights, capturing all the flavor and warmth of a home-cooked meal, but ready in just 35 minutes. These little wonders are not just fast; they’re also a fantastic way to enjoy a healthy, low-carb dinner without sacrificing taste. Imagine crisp-tender zucchini filled to the brim with a rich, savory ground beef mixture and melted cheese – pure perfection!

The beauty of this dish lies in its simplicity and the incredible textures it brings to the table. We’re talking about fresh zucchini, perfectly scooped and slightly pre-baked to achieve that ideal al dente bite. This prevents them from becoming soggy, a common challenge with zucchini recipes. The filling is a robust blend of lean ground beef, sautéed onions and garlic, bright tomato sauce, and a hint of Italian seasoning. The aroma alone as it simmers is enough to make your mouth water, reminiscent of a rustic Italian dish but with a lighter, fresher feel. And of course, the golden, bubbly cheese on top provides that irresistible finish that makes everyone reach for a second helping.

My culinary training in Paris taught me the importance of technique, even for the simplest of dishes, and with these ground beef zucchini boats, I’ve refined the process to be utterly foolproof. This recipe balances gourmet taste with weeknight practicality. I’ll share a pro tip on how to ensure your zucchini is cooked just right, and help you avoid the common mistake of over-stuffing. Get ready to add this versatile, healthy, and incredibly quick recipe to your regular dinner rotation – it’s a game-changer!

Why This Easy Ground Beef Zucchini Boats Recipe Is the Best

The secret to these truly outstanding zucchini boats isn’t just about the main ingredients; it’s how they come together. Inspired by the bold flavors from my Moroccan heritage and the refined techniques from my Parisian training, I’ve chosen a blend of Italian seasoning with a touch of paprika. This combination gives the ground beef filling a depth that goes beyond simple tomato sauce, adding a warm, subtle smokiness that elevates the entire dish. It’s a flavor profile that feels both familiar and excitingly new, ensuring every bite is rich and satisfying.

One of the biggest challenges with zucchini is its high water content, which can lead to a soggy dish. My perfected technique of pre-baking the hollowed zucchini halves for a short period before filling makes all the difference. This step draws out excess moisture and sets the structure of the “boats,” ensuring they remain firm yet tender. You get a delightful texture contrast between the crisp-tender zucchini and the succulent, cheesy filling, avoiding any unpleasant mushiness. This is a chef’s secret I picked up in culinary school, adapted for the home kitchen.

This recipe truly is foolproof and fast, making it ideal for anyone looking to whip up a delicious and healthy dinner in under 35 minutes. From prep to plate, I’ve streamlined every step to be as efficient as possible. The ingredients are easy to find at any New York City farmers market or grocery store, and the instructions are straightforward enough for even a novice cook. Whether you’re a busy parent, a health-conscious professional, or just looking for a simple yet gourmet meal, these easy zucchini boats are your new best friend.

Easy Ground Beef Zucchini Boats Ingredients

When I head to the Union Square Greenmarket here in NYC, I always look for the freshest, most vibrant zucchini. For me, good ingredients are the foundation of great food, a lesson I learned from my mother in Morocco. This recipe uses simple, wholesome ingredients that, when combined, create something truly special and delicious.

Ingredients List

  • 4 medium zucchinis (Halved lengthwise and scooped out to create “boats.”)
  • 1 pound ground beef (Lean ground beef works best, but any variety will do.)
  • 1 small onion (Diced for added flavor.)
  • 2 cloves garlic (Minced for a rich aromatic taste.)
  • 1 cup tomato sauce (A flavorful base for the filling.)
  • 1 cup shredded cheese (Mozzarella, cheddar, or parmesan work well.)
  • 1 tablespoon olive oil (For sautéing the beef and onions.)
  • 1 teaspoon Italian seasoning (A blend of herbs for extra flavor.)
  • 1/2 teaspoon paprika (Adds a subtle smokiness.)
  • Salt & pepper to taste

Ingredient Spotlight

Zucchini: These versatile green squash are the star of our show. Look for medium-sized zucchini that are firm, smooth, and free of blemishes. Fresh, local zucchini from your farmers market will have a better flavor and texture. Their mild taste makes them the perfect vessel for a savory filling, absorbing all those delicious flavors without overpowering them. If you can’t find medium ones, two large or six smaller ones will also work, just adjust baking time slightly.

Ground Beef: I prefer lean ground beef for this recipe to keep it healthy and prevent the boats from becoming greasy. However, if you typically use a different fat percentage, that’s perfectly fine. The key is to brown it well and drain any excess fat before adding the other ingredients. Ground turkey or even a plant-based crumble can be excellent substitutes if you’re looking for an alternative, with little impact on the cooking time, though the flavor profile will be slightly different.

Italian Seasoning: This blend of dried herbs like oregano, basil, thyme, and rosemary is my go-to for adding instant Mediterranean flair. It brings a balanced, aromatic depth to the ground beef mixture, reminiscent of many family meals we enjoyed. If you don’t have Italian seasoning, you can create your own blend or substitute with dried oregano and basil in equal parts, perhaps a pinch of marjoram if you have it on hand.

Shredded Cheese: A good shredded cheese really ties everything together, adding a creamy, melty finish. Mozzarella, cheddar, or parmesan are all excellent choices. I often use a mix of mozzarella for its meltiness and a sharp cheddar for extra flavor. For a dairy-free option, you can easily substitute with your favorite plant-based shredded cheese. It will melt similarly and still provide that appealing gooey texture.

Original IngredientBest SubstitutionFlavor / Texture Impact
Ground BeefGround Turkey or LambLighter flavor with turkey, richer with lamb. Both are good texture matches.
Tomato SauceCrushed Tomatoes or Diced Tomatoes (drained)Crushed will be thicker, diced will add more texture. Slight sweetness difference.
Shredded CheeseDairy-free shredded alternative, Nutritional YeastDairy-free will melt similarly, nutritional yeast adds a umami, cheesy flavor without melt.
Italian SeasoningDried Oregano + Basil (equal parts)Very similar flavor profile, perhaps slightly less complex than a ready-made blend.

Easy Ground Beef Zucchini Boats (35-Minutes)

How to Make Easy Ground Beef Zucchini Boats — Step-by-Step

Making these zucchini boats is simpler than you might think, and the result is a beautifully balanced meal. Don’t worry, I’ll walk you through each step to ensure perfect results every time!

Step 1: Prepare the Zucchini and Preheat

First, preheat your oven to 375°F (190°C). Then, slice each of your four medium zucchinis in half lengthwise. Using a spoon, gently scoop out the center flesh, leaving about a quarter-inch border all around to create your “boats.” Discard the scooped-out flesh or save it for another recipe like a frittata. Lightly brush the zucchini halves with olive oil and arrange them on a baking sheet. Pre-bake them for 5-7 minutes. This step is crucial for preventing soggy zucchini and giving them a head start on cooking.

💡 mia’s Pro Tip: To avoid soggy zucchini, once you’ve scooped them, you can sprinkle a little salt inside and let them sit for 10 minutes. The salt will draw out excess moisture. Then, pat them dry with a paper towel before brushing with olive oil and pre-baking. This is a little French technique I learned for keeping vegetables firm!

Step 2: Sauté Aromatics

While your zucchini par-bakes, heat 1 tablespoon of olive oil in a large skillet over medium heat. Add the diced small onion and sauté until it becomes translucent and softened, usually about 3-4 minutes. This gentle cooking brings out the natural sweetness of the onion, forming a flavorful base for your beef filling.

Step 3: Brown the Beef and Add Garlic

Add the minced garlic to the skillet with the onions and cook for just another 30 seconds until fragrant—be careful not to burn it! Immediately add the 1 pound of ground beef to the skillet. Cook, breaking it apart with a spoon, until it’s fully browned and cooked through. This ensures all the meat is evenly cooked and flavorful.

⚠️ Common Mistake to Avoid: Don’t rush browning your ground beef. Ensure it’s fully browned and any pink is gone before proceeding. If there’s a lot of rendered fat, drain it out at this stage to prevent your filling from becoming greasy.

Step 4: Simmer the Filling

Once the beef is browned, drain any excess fat from the skillet. Stir in the 1 cup of tomato sauce, 1 teaspoon of Italian seasoning, 1/2 teaspoon of paprika, and salt and pepper to taste. Bring the mixture to a gentle simmer and let it cook for 5 minutes. This simmering time allows the flavors to meld beautifully, creating a rich and savory filling that will make your mouth water.

Step 5: Fill and Bake

Carefully remove the pre-baked zucchini boats from the oven. Evenly spoon the delicious beef mixture into each hollowed-out zucchini half, mounding it slightly. Sprinkle 1 cup of shredded cheese generously over the top of each filled zucchini boat. Return the baking sheet to the oven and bake for 15 minutes, or until the cheese is melted and bubbly and the zucchini is tender. The cheese should be golden and inviting.

Step 6: Garnish and Serve

Once baked to perfection, remove the zucchini boats from the oven. For an extra touch of freshness and color, garnish with fresh herbs like chopped basil or parsley. Serve immediately, while the cheese is still warm and gooey. These ground beef zucchini boats are a complete meal on their own, but they also pair wonderfully with a simple side salad.

StepActionDurationKey Visual Cue
1Prepare zucchini and pre-bake5-7 minZucchini slightly softened but still firm.
2Sauté onions and garlic3-4 minOnions translucent, garlic fragrant.
3Brown ground beef5-7 minBeef fully browned, no pink visible.
4Simmer filling5 minSauce slightly thickened, flavors blended.
5Fill and final bake15 minCheese melted and bubbly, zucchini tender.
6Garnish and serveImmediateFresh herbs add color and aroma.

Serving & Presentation

When I serve these easy ground beef zucchini boats, I love to arrange them artfully on a large platter, letting the vibrant green of the zucchini contrast with the rich red of the tomato and the golden-brown cheese. A sprinkle of fresh basil or finely chopped parsley adds a pop of color and a fresh aroma that really enhances the dining experience, a trick I learned in my Parisian culinary days. They look incredibly elegant but are so wonderfully approachable.

For a complete meal, consider what will complement the savory, robust flavors of the beef and the freshness of the zucchini. A simple side salad with a bright vinaigrette is always a good choice, cutting through the richness. If you’re looking for something heartier, a side of fluffy couscous, a nod to my Moroccan roots, or even quinoa, would be fantastic to soak up any extra sauce. In my NYC kitchen, sometimes I just pair them with a crusty baguette from a local bakery.

These boats are incredibly versatile. You can serve them as a main course for a light yet satisfying dinner, or even as an appetizer if you use smaller zucchini. They are definitely satisfying enough on their own for a low-carb option, packed with protein and vegetables. My favorite way to enjoy them is fresh from the oven, with the cheese still bubbling!

Pairing TypeSuggestionsWhy It Works
Side DishGarden salad with balsamic vinaigrette, Quinoa pilaf, Roasted cherry tomatoesOffers fresh contrast, adds fiber, or provides a light carb accompaniment.
Sauce / DipA dollop of plain Greek yogurt, Harissa mayoAdds creaminess, tang, or a subtle spicy kick for extra flavor.
BeverageLight-bodied red wine (Pinot Noir), Sparkling water with lemon, Iced green teaComplements without overpowering, refreshes the palate.
GarnishFresh basil, Chopped parsley, Red pepper flakesAdds aromatic freshness, color, and a little heat if desired.

Make-Ahead, Storage & Reheating

Living in NYC with a demanding schedule, I’ve mastered the art of meal prepping. These ground beef zucchini boats are fantastic for making ahead, saving you precious time during the week. You can prepare them partially or fully, and they store and reheat beautifully, making them perfect for healthy lunches or quick dinners.

MethodContainerDurationReheating Tip
RefrigeratorAirtight container3-4 daysMicrowave on medium heat for 1-2 minutes or bake at 350°F (175°C) for 10-15 minutes.
FreezerFreezer-safe container (unbaked is best)Up to 2 monthsThaw overnight in fridge. Bake as directed, adding 10-15 mins to cook time.
Make-AheadBaking dish, coveredUp to 2 days in advance (unbaked)Prepare boats, fill, cover tightly with foil, and refrigerate. Bake when ready.

When making these ahead, I often prepare the beef filling entirely and let it cool, then store it in an airtight container in the fridge. On the day I want to serve, I just scoop out my zucchini, give them a quick pre-bake, and then fill and finish baking. This cuts down the active cooking time significantly.

For reheating, if they’re already baked, a quick pop in the microwave works for individual servings, but for the best texture and crispy cheese, I recommend reheating in the oven. Just a few minutes at 350°F (175°C) will bring them back to life, making the cheese bubbly and the zucchini tender without drying out.

Variations & Easy Swaps

One of the joys of cooking is being able to adapt a recipe to your taste or what you have on hand. These zucchini boats are incredibly forgiving and lend themselves well to creative variations. Don’t be afraid to experiment!

VariationKey ChangeBest ForDifficulty Impact
Spicy Mediterranean TwistAdd harissa, olives, and feta cheese to the filling.Those who love bold, zesty flavors with a hint of spice.Minimal – just a few extra ingredients to mix in.
Vegetarian/VeganSwap ground beef for lentils, mushrooms, or plant-based crumble. Use nutritional yeast for savory flavor.Vegetarians, vegans, or those looking for a lighter, meat-free option.Moderate – needs careful seasoning to mimic savory depth.
Cheesy Chicken & PoblanoUse ground chicken, add roasted poblano peppers and corn, top with Monterey Jack.A Southwestern-inspired flavor profile with a smoky, cheesy kick.Minimal – simple ingredient swaps.

Spicy Mediterranean Twist

To give these ground beef zucchini boats a taste of my Moroccan heritage, try adding a kick! Mix in 1-2 teaspoons of harissa paste to the ground beef filling when you add the tomato sauce. Stir in a quarter cup of chopped Kalamata olives and some crumbled feta cheese along with the shredded cheese for baking. The harissa adds a beautiful warmth and spice, while the olives and feta introduce a salty, briny Mediterranean flavor profile that’s simply irresistible.

Gluten-Free & Dairy-Free Options

This recipe is naturally gluten-free, which is fantastic! For dairy-free eaters, simply swap the shredded cheese for your favorite plant-based shredded cheese alternative. Many brands now offer excellent melt and flavor. Alternatively, you can sprinkle a generous amount of nutritional yeast over the top for a savory, cheesy flavor without the dairy. The texture won’t be as gooey, but the flavor is surprisingly satisfying and still creates a fantastic dish tested in my NYC kitchen.

Seasonal Vegetable Boost

Make these zucchini boats even more nutrient-packed by incorporating other seasonal vegetables. After sautéing the onions and garlic, you can add finely diced bell peppers, mushrooms, or even some leftover cooked spinach (squeezed dry). This is a wonderful way to use up ingredients from your weekly market haul. Just make sure any added vegetables are finely chopped so they cook evenly within the beef mixture and don’t make the filling watery.

How do you prepare the zucchini for zucchini boats so they don’t get soggy?

To prevent soggy zucchini boats, the key is a technique I learned from French cooking: pre-baking. After halving and scooping out the zucchini, lightly brush them with olive oil and bake them for 5-7 minutes at 375°F (190°C). This draws out excess moisture and slightly tenderizes the zucchini, ensuring it holds its shape and consistency when filled and baked with the meat. For an extra step, you can salt the scooped-out zucchini, let them sit for 10 minutes, then pat dry before brushing with oil and pre-baking – this pulls even more water out.

Can I substitute ground turkey for the ground beef in this recipe?

Absolutely, you can easily substitute ground turkey for the ground beef in this recipe. Ground turkey is a leaner alternative and works wonderfully. The cooking process remains the same: brown it with the onions and garlic, breaking it apart, and drain any excess fat. Keep in mind that ground turkey can be milder in flavor than beef, so you might want to slightly increase the Italian seasoning or add a pinch more paprika to ensure the filling remains robust and flavorful. I often use ground turkey for a lighter version myself.

What can I serve with ground beef zucchini boats for a complete meal?

For a complete and balanced meal, there are many delicious options to serve with your ground beef zucchini boats. I often pair them with a fresh, crisp green salad dressed with a light vinaigrette to cut through the richness of the beef and cheese. Other great choices include a side of fluffy couscous, a nod to my Moroccan background, or a simple grain like quinoa or brown rice. Roasted or steamed vegetables like asparagus or green beans also make a wonderful addition, keeping the meal light and healthy without overpowering the main dish.

Can I make zucchini boats ahead of time and reheat them?

Yes, these ground beef zucchini boats are excellent for making ahead! You have a couple of options: you can prepare the beef filling completely and store it separately in an airtight container in the refrigerator for up to 3 days. When ready to bake, scoop and pre-bake your zucchini, then fill and bake as directed. Alternatively, you can fully assemble the unbaked zucchini boats (filled and topped with cheese), cover them tightly, and refrigerate for up to 2 days before baking. For reheating baked boats, I recommend doing so in the oven at 350°F (175°C) for 10-15 minutes until heated through and the cheese is bubbly again, for the best texture.

Can I use frozen zucchini for zucchini boats?

While fresh zucchini is always preferred for its firm texture and ability to hold shape, you can technically use frozen zucchini for the filling if it’s finely chopped and thoroughly drained of excess liquid. However, using frozen zucchini for the “boats” themselves is not recommended. Frozen zucchini tends to become very soft and watery when thawed, making it difficult to scoop or maintain its structure as a vessel for the filling. It would likely result in a very soggy dish. Stick to fresh zucchini for the boat part!

Share Your Version!

I truly hope you enjoy making these easy ground beef zucchini boats as much as I do! There’s nothing more rewarding than seeing my recipes come to life in your kitchens. Please take a moment to leave a star rating and a comment below to let me know how it turned out for you. Your feedback means the world to me!

Did you try a fun variation, or perhaps stumble upon a new favorite side pairing? Share your creations! Snap a photo and tag @exorecipes on Instagram or Pinterest. I absolutely adore seeing your culinary adventures. And tell me, what’s your go-to ingredient for adding a little extra something to your weeknight healthy meals?

From my NYC kitchen to yours — I hope this recipe brings as much warmth to your table as it does to mine. — mia 🧡

📌

Love This Recipe? Save It to Pinterest!

If you enjoyed this Easy Ground Beef Zucchini Boats recipe, don’t let it get lost in your browser tabs! 😄 Pin it now so you can find it again anytime — and explore hundreds more tried-and-tested recipes waiting for you on my Pinterest boards.

👉 Follow mia on Pinterest @chefrecipes2

📌 Pin this recipe · 🔁 Re-pin your favorites · 💬 Tag me when you make it — I love seeing your creations!

Print

clock clock iconcutlery cutlery iconflag flag iconfolder folder iconinstagram instagram iconpinterest pinterest iconfacebook facebook iconprint print iconsquares squares iconheart heart iconheart solid heart solid icon

Easy Ground Beef Zucchini Boats (Healthy and Delicious)

  • Author: Chef Mia

Description

Ground Beef Zucchini Boats are a delicious and healthy low-carb meal featuring hollowed-out zucchini stuffed with a savory ground beef mixture, seasoned with garlic, onions, and Italian herbs, and topped with melted cheese.Baked to perfection, this dish is packed with protein and flavor while being keto-friendly and gluten-free. It’s quick, easy to customize, and perfect for a satisfying weeknight dinner.


Ingredients

Scale
  • 4 medium zucchinis (Halved lengthwise and scooped out to create "boats.")
  • 1 pound ground beef (Lean ground beef works best, but any variety will do.)
  • 1 small onion (Diced for added flavor.)
  • 2 cloves garlic (Minced for a rich aromatic taste.)
  • 1 cup tomato sauce (A flavorful base for the filling.)
  • 1 cup shredded cheese (Mozzarella, cheddar, or parmesan work well.)
  • 1 tablespoon olive oil (For sautéing the beef and onions.)
  • 1 teaspoon Italian seasoning (A blend of herbs for extra flavor.)
  • 1/2 teaspoon paprika (Adds a subtle smokiness.)
  • Salt & pepper to taste

Instructions

  1. Preheat the oven to 375°F (190°C).
  2. Slice the zucchinis in half lengthwise and use a spoon to scoop out the center, creating a hollow space for the filling.
  3. Lightly brush the zucchini halves with olive oil and arrange them on a baking sheet.
  4. Pre-bake the zucchini boats for 5-7 minutes to soften slightly.
  5. In a large skillet over medium heat, heat the olive oil and sauté the diced onion until translucent.
  6. Add the minced garlic and cook for another 30 seconds.
  7. Add the ground beef to the skillet and cook until browned, breaking it apart with a spoon.
  8. Drain excess fat, then stir in the tomato sauce, Italian seasoning, paprika, salt, and pepper.
  9. Let the mixture simmer for 5 minutes to blend the flavors.
  10. Spoon the beef mixture evenly into the pre-baked zucchini boats.
  11. Sprinkle shredded cheese over the top of each filled zucchini.
  12. Bake for 15 minutes or until the cheese is melted and bubbly.
  13. Garnish with fresh herbs like basil or parsley for added flavor.
  14. Serve immediately with your favorite sides.


Nutrition

  • Calories: 325 kcal


Easy Ground Beef Zucchini Boats (35-Minutes)

k">

Tried This Recipe? Leave a Comment!

Did you make this recipe? I’d love to hear how it turned out! Please leave a comment and a rating below. Your feedback helps other home cooks and supports cheerychop.com!

For more delicious inspiration, follow me on Pinterest!