
Table of Contents
Two Ingredient Sweet Potato Tortillas – Easy Paleo Tortillas from My Moroccan Kitchen
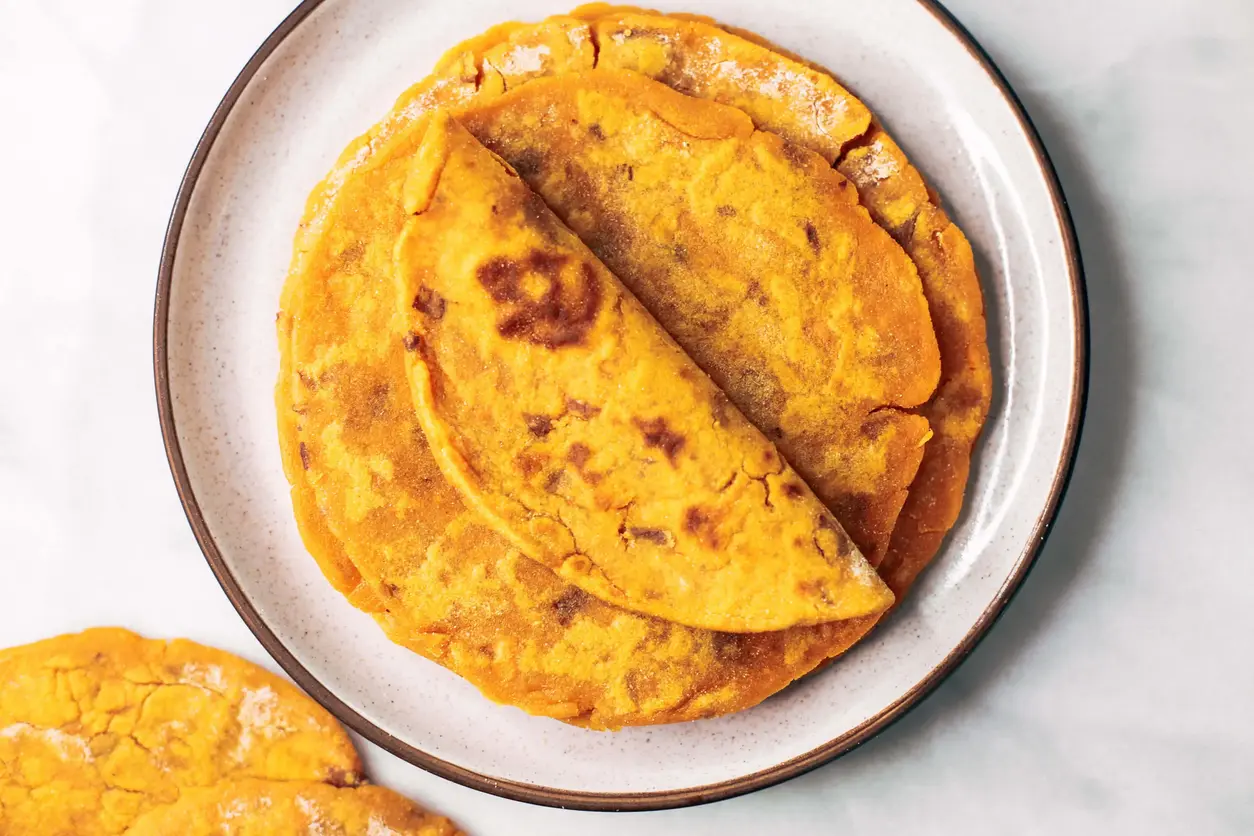
I still remember the first time I made these two ingredient sweet potato tortillas in my tiny NYC apartment. It was a rainy Tuesday, and I was craving the soft, pliable breads my mother used to make in our kitchen in Morocco, but I didn’t have any gluten flour on hand. I had just come home from the Union Square farmers market with a bag of organic sweet potatoes, and in my pantry sat a bag of cassava flour I’d been experimenting with. On a whim, I mashed the sweet potato, stirred in the cassava flour, and pressed out a tortilla. The moment it hit the hot skillet, that earthy, slightly sweet aroma filled my kitchen — and I knew I’d stumbled onto something special. This sweet potato tortillas recipe is proof that the simplest ingredients can create the most satisfying food.
The texture of these tortillas is what truly sets them apart. They’re soft and pliable, with a slight chew that reminds me of the Moroccan msemen I grew up eating — but without any of the complicated folding or resting time. The sweet potato gives them a natural sweetness and a gorgeous golden-orange hue, while the cassava flour keeps them light and flexible. When you cook them in a lightly oiled skillet, they develop beautiful golden-brown spots, and the edges get just a little crispy. I love how versatile they are — you can stuff them with spiced lamb, drizzle them with honey, or simply wrap them around some roasted vegetables and tahini sauce.
I’ve tested this paleo tortillas recipe dozens of times, tweaking the ratio of sweet potato to cassava flour until I got it just right. The key, I discovered, is to make sure your mashed sweet potato isn’t too wet — you want it to be dry enough that the dough comes together without sticking to your hands. In Paris, I learned that the best breads and pastries often come from the simplest techniques, and these 2 ingredient tortillas are a perfect example. My pro tip? Don’t skip pressing the tortillas thin — about ¼ inch is ideal for that perfect balance of soft and sturdy. And the most common mistake I see is using sweet potatoes that are too watery, which makes the dough sticky and hard to roll out.
Why This Two Ingredient Sweet Potato Tortillas Recipe Is the Best
The flavor secret here is all about the sweet potato. Growing up in Morocco, my mother always told me that the best food comes from the earth, and sweet potatoes are one of nature’s sweetest gifts. Their natural sugars caramelize beautifully in the skillet, giving these tortillas a rich, almost nutty flavor without any added sweetener. My French culinary training taught me to respect ingredients — and cassava flour, with its neutral flavor and fine texture, lets the sweet potato shine. It’s a match made in heaven, and it’s what makes these gluten free tortillas taste anything but boring.
Texture is everything when it comes to tortillas, and I’ve perfected the technique through countless trials. The trick is to cook the sweet potato until it’s very tender — almost falling apart — so it mashes into a smooth, silky puree. Then, you mix it with just the right amount of cassava flour to create a dough that’s soft but not sticky. When you press it out, the dough holds together perfectly, and once it hits the hot skillet, it develops that beautiful golden-brown crust while staying tender inside. I call it “chef’s touch” — the same precision I learned in Paris, applied to the humble tortilla.
This recipe is foolproof, even for beginners. You don’t need any special equipment — just a pot for steaming the sweet potato, a bowl for mixing, and a skillet for cooking. There’s no kneading, no rising time, and no complicated shaping. The dough comes together in minutes, and you can have fresh, warm tortillas on the table in under 30 minutes. It’s the kind of recipe that makes you feel like a confident cook, whether you’re a seasoned home chef or someone who’s never made a tortilla before. And because it’s naturally paleo tortillas and gluten free tortillas, it fits into so many dietary needs without sacrificing flavor or texture.
Two Ingredient Sweet Potato Tortillas Ingredients
When I shop for ingredients at the farmers market in NYC, I always look for sweet potatoes that are firm and heavy for their size — that’s a sign they’re fresh and full of moisture. My mother in Morocco used to say that the best vegetables are the ones that feel like they still have the sun in them. For the cassava flour, I prefer brands like Otto’s or Anthony’s — they’re consistently fine and don’t have any bitter aftertaste. I always keep a bag in my pantry because it’s so versatile for paleo tortillas and other grain-free baking.
Ingredients List
- 2 cups sweet potato (mashed) — about 1 large or 2 medium sweet potatoes
- 1 cup cassava flour — plus extra for dusting
- 1/4 teaspoon sea salt (optional) — but I highly recommend it for flavor balance
Ingredient Spotlight
Sweet potatoes are the heart of this recipe. They provide natural sweetness, moisture, and a soft, pliable texture that makes these tortillas so satisfying. When selecting sweet potatoes, look for ones that are firm with smooth skin — avoid any that are soft or have wrinkled spots. The orange-fleshed varieties are best because they’re naturally sweeter and mash more smoothly than the white or purple ones. If you can’t find sweet potatoes, you can substitute butternut squash or pumpkin, but the flavor and texture will be slightly different — still delicious, but not quite the same.
Cassava flour is the magic ingredient that makes these tortillas work. It’s made from the whole cassava root, so it’s grain-free, nut-free, and gluten-free, making it perfect for paleo and gluten-free diets. Unlike other gluten-free flours, cassava flour has a very fine texture and a neutral flavor that doesn’t overpower the sweet potato. It also absorbs moisture well, which helps the dough come together without being sticky. If you don’t have cassava flour, you can try using arrowroot flour or tapioca flour, but the texture will be more delicate and less sturdy — cassava flour is really the best choice for this sweet potato tortillas recipe.
Sea salt is optional but highly recommended. A pinch of salt enhances the natural sweetness of the sweet potato and balances the flavors beautifully. I like using fine sea salt because it dissolves evenly into the dough. If you’re on a low-sodium diet, you can omit it, but I think it makes a noticeable difference in the overall taste. It’s a small addition that elevates these 2 ingredient tortillas from good to great.
| Original Ingredient | Best Substitution | Flavor / Texture Impact |
|---|---|---|
| Sweet potato (mashed) | Butternut squash or pumpkin puree | Slightly less sweet; more fibrous texture |
| Cassava flour | Arrowroot flour or tapioca flour | More delicate, less sturdy; may crack |
| Sea salt (optional) | Himalayan pink salt or kosher salt | Same flavor; adjust quantity for kosher salt |
How to Make Two Ingredient Sweet Potato Tortillas — Step-by-Step
Making these tortillas is so simple — I promise you’ll be amazed at how easy it is. Just follow these steps, and you’ll have warm, pliable, delicious tortillas in no time.
Step 1: Prepare the Sweet Potato
Start by peeling and cubing your sweet potato. Cut it into roughly 1-inch cubes so they cook evenly. Place the cubes in a saucepan with about 1 inch of water, cover, and steam over medium heat for 10-12 minutes, until the sweet potato is very tender — you should be able to easily pierce it with a fork. Drain the sweet potato well and let it sit in the colander for a minute or two to release any excess steam. Then mash it with a fork or potato masher until smooth. You want it to be as smooth as possible — no lumps.
💡 mia’s Pro Tip: Don’t overcook the sweet potato — it should be tender but not waterlogged. If it’s too wet, the dough will be sticky and hard to work with. Let it drain thoroughly before mashing.
Step 2: Mix the Dough
In a large bowl, combine the mashed sweet potato, cassava flour, and sea salt (if using). Stir everything together with a spatula or your hands until a smooth dough forms. It should be soft and slightly sticky but not wet — if it’s too sticky, add a little more cassava flour, one tablespoon at a time. If it’s too dry, add a teaspoon of water. The dough should come together easily and hold its shape when pressed.
⚠️ Common Mistake to Avoid: Adding too much cassava flour. Start with the full cup, but if the dough feels dry and crumbly, you’ve added too much. The dough should be soft and pliable, not dry.
Step 3: Divide and Shape
Divide the dough into 8 equal pieces. Dust a clean work surface with a little cassava flour, and place one piece of dough on it. Using your hands or a rolling pin, press or roll the dough out into a circle about 1/4 inch thick. Don’t worry if they’re not perfectly round — rustic tortillas are beautiful! Repeat with the remaining dough pieces.
💡 mia’s Pro Tip: If the dough sticks to your rolling pin or hands, dust them lightly with cassava flour. A little goes a long way — you don’t want to dry out the dough.
Step 4: Cook the Tortillas
Heat a large skillet over medium heat. Drizzle lightly with olive oil — about 1 teaspoon per batch. Place one tortilla in the skillet and cook for 2-3 minutes on each side, until golden brown spots appear. The tortilla should puff up slightly and be cooked through. Remove from the skillet and keep warm under a clean kitchen towel while you cook the remaining tortillas.
⚠️ Common Mistake to Avoid: Cooking the tortillas over too high heat. If the heat is too high, the outside will burn before the inside is cooked through. Medium heat is perfect — you want a gentle sizzle, not a furious one.
| Step | Action | Duration | Key Visual Cue |
|---|---|---|---|
| 1 | Steam and mash sweet potato | 10-12 mins | Tender when pierced with fork |
| 2 | Mix dough | 2-3 mins | Smooth, soft, holds shape |
| 3 | Divide and press into circles | 5-8 mins | 1/4-inch thick, even circles |
| 4 | Cook in skillet | 2-3 mins per side | Golden brown spots, puffed slightly |
Serving & Presentation
These tortillas are incredibly versatile and can be used just like traditional tortillas — for tacos, wraps, quesadillas, or even as a side bread. I love serving them warm with a drizzle of tahini sauce, some pickled red onions, and fresh cilantro. The natural sweetness of the tortilla pairs beautifully with savory fillings like spiced ground lamb or grilled chicken. In my NYC kitchen, I often make a quick black bean and avocado filling for a vegetarian option that’s both satisfying and healthy.
For a Moroccan-inspired meal, I stuff these tortillas with my mother’s recipe for kefta — spiced meatballs — and top them with a sprinkle of cumin and a squeeze of lemon. The combination of the soft, slightly sweet tortilla with the savory, aromatic meat is absolutely divine. I also love serving them alongside a bowl of harira soup for a comforting, hearty meal that reminds me of home. And if you’re feeling fancy, you can use them as a base for a sweet treat — fill them with cinnamon-spiced apples and a dollop of coconut cream for a paleo-friendly dessert.
| Pairing Type | Suggestions | Why It Works |
|---|---|---|
| Side Dish | Grilled vegetables, roasted chicken, lamb tagine | The tortilla’s sweetness balances savory dishes |
| Sauce / Dip | Tahini sauce, harissa, avocado crema, garlic aioli | Creamy sauces complement the soft texture |
| Beverage | Mint tea, cold brew coffee, dry red wine | Herbal and earthy notes enhance the sweet potato |
| Garnish | Fresh cilantro, pickled onions, sesame seeds, lime wedges | Adds freshness, crunch, and acidity |
Make-Ahead, Storage & Reheating
As a busy food blogger and cook in NYC, I rely on make-ahead recipes to keep my weeknights stress-free. These tortillas are perfect for meal prep — you can make them ahead and have them ready to go for quick lunches or dinners. Here’s my tested system for storing and reheating them so they stay soft and pliable.

Two Ingredient Sweet Potato Tortillas
Description
Two ingredient sweet potato paleo tortillas. An easy gluten free and paleo tortilla recipe. These tortillas are pliable, delicious, and easy to make!
Ingredients
- 2 cups sweet potato (mashed)
- 1 cup cassava flour
- 1/4 teaspoon sea salt (optional)
Instructions
- Make mashed sweet potato (cut sweet potato into cubes, steam in a saucepan with 1" water until soft, then drain and use). Stir mashed sweet potato together with cassava flour in a bowl until smooth.
- Divide dough into 8 equal pieces, dust a clean surface with cassava flour, and press/roll out into 1/4" thick tortillas.
- Heat a skillet over medium heat, drizzle lightly with olive oil, and cook on each side until golden brown.
Nutrition
- Calories: 92 kcal
- Sugar: 3 g
- Fat: 0.1 g
- Carbohydrates: 22 g
- Protein: 1 g

Tried This Recipe? Leave a Comment!
Did you make this recipe? I’d love to hear how it turned out! Please leave a comment and a rating below. Your feedback helps other home cooks and supports cheerychop.com!
For more delicious inspiration, follow me on Pinterest!
Crunchy Detox Salad with Lemon Ginger Vinaigrette
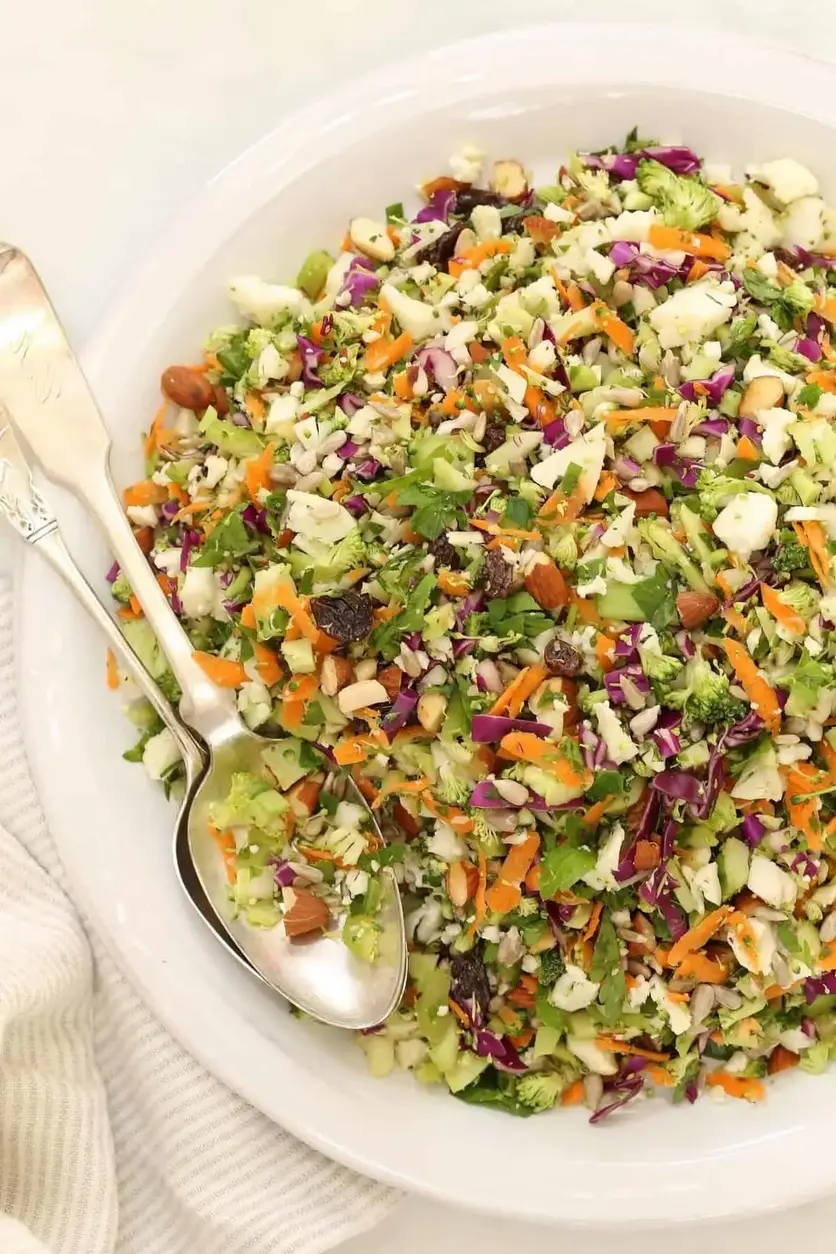
Table of Contents
Crunchy Detox Salad with Lemon Ginger Vinaigrette – A Salad You’ll Crave
I still remember the first time I made a truly crunchy detox salad. It was a humid summer afternoon in my tiny Paris apartment, and I was craving something from my childhood in Morocco—a salad my mother would make with whatever vegetables she had from the market, always with a bright, punchy dressing. That day, I had cauliflower, broccoli, and a lemon that felt like sunshine in my hand. I grated in some fresh ginger, and something clicked. This crunchy detox salad was born from that moment—a blend of my North African roots, my French culinary training, and a New York City energy that demands food that’s both nourishing and incredibly satisfying. It’s a healthy detox salad recipe that doesn’t taste like a sacrifice.
Imagine this: each bite is a symphony of textures. The cauliflower and broccoli are chopped into tiny, satisfying florets that crunch with every chew. Sweet, chewy raisins pop against the earthiness of raw almonds and sunflower seeds. The red cabbage adds a vibrant magenta hue and a peppery bite, while the fresh parsley brings a clean, grassy note that cuts through it all. Then there’s the dressing—a lemon ginger vinaigrette that is bright, zesty, and just a little bit sweet from clover honey. It’s not heavy; it clings to every piece of vegetable, making each forkful feel like a celebration of flavor. This is not a sad desk salad. This is a salad that demands to be eaten with a spoon.
What sets my version apart is the technique. Instead of leaving the vegetables in large, unwieldy chunks, I chop them finely—almost like a chopped salad or a Moroccan salade cuite. This maximizes the surface area for the dressing and ensures every single bite is packed with flavor and crunch. As a trained chef, I’ve tested this recipe countless times to get the perfect balance: the right amount of acid, the perfect level of sweetness, and a texture that holds up for days. 💡 mia’s Pro Tip: Don’t skip the step of letting the dressing sit for an hour. It allows the ginger and honey to meld into a single, harmonious flavor. And here’s a common mistake to avoid: over-chopping the parsley. You want it chopped, not minced into a paste—it needs to retain its texture.
Why This Crunchy Detox Salad Recipe Is the Best
The Flavor Secret: The real magic of this crunchy detox salad lies in the dressing. My mother in Morocco always used a simple lemon and olive oil combo, but I added fresh ginger and clover honey—a trick I learned from a pastry chef in Paris. The ginger adds a warm, slightly spicy kick that wakes up your palate, while the honey balances the acidity of the lemon. It’s a bright, clean vinaigrette that makes you want to eat salad for every meal. This isn’t just a dressing; it’s the heart of the recipe.
Perfected Texture: As a chef, texture is everything. I’ve learned that a salad can’t just be a pile of leaves. That’s why I chop the cauliflower, broccoli, and cabbage into small, uniform pieces—about the size of a pea. This technique, which I picked up in French culinary school for making fine mirepoix, ensures every bite is consistently crunchy. The nuts and seeds add a second layer of crunch, and the raisins provide a chewy counterpoint. It’s a textural experience that makes this salad a meal in itself.
Foolproof & Fast: This is the kind of recipe that works for anyone, from a busy parent in New York to a college student who’s never chopped a carrot before. There’s no cooking involved—just chopping and tossing. You can use a food processor to speed things up (I often do after a long day at the market), but a sharp knife works beautifully too. The recipe is forgiving: don’t have sunflower seeds? Use pumpkin seeds. No raisins? Dried cranberries work just as well. It’s a flexible, forgiving, and incredibly easy detox salad recipe that you’ll come back to again and again.
Healthy Detox Salad Recipe Ingredients
When I’m shopping for this salad at the Union Square Greenmarket in NYC, I look for the freshest, most vibrant produce. I love picking up a head of cauliflower that feels heavy for its size and broccoli with tight, dark green florets. The red cabbage should be firm and deeply colored—almost purple. And the parsley? I always buy two bunches because I end up eating half of it while I chop. It reminds me of my mother’s kitchen, where parsley was used as a vegetable, not just a garnish. Here’s everything you need:
Ingredients List
- 2 cups cauliflower, chopped
- 2 cups broccoli, chopped
- 1 cup red cabbage, chopped
- 1 cup carrots, chopped
- 1-1/2 cups fresh parsley, chopped
- 2 celery stalks, chopped
- 1/2 cup raw almonds, chopped
- 1/2 cup raw sunflower seeds
- 1/3 cup organic raisins
- 3 Tbsp olive oil
- 1/2 cup lemon juice (about 2-3 lemons)
- 1 tablespoon fresh ginger, peeled and grated
- 2 tablespoons clover honey
- 1/2 teaspoon sea salt
Ingredient Spotlight
Cauliflower & Broccoli: These are the backbone of the crunch. When finely chopped, they absorb the dressing beautifully while maintaining a satisfying bite. Look for heads that are firm and free of brown spots. In a pinch, you can use pre-chopped florets from the store, but the texture won’t be as consistent. A good substitute is chopped kohlrabi or even finely diced jicama for a slightly sweeter crunch.
Fresh Ginger: This is my secret weapon. A Parisian chef once told me that ginger is like a magic wand—it wakes up every flavor in the bowl. For this salad, you need fresh ginger, not the dried powder. Grate it on a microplane to avoid stringy bits. If you don’t have fresh ginger, you can use 1/2 teaspoon of ground ginger, but the flavor will be less bright and more earthy.
Raisins & Almonds: This sweet-savory combination is classic in Moroccan cooking. The raisins add a burst of sweetness that balances the tangy dressing, while the almonds provide a robust crunch. I prefer organic raisins because they’re plump and not coated in oil. For substitutions, dried cranberries or chopped dried apricots work wonderfully for the raisins, and walnuts or pecans can replace the almonds—just toast them lightly for extra flavor.
| Method | Container | Duration | Reheating Tip |
|---|---|---|---|
| Refrigerator | Airtight container or zip-top bag | Up to 5 days | Reheat in a dry skillet over medium heat for 1-2 mins per side |
| Original Ingredient | Best Substitution | Flavor / Texture Impact |
|---|---|---|
| Cauliflower | Kohlrabi or jicama | Slightly sweeter, still very crunchy |
| Broccoli | Broccolini or chopped kale stems | More tender, slightly different flavor |
| Fresh ginger | 1/2 tsp ground ginger | Less bright, more earthy, still works |
| Raisins | Dried cranberries or chopped apricots | Tart or more fruity sweetness |
| Raw almonds | Walnuts or pecans (toasted) | More buttery, less crunchy |
How to Make Crunchy Detox Salad — Step-by-Step
I promise, this is the easiest salad you’ll ever make. It’s basically chop, toss, and enjoy. Let me walk you through it so you get it perfect every time.
Step 1: Chop the Vegetables
Start by chopping the cauliflower, broccoli, red cabbage, carrots, and celery into very small, uniform pieces—about the size of a pea. You can use a sharp chef’s knife for this, or if you’re short on time, pulse them individually in a food processor. Be careful not to over-process; you want crunch, not mush. The parsley should be chopped coarsely—don’t mince it!
💡 mia’s Pro Tip: Work in batches with the food processor. Chop the cauliflower first, then the broccoli, and so on. This prevents the softer vegetables from getting pulverized while the harder ones are still in large chunks.
Step 2: Make the Vinaigrette
In a small mason jar, combine the olive oil, lemon juice, grated ginger, clover honey, and sea salt. Seal the lid tightly and shake vigorously for about 30 seconds until the dressing is emulsified. Alternatively, you can whisk everything together in a small bowl. For the best flavor, refrigerate the vinaigrette for up to an hour before using. This allows the ginger to infuse the dressing completely.
⚠️ Common Mistake to Avoid: Don’t skip the resting time for the dressing. If you use it immediately, the ginger will taste raw and harsh. Letting it sit mellows the flavor and blends everything together beautifully.
Step 3: Toss and Serve
Add all the chopped vegetables, almonds, sunflower seeds, and raisins to a large bowl. Pour the vinaigrette over the top and toss well to combine. Make sure every piece is coated. Taste and adjust seasoning—you might want a pinch more salt or a squeeze more lemon. Serve immediately, or let it sit for 10 minutes to allow the flavors to meld. This salad only gets better with a little time!
💡 mia’s Pro Tip: For the best texture, add the almonds and sunflower seeds just before serving if you’re not eating it all at once. That way, they stay super crunchy and don’t get softened by the dressing.
| Step | Action | Duration | Key Visual Cue |
|---|---|---|---|
| 1 | Chop vegetables | 10-15 minutes | Uniform pea-sized pieces |
| 2 | Make vinaigrette | 5 minutes | Emulsified, no separation |
| 3 | Toss and serve | 5 minutes | Evenly coated, glossy vegetables |
Serving & Presentation
I love serving this crunchy detox salad in a large, shallow wooden bowl that I picked up from a craftsman in the Catskills. It reminds me of the tagine bowls my mother used. Pile the salad high, and don’t be afraid to let some pieces fall onto the board—it looks rustic and inviting. Garnish with a few extra whole almonds and a sprinkle of fresh parsley on top. For a touch of elegance, add a few edible flowers like nasturtiums or chive blossoms; they add a pop of color and a subtle peppery flavor.
This salad is incredibly versatile. It’s a fantastic side dish for grilled chicken or fish—I often serve it alongside harissa-marinated salmon, a nod to my Moroccan heritage. It also makes a hearty main dish if you add a scoop of quinoa or chickpeas. For a French twist, serve it with a wedge of aged goat cheese and a crusty baguette. The bright, tangy flavors of the salad cut through the richness of the cheese beautifully.
| Pairing Type | Suggestions | Why It Works |
|---|---|---|
| Side Dish | Grilled salmon, roasted chicken, lamb kebabs | The bright acidity cuts through rich proteins |
| Sauce / Dip | Tahini dressing, yogurt mint sauce | Creamy elements balance the crunch |
| Beverage | Crisp white wine (Sauvignon Blanc), sparkling water with lemon | Refreshing, non-competitive flavors |
| Garnish | Toasted sesame seeds, pomegranate arils, fresh mint | Adds texture, color, and flavor layers |
Make-Ahead, Storage & Reheating
As a busy NYC food blogger, I’m all about meal prep that actually tastes good days later. This crunchy detox salad is a superstar in that regard. The key is to store the dressing separately from the vegetables and nuts until you’re ready to eat. This way, the salad stays crunchy for up to 5 days in the fridge. I often make a big batch on Sunday and portion it out for lunch all week. Here’s how to store it:
| Method | Container | Duration | Reheating Tip | ||||||||||||||||||||||||||||||||||||||||||||||||||||||||||||||||||||||||||||||||||||||||||||||||||||||||||||||||||||||||||||||||||||||||||||||||||||||||||||||||||||||||||||||||||||||||||||
|---|---|---|---|---|---|---|---|---|---|---|---|---|---|---|---|---|---|---|---|---|---|---|---|---|---|---|---|---|---|---|---|---|---|---|---|---|---|---|---|---|---|---|---|---|---|---|---|---|---|---|---|---|---|---|---|---|---|---|---|---|---|---|---|---|---|---|---|---|---|---|---|---|---|---|---|---|---|---|---|---|---|---|---|---|---|---|---|---|---|---|---|---|---|---|---|---|---|---|---|---|---|---|---|---|---|---|---|---|---|---|---|---|---|---|---|---|---|---|---|---|---|---|---|---|---|---|---|---|---|---|---|---|---|---|---|---|---|---|---|---|---|---|---|---|---|---|---|---|---|---|---|---|---|---|---|---|---|---|---|---|---|---|---|---|---|---|---|---|---|---|---|---|---|---|---|---|---|---|---|---|---|---|---|---|---|---|---|---|---|---|---|
| Refrigerator | Airtight glass container | Up to 5 days | Serve cold or at room temp; no reheating needed | ||||||||||||||||||||||||||||||||||||||||||||||||||||||||||||||||||||||||||||||||||||||||||||||||||||||||||||||||||||||||||||||||||||||||||||||||||||||||||||||||||||||||||||||||||||||||||||
| Freezer | Not recommended | N/A | Vegetables will become watery and lose crunch | ||||||||||||||||||||||||||||||||||||||||||||||||||||||||||||||||||||||||||||||||||||||||||||||||||||||||||||||||||||||||||||||||||||||||||||||||||||||||||||||||||||||||||||||||||||||||||||
| Make-Ahead |
 Tried This Recipe? Leave a Comment!Did you make this recipe? I’d love to hear how it turned out! Please leave a comment and a rating below. Your feedback helps other home cooks and supports cheerychop.com! For more delicious inspiration, follow me on Pinterest! Crispy Cabbage Fritters – Quick Veggie Patties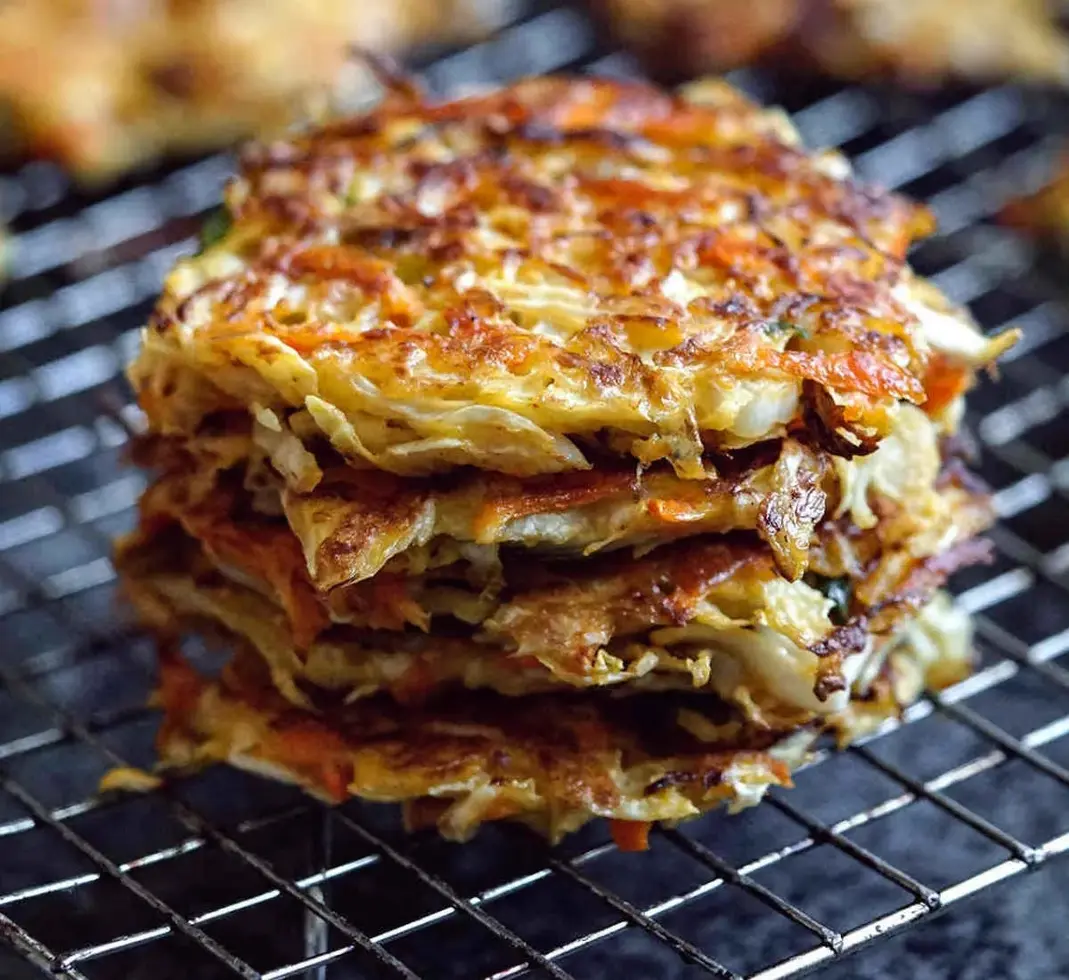 Table of ContentsCabbage Fritters | Crispy Fried or Oven Baked Patties – Quick & Versatile Veggie FrittersGrowing up in my mother’s kitchen in Morocco, I watched her transform humble vegetables into golden, crispy wonders that filled our home with the most incredible aromas. These cabbage fritters are my modern take on that memory — quick veggie patties made with shredded cabbage, carrots, eggs, and pantry spices that come together in minutes. The cabbage fritters can be pan-fried to a perfect golden crust or baked for a lighter option, making them budget-friendly and gluten free adaptable. Whether you call them crispy cabbage patties, fried cabbage pancakes, or cabbage and egg fritters, this recipe is destined to become a staple in your kitchen. Imagine biting into a fritter with a shatteringly crisp exterior that gives way to a tender, savory interior packed with sweet caramelized cabbage and subtle warmth from paprika and coriander. The carrots add natural sweetness and a pop of color, while the scallions provide a gentle bite that cuts through the richness. The beauty of these baked cabbage fritters is that they deliver all the texture and flavor of fried versions without the guilt — and they reheat beautifully for meal prep. After years of training at a Parisian culinary school and cooking in NYC kitchens, I’ve perfected this recipe to be foolproof for home cooks. The secret lies in a technique I learned from a French chef: salting the cabbage briefly to draw out moisture before mixing, ensuring your patties stay crisp, not soggy. My advice? Don’t skip the resting step — it’s the difference between a fritter that holds together and one that falls apart. Let’s dive in! Why This Cabbage Fritters Recipe Is the BestThe Flavor Secret: Most cabbage fritter recipes rely on heavy breading, but I let the vegetables shine. My North African roots inspired the use of smoked paprika and coriander — spices that add warmth without overpowering the natural sweetness of cabbage and carrots. The key is a light hand with flour (just 4-5 tablespoons for 16 ounces of cabbage), which keeps the fritters tender and vegetable-forward. I like to think of these as crispy cabbage patties with a Moroccan soul and French finesse. Perfected Texture: Achieving the ideal crunch is a science. In my Paris training, I learned that temperature control is everything. Cooking these cabbage and egg fritters on medium-low heat allows the interior to cook through while the exterior develops a deep golden crust. Pressing the patties thin (about 1/4 inch) ensures even cooking. For baked cabbage fritters, I recommend using a preheated sheet pan and a light spray of oil — this mimics the Maillard reaction you’d get from pan-frying, yielding fritters that are just as crispy but with less fat. Foolproof & Fast: This recipe is designed for busy weeknights. From start to finish, you’ll have crispy cabbage patties on the table in under 30 minutes. The ingredient list is short and pantry-friendly, and the method is forgiving. Even if you’ve never made fritters before, you’ll succeed. I’ve tested this recipe with both green and savoy cabbage, with gluten-free flours, and with different binders — and it works every time. Plus, these fritters freeze beautifully, making them perfect for make-ahead breakfasts or quick lunches. Cabbage Fritters IngredientsWhen I shop for these at the Union Square Greenmarket in NYC, I always look for firm, heavy heads of green cabbage with tightly packed leaves. The carrots should be bright orange and crisp — local ones from upstate New York have the best sweetness. I remember my mother using a similar combination of vegetables in her Moroccan m’rouzia (a slow-cooked meat dish), but here they take center stage in a quick, modern way. Let’s break down what you’ll need. Ingredients List
Ingredient SpotlightCabbage: Green cabbage is my go-to for its firm texture and mild flavor. It holds up well to shredding and frying without becoming watery. Choose heads that feel heavy for their size — this indicates freshness. Avoid cabbage with wilted outer leaves. Tested substitution: Savoy cabbage works, but it’s more delicate and may produce slightly less crispy fritters. Red cabbage is also fine, though it will turn a less appetizing color during cooking. Eggs: These are the primary binder in this recipe. They help the fritters hold together without making them dense. I use large eggs from pasture-raised hens when possible — they have richer yolks and more flavor. Tested substitution: For a vegan version, you can try flax eggs (1 tablespoon ground flaxseed + 3 tablespoons water per egg), but expect a softer, less crispy result. The texture won’t be as firm, but it’s still delicious. Flour: Just a small amount of all-purpose flour helps absorb excess moisture and creates a light binding matrix. Don’t be tempted to add more — the fritters should be vegetable-forward, not bready. Tested substitution: For gluten-free fritters, use a 1:1 gluten-free flour blend (like Bob’s Red Mill) or chickpea flour for a nutty flavor. Coconut flour is not recommended — it absorbs too much moisture and makes the fritters dry and crumbly.
How to Make Cabbage Fritters — Step-by-StepMaking these crispy cabbage patties is easier than you think. Follow these steps, and you’ll have perfect fritters every time — whether you choose to fry or bake. Step 1: Prepare the CabbageShred the cabbage using a mandoline slicer for fine, uniform shreds. You’ll need 16 ounces — about 7 packed cups or 1/3 of a medium head. After shredding, place the cabbage in a colander, sprinkle with 1/2 teaspoon of the salt, and let it sit for 10 minutes. This draws out excess moisture, ensuring your fritters stay crispy, not soggy. After 10 minutes, squeeze the cabbage firmly with your hands to remove as much liquid as possible. 💡 mia’s Pro Tip: Don’t skip the salting step! This is the single most important technique for achieving crispy cabbage fritters. The salt breaks down cell walls, releasing water that would otherwise make your fritters steam instead of fry. Step 2: Grate and SliceGrate the carrots using a box grater’s coarse side. Thinly slice the scallions (green and white parts). Mince the garlic with a sharp knife or use the finer side of a box grater. If using a regular onion, dice it finely — about 1/2 cup. ⚠️ Common Mistake to Avoid: Don’t over-grate the carrots into a paste. Coarse shreds add texture and prevent the fritters from becoming mushy. The goal is to have distinct bits of carrot visible in each bite. Step 3: Mix the BatterIn a large bowl, combine the squeezed cabbage, grated carrots, scallions, garlic, eggs, flour, remaining 1/2 teaspoon salt, pepper, paprika, and coriander. Toss lightly with your hands to combine — use a gentle touch. The mixture will look like a slaw at first, with little hope of sticking together, but trust the process. The eggs and flour will bind as the fritters cook. 💡 mia’s Pro Tip: Mix with your hands! You can feel when the ingredients are evenly distributed. Avoid over-mixing, which can draw too much water from the cabbage and make the batter watery. Step 4: Heat the PanPlace a non-stick skillet (I use a 10-inch ceramic-coated one) over medium-low heat — my stove dial is at 3. Let it heat for 3 minutes. Add your fat (ghee or oil) and let it heat for 1 minute more. The fat should shimmer but not smoke. ⚠️ Common Mistake to Avoid: Frying on too high heat is the #1 cause of burnt-outside, raw-inside fritters. Medium-low heat allows the interior to cook through while the exterior develops a deep golden crust. Patience pays off! Step 5: Form and FryForm a ball of the mixture in your hands (about 1/4 cup each) and place it in the heated skillet. Press down with a spatula or your fingers to flatten into a patty about 1/4 inch thick — the thinner the better for even cooking. Fry for 3 minutes per side, or until the surface is golden brown and crispy. Repeat with remaining mixture, adding more oil as needed. Serve warm or at room temperature. 💡 mia’s Pro Tip: For oven-baked cabbage fritters, preheat your oven to 425°F. Place the patties on a parchment-lined baking sheet lightly brushed with oil. Bake for 12 minutes, flip, and bake 10-12 minutes more until golden and crispy. They won’t be quite as crunchy as fried, but they’re still delicious and lighter.
Serving & PresentationThese cabbage fritters are incredibly versatile. I love serving them as a snack with a dollop of Greek yogurt mixed with lemon juice and fresh dill — a nod to the Mediterranean flavors I grew up with. For a heartier meal, serve them alongside a simple green salad with a tangy vinaigrette, or tuck them into a pita with tzatziki and pickled onions. They’re also fantastic as a side dish for grilled meats or roasted chicken — think of them as a lighter, more flavorful alternative to potato pancakes. When I’m hosting friends in my NYC apartment, I arrange the crispy cabbage patties on a platter with a ramekin of harissa-spiked mayonnaise (Moroccan heat meets French elegance) and a sprinkle of fresh herbs. The contrast of the crunchy fritters with the creamy, spicy dip is always a hit. For a brunch spread, serve them with poached eggs and a drizzle of sriracha for a fun twist on eggs Benedict.
|

| Original Ingredient | Best Substitution | Flavor / Texture Impact |
|---|---|---|
| Almond Flour | Sunflower Seed Flour | Very similar texture, slightly earthier flavor. May cause a green tint over time. |
| Butter | Refined Coconut Oil | Creates a dairy-free cookie with a very slight coconut aroma. Texture remains soft and chewy. |
| Powdered Sugar | Confectioners Erythritol | Ideal for keto/sugar-free. Provides same dissolving quality and rolling texture. |
How to Make Lemon Pixie Cookies — Step-by-Step
Follow these simple steps for perfect, soft lemon pixie cookies every single time. The process is quick, but patience during cooling is the final key to success.
Step 1: Prepare the Dough
In a medium bowl, combine the almond flour, 2 tablespoons of powdered sugar, lemon zest, salt, and baking soda. Whisk these dry ingredients together until fully combined and no lumps remain. In a separate small bowl or measuring cup, gently melt the butter or coconut oil. Let it cool for a minute, then stir in the vanilla extract and 2 teaspoons of fresh lemon juice.
💡 mia’s Pro Tip: When zesting, use a fine microplane and only grate the bright yellow outer layer of the lemon peel. The white pith underneath is bitter and will ruin the delicate flavor of your easy lemon cookies.
Step 2: Mix and Chill
Pour the wet ingredients into the dry ingredients. Use a spatula to mix until a soft, slightly sticky dough forms. It should come together easily. If the dough seems too dry, add an extra 1/2 teaspoon of lemon juice. Using a tablespoon or small cookie scoop, portion the dough and roll into 12 even balls.
⚠️ Common Mistake to Avoid: Over-mixing the dough. Once it comes together, stop stirring. Overworking it can make the almond flour release too much oil, leading to greasy cookies.
Step 3: Optional Rolling and Chilling
If desired, roll each dough ball in a small bowl of additional powdered sugar or erythritol until lightly coated. For the chewiest, most perfect soft lemon cookies, place the balls on a plate or parchment-lined tray and refrigerate for at least 30 minutes, or even overnight. This step firms up the fat, preventing excessive spreading.
Step 4: Bake and Shape
Preheat your oven to 325°F (163°C). Line a baking sheet with parchment paper. Place the dough balls about 2 inches apart. Bake for 10 minutes. The cookies will look soft and puffed. Immediately upon removing them from the oven, use the back of a spoon to gently press each ball down into a classic cookie shape.
💡 mia’s Pro Tip: The press-and-shape step is crucial and must be done while the cookies are piping hot. If you wait, they will set and crumble. A gentle, swift press is all you need.
Step 5: Cool Completely
Let the cookies cool on the baking sheet for at least 20 minutes. They will be incredibly delicate when warm but will firm up beautifully as they cool. Resist the temptation to move them early! Once completely cool, they can be handled and stored.
⚠️ Common Mistake to Avoid: Baking at a higher temperature to save time. Almond flour burns easily. 325°F is the sweet spot for a golden bottom and a pale, tender top.
| Step | Action | Duration | Key Visual Cue |
|---|---|---|---|
| 1 | Mix Dough | 5 mins | Soft, uniform dough that holds together. |
| 2 & 3 | Chill (Optional) | 30 mins – Overnight | Dough balls are firm to the touch. |
| 4 | Bake & Shape | 10 mins | Cookies are puffed and edges are lightly golden. |
| 5 | Cool | 20+ mins | Cookies are firm and release easily from parchment. |
Serving & Presentation
Presentation is where you can have fun. I love serving these on a simple white platter, dusted with a little extra powdered sugar, reminiscent of the snowy sugar-dusted pastries in Parisian patisserie windows. For a Moroccan-inspired touch, garnish with a few edible rose petals or a sprinkle of crushed pistachios alongside the lemon zest.
These lemon pixie cookies are incredibly versatile. They’re perfect with a mid-afternoon cup of Earl Grey tea, echoing the elegant “goûter” tradition in France. For a NYC-style brunch, serve them alongside a tart berry compote for dipping. Their bright flavor also cuts through the richness of a creamy dessert, making them a lovely accompaniment to lemon curd or vanilla bean panna cotta.
| Pairing Type | Suggestions | Why It Works |
|---|---|---|
| Beverage | Earl Grey Tea, Iced Lavender Lemonade, Sparkling Wine | The citrus and floral notes complement the lemon perfectly. |
| Sauce / Dip | Lemon Curd, Vanilla Greek Yogurt, Raspberry Coulis | Adds creamy or tart contrast to the cookie’s texture. |
| Garnish | Extra Lemon Zest, Edible Flowers, Crushed Pistachios | Enhances visual appeal and adds a subtle textural crunch. |
| Occasion | Afternoon Tea, Bridal Shower, Spring Picnic, Light Dessert | Their delicate size and flavor suit elegant, light gatherings. |
Make-Ahead, Storage & Reheating
As a busy New Yorker, I always appreciate recipes that can be prepped ahead. This lemon cookie recipe is a meal-prep dream. You can make the dough balls, freeze them on a tray, then transfer to a bag, and bake straight from frozen (adding 1-2 minutes to the bake time). It’s my secret for having fresh, warm cookies ready in under 15 minutes for unexpected guests.
| Method | Container | Duration | Reheating Tip |
|---|---|---|---|
| Counter (Cool & Dry) | Airtight Container | 3-4 days | Not needed. Best enjoyed at room temp. |
| Refrigerator | Airtight Container | 1 week | Let sit at room temp for 30 mins to soften. |
| Freezer (Dough Balls) | Freezer Bag | 3 months | Bake from frozen at 325°F for 11-12 mins. |
| Freezer (Baked Cookies) | Airtight Container | 2 months | Thaw at room temp for 1 hour. |
A note on freshness: Because of the almond flour, these soft lemon cookies retain moisture well. If they seem a bit soft after storage, a quick 5-minute warm-up in a 300°F oven will crisp the exterior slightly and refresh that just-baked aroma. Never microwave them, as it will make them tough and chewy in the wrong way.
Variations & Easy Swaps
| Variation | Key Change | Best For | Difficulty Impact |
|---|---|---|---|
| Lemon-Lavender | Add 1/2 tsp culinary lavender buds to dry ingredients. | Elegant tea parties, bridal showers. | None |
| Nut-Free “Meltaways” | Replace almond flour with 3/4 cup oat flour + 1/4 cup arrowroot. | Allergy-friendly, school snacks. | Slight (finding oat flour) |
| Citrus Trio | Use zest of 1/2 lemon, 1/4 orange, 1/4 lime. | Summer gatherings, bright flavor lovers. | None |
Lemon-Lavender Elegance
Inspired by the Provençal fields near my old culinary school, adding a hint of culinary lavender transforms these into an sophisticated treat. Crush the dried buds between your fingers to release their aroma before adding them to the dry mix. The floral note pairs magically with the lemon, creating a cookie that tastes like a sunny afternoon in the South of France.
Nut-Free Lemon Meltaways
For those with nut allergies, you can create a wonderful variation. Replace the almond flour with a blend of 3/4 cup finely ground oat flour and 1/4 cup arrowroot starch or cornstarch. The texture becomes even more delicate and truly “melt-in-your-mouth.” These are the perfect soft lemon cookies for lunchboxes or shared spaces where nuts are a concern.
Seasonal Citrus Trio
When winter citrus is at its peak at the NYC greenmarkets, I love making this version. Use the zest of half a lemon, a quarter of a sweet orange, and a quarter of a lime. The complexity is incredible. You get the bright punch of lemon, the sweetness of orange, and the sharp tang of lime—all in one blissful, chewy bite.
What is the best way to zest a lemon for lemon pixie cookies without getting the bitter pith?
The absolute best tool is a fine microplane grater. Wash and
Print
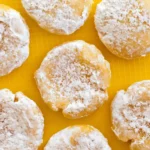
Lemon Pixie Cookies
Description
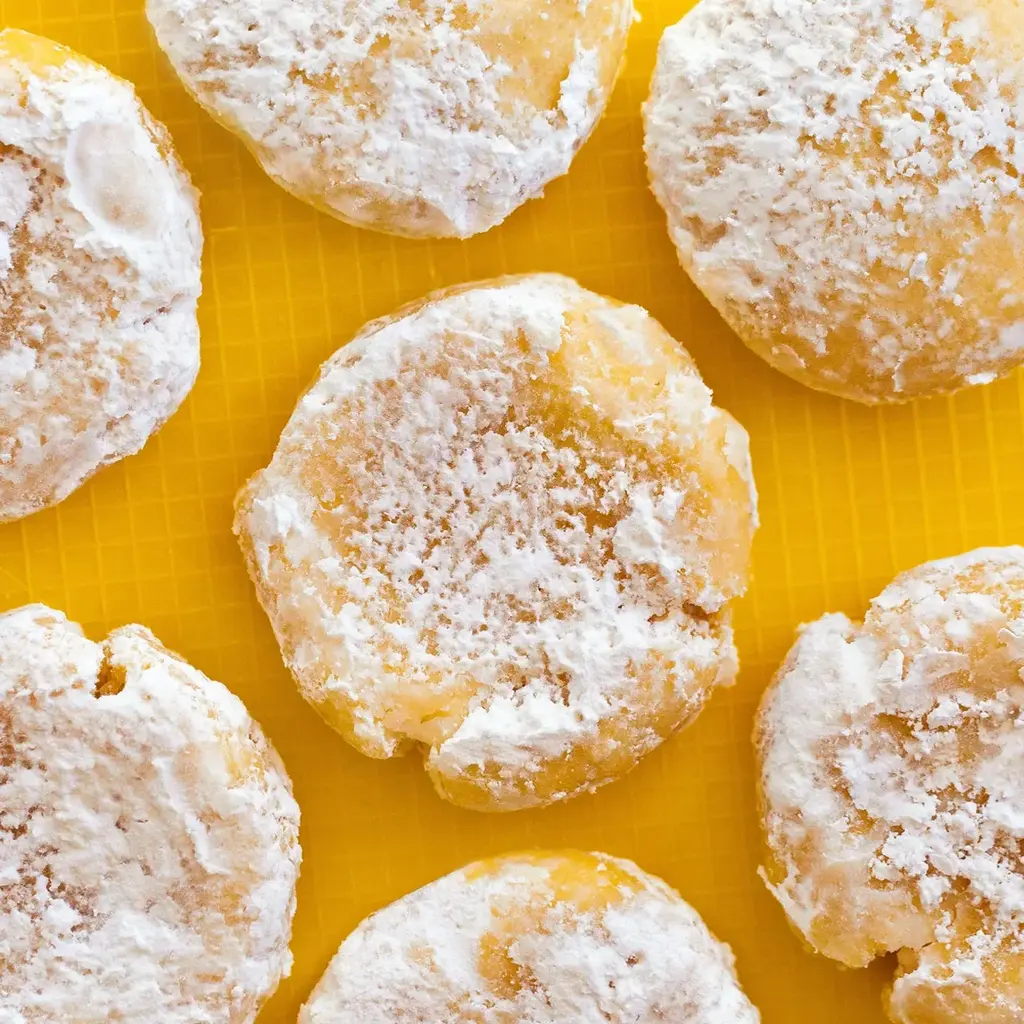
Soft and chewy homemade lemon pixie cookies are bursting with lemon flavor.
Ingredients
- 1 cup almond flour ((or try these nut free Lemon Meltaways))
- 2 tbsp powdered sugar or erythritol
- zest of one lemon
- scant 1/4 tsp salt
- 1/8 tsp baking soda
- 2 tbsp butter or coconut oil
- 1 tsp pure vanilla extract
- 2 tsp lemon juice
- optional powdered sugar or erythritol for rolling
Instructions
- Melt butter or oil. Stir all ingredients to form a dough, then roll into balls. For chewier cookies, refrigerate balls until cold or overnight. Or you can bake right away. Roll balls in additional powdered sugar if desired. Preheat the oven to 325 F. Bake on a parchment lined cookie tray for 10 minutes. Use a spoon to press the balls into cookie shapes. Let cool fully before handling, as they are delicate at first but firm up considerably as they cool.View Nutrition Facts
Nutrition
- Calories: 74 kcal

Tried This Recipe? Leave a Comment!
Did you make this recipe? I’d love to hear how it turned out! Please leave a comment and a rating below. Your feedback helps other home cooks and supports cheerychop.com!
For more delicious inspiration, follow me on Pinterest!
Asian-Inspired Vegan Cabbage Rolls with Brown Garlic Sauce
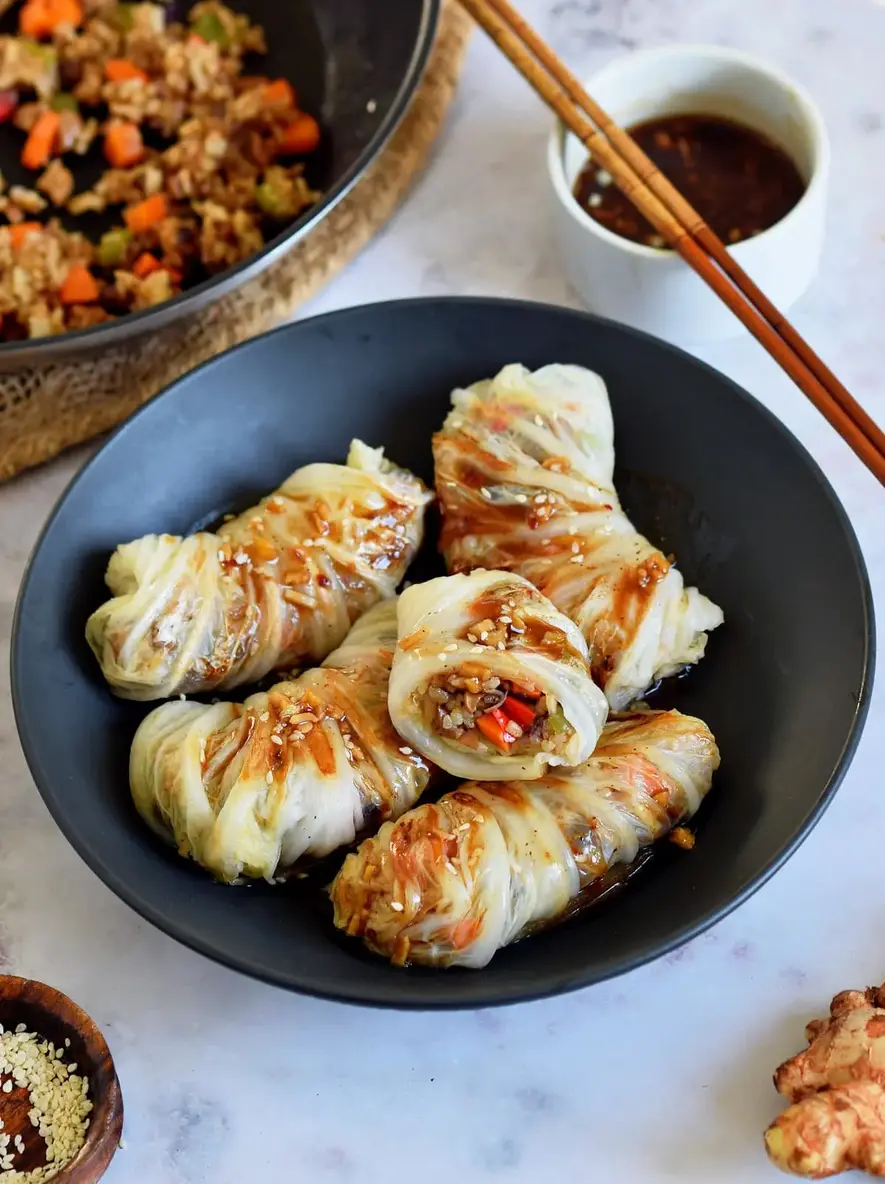
Table of Contents
Vegan Cabbage Rolls (Asian-Inspired Wraps) with Chinese Brown Garlic Sauce – A Chef’s Flavor-Packed Twist
Growing up in Morocco, I was surrounded by the art of wrapping food—think delicate warqa pastry and fragrant stuffed vegetables. Later, in Paris, I learned the precision of French technique. Now, in my NYC kitchen, I love fusing those worlds. These Asian-inspired vegan cabbage rolls are my latest obsession, marrying tender napa cabbage with a savory veggie and rice filling, all drenched in a glossy, umami-rich Chinese brown garlic sauce. They’re a perfect example of how gluten-free, healthy cabbage wraps can be absolutely bursting with flavor.
Imagine biting into a soft, slightly sweet cabbage leaf that gives way to a hearty, perfectly seasoned filling of short-grain rice, crisp carrots, bell peppers, and earthy mushrooms. The aroma of fresh ginger and garlic fills your kitchen as you pan-sear the rolls to a golden crisp. Then, you pour over that signature sauce—a beautiful balance of salty tamari, tangy rice vinegar, and a hint of maple sweetness, thickened to a glossy sheen that clings to every nook. It’s a symphony of textures and tastes that feels both comforting and excitingly new.
What sets my version apart is that sauce. Drawing from my French training, I’ve perfected the slurry technique to create a velvety, restaurant-quality glaze that elevates these vegan stuffed cabbage rolls from humble to spectacular. I’ll share my pro tip for softening cabbage leaves without a single tear, and I’ll warn you about the one common mistake that can make your filling soggy. Trust me, once you master this method, these rolls will become a regular in your healthy dinner rotation.
Why This Vegan Cabbage Rolls Recipe Is the Best
The secret weapon is undeniably the Chinese brown garlic sauce. While many vegan cabbage roll recipes stop at a simple tomato sauce or soy glaze, my version uses a carefully balanced reduction. The technique, reminiscent of a French velouté, involves creating a cornstarch slurry that integrates seamlessly, preventing lumps and giving you a glossy, clingy sauce that amplifies every bite with deep, savory-sweet notes. It’s the kind of detail from my culinary school days that makes home cooking feel professional.
Texture is everything, and here it’s perfected. By soaking the sushi rice before cooking, you achieve individual grains that are tender yet distinct, not mushy. Sautéing the vegetables just until they lose their raw edge ensures a filling with pleasant crunch. The final pan-sear on the assembled rolls is non-negotiable—it creates a delicate, slightly caramelized exterior on the cabbage that provides the perfect contrast to the soft interior, a technique I always emphasize for stuffed vegetables.
This recipe is designed to be foolproof and fast. I’ve streamlined the process so you can prep the filling while the rice cooks and blanch the cabbage leaves in batches. The steps are clear, visual cues are provided, and the ingredient list uses easy-to-find items from any well-stocked US grocery store or Asian market. Whether you’re new to making gluten free cabbage rolls or a seasoned cook, my method ensures delicious, impressive results every time.
Vegan Cabbage Rolls Ingredients
I pick up my napa cabbage and fresh ginger from the bustling Chinatown markets here in NYC—the quality and vibrancy there always inspire me. The rest comes from my local grocer. Remember, the best vegan stuffed cabbage starts with the freshest components. Using canned mushrooms is a great shortcut I learned during busy restaurant shifts, but fresh work beautifully too.
Ingredients List
- 1 1/4 cups dry sushi rice (or any short-grain rice)
- 1 large napa cabbage (10-12 leaves)
- 1 tbsp neutral oil, divided (like avocado or grapeseed)
- 1 medium onion, diced
- 3/4 tbsp fresh ginger, minced
- 3 garlic cloves, minced
- 1 medium carrot, diced
- 2 medium bell peppers (any color), diced
- 8 white button mushrooms, diced (canned or fresh)
- 2 tbsp tamari or coconut aminos
- 1/2 tsp each of sea salt, ground black pepper, onion powder
- 1/4 tsp red pepper flakes (or to taste)
- Sesame seeds, for garnish
For the Chinese Brown Garlic Sauce:
- 1 tsp sesame oil (or neutral oil)
- 1/2 tbsp fresh ginger, minced
- 2 garlic cloves, minced
- 1 1/2 tbsp tamari or coconut aminos
- 1 tbsp rice vinegar
- 3/4 tbsp maple syrup (or agave)
- 1/2 cup water
- 1/2 tbsp cornstarch
- Salt, pepper, red pepper flakes, smoked paprika to taste
Ingredient Spotlight
Napa Cabbage: This is your wrapper. Its elongated, tender leaves and mild, slightly sweet flavor are ideal for rolling. Look for a head that feels heavy for its size with crisp, un-wilted outer leaves. If you can’t find it, savoy cabbage is the best substitute—its crinkled leaves are also pliable, though slightly more robust in flavor.
Sushi Rice: The starchiness of short-grain rice helps bind the filling and gives it a lovely, slightly sticky texture. Soaking is key to perfect cooking. In a pinch, medium-grain rice like Arborio works, but avoid long-grain varieties as they stay too separate and dry.
Tamari: This is my go-to for a rich, gluten-free soy sauce alternative. It’s less salty and more nuanced than some standard soy sauces. Coconut aminos are a great sweeter, soy-free option. If using regular soy sauce, reduce the amount slightly and taste as you go.
Fresh Ginger & Garlic: The aromatic soul of the dish. Please use fresh—jarred minced ginger and garlic lack the bright, pungent kick that makes these Asian cabbage rolls sing. Mince them finely so they distribute evenly throughout the filling and sauce.
| Original Ingredient | Best Substitution | Flavor / Texture Impact |
|---|---|---|
| Napa Cabbage | Savoy Cabbage | Slightly earthier flavor, leaves are more textured but still rollable. |
| Sushi Rice | Quinoa or Cauliflower Rice | Quinoa adds nuttiness and protein; cauliflower rice is lighter but less binding. |
| Tamari | Liquid Aminos or Soy Sauce | Very similar salty-umami profile; soy sauce may contain wheat. |
| Bell Peppers | Zucchini or Water Chestnuts | Zucchini softens more; water chestnuts add a fantastic crunchy texture. |
| Button Mushrooms | Shiitake or Cremini Mushrooms | Adds a deeper, meatier umami flavor to the filling. |
How to Make Vegan Cabbage Rolls — Step-by-Step
Don’t let the rolling intimidate you! I’ve broken it down into simple, manageable stages. You’ll be assembling these healthy cabbage wraps like a pro in no time.
Step 1: Prep the Rice and Cabbage
Soak the sushi rice in a large bowl of cool water for 45-60 minutes. This crucial step removes excess starch and ensures even, tender cooking. Drain thoroughly. Cook the rice in a saucepan with 1.5 cups of water and a pinch of salt. Bring to a boil, then reduce to a simmer, cover, and cook for 10-12 minutes until the water is absorbed and the rice is tender. Fluff with a fork and set aside.
💡 mia’s Pro Tip: While the rice soaks and cooks, tackle the cabbage. Carefully remove 10-12 whole outer leaves from the napa cabbage. Use a paring knife to shave down the thick white rib at the base of each leaf—this makes them pliable and easy to roll without cracking.
Step 2: Soften the Cabbage Leaves
Bring a large pot of water to a rolling boil. Working in batches of 3-4 leaves, submerge the cabbage leaves using tongs. Blanch for 2-3 minutes until they turn bright green and are pliable. Immediately transfer them to a large bowl of ice water to stop the cooking. This sets the color and texture. Gently pat the leaves dry with a clean kitchen towel or paper towels.
⚠️ Common Mistake to Avoid: Don’t overcook the leaves or skip the ice bath. Over-blanching makes them mushy and prone to tearing during rolling. The ice bath is essential—it halts the cooking process, preserving that perfect tender-yet-strong structure.
Step 3: Sauté the Veggie Filling
Heat 1/2 tablespoon of oil in a large skillet or wok over medium-high heat. Add the diced onion, ginger, and garlic. Sauté for 1 minute until fragrant. Add the diced carrot, bell peppers, and mushrooms. Cook, stirring frequently, for 3-4 minutes until the vegetables are just tender but still have a slight bite. Add the 2 tablespoons of tamari, salt, pepper, onion powder, and red pepper flakes. Stir to coat and cook for another 1-2 minutes.
💡 mia’s Pro Tip: Get your skillet nice and hot before adding the veggies. This quick, high-heat sauté, a technique called “sauter à cru,” seals in flavor and moisture without making them watery, which is key for a non-soggy filling.
Step 4: Combine Filling and Roll
Add the cooked rice to the skillet with the sautéed vegetables. Gently fold everything together until well combined. Turn off the heat. Taste and adjust seasoning—this is your last chance to add more tamari or spices. Lay a blanched cabbage leaf flat on a clean surface. Place 1.5 to 2 tablespoons of the rice mixture in the center of the leaf. Fold the sides inward over the filling, then roll from the bottom up, like a burrito. Place seam-side down on a plate. Repeat with remaining leaves and filling.
Step 5: Pan Sear the Rolls
Heat the remaining 1/2 tablespoon of oil in a large non-stick skillet over medium heat. Once hot, carefully place 5-6 cabbage rolls in the pan, seam-side down. Cook for 2-3 minutes per side, or until they develop a beautiful golden-brown crust. Work in batches to avoid crowding the pan. Transfer the seared rolls to your serving platter.
⚠️ Common Mistake to Avoid: Don’t skip the sear! This step isn’t just for color. It caramelizes the natural sugars in the cabbage, adds a wonderful textural contrast, and helps seal the roll, preventing it from unraveling when you add the sauce.
Step 6: Make the Chinese Brown Garlic Sauce
In a small saucepan, heat 1 teaspoon of oil over medium heat. Add the minced ginger and garlic and cook for 30 seconds until fragrant. Pour in the tamari, rice vinegar, and maple syrup. Let it simmer for 1-2 minutes. In a separate small bowl, whisk the water and cornstarch into a smooth slurry. While stirring the saucepan constantly, slowly drizzle in the cornstarch slurry. Add a pinch of salt, pepper, red pepper flakes, and smoked paprika. Continue to cook, stirring, for 2-3 minutes until the sauce thickens to a glossy, gravy-like consistency.
💡 mia’s Pro Tip: Always add a cold slurry to a hot liquid, never the reverse, to prevent instant clumping. Whisk constantly as you pour for a perfectly smooth, lump-free sauce—a fundamental French liaison technique that works wonders here.
Step 7: Serve and Garnish
Arrange the warm, pan-seared vegan cabbage rolls on a platter. Generously drizzle the warm Chinese brown garlic sauce over the top. Finish with a sprinkle of toasted sesame seeds for nutty flavor and visual appeal. Serve immediately while everything is hot and the sauce is luxuriously glossy.
| Step | Action | Duration | Key Visual Cue |
|---|---|---|---|
| 1 | Soak & Cook Rice | ~60 min (mostly inactive) | Rice is tender, water fully absorbed. |
| 2 | Blanch Cabbage Leaves | 2-3 min per batch | Leaves turn bright green and flexible. |
| 3 & 4 | Sauté Filling & Combine | 6-8 min | Veggies are tender-crisp, filling is uniform. |
| 5 | Roll & Pan Sear | 4-6 min per batch | Rolls are golden brown on both sides. |
| 6 | Make Sauce | 4-5 min | Sauce coats the back of a spoon thickly. |
Serving & Presentation
Presentation is the final touch of love. I love serving these Asian cabbage rolls family-style on a large, rustic platter. Drizzle the sauce in a zig-zag pattern over the top, letting some pool enticingly around the base. The golden-brown sear on the rolls against the dark, glossy sauce is stunning. A final flourish of green sliced scallions or fresh cilantro leaves alongside the sesame seeds adds a pop of color that reminds me of the vibrant markets in Marrakech.
For a complete meal, think about balance. These vegan stuffed cabbage rolls are satisfying but not overly heavy. Pairing them with something light and refreshing or something with a contrasting texture makes the whole plate sing. Here in NYC, I often round out the meal with simple, seasonal sides I pick up from the Union Square Greenmarket.
| Pairing Type | Suggestions | Why It Works |
|---|---|---|
| Side Dish | Simple cucumber salad, steamed bok choy, or garlic sautéed green beans. | Adds a fresh, crunchy, or green element that cuts through the richness of the sauce. |
| Sauce / Dip | Extra brown garlic sauce, spicy sriracha mayo, or a sweet chili sauce. | Offers variety for dipping and allows guests to customize their heat and flavor level. |
| Beverage | Jasmine iced tea, a crisp Vegan Cabbage Rolls (Asian-Inspired Wraps)DescriptionThese Asian-inspired vegan cabbage rolls are made up of tender cabbage leaves, stuffed with a rice and veggie filling, and served alongside a Chinese brown garlic sauce. Plus, this recipe is super versatile, gluten-free, and naturally vegetarian and vegan! Ingredients
Scale
Instructions
Nutrition
 Tried This Recipe? Leave a Comment!Did you make this recipe? I’d love to hear how it turned out! Please leave a comment and a rating below. Your feedback helps other home cooks and supports cheerychop.com! |