Peanut Butter Cup Stuffed Brookies – Easy 3-Ingredient Dessert

Peanut Butter Cup Stuffed Brookies: Easy Shortcut to Decadence

⚖️
Difficulty
Easy
⏲️
Prep Time
10 mins
🕒
Cook Time
18-20 mins
⏱️
Total Time
28-30 mins
🍽️
Servings
12

From the bustling streets of Marrakech, where the aroma of sweet pastries filled my mother’s kitchen, to the refined patisseries of Paris, my culinary journey has always been about balancing rich flavors with accessible techniques. Now, here in New York City, I’m constantly inspired by the vibrant food scene to create recipes that are both comforting and exciting. Today, I’m thrilled to share something truly special: my **Peanut Butter Cup Stuffed Brookies**. This dessert is a magical fusion of a chewy cookie, a fudgy brownie, and that iconic, creamy peanut butter cup center. It’s the kind of treat that makes people stop, close their eyes, and savor every bite, a true testament to how simple ingredients can create pure joy. It’s a shortcut to pure indulgence, perfect for any home baker looking to impress without the fuss.

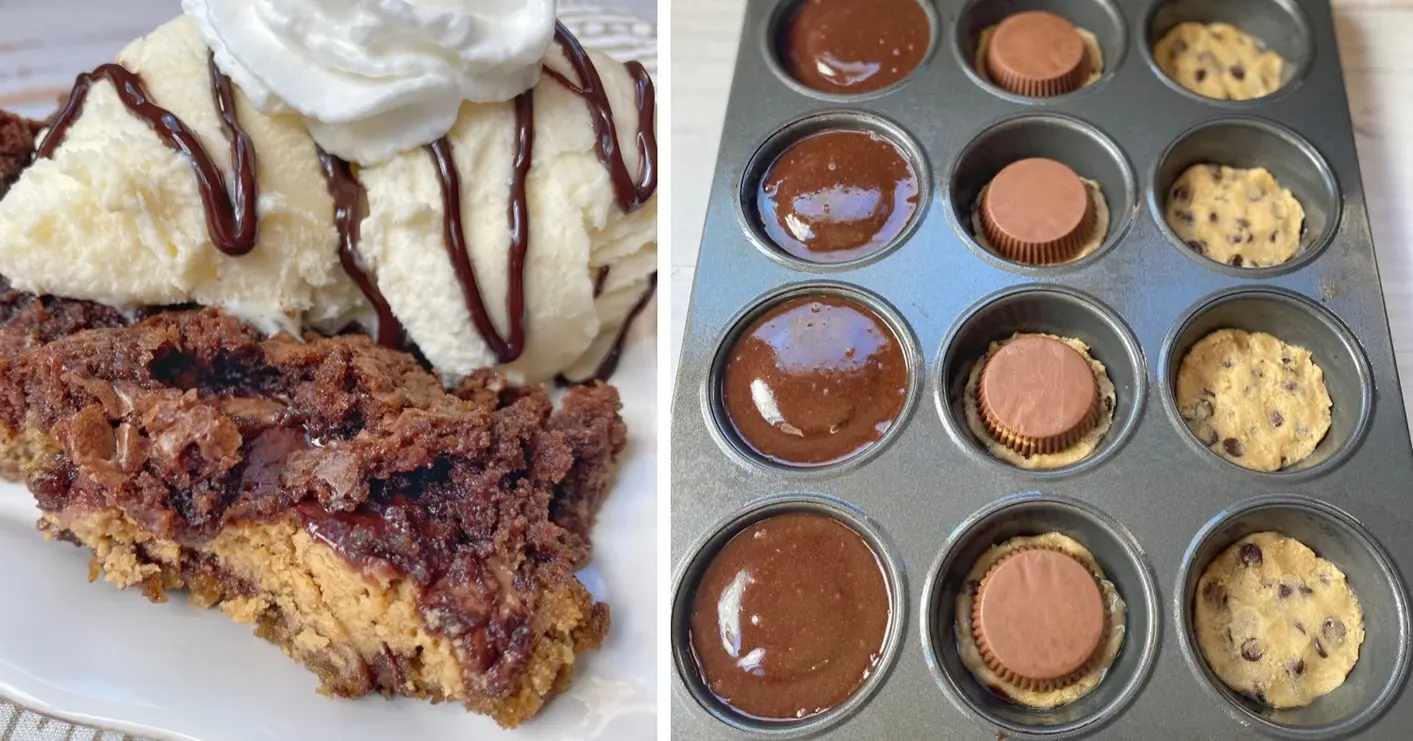
Imagine biting into a warm, slightly crisp cookie exterior that gives way to a molten, gooey brownie center. Hidden within that rich chocolatey embrace is a molten Reese’s Peanut Butter Cup, its sweet, nutty filling melting into a luscious pool that perfectly complements the dark chocolate. This isn’t just a dessert; it’s an experience. I’ve always loved how spices like cardamom and cinnamon can transform simple ingredients in Moroccan cooking, and in this recipe, the combination of chocolate and peanut butter, enhanced by the textures of cookie and brownie, evokes that same sense of elevated comfort. Each brookie is a miniature masterpiece, a symphony of textures and flavors that will transport you with every forkful.

What makes this brookie recipe my absolute favorite and the best I’ve ever made? It’s the ingenious shortcut using store-bought components that allows us to achieve restaurant-quality results in under 30 minutes. I’ve spent years perfecting pastry and dessert techniques, from delicate French macarons to robust Moroccan tagines, and I can tell you that simplicity often hides the most profound flavors. We’re going to avoid the common pitfall of over-baking, which can turn these gems into dry hockey pucks. Plus, I’ll share my secret pro tip for ensuring that gooey peanut butter cup center stays perfectly molten, not burnt. Get ready to discover your new go-to dessert!

Why This Peanut Butter Cup Stuffed Brookies Recipe Is the Best

The flavor secret to these incredible peanut butter cup stuffed brookies lies in the perfect marriage of familiar favorites, elevated by my culinary finesse. Drawing from my Moroccan roots, I appreciate how layers of flavor create depth, and from my French training, I understand the science of texture. This recipe brilliantly combines a rich, fudgy brownie base with a chewy chocolate chip cookie dough, hugging a creamy peanut butter cup at its core. It’s this delightful contrast — the slight chew of the cookie, the dense richness of the brownie, and the yielding sweetness of melted peanut butter — that makes each bite an adventure and keeps you coming back for more. It’s a genius shortcut to a complex, decadent dessert.

Achieving that elusive perfect texture, where the cookie is chewy, the brownie is moist, and the peanut butter center is gooey, is all about precise baking. Unlike a traditional brookie baked in a single pan, we’re using a muffin tin, which is key. This method allows each brookie to bake evenly and develop a wonderful crown. My chef’s instinct tells me that controlling the bake time and temperature is crucial. We want the edges to be set while the center is still slightly underbaked, ensuring that lava-like molten peanut butter cup experience. It’s a technique I learned in Paris that translates beautifully here.

What truly sets this recipe apart is its foolproof nature. For home bakers, especially those in busy NYC planning parties or weeknight treats, having a recipe that consistently delivers amazing results with minimal effort is pure gold. By using a quality store-bought brownie mix and refrigerated cookie dough, we eliminate the most time-consuming parts of baking. The muffin tin method is forgiving, and the combination of flavors is universally loved. This easy brookie recipe is designed to make you look like a star, even on your busiest days, proving that gourmet desserts can be simple.

Peanut Butter Cup Stuffed Brookies Ingredients

Shopping for these ingredients is a breeze, whether you’re at a bustling Chelsea Market vendor or a reliable supermarket in NYC. I always tell my friends that the best ingredients are often the simplest ones, and this recipe is a perfect example. My mother in Morocco would have been thrilled with how easy these are to assemble, using elements that are readily available across the globe. It’s a testament to universal cravings for chocolate and peanut butter!

Ingredients List

  • 1 (10oz) bag of brownie mix (plus the oil & egg required by the mix instructions)
  • 1 (16oz) package of refrigerated chocolate chip cookie dough
  • 12 Reese’s Peanut Butter Cups (standard size)
  • Vanilla ice cream, for serving (optional)

Ingredient Spotlight

Brownie Mix: This is the heart of our fudgy base. When selecting a brownie mix in the US, I look for brands that promise a rich, dark chocolate flavor. It’s crucial to follow the package directions for the correct amount of oil and egg, as this impacts the batter’s consistency and how it bakes. A good brownie mix not only provides deep chocolate flavor but also ensures a moist, dense texture that contrasts beautifully with the cookie dough.

Refrigerated Cookie Dough: While I adore making cookie dough from scratch, using a good quality refrigerated chocolate chip cookie dough is a brilliant shortcut here. It brings that chewy texture and sweet, buttery flavor that makes brookies so irresistible. When buying, choose one that’s firm but pliable. For this recipe, I prefer classic chocolate chip as it complements the brownie, but you could experiment with other flavors. The key is that it bakes up soft and chewy.

Reese’s Peanut Butter Cups: This iconic candy is the star of our stuffed surprise! The magic happens when the peanut butter cup melts into a warm, gooey center. For best results, use the standard-sized cups. Ensure they are at room temperature so they soften nicely during baking, but not so warm they become liquid before going into the oven. Their sweet, salty peanut butter filling is the perfect counterpoint to the rich chocolate.

Original IngredientBest SubstitutionFlavor / Texture Impact
Brownie MixHomemade brownie batter (use your favorite recipe)Deeper, more complex chocolate flavor; slightly less uniform texture.
Refrigerated Cookie DoughHomemade cookie dough (chocolate chip or sugar cookie)Greater control over sweetness and texture; may require adjusting bake time slightly.
Reese’s Peanut Butter CupsOther candy bars with peanut butter (e.g., Butterfinger, Snickers) or a dollop of smooth peanut butter mixed with a little powdered sugarChanges the flavor profile significantly; candy bars may melt differently. Pure peanut butter needs careful handling to avoid drying out.

How to Make Peanut Butter Cup Stuffed Brookies — Step-by-Step

Ready to create some magic? This recipe is as straightforward as it gets, perfect for a busy weeknight or a fun weekend project. Let’s dive in!

Step 1: Preheat Oven & Prepare Pan

First things first, let’s get our oven ready. Preheat it to 350°F (175°C, or gas mark 4). This ensures the oven is at the perfect temperature when your brookies are ready to bake. Next, generously grease a standard-sized muffin tin. You can use baking spray, butter, or oil. Make sure to get into all the nooks and crannies to prevent any sticking. A well-greased pan is crucial for easy removal later, just like preparing my couscous steamer back home!

💡 mia’s Pro Tip: For an extra layer of security against sticking and for easier cleanup, you can also use muffin liners, but make sure they are sturdy enough to hold the batter. If using liners, still lightly grease them.

Step 2: Prepare the Brownie Batter

Now, let’s prepare our decadent brownie batter. Take your 10oz bag of brownie mix and follow the package directions precisely for the required oil and egg. Whisk everything together until the batter is smooth and well combined. It should be thick but pourable. Set this rich chocolate mixture aside for a moment while we work on the cookie base.

Take your 16oz package of refrigerated cookie dough. Separate it into 12 equal portions, rolling each into a ball. Gently press each ball of cookie dough into the bottom of each greased muffin cup. You want to create a nice, even layer that will form the base of our brookie. Flatten them sufficiently to make room for the peanut butter cup and brownie batter.

💡 mia’s Pro Tip: If your cookie dough is very firm, let it sit at room temperature for about 10-15 minutes before separating. This makes it much easier to squish and shape without cracking.

Step 4: Add the Peanut Butter Cups

This is where the magic truly begins! Take one Reese’s Peanut Butter Cup for each muffin cup and place it, upside down, directly onto the center of the flattened cookie dough. The goal is to have the peanut butter filling facing upwards, ready to become a molten surprise.

Step 5: Top with Brownie Batter

Now, carefully spoon the prepared brownie batter over each peanut butter cup. Distribute the batter evenly among all 12 muffin cups, filling them about 90% full. Make sure the peanut butter cups are completely covered by the brownie batter. This ensures they bake within the brookie and their core stays luscious.

⚠️ Common Mistake to Avoid: Don’t overfill the muffin cups! Leaving a little space at the top will prevent the batter from spilling over the sides as it bakes, keeping your brookies neat and tidy.

Step 6: Bake to Perfection

Time to bake! Place the filled muffin tin into your preheated oven. Bake for 18 to 20 minutes. You’ll know they’re done when the brownie batter is cooked through. A toothpick inserted into the brownie part (avoiding the molten center) should come out with moist crumbs attached, not wet batter.

Step 7: Cool & Enjoy!

Once baked, carefully remove the muffin tin from the oven. Let the peanut butter cup stuffed brookies cool in the tin for about 5 minutes. This short resting period allows them to set slightly, making them easier to remove. Then, gently transfer them to a wire rack to cool further. They are absolutely divine served warm!

Enjoy warm with a scoop of vanilla ice cream – it’s the ultimate indulgence!

StepActionDurationKey Visual Cue
1Preheat Oven & Prepare Pan5 minsOven at 350°F; muffin tin greased
2Prepare Brownie Batter5 minsSmooth, thick batter
3Form Cookie Base5 minsEven layer in muffin cups
4Add Peanut Butter Cups2 minsCups centered on dough
5Top with Brownie Batter3 minsCups covered, 90% full cups
6Bake18-20 minsEdges set, toothpick moist
7Cool & Enjoy5 mins + coolingWarm, slightly firm

Serving & Presentation

Serving these peanut butter cup stuffed brookies is all about enhancing the experience! For that classic New York moment, serve them warm, right out of the oven, with a generous scoop of high-quality vanilla bean ice cream. The contrast between the warm, gooey brookie and the cold, creamy ice cream is simply divine. You can also elevate them with a drizzle of chocolate sauce or a sprinkle of flaky sea salt to balance the sweetness, a touch I learned from some of the best chefs in Paris.

Presentation-wise, the muffin tin baking creates a beautiful, individual portion. If you want to go the extra mile for a special occasion, place each brookie on a small dessert plate. A light dusting of powdered sugar can add a touch of elegance, reminiscent of how we’d plate desserts at home in Morocco for guests. The beauty of these is their inherent appeal – the rich, dark brownie, the visible hints of chocolate chip cookie, and that promise of a molten peanut butter center.

When presenting these brookies, think about creating a little dessert bar. Offer a variety of toppings like whipped cream, a raspberry coulis, or even some chopped roasted peanuts for extra crunch. They are perfect for potlucks, parties, or just a cozy night in. The joy comes from the shared experience, the oohs and aahs as everyone discovers that hidden peanut butter surprise inside.

Pairing TypeSuggestionsWhy It Works
Side DishNone needed – they are a complete dessert!The brookie is rich and self-contained.
Sauce / DipWarm chocolate ganache, caramel sauce, raspberry coulisAdds complementary or contrasting flavors and a luxurious texture.
BeverageCold milk, strong coffee, espresso, dessert wine (e.g., Port)Balances the sweetness and richness; coffee enhances chocolate flavors.
GarnishWhipped cream, chocolate shavings, flaky sea salt, chopped peanutsAdds visual appeal, textural contrast, and flavor complexity.

Make-Ahead, Storage & Reheating

Life in NYC is always on the go, and I love having easy desserts ready for unexpected guests or late-night cravings. These brookies are fantastic for making ahead. The key is to let them cool completely before storing them to maintain their perfect texture. Because they’re made in a muffin tin, they’re already portioned and easy to manage.

MethodContainerDurationReheating Tip
RefrigeratorAirtight container3-4 daysWarm gently in the microwave for 10-15 seconds or in a low oven (250°F/120°C) for 5-8 minutes to revive the gooey center.
FreezerFreezer-safe airtight container or bagUp to 2 monthsThaw overnight in the refrigerator, then reheat as above. For a faster thaw, microwave for 30-60 seconds.
Make-AheadStore cooled brookies in an airtight containerUp to 2 days before servingReheat to warm the center and enjoy. They are also delicious at room temperature.

To reheat, I find a quick zap in the microwave is perfect for a single serving if you’re craving that almost-fresh, gooey center. For multiple brookies, or if you want to ensure the cookie part retains a bit of crispness, a few minutes in a warm oven (around 250°F/120°C) works wonders. Just be careful not to overheat, as this can dry out the brownie. The goal is to warm the peanut butter cup to that perfect, melty state.

Variations & Easy Swaps

VariationKey ChangeBest ForDifficulty Impact
Seasonal Flourish BrookiesAdd chopped peppermint candy canes or gingerbread spicesHoliday seasons, festive gatheringsNo change; simple addition.
Gluten-Free & Dairy-Free MagicUse GF brownie mix, GF cookie dough, and dairy-free peanut butter cupsDietary needsMinimal, ensure GF products are certified.
Chocolate Lover’s Dream BrookiesUse dark chocolate cookie dough and add mini chocolate chips to brownie batterIntense chocolate cravingsNo change; enhances chocolate intensity.

Seasonal Flourish Brookies

To bring a touch of seasonal magic, I love adapting these brookies! For winter holidays, consider adding finely chopped peppermint candy canes to the cookie-dough base before pressing it into the muffin tin. Alternatively, incorporate a pinch of cinnamon and ginger into the brownie batter for a warming gingerbread-inspired brookie. These simple additions transform the dessert into something festive and truly special, perfect for cozy evenings.

Gluten-Free and Dairy-Free Magic

Making these brookies inclusive for everyone is easy! Simply opt for certified gluten-free brownie mix and a gluten-free refrigerated cookie dough. For the dairy-free version, ensure your cookie dough is dairy-free and look for dairy-free peanut butter cups. The texture and flavor remain remarkably similar, proving that dietary restrictions don’t mean sacrificing deliciousness.

Chocolate Lover’s Dream Brookies

If you’re a true chocoholic like me, you can amp up the chocolate factor! Use a dark chocolate cookie dough instead of classic chocolate chip. You can also fold a handful of mini chocolate chips directly into your prepared brownie batter before spooning it into the muffin tin. This creates even more pockets of molten chocolate, making each bite an extra decadent experience.

What is the difference between a brookie and a regular brownie?

A brookie is essentially a hybrid dessert that combines elements of a cookie and a brownie. Traditionally, a brookie is made by layering cookie dough and brownie batter in a pan and baking them together, so you get swirled layers of both textures and flavors. My peanut butter cup stuffed brookies take this concept a step further by incorporating a whole candy in the center, and by baking them individually in a muffin tin, which allows for better control and a delightful molten core. A regular brownie, on the other hand, is made solely from brownie batter and has a more uniform, fudgy or cakey texture throughout.

Can I use natural peanut butter instead of creamy peanut butter in stuffed brookies?

While you can technically use natural peanut butter, I don’t recommend it for this specific recipe. Natural peanut butter tends to be more oily and runny, especially when heated. The standard Reese’s Peanut Butter Cups contain a specially formulated peanut butter filling that holds its shape better and melts into a delightful goo without becoming greasy. If you were to try natural peanut butter, you might need to mix it with a bit of powdered sugar or a thickening agent to prevent it from becoming too liquidy and potentially making the brookie soggy. It’s best to stick with the candy for that perfect molten center.

How do you keep the peanut butter cups from melting completely while baking?

The key to keeping the peanut butter cups from melting completely is careful layering and baking temperature. By placing the Reese’s cup on top of the cookie dough and then covering it with brownie batter, we create a protective barrier. The brownie batter insulates the candy somewhat, allowing it to soften and melt from the inside out as the brookie bakes. It’s important not to overbake; checking for doneness when the brownie edges are set and the center is moist is crucial. This short and precise baking time ensures the peanut butter remains gooey and luscious rather than completely dissipating.

How long do peanut butter cup stuffed brookies stay fresh and how should I store them?

These peanut butter cup stuffed brookies are best enjoyed fresh, ideally within the first 1-2 days after baking. They tend to maintain their best texture – a chewy cookie exterior and a moist brownie center with a gooey peanut butter core – during this time. To store them, make sure they have cooled completely. Then, place them in an airtight container at room temperature. If your kitchen is particularly warm, you can store them in the refrigerator for up to 3-4 days. Just remember to reheat them gently to revive that delightful molten peanut butter center.

Can I make brookies in a different pan besides a muffin tin?

Absolutely! While the muffin tin method is my favorite for these stuffed brookies because it creates perfect individual portions and ensures even baking, you can certainly adapt this recipe for a standard baking pan. If you use a 9×13 inch pan, you’ll layer the cookie dough and then the brownie batter, and either swirl them together or keep them separate. You would then cut into squares or bars once cooled. For stuffed brookies, you might press cookie dough into the bottom, place peanut butter cups at intervals, cover with brownie batter, and bake. Adjust baking time accordingly; a 9×13 pan typically needs around 25-35 minutes at 350°F, but always check for doneness.

What kind of brownie mix should I use for this recipe?

For this peanut butter cup stuffed brookie recipe, I highly recommend using a good quality fudgy brownie mix. Look for brands that emphasize a rich chocolate flavor and a moist, dense texture. The exact type of brownie mix (e.g., regular, dark chocolate, family size) will slightly alter the final flavor and texture, but most standard 10oz or 13oz boxes will work well as long as you follow the package instructions for preparing the batter. A fudgy brownie provides the perfect chewy counterpoint to the cookie dough, creating that classic brookie experience.

Share Your Version!

I truly hope you adore these Peanut Butter Cup Stuffed Brookies as much as I do! They are such a fun and incredibly delicious dessert that always brings smiles to my table here in New York City. I can’t wait to hear what you think! Please consider leaving a star rating and a comment below to share your experience and help other home bakers discover this gem.

If you make these, I would be absolutely thrilled if you’d share a photo on Instagram or Pinterest and tag me @exorecipe! Seeing your creations made my day. And tell me, what’s your favorite way to enjoy a warm brookie – is it with ice cream, a glass of milk, or perhaps on its own?

From my NYC kitchen to yours — I hope this recipe brings as much warmth to your table as it does to mine. — mia 🧡

📌

Love This Recipe? Save It to Pinterest!

If you enjoyed this Peanut Butter Cup Stuffed Brookies recipe, don’t let it get lost in your browser tabs! 😄 Pin it now so you can find it again anytime — and explore hundreds more tried-and-tested recipes waiting for you on my Pinterest boards.

👉 Follow mia on Pinterest @chefrecipes2

📌 Pin this recipe · 🔁 Re-pin your favorites · 💬 Tag me when you make it — I love seeing your creations!
Print

clock clock iconcutlery cutlery iconflag flag iconfolder folder iconinstagram instagram iconpinterest pinterest iconfacebook facebook iconprint print iconsquares squares iconheart heart iconheart solid heart solid icon

Peanut Butter Cup Stuffed Brookies

  • Author: Chef Mia

Description

This quick and easy chocolate dessert is made with just 3 store-bought ingredients plus the egg and oil you need for the brownie batter, and they’re incredibly fun and simple to make in a muffin tin! This is seriously the BEST dessert recipe I’ve ever made. They remind me of a fancy lava cake or mini pizookie served warm with ice cream. It’s basically the marriage of a cookie, brownie and Reese’s peanut butter cup. How can you go wrong with that?


Ingredients

Scale
  • 1 (10oz) bag of brownie mix ((plus the oil & egg to make the batter))
  • 1 (16oz) package of refrigerated cookie dough
  • 12 Reese's Peanut Butter Cups
  • vanilla ice cream ((optional))

Instructions

  1. Preheat your oven to 350 degrees and generously grease a regular size muffin tin.
  2. Prepare the brownie mix according the package directions; set aside.
  3. Separate the cookie dough into 12 even balls and then squish them down into the bottom of each muffin cup.
  4. Place a Reese's peanut butter cup upside down on top of the cookie dough.
  5. Evenly distribute the brownie batter on top of each peanut butter cup until the wells are about 90% full.
  6. Bake for 18-20 minutes or until the brownie batter is cooked through.
  7. Allow them to cool for about 5 minutes before removing from the pan. Enjoy warm with vanilla ice cream!


Peanut Butter Cup Stuffed Brookies

Soft & Chewy Fluffernutter Cookies Recipe

⚖️
Difficulty
Easy
⏲️
Prep Time
15 mins
🕒
Cook Time
12 mins
⏱️
Total Time
27 mins
🍽️
Servings
24 cookies

I still remember the first time I bit into a fluffernutter sandwich as a kid. My mother, who grew up in a small town in New Jersey, introduced me to this glorious combination of peanut butter and marshmallow fluff. It was love at first bite. Now, living in New York City and trained at Le Cordon Bleu in Paris, I’ve taken that classic comfort food and turned it into an easy fluffernutter cookies recipe that’s even better than the sandwich. These marshmallow peanut butter cookies are soft, chewy, and packed with gooey marshmallow pockets in every bite. The key to the best fluffernutter cookies is freezing the marshmallows—a trick I learned from my pastry chef days in Paris. It prevents them from melting into the dough too quickly, so you get those glorious pockets of melted marshmallow.

Imagine the aroma: warm, nutty peanut butter mingling with the sweet, subtle vanilla of the marshmallow. The texture? A soft, slightly crisp edge giving way to a chewy center, punctuated by bursts of molten marshmallow that stretch with every pull. The flavor is perfectly balanced—the savory richness of the peanut butter against the sweet, airy marshmallow. It’s the kind of cookie that takes me back to my grandmother’s kitchen in Morocco, where simple ingredients were always transformed into something magical, but with a distinctly American twist.

I’ve tested this no-bake fluffernutter cookies idea in my tiny NYC apartment oven more times than I can count. What I’ve landed on is a foolproof method that delivers consistent results every single time. This isn’t just another cookie recipe; it’s a carefully engineered baking project from a chef who wants you to succeed. My secret? A specific ratio of brown to white sugar, the right kind of peanut butter, and that crucial step of freezing the marshmallows. Stick with me, and I’ll show you how to avoid the common mistakes that leave other bakers with flat, sticky messes. From my NYC kitchen to yours—let’s make some magic.

Why This Fluffernutter Cookies Recipe Is the Best

The Flavor Secret: Growing up in Morocco, I learned that the best dishes don’t need a dozen ingredients—just the right ones. My recipe uses a high-quality creamy peanut butter (Jif or Skippy work wonders, not the natural kind that separates) and a touch of vanilla extract. The salt in the dough balances the sweetness, while the combination of granulated and brown sugar creates a depth of flavor that’s reminiscent of caramel. It’s a flavor profile that’s rich, nostalgic, and utterly satisfying.

Perfected Texture: In Paris, I spent two years perfecting the art of the perfect cookie. The trick is in the technique. Creaming the butter and sugar long enough—until it’s truly light and fluffy—introduces air that helps the cookies rise. Then, the frozen marshmallows create steam pockets as they bake, leaving behind airy, chewy gaps. The result is a cookie that’s crisp at the edges, soft in the middle, and dotted with gooey, melted marshmallow pockets. No spreading, no sogginess, just perfection.

Foolproof & Fast: I designed this easy fluffernutter cookies recipe for busy home cooks. The dough comes together in under 15 minutes, and the only “active” waiting is the 1-2 hour freeze time for the marshmallows, which you can do ahead. The instructions are clear and tested to work with standard US ingredients. Even if you’re a beginner, you’ll get bakery-quality cookies on your first try. Plus, this batch makes about 24 cookies, perfect for sharing with friends or hoarding for yourself (I won’t judge).

Fluffernutter Cookies Ingredients

I source most of my ingredients from the Union Square Greenmarket or my local bodega. The quality of your peanut butter really matters—I remember my mother warning me about the cheap stuff in Morocco, but here in NYC, it’s easy to find good brands. I always use unsalted butter to control the salt, and I prefer light brown sugar for its delicate caramel notes. The mini marshmallows are a must; the big ones don’t distribute as evenly.

Ingredients List

  • 1 ½ cups all-purpose flour (stir, spoon & level)
  • 1 tsp baking soda
  • ½ tsp salt
  • ½ cup unsalted butter (room temperature)
  • ½ cup granulated sugar
  • ½ cup light brown sugar (gently packed)
  • ½ cup creamy peanut butter
  • 1 large egg
  • 1 tsp vanilla extract
  • 1 cup mini marshmallows (frozen*)

Ingredient Spotlight

Peanut Butter: This is the star of the show. I use creamy peanut butter—like Jif or Skippy—because it spreads evenly and provides a consistent flavor throughout the dough. Avoid natural peanut butter (the kind that separates) as it’s too oily and will make the cookies greasy. If you want to use crunchy peanut butter, go ahead, but reduce the salt slightly.

Mini Marshmallows: These are non-negotiable for the fluffernutter experience. Freezing them is the secret to preventing them from dissolving into the dough during baking. They need at least 1-2 hours in the freezer before you use them. You can find mini marshmallows at any grocery store in the baking aisle. If you want a vegan version, look for vegan marshmallows, but note that they may melt differently.

Butter: I always use unsalted butter so I can control the salt level. Room temperature means it should be soft enough to leave a finger indent but not melted. This is crucial for creaming. If you’re in a rush, cut it into small cubes and let it sit for 15 minutes; don’t microwave it.

Original IngredientBest SubstitutionFlavor / Texture Impact
Creamy Peanut ButterCrunchy Peanut ButterAdds crunch; slightly saltier; reduce added salt
Mini MarshmallowsDandies Vegan MarshmallowsSimilar texture but may melt less; slightly firmer
All-Purpose FlourBob’s Red Mill 1-to-1 Gluten-Free FlourSlightly grainier; use less for thicker cookies
Unsalted ButterVegan Butter (Miyoko’s)Good for dairy-free; slightly softer cookies

How to Make Fluffernutter Cookies — Step-by-Step

You’re going to love how simple this is! Just follow these steps closely, and you’ll have a batch of the best fluffernutter cookies in no time. The key is to work quickly once the marshmallows are added to keep them cold.

Step 1: Freeze the Marshmallows

Place the 1 cup of mini marshmallows in a freezer-safe bag and freeze them for at least 1-2 hours. This is a non-negotiable step. It prevents them from melting into the dough while mixing and baking, giving you those glorious pockets of gooey marshmallow.

💡 mia’s Pro Tip: I often keep a bag of mini marshmallows in the freezer just for this recipe. Ready to go when a cookie craving hits!

Step 2: Preheat and Prep

Preheat your oven to 350°F. Line two baking sheets with silicone baking mats or parchment paper. I use parchment paper that I get from Chelsea Market—it’s heavy-duty and never sticks. Set the sheets aside.

StepActionDurationKey Visual Cue
1Freeze marshmallows1-2 hoursMarshmallows are hard to the touch
2Preheat & prep sheets5 minsOven is at 350°F; sheets are lined
3Mix dry ingredients1 minFlour, baking soda, salt are combined
4Cream butter & sugars2-3 minsLight, fluffy, pale in color
5Add wet ingredients1 minPeanut butter incorporated, dough smooth
6Fold in frozen marshmallows30 secsMarshmallows are evenly distributed
7Scoop & bake11-12 minsEdges are golden, centers still soft

Step 3: Mix Dry Ingredients

In a medium bowl, whisk together the 1 ½ cups all-purpose flour, 1 tsp baking soda, and ½ tsp salt. Set this aside. Whisking ensures there are no lumps and the baking soda is evenly distributed.

Step 4: Cream Butter and Sugars

In a large bowl using an electric hand mixer or a stand mixer with the paddle attachment, cream together the ½ cup of room-temperature unsalted butter, ½ cup granulated sugar, and ½ cup light brown sugar. Beat on medium speed for 2-3 minutes until it’s light, fluffy, and a pale yellow color. Don’t rush this step—it’s the foundation of a tender cookie.

⚠️ Common Mistake to Avoid: Using cold butter. It won’t cream properly, resulting in dense cookies. Room temperature is key—about 65°F.

Step 5: Add Peanut Butter, Egg, and Vanilla

Add the ½ cup creamy peanut butter, 1 large egg, and 1 tsp vanilla extract to the creamed mixture. Mix on low speed until just combined, then increase to medium and beat for 30 seconds. Scrape down the sides and bottom of the bowl with a spatula to ensure everything is incorporated.

Step 6: Add Dry Ingredients

With the mixer on low, gradually add the dry ingredient mixture from Step 3. Mix only until the flour is almost fully incorporated—there may be a few streaks of flour left. Overmixing here will create tough cookies.

💡 mia’s Pro Tip: I always scrape the bowl down once more after mixing. That last bit of flour hiding at the bottom can ruin the texture.

Step 7: Fold in Frozen Marshmallows

Remove the marshmallows from the freezer. Now, work quickly! Using a rubber spatula, gently fold the heaping cup of frozen mini marshmallows into the dough. Be careful not to overmix or the marshmallows may start to soften. Just 10-12 folds should do it.

Step 8: Scoop and Bake

Use a #30 cookie scoop (about 2 tablespoons) to quickly shape the dough into balls. Place them 2-3 inches apart on the prepared baking sheets. Work in batches, keeping the remaining dough in the fridge to keep the marshmallows cold. Bake at 350°F for 11-12 minutes, or until the edges are just set and starting to brown. The centers will look soft and slightly puffed—that’s perfect.

⚠️ Common Mistake to Avoid: Overbaking! These cookies continue to set as they cool. If you wait for the centers to look firm, they’ll be hard. Pull them out when the edges are golden and the centers are still pale and slightly puffy.

Step 9: Cool and Shape

Allow the cookies to cool completely on the baking tray, about 10 minutes. After 2-3 minutes of cooling, use a greased spatula to gently round any misshapen cookies—the marshmallows can cause some unevenness. Do not transfer them to a wire rack; they may stick. Once fully cooled, carefully lift them off the tray and serve or transfer to an airtight container.

💡 mia’s Pro Tip: If you want perfectly round cookies, use a wide-mouthed mug or a biscuit cutter to gently “scoot” the edges into shape while they’re still warm.

Serving & Presentation

These fluffernutter cookies are best enjoyed slightly warm, when the marshmallow pockets are at their gooey peak. I love serving them with a tall glass of cold milk—a classic combo that my husband swears by. For a grown-up twist, serve them alongside a scoop of vanilla bean ice cream or a drizzle of warm chocolate sauce. They also make a fantastic base for an ice cream sandwich.

For a beautiful presentation, place the cookies on a rustic wooden board and dust them with a tiny bit of powdered sugar—though be careful not to overdo it, as they are already sweet. I often add a few fresh mint leaves for a pop of color. In Morocco, we’d serve these as part of a tea ceremony, with a pot of hot mint tea. Here in NYC, they’re perfect with a latte from my local coffee shop on the Upper West Side.

<
Print

clock clock iconcutlery cutlery iconflag flag iconfolder folder iconinstagram instagram iconpinterest pinterest iconfacebook facebook iconprint print iconsquares squares iconheart heart iconheart solid heart solid icon

Fluffernutter Cookies

  • Author: Chef Mia

Description

Fluffernutter Cookies are the ultimate peanut butter marshmallow cookies. The best soft and chewy peanut butter cookies, with gooey marshmallows throughout.


Ingredients

Scale
  • 1 ½ cups all-purpose flour ((stir, spoon & level))
  • 1 tsp baking soda
  • ½ tsp salt
  • ½ cup unsalted butter (room temperature)
  • ½ cup granulated sugar
  • ½ cup light brown sugar (gently packed)
  • ½ cup creamy peanut butter
  • 1 large egg
  • 1 tsp vanilla extract
  • 1 cup mini marshmallows (frozen*)

Instructions

  1. *FREEZE marshmallows for at least 1-2 hours before using. Keep marshmallows in freezer until ready to bake.
  2. Preheat oven to 350 degrees Fahrenheit. Line cookie sheets with a silicone baking mat or parchment paper. Set aside.
  3. In a medium bowl, stir together the flour, baking soda and salt. Set aside.
  4. Cream the butter and both sugars with an electric mixer until light and creamy.
  5. Add the peanut butter, egg, and vanilla. Mix well and scrape bowl. Add the dry ingredients and mix until almost incorporated.
  6. Remove marshmallows from freezer and fold a heaping cup of marshmallows into the cookie dough.
  7. Use a #30 scoop (about 2 Tbsp) to quickly shape the cookie dough into balls. Place a few inches apart on a prepared baking sheet. Place remaining cookie dough in the fridge to keep marshmallows cold until ready to bake.
  8. Bake cookies at 350°F for 11-12 minutes or until just set and edges are starting to brown. Allow cookies to cool completely on tray, about 10 minutes. After 2-3 minutes of cooling, use a greased spatula to round any misshapen cookies, if desired. Transfer cooled cookies directly to serving platter or airtight container. May stick to a wire cooling rack.


Nutrition

  • Calories: 161 kcal
  • Sugar: 11 g
  • Fat: 8 g
  • Carbohydrates: 20 g
  • Protein: 3 g


Fluffernutter Cookies

Easy Chocolate Peanut Butter Valentine Hearts Recipe

Chocolate Peanut Butter Valentine’s Heart – Your New Favorite Valentine’s Day Treat

⚖️
Difficulty
Easy
⏲️
Prep Time
20 mins
🕒
Cook Time
5 mins
⏱️
Total Time
2 hrs 25 mins (incl. chilling)
🍽️
Servings
16 hearts

Valentine’s Day is just around the corner, and you are probably looking for fun and tasty treats to make. Stop looking! This chocolate peanut butter Valentine’s heart recipe is super simple and easy to make. These cute chocolate peanut butter heart desserts are melt-in-your-mouth gooooooooood!!! I still remember the first time I made these—it was in my tiny Paris apartment, missing my mother’s Moroccan kitchen. I wanted something that felt like a hug from home, and this combination of rich, creamy peanut butter and silky chocolate was pure comfort. Now, living in New York City, I make these for my neighborhood friends and they disappear in minutes. The unique angle here is that I use a mix of semi-sweet and milk chocolate for a balanced sweetness, and I keep the filling slightly soft by using brown sugar—a little trick I learned in pastry school.

The moment you bite into one of these chocolate peanut butter Valentine hearts, you get a crisp chocolate shell that gives way to the most luscious, soft peanut butter center. It’s a little bit like a Reese’s cup, but homemade and so much more elegant. The aroma of vanilla and peanut butter fills your kitchen, and the shiny chocolate coating makes them look like they came from a fancy chocolate shop. My mother always said that the best treats are made with love, and I add a pinch of salt to balance the sweetness—just like she did with her Moroccan sweets.

As a trained chef and food blogger, I’ve perfected this easy Valentine’s dessert to be foolproof even for beginners. The key is using room-temperature peanut butter so it blends smoothly, and working with chilled hearts so the chocolate sets perfectly. A common mistake is letting the peanut butter mixture get too warm while dipping—that’s why I recommend taking only a few hearts out of the freezer at a time. So, whether you’re a seasoned baker or a first timer, this recipe will make you look like a pro.

Why This Chocolate Peanut Butter Valentine’s Heart Recipe Is the Best

The Flavor Secret: The combination of brown sugar and vanilla extract in the filling creates a depth that plain sugar just can’t match. I learned this technique while studying pastry arts in Paris—the brown sugar adds a hint of molasses that complements the peanut butter beautifully. Plus, using half semi-sweet and half milk chocolate gives you that perfect balance of dark and milky notes, so it’s not overly sweet.

Perfected Texture: The trick to getting that melt-in-your-mouth texture is pressing the mixture to exactly ½ inch thick. Any thinner and the hearts break; any thicker and they’re too cloying. I also knead the leftover scraps to cut out more hearts, because wasting food was never an option in my mother’s kitchen. The chocolate coating needs to be just the right temperature—warm enough to flow, but not so hot it melts the peanut butter filling.

Foolproof & Fast: This Valentine’s day chocolate treat requires no baking, no complicated equipment, and only 20 minutes of active prep time. Even if you’ve never made candy before, the step-by-step instructions will guide you through. And because you can freeze the hearts for later, it’s perfect for my busy NYC lifestyle—I make a batch on Sunday and have treats ready for the whole week.

Chocolate Peanut Butter Hearts Recipe Ingredients

I buy my peanut butter from the farmers market in Union Square, where they have the creamiest, freshest nut butter. It reminds me of the roasted peanut butter my grandmother would make in Morocco, using a stone mill. For this chocolate peanut butter hearts recipe, quality ingredients make all the difference.

Ingredients List

  • 1 cup creamy peanut butter – room temperature
  • ¼ cup unsalted butter – melted
  • 2 Tablespoons brown sugar
  • 2 teaspoon vanilla extract
  • ¼ teaspoon salt
  • 2 cups powdered sugar
  • 10-12 oz. chocolate chopped in small pieces (I used half of semi-sweet and half of milk chocolate) or use good quality candy coating (its easier to work with than with real chocolate, if you dont have too much experience)

Ingredient Spotlight

Peanut Butter: The star ingredient. Use creamy, not chunky, for a smooth filling. Room temperature is crucial—cold peanut butter won’t blend evenly. If you only have natural peanut butter (the kind with oil on top), stir it very well and expect a slightly softer texture. Avoid no-stir brands with added sugar, as they can make the filling too sweet.

Chocolate: I use a combination of semi-sweet and milk chocolate for a nuanced flavor. Candy coating (or melting wafers) is a great substitute for beginners—it’s more forgiving and doesn’t require tempering. However, if you use real chocolate, the flavor is much richer. Just make sure to chop it finely so it melts evenly.

Butter: Unsalted butter gives you control over the salt level. Melt it gently in the microwave or on the stove. If you use salted butter, reduce the added salt to ⅛ teaspoon. In a pinch, you can substitute with coconut oil for a dairy-free version, but the texture will be slightly more firm.

Pairing TypeSuggestionsWhy It Works
Side DishFresh berries, sliced applesBalances sweetness with tartness
Sauce / DipChocolate sauce, caramel dipComplements peanut butter and marshamallow
Beverage
Original IngredientBest SubstitutionFlavor / Texture Impact
Creamy Peanut ButterAlmond or cashew butterMilder flavor, slightly grainier texture
Unsalted ButterCoconut oil (solid)Coconut undertone, firmer filling
Powdered SugarGranulated sugar (blended to powder)Slightly grainier texture, less stable
Semi-sweet ChocolateDark chocolate (70% cacao)More intense, less sweet

How to Make Chocolate Peanut Butter Valentine’s Heart — Step-by-Step

Let me walk you through this simple process—I’ve broken it down so you can follow along without any stress. You’ll be amazed at how easy it is.

Step 1: Prepare the Dish

Line an 8 x 8 inch dish with parchment paper, leaving the paper overhang the sides so you can easily lift it later. Set aside. This little trick makes lifting the block of filling out so much easier—no scraping or breaking!

💡 mia’s Pro Tip: Use two strips of parchment paper—one going in one direction, the other crossing it—so you have handles on all four sides.

Step 2: Make the Filling

In a mixing bowl, stir together peanut butter, melted butter, brown sugar, vanilla, and salt until the sugar dissolves. This should take about 1-2 minutes. Then, gradually mix in the powdered sugar, stirring until no white streaks remain. The mixture will be thick and slightly crumbly, but that’s perfect.

⚠️ Common Mistake to Avoid: Don’t overmix or the filling can become tough. Stop as soon as the powdered sugar is incorporated.

Step 3: Press and Chill

Press the mixture into the prepared dish. Smooth the top with a spatula or simply press it with your palms to flatten into about ½ inch thick layer. Place it in the freezer until firm enough for cutting, about 30-45 minutes.

💡 mia’s Pro Tip: For an even layer, place a piece of plastic wrap over the mixture and use a flat-bottomed glass to smooth it out. This gives you a perfectly uniform thickness.

Step 4: Cut the Hearts

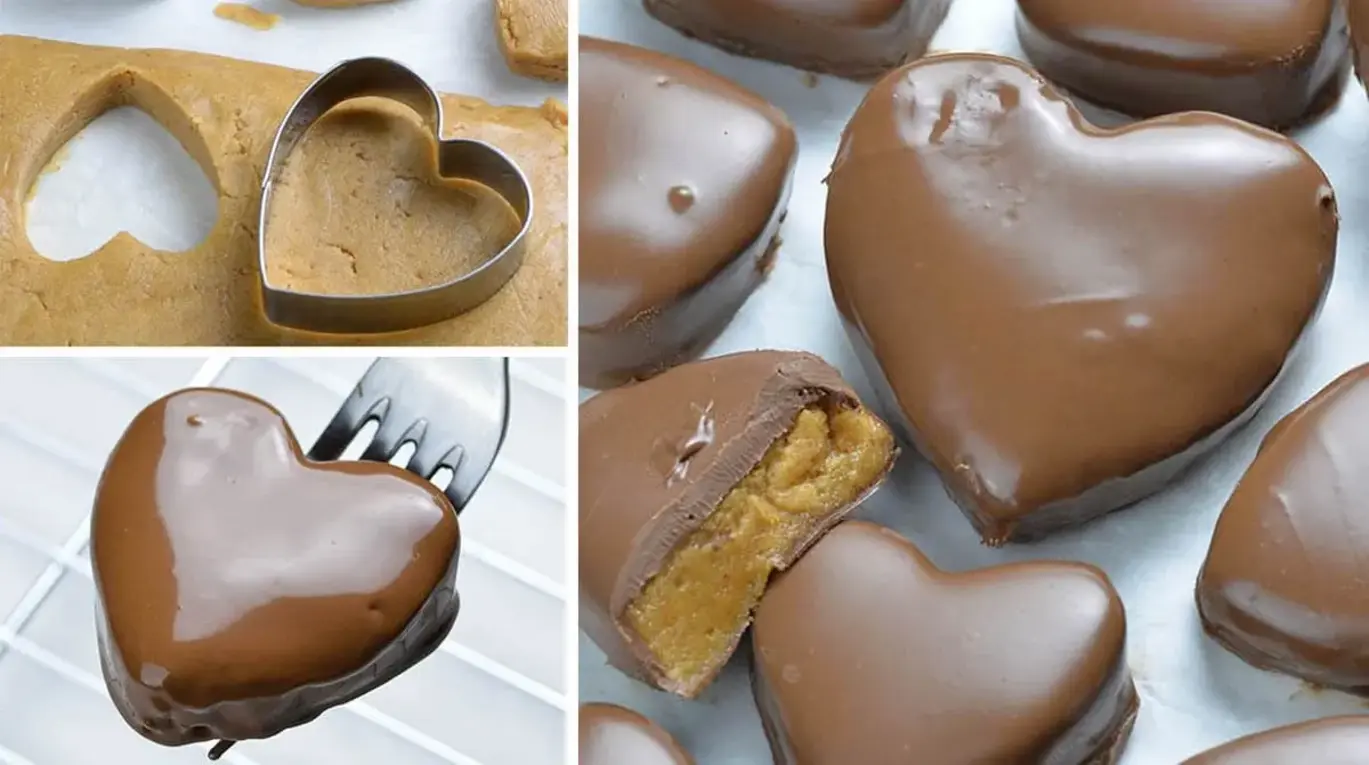
When the mixture is firm enough, line a tray with parchment paper and set aside. Using a small cookie cutter in the shape of a heart, cut out the hearts and place them on the tray. Don’t waste any batter—pick up leftovers, knead, press with your palms, and you will be able to cut out at least a few more hearts.

💡 mia’s Pro Tip: Dip the cookie cutter in a little powdered sugar between cuts to prevent sticking. If the mixture gets too soft, pop the dish back in the freezer for 10 minutes.

Step 5: Dip in Chocolate

Place the cut hearts in the freezer until firm, about 20 minutes. Then melt the chocolate (or candy coating) and line another tray with parchment paper. Using a fork, dip each heart into the melted chocolate to cover completely. Gently tap the fork to drip off the excess chocolate. Since the peanut butter mixture softens really fast at room temperature, I suggest you take just a few hearts at a time from the freezer—it’s easier to work with firm hearts!

⚠️ Common Mistake to Avoid: If your chocolate starts to get thick or lumpy, it may have seized. Add a teaspoon of vegetable oil and stir gently to bring it back. Work quickly but carefully.

Step 6: Set and Store

Place the chocolate-covered hearts on the parchment paper-lined tray. Refrigerate until the chocolate has set, about 30 minutes. Store in the fridge or freeze for longer storage.

💡 mia’s Pro Tip: For an extra glossy finish, let the chocolate set at room temperature instead of the fridge, though it takes a bit longer. This is a French chocolatier trick I learned in Paris!

StepActionDurationKey Visual Cue
1Prepare dish5 minsParchment overhang creates handles
2Make filling5 minsSugar dissolved, no white streaks
3Press and chill30-45 minsFirm to the touch
4Cut hearts10 minsClean cuts, no cracks
5Dip in chocolate15 minsFully coated, excess drips off
6Set and store30 minsChocolate is firm and shiny

Serving & Presentation

To serve these chocolate peanut butter Valentine hearts, arrange them on a beautiful platter—I like to use a white ceramic dish that makes the chocolate pop. You can dust them with a little powdered sugar or flaky sea salt right before serving for an elegant touch. In Morocco, we often serve sweets like these with mint tea, and in NYC, I love pairing them with a glass of cold milk or a rich espresso.

For a romantic Valentine’s Day dessert, place the hearts on a plate with fresh raspberries and a drizzle of melted dark chocolate. The tartness of the berries cuts through the sweetness beautifully. If you’re feeling extra fancy, you can sprinkle some edible gold dust on top—your guests will think you bought them from a Parisian patisserie.

Pairing TypeSuggestionsWhy It Works
Side DishFresh berries, sliced bananasAdds freshness and acidity to balance sweetness
Sauce / DipCaramel sauce, melted white chocolate, raspberry coulisLuxurious extra layer of flavor and texture
BeverageCold milk, hot coffee, red wine (like Pinot Noir)Creamy or tannic drinks cut through the sweetness
GarnishFlaky sea salt, powdered sugar, crushed peanutsAdds texture and visual appeal


Chocolate Peanut Butter Valentines Heart

Easy Chocolate Peanut Butter Banana Bites Recipe

Chocolate Peanut Butter Banana Bites – A Healthy No-Bake Dessert

⚖️
Difficulty
Easy
⏲️
Prep Time
15 mins
🕒
Cook Time
2 mins
⏱️
Total Time
1 hr 17 mins
🍽️
Servings
30 bites

My love for these Chocolate Peanut Butter Banana Bites started on a sweltering summer afternoon in our tiny NYC kitchen. The city was baking, and I craved something cool, sweet, and satisfying—but I didn’t want to turn on the oven or compromise on flavor. Growing up in Morocco, my mother would make simple frozen treats with fresh fruit and a touch of honey, so I channeled that memory and crossed it with a classic American peanut butter and banana combo. The result? A healthy chocolate snack that’s now a fixture in my freezer. These frozen banana bites are proof that you don’t need complicated techniques or a pantry full of obscure ingredients to create something truly delicious. They’re a brilliant, easy no-bake dessert that comes together in minutes, and they’ve rescued countless afternoons when a sugar craving hit—without the guilt.

Imagine a creamy, naturally sweet banana slice, sandwiched with a velvety layer of slightly salty peanut butter, and then dipped in a silky pool of melted dark chocolate. The moment you bite into one, you get that initial snap of tempered chocolate, followed by a soft, almost ice-cream-like texture from the frozen banana, all balanced by the rich, nutty peanut butter in the center. It’s pure alchemy—a simple combination that feels like a luxurious indulgence. The aroma of ripe bananas mingling with the deep notes of dark chocolate is intoxicating, and I love how the coconut oil gives the chocolate coating a beautiful, glossy sheen that makes these bites look as good as they taste. It’s a peanut butter banana recipe that truly delivers on every sensory level, from the crackle of the coating to the creamy, cold center.

What sets my version apart is a small but crucial detail I picked up during my training in Paris: I use a touch of coconut oil to thin out the dark chocolate, ensuring a perfectly even, thin coating that doesn’t overwhelm the other flavors. It’s the same technique we’d use for a perfect chocolate fondue, and it makes all the difference here. A common mistake home cooks make is skipping the initial freeze of the banana sandwiches before dipping them in chocolate—if you don’t freeze them first, the bananas will slide apart and the chocolate will clump. My first batch was a beautiful mess, and I learned this lesson the hard way! Now, I always give you this pro tip: patience pays off. These healthy treats are foolproof if you follow a few simple steps, and I’m so excited to share them with you.

Why This Chocolate Peanut Butter Banana Bites Recipe Is the Best

The flavor secret here is the contrast between ripe, sweet bananas and the salty depth of natural peanut butter. In my Moroccan kitchen, we always balanced sweet with savory—a touch of salt in a fruit salad, a drizzle of honey over roasted vegetables. So when I came to NYC and started experimenting with desserts, I knew that a pinch of salt in the peanut butter would elevate the sweetness of the banana and the bitterness of dark chocolate. I always recommend using natural peanut butter for its pure, unsweetened flavor; it doesn’t have the added sugars or stabilizers that can muddy the taste. This one simple choice makes these bites taste incredibly sophisticated, yet they’re so simple to make. It’s a healthy chocolate snack you can feel good about eating every single day.

Texture is where this recipe truly shines, and it’s all about the technique. My Parisian pastry training taught me the importance of temperature and timing. Freezing the banana and peanut butter sandwiches for a full hour ensures they’re solid enough to hold their shape against the hot chocolate. The secret is using high-quality dark chocolate chips (at least 60% cacao) and melting them with just two teaspoons of coconut oil. This creates a fluid, glossy coating that firms up beautifully in the freezer without becoming brittle or waxy. The result is a satisfying snap on the outside with a lusciously creamy, frozen interior—it’s a textural experience that you simply don’t get with other frozen banana recipes. It’s what makes these the best easy no-bake dessert I know.

This recipe is also incredibly foolproof and fast for beginners. You only need four simple ingredients, a microwave, and about 15 minutes of active time. Even if you’ve never made candy or chocolate work before, the short window of error makes this a total winner. The microwave method for melting chocolate is much more forgiving than a double boiler, and the coconut oil prevents burning. I’ve taught this recipe to busy friends in NYC who thought they couldn’t make anything from scratch, and they were amazed. Plus, with two bites coming in at under 100 calories, it’s a guilt-free indulgence that fits perfectly into a healthy lifestyle. This peanut butter banana recipe really is the best blend of simplicity, taste, and texture.

Chocolate Peanut Butter Banana Bites Ingredients

When I shop for these ingredients, I head straight to the farmers market in Union Square for the juiciest bananas, then swing by my local bodega for the rest. The simplicity of this list reminds me of the markets in Morocco, where you’d find everything you need for a perfect meal in just a few stalls. These ingredients are the foundation of a healthy chocolate snack that’s both nourishing and indulgent.

Ingredients List

  • 3 ripe bananas
  • 1/3 cup natural peanut butter
  • 1/2 cup dark chocolate chips
  • 2 teaspoons coconut oil

Ingredient Spotlight

Ripe bananas are your sweet foundation. The natural sugars in a well-spotted banana—flecks of brown on the peel—are enough to make this treat feel like dessert without any added sweetener. Underripe bananas will be starchy and lack sweetness, which throws off the entire flavor profile.

Natural peanut butter is non-negotiable for me. It’s just peanuts and salt, with no added sugar or hydrogenated oils. This gives the creamy center a deep, roasted flavor and allows the sweetness of the banana to shine. If you use a pre-sweetened brand, the bites will be cloyingly sweet.

Dark chocolate chips (60-70% cacao) provide the perfect bitter counterpoint. They’re also lower in sugar than milk chocolate, making this a healthier choice. The coconut oil is a simple trick from my pastry days: it thins the chocolate so it coats the frozen banana perfectly, creating a crisp shell without being too thick or heavy.

Coconut oil is the unsung hero here. It’s not just for thinning the chocolate—it also gives that glossy, professional-looking finish. Make sure you’re using refined coconut oil (which has a neutral flavor) or unrefined (which adds a subtle coconut note that pairs beautifully with chocolate and banana). I’ve tested both, and either works perfectly.

Original IngredientBest SubstitutionFlavor / Texture Impact
Ripe bananasFrozen banana slicesSlightly firmer texture; needs longer thaw.
Natural peanut butterAlmond butter or tahiniNutty flavor; less sweetness; tahini adds savory notes.
Dark chocolate chipsSemi-sweet or milk chocolate chipsSweeter, less bitter; milk chocolate is softer.
Coconut oilButter or gheeLess glossy; solid at room temp; slightly different mouthfeel.

How to Make Chocolate Peanut Butter Banana Bites — Step-by-Step

Follow these simple steps and you’ll have a batch of these easy no-bake dessert bites ready in no time. I’ll guide you through each one with my tried-and-true tips.

Step 1: Slice the Bananas

Peel and slice your ripe bananas into rounds about 1/4 inch thick. This is a key measurement—too thick and they won’t freeze properly, too thin and they’ll break. A sharp knife makes a clean cut, and be sure to discard any bruised parts for consistency.

💡 mia’s Pro Tip: Use a ruler the first time if you’re unsure of thickness. Uniform slices mean even freezing and a better bite experience.

Step 2: Assemble the Sandwiches

Line a small baking sheet with parchment paper. Take half of the banana slices and place a generous 1/2 teaspoon of natural peanut butter on each one. Top with another banana slice, pressing gently to form a little sandwich. Repeat until all the banana slices are used—you should have about 30 bites. Place them on two parchment-lined platters.

⚠️ Common Mistake to Avoid: Don’t overload the peanut butter—it will ooze out. A 1/2 teaspoon is the perfect amount for a thin, balanced layer.

Step 3: Initial Freeze

Place the two platters in the freezer and let the banana bites harden for at least 1 hour. This step is essential—if you skip it, the bananas will be too soft to dip properly, and the chocolate will clump and fail to form a smooth coating.

💡 mia’s Pro Tip: If you’re short on time, flash-freeze them for 30 minutes at the coldest setting. But I find 1 hour yields the best, most stable results.

Step 4: Melt the Chocolate

Once the bites are frozen, melt your chocolate. In a microwave-safe bowl, combine the dark chocolate chips and 2 teaspoons of coconut oil. Microwave for 1 minute, then stir well. Continue microwaving in 30-second increments, stirring after each, until the chocolate is completely melted and smooth. This should take no more than 2 minutes total. The coconut oil helps the chocolate stay fluid and glossy.

⚠️ Common Mistake to Avoid: Don’t overheat the chocolate. If it seizes or becomes grainy, you’ve gone too far. Stir frequently and stop as soon as it’s melted.

Step 5: Dip the Bites

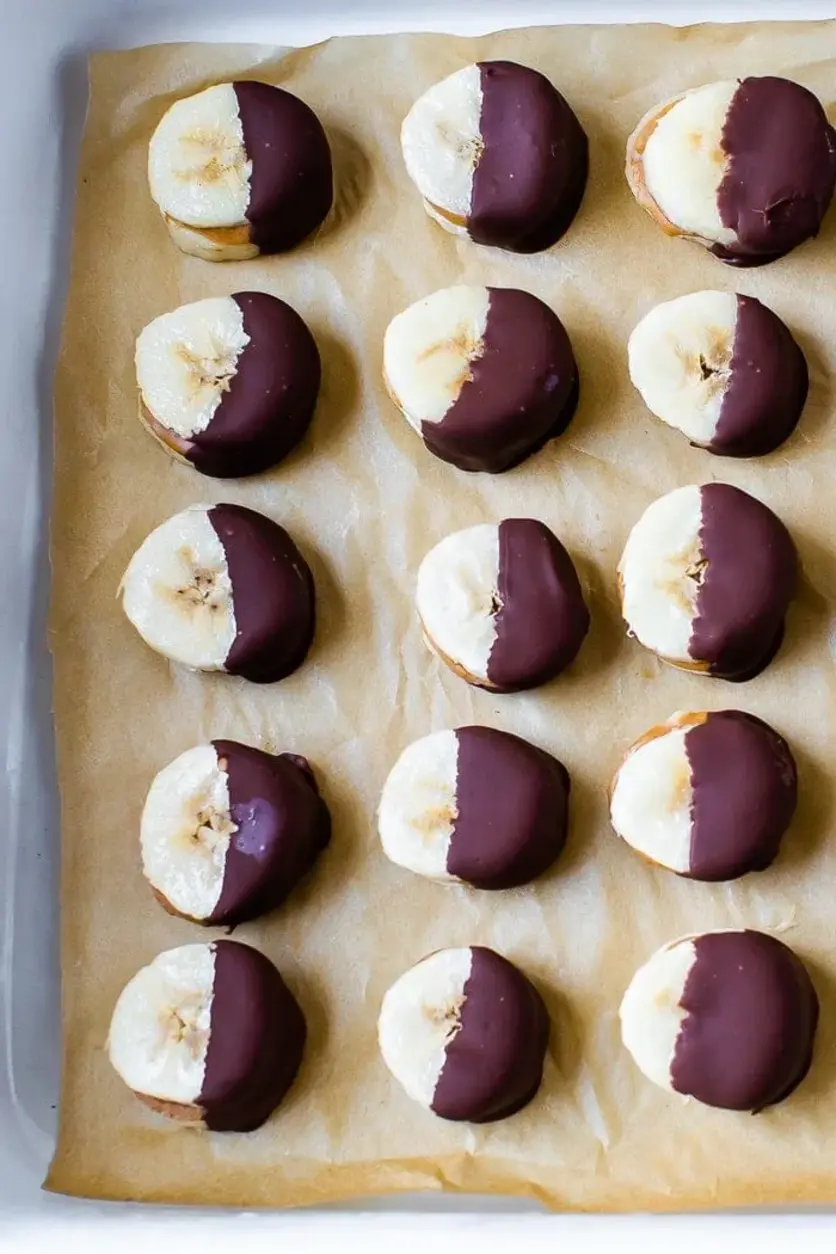
Remove one platter of the frozen banana bites from the freezer. Using a fork or toothpick, dip each bite into the melted chocolate, coating about half of it (you can do full coating if you prefer, but you’ll need more chocolate chips). Let any excess chocolate drip off, then place the coated bite back on the parchment-lined platter. Work quickly to keep the bananas frozen.

💡 mia’s Pro Tip: Dip bites in small batches—take out only one platter at a time so the others stay frozen. This keeps the chocolate coating thin and even.

Step 6: Harden and Store

Place the platter back in the freezer to harden up. Repeat the dipping process with the second platter. Let both platters freeze for about 15 minutes, or until the chocolate is completely set. At this point, you can enjoy them immediately, or transfer the bites to a freezer-safe container. They’ll last at least 1-2 months in the freezer.

⚠️ Common Mistake to Avoid: If you’re storing them for a long time, layer them with parchment paper to prevent sticking. The bites can become rock-hard, so thaw for 5 minutes before eating.

StepActionDurationKey Visual Cue
1Slice bananas5 minsUniform 1/4-inch rounds
2Assemble sandwiches10 minsPeanut butter visible but centered
3Initial freeze1 hourBites are solid and don’t move
4Melt chocolate2 minsSmooth, glossy, no lumps
5Dip bites10 minsHalf coated, chocolate sets quickly
6Harden and store15 minsChocolate is firm, not sticky

Serving & Presentation

These Chocolate Peanut Butter Banana Bites are wonderfully versatile. I love to serve them straight from the freezer on a wooden platter, sprinkled with a tiny pinch of flaky sea salt (a trick from my Parisian pastry days) to enhance the chocolate and peanut butter. For a fancy touch, you can arrange them on a plate with a drizzle of extra melted chocolate and a few fresh mint leaves. In NYC, we often enjoy them as a post-dinner treat or a mid-afternoon snack that feels like a true indulgence without the heaviness. The contrast of the cold, creamy bites against a warm afternoon is pure magic.

If you’re hosting a gathering, these make a brilliant shared dessert. I’ve brought them to countless potlucks in Brooklyn and they always disappear quickly. You can also serve them alongside a cup of strong coffee or a cold glass of oat milk—the bitterness of either beverage cuts through the richness beautifully. For kids, I sometimes skip the flaky salt and add a few mini chocolate chips on top before the chocolate sets for extra fun texture.

From my Moroccan roots, I love to add a pinch of cinnamon or a dusting of toasted sesame seeds on the chocolate before freezing—it’s a subtle nod to the spices of my childhood. The simplicity of these bites means they adapt beautifully to whatever flavor profile you’re craving. Whether it’s a classic dessert or a playful variation, this peanut butter banana recipe is always a crowd-pleaser.

Pairing TypeSuggestionsWhy It Works
Side DishFresh berries, sliced mangoAdds brightness and acidity to cut richness.
Sauce / DipDulce de leche, coconut creamEnhances sweetness or adds creamy contrast.
BeverageIced coffee, almond milk, chamomile teaCools palate; tea offers a calming pairing.
GarnishFlaky sea salt, crushed pistachiosAdds texture and

Print
clock clock iconcutlery cutlery iconflag flag iconfolder folder iconinstagram instagram iconpinterest pinterest iconfacebook facebook iconprint print iconsquares squares iconheart heart iconheart solid heart solid icon

Chocolate Peanut Butter Banana Bites

  • Author: Chef Mia

Description

These frozen chocolate covered peanut butter banana bites are the perfect healthy warm weather treat. Keep a batch in the freezer for easy snacking and enjoy two bites for less than 100 calories!


Ingredients

Scale
  • 3 ripe bananas
  • 1/3 cup natural peanut butter
  • 1/2 cup dark chocolate chips
  • 2 teaspoons coconut oil

Instructions

  1. Peel and slice bananas into rounds about 1/4 inch thick.
  2. Line a platter or small baking sheet with parchment paper. Place about 1/2 teaspoon of peanut butter on a banana slice and top with another banana slice to make a little banana peanut butter sandwich. Keep doing this until all banana slices are used and you have about 30 bites. Place bites on two parchment lined platters or plates and place in the freezer to harden for about 1 hour.
  3. Once banana bites have been in the freezer for over an hour, melt your chocolate by adding chocolate and coconut oil to a microwave-safe bowl. Microwave for 1 minute, stir and microwave in additional 30 second increments until chocolate is completely melted. This shouldn't take more than 2 minutes of microwave time.
  4. Once chocolate is melted, remove one platter of your frozen banana bites from the freezer. Dip each frozen banana bite into the melted chocolate so that half of each bite is coated. You can coat the full bite with chocolate, but you'll need more chocolate chips if you want to do this.
  5. Place chocolate covered bites back on the parchment lined platter. Place back in freezer to harden up, grab your second platter and continue until all the bites have been dipped. Let both platters of chocolate covered bites harden in the freezer for about 15 minutes.
  6. At this point you're ready to enjoy or you can transfer the bites into a freezer safe storage container for later. They should last a least 1-2 months in the freezer.
  7. When you store the banana bites for a longer period of time, they can get pretty hard so you'll want to take them out the freezer and let them thaw for about 5 minutes before eating.


Nutrition

  • Calories: 99 kcal
  • Sugar: 7 g
  • Fat: 6 g
  • Carbohydrates: 12 g
  • Protein: 2 g


Chocolate Peanut Butter Banana Bites

ph">For more delicious inspiration, follow me on Pinterest!
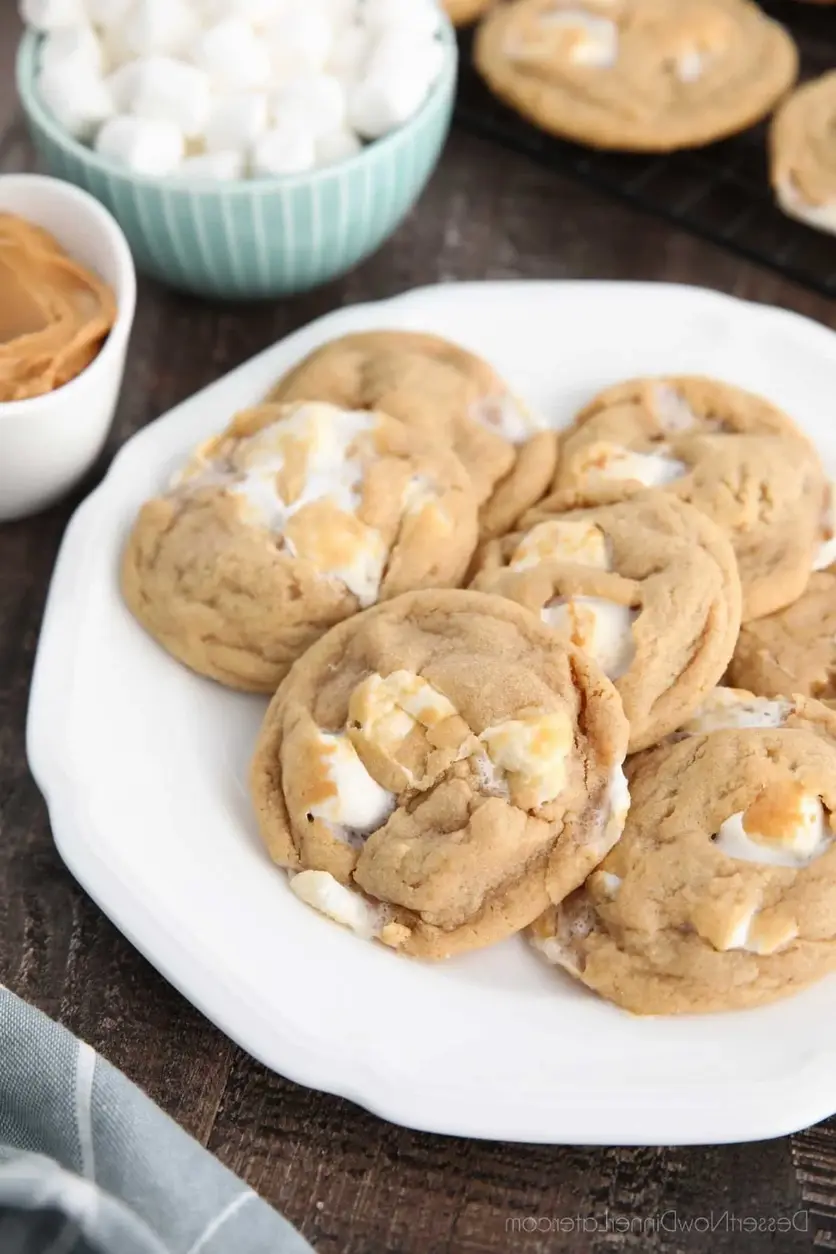
Soft & Chewy Peanut Butter Oatmeal Cookies

Peanut Butter Oatmeal Cookies: Naturally Sweetened and Gluten-Free

⚖️
Difficulty
Easy
⏲️
Prep Time
10 mins
🕒
Cook Time
12 mins
⏱️
Total Time
22 mins
🍽️
Servings
12 cookies

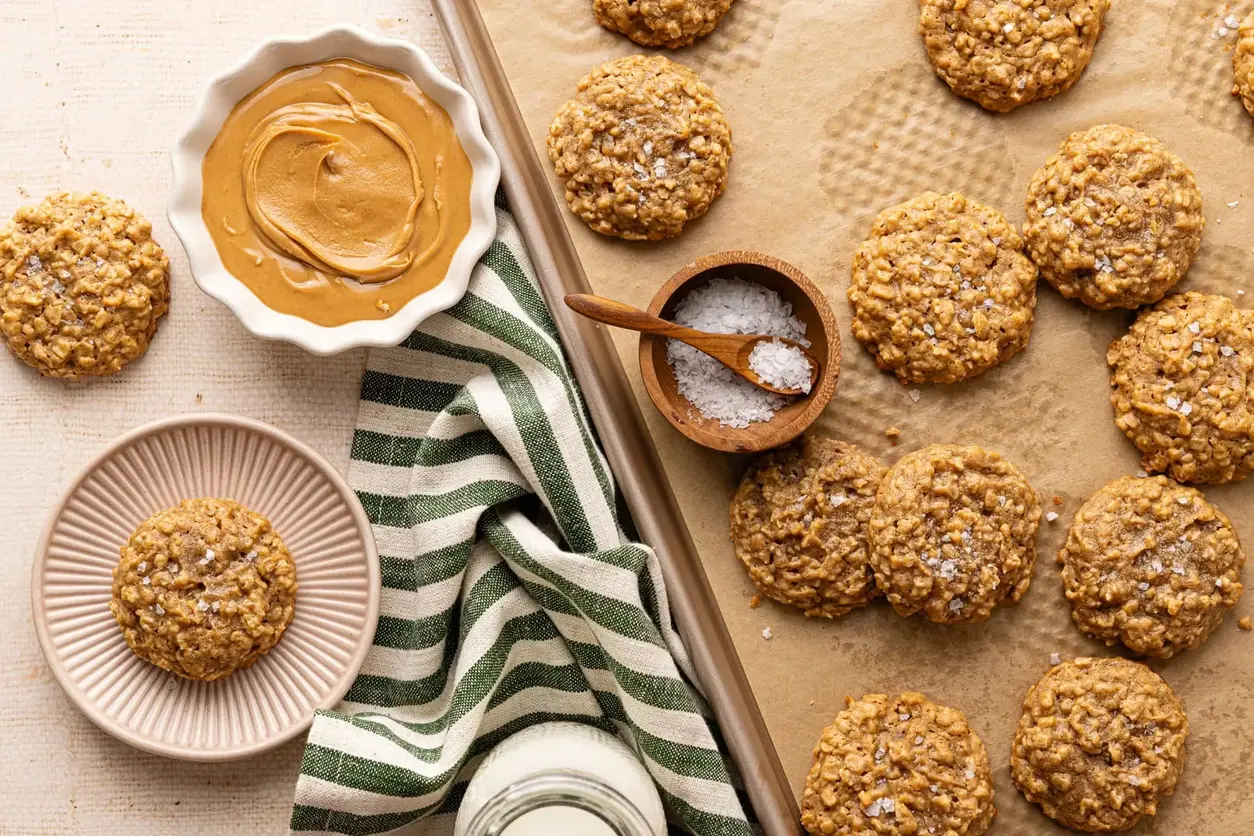
There are few things more comforting than pulling a tray of peanut butter oatmeal cookies from the oven. I first fell in love with the combination of peanut butter and oats years ago, standing beside my mother in our kitchen in Marrakech. She would roast peanuts in a cast-iron pan, and the scent would drift through the entire house. Today, I live in New York City, and when I come home from a busy afternoon at the Union Square Greenmarket with a bag of local rolled oats, I make these easy peanut butter cookies without flour. They remind me that simple, whole ingredients are all you really need.

Each cookie is soft, chewy, and full of that nutty richness you crave. The peanut butter caramelizes slightly at the edges, while the oats keep every bite hearty and satisfying. There is no butter in this dough, no refined sugar either — maple syrup adds a gentle sweetness that pairs perfectly with the creamy peanut butter. When you take a bite, you get the perfect balance: a tender center and a slightly crisp edge, all wrapped around that bold peanut flavor.

So many cookie recipes rely on a laundry list of ingredients, but these no flour peanut butter cookies prove you don’t need all that. I use only four ingredients, and I rely on a method I learned in Paris: cream the peanut butter with the egg first until it becomes light and airy. This small trick makes all the difference. You end up with the chewiest texture without any complicated steps. Stick with me, and I will show you exactly how to get perfect results every time — including the one mistake most people make that leads to flat, dry cookies.

Why This Peanut Butter Oatmeal Cookies Recipe Is the Best

The flavor secret here is the quality of your peanut butter. I use a creamy, unsweetened natural peanut butter that contains only peanuts and salt. This keeps the cookies rich without being overly sweet. In my New York kitchen, I have tested this recipe with every brand I could find, and the winner every time is a simple stir-it-yourself jar. The oats, meanwhile, are not just filler. They absorb the moisture from the maple syrup and egg, creating a structure that holds together beautifully without any flour at all. This is the kind of honest baking I learned in Paris — let each ingredient do its job.

Texture is where this recipe really shines. I trained at Le Cordon Bleu in Paris, and one of the most valuable lessons I learned was the importance of not overmixing. When I combine the oats into the peanut butter mixture, I fold them just until everything is moistened. This leaves the oats intact, so they break apart slightly on your tongue and give the cookie a satisfying chew. If you overmix, the oats break down into a paste, and you lose that lovely texture. So keep that wrist gentle.

This recipe is foolproof and fast. You do not need a mixer or any special equipment. From start to finish, you have warm cookies in under twenty-five minutes. That is the kind of reliability I love sharing with my readers. Whether you are a beginner or a seasoned baker, these easy peanut butter cookies will turn out soft, chewy, and full of flavor every single time. Plus, they are naturally gluten-free, so everyone at the table can enjoy them.

Peanut Butter Oatmeal Cookies Ingredients

When I need a last-minute dessert or an after-school snack, I head straight to my pantry. Living in New York City, I love the convenience of bodegas and corner markets that stock the basics. I picked up a fresh jar of peanut butter just yesterday from my local market on the Upper West Side. These four simple ingredients are all you need to create something truly wonderful.

Ingredients List

  • 1 cup creamy peanut butter
  • 1 large egg
  • 1/2 cup maple syrup
  • 1 1/4 cup rolled oats

Ingredient Spotlight

Peanut Butter: This is the real star of the show. Choose a natural, unsweetened peanut butter — the kind where the oil separates on top. Stir it well before using. If you use a commercial sweetened peanut butter, the cookies will be much sweeter and may spread more because of the added sugar and hydrogenated oils. I always buy one with just peanuts and salt listed.

Egg: A large egg brings everything together and gives the cookies structure. It also adds moisture and helps them puff up in the oven. If you want to make this egg-free, I have tested it with a flax egg (1 tablespoon ground flaxseed mixed with 3 tablespoons water) — it works, but the cookies will be slightly less puffy and a bit denser. Still delicious though.

Maple Syrup: Pure maple syrup sweetens naturally and adds a subtle, earthy sweetness. Do not use pancake syrup, which is usually corn syrup and artificial flavoring. The maple syrup also contributes to the chewy texture because it attracts moisture. You can substitute honey, but the flavor will be different, and honey is sweeter, so you might want to reduce it slightly.

Rolled Oats: Rolled oats (old-fashioned oats) are essential here. Do not use quick oats, which are processed more finely and will make the cookie dough loose and the cookies flat. Steel-cut oats are too hard and will not soften enough during this short baking time. Rolled oats hold their shape and provide that wonderful, chewy texture.

Original IngredientBest SubstitutionFlavor / Texture Impact
Creamy Peanut ButterAlmond ButterMilder, slightly less rich nuttiness; cookies spread a little more
Large EggFlax Egg (1 tbsp ground flax + 3 tbsp water)Denser, less puffy texture; works for vegan version
Maple SyrupHoney or Agave NectarHoney: sweeter, more floral; Agave: milder, slightly thinner dough
Rolled OatsGluten-Free Rolled OatsSame texture; ensures gluten-free for sensitive individuals

How to Make Peanut Butter Oatmeal Cookies — Step-by-Step

Follow these simple steps, and you will have the best chewy oatmeal cookies without any fuss. I have broken each step down so you can see exactly what to look for, along with my favorite tips.

Step 1: Preheat and Prepare

Preheat your oven to 350°F. Line a baking sheet with parchment paper or grease it lightly with a little oil. I like using a silicone baking mat — it helps the cookies slide right off and ensures even baking. This step sets the foundation for perfect cookies.

💡 mia’s Pro Tip: Always preheat your oven fully before mixing the dough. If you put the cookies into an oven that is not hot enough, they will spread too much before setting. Give your oven 15 minutes to reach the right temperature.

Step 2: Cream the Base

In a large bowl, combine the peanut butter, egg, and maple syrup. Use a spatula or a wooden spoon to mix until everything is completely smooth and uniform. This is the same creaming technique I learned in Paris — start with the wet ingredients to create an emulsion that traps air and gives the cookies lift.

Step 3: Fold in the Oats

Add the rolled oats to the bowl. Use a gentle folding motion — cut through the center of the mixture, lift from the bottom, and turn the bowl. Continue just until no dry oats remain. The dough will look sticky and thick, like a classic cookie dough. Do not overmix, or the cookies will become dense and tough.

⚠️ Common Mistake to Avoid: Overmixing the oats. When you stir too much, you break down the oat structure, which leads to a gluey paste and sad, flat cookies. Fold just until combined, and you will get that perfect, chewy bite.

Step 4: Shape the Cookies

Using a small cookie scoop or a tablespoon, scoop heaping spoonfuls of dough onto your prepared baking sheet. You should make about 10–12 cookies. Gently roll each portion between your palms into a round ball, then place it on the sheet and press it down slightly with your fingers to form a 1/2-inch thick disc. Leave about 2 inches between each cookie — they expand just a little during baking.

⚠️ Common Mistake to Avoid: Making the cookies too thick. If you do not flatten them, they will stay as tall mounds and bake unevenly. A gentle press ensures even baking and that signature chewy center.

Step 5: Bake and Cool

Bake in the preheated oven for 10–12 minutes. The cookies are done when the edges are lightly golden brown and the centers look just set. They will still feel soft — do not overbake them. Let the cookies cool on the baking sheet for 5 minutes, then transfer them to a wire rack to cool completely. This resting time allows them to firm up without getting dry.

💡 mia’s Pro Tip: For the chewiest texture, bake for exactly 10 minutes. For a slightly crispier edge, go for 12 minutes. Every oven is different, so check at the 10-minute mark.

StepActionDurationKey Visual Cue
1Preheat oven15 minsOven reaches 350°F
2Mix peanut butter, egg, maple syrup2 minsSmooth, uniform mixture
3Fold in oats1 minSticky dough, no dry oats visible
4Shape cookies5 mins10–12 round, 1/2-inch thick discs
5Bake and cool10–12 mins + 5 mins coolingGolden edges, set centers

Serving & Presentation

These peanut butter oatmeal cookies are wonderful on their own, but they also pair beautifully with a cold glass of milk — just the way I used to enjoy them after school in Morocco, though we had cups of hot mint tea instead. In my New York kitchen, I often serve them alongside a scoop of vanilla ice cream for an easy dessert. The warm, soft cookies melt the ice cream into a creamy sauce that coats every bite.

For a more elegant presentation, I sometimes dip half of each cookie in melted dark chocolate and let it set on a parchment-lined tray. It adds a touch of Parisian pastry flair to this simple American recipe. You can also sprinkle a pinch of flaky sea salt on top before serving — that salty-sweet contrast is irresistible.

Pairing TypeSuggestionsWhy It Works
Side DishFresh fruit salad, apple slicesAdds freshness and light acidity to balance the sweet, nutty cookies
Sauce / DipDark chocolate ganache, caramel sauce, yogurt dip (yogurt + honey)Enhances richness or adds a tangy contrast; great for dunking
BeverageCold milk, hot coffee, chai latteMilk balances sweetness; coffee’s bitterness cuts the richness; chai adds spice
GarnishFlaky sea salt, chopped peanuts, drizzle of melted peanut butterAdds texture and enhances the peanut butter flavor visually

Make-Ahead, Storage & Reheating

Living in New York City often means I am running from market to kitchen to blog, so I love recipes that work with my schedule. These cookies are perfect for making ahead — they store beautifully, and you can even freeze the dough for last-minute cookie emergencies. Here is exactly how I do it.

MethodContainerDurationReheating Tip
RefrigeratorAirtight containerUp to 5 days

Print
clock clock iconcutlery cutlery iconflag flag iconfolder folder iconinstagram instagram iconpinterest pinterest iconfacebook facebook iconprint print iconsquares squares iconheart heart iconheart solid heart solid icon

Peanut Butter Oatmeal Cookies

  • Author: Chef Mia
  • Prep Time: 10 minutes
  • Cook Time: 12 minutes
  • Total Time: 22 minutes
  • Yield: 12 cookies 1x
  • Method: Dessert
  • Cuisine: American

Description

These peanut butter oatmeal cookies are soft, chewy, and naturally sweetened with maple syrup. Made with just 4 simple ingredients, they are gluten-free and perfect for a quick snack or dessert.


Ingredients

Scale
  • 1 cup creamy peanut butter
  • 1 large egg
  • 1/2 cup maple syrup
  • 1 1/4 cup rolled oats

Instructions

  1. Preheat the oven to 350 F.
  2. In a large bowl, combine the peanut butter, egg and maple syrup. Mix well until smooth.
  3. Add the oats and mixed until well combined. The consistency should be like a sticky cookie dough.
  4. Using a small scoop, place heaping tablespoons of mixture on a greased baking sheet. You should have about 10-12 cookies. Use your hands to gently form into rounds and press down slightly to flatten.
  5. Bake in the preheated oven for 10-12 minutes, until cooked through. Let cool and serve.


Nutrition

  • Calories: 180
  • Sugar: 9g
  • Fat: 11g
  • Carbohydrates: 17g
  • Protein: 7g


Peanut Butter Oatmeal Cookies

ph">For more delicious inspiration, follow me on Pinterest!