Table of Contents
Red Wine Braised Short Ribs in Dutch Oven: Fall-Apart Perfection
New York City is a melting pot of flavors, and for me, nothing screams soulful comfort quite like a perfectly braised dish. Growing up in my mother’s kitchen in Marrakech, tagines simmered for hours, filling our home with the most incredible aromas. Later, in Paris, I fell in love with the elegance of French braising techniques, especially when applied to robust cuts of meat. This red wine braised short ribs recipe is a culmination of those experiences—a dish that’s both rustic and refined, bringing the best of Moroccan warmth and French technique right to your Dutch oven. It’s the kind of meal that makes a weeknight feel like a special occasion, and a holiday feast truly unforgettable. It’s my go-to for red wine short ribs recipe that never fails to impress.
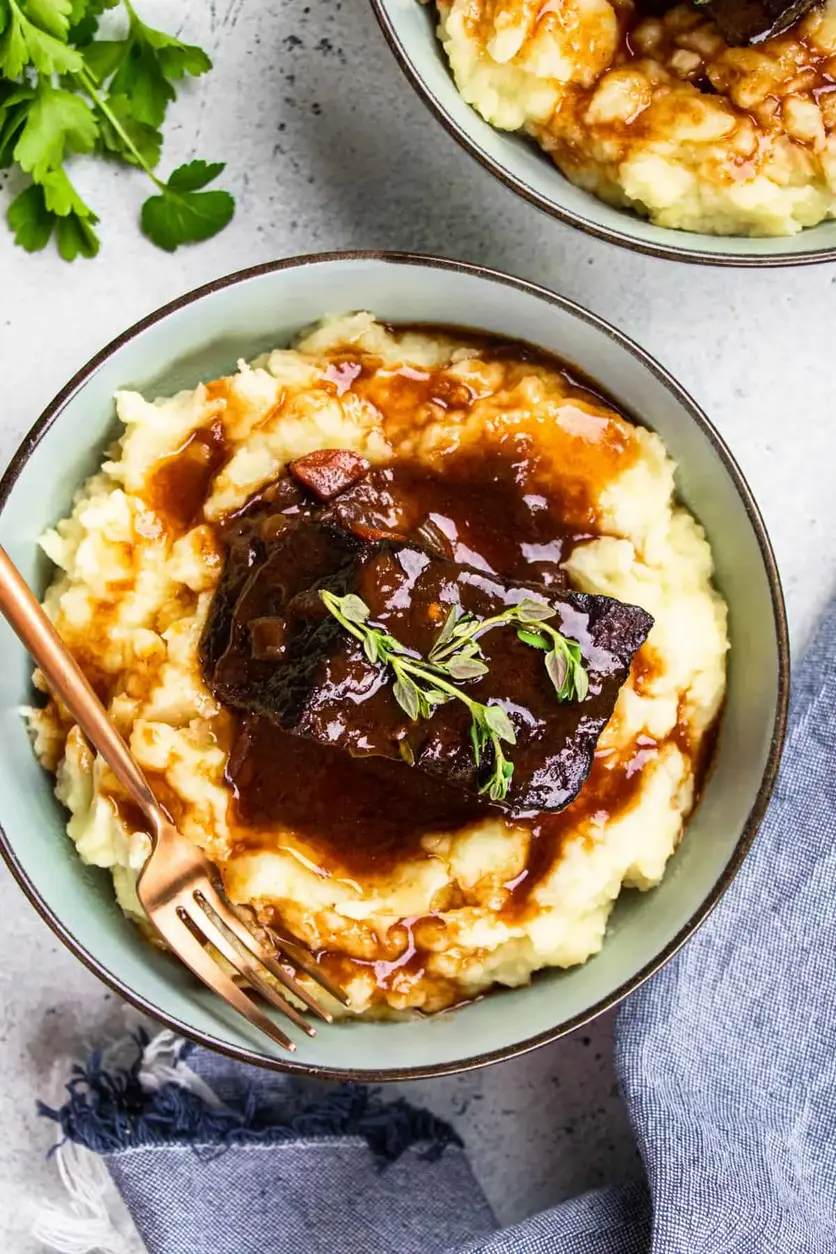
Imagine sinking your fork into impossibly tender beef short ribs, so succulent they practically melt off the bone. The rich, glossy sauce, deep ruby in color from the splash of Cabernet Sauvignon, clings to every morsel, laced with the subtle sweetness of slow-cooked vegetables and aromatic herbs. The scent alone — a heady mix of red wine, savory beef, and earthy mirepoix — is enough to make your stomach grumble in anticipation. This isn’t just food; it’s an experience, a culinary hug that warms you from the inside out. It’s the essence of slow-cooked perfection.
What makes my approach to braised short ribs in a Dutch oven so special? It’s all about building layers of flavor from the very first step. I learned in Paris that starting with a beautiful sear on the meat is non-negotiable for developing that deep, complex taste and a gorgeous color. And while many recipes might rush the sauce, I often let it simmer a little longer, coaxing out maximum richness. I’ll even share a little trick I picked up for thickening the sauce that’s far superior to simply adding cornstarch. Keep an eye out for my pro tip on perfecting that rich gravy – it’s a game-changer for anyone wanting truly exceptional dutch oven short ribs.
Why This Red Wine Braised Short Ribs in Dutch Oven Recipe Is the Best
My culinary journey has instilled in me a deep appreciation for the magic of braising. It’s a fundamental technique that transforms humble cuts of meat into tender, flavorful masterpieces. This red wine braised short ribs recipe is my perfected version, drawing on years of experience to ensure a result that is consistently delicious, remarkably easy, and deeply satisfying. It’s more than just a recipe; it’s a gateway to creating incredible meals at home.
The secret to the incredible depth of flavor in these beef short ribs braised lies in the combination of a robust Cabernet Sauvignon and the classic mirepoix, all painstakingly built in the pan before the slow braise begins. My Parisian training emphasized the importance of deglazing the pan properly after searing the meat, capturing all those browned bits—the ‘fond’—which are pure flavor gold. This recipe captures that essence, creating a sauce that is rich, nuanced, and utterly irresistible.
What truly sets this recipe apart is its foolproof nature. While the result tastes complex and restaurant-worthy, the actual steps are straightforward. The Dutch oven does most of the heavy lifting in the oven, ensuring that even if you’re new to braising, you’ll achieve perfectly tender, fall-off-the-bone results every time. I’ve streamlined the process so you can confidently create this impressive dish without stress, making it an ideal choice for both beginners and seasoned home cooks seeking to master dutch oven short ribs.
Red Wine Braised Short Ribs Ingredients
When I’m in New York City, my favorite place to source the best quality beef short ribs is at the Union Square Greenmarket. The butchers there are incredibly knowledgeable, and the quality is unparalleled. For everything else, I rely on my local grocer, but I always make sure to pick up fresh herbs from Kalustyan’s or a specialty spice shop when I’m craving that authentic Moroccan touch. This recipe is designed to be accessible, using ingredients you can find in most supermarkets.
Ingredients List
- 2 tablespoons olive oil
- 3-4 pounds bone-in beef short ribs (about 8-10 pieces)
- Salt and freshly ground black pepper (to taste)
- 1 large yellow onion, diced
- 2 stalks celery, diced
- 2 medium carrots, diced
- 3 cloves garlic, smashed
- 2 tablespoons tomato paste
- 2 cups dry red wine (Cabernet Sauvignon or Merlot recommended)
- 3 cups beef broth
- 2 bay leaves
- 1 sprig fresh thyme
- 1 sprig fresh oregano (or 1/2 teaspoon dried)
Ingredient Spotlight
Bone-in Beef Short Ribs: The star of the show! Opt for bone-in for maximum flavor and moisture. Look for ribs with a good amount of marbling – those streaks of fat will render down, keeping the meat incredibly tender and moist. If you can’t find bone-in, boneless will work, but the cooking time might be slightly shorter, and they may not yield quite the same richness. For the best visual appeal, I like ribs that are about 1.5-2 inches thick.
Dry Red Wine (Cabernet Sauvignon): This is crucial for the depth and character of the braising liquid. A full-bodied red wine like Cabernet Sauvignon or Merlot provides tannins and fruit notes that complement the rich beef perfectly. Avoid sweet wines or anything you wouldn’t enjoy drinking on its own. The alcohol cooks off, leaving behind a complex, savory flavor. If you absolutely cannot use wine, you can substitute with an additional cup of beef broth and a tablespoon of balsamic vinegar for acidity, though the flavor profile will be different.
Beef Broth: This is the backbone of the braising liquid, providing moisture and a savory base. Use a good quality, low-sodium beef broth or stock. Homemade stock is always a winner if you have it! The quality of your broth significantly impacts the final sauce, so splurge a little if you can. If you’re out of beef broth, a rich chicken broth or even vegetable broth can work in a pinch, but beef broth is preferred for its depth.
Mirepoix (Onion, Celery, Carrots): This classic French aromatic base forms the foundation of flavor for our sauce. These vegetables soften and sweeten as they cook, lending a subtle sweetness and depth that balances the richness of the beef and wine. I like to dice them relatively small so they break down nicely into the sauce. You can use yellow, white, or red onions; they all work beautifully here.
| Original Ingredient | Best Substitution | Flavor / Texture Impact |
|---|---|---|
| Bone-in Short Ribs | Boneless Short Ribs | Slightly less marrow flavor, may cook faster. Ensure adequate marbling. |
| Cabernet Sauvignon | Merlot or another dry, full-bodied red wine; OR 1 cup beef broth + 1 tbsp balsamic vinegar (for non-alcoholic) | Flavor profile will shift slightly based on wine choice. Balsamic vinegar adds tanginess but not the complex notes of red wine. |
| Beef Broth | Rich Chicken Broth or Strong Vegetable Broth | May result in a lighter flavor profile; beef broth provides the deepest, most savory base. |
| Fresh Thyme/Oregano | 1 teaspoon total of dried thyme and oregano | Dried herbs are more concentrated; use less. Fresh herbs offer a brighter, more nuanced flavor. |
How to Make Red Wine Braised Short Ribs in Dutch Oven — Step-by-Step
Alright, let’s get these incredible short ribs into your kitchen. Follow these steps, and you’ll be rewarded with a dish that truly sings.
Step 1: Preheat the Oven & Prep the Ribs
Preheat your oven to 350°F (175°C). This temperature is perfect for gently coaxing the collagen in the short ribs to break down into tender, succulent meat without drying them out. While the oven heats, rinse your bone-in short ribs under cold water and then pat them thoroughly dry with paper towels. This is a crucial step for achieving a good sear. Generously season all sides of the ribs with salt and freshly ground black pepper. Don’t be shy with the salt; it’s essential for flavor.
💡 mia’s Pro Tip: Ensuring the short ribs are completely dry is key to a beautiful, deep brown sear. Any moisture on the surface will steam the meat instead of searing it, preventing that delicious Maillard reaction that forms the foundation of so much flavor.
Step 2: Brown the Short Ribs
Place your 6-quart Dutch oven over medium-high heat on the stovetop. Add 2 tablespoons of olive oil and let it get hot and shimmery. Carefully place the seasoned short ribs into the hot oil, working in batches if necessary to avoid crowding the pot. Crowd-a-phobia is real in searing! Brown the ribs for about 5-6 minutes on each side until they have a deep, rich brown crust. Once browned, transfer the ribs to a clean plate and set them aside. Resist the urge to clean out the pot!
⚠️ Common Mistake to Avoid: Overcrowding the pan. If you try to brown too many ribs at once, the temperature of the oil will drop, and the meat will steam instead of sear. This results in pale, unappealing ribs and a less flavorful sauce. Work in batches for the best results!
Step 3: Sauté the Aromatics
Reduce the heat to medium. Add 1 large diced onion to the same Dutch oven, scraping up any browned bits from the bottom of the pot. Cook the onion for 8-10 minutes, stirring occasionally, until it’s softened and becoming translucent. Then, add 2 stalks of diced celery and 2 diced carrots. Cook for another 3-5 minutes, allowing them to soften slightly and release their sweet flavors into the pot.
Step 4: Add Garlic and Tomato Paste
Stir in 3 smashed cloves of garlic and 2 tablespoons of tomato paste. Cook for about 2-3 minutes more, stirring constantly. The tomato paste will darken slightly and become fragrant, which helps to mellow its raw flavor and deepen its umami notes. This step is like building your flavor foundation – don’t skip it!
Step 5: Deglaze with Red Wine
Pour in the 2 cups of red wine. Bring it to a boil, then reduce the heat to medium and let it simmer, uncovered, for about 15-20 minutes. You want to reduce the wine by about half. This process concentrates its flavor and cooks off some of the harsh alcohol, leaving behind a rich, fruity, and slightly acidic liquid that’s essential for tenderizing the beef and creating a complex sauce.
💡 mia’s Pro Tip: Scrape the bottom of the Dutch oven thoroughly as the wine simmers. All those browned bits stuck to the pan are packed with flavor and will dissolve into the liquid, enriching your sauce immensely. This is the core of classic French sauce-making!
Step 6: Add Broth and Herbs
Pour in 3 cups of beef broth and stir to combine with the reduced wine and vegetables. Add the 2 bay leaves, 1 sprig of fresh thyme, and 1 sprig of fresh oregano. If you’re using dried herbs, add about 1/2 teaspoon each of dried thyme and oregano now.
Step 7: Braise the Ribs
Carefully transfer the browned short ribs back into the Dutch oven, nestling them into the liquid. The liquid should come about two-thirds of the way up the sides of the ribs. Cover the pot tightly with its lid and carefully transfer the Dutch oven to the preheated oven.
⚠️ Common Mistake to Avoid: Using a pot that isn’t oven-safe or doesn’t have a tight-fitting lid. A secure lid traps the steam and moisture, ensuring the ribs braise gently and evenly. If your lid isn’t tight, you can use a layer of parchment paper followed by aluminum foil, then the lid.
Step 8: Slow Cook Until Tender
Allow the ribs to braise in the oven for 2 ½ to 3 hours. The exact time will depend on the size and thickness of your ribs. You’ll know they’re ready when the meat is incredibly tender and easily pulls away from the bone with a fork. I often check them around the 2-hour mark and then every 30 minutes after that.
Step 9: Rest Ribs & Strain Sauce
Once the ribs are fork-tender, carefully transfer them from the Dutch oven to a clean plate or baking dish. Tent them loosely with aluminum foil to keep them warm while you finish the sauce. Now, strain the braising liquid through a fine-mesh sieve set over a bowl or back into a clean saucepan. Discard the cooked vegetables—they’ve done their job!
💡 mia’s Pro Tip: For an extra smooth sauce, you can press down on the solids in the sieve with the back of a spoon to extract as much liquid as possible. However, be careful not to push too hard, as this can force solids through and make your sauce cloudy.
Step 10: Thicken the Sauce
Pour the strained liquid back into the Dutch oven (or your saucepan) over medium heat. Bring it to a simmer and let it cook, stirring occasionally, until it reduces and thickens to your desired consistency – it should coat the back of a spoon. This could take about 10-20 minutes depending on how much liquid you have. Taste and adjust seasoning with salt and pepper if needed; this is your final chance to get the flavor perfect!
| Step | Action | Duration | Key Visual Cue |
|---|---|---|---|
| 1 | Preheat & Prep Ribs | ~10 mins | Oven at 350°F, Ribs dry & seasoned |
| 2 | Brown Ribs | ~10-12 mins (per batch) | Deep golden-brown crust on all sides |
| 3 | Sauté Aromatics | ~10-13 mins | Onions translucent, carrots softened |
| 4 | Add Garlic & Tomato Paste | ~2-3 mins | Fragrant, tomato paste darkened |
| 5 | Deglaze with Wine | ~15-20 mins | Wine reduced by half |
| 6 | Add Broth & Herbs | ~1 min | All ingredients combined in pot |
| 7 | Nestle Ribs & Cover | ~2 mins | Ribs submerged 2/3 in liquid, lid on |
| 8 | Braise in Oven | 2.5-3 hours | Meat is fork-tender, easily shreds |
| 9 | Rest Ribs & Strain Sauce | ~10 mins | Ribs removed, liquid strained |
| 10 | Thicken Sauce | ~10-20 mins | Sauce coats back of spoon |
Serving & Presentation
The beauty of red wine braised short ribs is their inherent elegance. When plating, I love to place a generous portion of creamy mashed potatoes or polenta on the plate, creating a cozy bed for the succulent short rib. Spoon the rich, thickened sauce liberally over the top, making sure to capture some of those delicious bits from the bottom of the pot. If you like, you can pull the meat from the bone before serving, or serve them bone-in for a more rustic presentation.
Garnishes add that final touch of sophistication, reminiscent of the care taken in Parisian bistros. A sprinkle of fresh chopped parsley adds a pop of color and freshness. Some finely grated lemon zest can cut through the richness beautifully. For a nod to my Moroccan heritage, a pinch of smoked paprika or a very thin sliver of preserved lemon could add an unexpected, delightful twist. Serving this with a crusty baguette from a local NYC bakery is also a must for soaking up every last drop of that incredible sauce.
| Pairing Type | Suggestions | Why It Works |
|---|---|---|
| Side Dish | Creamy Mashed Potatoes, Buttery Polenta, Garlic-Herb Risotto, Roasted Root Vegetables, Crusty Bread | These are classic accompaniments that soak up the rich sauce beautifully, providing textural contrast and absorbing the deep flavors of the braise. |
| Sauce / Dip | A dollop of Crème fraîche, a spoonful of sour cream, or a simple Gremolata (parsley, lemon zest, garlic) | Adds a touch of brightness or creaminess to cut through the richness of the beef and sauce, balancing the dish. |
| Beverage | A glass of the same red wine used for braising, a rich Syrah, or a dark craft beer. | The wine echoes the flavor in the dish, while a dark beer offers a malty, complementary profile. |
| Garnish | Fresh Parsley, Chives, Thyme leaves, Thinly sliced lemon zest | Adds a final touch of color, freshness, and aromatic complexity, elevating the final presentation. |
Make-Ahead, Storage & Reheating
As a busy chef living in NYC, I’ve learned the art of the make-ahead meal! This braised short ribs recipe is a lifesaver because it’s even better on the second day. The flavors meld beautifully overnight, making it perfect for preparing a day or two in advance for stress-free entertaining or those busy weeknights when you want a gourmet meal without the last-minute fuss.
| Method | Container | Duration | Reheating Tip |
|---|---|---|---|
| Refrigerator | Airtight container or original Dutch oven with lid | 3-4 days | Gentle reheating on the stovetop over low heat, or in a 300°F oven. Add a splash of broth if sauce seems too thick. |
| Freezer | Heavy-duty freezer bags or airtight freezer containers | Up to 3 months | Thaw overnight in the refrigerator, then reheat gently on the stovetop or in the oven. The texture of the short ribs should hold up beautifully. |
| Make-Ahead | Once cooled, store the entire dish in the Dutch oven or transfer to an airtight container. | Up to 2 days before serving | Reheat slowly on the stovetop or in a low oven (300°F/150°C). You can even reheat it on the grill for a smoky flavor! |
When reheating, I prefer the stovetop method in a saucepan or the Dutch oven itself. This allows me to control the heat and stir gently, ensuring even warming and preventing the sauce from breaking or scorching. Add a small splash of beef broth or water if the sauce has become too thick during storage. For a richer flavor, you can even finish it by carefully spooning a tablespoon of cold butter into the sauce while it simmers.
Variations & Easy Swaps
| Variation | Key Change | Best For | Difficulty Impact |
|---|---|---|---|
| Herby European-Style | Add rosemary, sage, and a splash of brandy with the red wine. Strain and discard fewer vegetables like carrots. | A more traditional French feel. | Easy |
| Gluten-Free / Dairy-Free | Ensure broth is GF. Omit any dairy (like butter for finishing sauce or cream for mash). Use GF thickener if needed. | Dietary restrictions. | Easy |
| Spicy Moroccan-Inspired | Add cinnamon, cumin, coriander, and a pinch of chili flakes with the aromatics. Use beef broth and maybe a touch of pomegranate molasses in the sauce. | Adventurous palates seeking warmth. | Easy |
Herby European-Style Braised Short Ribs
For a classic European flair, embrace fragrant herbs like rosemary and sage, which pair beautifully with the earthy notes of beef. You can add a splash of brandy alongside the red wine for an extra layer of depth, just as I’ve seen done in the finest French kitchens. If you prefer a less chunky sauce, you can always strain out additional vegetables like carrots, though I often leave them in for texture and sweetness. This variation leans into the traditional, comforting heart of braised meats.
Gluten-Free & Dairy-Free Braised Short Ribs
Making this recipe gluten-free and dairy-free is remarkably simple and requires only a few mindful swaps. First, ensure your beef broth is certified gluten-free, as some store-bought stocks can contain hidden gluten. When thickening the sauce, if you prefer it thicker than it naturally reduces, use a cornstarch slurry (1 tbsp cornstarch mixed with 2 tbsp cold water) instead of flour. For serving, skip the butter in mashed potatoes and use olive oil or a dairy-free butter alternative, or opt for a naturally GF side like polenta or rice.
Spicy Moroccan-Inspired
To infuse a taste of my Moroccan home into this dish, I love to add warm spices like cinnamon, cumin, and coriander to the aromatic base. A pinch of cayenne pepper or chili flakes can provide a gentle warmth that complements the richness of the beef. You could even incorporate a tablespoon of pomegranate molasses into the sauce as it thickens for a unique sweet-tart finish, reminiscent of traditional Moroccan fruit stews. This creates a totally new dimension of flavor!
What is the best type of red wine to use for braising short ribs?
The best red wines for braising short ribs are dry, full-bodied varieties that have good acidity and tannins. Cabernet Sauvignon and Merlot are excellent choices due to their robust flavor profiles that stand up to the rich beef. Other good options include Zinfandel, Syrah, or a Rhône blend. Avoid sweet wines like port or sherry, and very light-bodied wines like Pinot Noir, as they won’t provide enough depth. Remember, the alcohol cooks off, leaving the complex flavors behind, so choose a wine you enjoy drinking!
How long does it take to braise short ribs in a Dutch oven until tender?
Typically, braising short ribs in a Dutch oven at 350°F (175°C) takes about 2.5 to 3 hours for bone-in ribs. The exact time can vary depending on the size and thickness of the ribs, as well as your specific oven. The key indicator of doneness is tenderness – the meat should be so tender that it easily pulls away from the bone with just a fork. It’s always best to check for tenderness rather than strictly adhering to the time.
Do I need to sear the short ribs before braising them in the Dutch oven?
Yes, absolutely! Searing the short ribs before braising is a critical step that develops a deep, rich flavor and a beautiful color through the Maillard reaction. This browning process creates what chefs call ‘fond’ – the caramelized bits left in the bottom of the pan – which adds immense depth to your braising liquid and final sauce. Skipping this step will result in a less flavorful and less visually appealing dish, so it’s well worth the extra few minutes.
Can I substitute beef broth for red wine in braised short ribs?
While you can technically make braised short ribs without red wine by substituting with additional beef broth, it’s not ideal if you want the full, complex flavor profile this recipe offers. The red wine contributes color, acidity, depth, and subtle fruity notes that are unique. If you must omit the wine, I recommend using 1 cup of extra beef broth and adding 1 tablespoon of balsamic vinegar or red wine vinegar to mimic some of the acidity and depth. The result will be different but still enjoyable.
What can I serve with red wine braised short ribs?
Red wine braised short ribs are incredibly versatile and pair beautifully with a range of sides that can soak up their luscious sauce. Classic choices include creamy mashed potatoes, buttery polenta, or fluffy mashed cauliflower for a lighter option. A rich risotto, buttered egg noodles, or simply some crusty bread for dipping also work wonderfully. Roasted root vegetables like carrots, parsnips, and potatoes are another excellent accompaniment, adding seasonality and texture to the meal.
How do I thicken the sauce for braised short ribs?
The easiest and most impactful way to thicken the sauce is by simmering it uncovered over medium heat after straining out the solids. This allows the liquid to reduce and concentrate naturally, which enhances its flavor. If you’re short on time or need a thicker sauce, you can create a ‘slurry’ by whisking together 1 tablespoon of cornstarch with 2 tablespoons of cold water, then gradually whisking this mixture into the simmering sauce until it reaches your desired consistency. A little butter whisked in at the end can also add gloss and richness.
Share Your Version!
I pour my heart into developing these recipes, and nothing makes me happier than seeing them come to life in your kitchens! If you’ve made these Red Wine Braised Short Ribs in a Dutch Oven, please consider leaving a star rating and a comment below. Your feedback is invaluable and genuinely helps other home cooks feel confident trying out new dishes. If you share a photo on Instagram or Pinterest, please tag me @exorecipe – I absolutely love seeing your creations and might even feature them!
I’m always curious to hear how you adapt recipes. Did you experiment with any unique spice combinations, perhaps drawing inspiration from your own culinary heritage? Let me know in the comments below – I’m always looking for new ideas to bring to my own cooking!
From my NYC kitchen to yours — I hope this recipe brings as much warmth to your table as it does to mine. — mia 🧡
Love This Recipe? Save It to Pinterest!
If you enjoyed this Red Wine Braised Short Ribs in Dutch Oven recipe, don’t let it get lost in your browser tabs! 😄 Pin it now so you can find it again anytime — and explore hundreds more tried-and-tested recipes waiting for you on my Pinterest boards.
👉 Follow mia on Pinterest @chefrecipes2
📌 Pin this recipe · 🔁 Re-pin your favorites · 💬 Tag me when you make it — I love seeing your creations!
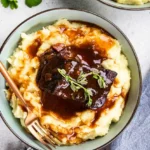
Red Wine Braised Short Ribs in Dutch Oven
Description
Red Wine Braised Short Ribs is the best recipe for tender fall apart bone-in beef short ribs slow cooked with gravy in a Dutch Oven. This is a perfect comfort meal you can make at home for your friends and family!
Ingredients
- 2 tablespoons olive oil
- 3–4 pounds bone-in short ribs (8–10 pieces)
- Salt (pepper to taste)
- 1 large onion (diced)
- 2 stalks celery (diced)
- 2 carrots (diced)
- 3 cloves garlic (crashed)
- 2 tablespoons tomato paste
- 2 cups wine (Cabernet Sauvignon)
- 3 cups beef broth
- 2 bay leaves
- 1 spring thyme
- 1 spring oregano
Instructions
- To start, lets preheat the oven to 350°F.
- Rinse and pat dry the meat and generously season with salt and pepper.
- Heat 2 tbsp olive oil in 6 Qt Dutch oven over medium-high heat. Brown the meat in two batches for 5-6 minutes on each side, then transfer to a plate and set aside.
- Add 1 diced onion and cook for 8-10 minutes or until translucent and softened. Then add 2 stalks diced celery and 2 diced carrots, and cook for 3-5 minutes more.
- Add 3 cloves smashed garlic and 2 tbsp tomato paste and cook for a few more minutes.
- Stir in 2 cups wine, bring to boil, lower the heat to medium and simmer until it reduces in half, about 15-20 minutes.
- Add 3 cups beef broth and stir.
- Transfer the meat back to the pot, add bay leaves, thyme and oregano.
- Cover with the lid and transfer to the oven.
- Cook for 2 ½-3 hours or until the ribs are tender.
- Transfer the meat to the plate and cover with foil.
- Strain the sauce and set discard the vegetables.
- Pour the liquid back to the pot and simmer until it thickens.
Nutrition
- Calories: 319 kcal
- Sugar: 2 g
- Fat: 16 g
- Carbohydrates: 6 g
- Protein: 25 g

Tried This Recipe? Leave a Comment!
Did you make this recipe? I’d love to hear how it turned out! Please leave a comment and a rating below. Your feedback helps other home cooks and supports cheerychop.com!