“`html
Table of Contents
Cinnamon Roll Pancakes Recipe
Craving That Cozy Cinnamon Roll Flavor in a Fluffy Pancake?
Is there anything better than the warm, comforting embrace of a freshly baked cinnamon roll, especially on a leisurely weekend morning? But what if you could capture that iconic swirled goodness in the delightfully fluffy form of a pancake? Enter: Cinnamon Roll Pancakes! This recipe masterfully merges the beloved sweet, spiced filling of a cinnamon roll with the light, airy texture of your favorite pancakes. Imagine biting into a golden-brown pancake, revealing decadent swirls of cinnamon sugar, all topped off with a luscious cream cheese glaze. It’s not just breakfast; it’s an experience. And the best part? You don’t need days to prepare it. With simple pantry staples and a straightforward method, you can bring this dreamy breakfast to your table. Keep reading to discover how to make these irresistible Cinnamon Roll Pancakes that will have your family begging for more!
Ingredients: The Sweet Stars of the Show
The magic of Cinnamon Roll Pancakes lies in their combination of familiar pancake ingredients and the simple yet impactful elements that bring the “cinnamon roll” magic to life. We’re keeping it accessible with everyday pantry staples.
For the Pancake Batter:
- 2 cups All-Purpose Flour: The sturdy foundation for our fluffy pancakes. This gives them structure and a satisfying chew.
- 2 tablespoons Brown Sugar: Adds a subtle caramel note and a touch of sweetness to the batter itself.
- 2 teaspoons Baking Powder: Our secret weapon for achieving that incredible lift and airy texture.
- 1/2 teaspoon Salt: Balances the sweetness and enhances all the other flavors.
- 2 large Eggs: Bind the ingredients together and enrich the batter for a tender crumb.
- 1 3/4 cups Milk (or Buttermilk): The liquid that brings our batter to life. Buttermilk adds a delightful tang and extra tenderness.
- 2 tablespoons Unsalted Butter, melted: Contributes richness, flavor, and helps create a tender pancake.
- 1 teaspoon Vanilla Extract: A classic aromatic that rounds out the sweet flavors beautifully.
For the Cinnamon Swirl Filling:
- 1/4 cup Brown Sugar (packed): The heart of our cinnamon flavor, providing a rich, molasses-like sweetness.
- 1 tablespoon Ground Cinnamon: The star spice, delivering that unmistakable warm, comforting aroma and taste.
- 1 tablespoon All-Purpose Flour: Helps to thicken the filling slightly and prevent it from melting out too much.
- 2 tablespoons Unsalted Butter, softened: Creates a paste-like consistency that holds the sugar and cinnamon together, allowing for beautiful swirling.
For the Cream Cheese Glaze:
- 4 oz Cream Cheese, softened: Provides a tangy, creamy base for our “frosting.”
- 2 tablespoons Milk (or cream): To achieve the perfect drizzling consistency.
- 1/2 teaspoon Vanilla Extract: Enhances the sweetness and adds a lovely aroma.
- 1/2 cup Powdered Sugar (Confectioners’ Sugar): For that classic sweet, smooth glaze finish. Adjust to your desired sweetness.
Substitutions & Tips:
- Milk: Almond milk, soy milk, or oat milk can be used for dairy-free options.
- Butter: Coconut oil or vegan butter can be substituted.
- Cream Cheese: For a dairy-free glaze, use dairy-free cream cheese.
- Don’t have buttermilk? Add 1 tablespoon of lemon juice or white vinegar to your milk and let it sit for 5 minutes before using.
Timing is Everything
10 minutes
20 minutes
30 minutes
Compared to the hours often spent making traditional cinnamon rolls from scratch (including rising time!), these Cinnamon Roll Pancakes are incredibly quick. The average pancake recipe typically takes about 20-25 minutes total. Our recipe is on par with that, but delivers a significantly more decadent experience. With just 10 minutes of prep, you can whip up a gourmet breakfast in under an hour, making it perfect for busy mornings too!
Step-by-Step Instructions
Step 1: Prepare the Batter
In a large bowl, whisk together the flour, brown sugar, baking powder, and salt. In a separate medium bowl, whisk together the eggs, milk, melted butter, and vanilla extract until well combined. Pour the wet ingredients into the dry ingredients and whisk until just combined. A few small lumps are perfectly fine – don’t overmix, as this can lead to tough pancakes!
Step 2: Create the Cinnamon Swirl
In a small bowl, combine the 1/4 cup brown sugar, 1 tablespoon cinnamon, and 1 tablespoon flour. Add the softened butter and mix with a fork or your fingers until a thick, crumbly paste forms. This is your cinnamon swirl mixture.
Step 3: Cook the Pancakes
Heat a lightly oiled griddle or non-stick frying pan over medium heat. For each pancake, pour about 1/4 cup of batter onto the hot griddle. Immediately, drop about a teaspoon of the cinnamon swirl mixture onto the batter. Using a toothpick or the tip of a knife, gently swirl the cinnamon mixture into the pancake batter with a few quick strokes, creating a marbled effect. Cook for about 2-3 minutes per side, until golden brown and cooked through. Flip when you see bubbles forming on the surface and the edges look set.
Step 4: Prepare the Cream Cheese Glaze
While the pancakes are cooking or cooling slightly, prepare the glaze. In a small bowl, combine the softened cream cheese, milk, vanilla extract, and powdered sugar. Whisk until smooth and creamy. If the glaze is too thick, add a tiny bit more milk; if it’s too thin, add a little more powdered sugar.
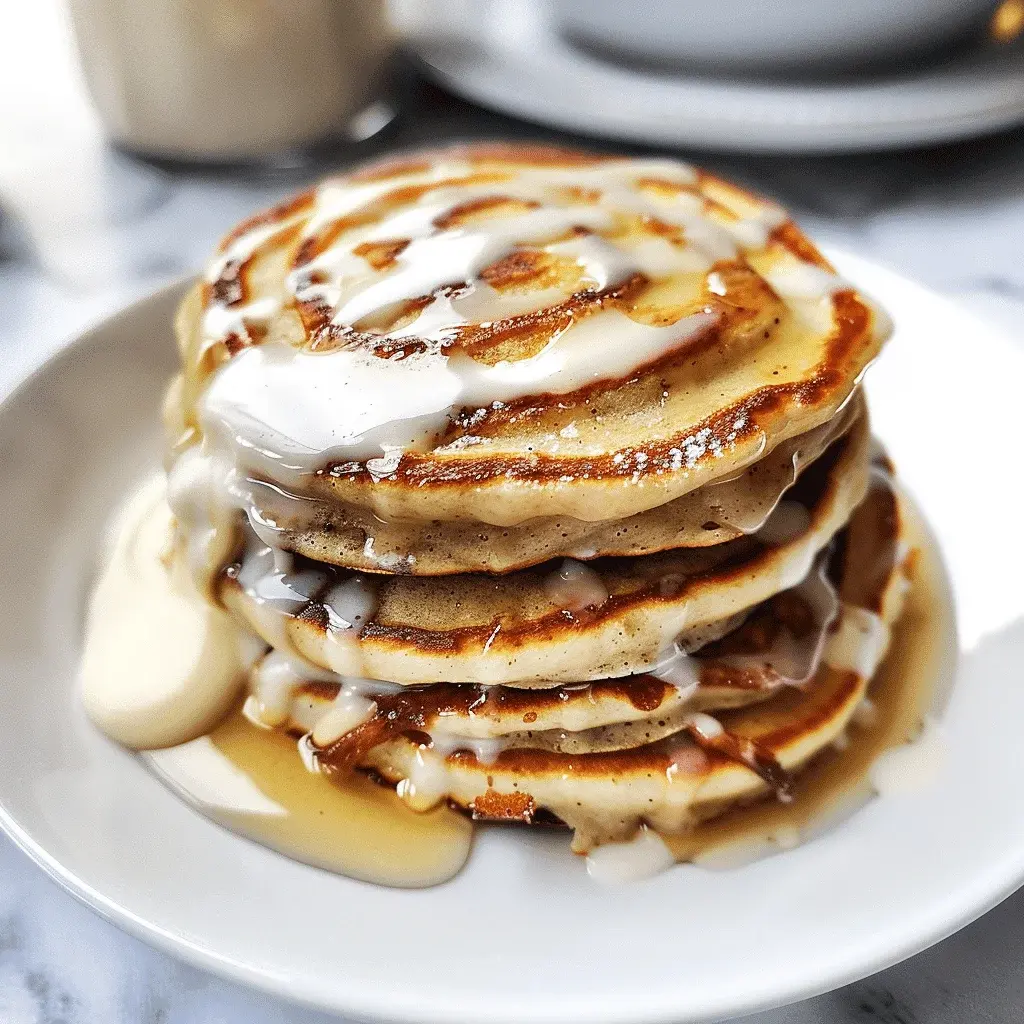
Step 5: Assemble and Serve
Stack the warm, fluffy Cinnamon Roll Pancakes on plates. Drizzle generously with the cream cheese glaze. For an extra festive touch, you can sprinkle a little extra cinnamon or some chopped pecans on top!
Nutritional Information (Approximate per serving, 4 servings total):
- Calories: ~350-400 kcal
- Protein: ~10-12g
- Fat: ~15-18g
- Carbohydrates: ~45-50g
Note: Nutritional values are estimates and can vary based on specific ingredients and portion sizes used.
Healthier Alternatives
Looking to make these Cinnamon Roll Pancakes a bit lighter without sacrificing flavor? Try these swaps:
- Flour: Substitute half of the all-purpose flour with whole wheat flour for added fiber. You could even try oat flour for a nuttier taste.
- Sugar: Reduce the amount of sugar in both the batter and the filling. For the glaze, consider a sugar-free powdered sweetener or simply drizzle with a touch of maple syrup.
- Glaze: Skip the cream cheese glaze altogether and opt for a drizzle of pure maple syrup. You could also make a lighter glaze with Greek yogurt, a touch of maple syrup, and cinnamon.
- Fat: Use unsweetened applesauce instead of some of the butter in the batter for a lower-fat option.
Serving Suggestions
These pancakes are a treat on their own, but here are some ideas to elevate your breakfast experience:
- Serve with a side of fresh berries like blueberries or raspberries for a pop of freshness.
- A dollop of whipped cream is always a welcome addition.
- For the ultimate indulgence, add a few slices of crispy bacon or sausage.
- A simple dusting of powdered sugar can add an elegant finish.
Common Mistakes to Avoid
- Overmixing the Batter: This develops the gluten too much, resulting in tough, rubbery pancakes instead of fluffy ones. Mix until just combined.
- Griddle Too Hot: If your griddle is too hot, the outside of the pancakes will burn before the inside is cooked, and the cinnamon swirl might char. Use medium heat.
- Not Letting the Batter Rest (Optional but Recommended): While not essential for this recipe, letting pancake batter rest for 5-10 minutes allows the flour to hydrate and gluten to relax, leading to a more tender pancake.
- Overcrowding the Pan: Give your pancakes space to cook evenly and make flipping easier. Cook in batches.
Storing Tips
Leftover Cinnamon Roll Pancakes can be stored in an airtight container in the refrigerator for up to 2-3 days. Reheat them gently in a toaster, oven, or microwave. The cream cheese glaze is best made fresh, but if you have leftovers, store it separately in the refrigerator and whisk it again before drizzling over reheated pancakes.

End Your Breakfast Blues with a Cinnamon Swirl
Cinnamon Roll Pancakes are more than just a breakfast item; they’re a delightful fusion that brings together two beloved classics into one unforgettable dish. The tender, fluffy pancakes infused with warm cinnamon swirls, all brought together by a tangy cream cheese glaze, create a symphony of flavors and textures that are simply divine. This recipe proves that you can achieve bakery-caliber flavor right in your own kitchen with minimal effort. So, ditch the ordinary and embrace the extraordinary by treating yourself and your loved ones to these incredible Cinnamon Roll Pancakes. Give this recipe a try this weekend, and prepare for rave reviews!
Frequently Asked Questions
Can I make the batter ahead of time?
Yes, you can prepare the pancake batter a few hours in advance (up to 24 hours) and store it covered in the refrigerator. However, it might be a bit thicker, so you may need to add a splash more milk when you’re ready to cook.
Can I skip the cream cheese glaze?
Absolutely! While the glaze adds a lovely richness, these pancakes are still delicious with just a drizzle of maple syrup or a dusting of powdered sugar.
How do I get defined swirls?
The key to defined swirls is to use a somewhat firm cinnamon filling (not too runny) and to swirl it gently with a toothpick or knife rather than mixing it completely into the batter. Don’t over-swirl, or it will blend in too much.
Can I freeze these pancakes?
Yes, you can freeze the cooked pancakes. Let them cool completely, then place them in a single layer on a baking sheet to freeze before transferring them to a freezer-safe bag or container. Reheat in a toaster or oven for best results. It’s best to store the glaze separately and add it after reheating.

Cinnamon Roll Pancakes Recipe
Description
Cinnamon Roll Pancakes combine the classic flavors of cinnamon rolls with fluffy pancakes. Key ingredients include all-purpose flour, baking powder, and brown sugar. The preparation involves creating a cinnamon filling and a cream cheese glaze. With a prep time of 10 minutes and a cook time of 20 minutes, these pancakes are a quick and delightful breakfast option. Perfect for a cozy morning, this recipe yields 4 servings. Enjoy the rich taste of cinnamon, enhanced with a creamy glaze. Keywords: Cinnamon Roll Pancakes, breakfast recipe, easy pancakes, cream cheese glaze.
Ingredients
- For Pancakes:
- For Cinnamon Filling:
- For Cream Cheese Glaze:
Instructions
Notes
Adjust milk quantity for desired batter consistency.
Use a squeeze bottle for easier application of cinnamon filling.
Nutrition
- Calories: 350
- Sugar: 20g
“`