Green Cake (Lime Cake) – Moist & Easy Lime Cake Recipe

Green Cake (Lime Cake) – The Easiest Lime Cake Recipe with a Vibrant Color!

⚖️
Difficulty
Easy
⏲️
Prep Time
15
🕒
Cook Time
30
⏱️
Total Time
45
🍽️
Servings
9

Introduction

When I first moved to New York City, a slice of vibrant green cake caught my eye in a bakery window. It reminded me of the colorful desserts we’d sometimes make back home in Morocco, but with a distinctly American zest. Inspired, I set out to create my own version of this eye-catching green cake, aiming for that perfect balance of tart lime flavor and tender, moist crumb. This lime cake recipe uses a clever trick with gelatin for that stunning hue and a delightful citrus punch, making it an effortless showstopper for any occasion, from a casual afternoon treat to a festive gathering.

Picture this: a cake so visually appealing with its natural emerald glow, it instantly brightens any table. The aroma alone is intoxicating – that fresh, zesty perfume of ripe limes promises a delightful experience. As you take a bite, the cake yields with a tender, melt-in-your-mouth softness, followed by a wave of bright, tangy lime that’s perfectly balanced by a subtle sweetness. It’s not overly sweet, which I adore; it allows the lime flavor to truly sing. This lime dessert is incredibly refreshing, and I’ve perfected the texture to be wonderfully moist, a testament to using simple, wholesome ingredients and a touch of chef’s intuition. It’s a lime cake that truly delights all the senses.

Over the years, I’ve refined this recipe, drawing from my classic French pastry training and my roots in North African home cooking to bring you a lime cake that’s both sophisticated and incredibly easy. My goal is always to share recipes that are accessible to home bakers but deliver professional results. This green cake recipe highlights my unique angle: achieving that vivid green without any artificial coloring, relying instead on the magic of lime-flavored gelatin. I’ll also share a 💡 mia’s Pro Tip: to ensure your cake has the perfect rise and a common pitfall to avoid when mixing the batter. Get ready for your new favorite easy lime cake!

Why This Green Cake (Lime Cake) Recipe Is the Best

Many recipes call for food coloring or use artificial flavorings, but my lime cake recipe achieves its beautiful green hue and bright, authentic lime flavor through a simple, almost magical ingredient: lime-flavored gelatin. This is my unique twist, inspired by a technique I learned while experimenting with desserts that could be both visually stunning and packed with natural flavor. It’s a little secret that makes this green cake stand out, offering a delightful citrus experience without any fake colors or overwhelming sweetness.

From my days training in pastry in Paris, I learned the importance of understanding how ingredients interact to create perfect textures. For this lime cake, the combination of leavening agents, the right balance of wet and dry ingredients, and the fat content from the oil and milk contribute to an incredibly moist and tender crumb. I’ve meticulously tested the ratios to ensure this cake is fluffy and light yet wonderfully moist, avoiding that dry cake texture that can be so disappointing. It’s a result of careful technique and a deep appreciation for the science of baking.

One of the biggest joys of this recipe is its simplicity. You don’t need any fancy equipment or hard-to-find ingredients. Everything comes together quickly, making it perfect for a weeknight treat or a last-minute dessert. I’ve also included a note on testing your baking powder, a simple step that guarantees a beautifully risen cake, so even if you’re new to baking, you’ll achieve fantastic results. This is truly a foolproof and fast lime dessert that tastes like it came from a professional bakery.

Lime Cake Recipe Ingredients

I love sourcing my ingredients from the bustling farmers markets here in NYC, especially the fresh limes and vibrant citrus readily available most of the year. If I can’t make it to the market, I’ll head to my favorite specialty grocer. This recipe uses pantry staples alongside a key ingredient that gives it both its color and a delightful flavor boost. Freshness is key for the best lime flavor, so always opt for bright, heavy limes.

Ingredients List

  • 2 Large eggs at room temperature
  • 3/4 cup (180g) Milk at room temperature
  • 1/3 cup (75g) Vegetable oil (any flavorless vegetable oil like canola, corn, sunflower)
  • 1/4 cup (60g) Freshly squeezed lime juice
  • 1 Tbsp Lime zest
  • 2 Tbsp (24g) Lime flavored gelatin powder (for the green color)
  • 1 1/2 cups (180g) All-purpose flour
  • 3/4 cup (150g) Granulated sugar
  • 2 tsp (8g) Baking powder*
  • 1/4 tsp (1g) Salt
  • 1 1/3 cups (397g) Sweetened Condensed Milk
  • 1/3 cup (80g) Freshly squeezed lime juice
  • 1 Tbsp (12g) Lime flavored gelatin powder
  • 2 Tbsp (30g) Hot water

Ingredient Spotlight

Lime Flavored Gelatin: This is the star ingredient for both color and flavor. It provides the vibrant green hue naturally, avoiding the need for artificial food coloring, AND it infuses the cake with a wonderful tartness. You can find this in most grocery stores in the baking aisle. If you can’t find lime-flavored, lemon or even unflavored gelatin mixed with a touch more lime juice or extract could work, but the color might be less intense.

Fresh Limes (Juice & Zest): Good quality limes are crucial for that authentic, zesty flavor profile. I always recommend using fresh limes over bottled juice; the zest adds an even more intense citrus perfume that bottled versions often lack. When zesting, be sure to only get the green outer peel, avoiding the bitter white pith underneath. For substitutions, Meyer lemons could offer a slightly sweeter, floral variation, but classic Persian or Key limes are ideal here.

Sweetened Condensed Milk: This forms the base of our luscious topping. It brings a rich, creamy sweetness that beautifully complements the tartness of the lime. Ensure you’re using sweetened condensed milk, not evaporated milk, as the sugar content is essential for the topping’s texture and flavor. While not a direct substitute, a thick caramel sauce could be an interesting, albeit very different, alternative if condensed milk is unavailable.

Original IngredientBest SubstitutionFlavor / Texture Impact
Lime Flavored GelatinLemon or Unflavored Gelatin + extra lime juice/extractColor may be less vibrant; flavor similar.
Fresh LimesMeyer LemonsAdds a floral, sweeter note; less sharp tartness.
Vegetable OilMelted Butter (unsalted)Adds a slight richness and buttery flavor; may slightly alter texture.

How to Make Green Cake (Lime Cake) — Step-by-Step

Follow these easy steps to create your beautiful and delicious green lime cake. Precision is key, especially with baking powder, so let’s get started!

Step 1: Prepare the Pan and Oven

First things first, let’s get our baking workspace ready. Line an 8-inch (20cm) square baking pan with parchment paper, leaving a slight overhang on two sides to help you lift the cake out easily later. Set this aside. Now, preheat your oven to 350°F (180°C). It’s important to let the oven reach its temperature fully before baking to ensure even cooking.

💡 mia’s Pro Tip: Using parchment paper makes cleanup a breeze and ensures your cake won’t stick, giving you a perfectly intact cake every time.

Step 2: Mix Wet Ingredients

In a large mixing bowl, whisk the 2 large eggs until they are frothy, about a minute. This incorporates a little air, helping with the cake’s rise. Next, add the room temperature milk, vegetable oil, 1/4 cup of fresh lime juice, lime zest, and the first portion of lime-flavored gelatin powder (2 tablespoons). Whisk everything together until it’s completely smooth and well combined. The mixture should already be showing a lovely green hue!

Step 3: Combine Dry Ingredients and Mix Batter

In a separate bowl or directly over the wet ingredients, sift together the all-purpose flour, granulated sugar, baking powder, and salt. Sifting helps to aerate the dry ingredients and prevent lumps. Gently whisk these dry ingredients into the wet mixture until *just* combined and you have a smooth batter. Be careful not to overmix at this stage, as it can lead to a tough cake. A few gentle stirs until no dry streaks remain is perfect.

💡 mia’s Pro Tip: Overmixing flour develops gluten, which can make your cake tough and dense. Mix only until the ingredients come together.

Step 4: Bake the Cake

Pour the beautifully green batter into your prepared 8-inch square pan, spreading it evenly. Place the pan in the preheated oven and bake for approximately 30 minutes. You’ll know it’s ready when a toothpick inserted into the center of the cake comes out clean. The aroma filling your kitchen will be simply divine!

Step 5: Cool and Prepare Topping

Once baked, carefully remove the cake from the oven and let it cool completely in the pan on a wire rack. Patience here is key for the topping to set correctly. While the cake cools, prepare the luscious lime topping. In a medium bowl, whisk together the sweetened condensed milk and the remaining 1/3 cup of fresh lime juice. You’ll notice the mixture thickens slightly as the lime’s acidity reacts with the milk – this is exactly what we want! Set this mixture aside.

Step 6: Finish the Topping and Chill

In a small bowl, combine the remaining 1 tablespoon of lime-flavored gelatin powder with 2 tablespoons of hot water. Stir until the gelatin is completely dissolved, creating a smooth liquid. Pour this dissolved gelatin mixture into the sweetened condensed milk and lime juice mixture. Stir thoroughly until everything is well combined and smooth. Once the cake has cooled completely, carefully spread this delightful lime glaze evenly over the top. Then, refrigerate the cake for at least 2 hours, or until the topping is set.

💡 mia’s Pro Tip: Ensure the cake is completely cool before adding the topping. A warm cake will melt the topping and prevent it from setting properly.

StepActionDurationKey Visual Cue
1Prepare Pan & Oven5 mins Oven PreheatOven reaches 350°F.
2Mix Wet Ingredients1-2 minsSmooth, homogenous green liquid.
3Combine Dry & Mix Batter1 minSmooth, lump-free batter.
4Bake Cake30 minsToothpick comes out clean.
5Cool & Prep ToppingAt least 1 hour (cooling)Cake cool to touch; topping thickened.
6Finish Topping & Chill2+ hours (chilling)Topping set firm.

Serving & Presentation

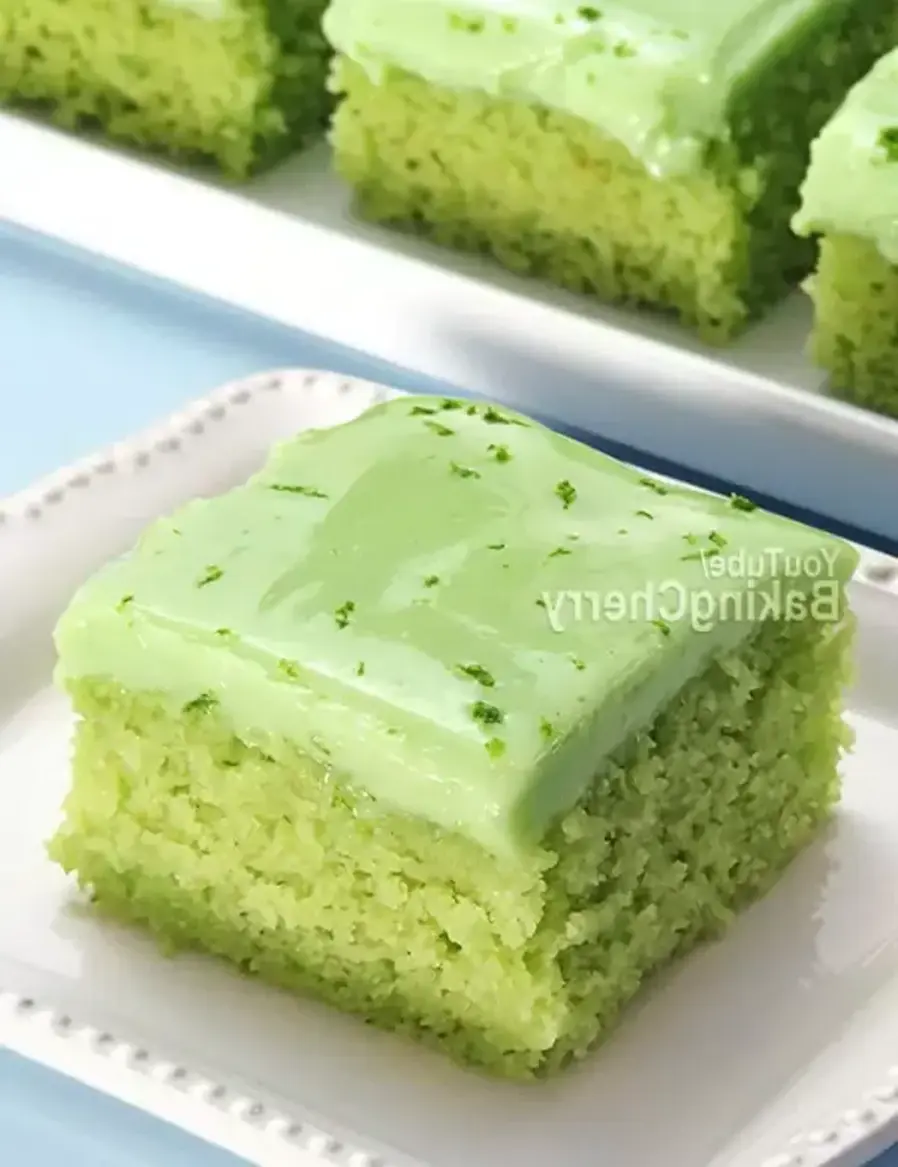
This green cake is a stunner all on its own! I love seeing the vibrant lime glaze catching the light. For an elegant presentation, especially if serving for a special occasion or a holiday like St. Patrick’s Day, I’ll cut the cake into neat squares directly in the pan. A sprinkle of finely grated lime zest right before serving adds a burst of fresh aroma and a pop of color.

In my NYC apartment, I often serve this lime dessert with a dollop of lightly sweetened whipped cream or a small quenelle of crème fraîche to balance the tartness. Its bright flavor also pairs beautifully with a refreshing cup of mint tea, reminiscent of Moroccan hospitality, or a crisp, slightly off-dry Riesling. For a more casual gathering, it’s delicious simply as is, perhaps alongside a vibrant berry salad. The key is to let that gorgeous green and zesty lime flavor shine.

Pairing TypeSuggestionsWhy It Works
Side DishFresh Berry Salad, Whipped CreamThe sweet berries and cream complement the tartness of the lime cake.
Sauce / DipLime Curd (for extra kick), Vanilla Bean Pastry CreamEnhances the lime flavor or provides a creamy contrast.
BeverageMint Tea, Sparkling Limeade, Crisp White Wine (Riesling)Refreshing beverages that echo or cut through the lime’s intensity.
GarnishLime Zest, Candied Lime Slices, Mint SprigsAdds visual appeal and an extra layer of fresh aroma and flavor.

Make-Ahead, Storage & Reheating

Living in a bustling city like New York means life is always on the go, so I appreciate recipes that can be prepared ahead of time. This green lime cake is perfect for that! I often make the whole cake a day in advance, letting it chill overnight in the refrigerator, which allows the flavors to meld beautifully and the topping to set perfectly.

MethodContainerDurationReheating Tip
RefrigeratorAirtight container or plastic wrap3-4 daysServe chilled or at room temperature.
FreezerWrapped tightly in plastic wrap, then foil1-2 monthsThaw in the refrigerator overnight. The glaze may soften slightly; chill again to firm up.
Make-AheadFully assembled and chilledUp to 2 days in advanceChilling overnight is best for flavor melding.

When serving from the refrigerator, I recommend letting the cake sit at room temperature for about 15-20 minutes before slicing. This slightly softens the topping and cake, making for a more pleasant texture compared to serving it ice-cold. If freezing, be aware that the texture of the glaze might change slightly upon thawing, but it will still be delicious. I haven’t found a way to “reheat” this cake traditionally, as it’s best served chilled or at room temperature to preserve the integrity of the lime glaze.

Variations & Easy Swaps

VariationKey ChangeBest ForDifficulty Impact
Spiced Lime CakeAdd cinnamon/nutmeg to dry ingredientsAutumnal or cozy gatheringsEasy
Gluten-Free Lime CakeUse 1:1 gluten-free flour blendDietary restrictionsEasy (ensure blend has xanthan gum)
Coconut Lime CakeSubstitute coconut milk for regular milk, add toasted coconut flakesTropical flavor loversEasy

Spiced Lime Cake

For a warming twist, I love to add a pinch of cinnamon and a whisper of nutmeg to the dry ingredients. This subtle addition transforms the cake into something reminiscent of autumn or a cozy afternoon tea. It’s reminiscent of the spice blends my mother used in Moroccan pastries, adding layers of warmth that beautifully complement the bright lime. The process remains exactly the same; you just get an extra dimension of comforting flavor.

Gluten-Free and Dairy-Free Options

To make this green cake gluten-free, simply swap the all-purpose flour for a good quality 1:1 gluten-free baking flour blend that already contains xanthan gum. I’ve tested this with several brands, and the texture is remarkably similar to the original. For a dairy-free version, you can substitute the milk with unsweetened almond milk or oat milk. Ensure your chosen milk alternative is at room temperature for best results, just like dairy milk.

Coconut Lime Twist

If you’re a fan of tropical flavors, you’ll adore this variation! Replace the regular milk with full-fat coconut milk (from a can, shaken well) and stir in about 1/4 cup of toasted coconut flakes into the batter before baking. The coconut milk adds a subtle richness and a hint of coconut flavor that pairs wonderfully with the lime. The toasted flakes bring a lovely textural contrast.

What gives green cake its bright green color if it’s made with lime?

The vibrant green color in this recipe comes from lime-flavored gelatin powder. It’s a fantastic natural way to achieve that beautiful emerald hue without using any artificial food coloring. The gelatin not only adds color but also contributes to a slightly firmer, glossier topping that complements the moist cake crumb perfectly. It’s a simple yet effective trick I love to use!

Can I use bottled lime juice instead of fresh lime juice in a green lime cake?

While bottled lime juice can work in a pinch, I highly recommend using fresh lime juice for the best flavor in this lime cake recipe. Fresh limes provide a more vibrant, zesty, and authentic citrus taste that truly shines in both the cake and the topping. Bottled juice can sometimes have a slightly artificial or diluted flavor. For the topping, fresh lime juice is crucial for thickening the condensed milk mixture properly due to its natural acidity.

How do I make a green cake without artificial food coloring?

This recipe achieves its natural green color thanks to the lime-flavored gelatin powder. It’s a clever ingredient that imparts both a beautiful hue and a complementary flavor. If you prefer an even greener cake or can’t find lime gelatin, you could consider adding a very small amount (start with 1/4 teaspoon) of natural green food coloring derived from spirulina or spinach, but the gelatin usually provides sufficient color!

What is the best frosting to pair with a lime-flavored green cake?

For this specific green lime cake, the recipe includes a delightful lime glaze made from sweetened condensed milk and lime juice, which acts as both a topping and a delicious “frosting.” It’s perfectly balanced with the cake. If you wanted an alternative frosting, a classic cream cheese frosting with a hint of lime zest would be divine, or even a simple vanilla buttercream offers a neutral sweetness that lets the lime shine through. A meringue frosting could also offer a lovely contrast.

Why is my lime cake batter not green enough?

If your lime cake batter isn’t as green as you’d like, it could be due to a few factors. The brand or specific type of lime-flavored gelatin you used might have a less intense color. Ensure you’re using the amount specified in the recipe. If you’re still aiming for a more vibrant green, you can always supplement with a tiny amount of natural green food coloring, like those made from spirulina or spinach. However, the current amount usually provides a lovely, subtle spring green.

Can I make this lime dessert more tart?

Absolutely! If you prefer a more intensely tart lime dessert, you can easily adjust the recipe. For the cake batter, increase the lime zest to 2 tablespoons and the lime juice to 1/3 cup. For the topping, I recommend adding an extra tablespoon or two of fresh lime juice. You could also consider adding a touch more lime-flavored gelatin, but be mindful not to make the topping too firm. Tasting and adjusting is always my favorite part of baking!

Share Your Version!

I truly hope you love this Green Cake (Lime Cake) recipe as much as I do! It’s a simple yet stunning lime dessert that’s always a hit. If you give this recipe a try, please share your experience in the comments below and leave a star rating. I’d also be thrilled if you shared a photo of your beautiful green cake on Instagram or Pinterest and tagged me @exorecipe. I adore seeing your creations come to life in your kitchens! Let me know, what’s your favorite occasion to bake a vibrant, citrusy cake?

From my NYC kitchen to yours — I hope this recipe brings as much warmth to your table as it does to mine. — mia 🧡

📌

Love This Recipe? Save It to Pinterest!

If you enjoyed this Green Cake (Lime Cake) recipe, don’t let it get lost in your browser tabs! 😄 Pin it now so you can find it again anytime — and explore hundreds more tried-and-tested recipes waiting for you on my Pinterest boards.

👉 Follow mia on Pinterest @chefrecipes2

📌 Pin this recipe · 🔁 Re-pin your favorites · 💬 Tag me when you make it — I love seeing your creations!
Print

clock clock iconcutlery cutlery iconflag flag iconfolder folder iconinstagram instagram iconpinterest pinterest iconfacebook facebook iconprint print iconsquares squares iconheart heart iconheart solid heart solid icon

Green Cake (Lime Cake)

  • Author: Chef Mia

Description

Green Cake (Lime Cake). This quick, easy-to-make lime cake is soft, moist, and delicious! And the best thing is that you can make it at home in just a few minutes with simple ingredients! With a beautiful green color, this cake is perfect for Halloween or any other occasion!


Ingredients

Scale
  • 2 Large eggs at room temperature
  • 3/4 cup (180g) Milk at room temperature
  • 1/3 cup (75g) Vegetable oil (any flavorless vegetable oil like canola, corn, sunflower)
  • 1/4 cup (60g) Freshly squeezed lime juice
  • 1 Tbsp Lime zest
  • 2 Tbsp (24g) Lime flavored gelatin powder (for the green color)
  • 1 1/2 cups (180g) All-purpose flour
  • 3/4 cup (150g) Granulated sugar
  • 2 tsp (8g) Baking powder*
  • 1/4 tsp (1g) Salt
  • 1 1/3 cups (397g) Sweetened Condensed Milk
  • 1/3 cup (80g) Freshly squeezed lime juice
  • 1 Tbsp (12g) Lime flavored gelatin powder
  • 2 Tbsp (30g) Hot water

Instructions

  1. Line an 8in (20cm) square pan with parchment paper. Set it aside.
  2. Preheat the oven to 350°F (180°C) for about 5 minutes before baking the cake.
  3. Place the eggs in a large bowl and mix for about 1 minute using a wire whisk.
  4. Add the milk, vegetable oil, lime juice, lime zest, and lime gelatin powder. Whisk until well combined.
  5. Sift the flour, sugar, baking powder, and salt over the mixture. Gently whisk until just combined and smooth. Dont overmix the flour.
  6. *Note: Make sure the baking powder is good because it will make the cake rise and become fluffy. To make the test, sprinkle about 1/2 teaspoon of baking powder in a glass of warm water. If it starts to fizz and bubble, the baking powder is active.
  7. Pour the batter into the prepared pan and bake for about 30 minutes or until a toothpick inserted in the center comes out clean.
  8. Allow the cake to cool completely at room temperature.
  9. Combine the condensed milk and lime juice in a medium bowl. Whisk until well combined. The acidity of the lime will react with the condensed milk, and the mixture will thicken slightly. Set it aside.
  10. Pour the hot water over the lime gelatin and stir until completely dissolved. Pour the melted gelatin into the condensed milk mixture and stir until well combined.
  11. Spread the mixture over the cake and refrigerate for at least 2 hours.


Green Cake (Lime Cake)

ph">For more delicious inspiration, follow me on Pinterest!

Homemade Oatmeal Cream Pies – Better Than Store-Bought

Homemade Oatmeal Cream Pies Copycat Little Debbie Oatmeal Pies: The Ultimate Homemade Treat

⚖️
Difficulty
Medium
⏲️
Prep Time
25
🕒
Cook Time
10
⏱️
Total Time
45
🍽️
Servings
16-17

Ah, the classic oatmeal cream pie. It’s a cookie that always brings a smile, a wave of nostalgia. When I was a girl in my mother’s kitchen in Morocco, we didn’t have many packaged treats, but the concept of a soft, spiced cookie sandwiching a sweet, creamy filling was universal. It reminds me of the spiced *ghoriba* cookies, delicate pastries lightly scented with orange blossom and almonds that my mother would serve with sweet mint tea. Recreating that childhood magic in my New York City kitchen has been a joy, and this homemade version of the beloved copycat Little Debbie oatmeal pies truly captures the essence of comfort and homemade goodness, elevating it with superior ingredients and a touch of my culinary training from Paris.

Imagine biting into a chewy, golden-brown cookie, infused with the warm embrace of cinnamon and the deep, rich notes of brown sugar and molasses. The texture is sublime — soft, slightly cakey, yet with that essential chew that makes an oatmeal cookie irresistible. Then, the filling: a luscious, cloud-like cream that’s perfectly sweet, a delightful contrast to the spiced cookie. It’s the kind of treat that makes you close your eyes and savor each bite. This is inspired by French patisserie techniques where balance is key, ensuring no single flavor overpowers another, but rather, they dance together in perfect harmony, creating a truly memorable experience.

What sets my recipe apart from other copycat oatmeal cream pies? It’s all about the details your taste buds will thank you for. I’ve refined the dough for optimum chewiness and the frosting for a perfectly balanced sweetness, avoiding the cloying taste some store-bought versions can have. I’ll share a secret for achieving that signature soft texture that doesn’t crumble, and I’ll also highlight a common pitfall many home bakers encounter that can easily be avoided. My years of experimenting, from the bustling markets of Marrakech to the precision of Parisian kitchens, have culminated in this exceptionally delicious, truly homemade oatmeal cream pie.

Why This Homemade Oatmeal Cream Pies Recipe Is the Best

My secret to the sensational flavor of these homemade oatmeal cream pies lies in the nuanced blend of spices and sugars. Drawing from my Moroccan roots, I incorporate a whisper of cinnamon that complements the brown sugar and molasses beautifully, creating a depth that is both comforting and exciting. The addition of a tiny bit of molasses isn’t just for color; it provides a caramel-like sweetness and a slight chewiness that store-bought versions often miss. This deliberate layering of flavors, a technique honed during my culinary studies in Paris, ensures each bite is a perfectly balanced symphony of sweet, spiced, and warm notes, far superior to the original.

The texture is where true baking magic happens, and I’ve paid special attention to it. The use of quick oats is crucial here, as they absorb moisture differently than rolled oats, contributing to a softer, more tender cookie. My Parisian pastry training taught me the importance of creaming butter and sugar correctly to incorporate air, which gives the cookies their lift and delicate crumb. For the filling, using full-fat cream cheese alongside butter provides a tangy counterpoint to the sweetness, making it incredibly rich and decadent without being overly heavy. This attention to textural detail is what makes these soft baked oatmeal cookies melt-in-your-mouth good.

I designed this recipe to be surprisingly approachable, even for those new to baking. By using common pantry staples and providing clear, step-by-step instructions, you’ll find that making homemade oatmeal cream pies is less intimidating than you might think. The key is in the simple ratios and the visual cues I provide. Preheating your oven correctly and not overmixing the dough are crucial, but easily managed steps. This recipe ensures you achieve that delightful homemade taste and texture without needing advanced skills, making it perfect for anyone looking to impress with a classic treat.

Homemade Oatmeal Cream Pies Ingredients

In New York City, I’m lucky to have access to incredible farmers’ markets and specialty shops where I source the freshest ingredients. But for these copycat Little Debbie oatmeal pies, most items are readily available at your local supermarket. My tip is to opt for good quality butter and pure vanilla extract – they truly make a difference, just like my mother insisted on in her kitchen back home.

Ingredients List

  • 1 cup unsalted butter (226 grams) (softened)
  • 1 cup brown sugar (200 grams) (packed)
  • 1/2 cup granulated sugar (100 grams)
  • 1 tablespoon molasses
  • 2 teaspoons vanilla extract
  • 2 large eggs
  • 2 cups all-purpose flour (250 grams)
  • 1/2 teaspoon cinnamon
  • 1 teaspoon baking soda
  • 1/4 teaspoon salt
  • 3 cups quick oats
  • 3/4 cup unsalted butter (168 grams) (softened) – for filling
  • 2 ounces cream cheese (57 grams) (make sure to use full-fat, brick style) – for filling
  • 3-4 cups powdered sugar (330-440 grams) – ADJUST TO TASTE
  • 1 teaspoon vanilla extract – for filling
  • 1/4 teaspoon salt – for filling
  • 1 tablespoon cream (if needed) – for filling

Ingredient Spotlight

**Quick Oats:** These are essential for achieving the signature soft, chewy texture in our homemade oatmeal cream pies. Unlike old-fashioned rolled oats, quick oats have been cut into smaller pieces, allowing them to soften and integrate more fully into the cookie dough. If you only have rolled oats, you can pulse them briefly in a food processor to break them down, but be careful not to turn them into flour. The result will be a slightly chewier cookie, but still delicious.

**Brown Sugar:** The backbone of that classic caramel-like flavor and soft chewiness. I always recommend using packed dark or light brown sugar. It contains more molasses, which contributes to moisture and a richer taste profile. If you find yourself out of brown sugar, a mix of granulated sugar with a couple of tablespoons of molasses can work as a substitute, though precise measurement is key to replicating the texture.

**Full-Fat Cream Cheese:** This is my secret for a frosting that’s both creamy and slightly tangy, cutting through the sweetness beautifully. For the best results and a stable frosting, always use brick-style, full-fat cream cheese that has been softened. Low-fat or spreadable versions contain more water and stabilizers, which can make your filling runny and less delicious. If you need a dairy-free option, a good quality dairy-free cream cheese alternative, preferably in a block form, will work similarly.

Original IngredientBest SubstitutionFlavor / Texture Impact
Quick OatsOld-fashioned rolled oats (pulsed briefly in food processor)Slightly chewier cookie, still very soft and delicious.
Brown Sugar1 cup granulated sugar + 2 tbsp molassesClosest match but may alter moisture and chewiness slightly if not balanced carefully.
Full-Fat Brick Cream CheeseDairy-free block cream cheese alternativeMaintains creaminess and tang, ensuring a stable filling. Flavor profile might vary slightly depending on the brand.

How to Make Homemade Oatmeal Cream Pies — Step-by-Step

Making these cookies is a rewarding process that brings classic flavors to life right in your kitchen. Follow these steps carefully, and you’ll be enjoying these delights in no time.

Step 1: Prepare the Oatmeal Dough

Preheat your oven to 350°F (175°C). Line two baking sheets with parchment paper or silicone mats. In a large bowl, cream together the softened butter, packed brown sugar, and granulated sugar until light and fluffy. This incorporates air, crucial for a tender cookie. Mix in the molasses, vanilla extract, and then the eggs, one at a time, beating well after each addition until the mixture is smooth and creamy.

💡 mia’s Pro Tip: Ensure your butter is properly softened, not melted. Softened butter creams better with sugar, creating air pockets that lead to lighter, chewier cookies.

Step 2: Incorporate Dry Ingredients and Oats

In a separate bowl, whisk together the all-purpose flour, cinnamon, baking soda, and salt. Gradually add this dry mixture to the wet ingredients. I like to give it a few stirs by hand first to prevent flour from flying everywhere when I turn on the mixer. Beat on low speed until just combined. Finally, gently stir in the quick oats until evenly distributed throughout the dough.

💡 mia’s Pro Tip: Don’t overmix the dough once the flour is added. Overmixing develops gluten, which can result in tough cookies instead of the desired soft-baked oatmeal cookies.

Step 3: Form and Bake the Cookies

Drop rounded tablespoons of dough onto the prepared baking sheets, spacing them about 2 inches apart. I find a cookie scoop is perfect for uniform size, yielding about 32-34 cookies total, which makes 16-17 sandwiches. Bake one sheet at a time in the center of the preheated oven for 9-11 minutes, or until the edges are lightly golden and the tops look set.

💡 mia’s Pro Tip: Baking one sheet at a time ensures even heat circulation, leading to consistently baked cookies without burnt bottoms or undercooked centers.

Step 4: Cool the Cookies

Let the cookies cool on the baking sheets for at least 10 minutes before carefully transferring them to a wire rack to cool completely. This resting period on the hot baking sheet allows them to set up properly, preventing them from breaking when handled.

Step 5: Prepare the Cream Filling

While the cookies cool, make the filling. In a large bowl, beat the softened butter until fluffy. Chop the softened cream cheese into a few pieces and beat it into the butter until smooth and well combined. This step ensures no lumps in your delicious cream filling.

💡 mia’s Pro Tip: Make sure the cream cheese and butter are at the same room temperature for the smoothest, most easily combined filling.

Step 6: Finish the Filling and Assemble

Add 1 ½ cups of powdered sugar, 1 teaspoon of vanilla extract, and ¼ teaspoon of salt to the butter and cream cheese mixture. Mix on low speed initially, then increase to medium until incorporated. Gradually beat in the remaining powdered sugar, ½ cup at a time, until you reach your desired sweetness and creamy consistency. If the frosting seems too thick, you can beat in 1 tablespoon of cream. To assemble, spread about 1 to 1.5 tablespoons of frosting onto the bottom of one cooled cookie and sandwich it with another cookie, bottom-side down.

⚠️ Common Mistake to Avoid: Adding too much powdered sugar at once when making the filling. It’s best to add it gradually, allowing you to control the consistency and sweetness perfectly, avoiding a gritty texture or overly thick frosting.

StepActionDurationKey Visual Cue
1Prepare Dough~10 minsLight, fluffy butter/sugar mixture; smooth, creamy batter.
2Incorporate Dry Ingredients & Oats~5 minsDough comes together, oats evenly distributed.
3Form & Bake Cookies9-11 mins per sheetGolden edges, set tops.
4Cool Cookies~10 mins on sheet, then fully on rackCookies are firm enough to handle.
5Prepare Filling~5 minsSmooth, fluffy butter and cream cheese mixture.
6Finish Filling & Assemble~10 minsThick, pipeable/spreadable frosting; assembled sandwiches.

Serving & Presentation

These homemade oatmeal cream pies are delightful on their own, but I love to present them with a certain flair, a nod to the elegance of Parisian cafés. For a simple, beautiful presentation, arrange them on a rustic wooden board, perhaps dusted with a whisper of powdered sugar. A small bunch of fresh mint or a few edible flowers can add a pop of color that’s both sophisticated and inviting. In my NYC kitchen, I often serve these with a glass of high-quality milk, or for a more adult twist, a small glass of spiced apple cider or a bold dark roast coffee—perfect for cozy afternoons.

The satisfying crunch of the cookie giving way to the creamy center is an experience in itself. For gatherings, I sometimes arrange them in a circular pattern, reminiscent of a flower or a sunburst, on a platter. This not only looks beautiful but also makes them easy for guests to pick up. The warm, comforting flavors are also reminiscent of some of the spiced desserts I enjoyed growing up in Morocco, where food is always about sharing and community. They’re perfect for a bake sale, a potluck, or simply as a special afternoon treat for your loved ones.

Pairing TypeSuggestionsWhy It Works
Side DishA simple green salad with a light vinaigretteThe freshness cuts through the richness of the cookie.
Sauce / DipWarmed caramel sauce for dippingAn extra layer of decadence that complements the brown sugar notes.
BeverageCold whole milk, black coffee, or spiced apple ciderMilk balances the sweetness; coffee provides a contrast; cider echoes the warm spices.
GarnishDusting of powdered sugar, a sliver of dark chocolate, or fresh mint leavesEnhances visual appeal and adds subtle flavor complexity.

Make-Ahead, Storage & Reheating

In my busy NYC life, I rely on smart make-ahead strategies to enjoy homemade treats without constant baking. These oatmeal cream pies are perfect for that! You can bake the cookies one day and make the filling the next, then assemble just before serving for peak freshness. Alternatively, you can bake and assemble them a couple of days in advance as they hold up beautifully.

MethodContainerDurationReheating Tip
RefrigeratorAirtight container3-4 daysEnjoy cold or very briefly microwave (7-10 seconds per cookie) to soften filling.
FreezerFreezer-safe container or wrap well in plastic wrap, then foil2 monthsThaw completely in the refrigerator before serving. Avoid refreezing.
Make-AheadStore cookies and filling separately in airtight containersCookies: 2 days; Filling: 1 dayAssemble just before serving for the best texture.

If you’re reheating slightly chilled cookies from the fridge, a very short stint in the microwave can bring the filling back to a wonderfully soft state without overcooking the cookie. For a more authentic “just baked” feel, I sometimes place them on a baking sheet in a low oven (around 250°F / 120°C) for a few minutes until the filling is just soft. Be cautious not to overheat, as this can dry out the cookies very quickly. The cream cheese gives the filling a bit of stability even when warmed, making them quite forgiving.

Variations & Easy Swaps

VariationKey ChangeBest ForDifficulty Impact
Cinnamon Spice TwistAdd nutmeg, cloves, or ginger to cookie doughCraving a warmer spice profile.Easy
Gluten-Free / Dairy-FreeUse GF flour blend, dairy-free butter/cream cheese alternativesDietary restrictions.Medium (requires specific product selection)
Seasonal Chocolate OrangeAdd cocoa powder to dough; orange zest to fillingFestive occasions, chocolate lovers.Easy

Cinnamon Spice Twist

For an extra layer of warmth, I love to subtly enhance the spices in the cookie dough. Think of the fragrant spice blends used in Moroccan tagines! Add an eighth of a teaspoon of ground nutmeg and a pinch of ground cloves along with the cinnamon. You could even add a touch of ground ginger for a subtle kick. This variation is perfect for the autumn and winter months, adding a cozy depth that complements the brown sugar and oats beautifully.

Gluten-Free Dairy-Free Swap

Making these accessible for everyone is important to me. For a gluten-free version, swap the all-purpose flour for a good quality gluten-free baking blend (one that contains xanthan gum). For a dairy-free treat, substitute the butter with a high-quality vegan butter stick and use a dairy-free cream cheese alternative that comes in a block form, similar to regular cream cheese. The texture might be slightly different, but the flavor will still be wonderfully comforting.

Seasonal Chocolate Orange Twist

Drawing inspiration from my favorite chocolate-orange pastries I find at NYC bakeries, this variation is divine. For the cookies, reduce the flour by ¼ cup and add 2-3 tablespoons of unsweetened cocoa powder. For the filling, add 1 teaspoon of finely grated orange zest and a touch more powdered sugar if needed. This creates a rich, decadent cookie with a bright citrus note, perfect for holidays or when you crave something a little more luxurious.

How do you make the marshmallow filling for homemade oatmeal cream pies?

While the classic store-bought version uses a marshmallow creme, my homemade oatmeal cream pie filling is a rich, creamy frosting made from softened butter, full-fat brick-style cream cheese, and powdered sugar. I also add vanilla extract and a pinch of salt for flavor balance. This method results in a more stable and less overly sweet filling that perfectly complements the chewy oatmeal cookies, providing a delicious tang that you won’t find in simpler marshmallow versions. It’s a technique I learned for ensuring perfect frosting consistency.

Can I substitute regular rolled oats for quick oats in homemade oatmeal cream pies?

Yes, you can substitute regular old-fashioned rolled oats for quick oats, but keep in mind there will be a slight difference in texture. Rolled oats are larger and chewier, so your cookies might be a bit more robust. To achieve a texture closer to the cookies made with quick oats, I recommend pulsing the rolled oats a few times in a food processor before adding them to the dough. This breaks them down into smaller pieces, helping them integrate more smoothly and contributing to that characteristic softer bite.

How long do homemade oatmeal cream pies stay fresh, and how should you store them?

Proper storage is key to enjoying these delightful treats. Homemade oatmeal cream pies are best stored in an airtight container at room temperature for up to 2-3 days, or in the refrigerator for up to 4-5 days. Refrigeration will firm up the filling, so let them sit out for about 15-20 minutes before serving if you prefer a softer creaminess. Avoid storing them in direct sunlight or humid conditions to prevent them from becoming stale or soggy. If you need to store them for longer, freezing is an excellent option.

What can I use instead of shortening in the cream filling for oatmeal cream pies?

My recipe doesn’t use shortening in the cream filling; instead, I opt for a combination of butter and full-fat cream cheese. This provides a much richer flavor and a delightful tang. If, for some reason, you needed to substitute the butter in my filling recipe (though I highly recommend against it for flavor), a high-quality vegan butter alternative that’s block-style would be the closest substitute. However, stick margarine or oil-based spreads would likely result in a softer, less stable filling and a different flavor profile altogether.

Why are my oatmeal cream pies falling apart?

If your homemade oatmeal cream pies are falling apart, it’s usually due to one of two things: the cookies weren’t baked long enough to set properly, or they were handled too soon after baking. They need adequate cooling time on the baking sheet to firm up before being moved. Another possibility is overmixing the dough after adding the flour, which can make the cookies brittle. Ensure you’re following the baking time and cooling instructions precisely, and try to handle them gently when assembling.

Can I make the cookie dough ahead of time?

Absolutely! The cookie dough for these homemade oatmeal cream pies can be made ahead of time. Once the dough is mixed, cover it tightly with plastic wrap and refrigerate for up to 2-3 days. The flavors will actually meld and deepen during this time, leading to an even more delicious cookie. When you’re ready to bake, let the dough sit at room temperature for about 15-20 minutes to make it easier to scoop and shape, then proceed with the baking instructions as usual.

Share Your Version!

I pour my heart into all my recipes, and I’m so excited for you to try these Homemade Oatmeal Cream Pies. If you whip up a batch, I would absolutely love to see your creations! Tag me on Instagram or Pinterest using @exorecipe — your photos always brighten my day. And if you have any questions, especially about how those flavors marry or specific texture tips, please don’t hesitate to ask in the comments below. Your feedback and questions help me make my recipes even better!

From my NYC kitchen to yours — I hope this recipe brings as much warmth to your table as it does to mine. — mia 🧡

📌

Love This Recipe? Save It to Pinterest!

If you enjoyed this Homemade Oatmeal Cream Pies recipe, don’t let it get lost in your browser tabs! 😄 Pin it now so you can find it again anytime — and explore hundreds more tried-and-tested recipes waiting for you on my Pinterest boards.

👉 Follow mia on Pinterest @chefrecipes2

📌 Pin this recipe · 🔁 Re-pin your favorites · 💬 Tag me when you make it — I love seeing your creations!

Print

clock clock iconcutlery cutlery iconflag flag iconfolder folder iconinstagram instagram iconpinterest pinterest iconfacebook facebook iconprint print iconsquares squares iconheart heart iconheart solid heart solid icon

Homemade Oatmeal Cream Pies

  • Author: Chef Mia

Description

These oatmeal cream pie cookies are incredibly chewy with a hint of cinnamon, brown sugar and vanilla. The filling is deliciously creamy and not too sweet either. They’re the homemade version of the classic Lil’ Debbie cookies, but so much better!


Ingredients

Scale
  • 1 cup unsalted butter (226 grams) (softened)
  • 1 cup brown sugar (200 grams) (packed)
  • 1/2 cup granulated sugar (100 grams)
  • 1 tablespoon molasses
  • 2 teaspoons vanilla extract
  • 2 large eggs
  • 2 cups all-purpose flour (250 grams)
  • 1/2 teaspoon cinnamon
  • 1 teaspoon baking soda
  • 1/4 teaspoon salt
  • 3 cups quick oats
  • 3/4 cup unsalted butter (168 grams) (softened)
  • 2 ounces cream cheese (57 grams) (make sure to use full-fat, brick style)
  • 34 cups powdered sugar (330440 grams)
  • 1 teaspoon vanilla extract
  • 1/4 teaspoon salt
  • 1 tablespoon cream (if needed)

Instructions

  1. Preheat the oven to 350F (180C or 170C fan forced). Line cookie sheets with silicone baking mats or baking paper.
  2. In a large bowl beat together the butter, brown sugar and granulated sugar until fluffy.
  3. Mix in the molasses, vanilla extract and eggs until creamy.
  4. Turn off the mixer and add in the flour, cinnamon, baking soda and salt. Do a few stirs by hand first, then turn the mixer to a low speed and beat until incorporated. (This is to avoid the flour flying everywhere).
  5. Stir in the oats.
  6. Form the cookies into balls about 1 to 1.5 tablespoons in size and place 2 inches apart on the lined cookie sheets. I use a cookie scoop for this. I typically get about 32-34 cookies which will make 16-17 sandwiches.
  7. Bake 1 sheet of cookies at a time in the middle of the preheated oven. They'll bake for about 9-11 minutes, or until the tops look set.
  8. Cool on the cookie sheet for at least 10 minutes before transferring to a wire rack to continue cooling.
  9. In a large bowl, beat the butter until fluffy.
  10. Chop the cream cheeses into 3-4 pieces, then beat into the butter.
  11. Add in 1 1/2 cups powdered sugar, vanilla and salt. Start with the mixer on a low speed, then gradually increase to a medium speed until the ingredients are incorporated.
  12. Beat in the rest of the powdered sugar about 1/2 cup at a time until the desired sweetness is reached. If needed (AKA if the frosting is too thick), beat in 1 tablespoon of cream.
  13. Take 1 cooled cookie and frost the bottom with about 1 to 1.5 tablespoons of frosting.
  14. Then sandwich a second cookie on top with the bottom facing down.


Nutrition

  • Calories: 509 kcal
  • Sugar: 49 g
  • Fat: 24 g
  • Carbohydrates: 72 g
  • Protein: 5 g


Homemade Oatmeal Cream Pies

k">

Tried This Recipe? Leave a Comment!

Did you make this recipe? I’d love to hear how it turned out! Please leave a comment and a rating below. Your feedback helps other home cooks and supports cheerychop.com!


For more delicious inspiration, follow me on Pinterest!

Juicy Garlic Steak Bites and Potatoes – One Pan Perfection

Garlic Steak Bites and Potatoes: An Easy One-Pan Wonder

⚖️
Difficulty
Easy
⏲️
Prep Time
15 mins
🕒
Cook Time
30 mins
⏱️
Total Time
45 mins
🍽️
Servings
4-6

There’s something magical about a dish that comes together with minimal fuss but delivers maximum flavor, especially after a long day navigating the vibrant chaos of New York City. This Garlic Steak Bites and Potatoes recipe is precisely that kind of magic. It’s a dish I first envisioned on a chilly evening, yearning for the hearty comfort of a well-loved meal but with the speed and elegance that my busy schedule demands. For me, it started with a craving for perfectly seared steak and creamy, crisp potatoes, all enveloped in a rich garlic butter sauce. Drawing inspiration from my Moroccan roots, where simple ingredients are elevated with aromatic spices, and my French training, which instilled a deep respect for precise cooking techniques, I set out to create an unforgettable garlic steak bites and potatoes recipe that’s both elegant and incredibly easy steak bites recipe.

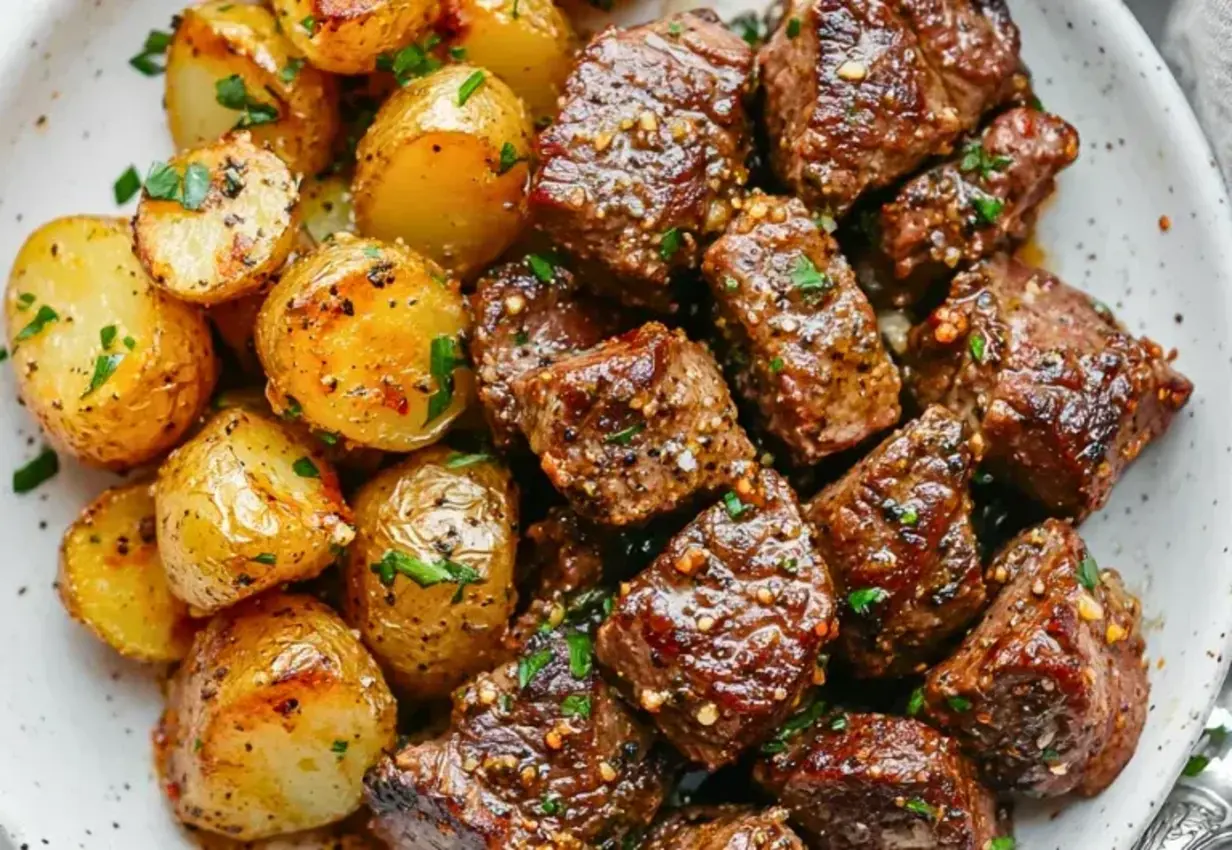
Imagine this: succulent cubes of steak, seared to a perfect medium-rare, their edges kissed with a beautiful crust. Alongside them, tender baby potatoes, roasted until golden and slightly crispy, offering a delightful contrast in texture. The aroma that fills your kitchen as the 56 cloves of garlic (yes, 56! It’s a garlic lover’s dream!) begin to sizzle in butter is simply intoxicating. The warmth of the paprika and the subtle herbaceous notes of Italian herbs weave through the dish, creating a symphony of flavors that’s both comforting and sophisticated. It’s a one-pan wonder, meaning less cleanup and more enjoyment, a philosophy I learned to cherish during my culinary studies in Paris, where efficiency in the kitchen is an art form. This garlic butter steak bites dish truly sing with every bite.

What makes this steak and potato bites recipe stand out is the balance. I’ve perfected the timing so your potatoes are fork-tender and kissed with golden edges just as the steak finishes searing. It’s a technique I’ve refined over years of cooking, ensuring you get beautifully cooked components without the stress. I’ll also share a little secret – the trick to infusing maximum garlic flavor without burning it. And I’ll point out a common pitfall that many home cooks fall into when searing steak, ensuring your bites are always tender and juicy. This isn’t just another recipe; it’s my curated approach to a dish that’s become a go-to in my New York kitchen.

Why This Garlic Steak Bites and Potatoes Recipe Is the Best

My culinary journey, from my mother’s fragrant kitchen in Marrakech to the hallowed halls of Parisian culinary schools and finally to the bustling streets of NYC, has taught me that the best dishes are often born from simplicity elevated by thoughtful technique. This garlic steak bites and potatoes recipe embodies that philosophy. The “flavor secret” here isn’t just the sheer amount of garlic, but how it’s introduced at the right moment to bloom its aromatic essence without bitterness. My North African heritage instilled in me a love for warming spices like paprika, which I use to give the potatoes a beautiful hue and subtle smoky flavor, while my French training ensures the steak is treated with the respect it deserves, achieving that perfect sear.

The “perfected texture” in these steak and potato bites is a result of a deliberate cooking process. By roasting the potatoes first until they’re tender and then allowing them to re-integrate with the steak and garlic butter at the end, I ensure each potato piece is perfectly cooked and slightly crisp, not mushy. The steak is seared quickly to lock in its juices, ensuring it remains incredibly tender. This careful layering of textures and flavors is what transforms a simple meal into something truly special, a testament to applying classic techniques to accessible ingredients found at any NYC farmers market.

This recipe is “foolproof and fast” because I designed it for real life. The one-pan method not only minimizes cleanup but also allows flavors to meld beautifully. The ingredient list is straightforward, featuring items you can easily find at your local supermarket. The instructions are clear and concise, guiding you through each step with confidence. Whether you’re a seasoned home cook or just starting out, this easy steak bites recipe provides a guaranteed delicious meal that tastes like it came from a gourmet steakhouse, without the fuss.

Garlic Steak Bites and Potatoes Ingredients

When I’m sourcing ingredients for this dish in my NYC neighborhood, especially near Union Square Market, I always look for the freshest produce. For the steak, I prefer locally raised sirloin, known for its tenderness and rich flavor. The baby potatoes I choose are usually small and firm, perfect for roasting until they get those irresistible crispy edges. And of course, the garlic – in my apartment, we believe you can never have too much! I often buy these beautiful, plump heads from a local vendor who says they come from California. It reminds me of the fragrant markets back home in Morocco. This garlic butter steak bites recipe is a true celebration of great ingredients.

Ingredients List

  • 1½ lbs sirloin steak, cut into bite-sized cubes
  • 1½ lbs baby potatoes, halved or quartered
  • 4 tablespoons olive oil (divided)
  • 4 tablespoons butter
  • 56 cloves garlic, minced (about 2-3 heads)
  • 1 teaspoon paprika
  • 1 teaspoon dried Italian herbs
  • Salt and black pepper, to taste
  • Fresh parsley, chopped (for garnish)

Ingredient Spotlight

Sirloin Steak: For this easy steak bites recipe, sirloin is my top choice. It strikes a beautiful balance between tenderness and flavor, and it’s widely available in US supermarkets. Look for a well-marbled piece for the best results. If sirloin isn’t available, a good quality flank steak or ribeye cut into cubes would also work wonderfully, though they might require slightly different cooking times to maintain doneness.

Baby Potatoes: These little gems are crucial for achieving that delightful texture contrast. I love using baby Yukon Gold or red potatoes because their skins thin and crisp up beautifully when roasted. When shopping in the US, aim for uniform sizes so they cook evenly. If you can’t find baby potatoes, simply chop larger potatoes like Yukon Gold or fingerlings into 1-inch cubes; just be mindful to increase their cooking time slightly.

Garlic: Ah, garlic! 56 cloves might sound like a lot, but trust me, it’s the heart of this dish. When minced and gently sautéed, garlic transforms into a sweet, aromatic powerhouse that infuses the entire pan. I recommend using fresh garlic – it has a superior flavor profile to pre-minced varieties. If you’re sensitive to raw garlic’s bite, you can opt for slightly less, or ensure you cook it gently until golden and fragrant, not browned, to mellow its intensity.

Original IngredientBest SubstitutionFlavor / Texture Impact
Sirloin SteakFlank or Ribeye SteakSimilar richness, may require slightly adjusted searing time.
Baby PotatoesDiced Larger Potatoes (e.g., Yukon Gold)Slightly less uniform crispness, may require longer roasting time.
Minced GarlicGarlic Powder (use 1 tsp)Less intense, fresher garlic flavor; may require slightly more seasoning.

How to Make Garlic Steak Bites and Potatoes — Step-by-Step

Let’s get cooking! This recipe is designed to be straightforward, but paying attention to a few key details will ensure perfection every time.

Step 1: Prepare and Roast the Potatoes

In a large skillet, heat 2 tablespoons of olive oil over medium heat. Add your halved or quartered baby potatoes to the hot skillet. Season them generously with salt, black pepper, and the paprika. Stir to coat them evenly. Cook, stirring occasionally, for about 15 minutes, or until they are golden brown and easily pierced with a fork, indicating they are fork-tender. Once ready, remove the potatoes from the skillet and set them aside on a plate. This initial roast is key to their tender interior and slightly crisp exterior.

💡 mia’s Pro Tip: Don’t overcrowd the pan when roasting the potatoes! If your skillet isn’t large enough, it’s better to use two pans or work in batches. Overcrowding will cause the potatoes to steam rather than roast, preventing them from developing that beautiful golden-brown crispiness I love.

Step 2: Sear the Steak

While the potatoes are roasting (or after they’re done), pat your seasoned steak cubes dry with paper towels – this is crucial for a good sear. Season them with salt, pepper, and the dried Italian herbs. In the same skillet (no need to wash it!), add the remaining 1 tablespoon of olive oil and 2 tablespoons of butter. Once the butter has melted and the pan is hot over medium-high heat, carefully add the steak cubes in a single layer. Sear them for 2-3 minutes per side until beautifully browned. Avoid overcrowding the pan by searing in batches if necessary.

⚠️ Common Mistake to Avoid: Overcooking the steak! Steak bites cook very quickly. They should be seared to your desired doneness (medium-rare is ideal for tenderness) and then removed. Overcooked steak bites will be tough and dry. Remember, they will continue to cook slightly when returned to the pan later.

Step 3: Sauté the Garlic

Reduce the skillet heat to medium-low. Add the remaining 2 tablespoons of butter to the pan. Once melted, add all the minced garlic. Sauté the garlic gently for about 1 minute, stirring constantly, until it becomes fragrant and is just starting to turn a pale golden. You want to cook the garlic until it’s aromatic and sweet, not burnt, as burnt garlic is bitter.

Step 4: Combine and Finish

Return the par-cooked roasted potatoes back into the skillet with the fragrant garlic butter. Toss everything together gently to coat the potatoes. Now, add the seared steak bites back into the pan. Stir everything together well, ensuring the steak and potatoes are coated in the delicious garlic butter sauce.

💡 mia’s Pro Tip: For an extra layer of flavor, deglaze the pan with a splash of dry white wine or beef broth after removing the steak and before adding the garlic. Scrape up any browned bits from the bottom of the pan – they are packed with flavor!

Cook for about 2-3 more minutes, stirring occasionally, just until the steak bites are heated through and coated beautifully. Be careful not to overcook them at this stage. Finally, garnish generously with fresh chopped parsley. Serve immediately while hot and delicious.

StepActionDurationKey Visual Cue
1Roast Potatoes15 minutesGolden brown, fork-tender
2Sear Steak4-6 minutes totalBrowned sear marks, juicy interior
3Sauté Garlic1 minuteFragrant, pale golden
4Combine & Finish2-3 minutesHeated through, coated in sauce

Serving & Presentation

This garlic steak bites and potatoes dish is inherently rustic and comforting, perfect for a casual weeknight dinner or a relaxed weekend gathering. I love plating it family-style, transferring the skillet directly to the table (with a heatproof mat, of course!) so everyone can dig in. The vibrant green of the fresh parsley garnish pops beautifully against the golden potatoes and deep brown steak, adding a fresh aromatic lift. It’s a dish that speaks of home, warmth, and good company, much like the meals shared in my Moroccan childhood home, but with that touch of elevated simplicity that my French training ingrained in me.

For a more formal presentation, I’ll serve individual portions in shallow bowls, making sure each serving gets a good mix of steak, potatoes, and plenty of that luscious garlic butter sauce. A little extra sprinkle of parsley or a tiny pinch of red pepper flakes for a hint of heat can add a professional touch. This dish pairs wonderfully with simple, fresh elements that don’t compete with its rich flavors, a principle I learned from watching chefs plate intricate dishes in Paris – balance is key!

Pairing TypeSuggestionsWhy It Works
Side DishSteamed Asparagus, Sautéed Green Beans with Lemon, Simple Arugula SaladThese add a fresh, slightly bitter or acidic counterpoint to the rich steak and potatoes.
Sauce / DipAioli, Chimichurri, Sriracha MayoA creamy aioli or herbaceous chimichurri complements the garlic butter, while sriracha mayo adds a welcome kick.
BeverageFull-bodied Red Wine (Cabernet Sauvignon, Malbec), Craft Beer, Sparkling Water with LemonA robust red wine cuts through the richness, a good beer offers refreshment, and a simple sparkling water cleanses the palate.
GarnishFresh Parsley, Chives, Red Pepper FlakesAdds a burst of freshness and visual appeal. Red pepper flakes offer a hint of heat if desired.

Make-Ahead, Storage & Reheating

As a busy New Yorker, I often rely on smart meal prep to keep my kitchen running smoothly. While this dish is best enjoyed fresh, I’ve found ways to make it work for make-ahead meals. The key is to slightly undercook the potatoes during their initial roast and to sear the steak while keeping it medium-rare, as both will continue to cook during reheating. Store components separately if possible, or together if you’re short on time.

MethodContainerDurationReheating Tip
RefrigeratorAirtight container3-4 daysReheat gently in a skillet over medium-low heat, adding a splash of water or broth if needed.
FreezerFreezer-safe bag or container1-2 monthsThaw in the refrigerator overnight. Reheat as above. Texture may be slightly softer.
Make-AheadAirtight container (components separate/together)1 day in advanceFinal searing/heating step can be done just before serving.

When reheating, I always opt for the stovetop method for the best texture. A sauté pan on medium-low heat allows you to control the process and re-crisp the potatoes while gently warming the steak. Add a tiny splash of olive oil or butter if the pan seems dry. If you’re reheating from frozen, ensure it’s fully thawed in the refrigerator first to prevent uneven cooking and a rubbery texture. The goal is to bring back that beautiful, slightly crispy exterior on the potatoes and ensure the steak remains tender.

Variations & Easy Swaps

VariationKey ChangeBest ForDifficulty Impact
Spicy Garlic Steak BitesAdd red pepper flakes or a pinch of cayenne to the garlic sauté.Those who love heat.Same.
Rosemary & Thyme Steak BitesUse fresh rosemary and thyme instead of Italian herbs.Herb lovers, French cuisine enthusiasts.Same.
Lemon Garlic Steak BitesAdd lemon zest and juice at the end, with fresh parsley garnish.Lighter, brighter flavor profile.Same.

Spicy Garlic Steak Bites and Potatoes

For a little kick, I love to add a pinch of red pepper flakes or a dash of cayenne pepper to the pan when I sauté the garlic. This awakens the palate and adds a fiery dimension that beautifully complements the richness of the steak and the sweetness of the garlic. It’s a simple Moroccan touch, reminiscent of the warmth found in tagines seasoned with a touch of heat.

Gluten-Free and Dairy-Free Steak Bites and Potatoes

This recipe is naturally gluten-free! For a dairy-free version, simply substitute the butter with your favorite high-quality dairy-free butter alternative or use an additional tablespoon of olive oil. I’ve tested this with a good plant-based butter, and it imparts a similar richness without altering the core flavors. Just like the original, it’s incredibly satisfying and perfect for feeding a crowd with diverse dietary needs.

Seasonal Steak Bites and Potatoes with Rosemary and Thyme

One of my favorite variations, especially in the cooler months, is to swap the Italian herbs for fresh rosemary and thyme. The earthy, pine-like aroma of rosemary and the subtle minty notes of thyme pair exceptionally well with steak and potatoes. I often pick up fresh bundles at the Greenmarket on Saturdays. This combination brings a sophisticated, almost rustic French countryside feel to the dish.

What is the best cut of steak to use for garlic steak bites and potatoes?

For the best garlic steak bites and potatoes recipe, I recommend using tender cuts of beef that cook quickly. Sirloin is excellent due to its balanced flavor and tenderness, and it’s readily available. Ribeye or New York strip are also fantastic choices, offering richer marbling for extra tenderness and flavor. Avoid tougher cuts that require slow braising, as these steak bites are meant for quick searing to maintain their succulent texture.

How do you keep garlic steak bites from getting tough?

The secret to tender steak bites is threefold: choose a tender cut of steak, don’t overcook it, and cut against the grain if your steak cubes are larger. For this easy steak bites recipe, searing them quickly over high heat for just a few minutes per side is crucial. Aim for medium-rare to medium doneness. Remember that the steak will continue to cook slightly after it’s removed from the heat, so err on the side of undercooking if you’re unsure. Proper searing creates a flavorful crust without toughening the meat.

Can I cook garlic steak bites and potatoes in the oven instead of a skillet?

Yes, you absolutely can adapt this garlic steak bites and potatoes recipe for the oven, and it can be quite convenient! You would first roast the seasoned potatoes on a baking sheet at around 400°F (200°C) until they are mostly tender and golden, which usually takes about 20-25 minutes. While the potatoes roast, sear the steak bites in a skillet – you don’t want to bake the steak for too long as it will become tough. Once the potatoes are almost done, you can combine everything in the skillet with the garlic butter, or even put the skillet (if oven-safe) into the oven for the last few minutes to finish everything off together.

Should I boil the potatoes before frying them with the steak bites?

For this specific steak and potato bites recipe, I actually prefer to roast the potatoes first rather than boiling them. Roasting allows them to develop a lovely crispy exterior and a tender, fluffy interior, which provides a wonderful textural contrast to the seared steak bites. Boiling them beforehand would make them too soft and potentially mushy when combined with the other ingredients. The roasting method ensures each piece holds its shape and gets those delicious golden-brown edges from the skillet.

How much garlic is too much garlic for steak bites?

In my kitchen, there’s really no such thing as “too much garlic” when it comes to a dish like these garlic butter steak bites, especially when it’s balanced correctly! The 56 cloves in this recipe might seem intimidating, but when minced and sautéed gently, they become wonderfully sweet and aromatic, infusing the entire dish without being overpowering or acrid. The key is in the slow, gentle cooking of the garlic to release its flavor at its best. If you’re new to this amount, start with about 30-40 cloves and adjust to your preference.

Can I use different herbs for my steak and potato bites?

Absolutely! While I love the classic Italian herbs for this garlic steak bites and potatoes recipe, feel free to experiment. Fresh rosemary and thyme, as mentioned in the variations, are fantastic. For a more North African flair, a pinch of cumin or coriander could be added to the potatoes. Even a bit of fresh cilantro or mint at the end can offer a delightful freshness. The goal is to complement the garlic and steak, so choose herbs that you enjoy and that won’t be overpowered.

Share Your Version!

I truly hope you adore this Garlic Steak Bites and Potatoes recipe as much as I do! It’s a dish that brings a smile to my face, and I’m so excited for you to try it. When you make it, please consider leaving a star rating and a comment below – your feedback means the world to me and helps other cooks. I also love seeing your creations! Share a photo on Instagram or Pinterest and tag me @exorecipe. I’m always curious to know how you personalize my recipes – did you go heavy on the garlic, or perhaps add a pinch of smoked paprika for an extra layer of flavor?

From my NYC kitchen to yours — I hope this recipe brings as much warmth to your table as it does to mine. — mia 🧡

📌

Love This Recipe? Save It to Pinterest!

If you enjoyed this Garlic Steak Bites and Potatoes recipe, don’t let it get lost in your browser tabs! 😄 Pin it now so you can find it again anytime — and explore hundreds more tried-and-tested recipes waiting for you on my Pinterest boards.

👉 Follow mia on Pinterest @chefrecipes2

📌 Pin this recipe · 🔁 Re-pin your favorites · 💬 Tag me when you make it — I love seeing your creations!

Print

clock clock iconcutlery cutlery iconflag flag iconfolder folder iconinstagram instagram iconpinterest pinterest iconfacebook facebook iconprint print iconsquares squares iconheart heart iconheart solid heart solid icon

Garlic Steak Bites and Potatoes

  • Author: Chef Mia

Description

Garlic Steak Bites and Potatoes is a one-pan meal featuring juicy seared steak and crispy golden potatoes tossed in buttery garlic goodness. Its quick, flavorful, and perfect for cozy dinners or casual entertaining.


Ingredients

Scale
  • lbs sirloin steak, cut into bite-sized cubes
  • lbs baby potatoes, halved or quartered
  • 4 tablespoons olive oil (divided)
  • 4 tablespoons butter
  • 56 cloves garlic, minced
  • 1 teaspoon paprika
  • 1 teaspoon dried Italian herbs
  • Salt and black pepper, to taste
  • Fresh parsley, chopped (for garnish)

Instructions

  1. Heat 2 tablespoons olive oil in a large skillet over medium heat. Add potatoes, season with salt, pepper, and paprika. Cook until golden and fork-tender (about 15 minutes), stirring occasionally. Remove and set aside.
  2. Season steak cubes with salt, pepper, and herbs. In the same pan, add 1 tablespoon oil and 2 tablespoons butter. Sear steak in a single layer (in batches if needed) for 23 minutes per side until browned. Dont overcook.
  3. Reduce heat to medium-low. Add remaining butter and garlic. Sauté until fragrant, about 1 minute. Return the potatoes to the pan and toss everything together.
  4. Cook for 12 more minutes to heat through. Garnish with fresh parsley and serve hot.


Garlic Steak Bites and Potatoes

k">

Tried This Recipe? Leave a Comment!

Did you make this recipe? I’d love to hear how it turned out! Please leave a comment and a rating below. Your feedback helps other home cooks and supports cheerychop.com!

For more delicious inspiration, follow me on Pinterest!

Easy Chicken Enchilada Rice Casserole Ready in 35 Minutes

Chicken Enchilada Rice Casserole: Mexican Chicken Casserole – Easy Weeknight Wonder

⚖️
Difficulty
Easy
⏲️
Prep Time
10 mins
🕒
Cook Time
25 mins
⏱️
Total Time
35 mins
🍽️
Servings
6-8

Living in a bustling city like New York, weeknights can feel like a marathon. Between work, errands, and the sheer energy of the city, the last thing I want to worry about is a complicated dinner. That culinary chaos is exactly what inspired this Chicken Enchilada Rice Casserole. It’s my shortcut to that comforting, familiar taste of enchiladas without any of the fuss, using readily available ingredients that sing with flavor. This isn’t just any casserole; it’s a homage to the vibrant flavors I grew up with, simplified for modern life.

Imagine it: fluffy rice, tender shredded chicken, hearty black beans, and sweet corn, all swaddled in a rich, smoky enchilada sauce and topped with a blanket of perfectly melted cheese. The aroma alone is enough to transport you. The secret to its magic lies in a simple emulsion technique, much like my mother would use in her Marrakesh kitchen, combined with the boldness of New World ingredients. It’s a dish that brings people together, offering a spectrum of textures – from the soft rice and beans to the slightly crisp edges and gooey cheese.

What sets this Enchilada Rice Bake apart is its incredible speed and simplicity, a hallmark of my Parisian culinary training where efficiency is key. I’ve streamlined it so you get all the big enchilada flavors in a fraction of the time. I’ll share a pro tip that guarantees cheesy perfection and pinpoint a common mistake most people make that can lead to a dry, lackluster dish. Prepare for a weeknight rescue that tastes like a weekend feast!

Why This Chicken Enchilada Rice Casserole Recipe Is the Best

The flavor secret in this Chicken Enchilada Rice Casserole is all about layering and balance. While I draw inspiration from my Moroccan roots for warmth and spice, and my Parisian training for finesse, this dish is truly New York street food elevated. I’ve found the perfect synergy between classic enchilada flavors and the heartiness of a rice bake, creating a symphony that’s both exciting and deeply comforting. It’s the kind of meal that makes you feel good from the inside out.

From a chef’s perspective, the key to a perfect casserole is texture. This Enchilada Rice Bake achieves that by ensuring the rice isn’t mushy and the chicken remains tender. We achieve this through a careful combination of ingredients and bake time, ensuring every bite is a delight. It’s about creating a harmonious blend where nothing is overpowering, and everything comes together beautifully in the oven. This attention to detail is what I learned in culinary school and it elevates even the simplest dishes.

This Mexican Chicken Casserole is genuinely foolproof, even if you’re new to cooking. The beauty of a casserole is its forgiving nature, and this recipe is designed for maximum flavor with minimal effort. I’ve tested it countless times to ensure it’s accessible for any home cook. You’ll be amazed at how a few simple steps can result in such a satisfying and delicious Cheesy Chicken Enchilada Casserole. It’s the ultimate easy chicken casserole for busy evenings.

Chicken Enchilada Rice Casserole Ingredients

When I first moved to NYC, discovering the fantastic variety of ingredients at places like the Union Square Greenmarket and the diverse ethnic markets was a revelation. This recipe relies on those accessible, vibrant ingredients. On a trip back to my mother’s kitchen in Morocco, I found many of the same warming spices we use there are echoed in Mexican cuisine, which is why these flavors harmonize so beautifully. Even if you can’t visit a NYC market, you’ll find these staples easily at your local supermarket.

Ingredients List

  • 2 cups cooked shredded chicken (rotisserie chicken makes this a true weeknight wonder!)
  • 2 cups cooked rice (white or brown, leftover rice is perfect here)
  • 1 can (15 oz) black beans, drained and rinsed
  • 1 can (10 oz) diced tomatoes with green chilies (like Ro-Tel), undrained
  • 1 cup corn kernels (fresh, frozen, or canned and drained)
  • 1 can (10 oz) red enchilada sauce (mild or medium, your preference!)
  • 1 cup shredded cheddar cheese
  • 1 cup shredded Monterey Jack cheese
  • 1/2 cup chopped fresh cilantro
  • 1/4 cup sliced black olives, drained (optional, adds a briny bite!)
  • 2 green onions, thinly sliced (for garnish)

Ingredient Spotlight

The shredded chicken is our protein backbone, and I highly recommend using a good quality pre-cooked rotisserie chicken. It saves so much time and adds a wonderful savory depth. If you have leftover grilled or baked chicken, that works beautifully too. I avoid boiling plain chicken breasts for this, as they can become dry when shredded.

Diced tomatoes with green chilies are essential for that “enchilada” flavor profile, adding a touch of acidity and a gentle warmth. Look for brands like Ro-Tel, which are readily available in most US supermarkets. If you can’t find them, you can substitute with one 14.5-ounce can of diced tomatoes mixed with 1-2 tablespoons of diced green chilies. This substitution will offer a similar flavor but might be slightly less zesty.

The enchilada sauce ties everything together. I prefer a good quality red enchilada sauce from a can or jar for convenience, but if you’re feeling adventurous, a homemade sauce is wonderful. My mother’s Moroccan spice blends often feature paprika and cumin, which are foundations in many Mexican sauces, so I always look for a sauce with those rich, warm notes. Ensure it’s not too watery, or your casserole might become soupy.

Original IngredientBest SubstitutionFlavor / Texture Impact
Rotisserie ChickenShredded cooked chicken (baked, grilled)Slightly less savory but still tender.
Diced Tomatoes w/ Green Chilies1 can Diced Tomatoes + 2 tbsp Diced Green ChiliesSimilar, but may be a little less “punchy”.
Red Enchilada SauceGreen enchilada sauce or Mole sauceEnchilada bake will have a different flavor profile (tangier with green, richer and complex with mole).
Cheddar/Monterey Jack Cheese blendMexican blend cheese or Pepper JackSlightly different spice profile (Pepper Jack) or a more traditional Mexican flavor.

How to Make Chicken Enchilada Rice Casserole — Step-by-Step

Making this Cheesy Chicken Enchilada Casserole is as simple as stirring and baking. Let’s get this delicious meal on your table!

Step 1: Preheat and Prepare

Preheat your oven to 375°F (190°C). Lightly grease a 9×13 inch baking dish. This step ensures your casserole won’t stick, making cleanup a breeze.

Step 2: Combine the Filling

In a large bowl, combine the shredded chicken, cooked rice, black beans, diced tomatoes with green chilies (undrained!), and corn kernels. Add about half of the red enchilada sauce and mix everything together gently until well combined. Don’t overmix; we want to keep our rice fluffy!

💡 mia’s Pro Tip: For the best flavor and texture, use rice that’s a day old. It holds its shape better than freshly cooked rice, preventing a mushy casserole. If you must use fresh, cool it down completely before mixing!

Step 3: Layer the Casserole

Spread half of the chicken and rice mixture evenly into the prepared baking dish. Sprinkle half of the shredded cheddar and Monterey Jack cheese over this first layer. This creates a cheesy middle layer that’s truly divine.

Step 4: Add Second Layer

Gently add the remaining chicken and rice mixture on top of the cheese layer. Make sure it’s spread out evenly to create a nice top surface for the sauce and remaining cheese.

Step 5: Sauce and Cheese

Pour the remaining enchilada sauce evenly over the entire top of the casserole. Then, sprinkle the rest of the shredded cheddar and Monterey Jack cheese over the sauce. If using, scatter the sliced black olives over the cheese.

⚠️ Common Mistake to Avoid: Don’t drown the casserole in *too much* sauce. While enchilada sauce is key, an excessive amount can make the rice gummy and the casserole watery. Stick to the recipe amounts for that perfect saucy-yet-structured consistency.

Step 6: Bake to Perfection

Bake in the preheated oven for 20-25 minutes, or until the cheese is melted, bubbly, and lightly golden brown around the edges. The casserole should be heated through.

Step 7: Rest and Garnish

Once out of the oven, let the casserole rest for 5 minutes. This is crucial for the cheese and sauce to set slightly, making it easier to serve. Just before serving, sprinkle generously with fresh cilantro and sliced green onions.

StepActionDurationKey Visual Cue
1Preheat & Grease DishN/AOven at 375°F (190°C) and dish oiled.
2Combine Filling5 minsIngredients evenly distributed in bowl.
3Layer First Half2 minsDish has an even layer of mixture & half the cheese.
4Add Second Half1 minEven top layer of chicken & rice mixture.
5Sauce & Top Cheese2 minsSauce poured evenly, cheese & olives (if using) covering all.
6Bake20-25 minsCheese melted, bubbly, and lightly browned.
7Rest & Garnish5 mins restCasserole slightly set, topped with fresh herbs.

Serving & Presentation

This Chicken Enchilada Rice Casserole is a star on its own, but I love to plate it with a flourish. A generous sprinkle of fresh, vibrant cilantro and bright green onions adds a pop of color and freshness that contrasts beautifully with the rich, cheesy layers. Think of it like adding a final, delicate garnish to a dish at a chic NYC bistro – it makes all the difference.

For a truly complete meal inspired by the vibrant flavors of the Southwest and my Moroccan heritage, I often serve this alongside a dollop of cool sour cream or a spoonful of creamy guacamole. A simple side salad with a lime vinaigrette also cuts through the richness wonderfully, making it a balanced and satisfying meal. It’s about creating a harmonious plate that appeals to all the senses.

Pairing TypeSuggestionsWhy It Works
Side DishSimple Green Salad with Lime Vinaigrette, Mexican RiceThe salad offers a refreshing counterpoint; extra rice adds to the comfort.
Sauce / DipSour Cream, Guacamole, Pico de GalloCreamy tang (sour cream), cool fat (guacamole), and fresh acidity (pico) balance the casserole’s richness.
BeverageMargarita, Mexican Beer, Agua FrescaClassic pairings that complement the Mexican flavors. Agua Fresca offers a light, cooling option.
GarnishFresh Cilantro, Chopped Green Onions, Diced JalapeñoAdds vibrant color, fresh herbaceous notes, and optional heat.

Make-Ahead, Storage & Reheating

As a busy New Yorker, I rely on smart meal prep to keep my kitchen humming. This Chicken Enchilada Rice Casserole is a dream for make-ahead meals. You can assemble the entire casserole (up to the baking step) the night before, cover it tightly with plastic wrap, and refrigerate it. Then, simply pop it in the oven when you’re ready to eat, adding a few extra minutes to the bake time.

MethodContainerDurationReheating Tip
RefrigeratorAirtight container or with plastic wrap3-4 daysReheat individual portions in microwave or oven until hot.
FreezerFreezer-safe container or heavy-duty foil2-3 monthsThaw overnight in the refrigerator, then reheat as above. For best texture, reheat from thawed.
Make-AheadAssembled in baking dish, coveredUp to 1 day before bakingBake covered for first 15 mins, then uncover to brown cheese. Add 5-10 mins to bake time.

When reheating, I prefer the oven. It helps maintain the texture of the rice and chicken better than a microwave, and it ensures the cheese gets beautifully gooey again. For individual servings, a small oven-safe dish works perfectly. Just cover it loosely with foil to prevent the top from burning before the inside is warm.

Variations & Easy Swaps

VariationKey ChangeBest ForDifficulty Impact
Quick Enchilada BakeUse pre-cooked rice and rotisserie chickenBusy weeknightsEasiest
Gluten-FreeEnsure enchilada sauce and all other ingredients are GF; use GF rice or quinoaDietary needsEasy
Spicy KickUse hot enchilada sauce, add diced jalapeños or a dash of hot sauce to the fillingThose who love heatEasy

Quick Enchilada Bake

This is essentially the recipe as written! The focus here is speed and convenience. I always keep cooked rice and shredded chicken on hand, or rely on my trusty rotisserie chicken from Whole Foods. It’s the ultimate assembly job, akin to building a beautiful charcuterie board in Paris – simple components creating a stunning result with minimal fuss.

Gluten-Free Enchilada Casserole

Making this gluten-free is straightforward. Simply ensure your chosen enchilada sauce is certified gluten-free, as some can contain wheat thickeners. If you’re using pre-made rice, verify it’s GF. You could also swap the white or brown rice for quinoa for a nutty flavor and added protein, which holds up beautifully in casseroles. The texture will be slightly different but equally delicious.

Seasonal Spin with Corn and Peppers

For a fresh twist, especially in the summer when New York’s markets are overflowing, I love adding roasted bell peppers (any color works) or extra corn. If you have a few minutes, charring some poblano peppers adds a smoky, complex layer that’s truly special. You can also toss in some sautéed zucchini or mushrooms for added vegetables. This seasonal approach brings vibrancy and depth.

Can I use leftover chicken in a chicken enchilada rice casserole?

Absolutely! Leftover cooked chicken is perfect for this Chicken Enchilada Rice Casserole. In fact, I often plan my meals around using up leftover roasted chicken from the weekend. Just make sure it’s shredded or diced into bite-sized pieces. Rotisserie chicken is my absolute favorite shortcut, as it’s already seasoned and tender, making this recipe incredibly fast for a weeknight dinner.

How do I keep the rice from getting mushy in this casserole?

The key to preventing mushy rice in this Enchilada Rice Bake is to use cooked rice that is not overly moist. Day-old rice, kept in the refrigerator, is ideal because it firms up slightly. If you’re cooking rice fresh, make sure it’s cooked slightly al dente and allowed to cool completely before mixing it into the casserole. Also, be careful not to add too much liquid from other ingredients to the mix; the enchilada sauce should be enough.

What can I substitute for cream of chicken soup in chicken enchilada rice casserole?

This particular Chicken Enchilada Rice Casserole recipe is designed *without* cream of chicken soup, which many traditional casseroles use. Instead, we rely on red enchilada sauce for moisture and flavor, which provides a more authentic Mexican taste profile. If you were adapting a recipe that *did* call for cream of chicken soup, you could substitute it with a homemade béchamel sauce mixed with chicken broth and seasonings or even a can of condensed cream of mushroom soup for a similar creamy base.

How long should I bake a chicken enchilada rice casserole for best results?

For the best results, this Chicken Enchilada Rice Casserole should bake for about 20-25 minutes at 375°F (190°C). You’re looking for the cheese to be fully melted and bubbly, with perhaps a few golden-brown spots. The casserole should be heated through to its core. Allowing it to rest for 5 minutes after baking helps set the layers and makes serving much neater, ensuring everything holds together beautifully on the plate.

Can I make this enchilada rice bake ahead of time?

Yes, this Enchilada Rice Bake is an excellent candidate for making ahead! You can assemble the entire casserole, from mixing the ingredients to adding the final cheese topping, up to one day in advance. Cover it tightly with plastic wrap and refrigerate. When you’re ready to bake, simply remove the plastic wrap, and add about 5-10 minutes to the baking time to ensure it heats through thoroughly. It’s a true lifesaver for busy evenings!

What kind of rice is best for this casserole?

You can use either white or brown rice for this Chicken Enchilada Rice Casserole, and the key is that it should be already cooked. Leftover rice works exceptionally well because it tends to be a bit drier and firmer, which helps prevent your casserole from becoming mushy. If you cook the rice specifically for this recipe, aim for a slightly al dente texture and let it cool completely before mixing it with the other ingredients. Fluffy, separate grains are what you’re aiming for.

Is enchilada sauce the only sauce option for this Mexican chicken casserole?

While red enchilada sauce is traditional and provides the signature flavor for this Mexican Chicken Casserole, you have some flexibility. You could certainly use green enchilada sauce for a tangier, spicier profile, or even a mole sauce for a richer, more complex flavor, though that would significantly change the dish. For a milder option, a combination of tomato sauce, cumin, and chili powder can be used. However, the canned or jarred red enchilada sauce offers the best balance of convenience and authentic flavor for this specific recipe.

Can I add other vegetables to this easy chicken casserole?

Absolutely! This easy chicken casserole is very adaptable. I love adding sautéed onions and bell peppers to the mix for extra flavor and texture. Zucchini, corn (even more!), or even some spinach wilted down would all be delicious additions. When adding vegetables, consider sautéing them first to remove excess moisture and concentrate their flavors. This ensures they integrate well without making the casserole watery. It’s a fantastic way to boost the nutritional content too.

Share Your Version!

I absolutely adore seeing how you bring my recipes to life in your own kitchens! If you’ve made this Chicken Enchilada Rice Casserole, please leave a star rating and a comment below. Your feedback helps other cooks and inspires me endlessly. I’d also be thrilled if you shared a photo of your creation on Instagram or Pinterest, tagging me @exorecipes. I can’t wait to see your delicious adaptations and hear what you think!

From my NYC kitchen to yours — I hope this recipe brings as much warmth to your table as it does to mine. — mia 🧡

📌

Love This Recipe? Save It to Pinterest!

If you enjoyed this Chicken Enchilada Rice Casserole recipe, don’t let it get lost in your browser tabs! 😄 Pin it now so you can find it again anytime — and explore hundreds more tried-and-tested recipes waiting for you on my Pinterest boards.

👉 Follow mia on Pinterest @chefrecipes2

📌 Pin this recipe · 🔁 Re-pin your favorites · 💬 Tag me when you make it — I love seeing your creations!

Print

clock clock iconcutlery cutlery iconflag flag iconfolder folder iconinstagram instagram iconpinterest pinterest iconfacebook facebook iconprint print iconsquares squares iconheart heart iconheart solid heart solid icon

Chicken Enchilada Rice Casserole

  • Author: Chef Mia

Description

This Chicken Enchilada Rice Casserole is a delicious, easy-to-make meal that combines the flavors of traditional enchiladas with the convenience of a casserole. Perfect for busy weeknights, it takes just 35 minutes from start to finish


Ingredients

Scale
  • 2 cups cooked shredded chicken (rotisserie chicken works great!)
  • 2 cups cooked rice (white or brown)
  • 1 can (15 oz) black beans, drained and rinsed
  • 1 can (10 oz) diced tomatoes with green chilies
  • 1 cup corn kernels (fresh, frozen, or canned)
  • 1 can (10 oz) red enchilada sauce
  • 1 cup shredded cheddar cheese
  • 1 cup shredded Monterey Jack cheese
  • 1/2 cup chopped fresh cilantro
  • 1/4 cup sliced black olives (optional)
  • 2 green onions, thinly sliced

Instructions

  1. Preheat your oven to 375°F (190°C). Grease a 9×13 inch baking dish.
  2. In a large bowl, combine the shredded chicken, cooked rice, black beans, diced tomatoes with green chilies, corn, and half of the enchilada sauce. Mix well.
  3. Spread half of the mixture in the prepared baking dish.
  4. Sprinkle half of each cheese over the mixture.
  5. Add the remaining chicken and rice mixture on top.
  6. Pour the remaining enchilada sauce over everything.
  7. Top with the rest of the cheese, olives, and green onions.
  8. Bake for 20-25 minutes, or until the cheese is melted and bubbly.
  9. Remove from the oven and let it cool for 5 minutes.
  10. Sprinkle fresh cilantro over the top before serving.


Nutrition

  • Calories: 420 kcal


Chicken Enchilada Rice Casserole

Easy Cream Cheese Chicken – 30-Minute Creamy Skillet Dinner

Easy Cream Cheese Chicken: Creamy Garlic Herb Wonder

⚖️
Difficulty
Easy
⏲️
Prep Time
10 mins
🕒
Cook Time
20 mins
⏱️
Total Time
30 mins
🍽️
Servings
4

When I first moved to New York City, I was on a mission to find quick, delicious weeknight meals that could impress without requiring hours in the kitchen. My days are packed, from recipe testing to exploring the vibrant food scene here, and by the time evening rolls around, I crave comfort and flavor. This Easy Cream Cheese Chicken recipe became my secret weapon. It transforms simple pantry staples into an incredibly creamy, garlicky, herb-infused chicken dish in under 30 minutes. It’s proof that you don’t need fancy ingredients to create something truly special, a lesson I learned from my mother’s bustling kitchen in Morocco, where resourcefulness and flavor always went hand-in-hand.

Imagine this: tender chicken breasts bathed in a luscious, velvety sauce that’s rich with the tang of cream cheese, fragrant with garlic and fresh herbs, and kissed with just a hint of spice. The aroma alone is intoxicating, filling your home with a warmth that’s utterly irresistible. The sauce is so dreamy, you’ll want to lick your plate clean! It coats the chicken beautifully, creating a dish that’s both elegant enough for guests and comforting enough for a cozy Tuesday night. It’s a symphony of textures and tastes, a testament to the magic that happens when humble ingredients are treated with care and a touch of culinary flair.

What makes this recipe a standout, beyond its incredible speed and flavor, is the ingenious way we coax maximum creaminess from a simple block of cream cheese. I’ve also perfected a few tricks over the years to ensure the sauce is always smooth and never greasy – a common pitfall for creamy sauces. For instance, ensuring your cream cheese is properly softened is key, and I’ll share that little secret with you soon. You’ll also learn about a critical step that prevents the sauce from becoming too thick or too thin, guaranteeing a perfect consistency every time, which is something I honed during my pastry training in Paris.

Why This Easy Cream Cheese Chicken Recipe Is the Best

My French training taught me the art of sauce-making, where technique is paramount for achieving sublime textures. This recipe takes that foundational knowledge and applies it to an ingredient we all love: cream cheese. Instead of a complex béchamel or reduction, we build flavor and creaminess instantly. By softening the cream cheese and whisking it into a fragrant garlic-onion base with chicken broth, we create a luxurious sauce that’s unbelievably quick. It’s my way of bringing professional technique to your home kitchen, proving that restaurant-worthy flavor doesn’t always require hours of simmering.

Achieving that perfectly velvety, emulsified sauce is all about managing heat and ingredients correctly. In this recipe, we’re not just dumping cream cheese in; we’re carefully incorporating it into a warm, savory liquid base. This gentle integration, along with the slight acidity from the cream cheese, creates a stable, luxurious emulsion. This method ensures the sauce is rich and coating, rather than oily or broken, a technique vital for any creamy sauce, whether it’s for pasta, chicken, or vegetables. It’s a small step that makes a world of difference in the final dish.

This recipe is genuinely fool-proof, making it an ideal weeknight dinner solution, even for novice cooks. The ingredients are readily available at any US grocery store, and the steps are straightforward and clearly explained. I designed this to be a 30-minute meal from start to finish, which means you can have a satisfying, delicious dinner on the table with minimal stress. The forgiving nature of the sauce means even if you’re a bit off on timing or measurements, it will still turn out beautifully. It’s the kind of meal that builds confidence in the kitchen.

Easy Cream Cheese Chicken Ingredients

One of the things I adore about this easy cream cheese chicken recipe is how it relies on pantry staples. I can usually find everything I need at my local Brooklyn Whole Foods or the Italian specialties shop in Greenwich Village. Thinking about my mother’s spice rack in Morocco makes me smile; she always had the perfect blend for every dish. For this recipe, I try to use high-quality chicken and fresh garlic, but honestly, it’s forgiving enough that even if you’re using frozen chicken or garlic powder in a pinch, it will still be delicious.

Ingredients List

  • 8 ounces cream cheese (a block of Philly works perfectly) (softened)
  • 2 large boneless, skinless chicken breasts
  • 1/2 teaspoon garlic powder
  • Salt and freshly ground black pepper (to taste)
  • 1 tablespoon unsalted butter
  • 1 tablespoon olive oil
  • 1/2 medium yellow onion (chopped)
  • 3 cloves garlic (minced)
  • 3/4 cup low-sodium chicken broth
  • 1/2 teaspoon Italian seasoning blend
  • 1/4 teaspoon crushed red pepper flakes (optional, for a little heat)
  • Fresh chopped parsley (optional, for garnish)

Ingredient Spotlight

Cream Cheese: This is the star of our sauce! Use a full-fat block of cream cheese, like Philadelphia brand, as it provides the best creamy texture and rich flavor. For easy incorporation, ensure it’s softened to room temperature. You can usually find it in the dairy aisle of any US grocery store. If you need a dairy-free option, a high-quality dairy-free cream cheese alternative can be used, though the tanginess and richness might differ slightly.

Chicken Breasts: I prefer using boneless, skinless chicken breasts for their quick cooking time and lean profile. When shopping, look for plump, evenly sized breasts. Cutting them in half lengthwise helps them cook faster and more evenly. If you only have boneless, skinless thighs, they work beautifully too, offering a richer flavor and more forgiving texture; just adjust the cooking time as needed.

Fresh Garlic & Onion: The aromatics form the flavor foundation of our dish. Minced fresh garlic and chopped yellow onion sautéed until tender and slightly browned add a depth of flavor that dried spices alone can’t replicate. When buying, choose firm onions with no soft spots and garlic bulbs that are firm and dry. You can substitute garlic powder and onion powder in a pinch, but the fresh versions offer a brighter, more robust taste.

Chicken Broth: Low-sodium chicken broth allows you to control the saltiness of the dish. It also helps create the smooth, sauce-like consistency. I like to keep a carton of good quality low-sodium broth in my pantry. If you don’t have chicken broth, vegetable broth or even water can be used, but your sauce might have a slightly less developed flavor profile.

Original IngredientBest SubstitutionFlavor / Texture Impact
Cream CheeseDairy-free cream cheese alternative / Mascarpone cheeseDF version may be tangier/less rich. Mascarpone will be richer, sweeter, and less tangy.
Chicken BreastsBoneless, skinless chicken thighsThighs are more tender and flavorful but require slightly longer cooking.
Fresh GarlicGarlic powderLess pungent, more mellow flavor. Use 1/4 tsp garlic powder for each clove.
Chicken BrothVegetable broth or waterVegetable broth is a good neutral option. Water will result in a less savory sauce.

How to Make Easy Cream Cheese Chicken — Step-by-Step

Follow these simple steps to achieve restaurant-quality creamy chicken right in your home kitchen!

Step 1: Prepare the Cream Cheese

Microwave the 8-ounce block of cream cheese for about 20-30 seconds, just until it’s very soft and pliable. You don’t want it melted, just easily stir-able. Cut it into smaller cubes to help it incorporate smoothly into the sauce later. Set it aside at room temperature while you prepare the other ingredients.

💡 mia’s Pro Tip: Softening cream cheese in the microwave is a speedy trick, but don’t overdo it! If it becomes liquid, it can be harder to emulsify. If you forget to soften it, you can let it sit in a warm spot on your counter for about 30 minutes.

Step 2: Prepare and Season the Chicken

Take your two large chicken breasts and cut each one in half horizontally. This creates four thinner chicken cutlets, which cook much faster and more evenly. Season both sides generously with 1/2 teaspoon garlic powder, salt, and freshly ground black pepper. Aim for pieces that are about 1/2 inch thick.

Step 3: Sear the Chicken

Melt the 1 tablespoon of butter and 1 tablespoon of olive oil in a large skillet over medium-high heat. Once the pan is hot and the butter is foamy, carefully add the seasoned chicken cutlets. Sear for about 5-6 minutes per side, until golden brown and cooked through to an internal temperature of 165°F (74°C). Transfer the cooked chicken to a clean plate and set aside.

⚠️ Common Mistake to Avoid: Don’t overcrowd the pan when searing the chicken. If you put too many pieces in at once, they will steam instead of sear, and you won’t get that beautiful golden-brown crust that adds so much flavor. Cook in batches if necessary.

Step 4: Sauté the Onions

Reduce the heat to medium. Add the chopped 1/2 medium onion to the same skillet (no need to clean it – those browned bits are flavor gold!). Sauté the onions for 5-7 minutes, stirring occasionally, until they are softened and begin to turn lightly golden brown.

Step 5: Add Garlic

Stir in the 3 minced cloves of garlic. Cook for about 30 seconds, just until fragrant. Be careful not to burn the garlic, as it can become bitter.

Step 6: Create the Cream Sauce

Pour in the 3/4 cup chicken broth. Add the softened cream cheese, 1/2 teaspoon Italian seasoning, and 1/4 teaspoon crushed red pepper flakes (if using). Stir continuously with a whisk or wooden spoon until the cream cheese has melted and the sauce is smooth and creamy. This might take a couple of minutes. Scrape up any browned bits from the bottom of the pan as you stir.

⚠️ Common Mistake to Avoid: Adding cold cream cheese directly to a boiling liquid can cause it to seize up and become lumpy. Make sure the cream cheese is soft and introduced to a medium-heat liquid base, stirring constantly as it incorporates.

Step 7: Combine and Serve

Return the seared chicken cutlets to the skillet, nestling them into the creamy sauce. Let them warm through for a minute or two. If the sauce seems too thick, you can stir in a splash more chicken broth until you reach your desired consistency. Taste and adjust seasoning with additional salt and pepper if needed. Sprinkle with fresh chopped parsley, if desired, and serve immediately.

StepActionDurationKey Visual Cue
1Soften Cream Cheese20-30 seconds (microwave)Pliable, not melted
2Prep & Season Chicken~5 minsEvenly cut pieces
3Sear Chicken10-12 mins totalGolden brown, cooked through
4Sauté Onions5-7 minsSoftened, lightly browned
5Add Garlic~30 secondsFragrant
6Create Cream Sauce2-3 minsSmooth and creamy
7Combine & Serve1-2 minsChicken warmed through, sauce coats evenly

Serving & Presentation

This dish is wonderfully versatile. For a quick weeknight meal, I love serving it with a simple green salad, perhaps with a light lemon vinaigrette, or some tender steamed asparagus. If I’m aiming for something more substantial, a side of fluffy quinoa, creamy mashed potatoes, or even a crusty baguette (perfect for soaking up that glorious sauce!) makes it a complete feast. For a touch of my Moroccan heritage, I sometimes serve it with couscous, seasoned with a pinch of saffron for color and aroma.

Presentation-wise, the creamy sauce provides a beautiful golden hue. A sprinkle of fresh chopped parsley adds a pop of vibrant green, making the dish visually appealing. A drizzle of good quality olive oil just before serving can also add a lovely sheen. Remember, the goal is to make it look as delicious as it tastes, a principle I learned observing the artistry in Parisian bistros – simple, elegant, and utterly mouthwatering.

Pairing TypeSuggestionsWhy It Works
Side DishSteamed asparagus, roasted Brussels sprouts, fluffy quinoa, mashed potatoes, couscous.These provide a neutral base to complement the rich sauce, or absorb it beautifully.
Sauce / DipCrusty bread, pasta, rice.Perfect for scooping up every last bit of the delicious cream sauce.
BeverageA crisp white wine like Sauvignon Blanc or Pinot Grigio, light-bodied red like Pinot Noir, sparkling water with lemon.The acidity cuts through the richness of the cream sauce, cleansing the palate.
GarnishFresh parsley, chives, a sprinkle of red pepper flakes, lemon zest.Adds freshness, color, and a subtle layer of flavor.

Make-Ahead, Storage & Reheating

As a busy New Yorker, I often rely on smart meal prep, and this cream cheese chicken is perfect for that. I might cook the chicken and make the sauce ahead of time and store them separately. Then, on a busy evening, I can quickly combine and reheat everything in under 10 minutes. It’s a lifesaver when you want a home-cooked meal but have zero time.

MethodContainerDurationReheating Tip
RefrigeratorAirtight container3-4 daysGently reheat on the stovetop over low heat, adding a splash of chicken broth or water if the sauce has thickened. Stir constantly.
FreezerFreezer-safe container or bag2-3 monthsThaw overnight in the refrigerator. Reheat on the stovetop as above. The sauce might separate slightly upon reheating; whisking vigorously usually restores it.
Make-AheadStore cooked chicken and sauce separately2 days in advanceCombine chicken and sauce in skillet and gently reheat until warmed through, adding a splash of broth if needed.

When reheating, always use low to medium heat. High heat can cause the cream sauce to break. If it seems too thick, a little extra liquid is your best friend. If reheating from frozen, ensure it’s fully thawed before applying heat. Some people find a quick burst in the microwave before transferring to the stovetop helps, but I usually just go straight to the pan for the best texture control.

Variations & Easy Swaps

VariationKey ChangeBest ForDifficulty Impact
Spicy KickAdd more crushed red pepper flakes, a pinch of cayenne, or a dash of hot sauce.Those who love heat.None. Simply adjust spice level.
Lemon Herb ChickenAdd lemon zest to the softened cream cheese and a squeeze of fresh lemon juice at the end.A brighter, fresher flavor profile.None. Essential pantry spices.
Cream Cheese Chicken with MushroomsSauté sliced mushrooms with the onions until golden.Adding earthy depth.Slightly longer cooking for mushrooms.

Keto-Friendly Cream Cheese Chicken

This recipe is naturally quite keto-friendly! The sauce is low in carbohydrates. For a full keto meal, serve it alongside cauliflower rice, sauteed zucchini noodles, or a generous green salad with a keto-approved dressing. You can use heavy cream instead of chicken broth for an even richer, carb-free sauce, though the tanginess will be reduced. Adjusting the chicken broth amount is key for keto consistency.

Gluten-Free and Dairy-Free Options

This recipe is already gluten-free if you use gluten-free chicken broth and avoid any cross-contamination. For a dairy-free version, substitute the cream cheese with a good quality plain dairy-free cream cheese alternative. The texture and tanginess might vary slightly, but it will still be delicious. Some dairy-free cream cheeses can be thinner, so you might need to let the sauce simmer a moment longer to thicken. I’ve tested this with a few brands from Whole Foods and found success.

Moroccan-Inspired Twist

To give this a Moroccan flair, I love to add a pinch of cinnamon and a touch of cumin to the sautéed onions and garlic. You could also stir in some preserved lemon rind (finely chopped) into the cream sauce along with the Italian seasoning, or a handful of Kalamata olives for a briny, salty kick. Serve with fluffy couscous and a side of preserved lemons for an authentic touch, reminiscent of my childhood meals.

How do you keep cream cheese chicken from curdling?

The key to preventing cream cheese chicken from curdling is temperature control and proper emulsification. Always ensure your cream cheese is softened before adding it to the pan. Introduce it to a gently simmering liquid base over medium-low heat, and stir constantly until fully incorporated. Adding cold ingredients to a rapidly boiling sauce or using too high a heat can shock the fats in the cream cheese, causing them to separate. If your sauce does start to look a bit oily, remove it from the heat immediately and whisk vigorously; sometimes a splash of broth or water can help bring it back together.

What can I substitute for cream cheese in easy cream cheese chicken?

If you need to substitute cream cheese, several options can work, each with a slightly different result. Mascarpone cheese is a decadent substitute that will make the sauce even richer and creamier, though it’s less tangy. For a dairy-free option, a good quality plain dairy-free cream cheese alternative is your best bet; choose one that’s known for its good texture. Greek yogurt or sour cream can be used in a pinch, but they don’t emulsify as smoothly and can curdle more easily, so incorporate them off the heat and serve immediately. These substitutions still offer creaminess but might alter the final flavor profile.

How long does it take to cook easy cream cheese chicken in the oven?

While this recipe is designed for the stovetop and takes about 30 minutes total, you can adapt it for the oven. First, prepare the sauce on the stovetop as directed until it’s smooth. Make sure your chicken is seared or mostly cooked. Then, place the chicken in a baking dish, pour the sauce over it, and bake in a preheated oven at 375°F (190°C) for about 15-20 minutes, or until the chicken is fully cooked through and the sauce is bubbly. This oven method is great if you want to bake other items alongside it or prefer less hands-on cooking time.

What goes well as a side dish with cream cheese chicken?

This creamy chicken dish is incredibly versatile and pairs well with a variety of side dishes. For a light and healthy option, steamed or roasted vegetables like broccoli, asparagus, green beans, or spinach are excellent choices. If you’re looking for something more filling, consider serving it over pasta, rice, quinoa, or mashed potatoes, as these bases are perfect for soaking up the rich cream sauce. Cauliflower rice is a popular low-carb option. A simple green salad with a bright vinaigrette also offers a nice contrast to the richness of the chicken.

Can I use chicken thighs instead of breasts?

Absolutely! Boneless, skinless chicken thighs are a fantastic alternative to chicken breasts in this recipe. They tend to be more tender and flavorful due to their higher fat content, which means they are also more forgiving and less likely to dry out. The cooking time might need a slight adjustment; usually, thighs take a few minutes longer to cook through than thinner breast cutlets. Just ensure they reach an internal temperature of 165°F (74°C) before adding them back to the sauce. The rich flavor of the thighs complements the creamy sauce beautifully.

How do I make the sauce thicker or thinner?

Adjusting the sauce consistency is simple! To thicken a sauce that’s too thin, you can let it simmer gently uncovered for a few extra minutes, allowing some of the liquid to evaporate. Alternatively, you can create a slurry by mixing 1 teaspoon of cornstarch or arrowroot powder with 2 teaspoons of cold water, then whisking it into the simmering sauce. For a sauce that’s too thick, simply stir in more chicken broth, a tablespoon at a time, until you reach your desired consistency. Remember that the sauce will also thicken slightly as it cools.

What kind of onion is best for this recipe?

For this Easy Cream Cheese Chicken recipe, a medium yellow onion is my top choice. Yellow onions have a good balance of sweetness and pungency when sautéed, developing a lovely mild flavor that complements the creamy sauce without overpowering it. A sweet onion like Vidalia would also work well for a slightly sweeter profile. Red onions might add a bit too much sharp bite unless cooked down considerably. If you don’t have fresh onions available, about 1 teaspoon of onion powder can be added with the garlic powder, though it won’t provide the same depth of flavor.

Can I make this dairy-free?

Yes, you can absolutely make this recipe dairy-free! The key is to substitute the cream cheese with a high-quality plain dairy-free cream cheese alternative. Many brands are available in supermarkets now, so experiment to find one you like. The flavor and tanginess might differ slightly from dairy cream cheese, and some dairy-free options can be thinner, so you might need to simmer the sauce a bit longer to achieve the desired thickness. Ensure your chicken broth is also dairy-free. This adaptation still yields a wonderfully creamy and satisfying dish.

Share Your Version!

I truly hope you enjoy this Easy Cream Cheese Chicken recipe as much as I do! It’s a recipe that brings me so much joy because it’s simple, quick, and reliably delicious. If you give it a try, please consider leaving a star rating and a comment below – your feedback helps me immensely! I also love seeing your culinary creations; if you share a photo on Instagram or Pinterest, please tag me at @chefrecipes2 – I’m always thrilled to see how my recipes turn out in your kitchens, whether they’re in NYC or across the globe!

I’m curious, when you make this, do you find yourself reaching for Italian seasoning, or do you prefer to mix your own herbs? Let me know in the comments! From my NYC kitchen to yours — I hope this recipe brings as much warmth to your table as it does to mine. — mia 🧡

📌

Love This Recipe? Save It to Pinterest!

If you enjoyed this Easy Cream Cheese Chicken recipe, don’t let it get lost in your browser tabs! 😄 Pin it now so you can find it again anytime — and explore hundreds more tried-and-tested recipes waiting for you on my Pinterest boards.

👉 Follow mia on Pinterest @chefrecipes2

📌 Pin this recipe · 🔁 Re-pin your favorites · 💬 Tag me when you make it — I love seeing your creations!

Print

clock clock iconcutlery cutlery iconflag flag iconfolder folder iconinstagram instagram iconpinterest pinterest iconfacebook facebook iconprint print iconsquares squares iconheart heart iconheart solid heart solid icon

Easy Cream Cheese Chicken

  • Author: Chef Mia

Description

This easy cream cheese chicken is a 30-minute meal made with pantry staples! Transform a block of cream cheese into the best creamy garlic herb sauce.


Ingredients

Scale
  • 8 ounces cream cheese (a block of Philly) (softened)
  • 2 large chicken breasts
  • 1/2 teaspoon garlic powder
  • Salt & pepper (to taste)
  • 1 tablespoon butter
  • 1 tablespoon olive oil
  • 1/2 medium onion (chopped)
  • 3 cloves garlic (minced)
  • 3/4 cup chicken broth
  • 1/2 teaspoon Italian seasoning
  • 1/4 teaspoon crushed red pepper flakes
  • Fresh chopped parsley (optional, to taste)

Instructions

  1. Microwave the cream cheese until very soft. Cut it into smaller pieces and set aside until needed.
  2. Cut the chicken breasts in half lengthwise so you have 4 thinner pieces. Season them with the garlic powder and some salt & pepper.
  3. Melt the butter and oil in a skillet over medium-high heat. When the pan is hot, add the chicken and cook for about 5-6 minutes/side or until golden and cooked through (165F). Transfer the chicken to a plate.
  4. Reduce the heat to medium, then add the onions to the skillet and sauté for 5-7 minutes or until softened and lightly browned.
  5. Stir in the garlic and cook for 30 seconds.
  6. Add in the chicken broth, cream cheese, Italian seasoning, and crushed red pepper flakes. Stir until the sauce is smooth (this may take a few minutes).
  7. Add the chicken back to the skillet and warm through. If you need to thin the sauce, add a splash more chicken broth. Season with extra salt & pepper if needed, sprinkle with parsley if desired, and serve immediately.


Nutrition

  • Calories: 397 kcal
  • Sugar: 3 g
  • Fat: 29 g
  • Carbohydrates: 6 g
  • Protein: 28 g


Easy Cream Cheese Chicken