“`html
Table of Contents
Barbacoa Beef – Slow Cooker Magic with Authentic Mexican Flavors
I still remember the first time I tasted barbacoa that truly stopped me in my tracks. It was at a tiny taqueria in the East Village run by a family from Hidalgo. The meat was so tender it barely needed chewing, and the fragrance of chipotle, cumin, and cloves wrapped around me like a warm blanket. Growing up in Morocco, I knew slow-cooked meat — my mother would simmer lamb with saffron and ginger for hours until it fell apart. That same low-and-slow patience is the soul of this barbacoa beef recipe. Every time I make it, I feel that connection between my mother’s tagine and this Mexican classic.
Imagine a mound of deeply browned, shredded beef glistening with a sauce that’s smoky, earthy, and kissed with lime. The aroma alone — toasted cumin, sticky-sweet adobo, a whisper of clove — fills your kitchen and makes everyone wander in asking what’s for dinner. The texture is what I crave most: each strand of beef is succulent, almost buttery, yet with a slight bite that reminds you it’s real meat. When you spoon it onto a warm tortilla and add a splash of the cooking juices, it’s pure comfort. My Parisian chef instructor once told me, “The best dishes taste like the cook’s story.” This one tastes like mine.
What sets my version apart is the technique I adapted from both my Moroccan roots and French training. I sear the chuck roast in batches until deeply browned — that’s non-negotiable for building the flavor foundation. Then I puree the chipotle chilies with garlic and a splash of broth, which distributes the heat and smokiness evenly. The secret that makes my slow cooker barbacoa beef truly special? I stir fresh lime juice into the broth after shredding and let the meat soak it up for 20 more minutes. That brightness cuts through the richness like a beam of sunlight. One common mistake I see is skipping the sear — don’t do it! You’ll lose the deep, caramelized notes that make this dish unforgettable.
Why This Barbacoa Beef Recipe Is the Best
The flavor secret lies in my bold spice blend and the way I layer it. Growing up in Morocco, I learned that spices need to be toasted and bloomed to unlock their full potential. Here, I bloom the cumin and oregano in the hot pan after searing the beef, which makes their aromas ten times more intense. Then I combine them with chipotle in adobo — that smoky, slightly sweet heat is the hallmark of authentic Mexican barbacoa. The ground clove is my nod to both worlds: it’s used in Moroccan cooking and Mexican barbacoa alike, adding a warm, almost floral depth that you can’t quite name but will miss if it’s absent.
The perfected texture comes from a chef’s trick I learned in Paris: rest the meat in its own juice after shredding. Most recipes have you shred and serve immediately, but I let the beef sit in the seasoned broth with lime juice for 20 to 30 minutes on low. This resting step allows the fibers to relax and soak up all that tangy, smoky liquid. The result is shredded beef tacos that are moist but not soggy, with each strand carrying the full flavor of the sauce. The 8-hour slow cook makes the beef fork-tender, but that final rest is what elevates it from good to memorable.
This recipe is foolproof and fast in terms of active time — just 20 minutes of prep and searing, then the slow cooker does the rest. Whether you’re a busy parent, a working professional, or someone hosting a taco night, this dish fits your schedule. The barbacoa seasoning is made from pantry staples you likely already have, and the slow cooker method guarantees consistent results every time. I’ve taught this recipe to dozens of friends in my NYC cooking classes, and even total beginners walk away with restaurant-quality barbacoa.
Barbacoa Beef Ingredients
I source most of my ingredients from the Union Square Greenmarket and a little Mexican grocer on 116th Street called El Rancho. The chipotles in adobo I buy by the case — they’re that essential. When I pick up a chuck roast, I always look for good marbling because that fat is what keeps the meat juicy during the long cook. This list is straightforward, but each ingredient has a specific job to do.
Ingredients List
- 3 lb chuck roast
- Salt and freshly ground black pepper
- 2 Tbsp vegetable oil
- 1 1/4 cups beef broth, (divided)
- 3 – 4 chipotle chilies in adobo*
- 6 garlic cloves
- 1 1/2 Tbsp ground cumin
- 1 Tbsp dried oregano
- 1/4 tsp ground cloves
- 3 bay leaves
- 1/4 cup fresh lime juice
Ingredient Spotlight
Chuck roast is my go-to for barbacoa because it has enough fat and connective tissue to break down into tender shreds without becoming dry. Look for a roast with visible white marbling — that’s the intramuscular fat that renders during the long cook. If you can’t find chuck, brisket is a solid substitute, though it will be slightly leaner. I avoid round or sirloin roasts because they’re too lean and will turn out tough and stringy.
Chipotle chilies in adobo are the heart of this dish. They’re smoked, dried jalapeños rehydrated and canned in a tangy, sweet tomato-based sauce. The heat level is moderate — about 3 to 4 chilies gives a nice warmth without being overpowering. If you’re sensitive to spice, start with 2 chilies and taste the puree. For more heat, add a fifth chili or a spoonful of the adobo sauce. I find the Goya brand in the Mexican aisle of most US supermarkets reliable and consistent.
Ground cloves might seem like an unusual addition to a savory beef dish, but they’re a traditional barbacoa ingredient that adds a subtle, almost floral warmth. A little goes a long way — 1/4 teaspoon is plenty. In Moroccan cooking, we use cloves in both sweet and savory tagines, so this ingredient feels like home to me. If you’re out of ground cloves, a tiny pinch of allspice can work, but the flavor will be slightly different.
Fresh lime juice is my non-negotiable finishing ingredient. I never use bottled lime juice — the bright, zesty flavor of fresh limes is what cuts through the richness of the beef and wakes up all the other flavors. I like to roll the limes on the counter before juicing to get the most out of them. If you have a bag of key limes, even better — they’re a bit more tart and floral.
| Original Ingredient | Best Substitution | Flavor / Texture Impact |
|---|---|---|
| Chuck roast | Beef brisket | Slightly leaner but still tender after long cook |
| Chipotle in adobo | 2 tsp chipotle powder + 1 tsp smoked paprika + 1 tsp tomato paste | Less smoky depth; still good in a pinch |
| Ground cloves | Allspice (tiny pinch) | Warmer, less floral — still delicious |
| Fresh lime juice | White vinegar + pinch of sugar | More acidic, less bright — use as last resort |
How to Make Barbacoa Beef — Step-by-Step
Trust me on this: the few minutes you spend searing the beef and making the sauce will reward you with the most incredible flavor. Let me walk you through each step so you feel confident from start to finish.
Step 1: Prep and Sear the Beef
Cut the chuck roast into 6 even portions, trimming away any large pieces of hard fat. (You want some fat for flavor, but remove the big knobby pieces.) Heat 1 tablespoon of vegetable oil in a large skillet over medium-high heat. Pat the beef portions dry with paper towels — this is crucial for a good sear. Season generously with salt and pepper (about 1 teaspoon salt and 3/4 teaspoon pepper). Add 3 pieces to the skillet in a single layer and sear until deeply browned on all sides, about 3-4 minutes per side. Transfer to the slow cooker. Repeat with the remaining 1 tablespoon oil and the other 3 pieces. Nestle them side by side in an even layer.
💡 mia’s Pro Tip: Don’t crowd the pan! If the pieces are too close, they’ll steam instead of searing. Work in batches and let the pan reheat between batches. That dark brown crust is pure flavor.
Step 2: Make the Chipotle Puree
In a food processor, combine the chipotle chilies in adobo, the garlic cloves, and 1/4 cup of the beef broth. Pulse until the mixture is well pureed, stopping occasionally to scrape down the sides of the bowl. The puree should be smooth and deeply red. This concentrated paste is what gives the barbacoa its signature smoky heat.
⚠️ Common Mistake to Avoid: Don’t skip pureeing the chipotles! If you just chop them by hand, the heat and flavor won’t distribute evenly through the meat. A smooth puree means every bite is perfectly seasoned.
Step 3: Assemble the Cooking Liquid
In a 2-cup liquid measuring cup or a bowl, whisk together the remaining 1 cup beef broth, the chipotle puree, ground cumin, dried oregano, and ground cloves. Pour this mixture evenly over the seared beef in the slow cooker. Nestle the bay leaves between the beef portions, tucking them into the liquid so they can infuse their flavor.
💡 mia’s Pro Tip: Tasting your spice blend before adding it to the meat is a habit I picked up in Paris. Dip a clean spoon into the liquid — you should taste a balance of smoky, earthy, and warm notes. Adjust with a pinch more salt or cumin now, before it starts cooking.
Step 4: Slow Cook to Perfection
Cover the slow cooker and set it to low heat. Cook for 8 to 9 hours, until the beef is fall-apart tender. You’ll know it’s ready when you can easily pierce the largest piece with a fork and it shreds with almost no resistance. The aroma at this point is absolutely intoxicating — smoky, rich, and slightly sweet from the adobo.
⚠️ Common Mistake to Avoid: Peeking too often! Every time you lift the lid, heat escapes and adds 15-20 minutes to the cooking time. Resist the urge — trust the process. I check only once at the 7-hour mark to see how it’s progressing.
Step 5: Shred and Finish with Lime
Using tongs, remove the beef from the slow cooker and transfer it to a large cutting board or bowl. Leave the cooking liquid in the slow cooker. Shred the beef using two forks — it should fall apart easily. Stir the fresh lime juice into the broth in the slow cooker, then return the shredded beef to the pot. Cook on low or the warm setting for an additional 20 to 30 minutes, allowing the meat to soak up the tangy, seasoned liquid.
💡 mia’s Pro Tip: This final rest in the lime-spiked broth is my French-trained secret. In Paris, we call it “la cuisson de repos” — the resting cook. The beef relaxes and absorbs the bright acidity, making every strand taste like it was marinated, not just braised.
Step 6: Strain and Serve
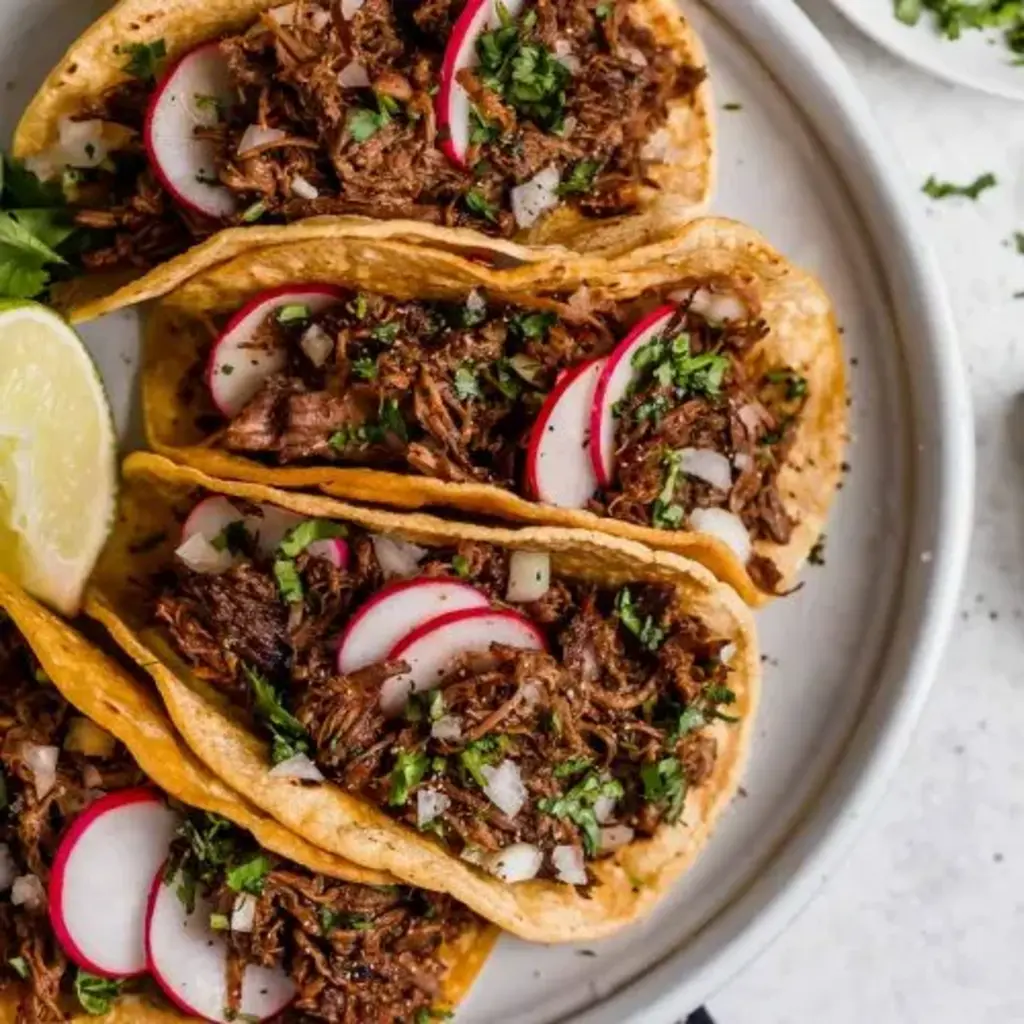
Before serving, strain the liquid from the beef using a slotted spoon or by pouring the mixture through a colander set over a bowl. Reserve some of the strained liquid to drizzle over the tacos if desired. Serve the barbacoa in warm tortillas with your choice of toppings.
| Step | Action | Duration | Key Visual Cue |
|---|---|---|---|
| 1 | Sear beef in batches | 12-15 mins | Deep brown crust on all sides |
| 2 | Puree chipotle, garlic, broth | 2-3 mins | Smooth, dark red paste |
| 3 | Whisk liquid and pour over beef | 2 mins | Liquid reaches halfway up beef |
| 4 | Slow cook on low | 8-9 hours | Fork-tender, shreds easily |
| 5 | Shred beef, add lime, rest | 20-30 mins | Beef soaks up liquid |
| 6 | Strain and serve | 2 mins | Moist but not swimming in liquid |
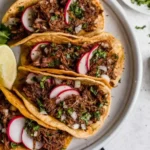
Serving & Presentation
The way I like to serve this barbacoa is on warm corn tortillas with a sprinkle of finely diced white onion, fresh cilantro, and a squeeze of extra lime. Sometimes I add a spoonful of my quick tomatillo salsa — the bright acidity is a perfect foil to the rich, smoky beef. For a heartier meal, serve it over cilantro-lime rice with black beans and a dollop of crema or sour cream. In my NYC apartment, I often set up a taco bar for friends: bowls of barbacoa, warm tortillas, pickled red onions, crumbled cotija cheese, sliced radishes, and a big pile of grilled jalapeños. Everyone builds their own, and it’s always a hit.
Growing up in Morocco, we ate our slow-cooked meats with fresh bread and aromatic salads. That same principle applies here — the barbacoa is the star, and everything else is there to support it. If you’re hosting a party, consider making a double batch and keeping it warm in a slow cooker on the buffet. The meat stays tender and flavorful for hours. I also love serving the barbacoa over a bed of creamy polenta or mashed potatoes for a comforting winter meal that bridges my American life with my North African roots.
| Pairing Type | Suggestions | Why It Works |
|---|---|---|
| Side Dish | Cilantro-lime rice, Mexican street corn, black beans | Absorbs juices and adds freshness |
| Sauce / Dip | Tomatillo salsa, crema, pickled red onions | Bright acidity cuts the rich, smoky meat |
| Beverage | Mexican lager, smoky mezcal cocktail, hibiscus iced tea | Complementary smoky and earthy notes |
| Garnish | Fresh cilantro, diced white onion, crumbled cotija, lime wedges | Adds texture, freshness, and salt |
Make-Ahead, Storage & Reheating
This barbacoa is a meal-prepper’s dream. I often make a batch on Sunday and use it throughout the week for quick tacos, burrito bowls, or even piled on a salad for lunch. The flavors actually deepen and meld together after a day in the fridge, so day-old barbacoa is even more delicious. Here’s how I store and reheat it for my busy NYC lifestyle.
| Method | Container | Duration | Reheating Tip |
|---|---|---|---|
| Refrigerator | Airtight glass container with some cooking liquid | Up to 5 days | Reheat in a covered skillet over medium-low with 2-3 Tbsp reserved broth, stirring occasionally until hot |
| Freezer | Freezer-safe zip-top bag or vacuum-sealed bag (remove as much air as possible) | Up to 3 months | Thaw overnight in fridge, then reheat in a covered skillet or microwave in 30-second bursts, adding broth as needed |
| Make-Ahead | Complete the recipe, cool completely, and store in the fridge | Up to 3 days in advance | Reheat gently on the stove; the flavor will be even better the next day |
One thing I always do when reheating is add a splash of beef broth or water to keep the meat moist. The barbacoa will absorb liquid as it sits, so a little extra moisture brings it back to its just-cooked glory. I never microwave it straight — the microwave can make the edges dry out. A covered skillet on the stove is the best method for preserving that tender, juicy texture. If you’re in a hurry, the microwave works fine with a wet paper towel over the bowl, but the stove is worth the extra two minutes.
Variations & Easy Swaps
| Variation | Key Change | Best For | Difficulty Impact |
|---|---|---|---|
| Lamb Barbacoa | Substitute lamb shoulder for chuck roast | A more traditional, gamey flavor | No change in difficulty |
| Beef Barbacoa with Ancho & Cocoa | Add 1 dried ancho chile (rehydrated) and 1 tsp cocoa powder | Deeper, more complex mole-like flavor | Slightly more prep, same cook |
| Instant Pot Barbacoa | Use pressure cooker: high pressure for 60 mins, natural release | Weeknight dinner in under 2 hours | Same prep, shorter cook time |
Lamb Barbacoa
Using lamb shoulder instead of beef brings this recipe closer to the original barbacoa of central Mexico. Lamb has a distinct, slightly gamey flavor that pairs beautifully with the smoky chipotle and warm cloves. In Morocco, we cook lamb with cinnamon and cumin, and I’ve adapted that here. The cooking time is the same — 8 to 9 hours on low — and the meat shreds just as beautifully. If you enjoy lamb, this variation is a must-try. I like to garnish it with fresh mint alongside the cilantro for an extra layer of freshness.
Beef Barbacoa with Ancho & Cocoa
For a deeper, more complex flavor, add one dried ancho chile (stemmed, seeded, and rehydrated in hot water for 20 minutes) along with the chipotles, and stir in 1 teaspoon of unsweetened cocoa powder to the spice blend. The ancho adds a sweet, raisin-like richness, while the cocoa rounds out the smoky heat with a subtle bitterness. This version is inspired by mole poblano, which I studied during a pastry course in Paris — yes, chocolate in savory food! A friend from Puebla taught me that a touch of cocoa makes barbacoa taste more layered and luxurious.
Instant Pot Barbacoa
Need barbacoa in a hurry? Use an Instant Pot or other electric pressure cooker. Follow the same searing and puree steps using the sauté function, then cook on high pressure for 60 minutes with a natural pressure release (about 20 minutes). The results are remarkably close to the slow cooker version — tender, flavorful, and ready in under 2 hours total. I tested this during a busy recipe shoot week, and it saved me. Just note that the liquid won’t reduce as much as in the slow cooker, so you may want to simmer the sauce on the sauté function for 5-10 minutes after shredding to concentrate the flavors.
Frequently Asked Questions
What cut of beef is best for making barbacoa?
Chuck roast is my top choice because it has the perfect balance of fat, connective tissue, and meat to break down into tender shreds during the long, slow cook. The marbling keeps the beef moist and juicy. Brisket is an excellent second option — it’s slightly leaner but still works beautifully. Avoid lean cuts like sirloin or round, as they’ll turn out dry and tough no matter how long you cook them. If you’re at the grocery store and unsure, look for a roast with visible white streaks of fat running through it. That’s your best bet for succulent shredded beef tacos.
Can I make barbacoa in a slow cooker instead of a Dutch oven?
Absolutely — in fact, this recipe is designed specifically for a slow cooker! Cooking barbacoa in a slow cooker on low heat for 8 to 9 hours produces exceptionally tender, flavorful meat with minimal effort. The gentle, even heat breaks down the connective tissues in the chuck roast while the sealed environment keeps all the moisture and aromas trapped inside. If you don’t have a slow cooker, you can use a Dutch oven in a 300°F oven for about 3 to 3 1/2 hours, checking for doneness at the 3-hour mark. Both methods work, but the slow cooker is the most hands-off and foolproof option for busy cooks.
How long does it take to cook barbacoa beef until it’s tender?
In a slow cooker on the low setting, barbacoa beef typically needs 8 to 9 hours to become fork-tender and easily shreddable. The exact time depends on the size of your roast pieces and your slow cooker model. I recommend starting to check at the 7-hour mark by trying to pierce the largest piece with a fork. If it meets resistance, give it another hour. The meat is ready when it shreds with almost no effort and the internal temperature reaches about 200°F to 205°F. Remember that after shredding, you’ll let the beef soak in the lime-spiced broth for another 20 to 30 minutes, which adds to the overall tenderness.
What is the difference between barbacoa and carnitas?
Barbacoa and carnitas are both Mexican shredded meat dishes, but they differ in the type of meat, cooking method, and flavor profile. Barbacoa is traditionally made from beef (like chuck roast or brisket) or lamb, and it’s cooked with smoky, earthy seasonings such as chipotle, cumin, and cloves. It’s often finished with lime juice for brightness. Carnitas, on the other hand, is made from pork shoulder and is cooked with lard or oil until tender, then typically shredded and crisped under a broiler. The seasonings for carnitas are simpler — usually salt, garlic, and orange — and the flavor is rich and savory rather than smoky. Both are delicious, but they bring different personalities to your taco night.
Can I make this barbacoa recipe spicy or mild?
Yes, you can easily adjust the heat level to suit your preference. The recipe calls for 3 to 4 chipotle chilies in adobo, which gives a moderate, pleasant warmth. For a milder version, use only 2 chipotle chilies and scrape off some of the adobo sauce before pureeing. For a spicier kick, add a fifth chili or include 1 to 2 teaspoons of the adobo sauce from the can. You can also add a minced fresh jalapeño or serrano pepper along with the chipotle puree for extra heat. Remember that the long cook time mellows the spiciness slightly, so aim for a little more heat than you ultimately want.
How do I store leftover barbacoa beef?
Leftover barbacoa beef should be cooled completely and stored in an airtight container with some of the cooking liquid to keep it moist. It will keep well in the refrigerator for up to 5 days. For longer storage, transfer the cooled beef and some liquid to a freezer-safe bag or vacuum-sealed bag, remove as much air as possible, and freeze for up to 3 months. To reheat, thaw overnight in the refrigerator if frozen, then warm gently in a covered skillet over medium-low heat with a splash of beef broth or water. Stir occasionally until heated through. The microwave also works in a pinch — use 30-second bursts and sprinkle lightly with water to prevent drying.
Can I use this barbacoa for meal prep?
Absolutely! This barbacoa is one of my favorite meal-prep recipes. I often cook a batch on Sunday and use it throughout the week in different ways: tacos one night, burrito bowls with rice and beans the next, and piled over a salad with avocado and cilantro for lunch. The flavors actually deepen after a day in the fridge, making the leftovers even more delicious. Portion the shredded beef into individual containers with a little cooking liquid, and you’ll have ready-to-go protein for quick meals. It’s a lifesaver on busy weeknights when you want something satisfying without starting from scratch.
What toppings go well with barbacoa tacos?
Barbacoa tacos are incredibly versatile, and the right toppings can elevate them from delicious to unforgettable. My classic combination is finely diced white onion, fresh cilantro, and a squeeze of lime. For more texture and flavor, try pickled red onions (they add a beautiful color and tangy crunch), crumbled cotija cheese or queso fresco, sliced radishes for peppery crunch, and a spoonful of crema or sour cream to cool the smoky heat. If you like spice, add pickled jalapeños or a drizzle of hot sauce. For a heartier taco, layer on some refried beans or guacamole. The key is balancing the rich, smoky barbacoa with fresh, bright, and crunchy elements.
Can I cook barbacoa from frozen beef?
I recommend thawing the chuck roast completely before cooking for the best results. Cooking from frozen will significantly increase the time it takes to reach a safe internal temperature, and the searing step — which is crucial for building deep flavor — won’t work properly on frozen meat. For food safety and texture, thaw the roast in the refrigerator for 24 to 48 hours before starting the recipe. If you’re in a hurry, you can use the cold water method: place the sealed roast in a bowl of cold water, changing the water every 30 minutes, until thawed (about 1 hour per pound).
Why do you add lime juice after shredding instead of at the beginning?
Adding the lime juice after the beef is fully cooked and shredded is a technique I learned from a chef in Oaxaca, and it makes a big difference. If you add lime juice at the start of the long cook, the high heat and extended time will dull its bright, zesty character, leaving behind only a flat sourness. By stirring it in after shredding and letting the beef rest in the liquid for 20 to 30 minutes on warm, the lime flavor stays vibrant and fresh. It cuts through the rich, smoky meat and wakes up all the other spices. That final burst of citrus is what makes this barbacoa taste alive and balanced.
Share Your Version!
I absolutely love hearing how this recipe comes to life in your kitchen! Did you use the chipotle and clove blend, or did you try the ancho-cocoa variation? Maybe you loaded your tacos with pickled onions and crema, or served it over a bowl of cilantro-lime rice. Every cook brings their own story to the table, and I’d love to hear yours. Leave a star rating and a comment below — your feedback helps other readers know what to expect, and it makes my day to see your success.
If you share a photo on Instagram or Pinterest, be sure to tag @exorecipes so I can see your beautiful creation. Nothing makes me happier than spotting your barbacoa tacos in my feed! And if you have a question about the recipe — maybe about the spice level or a substitution — just ask in the comments. I read every single one and answer as quickly as I can. From my NYC kitchen to yours — I hope this recipe brings as much warmth to your table as it does to mine. — mia 🧡
⭐ Made this recipe? I’d love to hear from you!
Did you try this barbacoa beef recipe? Leave a star rating ⭐⭐⭐⭐⭐ and share your experience in the comments below. What toppings did you use? Did you make any twists? Your feedback helps me create better recipes for you — and it inspires other home cooks too!
Tag me on Instagram @exorecipes or Pin this recipe to your board — let’s keep the taco night tradition alive! 🌮🔥
Love This Recipe? Save It to Pinterest!
If you enjoyed this Barbacoa Beef recipe, don’t let it get lost in your browser tabs! 😄 Pin it now so you can find it again anytime — and explore hundreds more tried-and-tested recipes waiting for you on my Pinterest boards.
👉 Follow mia on Pinterest @chefrecipes2
📌 Pin this recipe · 🔁 Re-pin your favorites · 💬 Tag me when you make it — I love seeing your creations!
“`
Print
Barbacoa Beef
Description
The best Barbacoa Beef recipe! This flavorful meat is deliciously seasoned and cooked low and slow until perfectly tender. Layer it in tortillas with all your favorite toppings for a crave-worthy dinner!
Ingredients
- 3 lb chuck roast
- Salt and freshly ground black pepper
- 2 Tbsp vegetable oil
- 1 1/4 cups beef broth, (divided)
- 3 – 4 chipotle chilies in adobo*
- 6 garlic cloves
- 1 1/2 Tbsp ground cumin
- 1 Tbsp dried oregano
- 1/4 tsp ground cloves
- 3 bay leaves
- 1/4 cup fresh lime juice
Instructions
- Cut roast into 6 portions while removing any large pieces of fat. Heat 1 Tbsp vegetable oil in a skillet.
- Dab roast dry with paper towels, season with salt and pepper (about 1 tsp salt 3/4 tsp pepper). Add 3 pieces to skillet and sear until browned on all sides. Transfer to a slow cooker.
- Add remaining 1 Tbsp vegetable oil to skillet and repeat process with remaining 3 roast pieces. Nestle beef portions side by side in an even layer in slow cooker.
- In a food processor, pulse together chipotle chilies, garlic and 1/4 cup beef broth until well pureed, occasionally stopping and scraping down sides of processor.
- In a 2 cup liquid measuring cup or in a bowl, whisk together remaining beef broth with chipotle mixture, cumin, oregano and cloves. Pour mixture over beef in slow cooker, then nestle bay leaves between beef portions.
- Cover and cook on low heat 8 – 9 hours**.
- Remove beef from slow cooker (leave broth) and shred. Stir lime juice into broth in slow cooker then return beef to slow cooker and cook on low or warm 20 – 30 minutes longer.
- Strain liquid from beef and serve in tortillas with desired toppings.
Nutrition
- Calories: 349 kcal
- Fat: 23 g
- Carbohydrates: 2 g
- Protein: 33 g

k">
Tried This Recipe? Leave a Comment!
Did you make this recipe? I’d love to hear how it turned out! Please leave a comment and a rating below. Your feedback helps other home cooks and supports cheerychop.com!
For more delicious inspiration, follow me on Pinterest!