“`html
Table of Contents
- A Flavorful Journey into Thai Chicken Soup
- Ingredients: The Heart of the Flavor
- Timing: When the Magic Happens
- Step-by-Step Instructions: How to Create This Masterpiece
- Nutritional Information: Fuel Your Body
- Healthier Alternatives: Mindful Indulgence
- Serving Suggestions: Elevate Your Experience
- Common Mistakes to Avoid
- Storing Tips: Relish the Flavors Later
- Conclusion: Your New Favorite Soup
- FAQs: Your Burning Questions Answered
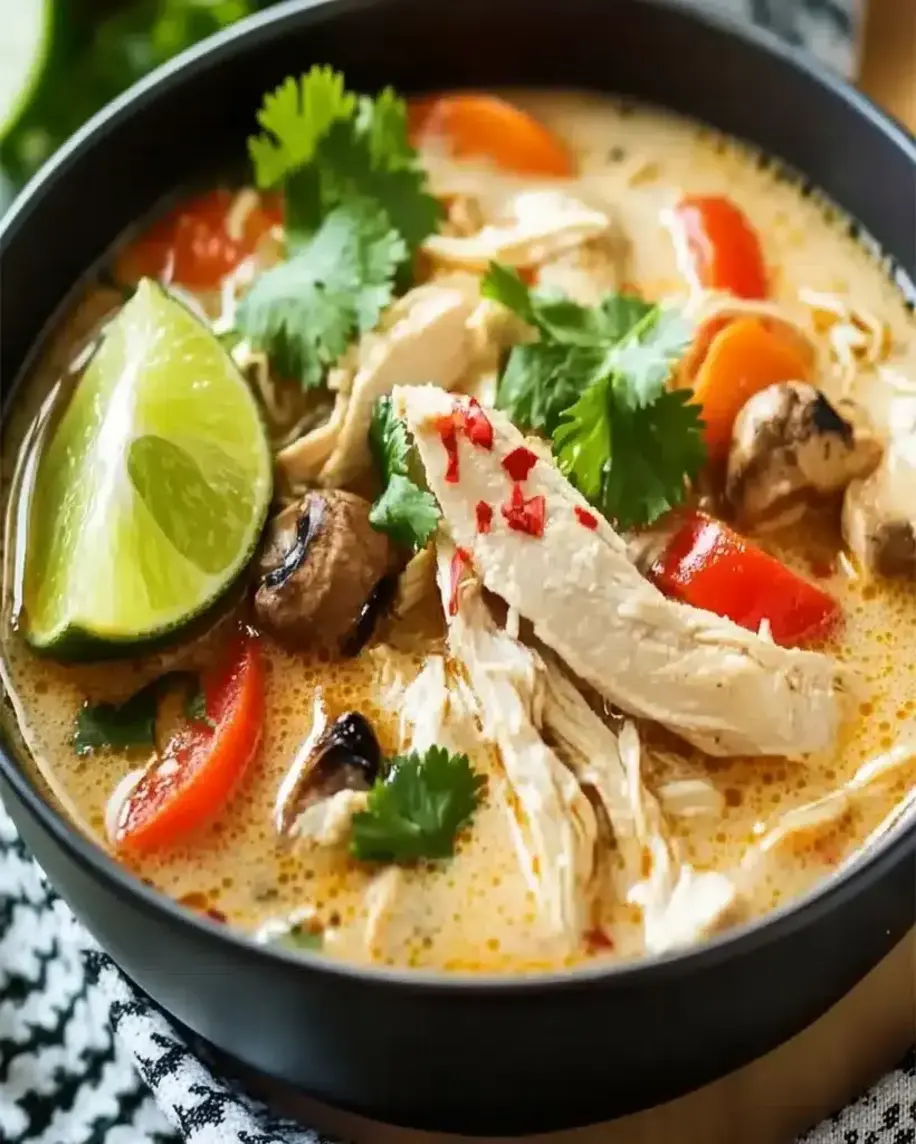
🥣 Thai Chicken Soup Recipe – Easy & Flavorful Comfort in a Bowl!
Craving something warm, comforting, and bursting with exotic flavors? If you’re looking for a soup that’s both easy to make and incredibly satisfying, you’ve landed in the right place!
A Flavorful Journey into Thai Chicken Soup
Did you know that a bowl of well-made Thai chicken soup can transport you to the vibrant streets of Bangkok with just one spoonful? For many home cooks, recreating those authentic, complex Thai flavors at home might seem daunting. However, this Thai Chicken Soup recipe is designed to be both approachable and incredibly rewarding. It’s a harmonious blend of creamy coconut milk, tender chicken, and a symphony of aromatic spices that create a truly comforting and delicious meal. Whether you’re a seasoned fan of Thai cuisine or a curious beginner, this recipe promises a delightful culinary adventure that is surprisingly easy to master, making it perfect for a quick weeknight dinner or a cozy weekend treat.
Ingredients: The Heart of the Flavor
The magic of Thai cuisine lies in its careful balance of sweet, salty, sour, and spicy. This recipe aims to capture that essence using readily available ingredients. We’ve also included some suggestions for substitutions to cater to your pantry and preferences.
For the Soup Base:
- 2 tablespoons coconut oil or vegetable oil: This provides a neutral base for sautéing aromatics. Coconut oil adds a subtle tropical note.
- 1 (13.5 ounce) can full-fat coconut milk: The creamy, luxurious foundation of our soup. Use full-fat for the best richness. (Low-fat can be used but will result in a thinner broth.)
- 4 cups low-sodium chicken broth: The savory liquid base. Low-sodium allows you to control the saltiness. (Vegetable broth can be substituted for a vegetarian version, though it will alter the flavor profile.)
For the Aromatics and Flavor:
- 1 inch ginger, peeled and thinly sliced: Adds a sharp, warming spice. Don’t skimp on this!
- 3-4 cloves garlic, minced: A fundamental aromatic for depth of flavor.
- 1-2 red chilies (like Thai bird’s eye or Serrano), thinly sliced (seeds removed for less heat): For that signature Thai kick! Adjust to your spice preference. (Dried red pepper flakes can be a substitute in a pinch.)
- 2 stalks lemongrass, outer layers removed, bruised, and cut into 3-inch pieces: Essential for its bright, citrusy aroma. If you can’t find fresh lemongrass, 1 tablespoon of lemongrass paste can be used.
- 2-3 tablespoons fish sauce: The umami powerhouse of Thai cooking. Provides depth and saltiness. (Soy sauce or tamari can be a vegetarian/vegan substitute, but the flavor will differ.)
- 1-2 tablespoons brown sugar or palm sugar: To balance the savory and spicy notes with a touch of sweetness.
- Juice of 1 lime: Adds a crucial bright, tangy finish that cuts through the richness.
- Optional: 1-2 tablespoons red curry paste: For an extra layer of complex spicy flavor.
For the Protein and Body:
- 1 pound boneless, skinless chicken thighs or breasts, cut into bite-sized pieces: Thighs remain more tender, but breasts work well too.
- Optional: ½ cup sliced mushrooms (shiitake or cremini): Adds an earthy flavor and tender texture.
For Garnish and Freshness:
- Fresh cilantro, chopped: For a burst of fresh, herbaceous flavor.
- Fresh basil leaves (Thai basil preferred): Adds a subtle anise-like aroma.
- Extra lime wedges: For serving.
- Thinly sliced scallions or red onion: For a mild, fresh bite.

Timing: When the Magic Happens
This Thai Chicken Soup recipe typically takes about 40 minutes from start to finish. This is on par with many quick and easy soup recipes, but significantly faster than many complex curry or stew recipes that can take over an hour. The hands-on time is minimal, making it a perfect weeknight meal when time is of the essence.
Step-by-Step Instructions: How to Create This Masterpiece
Step 1: Prepare Your Aromatics
Gather and prepare all your ingredients. Peel and slice the ginger, mince the garlic, thinly slice your chilies (discarding seeds if you prefer less heat), and bruise and chop the lemongrass. Having everything ready (mise en place) makes the cooking process smooth and enjoyable!
Step 2: Sauté the Aromatics
Heat the coconut oil in a large pot or Dutch oven over medium heat. Add the sliced ginger, minced garlic, sliced chilies, and lemongrass. Sauté for 1-2 minutes until fragrant, being careful not to burn the garlic. If using red curry paste, add it at this stage and cook for another minute, stirring constantly, until fragrant.
Step 3: Add the Broth and Liquid
Pour in the chicken broth and scrape up any browned bits from the bottom of the pot. Add the can of coconut milk and stir to combine. Bring the mixture to a gentle simmer.
Step 4: Simmer and Flavor Infusion
Reduce the heat to low, cover the pot, and let the soup simmer for about 10 minutes to allow the flavors of the ginger, garlic, lemongrass, and chili to meld beautifully into the broth.
Step 5: Add the Chicken
Add the bite-sized chicken pieces (and mushrooms, if using) to the simmering soup. Cook for 5-7 minutes, or until the chicken is cooked through and no longer pink. Be careful not to overcook the chicken, as it can become tough.
Step 6: Finish and Season
Stir in the fish sauce and brown sugar (or palm sugar). Taste the soup and adjust seasonings as needed. You’re looking for a balance of savory, sweet, and a hint of spicy. Add more fish sauce for saltiness, more sugar for sweetness, or a touch more chili for heat. Finally, stir in the fresh lime juice for brightness.
Step 7: Serve and Enjoy
Ladle the hot Thai chicken soup into bowls. Garnish generously with fresh cilantro, basil leaves, sliced scallions, and serve with extra lime wedges on the side. Enjoy the comforting, aromatic warmth!
Nutritional Information: Fuel Your Body
- Calories: Approximately 350-450 per serving (varies based on exact ingredients and portion size)
- Protein: ~25-30g
- Fat: ~20-30g (mostly from coconut milk)
- Carbohydrates: ~10-15g
- Sodium: Varies based on broth and fish sauce used.
Please note: This is an estimated breakdown. For precise nutritional information, it’s recommended to use a nutritional calculator with your specific ingredients and quantities.
Healthier Alternatives: Mindful Indulgence
While this soup is already quite wholesome, here are a few ways to make it even healthier:
- Leaner Protein: Opt for chicken breast instead of thighs, or even extra-firm tofu for a vegetarian option.
- Reduced Coconut Milk: Use light coconut milk or a combination of light coconut milk and chicken broth to reduce fat and calories. You can also add a tablespoon of tahini for creaminess if reducing coconut milk significantly.
- Packed with Veggies: Load up on non-starchy vegetables like spinach, bok choy, snow peas, or thinly sliced bell peppers. Add them in the last few minutes of cooking.
- Lower Sodium Broth & Fish Sauce: Choose genuinely low-sodium chicken broth and be mindful of the amount of fish sauce used. Adjust seasoning with lime juice and herbs to compensate for any lost flavor.
Serving Suggestions: Elevate Your Experience
This Thai Chicken Soup is a complete meal on its own, but here are a few ideas to make it even more special:
- Serve with Rice: A small bowl of steamed jasmine rice on the side is traditional and delicious for soaking up the flavorful broth.
- Add Noodles: For a heartier meal, add cooked rice noodles or ramen noodles to your bowl.
- Crunchy Toppings: A sprinkle of toasted peanuts or cashews adds a lovely textural contrast.
- Side Salad: A fresh, crisp green salad with a light vinaigrette can provide a refreshing counterpoint.
Common Mistakes to Avoid
- Burning Aromatics: Garlic, ginger, and chilies can burn quickly. Sauté them gently over medium-low heat and don’t walk away.
- Overcrowding the Pot: Too many ingredients will steam rather than sauté, and the chicken might not cook evenly.
- Skipping the Acid: The lime juice is crucial for balancing the richness of the coconut milk and the depth of the other flavors. Don’t forget it!
- Not Tasting and Adjusting: Every batch of ingredients can vary. Always taste and adjust seasonings (saltiness, sweetness, sourness, spice) at the end of cooking.
- Using Old Lemongrass: Woody, dried-out lemongrass won’t release much flavor. Ensure your lemongrass is fresh and aromatic.
Storing Tips: Relish the Flavors Later
This Thai Chicken Soup stores beautifully in the refrigerator. Allow it to cool completely, then transfer it to an airtight container. It will keep for 3-4 days. Reheat gently on the stovetop or in the microwave. The flavors often meld and deepen overnight, making leftovers incredibly delicious.
For longer storage, you can freeze the soup in individual portions. Thaw overnight in the refrigerator before reheating.
Conclusion: Your New Favorite Soup
This Thai Chicken Soup recipe is more than just a meal; it’s an experience. It’s a testament to how simple ingredients, when combined with a little technique and a lot of heart, can create something truly extraordinary. The creamy coconut broth, tender chicken, and fragrant aromatics offer a taste of Thailand that is both comforting and exhilarating. We hope this recipe becomes a regular in your rotation, bringing a little bit of sunshine and spice into your everyday life. Give it a try and let us know what you think!
FAQs: Your Burning Questions Answered
***Can I make this soup vegetarian/vegan?***
Absolutely! Replace the chicken broth with vegetable broth. Instead of chicken, use extra-firm tofu (pan-fried or baked until crispy for best texture) or a mix of hearty vegetables like mushrooms and bok choy. Ensure your fish sauce is replaced with soy sauce or tamari, and check that any added curry paste is vegan.
***How can I adjust the spice level?***
The spice comes primarily from the fresh chilies and optional red curry paste. To make it milder, remove the seeds and membranes from the chilies, or use fewer chilies. For a milder flavor but still some heat, use a pinch of red pepper flakes. For more heat, add more chilies or a dash of sriracha at the end.
***My soup doesn’t taste “Thai” enough. What am I missing?***
Ensure you’re using good quality fish sauce and fresh aromatics like ginger, garlic, and lemongrass. The balance of sweet (sugar), salty (fish sauce), sour (lime), and spicy (chili) is key. Don’t be afraid to taste and adjust these elements until they sing together. Sometimes, an additional tablespoon of fish sauce or a squeeze of lime at the very end can make all the difference.
***Can I use dried lemongrass?***
Dried lemongrass is much less potent than fresh. If you must use it, you’ll need a significantly larger amount (at least 2-3 tablespoons, crushed) and it may not impart the same bright, citrusy aroma. Fresh lemongrass is highly recommended for authentic flavor.
***What kind of chicken is best for this soup?***
Chicken thighs are generally preferred because they have more fat and connective tissue, which helps them stay tender and moist during cooking, even if slightly overcooked. Chicken breasts can be used but are more prone to drying out. If using breasts, add them towards the end of cooking and cook just until opaque.
Print
Thai Chicken Soup Recipe – Flavorful, Easy, and Comforting Meal
Description
Discover how to make a delicious Thai Chicken Soup that’s perfect for any occasion. With bold Thai flavors, tender chicken, and creamy coconut broth, this dish is a must-try for fans of both hearty soups and Thai cuisine. Whether you’re looking for a cozy meal to enjoy on a cold day or a satisfying dish to impress guests, this recipe has you covered.
Ingredients
- 2medium carrots(chopped)
- 1medium red bell pepper(chopped)
- ½medium yellow onion(chopped)
- 2-inch piece of ginger(minced)
- 4cloves garlic(minced)
- 4 tablespoonsred curry paste
- 2 tablespoonsfish sauce
- 2 tablespoonssoy sauce(use gluten-free if needed)
- 1 tablespoonpalm sugar(or brown sugar)
- 3 cupschicken stock
- 4boneless, skinless chicken thighs
- 215-ounce cans coconut milk
- 1lime(juiced)
- 8 ouncesrice vermicelli(cooked according to package directions)
- Optional toppings:Lime wedges, sautéed mushrooms, cilantro, cherry tomatoes, black pepper
Instructions
- Chop the carrots, red bell pepper, and onion.
- Mince the ginger and garlic.
- Add the chopped vegetables, ginger, garlic, red curry paste, fish sauce, soy sauce, palm sugar, chicken stock, and chicken thighs to the slow cooker.
- Stir well to ensure all ingredients are evenly distributed.
- Cover the slow cooker and cook on low for 8-10 hours until the chicken is tender.
- Remove the chicken thighs from the slow cooker and shred them using two forks.
- Return the shredded chicken to the slow cooker.
- Pour in the coconut milk and add the lime juice. Stir well.
- Let the soup warm for another 10-15 minutes before serving.
- Place the cooked rice vermicelli in bowls and ladle the Thai Chicken Soup over the top.
- Serve with any optional toppings like lime wedges, sautéed mushrooms, cilantro, cherry tomatoes, and a sprinkle of black pepper.
Notes
Use Fresh Ingredients: Fresh ginger and garlic add a more vibrant flavor to the soup.
Make It Spicy: Add chopped Thai chilies if you want extra heat.
Vegetarian Option: Replace chicken with tofu and use vegetable broth for a vegetarian version.
Storage Tip: The soup base (without the vermicelli) can be stored in the refrigerator for up to 4 days.
“`