“`html
Table of Contents
- Irresistible Peanut Butter Truffles – Easy Homemade Treats!
- Introducing Peanut Butter Chocolate Bliss Bites!
- Timing is Everything
- Step-by-Step Directions to Heaven
- Nutritional Information
- Healthier Alternatives for Guilt-Free Indulgence
- Serving Suggestions: Elevate Your Truffle Experience
- Common Mistakes to Avoid
- Storing Your Delicious Truffles
- Conclusion: Peanut Butter Chocolate Bliss Awaits!
- Frequently Asked Questions
Irresistible Peanut Butter Truffles – Easy Homemade Treats!
Introducing Peanut Butter Chocolate Bliss Bites!
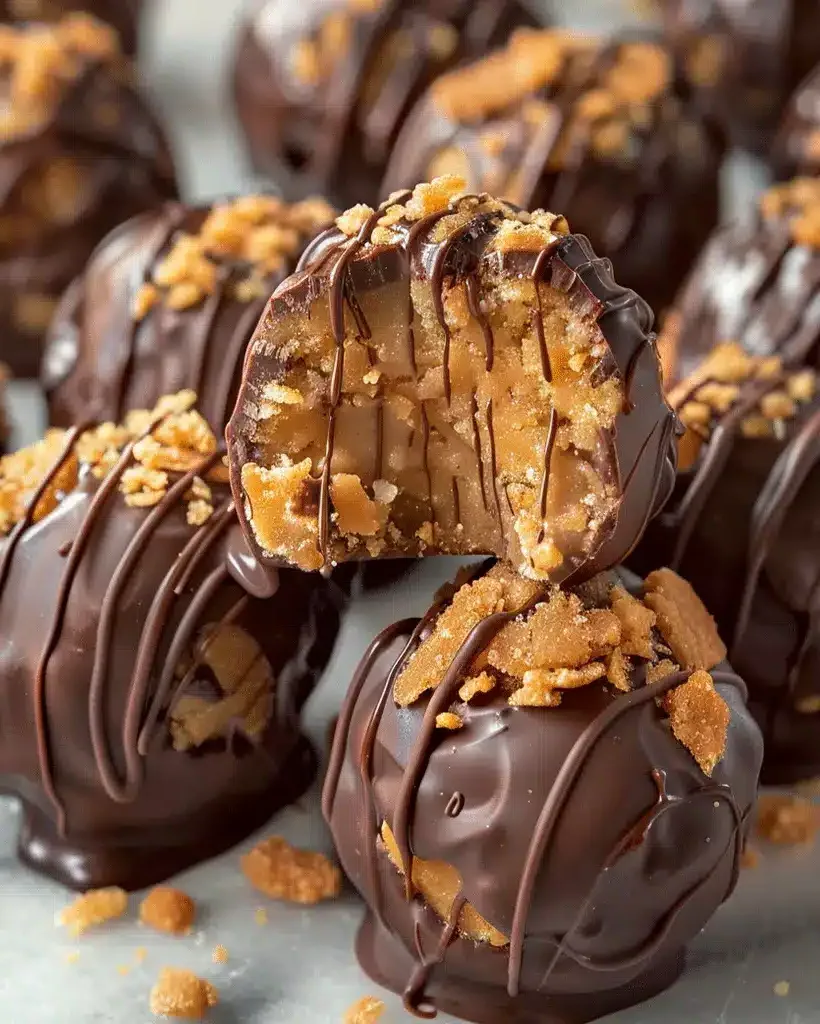
Are you craving a dessert that’s both luxuriously rich and delightfully easy to make? If you’re a fan of the dynamic duo that is peanut butter and chocolate, then you’re in for a treat! These Peanut Butter Chocolate Truffles, lovingly nicknamed “Peanut Butter Chocolate Bliss Bites,” are the answer to your deepest dessert desires. Imagine soft, creamy peanut butter centers enrobed in a decadent shell of luscious chocolate – it’s pure bliss! In a world where many homemade treats can be intimidating, these truffles stand out as an accessible delight, perfect for beginners and seasoned bakers alike. They are a guaranteed crowd-pleaser, swiftly becoming a go-to for parties, holidays, or just a Tuesday afternoon pick-me-up. This guide will walk you through creating these irresistible morsels that perfectly blend the nutty, salty notes of peanut butter with the sweet, smooth embrace of chocolate.
Ingredients for Peanut Butter Chocolate Bliss Bites
The magic of these Peanut Butter Chocolate Truffles lies in their simplicity, using readily available ingredients to create something truly spectacular. The key is quality, so opt for the best you can find for a truly elevated flavor profile. Remember to allow your ingredients to come to room temperature unless otherwise specified, as this helps ensure a smooth, cohesive mixture.
- Peanut Butter: 1 cup (about 250g), creamy or crunchy. For the best texture and flavor, use a good quality peanut butter – natural peanut butter can sometimes be oily, so ensure it’s well-stirred and any excess oil is drained. The subtle saltiness balances the sweetness beautifully.
- Powdered Sugar (Confectioners’ Sugar): 1 ½ cups (about 180g), sifted. This is crucial for achieving that wonderfully smooth, melt-in-your-mouth texture. Sifting prevents any lumps and ensures a velvety finish.
- Butter: ¼ cup (57g), unsalted, softened. Softened butter acts as a binder, adding richness and creamy texture.
- Vanilla Extract: 1 teaspoon. A classic flavor enhancer that rounds out the peanut butter and chocolate notes, adding a touch of warmth and aroma. Use pure vanilla extract for the best results.
- Salt: ¼ teaspoon (optional, adjust to taste). If your peanut butter is already salted, you might skip this or use a pinch of sea salt for a delicate crunch and enhanced flavor.
- Chocolate Chips (for coating): 2 cups (about 340g), semi-sweet or dark chocolate. Choose a good quality chocolate that melts smoothly. The type of chocolate is a matter of preference; semi-sweet offers a classic balance, while dark chocolate provides a more intense, sophisticated flavor. Substitution: Milk chocolate can be used for a sweeter truffle. You can also use chocolate wafers or chopped chocolate bars.
- Optional: Coconut Oil or Vegetable Shortening: 1 tablespoon (for coating). Adding a small amount of fat to the melted chocolate helps it thin out, making dipping easier and giving the coating a beautiful sheen.
Timing is Everything
One of the best things about these Peanut Butter Chocolate Truffles is how quickly they come together. While they require chilling time to set, the active preparation is minimal. Most recipes for similar no-bake treats have active prep times of around 15-20 minutes, and a total time of 1-2 hours due to chilling. Our Peanut Butter Chocolate Bliss Bites fit perfectly within this range, making them an ideal last-minute dessert.
Step-by-Step Directions to Heaven
Let’s dive into crafting these delightful bites. It’s a simple process that yields incredibly rewarding results.
Step 1: Prepare the Peanut Butter Filling
In a medium bowl, combine the softened butter and peanut butter. Use a spatula or an electric mixer on low speed to cream them together until smooth and well-combined. Next, gradually add the sifted powdered sugar, mixing on low speed until just incorporated. Add the vanilla extract and salt (if using). Continue mixing until the dough-like mixture is smooth and holds together. It should be thick enough to roll into balls without being overly sticky.
Step 2: Chill the Mixture
Cover the bowl with plastic wrap and refrigerate for at least 30 minutes. This step is crucial as it firms up the peanut butter mixture, making it much easier to handle and roll into uniform balls without becoming too messy.
Step 3: Shape the Truffles
Once the mixture is firm enough, scoop out portions using a small cookie scoop or a tablespoon. Roll each portion between your palms to form smooth, round balls, about 1-inch in diameter. Place the rolled balls onto a baking sheet lined with parchment paper. If the mixture becomes too soft as you work, return it to the refrigerator for a few minutes to firm up again.
Step 4: Melt the Chocolate
While the truffle balls are chilling (or after they are shaped), prepare your chocolate coating. You can melt chocolate chips using a double boiler or in the microwave. To melt in the microwave, place the chocolate chips (and optional coconut oil/shortening) in a microwave-safe bowl. Heat on 50% power for 30-second intervals, stirring well after each interval, until the chocolate is smooth and completely melted. Be careful not to overheat, as chocolate can seize up easily.
Step 5: Dip the Truffles
Using a fork or a toothpick, carefully dip each peanut butter ball into the melted chocolate, ensuring it’s fully coated. Gently lift the truffle out and allow any excess chocolate to drip back into the bowl. You can tap the fork gently on the side of the bowl to help with this. Return the dipped truffle to the parchment-lined baking sheet. If desired, you can sprinkle toppings like chopped peanuts, sea salt, or sprinkles onto the wet chocolate immediately after dipping.
Step 6: Let Them Set
Once all the truffles are dipped, place the baking sheet in the refrigerator for about 15-30 minutes, or until the chocolate coating has completely set and hardened. This allows the flavors to meld and the truffles to achieve their final, perfect texture.
Nutritional Information
While exact nutritional values can vary based on ingredients used (especially the type of peanut butter and chocolate), a typical serving (approximately 1-2 truffles) contains:
- Calories: 150-200 kcal
- Fat: 10-15g (depending on chocolate and peanut butter)
- Carbohydrates: 15-20g
- Protein: 3-5g
- Sugar: 10-15g
Note: These are approximate values. For precise information, it’s recommended to calculate using the specific ingredients you use.
Healthier Alternatives for Guilt-Free Indulgence
Looking to make these Peanut Butter Chocolate Bliss Bites a little lighter without sacrificing flavor? Try these wholesome swaps:
- Use Natural Peanut Butter: Opt for natural peanut butter with minimal added sugar and oil.
- Reduce Powdered Sugar: Gradually decrease the amount of powdered sugar, or use a natural sweetener like maple syrup or agave nectar (you may need to adjust the consistency if using liquid sweeteners).
- Dark Chocolate Coating: Use high-quality dark chocolate (70% cocoa or higher) for its lower sugar content and richer flavor. Alternatively, use a sugar-free chocolate option.
- Whole Wheat Flour/Almond Flour: For a slight boost in fiber, you can experiment with replacing a tablespoon or two of powdered sugar with finely ground almond flour or whole wheat flour, though this can slightly alter the texture.
Serving Suggestions: Elevate Your Truffle Experience
These truffles are delightful on their own, but here are a few ideas to enhance your serving experience:
- Garnish: Finish with a sprinkle of flaky sea salt, chopped roasted peanuts, toasted coconut flakes, or a drizzle of contrasting chocolate (white or dark).
- Presentation: Arrange them on a beautiful dessert platter, perhaps with fresh berries or a dusting of cocoa powder.
- Pairing: Serve alongside a cup of coffee, a glass of milk, or a rich dessert wine for a sophisticated treat.
- Gift Giving: Package them in small boxes or tins, tied with a ribbon, for a wonderfully homemade gift.
Common Mistakes to Avoid
- Overworking the Dough: Mixing the peanut butter filling too much after adding powdered sugar can make it tough.
- Not Chilling the Mixture: Trying to roll warm peanut butter mixture will result in sticky, unmanageable dough.
- Overheating Chocolate: Chocolate seizes easily when overheated, becoming grainy and clumpy. Melt slowly and gently.
- Dipping Cold Truffles: Ensure your formed truffle balls are at room temperature or slightly chilled before dipping to prevent the chocolate from hardening too quickly or cracking.
Storing Your Delicious Truffles
Proper storage ensures these delightful treats stay fresh and delicious. Store your Peanut Butter Chocolate Truffles in an airtight container in the refrigerator. They will keep well for up to 1-2 weeks. For a firmer texture, especially in warmer climates, keeping them refrigerated is best. If you plan to serve them at room temperature, take them out of the fridge about 15-20 minutes before enjoying.
Conclusion: Peanut Butter Chocolate Bliss Awaits!
There you have it – a foolproof guide to creating Irresistible Peanut Butter Truffles! These “Peanut Butter Chocolate Bliss Bites” are more than just a dessert; they are a testament to how simple ingredients can come together to create moments of pure joy. Their rich, creamy peanut butter center enveloped in a smooth chocolate shell is a classic combination that never fails to impress. Whether you’re making them for a special occasion, a thoughtful gift, or simply to satisfy a craving, this recipe is guaranteed to be a hit. So, gather your ingredients, follow these easy steps, and prepare to be amazed by the deliciousness you can create right in your own kitchen. Happy baking (and no-baking!)!
Frequently Asked Questions
***_Can I use crunchy peanut butter?_***
Absolutely! Using crunchy peanut butter will add a delightful texture to the center of your truffles. Just ensure it’s well-stirred.
***_How do I get a smooth chocolate coating?_***
For the smoothest coating, use good quality chocolate chips or couverture chocolate. Melt them gently using a double boiler or in the microwave on low power, stirring frequently. Adding a teaspoon of coconut oil or shortening can also help achieve a smoother, glossier finish.
***_Can I make these truffles ahead of time?_***
Yes! These truffles can be made a few days in advance and stored in an airtight container in the refrigerator. This actually allows the flavors to meld, making them even more delicious!
***_What if my peanut butter mixture is too sticky?_***
If the mixture is too sticky to roll, it likely needs more chilling time. Cover it and place it back in the refrigerator for another 15-30 minutes until it’s firm enough to handle.
***_Can I freeze these truffles?_***
Yes, you can freeze them. Place the set truffles in a single layer on a baking sheet and freeze until firm. Then, transfer them to an airtight container or freezer bag. Thaw them in the refrigerator overnight before serving for the best texture.
Print
Peanut Butter Truffles Recipe – Easy Homemade Treats
Description
Welcome to the ultimate guide for makingPeanut Butter Chocolate Truffles! These delightful treats, also known asPeanut Butter Chocolate Bliss Bites, are a heavenly combination of rich peanut butter and smooth chocolate. Perfect for any occasion, they’re a crowd-pleaser that’s easy to prepare. Whether you’re a chocolate lover or a peanut butter enthusiast, this recipe is sure to become a favorite in your dessert repertoire.
Ingredients
- Truffles:
- Optional Substitutions:
Instructions
- In a large mixing bowl, combinepeanut butter,powdered sugar,vanilla extract,salt, andcrushed graham crackers. Mix thoroughly until a thick, pliable dough forms. If the mixture feels too sticky, add more crushed graham crackers.
- Using a small scoop or spoon, portion out the dough and roll it into bite-sized balls. Place the balls on a parchment-lined tray to prevent sticking. Once all the dough is shaped, freeze the tray for about 30 minutes. This step ensures the truffles hold their shape during the chocolate dipping process.
- While the truffles are chilling, melt thesemi-sweet chocolate chipswith the optionalcoconut oil. Use a microwave-safe bowl and heat in 15-second intervals, stirring in between, until the chocolate is smooth. Alternatively, melt the chocolate in a double boiler for a gentler process.
- Remove the chilled truffles from the freezer. Using a fork or dipping tool, coat each truffle in the melted chocolate, allowing any excess to drip off. Place the coated truffles back on the parchment-lined tray and sprinkle withcrushed peanutsorcookie crumbsfor added texture and flavor.
- Refrigerate the truffles for at least 1 hour or until the chocolate is fully set. Serve chilled or at room temperature and enjoy the perfect balance of creamy, crunchy, and chocolaty goodness.
Notes
Use high-quality chocolate chips for a smoother coating and richer taste.
For a perfectly round shape, roll the dough balls between your palms after freezing them for a few minutes.
A drizzle of white chocolate can add an elegant touch to the truffles.
If you don’t have a double boiler, place a heatproof bowl over a pot of simmering water to melt the chocolate evenly.
“`