Garlic Brown Butter Roasted Beef Tenderloin: Perfect Recipe for Special Occasions

beef tenderloin recipe, roasted beef tenderloin, garlic butter beef, brown butter beef roast, tender beef recipe, holiday beef dish, elegant beef dinner

Garlic Brown Butter Roasted Beef Tenderloin: The Perfect Showstopper Dish

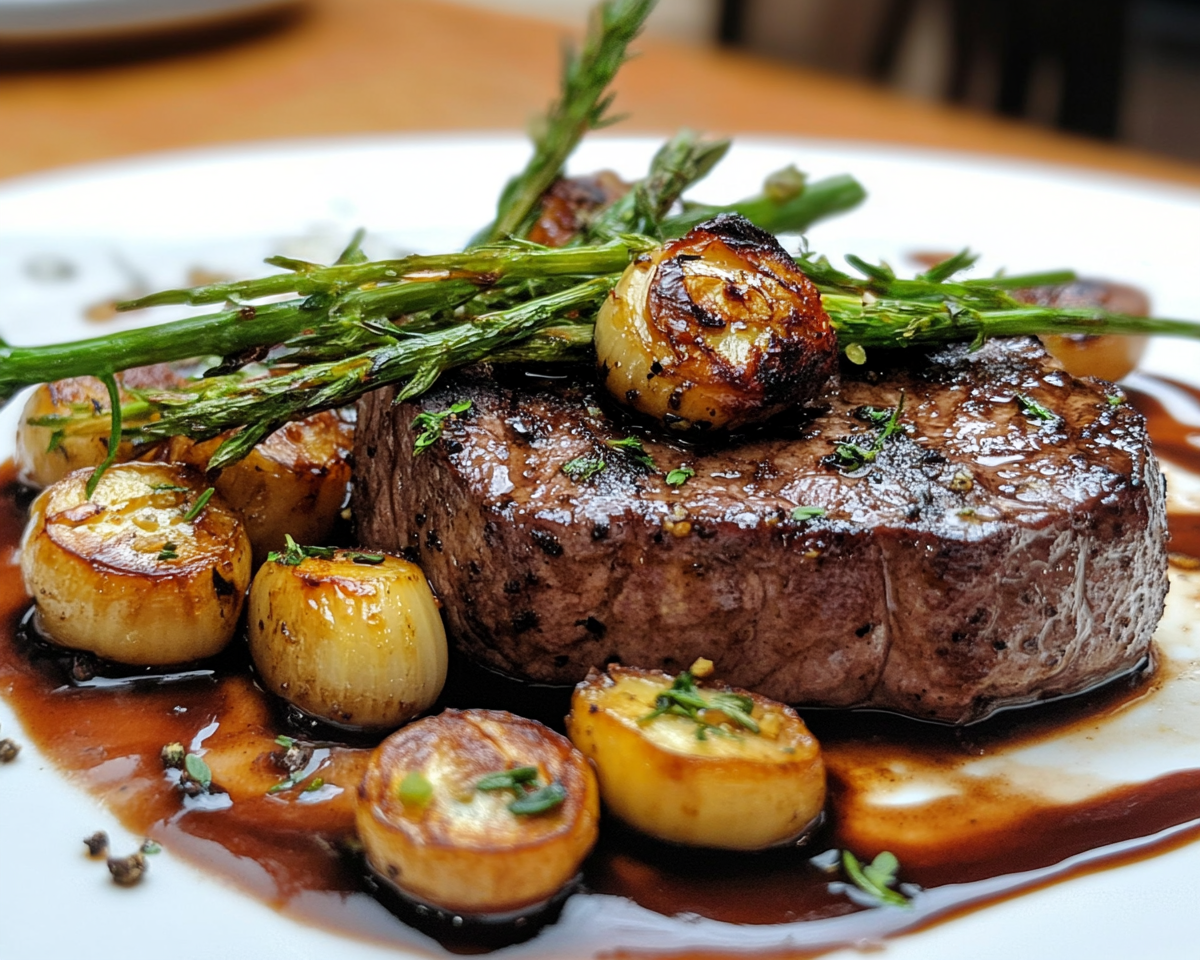
Garlic Brown Butter Roasted Beef Tenderloin is the epitome of elegance and flavor. Perfect for special occasions or indulgent family dinners, this dish is a harmony of tender beef, nutty brown butter, and aromatic garlic. In this detailed guide, you’ll master every step, from selecting the right cut of meat to achieving a perfect sear and roast.


Why Beef Tenderloin?

Beef tenderloin is prized for its unparalleled tenderness and subtle flavor. This premium cut is ideal for roasting, allowing you to enhance it with layers of garlic and brown butter.

Looking to elevate your cooking further? Check out The Perfect Ribeye Steak Recipe for another stunning beef option.

The addition of brown butter—a culinary secret for a nutty, rich flavor—pairs exceptionally well with the tender beef. Learn how to master this technique with Serious Eats’ Guide to Brown Butter.


Key Ingredients

For the Tenderloin

  • Beef Tenderloin: Choose a center-cut piece for even cooking.
  • Butter: High-quality unsalted butter for browning.
  • Garlic: Fresh cloves for maximum aroma and depth.
  • Herbs: Rosemary and thyme to enhance the earthy flavors.
  • Olive Oil: Helps achieve the perfect sear.

For the Sauce

  • Red wine reduction or pan drippings to create a complementary sauce.

Essential Tools

  • Cast Iron Skillet: For an even sear.
  • Meat Thermometer: Ensures precise doneness.
  • Roasting Rack: Prevents soggy bottoms and promotes air circulation.

Step-by-Step Recipe

1. Preparing the Beef

  1. Trim excess fat and silver skin for even cooking.
  2. Tie the tenderloin with butcher’s twine to maintain its shape.
  3. Pat the meat dry and season generously with salt and pepper.

2. Making Garlic Brown Butter

  1. Melt butter in a skillet over medium heat.
  2. Add garlic cloves and cook until the butter turns golden and fragrant.
  3. Stir in fresh herbs for an aromatic boost.

3. Searing the Tenderloin

  1. Heat olive oil in a cast iron skillet.
  2. Sear the tenderloin on all sides to create a golden crust.

4. Roasting the Tenderloin

  1. Preheat the oven to 425°F (220°C).
  2. Place the seared tenderloin on a roasting rack and drizzle with garlic brown butter.
  3. Roast until the internal temperature reaches 135°F (medium-rare).

Creative Variations

  • Herb-Crusted Tenderloin: Coat the beef with a mixture of breadcrumbs, Parmesan, and herbs before roasting.
  • Spicy Butter: Add red pepper flakes to the brown butter for a slight kick.
  • Sous Vide Method: Cook sous vide for perfect doneness, then sear with garlic butter.

Perfect Pairings

  • Sides: Pair with Garlic Rosemary Potatoes for a complete meal.
  • Salad: A crisp Caesar salad adds freshness.
  • Wine: A bold Cabernet Sauvignon complements the dish beautifully.

Troubleshooting and Tips

Common Mistakes

  • Overcooking: Use a meat thermometer and monitor the temperature closely.
  • Burnt Butter: Keep the heat low while browning butter to avoid bitterness.
  • Uneven Cooking: Tie the beef tenderloin evenly for consistent results.

Storage and Reheating

  • Refrigeration: Store leftovers in an airtight container for up to 3 days.
  • Reheating: Gently warm in the oven at 300°F to retain tenderness.

FAQs

  1. What cut of beef is best for this recipe?
    • Center-cut tenderloin ensures even cooking and premium tenderness.
  2. Can I prepare this dish ahead of time?
    • Yes, sear the beef in advance and roast just before serving.
  3. What’s the best wine to pair with beef tenderloin?
    • Bold reds like Cabernet Sauvignon or Merlot enhance the flavors.
  4. Can I make this dish without a cast iron skillet?
    • A heavy stainless steel skillet works as a substitute, though cast iron is ideal.

Conclusion

Garlic Brown Butter Roasted Beef Tenderloin is a dish that elevates any meal to a fine dining experience. With tender beef, nutty butter, and aromatic garlic, it’s a recipe guaranteed to impress. Pair it with rich sides, a bold wine, and you have the ultimate centerpiece for a special occasion.

For more indulgent recipes, explore Slow Cooker Mississippi Ribeye Steaks to add variety to your beef repertoire.

Amish ‘Fancy’ Butter and Egg Dinner Rolls: Soft, Rich, and Perfect Every Time

Amish dinner rolls, butter and egg rolls, soft dinner rolls recipe, rich dinner rolls, Amish bread rolls, homemade fluffy dinner rolls, Amish bread recipes

Amish “Fancy” Butter and Egg Dinner Rolls: A Timeless Delight

Amish “Fancy” Butter and Egg Dinner Rolls are the epitome of comfort baking—rich, fluffy, and indulgent. Whether you’re hosting a family dinner or planning a holiday feast, these rolls are a showstopper. This guide covers everything from history to troubleshooting tips, ensuring your rolls are bakery-perfect.


What Makes Amish Butter and Egg Dinner Rolls Unique?

These fancy dinner rolls stand out for their rich texture, thanks to the generous use of butter and eggs. Their slightly sweet flavor makes them versatile enough to pair with any meal.

For additional buttery bread inspiration, check out Kentucky Butter Cake from ExoRecipes.

Butter, a key ingredient, not only enriches the flavor but also contributes to the roll’s soft and airy texture. Learn more about the science of butter in baking with Serious Eats’ Butter Guide.


Why Make Amish Dinner Rolls at Home?

  • Superior Flavor: The freshness and richness are unmatched by store-bought alternatives.
  • Customizable: Perfect for experimenting with herbs, spices, or seeds.
  • A Touch of Tradition: These rolls bring the warmth of Amish kitchens to your table.

For additional dinner bread ideas, explore Savory Bacon Bread, another ExoRecipes favorite.


Essential Ingredients

For the Dough

  • Flour: Bread flour for structure and softness.
  • Butter: Unsalted for better control over flavor.
  • Eggs: Provide richness and aid in leavening.
  • Yeast: Active dry or instant yeast for a light texture.
  • Sugar: Adds a slight sweetness to balance the savory flavor.

For the Egg Wash

  • One egg, beaten with water or milk for a glossy finish.

Tools You’ll Need

  • Stand Mixer: Essential for easier kneading.
  • 9×13-inch Baking Pan: Ensures evenly baked rolls.
  • Kitchen Scale: For precise measurements.

Step-by-Step Recipe for Amish Butter and Egg Rolls

1. Preparing the Dough

  1. Activate the yeast by dissolving it in warm water with a pinch of sugar.
  2. Mix the flour, sugar, and salt in a bowl. Add eggs, yeast mixture, and softened butter.
  3. Knead the dough for 8-10 minutes until smooth and elastic.
  4. Let the dough rise in a warm place until it doubles in size (about 1-2 hours).

2. Shaping the Rolls

  1. Divide the dough into equal pieces (about 12-16).
  2. Roll into smooth balls and arrange them in a greased baking dish.
  3. Cover and let them rise again until doubled in size.

3. Baking

  1. Preheat the oven to 375°F (190°C).
  2. Brush the rolls with an egg wash for a golden-brown crust.
  3. Bake for 18-22 minutes or until the tops are golden.

Creative Variations

  • Herbed Dinner Rolls: Add chopped rosemary or thyme to the dough.
  • Sweet Rolls: Incorporate a cinnamon sugar filling before shaping.
  • Gluten-Free Option: Substitute with gluten-free flour and adjust liquids.

Troubleshooting Tips

  • Flat Rolls: Ensure your yeast is fresh and the dough is adequately proofed.
  • Dense Texture: Knead longer to develop gluten.
  • Burnt Tops: Lower the oven rack or cover with foil mid-bake.

FAQs

1. Can I Make These Rolls Ahead of Time?

Yes, shape the rolls and refrigerate them overnight. Let them come to room temperature before baking.

2. What’s the Best Butter to Use?

High-quality unsalted butter works best for flavor and texture.

3. How Do I Keep the Rolls Soft?

Store them in an airtight container or wrap them in foil to retain moisture.

4. Can I Freeze the Dough?

Absolutely! Shape the rolls, freeze on a baking sheet, then transfer to a bag. Thaw and bake as needed.


Serving Suggestions

  • Pair with a hearty soup like Crockpot Potato Soup.
  • Serve alongside a classic roast for a holiday feast.

Storage and Reheating

  • Room Temperature: Store in an airtight container for up to 3 days.
  • Freezing: Wrap baked rolls individually in plastic wrap and freeze for up to 3 months.
  • Reheating: Warm in the oven at 300°F for 5-10 minutes.

Conclusion

Amish “Fancy” Butter and Egg Dinner Rolls are a timeless recipe that delivers unbeatable flavor and texture. Perfect for holidays or weekday dinners, these rolls will become a staple in your kitchen.

For more traditional bread recipes, visit Milk Brioche Bread.

Zucchini Bars with Brown Butter Frosting: A Moist and Nutty Dessert Delight

zucchini dessert recipe, moist zucchini bars, brown butter glaze recipe, zucchini cake bars, vegetable-based desserts, nutty frosting ideas, easy zucchini bar recipe

Zucchini Bars with Brown Butter Frosting: The Ultimate Guide

Moist, lightly spiced, and topped with a decadent nutty frosting, zucchini bars with brown butter frosting are a delightful dessert or snack for any occasion. This guide will walk you through the recipe, variations, and pro tips to perfect this treat.


Why Zucchini Bars Are So Popular

Zucchini is a baker’s secret weapon. It adds moisture and texture without dominating the flavor. Plus, zucchini bars are an excellent way to sneak veggies into a dessert that everyone will love.
For a similar vegetable-inspired dessert, check out Carrot Cake on the ExoRecipes website.

The addition of brown butter frosting elevates zucchini bars to a gourmet level with its nutty, caramel-like flavor. To learn how to master brown butter, visit Serious Eats’ Guide to Browning Butter.


What You’ll Need for Zucchini Bars

Ingredients for the Bars

  • Zucchini: Fresh, grated, and lightly drained.
  • Spices: Cinnamon and nutmeg for warmth.
  • Sugars: Brown sugar for richness and white sugar for balance.
  • Leavening Agents: Baking powder and soda for a perfect rise.
  • Optional Add-ins: Chopped nuts or chocolate chips.

Ingredients for the Frosting

  • Unsalted Butter: The key to browning perfection.
  • Powdered Sugar: For a smooth, creamy texture.
  • Vanilla Extract: To enhance the brown butter flavor.

Essential Tools

  • A grater for zucchini.
  • A mixing bowl and whisk for batter preparation.
  • A 9×13-inch baking dish for even baking.

For a similar moist dessert experience, you might enjoy these Cinnamon Roll Cookies.


Step-by-Step Recipe for Zucchini Bars

1. Preparing the Bars

  1. Preheat your oven to 350°F (175°C).
  2. Grate zucchini and gently press to remove excess moisture.
  3. In a mixing bowl, whisk flour, spices, baking soda, and salt.
  4. In another bowl, combine eggs, sugar, oil, and vanilla, then fold in the zucchini.
  5. Gradually mix dry ingredients into the wet mixture.
  6. Pour the batter into a greased or parchment-lined baking dish.
  7. Bake for 25-30 minutes or until a toothpick inserted in the center comes out clean.

2. Making the Brown Butter Frosting

  1. Heat butter in a pan until golden and fragrant.
  2. Remove from heat and mix with powdered sugar, milk, and vanilla extract.
  3. Spread frosting over completely cooled bars for a perfect finish.

Creative Variations

  • Nut-Free: Skip the nuts for allergy-friendly bars.
  • Gluten-Free: Replace all-purpose flour with a gluten-free baking blend.
  • Vegan Option: Use plant-based butter and flax eggs.

For more dessert inspiration, check out Kentucky Butter Cake.


Storing and Serving Suggestions

  • Room Temperature: Store in an airtight container for up to 3 days.
  • Refrigerator: Extend freshness by keeping them chilled for up to a week.
  • Freezer: Freeze unfrosted bars for up to 3 months and frost when ready to serve.

Common Issues and Solutions

Why Are My Bars Soggy?

  • Ensure the zucchini is properly drained to avoid excess moisture.

How Do I Avoid Overly Sweet Frosting?

  • Use salted butter or add a pinch of salt to balance the sweetness.

FAQs

  1. Can I use frozen zucchini?
    • Yes, but make sure to thaw and drain it thoroughly.
  2. What if I don’t like frosting?
    • You can top the bars with a simple glaze or leave them plain.
  3. Can I make these ahead of time?
    • Absolutely. Bake the bars a day in advance and frost them the day of serving.
  4. Are there substitutes for brown butter?
    • Regular butter works, but it won’t have the same nutty flavor.

Conclusion

Zucchini bars with brown butter frosting are a perfect combination of healthy ingredients and indulgent flavors. Whether you stick to the classic recipe or try a variation, this dessert is sure to impress.

For another unique treat, explore Crispy Popcorn Shrimp, a savory delight from ExoRecipes.

Easy Homemade Lasagna: The Perfect Recipe for a Comforting Meal

Homemade lasagna recipe, lasagna dinner ideas, easy lasagna recipe, classic Italian lasagna, layered pasta dish, lasagna cooking tips, lasagna variations

Easy Homemade Lasagna: A Step-by-Step Guide

Lasagna is the ultimate comfort food—a rich, layered masterpiece that combines pasta, meat, cheese, and sauce into a hearty dish everyone loves. This guide will walk you through every step of creating a delicious, easy homemade lasagna from scratch. Whether you’re a seasoned chef or a novice in the kitchen, you’ll master this classic Italian dish in no time.


What Makes Lasagna Special?

Lasagna is more than just a meal; it’s a culinary experience steeped in history. Originating in Italy, this dish has become a global favorite due to its adaptability and hearty flavors. The layers of pasta, savory fillings, and melted cheese create a perfect harmony of textures and tastes.

For more insight into Italian dishes, check out Slow Cooker Baked Ziti, which offers a similar comfort-food vibe.


Why Make Lasagna at Home?

  • Better Taste: Homemade lasagna gives you control over the quality of ingredients, ensuring superior flavor.
  • Cost-Effective: Making lasagna at home is cheaper than dining out or buying pre-made options.
  • Customizable: Adjust the recipe to accommodate dietary needs, from vegetarian options to gluten-free pasta.

Discover more cost-saving comfort dishes like Crockpot Potato Soup.


Internal Linking Opportunities:


Essential Ingredients for Homemade Lasagna

  • Pasta: Lasagna noodles, boiled or no-boil options.
  • Cheese: Mozzarella, ricotta, Parmesan, or dairy-free alternatives.
  • Meat Sauce: A combination of ground beef and pork, or a vegetarian alternative with mushrooms or lentils.
  • Marinara Sauce: Use homemade or a high-quality store-bought version.
  • Herbs and Spices: Fresh basil, parsley, oregano, and garlic.

Tools You’ll Need

  • A large baking dish (preferably 9×13 inches).
  • Saucepan for cooking the meat and marinara.
  • Mixing bowls for combining cheese and seasonings.
  • Aluminum foil to cover the dish while baking.

Step-by-Step Recipe for Easy Homemade Lasagna

Preparation (400 Words)

  1. Cook the Noodles: If using regular lasagna noodles, boil them until al dente. Drain and lay flat on parchment paper.
  2. Make the Sauce: Sauté onions and garlic in olive oil, add ground meat, and cook until browned. Stir in marinara sauce and simmer for 20 minutes.
  3. Prepare the Cheese Mixture: Combine ricotta, Parmesan, one egg, and chopped parsley in a bowl.

Layering the Lasagna (600 Words)

  1. First Layer: Spread a thin layer of sauce on the bottom of the dish.
  2. Layer Pasta: Lay noodles flat, slightly overlapping.
  3. Add Cheese: Spread a layer of the ricotta mixture, then sprinkle shredded mozzarella.
  4. Repeat Layers: Alternate pasta, sauce, and cheese until the dish is full.
  5. Top Layer: Finish with a generous layer of sauce and mozzarella.

Baking the Lasagna (400 Words)

  1. Preheat the oven to 375°F (190°C).
  2. Cover the dish with aluminum foil and bake for 25 minutes.
  3. Remove the foil and bake for an additional 15 minutes until the cheese is golden and bubbly.
  4. Let the lasagna rest for 10-15 minutes before slicing.

Creative Lasagna Variations

  • Vegetarian Lasagna: Replace meat with zucchini, spinach, or eggplant.
  • Gluten-Free Lasagna: Use gluten-free pasta or substitute zucchini slices.
  • Dairy-Free Lasagna: Opt for plant-based cheese and béchamel sauce.
  • Seafood Lasagna: Incorporate shrimp or crab with Alfredo sauce.

For other rich dishes, check out Cheesy Smoked Sausage Pasta.


Troubleshooting Common Issues

  • Watery Lasagna: Avoid overloading with sauce or undercooking the noodles.
  • Burnt Edges: Use foil during baking and remove it only for the final browning.
  • Uneven Cooking: Ensure even layers and bake at the recommended temperature.

FAQs About Homemade Lasagna

  1. Can I make lasagna ahead of time?
    • Yes, assemble and refrigerate it for up to 24 hours before baking.
  2. What’s the best cheese for lasagna?
    • Mozzarella for meltiness, Parmesan for flavor, and ricotta for creaminess.
  3. How do I store leftovers?
    • Refrigerate in an airtight container for up to 3 days or freeze for up to 3 months.
  4. Can I make lasagna without boiling noodles?
    • Yes, no-boil noodles can be used directly, but add extra sauce to prevent dryness.

Serving Suggestions

  • Pair your lasagna with Savory Bacon Bread for a hearty meal.
  • Add a fresh side like a Caesar salad or steamed vegetables.

Conclusion

Making easy homemade lasagna from scratch is simpler than you think. With fresh ingredients, simple tools, and step-by-step guidance, you’ll create a dish that rivals any restaurant. Whether you stick to the classic recipe or experiment with creative variations, this dish will always impress.

Explore other comforting recipes like Potato Casserole to round out your meal.

How to Make Fluffy Pancakes: The Ultimate Guide for Perfect Breakfast Stacks

light pancakes, airy pancakes, soft pancakes, buttermilk pancakes, homemade pancakes, best pancake recipe, breakfast pancake ideas, fluffy pancake recipe

Fluffy Pancakes: Your Ultimate Guide to the Perfect Stack

Fluffy pancakes are the crown jewel of a hearty breakfast, delivering light, airy bites of perfection with every forkful. Whether you’re a seasoned cook or just beginning your pancake journey, this guide will help you master the art of making fluffy pancakes from scratch.


What Makes Pancakes Fluffy?

The secret to achieving fluffy pancakes lies in a perfect balance of ingredients and technique. Baking powder and baking soda act as leavening agents, creating air pockets that give pancakes their characteristic lightness. Pairing this with minimal mixing and incorporating buttermilk can take your pancakes to the next level.

For more tips on how these ingredients work, check out King Arthur Baking’s Guide to Baking Powder.


Why Make Fluffy Pancakes at Home?

  • Control Over Ingredients: Use fresh, quality ingredients tailored to your taste.
  • Endless Customization: From blueberries to chocolate chips, the possibilities are endless.
  • Better Taste and Texture: Homemade pancakes are unbeatable in flavor and fluffiness.

If you’re looking for nonstick cookware to perfect your pancakes, visit Good Housekeeping’s Best Pancake Griddles.


Internal Linking Opportunities:


Essential Ingredients for Fluffy Pancakes

  • All-Purpose Flour: The foundation for a light texture.
  • Buttermilk: Adds tang and activates leavening agents.
  • Baking Powder & Baking Soda: Ensure optimal rise.
  • Eggs: Provide structure and moisture.
  • Melted Butter: Adds richness and tenderness.

Tools for Pancake Perfection

  • A nonstick griddle for even cooking.
  • A whisk for aeration.
  • Measuring spoons and cups for precision.

The Science of Pancake Batter

Mixing pancake batter is an art:

  • Overmixing can deflate the batter, leading to dense pancakes.
  • Letting the batter rest for 5-10 minutes allows the gluten to relax, enhancing fluffiness.

Step-by-Step Recipe for Fluffy Pancakes

Ingredients:

  • 1 ½ cups all-purpose flour
  • 1 tbsp baking powder
  • ½ tsp baking soda
  • 1 tbsp sugar
  • 1 cup buttermilk
  • 2 large eggs
  • 2 tbsp melted butter

Instructions:

  1. Mix Dry Ingredients: Combine flour, sugar, baking powder, and baking soda in a bowl.
  2. Whisk Wet Ingredients: In another bowl, whisk buttermilk, eggs, and melted butter.
  3. Combine Gently: Fold wet ingredients into dry ingredients until just combined.
  4. Heat and Cook: Preheat a nonstick griddle and ladle ¼ cup batter for each pancake. Cook until bubbles appear, then flip.

Creative Pancake Variations

  • Blueberry Pancakes: Fold in fresh or frozen blueberries.
  • Chocolate Chip Pancakes: Add a sprinkle of chocolate chips to the batter.
  • Vegan Pancakes: Substitute eggs with flaxseed meal and buttermilk with almond milk.

For more ideas, try Reinventing Breakfast with Pancake Muffins.


Sweet and Savory Toppings

Sweet Toppings:

  • Maple syrup and powdered sugar
  • Fresh fruits like strawberries and bananas

Savory Toppings:

  • Bacon crumbles and cheddar cheese
  • Avocado slices with a poached egg

Troubleshooting Pancake Problems

  • Flat Pancakes: Check your leavening agents for freshness.
  • Burnt Pancakes: Lower the griddle temperature.
  • Uneven Cooking: Spread the batter evenly with a ladle.

FAQs About Fluffy Pancakes

  1. What makes pancakes fluffy?
    • Proper leavening and minimal mixing create air pockets.
  2. How can I store leftover pancakes?
    • Freeze in an airtight container and reheat in a toaster.
  3. Can I make pancakes without eggs?
    • Yes, use substitutes like mashed bananas or yogurt.

Conclusion

Mastering fluffy pancakes is simpler than you think. With the right ingredients, tools, and techniques, you can whip up a batch that rivals the best breakfast spots. Whether you stick to the classic recipe or try new variations, pancakes are a timeless treat that never disappoints.