Peppermint Crunch Mini Cheesecakes: Festive Holiday Desserts Made Easy

holiday mini cheesecakes, peppermint cheesecake bites, Christmas dessert ideas, festive cheesecake recipe, peppermint candy desserts

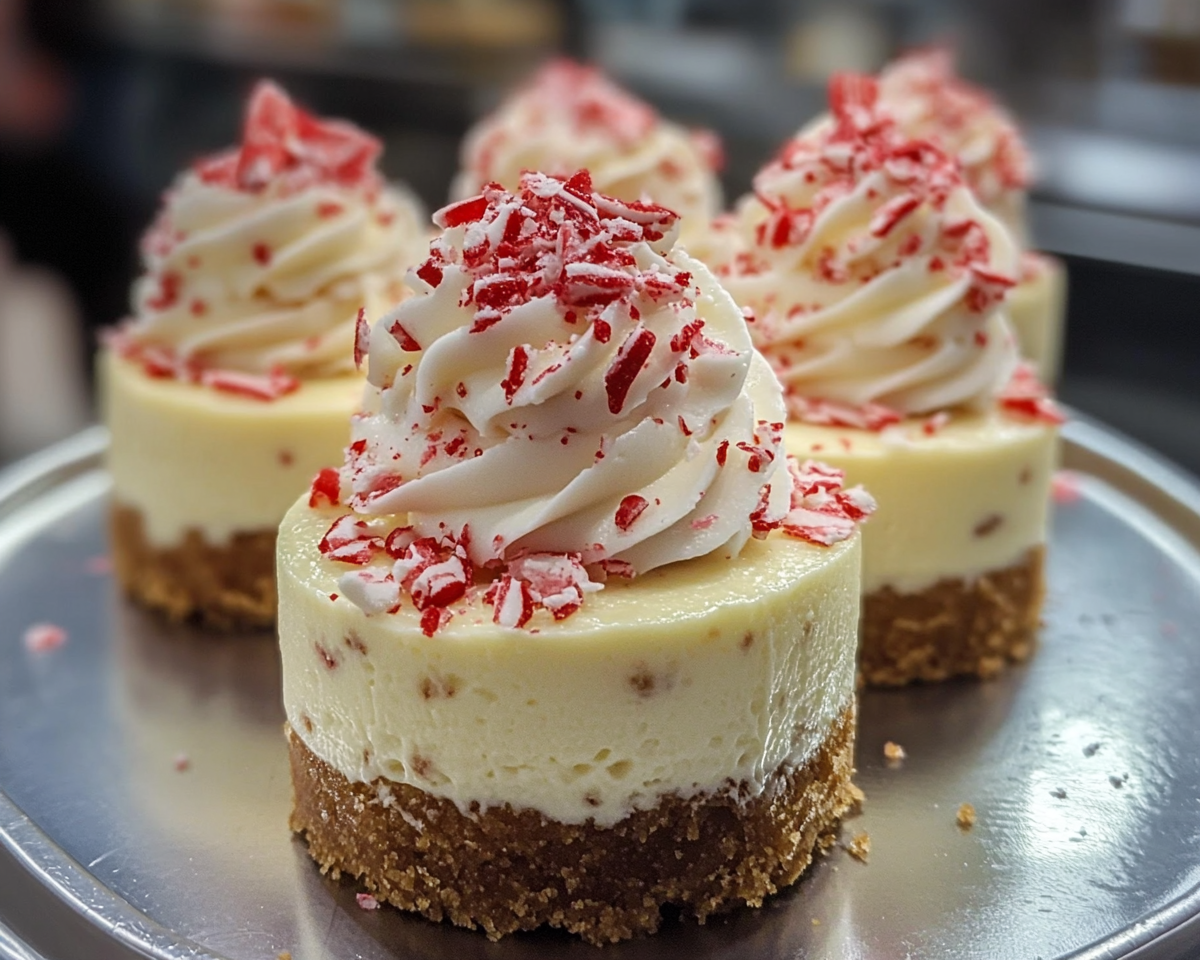
Peppermint Crunch Mini Cheesecakes: Festive and Easy Holiday Dessert

Peppermint Crunch Mini Cheesecakes are the epitome of holiday cheer—delightfully creamy, perfectly portioned, and adorned with the festive crunch of peppermint candies. Whether for Christmas gatherings or a winter treat, these cheesecakes are guaranteed to impress.


What Makes Peppermint Crunch Mini Cheesecakes Special?

  • Festive Appeal: Perfectly sized and visually stunning with crushed candy canes or peppermint sprinkles.
  • Creamy Delight: A silky cream cheese filling that pairs beautifully with the buttery crust.
  • Simple to Prepare: No special equipment required—just a muffin tin and everyday ingredients.

For more holiday dessert ideas, explore Easy Holiday Desserts.


Ingredients for Peppermint Crunch Mini Cheesecakes

For the Crust

  • 1 cup graham cracker crumbs
  • 2 tablespoons granulated sugar
  • 5 tablespoons unsalted butter, melted

For the Cheesecake Filling

  • 12 oz cream cheese, softened
  • ½ cup granulated sugar
  • 2 eggs
  • ½ teaspoon peppermint extract
  • ½ cup sour cream
  • 1 cup crushed peppermint candies

For the Topping

  • 1 cup heavy whipping cream
  • 2 tablespoons powdered sugar
  • 1 teaspoon vanilla extract
  • Crushed candy canes or peppermint sprinkles

Step-by-Step Instructions

1. Prepare the Crust

  • Preheat oven to 325°F (165°C). Line a muffin pan with cupcake liners.
  • Combine graham cracker crumbs, sugar, and melted butter in a bowl.
  • Divide mixture evenly among liners, pressing firmly to form the crust.

2. Make the Filling

  • Beat cream cheese and sugar together until smooth. Add eggs one at a time, mixing well after each addition.
  • Stir in peppermint extract and sour cream until fully incorporated. Fold in crushed peppermint candies.

3. Assemble and Bake

  • Pour filling over the crust in each liner, filling about ¾ full.
  • Bake for 18–22 minutes or until set. Cool at room temperature, then refrigerate for at least 2 hours.

4. Add the Topping

  • Whip heavy cream with powdered sugar and vanilla until stiff peaks form.
  • Pipe or spoon onto chilled cheesecakes and garnish with crushed peppermint or mini candy canes.

For more easy dessert ideas, see Perfect Cheesecake Tips.


Variations for Peppermint Crunch Mini Cheesecakes

  • Chocolate Peppermint: Add a layer of melted chocolate to the crust before the filling.
  • Gluten-Free: Use gluten-free graham crackers for the crust.
  • No-Bake Version: Swap out the baked filling for a no-bake cream cheese mixture stabilized with gelatin.
  • Custom Toppings: Add a drizzle of chocolate sauce, edible glitter, or festive sprinkles.

Tips for the Best Mini Cheesecakes

  • Always use room-temperature ingredients for a smooth filling.
  • Avoid overbaking; the centers should be slightly jiggly when removed from the oven.
  • Cool gradually to prevent cracks in the cheesecake.

For even more creative ideas, check out Festive Christmas Treats.


Serving Suggestions

  • Serve with a side of hot chocolate, peppermint mocha, or spiced cider.
  • Arrange on a dessert platter with other holiday favorites like cookies and truffles.
  • Package in festive boxes for a thoughtful edible gift.

Frequently Asked Questions (FAQs)

1. Can I Make Peppermint Crunch Mini Cheesecakes Ahead of Time?

Yes! These can be made up to 2 days in advance. Store in the refrigerator and add toppings before serving.

2. Can I Freeze These Cheesecakes?

Absolutely. Freeze without the whipped topping for up to 3 months. Thaw overnight in the refrigerator before decorating.

3. What Can I Use Instead of Peppermint Candies?

Crushed candy canes or peppermint bark pieces work perfectly as substitutes.

4. Can I Double the Recipe?

Yes, simply double the ingredients for larger gatherings.


Internal Linking Opportunities


Suggested External Links

  1. Cheesecake Baking Tips (Anchor Text: Perfect Cheesecake Baking Tips).
  2. Candy Cane Recipes (Anchor Text: Candy Cane Recipes).
  3. Whipping Cream Guide (Anchor Text: Whipping Cream Basics).

Nutritional Information

  • Calories: ~315 per mini cheesecake
  • Carbohydrates: 28g
  • Protein: 4g
  • Fat: 22g

Enjoy the festive flavor of Peppermint Crunch Mini Cheesecakes, a perfect dessert for any holiday celebration! Let me know if you’d like further edits.

Christmas Tree Meringues: Light and Festive Holiday Treats

holiday meringue cookies, Christmas dessert ideas, festive tree-shaped meringues, egg white desserts, light holiday treats

Christmas Tree Meringues: Whimsical Holiday Treats

Meringues are the epitome of light, airy sweetness, and when styled as Christmas Tree Meringues, they add a festive flair to any holiday celebration. These dainty desserts are perfect for gifting, dessert tables, or indulging in a holiday-inspired treat.


What Are Christmas Tree Meringues?

Christmas Tree Meringues are festive, colorful desserts made from whipped egg whites and sugar, piped into the shape of Christmas trees. Their melt-in-your-mouth texture and customizable decorations make them a standout holiday treat. If you love creative baking ideas, explore Mini Pineapple Coconut Milk Cheesecakes for another delightful dessert.


Ingredients for Christmas Tree Meringues

Core Ingredients

  • Egg Whites: Provide structure and fluff.
  • Granulated Sugar: Adds sweetness and stability.
  • Cream of Tartar: Helps achieve stiff peaks.
  • Green Food Coloring: Gives the meringues their tree-like appearance.
  • Edible Decorations: Use star sprinkles, candy balls, or edible glitter.

Optional Additions

  • Vanilla extract for a hint of sweetness.
  • Peppermint or almond extract for a seasonal twist.

Step-by-Step Recipe Guide

1. Preparing the Meringue Mixture

  1. Separate egg whites, ensuring no yolk contamination.
  2. Beat egg whites with cream of tartar until soft peaks form.
  3. Gradually add sugar and beat until stiff, glossy peaks develop.

2. Coloring and Shaping

  • Gently fold in green food coloring until uniformly blended.
  • Transfer the mixture to a piping bag fitted with a star tip.
  • Pipe tree shapes onto a parchment-lined baking sheet.

3. Decorating

  • Add sprinkles, edible stars, or glitter for a festive finish.

4. Baking

  • Bake in a preheated oven at 200°F (95°C) for 90 minutes.
  • Allow meringues to cool in the oven to prevent cracking.

For additional tips, visit Serious Eats’ Guide to Meringues.


Creative Variations for Christmas Tree Meringues

  • Flavors: Incorporate extracts like peppermint or lemon for a flavorful twist.
  • Colors: Try ombre green for a gradient effect.
  • Shapes: Use the same meringue base to create stars, wreaths, or candy canes.

For more whimsical holiday ideas, check out Smores Crunchwraps.


Tips for Perfect Christmas Tree Meringues

  • Ensure all utensils are grease-free to achieve stiff peaks.
  • Use room-temperature egg whites for better aeration.
  • Avoid over-mixing the meringue to maintain its light texture.

How to Serve and Store Christmas Tree Meringues

Serving Ideas

  • Arrange on a festive platter for dessert tables.
  • Package individually in clear bags tied with ribbons for gifts.

Storage Tips

  • Store in an airtight container at room temperature for up to two weeks.
  • Avoid humid environments to prevent stickiness.

FAQs About Christmas Tree Meringues

1. Can I use liquid food coloring?
Yes, but gel food coloring is recommended to maintain the meringue’s consistency.

2. Why did my meringues crack?
Cracking often occurs if the meringues cool too quickly. Allow them to cool slowly in the oven.

3. Can I make meringues without cream of tartar?
Yes, substitute with lemon juice or white vinegar for similar stabilization.

4. How do I fix sticky meringues?
Bake them for an additional 10–15 minutes at low heat.


LSI and NLP Keywords for SEO

  • Festive meringue recipes
  • Holiday meringue desserts
  • Christmas baking ideas
  • Green Christmas tree meringues
  • Egg white-based desserts
  • Light and airy holiday treats

Internal Linking Opportunities


Conclusion

Christmas Tree Meringues are a delightful combination of creativity and flavor, perfect for celebrating the holiday season. Whether gifted or enjoyed as part of a festive dessert spread, these meringues are guaranteed to bring joy. With simple ingredients and endless customization options, they’re a must-try for holiday bakers.

Grinch Oreo Surprise Balls: A Fun and Festive Holiday Treat

Grinch-themed Oreo truffles, no-bake holiday treats, Oreo ball recipes, Christmas dessert ideas, festive Oreo snacks, easy Grinch dessert recipe

Grinch Oreo Surprise Balls: A Festive Holiday Treat

Grinch Oreo Surprise Balls are a delightful, no-bake holiday dessert that combines the richness of crushed Oreos with a festive Grinch-themed presentation. Whether you’re preparing for a holiday party or creating treats for family and friends, these fun and colorful Oreo balls are sure to steal the spotlight.


Why Make Grinch Oreo Surprise Balls?

This recipe is perfect for:

  • Festive Celebrations: Bright green color and heart-shaped sprinkles give them a Grinchy charm.
  • No-Bake Simplicity: Ideal for busy holiday schedules.
  • Kid-Friendly Fun: Great for involving kids in the kitchen.

For other holiday recipes, explore Deep-Fried Oreos, a carnival classic turned festive.


Ingredients You’ll Need

For the Balls:

  • 36 Oreo cookies, finely crushed
  • 8 oz cream cheese, softened

For the Coating:

  • 12 oz green candy melts or white chocolate (colored with green food dye)

For Decoration:

  • Red heart-shaped sprinkles (to represent the Grinch’s growing heart)

How to Make Grinch Oreo Surprise Balls

Step 1: Prepare the Oreo Mixture

  1. Crush Oreos into fine crumbs using a food processor.
  2. Mix crushed Oreos with softened cream cheese until a dough-like consistency forms.

Step 2: Shape the Balls

  1. Roll the mixture into 1-inch balls.
  2. Place them on a parchment-lined baking sheet and chill for at least 30 minutes.

Step 3: Coat and Decorate

  1. Melt green candy melts according to package instructions.
  2. Dip the chilled Oreo balls into the green coating, ensuring they are fully covered.
  3. Place on parchment paper and immediately add a red heart sprinkle on top.

For additional dipping tips, check out Perfect Candy Coating Techniques to master the art of smooth coatings.


Pro Tips for the Best Results

  • Chill Before Coating: This helps the balls maintain their shape during dipping.
  • Use Dipping Tools: Forks or dipping sticks make coating easier and neater.
  • Store Properly: Keep in an airtight container in the refrigerator to maintain freshness.

Pair these Grinch Oreo Surprise Balls with Easy No-Bake Banana Split Cheesecake for a no-bake dessert duo.


Variations and Creative Twists

  • Peppermint Grinch Balls: Add crushed peppermint candy to the Oreo mixture for a minty twist.
  • Chocolate Drizzle: Use white or dark chocolate to add decorative drizzles.
  • Gluten-Free Option: Replace Oreos with gluten-free sandwich cookies.

FAQs About Grinch Oreo Surprise Balls

How Long Do These Treats Last?

Stored in an airtight container, they last up to one week in the fridge.

Can I Freeze Oreo Balls?

Yes, freeze them before coating for up to three months. Dip and decorate after thawing.

What Can I Use Instead of Candy Melts?

White chocolate chips with food coloring work well as an alternative.


Internal Linking Opportunities


Conclusion

Grinch Oreo Surprise Balls are an easy, fun, and festive treat that will bring joy to any holiday gathering. With their vibrant colors and delightful flavors, they’re sure to become a family favorite. Pair them with other no-bake desserts for a hassle-free holiday dessert table.

For more creative recipes and festive ideas, visit ExoRecipes and make your holidays unforgettable!