Table of Contents
Peanut Butter Balls with Rice Krispies: Easy No-Bake Chocolate Covered Delight
There are some recipes that are just pure joy in edible form, and these Peanut Butter Balls with Rice Krispies are absolutely one of them. I first discovered a similar treat at a bustling market in Marrakesh during a trip with my mother, where vendors skillfully crafted these sticky, sweet delights. The combination of nutty peanut butter and crispy cereal coated in rich chocolate always transports me back. Now, living in New York City, I’ve perfected my own no-bake peanut butter balls recipe, blending that nostalgic charm with the efficiency needed for a busy urban life. It’s a simple yet magical recipe, perfect for any occasion, and I can’t wait for you to try my version of these easy peanut butter balls.
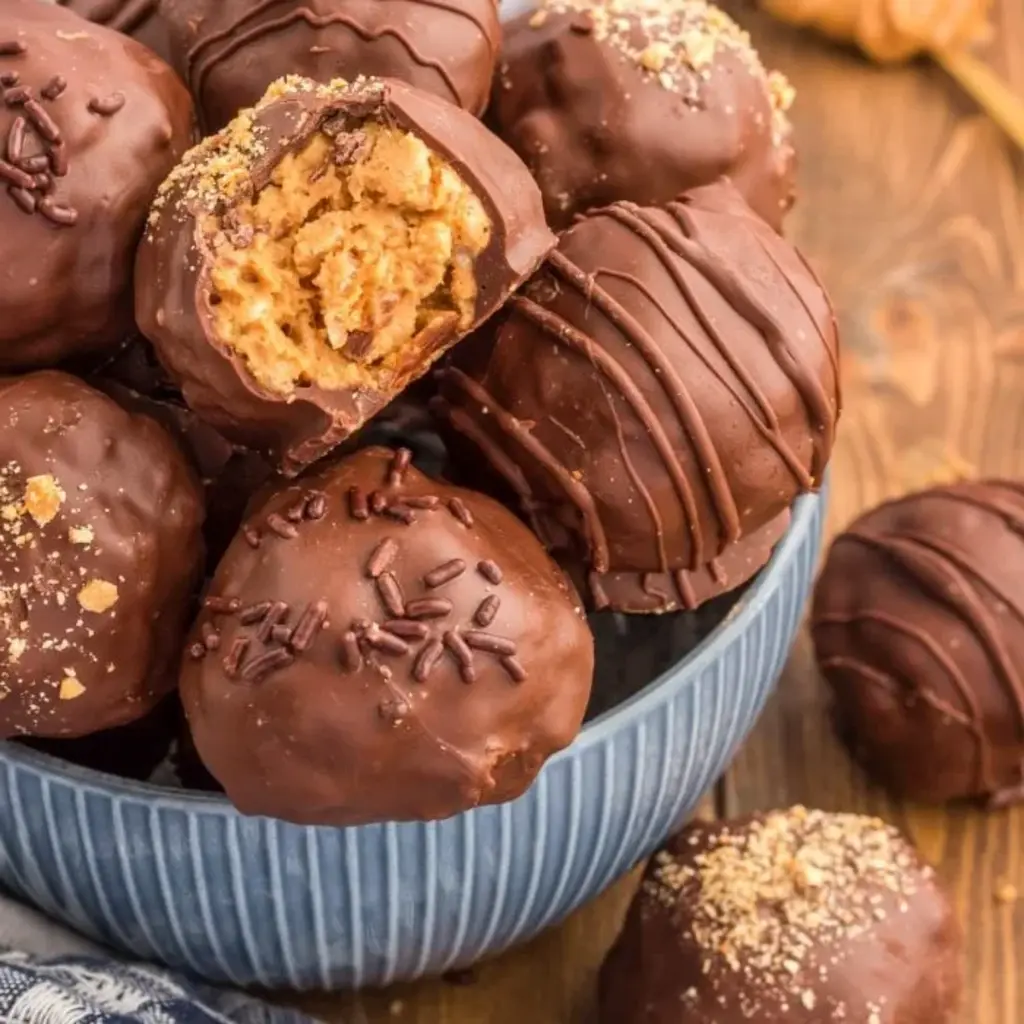
Imagine biting into a perfectly spherical treat: the satisfying crunch of Rice Krispies cereal immediately gives way to a dense, creamy peanut butter center, all enrobed in a shell of smooth, decadent chocolate. The saltiness of the peanut butter beautifully balances the sweetness of the chocolate and the subtle malty notes of the cereal. It’s a symphony of textures and flavors that can only be described as utterly addictive. It reminds me of the meticulous sauce work I learned in Paris – how seemingly simple ingredients can create complex satisfying results. The aroma alone, a blend of roasted peanuts and melting chocolate, is enough to make your kitchen feel like the coziest spot in the city.
What makes my rendition of these no-bake peanut butter balls truly special is its simplicity without compromising on taste or texture. I’ve streamlined the process so you can achieve that perfect, melt-in-your-mouth bite with minimal effort. You’ll discover a key technique for achieving that beautiful chocolate shell and learn about a common pitfall that can lead to crumbly balls. I’m excited to share these insights, gathered from years in professional kitchens and countless home baking adventures, to ensure your homemade batch is an absolute triumph. Get ready for a simple, delightful dessert that will become a family favorite in no time.
Why This Peanut Butter Balls with Rice Krispies Recipe Is the Best
The secret to these incredible no-bake peanut butter balls lies in the perfect balance of ingredients and a touch of professional technique. My background, blending Moroccan comforts with Parisian precision, truly shines here. I’ve found that using a specific ratio of creamy peanut butter to softened butter creates a base that is both rich and cohesive, ensuring a delightful flavor profile. This isn’t just about mixing ingredients; it’s about understanding how they interact to create something truly special. The addition of vanilla extract, a whisper learned from my pastry training in France, elevates the nutty notes and adds a layer of depth that makes these truly irresistible.
Achieving that ideal texture – a delightful chewiness from the peanut butter and cereal mixture, contrasted with a crisp chocolate shell – is all about the folding technique and the temperature control of the chocolate. I’ll guide you on how to gently incorporate the Rice Krispies cereal so you retain their signature crunch, preventing a soggy or dense ball. Furthermore, my method for melting chocolate ensures a smooth, glossy coating every time, setting up beautifully without cracking or blooming. This attention to detail, something a true chef values, ensures your easy peanut butter balls have a professional finish.
For busy home cooks and anyone new to baking, this recipe is an absolute dream. It’s entirely no-bake, meaning no turning on the oven for hours, which is perfect for those hot New York City summer days or when you need a quick dessert fix. With just a few common pantry staples, you can whip up a batch of these delightful peanut butter balls with rice krispies in under an hour. The steps are straightforward, and the results are incredibly rewarding, making it an ideal recipe for kids to help with or for last-minute potluck contributions.
Peanut Butter Balls with Rice Krispies Ingredients
When I first started creating this recipe, I’d scour the aisles of my local Union Square Greenmarket for the freshest peanut butter and seasonal chocolate, though most of my pantry staples are now sourced from my favorite NYC stores, ensuring quality and flavor. If you’re on the West Coast, you’ll find similar quality ingredients in your local farmers’ markets. My mother in Morocco always emphasized using the best of what’s available, and that philosophy guides my cooking today.
Ingredients List
- 2 cups peanut butter (creamy or crunchy)
- ½ cup salted butter, softened
- 2 teaspoons vanilla extract
- 2 cups powdered sugar
- 3½ cups Rice Krispies cereal
- 20 ounces chocolate melting wafers (milk, semi-sweet, or dark)
Ingredient Spotlight
Peanut Butter: This is the star of the show! I recommend using a good quality commercial peanut butter like Jif or Skippy, as they often contain stabilizers that help achieve the best texture for no-bake treats. Creamy peanut butter will give you a smoother ball, while crunchy will add an extra textural element. If you can find a natural peanut butter without added oils, ensure it’s well-stirred for optimal consistency. I often find the best selection at my local grocery store in Manhattan.
Butter: Unsalted, softened butter is crucial for binding the peanut butter mixture and ensuring it’s pliable enough to roll. Using salted butter, as called for in this recipe, adds a wonderful little salty kick that balances the sweetness. Make sure it’s truly softened, not melted – this means leaving it at room temperature for about an hour. Proper softening ensures it creams beautifully with the peanut butter without making the mixture too greasy.
Rice Krispies Cereal: This provides that signature crunch and light texture, making the balls less dense and more delightful. The key is to fold them in gently at the end to avoid crushing them too much, preserving their iconic crispiness. Any brand of puffed rice cereal will work, but the classic Kellogg’s Rice Krispies are my go-to for that nostalgic snap, crackle, and pop!
Chocolate Melting Wafers: I opt for melting wafers (also known as candy melts or compound chocolate) because they are formulated to set up smoothly and firmly without the need for tempering. This is a chef’s shortcut that makes making chocolate-covered treats at home so much easier. You can find these in various colors and flavors at craft stores or well-stocked grocery stores. Semi-sweet is my personal favorite for a classic chocolate peanut butter taste.
| Original Ingredient | Best Substitution | Flavor / Texture Impact |
|---|---|---|
| Peanut Butter (creamy/crunchy) | Almond Butter or Sunflower Seed Butter | Maintains similar texture; flavor change; nut-free for sunflower seed butter. |
| Salted Butter | Unsalted Butter + ¼ tsp Salt | Slightly less salty, but the salt still enhances flavor. |
| Powdered Sugar | Finely Ground Granulated Sugar + Cornstarch | Will result in a slightly grittier texture if not ground very fine. |
| Chocolate Melting Wafers | Good Quality Chocolate Chips (with a tiny bit of coconut oil) | Will likely require tempering or may not set as firmly, leading to a softer coating. |
How to Make Peanut Butter Balls with Rice Krispies — Step-by-Step
Follow these simple steps to create a batch of irresistible no-bake peanut butter balls that will disappear in minutes!
Step 1: Combine Wet Ingredients
In a large mixing bowl, combine the 2 cups of peanut butter, ½ cup of softened salted butter, and 2 teaspoons of vanilla extract. Beat these together with an electric mixer or a sturdy whisk until the mixture is smooth and fully incorporated. You want a creamy, cohesive base before adding the dry ingredients.
💡 mia’s Pro Tip: Make sure your butter is truly softened but not melted. If it’s too cold, it won’t incorporate well; if it’s melted, your mixture will be too greasy and harder to handle later.
Step 2: Add Powdered Sugar
Gradually add the 2 cups of powdered sugar, ½ cup at a time, mixing on low speed (or by hand) after each addition. This prevents a cloud of sugar from dustings your kitchen and ensures it incorporates evenly into the peanut butter mixture. Continue mixing until it’s just combined and the mixture starts to thicken considerably.
⚠️ Common Mistake to Avoid: Don’t dump all the powdered sugar in at once! This can create a huge mess and make it difficult to mix evenly. Adding it in stages ensures a smooth, well-combined dough.
Step 3: Fold in Cereal
Gently fold in the 3½ cups of Rice Krispies cereal using a spatula or wooden spoon. Be careful not to crush the cereal too much; you want to maintain its crispiness. Once the cereal is evenly distributed throughout the thick peanut butter mixture, spoon portions onto a parchment-lined baking sheet using a medium cookie scoop (about 1.5 tablespoons each). This ensures uniform size for even setting.
Step 4: Shape the Balls
Once you have your portions scooped, gently roll each one between your palms to smooth out any rough edges and create neat, uniform balls. This step is important for ensuring they dip cleanly into the chocolate. Place the shaped balls back onto the parchment-lined baking sheet, ensuring they aren’t touching.
💡 mia’s Pro Tip: If the mixture feels too sticky to handle, lightly dust your hands with a bit more powdered sugar or chill the mixture for 10-15 minutes before shaping.
Step 5: Melt the Chocolate
Melt the 20 ounces of chocolate melting wafers in a deep, wide-mouth cup or bowl suitable for dipping. Microwave in 30-second intervals, stirring well after each period, until the chocolate is completely smooth and pourable. Stirring is key to ensuring even melting and preventing scorching.
Step 6: Dip the Balls
Dip each peanut butter ball into the melted chocolate one at a time using a fork or a dipping tool. Allow any excess chocolate to drip back into the bowl for a clean finish. Carefully place the chocolate-coated balls back onto the parchment-lined baking sheet. Work relatively quickly as the chocolate can start to set.
⚠️ Common Mistake to Avoid: Overheating the chocolate can make it seize up or become dull. Stick to short microwave intervals and stir constantly. If the chocolate gets too thick during dipping, microwave it for another 10-15 seconds.
Step 7: Finish and Harden
Continue dipping the remaining balls, reheating the chocolate as needed to maintain a smooth consistency. Once all balls are dipped, let them sit at room temperature for about 30 minutes until the chocolate has hardened. For a quicker set, pop the baking sheet into the refrigerator for about 15 minutes until the chocolate is firm.
| Step | Action | Duration | Key Visual Cue |
|---|---|---|---|
| 1 | Combine Peanut Butter, Butter, Vanilla | 2-3 mins | Smooth, creamy, fully combined mixture. |
| 2 | Mix in Powdered Sugar | 5-7 mins | Thick, dough-like consistency. |
| 3 | Fold in Rice Krispies Cereal | 2 mins | Evenly distributed cereal, mixture holds shape. |
| 4 | Scoop and Roll Balls | 10 mins | Uniform, smooth balls without cracks. |
| 5 | Melt Chocolate | 2-3 mins | Smooth, glossy, easily pourable chocolate. |
| 6 | Dip Balls in Chocolate | 10-15 mins | Evenly coated balls, excess chocolate dripped off. |
| 7 | Harden Chocolate | 15-30 mins | Firm, solid chocolate coating. |
Serving & Presentation
These no-bake peanut butter balls are perfectly delightful on their own, but I love presenting them as part of a larger dessert spread. For a NYC-style brunch, I’ll arrange them alongside miniature pastries and fresh fruit. In my mother’s tradition, a small dollop of sweetened condensed milk or a drizzle of honey can add an extra touch of sweetness, reminiscent of the flavors found in our Moroccan kitchens. They also make a beautiful addition to a cookie tray for holidays or special gatherings, adding a comforting, familiar crunch and creamy texture that guests always adore.
| Pairing Type | Suggestions | Why It Works |
|---|---|---|
| Side Dish | Miniature fruit tarts, rich brownies, or classic sugar cookies. | Complements the sweetness and texture without overpowering the peanut butter balls. |
| Sauce / Dip | Raspberry coulis, caramel sauce, or a dusting of sea salt flakes. | Adds a contrasting flavor profile and visual appeal, enhancing the overall dessert experience. |
| Beverage | A strong cup of coffee, a glass of cold milk, or a spiced herbal tea (like Moroccan mint tea). | The richness of the coffee or tea cuts through the sweetness, while milk provides a classic, comforting pairing. |
| Garnish | A light drizzle of contrasting chocolate (white chocolate on dark), finely chopped peanuts, or edible gold leaf. | Adds a touch of elegance and visual interest, making them stand out on any platter. |
Make-Ahead, Storage & Reheating
With my busy New York life, make-ahead recipes are my lifesavers! These peanut butter balls with rice krispies are perfect for preparing a day or two in advance, or even freezing for later. They hold their shape and flavor beautifully, making them ideal for spontaneous dessert needs or planned events. Simply follow the recipe, allow them to set completely, and then store them according to the guidelines below.
| Method | Container | Duration | Reheating Tip |
|---|---|---|---|
| Refrigerator | Airtight container or sealed bag. | Up to 7 days. | Serve chilled or bring to room temperature for 15-20 minutes. |
| Freezer | Freezer-safe airtight container or bag, with parchment between layers. | Up to 3 months. | Thaw overnight in the refrigerator, then bring to room temperature for 30 minutes. |
| Make-Ahead | Store as above. | Can be made up to 3 days in advance. | Assemble and dip the day before serving for best texture. |
If you’ve frozen these beauties, plan ahead for thawing. The best method, in my opinion, is to let them come to room temperature slowly. Take them out of the freezer and place them in an airtight container in your refrigerator overnight. This prevents condensation from forming on the chocolate. Once they’re fully chilled, leave them on the counter for about half an hour to reach perfect serving temperature. This ensures the chocolate coating remains smooth and the interior stays perfectly chewy.
Variations & Easy Swaps
While this classic peanut butter balls with rice krispies recipe is perfect as is, it’s always fun to experiment with flavors! My culinary journey has taught me to embrace creativity, whether it’s adding a North African spice to a French pastry or a unique twist to an American classic. Here are a few variations I love to make in my NYC kitchen.
| Variation | Key Change | Best For | Difficulty Impact |
|---|---|---|---|
| Cinnamon Spice | Add 1 tsp ground cinnamon to the peanut butter mixture. | Fall gatherings, warm dessert lovers. | No change. |
| White Chocolate Drizzle | Drizzle melted white chocolate over the hardened dark chocolate coating. | Festive occasions, aesthetic appeal. | Minor added step; requires careful drizzling. |
| Add-ins | Fold in ¼ cup mini chocolate chips or crushed pretzels with the Rice Krispies. | Snackers, texture enthusiasts. | No change. |
Cinnamon Spice Peanut Butter Balls
For a warm, comforting twist, I love adding a teaspoon of ground cinnamon to the initial peanut butter and butter mixture. This subtly transforms the flavor profile, adding a cozy spice that pairs wonderfully with the peanut butter and chocolate. It’s a simple nod to some of the aromatic spices used in Moroccan baking, elevating these cookies to something truly special. This variation is particularly delightful during the autumn months.
Gluten-Free & Dairy-Free Option
To make these peanut butter balls gluten-free (they already are, inherently!) and dairy-free, you’ll need a couple of swaps. Use a dairy-free butter alternative (like a vegan butter stick or coconut oil, though coconut oil can slightly alter the flavor) and ensure your chocolate melting wafers are certified dairy-free and vegan. This modification is fantastic for accommodating guests with dietary restrictions, and the texture remains surprisingly similar. I’ve tested this with great success in my NYC apartment kitchen.
Seasonal Flavor Twist
During the holidays, I sometimes incorporate a hint of peppermint extract (just ½ teaspoon to start) into the peanut butter mixture or dip them in dark chocolate and then add a sprinkle of crushed candy canes. For a more elegant touch, inspired by Parisian patisseries, I might gently fold in some finely chopped candied orange peel with the Rice Krispies. These small changes make for wonderfully festive and unique treats.
How do you keep Peanut Butter Balls with Rice Krispies from falling apart?
The key to preventing these no-bake peanut butter balls from falling apart is in the consistency of your base mixture. Ensure you use softened, but not melted, butter and that the powdered sugar is fully incorporated. If the mixture seems too dry and crumbly, you can try adding a tiny bit more softened butter (about ½ teaspoon at a time). If it’s too wet, a tablespoon of powdered sugar can help. Rolling them firmly between your palms also helps create a more cohesive ball before dipping them in chocolate.
Can I use creamy peanut butter instead of crunchy for Peanut Butter Balls with Rice Krispies?
Absolutely! You can use either creamy or crunchy peanut butter for this recipe. Creamy peanut butter will result in a smoother interior for your peanut butter balls with Rice Krispies, while crunchy peanut butter will add an extra textural element with the peanut pieces throughout the center. Both options will yield delicious results, so choose whichever you prefer or have on hand. I find that good quality commercial peanut butters work best due to their stabilizers.
How long do Peanut Butter Balls with Rice Krispies need to chill in the fridge?
If you choose to refrigerate your chocolate-covered peanut butter balls for faster setting, they typically only need about 15 to 20 minutes. You’ll know they’re ready when the chocolate coating is firm to the touch and no longer sticky. Leaving them in longer is perfectly fine and won’t harm them. Alternatively, they can be left at room temperature to harden, which usually takes about 30-60 minutes, depending on the ambient temperature of your kitchen.
What is the best way to melt chocolate for dipping Peanut Butter Balls with Rice Krispies?
For dipping, the easiest and most reliable method is using chocolate melting wafers (or candy melts) and a microwave. Place them in a microwave-safe bowl and heat in 30-second intervals, stirring thoroughly between each one. This prevents the chocolate from burning. You want it to become completely smooth and pourable. If using regular chocolate chips, you might need to add a teaspoon of coconut oil or vegetable shortening and melt over a double boiler for a smoother, glossier finish that sets better.
Can I make these peanut butter balls without Rice Krispies?
Yes, you can absolutely make these peanut butter balls without Rice Krispies, but they will be a different kind of treat! If you omit the Rice Krispies, you’ll have a dense, rich peanut butter fudge ball. You might need to adjust the powdered sugar slightly, as the cereal adds bulk. For a similar textural element, you could try adding finely chopped nuts or even mini chocolate chips into the peanut butter mixture instead. The overall consistency and flavor profile will change, but it will still be a delicious, no-bake confection.
Why are my chocolate-dipped peanut butter balls cracking?
Cracking in the chocolate coating usually happens for a few reasons. If you’re using regular chocolate chips and not properly tempering them, they can contract too much as they cool, leading to cracks. Using chocolate melting wafers, which are designed to set without tempering, is usually the best bet for avoiding this. Another cause can be a significant temperature difference between the cold peanut butter ball and the warm chocolate, or the chocolate cooling too quickly. Ensure your balls are at room temperature before dipping, and work in a moderately warm environment.
Can I double this recipe for Peanut Butter Balls with Rice Krispies?
Yes, you can absolutely double this recipe for Peanut Butter Balls with Rice Krispies. This recipe is quite scalable. You’ll want to increase all ingredients proportionally. Be mindful that doubling the mixture might require a larger mixing bowl and more surface area to lay out the balls to set. If you’re making a very large batch, ensure you have enough space in your refrigerator or on your countertops for all the trays. The cooking and setting times should remain largely the same.
What kind of peanut butter is best for these balls?
For these no-bake peanut butter balls, I strongly recommend using a standard commercial peanut butter like Jif or Skippy. These types of peanut butters contain oils and stabilizers that help them maintain a smooth, consistent texture when mixed with other ingredients like butter and sugar. Natural peanut butters, which tend to separate or have a runnier consistency, can make the mixture too soft and difficult to roll and shape properly. If you must use natural, ensure it’s very well stirred and perhaps chill the mixture thoroughly.
Share Your Version!
I truly hope you’ll try making these easy Peanut Butter Balls with Rice Krispies! They’re such a simple, satisfying treat that always brings smiles. If you do make them, please consider leaving a star rating and your thoughts in the comment section below – it helps me know what you love! And if you share photos of your culinary creations on Instagram or Pinterest, please tag me @exorecipe; I absolutely adore seeing what you make in your kitchens. What’s your favorite type of chocolate for dipping these delightful treats, and why?
From my NYC kitchen to yours — I hope this recipe brings as much warmth to your table as it does to mine. — mia 🧡
Love This Recipe? Save It to Pinterest!
If you enjoyed this Peanut Butter Balls with Rice Krispies recipe, don’t let it get lost in your browser tabs! 😄 Pin it now so you can find it again anytime — and explore hundreds more tried-and-tested recipes waiting for you on my Pinterest boards.
👉 Follow mia on Pinterest @chefrecipes2
📌 Pin this recipe · 🔁 Re-pin your favorites · 💬 Tag me when you make it — I love seeing your creations!

Peanut Butter Balls with Rice Krispies
Description
These Rice Krispie Peanut Butter Balls are a sweet and salty no-bake treat that’s made with only 6 ingredients in just 45 minutes! Great for potlucks and cookie trays!
Ingredients
- 2 cups peanut butter (creamy or crunchy)
- ½ cup salted butter (softened)
- 2 teaspoons vanilla extract
- 2 cups powdered sugar
- 3½ cups rice krispies cereal
- 20 ounces chocolate melting wafers
Instructions
- In a large bowl, beat together 2 cups peanut butter, ½ cup salted butter, and 2 teaspoons vanilla extract until fully combined.
- Add 2 cups powdered sugar (½ cup at a time), mixing a little between each addition so it doesn't make a mess.
- Fold in the 3½ cups rice krispies cereal and portion the mixture out onto a parchment-lined baking sheet with a medium cookie scoop.
- Roll the balls between your palms to smooth them out.
- Melt 20 ounces chocolate melting wafers in a deep wide-mouth cup or bowl at 30-second intervals, stirring between each one, until fully melted.
- Dip the balls in the melted chocolate one at a time, letting any excess chocolate drip off, then placing back on the parchment.
- Reheat the chocolate if it begins getting too cool and thick, then finish dipping the balls.
- Let the balls sit at room temperature until the harden or pop them in the fridge for 15 minutes.
Nutrition
- Calories: 324 kcal
- Sugar: 24 g
- Fat: 22 g
- Carbohydrates: 31 g
- Protein: 6 g

k">
Tried This Recipe? Leave a Comment!
Did you make this recipe? I’d love to hear how it turned out! Please leave a comment and a rating below. Your feedback helps other home cooks and supports cheerychop.com!
For more delicious inspiration, follow me on Pinterest!
