Table of Contents
Peanut Butter Blossom Bars – Easy Bar Cookies with a Twist – Your Holiday Baking Just Got Easier!
Growing up in a bustling Moroccan kitchen, the scent of baking was a constant, comforting presence. My mother, a magician with spices and dough, taught me the joy of turning simple ingredients into pure comfort. Now, living in the vibrant heart of New York City, I’ve found so many ways to blend those North African roots with sophisticated French techniques and the dynamic pulse of American baking. This recipe for Easy Peanut Butter Blossom Bars is a perfect example – it takes a beloved American classic, the Peanut Butter Blossom cookie, and transforms it into a crowd-pleasing, no-fuss bar that’s perfect for any occasion, especially the holidays.
Imagine a bite that’s perfectly chewy, bursting with rich, nutty peanut butter flavor, studded with pockets of melted chocolate, and crowned with that iconic, glossy Hershey’s Kiss. The aroma alone is enough to transport you to cozy kitchens and festive gatherings. The texture is a dream: a soft, slightly dense base that yields beautifully to the smooth, cool kiss on top. To achieve this delightful contrast, my French pastry training taught me the importance of precise ingredient ratios and specific mixing techniques, which I’ve incorporated here to guarantee a wonderful result every time. It’s just like enjoying your favorite Peanut Butter Blossom Cookies, but in an easier-to-serve bar format.
What makes my Peanut Butter Blossom Bars recipe truly special is how I’ve adapted the classic to be incredibly forgiving and efficient, without sacrificing an ounce of flavor or that signature charm. I’ll share a little trick I learned in Paris that makes the dough easier to handle, and I’ll also point out a common mistake many bakers make that can easily be avoided, ensuring your bars turn out perfectly golden and delicious. These easy peanut butter cookie bars are my go-to for holiday parties and potlucks, and I can’t wait for you to experience them!
Why This Peanut Butter Blossom Bars Recipe Is the Best
This recipe stands out because it ingeniously simplifies a beloved classic into a universally approachable bar format. The blend of creamy peanut butter, rich sugars, and a hint of chocolate creates a flavor profile that’s both nostalgic and exciting. It’s a guaranteed hit, perfect for weeknight treats or grand holiday dessert platters. It captures the essence of the original Peanut Butter Blossom cookie while offering the convenience of a bar.
The secret to the perfect texture lies in a simple, yet crucial step: creaming the butter, sugars, and peanut butter until light and fluffy, and then being careful not to overmix the dry ingredients. This technique, a cornerstone of French patisserie, ensures a tender crumb. The addition of milk chocolate chips adds little bursts of extra indulgence, making each piece a delightful surprise. It’s these small chef-inspired details that elevate these simple bars.
For anyone looking for straightforward, crowd-pleasing holiday peanut butter desserts, this recipe is your answer. It requires no special equipment and uses common pantry staples. I’ve fine-tuned the ingredient ratios and baking times based on years of testing in my NYC kitchen, ensuring that even if you’re new to baking, you’ll achieve delicious, perfectly baked bars. They are truly foolproof and incredibly satisfying, offering that classic taste with minimal effort.
Peanut Butter Blossom Bars Ingredients
When I’m developing recipes in my New York kitchen, I always make a trip to my local Union Square Greenmarket for the freshest ingredients, but for pantry staples like these, I rely on my neighborhood supermarket or, honestly, my trusty Amazon grocery delivery! The quality of your peanut butter and chocolate chips can make a big difference, so I always opt for well-known brands. My mother in Morocco used a rich, earthy peanut paste in her sweets, and while different, it inspired me to seek out the creamiest peanut butter for this recipe.
Ingredients List
- 1/2 cup unsalted butter, softened
- 1/2 cup granulated sugar
- 1/2 cup packed light brown sugar
- 1/2 cup creamy peanut butter (use a common commercial brand like Jif or Skippy)
- 1 large egg
- 1 1/2 cups all-purpose flour
- 3/4 teaspoon baking soda
- 1/2 teaspoon baking powder
- 1/8 teaspoon salt
- 2/3 cup milk chocolate chips (or semi-sweet, if you prefer)
- 24 Hershey’s Kisses, unwrapped (milk chocolate is classic)
- 3 teaspoons white sparkling sugar OR granulated sugar, for topping
Ingredient Spotlight
Unsalted Butter: The foundation of our cookie bars, unsalted butter provides richness and helps create that tender texture. Using unsalted allows us to control the salt content precisely. In U.S. supermarkets, you’ll find it in the dairy aisle, typically in 1-pound (4 sticks) or 1/2-pound boxes. Always make sure it’s softened to room temperature for optimal creaming; this means it should yield to gentle pressure but not be melted.
Creamy Peanut Butter: This is the star of the show! For these bars, I recommend using a conventional creamy peanut butter like Jif or Skippy. These have added sugars and oils that contribute to a consistent texture and flavor that bakes up beautifully. Natural peanut butters, which tend to separate and have a looser texture, can sometimes lead to a greasier or less set bar, though they can be used with adjustments (see variations!).
Hershey’s Kisses: The iconic topper that defines this cookie bar. Their smooth milk chocolate melts slightly from the residual heat of the bars, creating a glossy finish while maintaining their shape. While milk chocolate is traditional, you could certainly experiment with dark chocolate or even caramel-filled Kisses for a different flavor profile. Ensure they are unwrapped before baking!
| Original Ingredient | Best Substitution | Flavor / Texture Impact |
|---|---|---|
| Creamy Peanut Butter | Natural Peanut Butter (well-stirred) | May result in a slightly more crumbly texture or a lighter peanut flavor. Ensure it’s very well-mixed. |
| Milk Chocolate Chips | Semi-sweet or Dark Chocolate Chips | Deeper chocolate flavor. Might be less sweet. |
| Hershey’s Kisses (Milk Chocolate) | Chocolate Truffles or Chocolate Chunks | May not hold shape as well and could melt significantly. Truffles might be too rich. |
How to Make Peanut Butter Blossom Bars — Step-by-Step
Follow these simple steps, and you’ll have these delightful Peanut Butter Blossom Bars ready in no time!
Step 1: Cream the Wet Ingredients
In a large mixing bowl, combine the softened unsalted butter, granulated sugar, packed light brown sugar, creamy peanut butter, and the large egg. Use an electric mixer on medium speed to beat these ingredients together until the mixture is light, fluffy, and well-combined. This usually takes about 2-3 minutes. Scrape down the sides of the bowl as needed.
💡 mia’s Pro Tip: For the best texture, ensure your butter is truly softened to room temperature – it should give slightly when pressed with your finger but not be greasy or melted. This is crucial for creating that airy base that bakes up tender.
Step 2: Combine Dry Ingredients and Mix Dough
In a separate medium bowl, whisk together the all-purpose flour, baking soda, baking powder, and salt. Gradually add this dry mixture to the creamed wet ingredients. Stir with a wooden spoon or spatula until just combined and a cohesive dough begins to form. Be careful not to overmix at this stage. Finally, gently stir in the milk chocolate chips.
⚠️ Common Mistake to Avoid: Overmixing the dough after adding the flour. Once flour is incorporated, gluten starts to develop, which can lead to tough, dense bars. Mix only until the flour streaks disappear.
Step 3: Press into Pan and Sprinkle Sugar
Preheat your oven to 350°F (175°C). Lightly grease a 9×13-inch baking pan, or line it with parchment paper, leaving an overhang on the sides for easy lifting later. Press the cookie dough evenly into the bottom of the prepared pan. Once the dough is spread, sprinkle about 2 teaspoons of the white sparkling sugar (or granulated sugar) evenly over the top.
Step 4: Bake the Bars
Bake in the preheated oven for 22-24 minutes, or until the edges are golden brown and the center is puffed up and set. A toothpick inserted into the center should come out with moist crumbs attached, not wet batter. The exact time may vary slightly depending on your oven.
Step 5: Top with Hershey’s Kisses
As soon as you remove the pan from the oven, immediately arrange the unwrapped Hershey’s Kisses over the hot bars. I like to use a pattern of 4 rows by 6 rows to ensure each bar gets a kiss. Sprinkle the remaining teaspoon of white sparkling sugar (or granulated sugar) over the Kisses and the bars.
⚠️ Common Mistake to Avoid: Touching the Hershey’s Kisses after placing them on the hot bars. The residual heat will cause them to melt and glisten beautifully while retaining their shape. If you try to adjust or smooth them, they will smudge and lose their iconic look.
Step 6: Cool and Cut
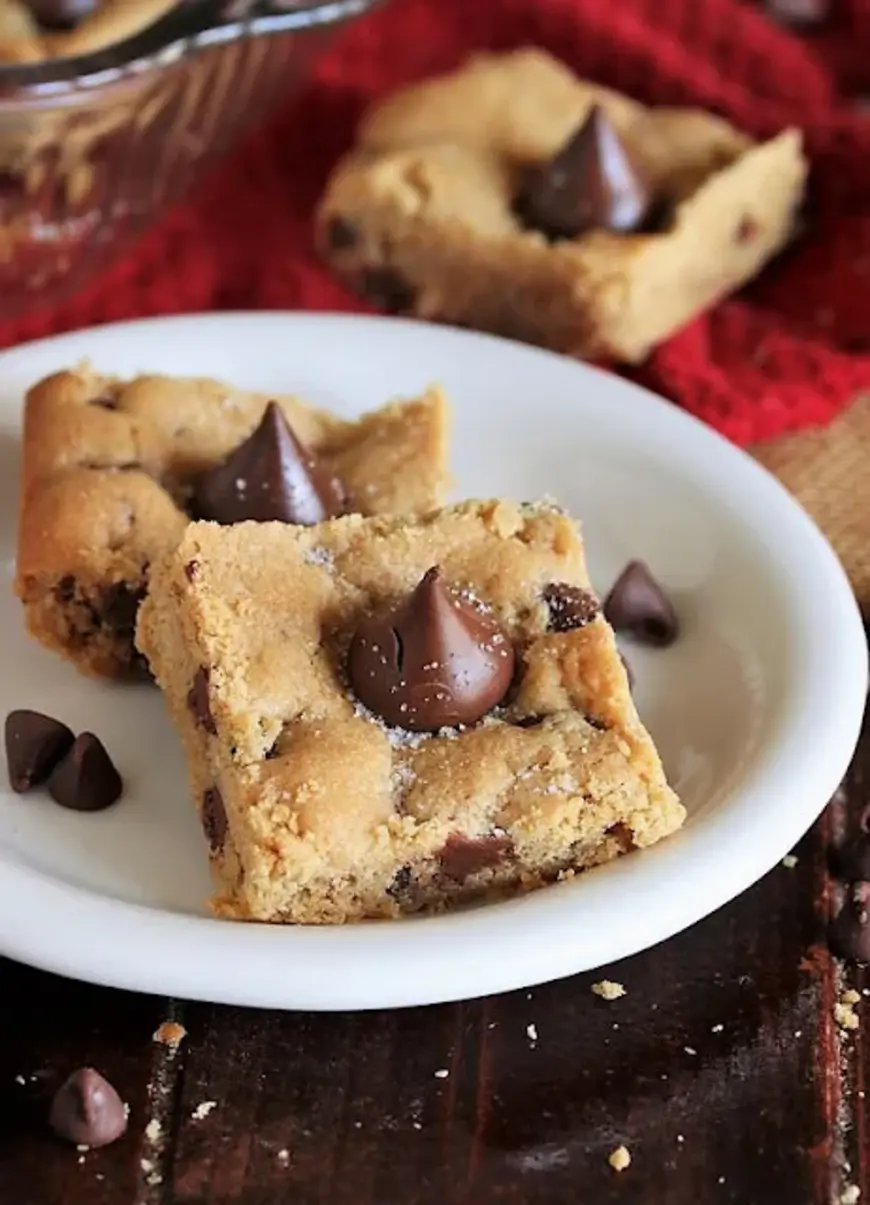
Let the bars cool completely in the pan on a wire rack. This is crucial! Cooling allows the Kisses to fully set and the bars to firm up. Once completely cool, lift the bars out of the pan using the parchment paper overhang. Cut into squares, ensuring there’s one perfectly shaped Hershey’s Kiss centered in each bar.
| Step | Action | Duration | Key Visual Cue |
|---|---|---|---|
| 1 | Cream Wet Ingredients | 2-3 minutes | Light and fluffy mixture |
| 2 | Combine and Mix Dough | 1-2 minutes | Cohesive dough, chocolate chips incorporated |
| 3 | Press into Pan & Sugar | 2 minutes | Evenly spread dough, sugar sprinkled |
| 4 | Bake Bars | 22-24 minutes | Golden brown edges, puffed center |
| 5 | Top with Kisses | 1 minute | Kisses arranged neatly, sugar sprinkled |
| 6 | Cool and Cut | At least 1 hour | Completely cooled, cut into squares |
Serving & Presentation
These Peanut Butter Blossom Bars are truly a joy to serve, whether at a casual family gathering or a more elegant holiday fête. I love how the glossy Hershey’s Kiss on top adds a touch of whimsy and charm. For a classic presentation, simply cut them into neat squares and arrange them on a pretty platter. The contrast between the warm, chewy peanut butter bar and the cool, smooth chocolate kiss is divine.
In New York, we love our dessert experiences to be both delicious and photogenic! A sprinkle of those sparkling sugar crystals adds a lovely shimmer that catches the light, making them irresistible. You can serve these as is, or alongside a scoop of vanilla bean ice cream if you’re feeling decadent. They are also fantastic dipped for a Parisian touch – perhaps a dark chocolate ganache for those who love a richer profile.
| Pairing Type | Suggestions | Why It Works |
|---|---|---|
| Side Dish | Vanilla Bean Ice Cream, Fresh Berries | Ice cream provides a cool, creamy contrast to the chewy bar. Berries add a fresh, tart counterpoint. |
| Sauce / Dip | Caramel Sauce, Dark Chocolate Ganache | Enhances the existing flavors with added richness and depth. |
| Beverage | Milk, Coffee, Hot Chocolate, Sweet Red Wine | Classic pairings that complement the sweet and nutty flavors. |
| Garnish | Chopped Peanuts, Shaved Chocolate, Raspberry Coulis | Adds visual appeal and textural or flavor accents. |
Make-Ahead, Storage & Reheating
In my busy New York life, making ahead is key! These Peanut Butter Blossom Bars are fantastic for preparing a day or two in advance, saving you precious time on busy weeknights or holiday mornings. They store wonderfully, making them perfect for packing in lunches or grabbing for a quick snack. The flavors even meld slightly overnight, which I sometimes think makes them even better!
| Method | Container | Duration | Reheating Tip |
|---|---|---|---|
| Refrigerator | Airtight container | Up to 5 days | Enjoy cold, or microwave for 5-10 seconds for a slightly gooey center. |
| Freezer | Airtight container or freezer bag (wrap bars individually first) | Up to 2 months | Thaw overnight in the refrigerator, then enjoy cold or microwave briefly. |
| Make-Ahead | Baked and cooled bars in an airtight container | Up to 2 days in advance | Ready to serve once completely cooled and cut. |
For optimal freshness, I always store leftovers in an airtight container at room temperature if I plan to eat them within a day or two. If they need to last longer, the refrigerator is the best bet. The Kisses will remain nicely shaped in the fridge, and the bar itself stays delightfully chewy. When reheating, aim for just a few seconds in the microwave; you want to warm the cookie bar slightly without completely melting the Kiss into an unrecognizable puddle.
Variations & Easy Swaps
| Variation | Key Change | Best For | Difficulty Impact |
|---|---|---|---|
| Chocolate Chunk | Replace chips with chopped chocolate bar | Chocolate lovers | None |
| Gluten-Free | Use a 1:1 gluten-free flour blend | Gluten-intolerant guests | None significant |
| Holiday Spice | Add cinnamon & nutmeg to dry ingredients | Festive occasions | None |
Chocolate Chunk Peanut Butter Blossom Bars
Instead of milk chocolate chips, I sometimes love to chop up a good quality dark chocolate bar (around 70% cocoa) into rough chunks. This adds larger pockets of intensely flavored chocolate that melt beautifully. This is a simple swap that elevates the chocolate experience without changing the structure of the bar. It’s a little luxury I learned to appreciate during my time in Paris, where bakeries often use high-quality chocolate for their pastries.
Gluten-Free Peanut Butter Blossom Bars
For a gluten-free version, simply swap the all-purpose flour for a good quality 1:1 gluten-free baking blend that contains xanthan gum. I’ve tested this method extensively in my kitchen, and it works wonderfully. The texture remains remarkably similar, maintaining that delightful chewiness. Ensure your gluten-free flour is fresh and well-combined with the other dry ingredients for best results.
Holiday Spice Peanut Butter Blossom Bars
To give these bars a festive, warm hug, especially during the holidays, I like to add about 1/2 teaspoon of ground cinnamon and a pinch of ground nutmeg to the dry ingredients along with the flour. This subtle addition brings a beautiful aroma and a cozy flavor that pairs perfectly with the peanut butter and chocolate, reminiscent of the fragrant spice markets of my childhood in Morocco.
How do you make Peanut Butter Blossom Bars without a cookie press or piping bag?
You don’t need a cookie press or piping bag for these bars at all! The beauty of making them in a pan is that you simply press the dough evenly into the bottom of your 9×13 inch baking pan. This creates a smooth, consistent base. Then, after baking, you place the Hershey’s Kisses directly onto the warm surface of the bars in your desired pattern. The residual heat gently melts them and they adhere beautifully without any special tools. It’s one of the major conveniences over traditional cookies!
What is the best substitute for a Hershey’s Kiss in Peanut Butter Blossom Bars?
The best substitute for a Hershey’s Kiss would be a good quality chocolate chunk or a small chocolate truffle. If using chocolate chunks, aim for pieces that are roughly the size of a Kiss. You can break up a high-quality chocolate bar. If using truffles, choose ones that aren’t too large or overly filled with liquid ganache, as they might melt too much and lose their form. The goal is to have a chocolate accent that melts slightly but still holds some shape, providing that signature visual and flavor.
Can you use natural peanut butter for Peanut Butter Blossom Bars?
Yes, you can use natural peanut butter, but keep in mind it might affect the texture and set of the bars. Natural peanut butter often separates and has a looser, oilier consistency. Ensure you stir it *very* thoroughly until completely smooth before measuring. You might find the bars are slightly more crumbly or spread a bit more. If your natural peanut butter is unsweetened, you may also want to slightly increase the sugar in the recipe for optimal sweetness.
How long should Peanut Butter Blossom Bars cool before cutting into squares?
This is a critical step, my friends! The bars must cool completely, which typically takes at least 1 to 2 hours, before you attempt to cut them. This ensures they firm up enough to hold their shape. If you try to cut them while they are still warm, the bars will be too soft and crumbly, and the Hershey’s Kisses will likely melt entirely and spread messily. Patience here is key for those beautiful, defined squares.
Can I make these Peanut Butter Blossom Bars ahead of time?
Absolutely! These bars are a baker’s best friend for making ahead. Once they are completely cooled and cut, store them in an airtight container at room temperature for 2-3 days, or in the refrigerator for up to 5 days. They also freeze beautifully. This makes them perfect for holiday baking when you need to get a head start on your dessert preparations, or for packing into lunchboxes without worry. They hold their texture and flavor remarkably well.
Share Your Version!
I absolutely adore seeing how my recipes come to life in your kitchens! If you’ve made these delightful Peanut Butter Blossom Bars, please take a moment to leave your star rating and a comment below. Your feedback is invaluable to me and helps other bakers. If you’re sharing photos on Instagram or Pinterest, please tag me @exorecipes— I genuinely love to see your creations and share them!
I’m always curious to know how my readers adapt recipes. Did you try any of the variations, like adding the holiday spices or making them gluten-free? I’d love to hear about your experience in the comments below! What’s your favorite way to enjoy this classic flavor combination?
From my NYC kitchen to yours — I hope this recipe brings as much warmth to your table as it does to mine. — mia 🧡
Love This Recipe? Save It to Pinterest!
If you enjoyed this Peanut Butter Blossom Bars recipe, don’t let it get lost in your browser tabs! 😄 Pin it now so you can find it again anytime — and explore hundreds more tried-and-tested recipes waiting for you on my Pinterest boards.
👉 Follow mia on Pinterest @chefrecipes2
📌 Pin this recipe · 🔁 Re-pin your favorites · 💬 Tag me when you make it — I love seeing your creations!
Peanut Butter Blossom Bars
Description
We all know and love iconic Peanut Butter Blossom cookies — but why not enjoy this classic treat in easy bar form? Just like their classic cookie inspiration, Peanut Butter Blossom Bars are rich in peanut butter flavor with that signature Hershey’s Kiss perched deliciously on top. And they’re super easy to make, too.
Ingredients
- 1/2 c. unsalted butter, softened
- 1/2 c. granulated sugar
- 1/2 c. brown sugar
- 1/2 c. creamy peanut butter
- 1 egg
- 1 1/2 c. all-purpose flour
- 3/4 tsp. baking soda
- 1/2 tsp. baking powder
- 1/8 tsp. salt
- 2/3 c. milk chocolate chips
- 24 Hershey's Kisses, unwrapped
- 3 tsp. white sparkling sugar OR granulated sugar
Instructions
- In large mixing bowl, combine the butter, 1/2 cup granulated sugar, brown sugar, peanut butter, and egg. Beat with an electric mixer on medium speed until well mixed.
- By hand, stir in flour, baking soda, baking powder, and salt until just combined and a dough forms. Stir in milk chocolate chips.
- Press dough into the bottom of a greased 9×13-inch baking pan. Sprinkle evenly with 2 teaspoons of the white sparkling sugar (or granulated sugar).
- Bake at 350x for 22-24 minutes, or until puffed up all over and golden brown.
- Remove from oven and immediately top with unwrapped Hershey's Kisses in a 4 rows by 6 rows pattern. Sprinkle with remaining teaspoon of the white sparkling sugar (or granulated sugar).
- Cool completely. Cut into squares with one of the Hershey's Kisses in the center of each bar.
- Store in an airtight container.
- The dough will be a stiff, almost crumbly dough.
- After placing the Hershey's Kisses on the baked bars, don't touch the Kisses again until the bars are completely cooled. The Kisses do melt (and glisten) from the heat of the baked bars, but do keep their shape. If you touch the Kisses at this point, they will smush and their shape will warp.

Tried This Recipe? Leave a Comment!
Did you make this recipe? I’d love to hear how it turned out! Please leave a comment and a rating below. Your feedback helps other home cooks and supports cheerychop.com!
