Table of Contents
Peach Galette Recipe with Flaky Crust – The Best Summer Dessert
Growing up in Morocco, summers were all about fresh fruits, often enjoyed simply or transformed into something truly magical. While our peaches were ripe and juicy, I discovered the elegance of French pastry during my culinary training in Paris. Bringing those two worlds together, I found that a rustic galette is the absolute perfect canvas for showcasing the vibrant flavor of peak-season peaches. This Peach Galette Recipe is so simple to make, yet it delivers all the warmth and comfort of a traditional pie without the fuss. It’s truly the best summer dessert, offering that delightful balance of sweet, tart, and undeniably flaky crust.
Imagine the aroma filling your kitchen – sweet peaches mingling with a hint of warm cinnamon, encased in a buttery, golden crust that practically shatters as you bite into it. The secret to this dream experience lies in the combination of butter and shortening in the crust, a classic French technique for achieving that ethereal flakiness. When it’s baked, the peaches soften into a jammy perfection, their juices caramelized around the edges, creating a truly irresistible rustic peach tart. It’s a dessert that speaks of lazy summer afternoons and the joy of simple, seasonal ingredients.
What sets mia’s easy peach galette apart is not just its rustic charm, but the perfect balance I’ve struck between the tender, juicy fruit filling and a crust that truly stands up to it. Forget soggy bottoms; my method ensures a crisp, buttery foundation every single time. I’ll show you exactly how to achieve that perfect dough consistency, and even share a pro tip for selecting the ripest peaches at your local NYC farmers’ market. Plus, I’ll walk you through a common mistake many home bakers make that can lead to a less-than-perfect pastry.
Why This Peach Galette Recipe Is the Best
The Flavor Secret: This galette doesn’t rely on excessive sugar, allowing the natural sweetness and slight tartness of fresh peaches to shine through, just like the unfussy, ingredient-focused cooking I learned in my mother’s Moroccan kitchen. The touch of cinnamon enhances, rather than overwhelms, the fruit, creating a harmonious and truly authentic summer flavor. It’s light, bright, and perfectly balanced, a refreshing alternative to heavier desserts.
Perfected Texture: The real star here, besides the glorious peaches, is the crust. My recipe uses a combination of chilled butter and shortening, which, as I learned in my Parisian pastry classes, is key to achieving an unbelievably flaky, tender, and robust crust. When you bite into it, you get that satisfying crunch followed by a buttery melt-in-your-mouth experience that flawlessly complements the soft, warm peach filling. It’s a rustic elegance that’s hard to beat.
Foolproof & Fast: One of my favorite things about a galette is its forgiving nature. Unlike a pie, you don’t need perfect edges or a top crust; its free-form design is part of its charm. The dough comes together quickly in a food processor, and the assembly is straightforward, making this an ideal dessert for both seasoned bakers and beginners. It’s the kind of recipe I pull out after a busy day in my NYC kitchen when I still want something spectacular without all the fuss.
Peach Galette Recipe Ingredients
For me, the best galette starts with the best ingredients. When I’m at the Union Square Greenmarket here in NYC, I’m always on the lookout for perfectly ripe, fragrant peaches – the kind that smell like pure summer. You don’t need anything fancy for this easy peach galette, just good quality staples.
Ingredients List
- 1½ cup all-purpose flour
- ½ cup unsalted butter (chilled and cut into ½-inch pieces)
- 3 tbsp vegetable shortening (chilled)
- 2 tbsp granulated sugar (for the dough)
- 1 pinch salt
- 1-2 tbsp milk (for brushing crust)
- Raw sugar or granulated sugar (for sprinkling on crust)
- ½ cup granulated sugar (for filling)
- 3 tbsp all-purpose flour (for filling)
- ½ tsp ground cinnamon
- 4 or 5 ripe peaches (skinned and sliced ¼ – ½” thick)
Ingredient Spotlight
Peaches: The star of our rustic peach tart! Look for peaches that are fragrant and give slightly when gently squeezed. Freestone peaches are easiest to work with for slicing. If you can’t find fresh, frozen peaches can work in a pinch, but thaw them and pat them very dry before using to prevent a watery filling.
Butter & Shortening: This dynamic duo is my secret weapon for the flakiest crust. The butter provides flavor, while the shortening contributes to tenderness and prevents the crust from becoming too hard. Always keep them very cold – this is crucial for a light, airy texture.
Flour: Regular all-purpose flour works beautifully here, both for the crust and as a thickener for the peach filling. It helps absorb excess moisture from the fruit, ensuring your galette isn’t soggy. For a more tender crust, you could experiment with a pastry flour blend, but I find AP to be perfectly reliable.
Cinnamon: Just a touch of ground cinnamon elevates the peaches, bringing out their warm, sweet notes. It’s a classic pairing that instantly makes this dessert feel cozy and inviting. If you’re feeling adventurous, a tiny pinch of cardamom (a spice often used in Moroccan desserts!) also pairs wonderfully with peaches.
| Original Ingredient | Best Substitution | Flavor / Texture Impact |
|---|---|---|
| Peaches | Nectarines, Plums, Apples | Similar sweet-tart flavor, slight texture difference. Adjust sugar based on fruit sweetness. |
| Butter + Shortening | All butter (European-style best) | Flakiness might be slightly less, but flavor will be richer. More prone to cracking if over-handled. |
| All-Purpose Flour | Gluten-free all-purpose blend (with xanthan gum) | Requires a specific blend; can alter crust texture slightly, may be less pliable. |
| Cinnamon | Nutmeg, Cardamom, Peach pie spice blend | Similar warming spice notes; cardamom offers a more exotic, almost floral hint. |

How to Make Peach Galette Recipe — Step-by-Step
Making this easy peach galette is a journey, not a race. Follow these steps, and you’ll have a gorgeous, delicious dessert that looks much harder than it is!
Step 1: Prepare the Galette Dough
In a food processor, combine 1½ cups flour, ½ cup chilled butter (cut into ½-inch pieces), 3 tablespoons chilled shortening, 2 tablespoons sugar, and 1 pinch of salt. Pulse the blender a few times until the mixture resembles a very coarse meal with some pea-sized butter pieces still visible. This texture is key for a flaky crust.
💡 mia’s Pro Tip: The colder your fats (butter and shortening), the flakier your crust will be. I often pop diced butter and shortening into the freezer for 10-15 minutes before mixing to ensure they are ice-cold.
Step 2: Chill the Dough
Continue to mix the pastry dough in the food processor until it *just* begins to come together and forms a round, soft ball. Avoid overmixing, as this develops gluten and can make the crust tough. Sprinkle a piece of parchment or wax paper generously with flour, place the dough on it, and flatten it into a small disk shape. Wrap the dough tightly in the parchment paper and refrigerate for at least two hours. Overnight is even better if you can plan ahead!
⚠️ Common Mistake to Avoid: Overworking the dough. Too much kneading or mixing will develop the gluten, resulting in a tough, un-flaky crust. Stop as soon as it forms a ball.
Step 3: Preheat Oven and Prepare Peaches
Preheat your oven to 375° F. While the oven heats, peel your 4 or 5 ripe peaches. To easily peel, you can briefly blanch them in boiling water for 30 seconds, then immediately transfer to an ice bath. The skins should slip right off. Slice the peeled peaches into ¼ – ½” thick wedges.
Step 4: Mix Filling
In a medium-sized bowl, stir together the ½ cup granulated sugar, 3 tablespoons flour, and ½ teaspoon cinnamon. Add the sliced peaches to this sugar mixture and gently toss to coat them evenly. The flour here helps absorb some of the peach juices, preventing a soggy bottom. If your peaches are particularly tart, you can add an extra tablespoon or two of sugar to taste.
Step 5: Roll Out the Dough
Remove the chilled dough from the refrigerator. Place it on a clean, generously floured piece of parchment paper, measuring about 12″ long and wide. I love using parchment paper as it makes transferring the galette much easier – simply slide the paper onto a rimless baking sheet. Using a rolling pin, beat the cold dough briefly to soften it slightly, then knead the edges. Roll the dough out from the center to the edges, lifting and turning occasionally, until you create an 11-inch diameter circle. Keep the edges a bit thicker to help form the galette’s rustic border.
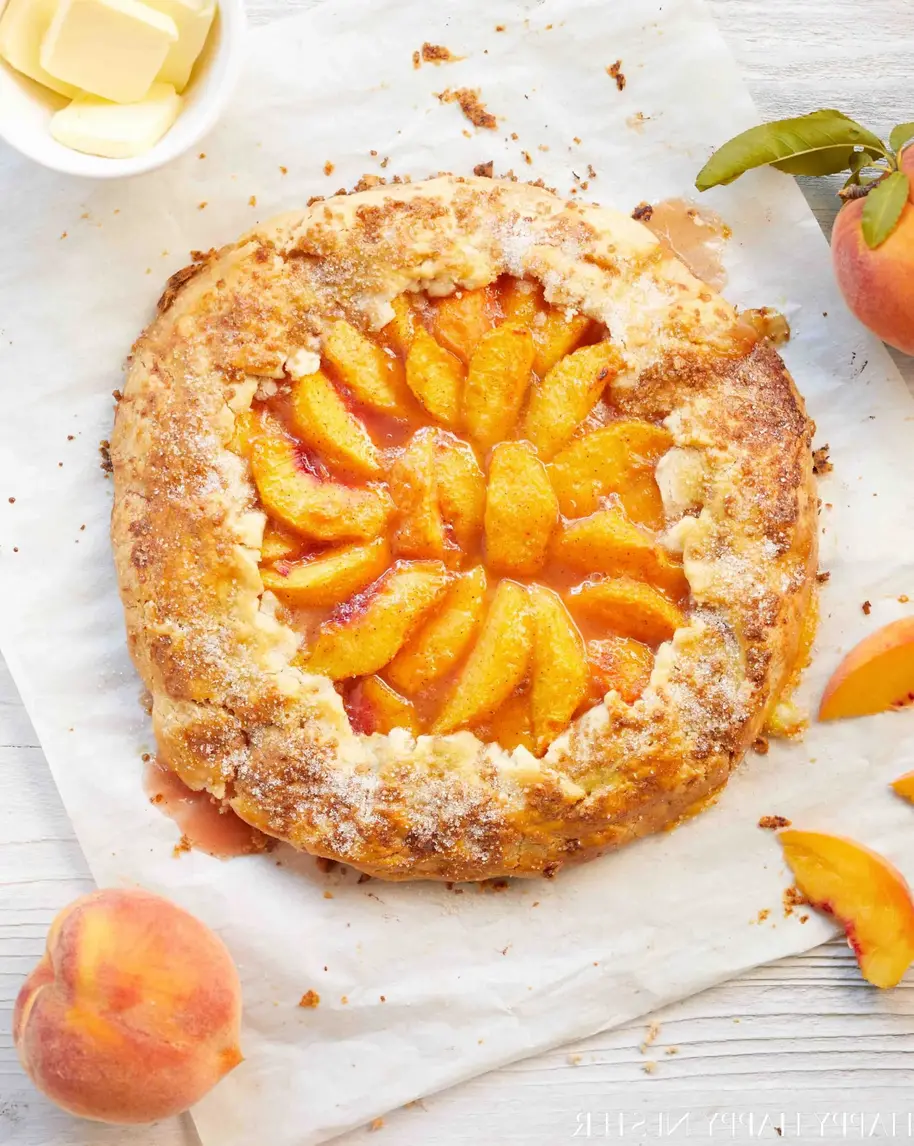
Step 6: Arrange Peaches
Starting 1 to 1½ inches from the edge of the rolled-out dough, arrange the peach wedges in a single layer. Create concentric circles, working your way towards the center of the dough. It’s like creating a beautiful rosette! Be sure to leave any extra juice from the peach-sugar mixture in the bowl, as too much líquido on the crust can make it soggy.
💡 mia’s Pro Tip: Overlap the peach slices slightly and arrange them tightly. As they cook, they will soften and shrink a bit. A beautiful arrangement makes for a beautiful presentation.
Step 7: Fold and Brush Crust
Carefully fold the outer edges of the pastry over the peaches, creating overlapping folds as you work your way around the perimeter. This creates the quintessential rustic look of a galette. Press the folds gently to seal and ensure there are no cracks where the peach filling can seep out during baking. Brush the folded pastry edges lightly with milk and sprinkle generously with raw sugar for a delightful crunch and golden finish.
Step 8: Bake to Golden Perfection
Transfer the baking sheet with the galette to the preheated oven. Bake for 50 to 60 minutes, or until the crust is beautifully golden brown and the peach filling is bubbly and tender. If you notice the crust browning too quickly, you can loosely cover the galette with aluminum foil. During the last 10 minutes of baking, I often remove the foil to ensure a crisp, golden edge. If your galette seems particularly juicy, place another baking sheet on the rack below to catch any potential overflows.
Step 9: Cool and Serve
Once baked, remove the galette from the oven and let it cool on the baking sheet set on a wire rack. While it’s tempting to cut into it immediately, allowing it to cool for at least 20-30 minutes helps the filling set properly and prevents it from falling apart. Slice into wedges and serve warm. It’s absolutely divine on its own, but a scoop of vanilla bean ice cream or a dollop of crème fraîche takes it to another level!
| Step | Action | Duration | Key Visual Cue |
|---|---|---|---|
| 1 | Prepare Dough | 5-7 mins | Coarse meal with pea-sized butter pieces |
| 2 | Chill Dough | 2+ hours (minimum) | Firm, pliable disk |
| 3 | Prep Oven/Peaches | 10-15 mins | Oven to 375°F, peaches sliced |
| 4 | Mix Filling | 5 mins | Peaches evenly coated |
| 5 | Roll Dough | 5-10 mins | 11″ circle, slightly thicker edge |
| 6 | Arrange Peaches | 5 mins | Concentric circles, 1-1.5″ border |
| 7 | Fold & Brush | 3-5 mins | Rustic folded edge, brushed with milk/sugar |
| 8 | Bake | 50-60 mins | Golden crust, bubbly filling |
| 9 | Cool & Serve | 20-30 mins | Filling set, ready to slice |
Serving & Presentation
One of the beauties of this rustic peach tart is its understated elegance – it doesn’t need much fuss to look magnificent. I love serving it warm, fresh from the oven after it’s had a moment to cool and set. The golden crust, the vibrant peaches, the caramelized edges – it’s a feast for the eyes and the palate. A simple dusting of powdered sugar adds a touch of refinement without masking its natural charm.
For me, the best way to enjoy this easy peach galette is with a dollop of something creamy. A scoop of silky vanilla bean ice cream is a classic pairing that provides a delightful contrast in temperature and texture. If you want to lean into my French culinary roots, a spoonful of crème fraîche or even a homemade chantilly cream (lightly sweetened whipped cream kissed with vanilla) would be absolutely divine. The slight tang of crème fraîche cuts through the sweetness beautifully.
When I serve this for friends in my NYC apartment, I usually present it whole on a beautiful wooden board or a rustic platter, allowing everyone to admire its free-form perfection before I slice it into generous wedges. It’s a dessert that invites communal enjoyment—perfect for a backyard BBQ or a relaxed dinner party. A few fresh mint leaves or a sprinkle of toasted almonds can also add a lovely final touch, both visually and texturally.
| Pairing Type | Suggestions | Why It Works |
|---|---|---|
| Side Dish | Vanilla Bean Ice Cream, Crème Anglaise, Chantilly Cream | Provides a cool, creamy contrast to the warm, flaky galette. |
| Sauce / Dip | Crème Fraîche, Honey Drizzle, Raspberry Coulis | Adds a tangy complexity or a touch of sweetness and moisture. |
| Beverage | Iced Tea, Rosé Wine, Sparkling Cider, Coffee | Refreshing options that complement the fruit without overpowering. |
| Garnish | Fresh Mint, Toasted Almond Slices, Lemon Zest | Adds fresh flavor, textural crunch, and visual appeal. |
Make-Ahead, Storage & Reheating
As a busy chef in NYC, I’m all about making life easier without sacrificing flavor. This best summer dessert is actually quite forgiving when it comes to make-ahead and storage, which is fantastic for entertaining or simply enjoying leftovers throughout the week. Knowing how to properly store and reheat can save you so much time and ensure you always have a delicious treat on hand.
| Method | Container | Duration | Reheating Tip |
|---|---|---|---|
| Refrigerator | Airtight container or covered with plastic wrap | Up to 3 days | Warm slices in oven (300°F for 10-15 min) or microwave (short bursts) |
| Freezer | Wrap tightly in plastic wrap, then foil | Up to 1 month | Thaw overnight in fridge. Reheat in oven (350°F for 15-20 min) |
| Make-Ahead | Prepare dough, wrap well | Dough up to 2 days in advance (fridge) | Assemble and bake fresh on serving day for best results. |
To truly maximize flakiness, my preferred method for reheating leftover galette is in the oven. A few minutes at 300-350°F will revive the crust, making it crisp once more, something the microwave just can’t quite achieve. This makes it perfect for a leisurely Sunday brunch or an unexpected guest.
You can also bake the galette completely, let it cool, then wrap it tightly and freeze. When you’re ready for a treat, simply thaw it in the refrigerator overnight and then reheat in the oven until warmed through. It’s almost as good as fresh, and a fantastic way to enjoy summer flavors well into the cooler months.
Variations & Easy Swaps
While this peach galette recipe is perfect as is, part of the joy of cooking is experimenting! Here are some tried-and-true variations and simple swaps I love to make, sometimes inspired by fresh finds at my local NYC market, or echoes of flavors from my Moroccan heritage.
| Variation | Key Change | Best For | Difficulty Impact |
|---|---|---|---|
| Berry Peach Galette | Add ½ cup mixed berries to peach filling | Enhanced tartness, deeper color | Minimal (easy) |
| Gluten-Free Crust | Use GF all-purpose flour blend | Dietary restriction, slightly different texture | Moderate (requires specific GF flour) |
| Apple/Pear Galette | Swap peaches for sliced apples/pears | Seasonal alternative, different spice profile | Minimal (easy) |
Berry Peach Galette
To add a burst of color and a touch more tartness, fold in about ½ cup of fresh raspberries, blueberries, or sliced strawberries along with your peaches. The berries will create a more complex flavor profile and a gorgeous, vibrant filling. Just be mindful that berries release more liquid, so ensure your filling has enough flour to absorb it, and perhaps bake it a few minutes longer.
Gluten-Free / Dairy-Free Peach Galette
For a gluten-free version, swap the all-purpose flour in the crust for a 1-to-1 gluten-free baking flour blend (ensure it contains xanthan gum). For dairy-free, replace the butter with a high-quality vegan butter substitute and use a plant-based milk for brushing. I’ve tested this myself, and while the texture is a tad less flaky, it’s still absolutely delicious and caters to dietary needs perfectly.
Spiced Apple Galette
When summer peaches are out of season, this recipe transitions beautifully to a spiced apple or pear galette. Use firm, tart apples like Granny Smith or Honeycrisp, slice them thinly, and increase the cinnamon to ¾ teaspoon, perhaps adding a pinch of nutmeg or allspice. It’s a wonderful fall variation that brings a different kind of warmth to your table, reminiscent of the traditional Moroccan apple tagine.
Can I use frozen peaches for a peach galette?
Yes, you absolutely can use frozen peaches for this galette, especially when fresh ones are out of season. However, there’s a crucial step: you must thaw them completely and then pat them very, very dry with paper towels before tossing them with the sugar and flour mixture. Frozen peaches release a lot of liquid, and if you don’t remove that excess moisture, you’ll end up with a soggy crust. Don’t skip this drying step!
How do I keep the bottom of my peach galette from getting soggy?
A soggy bottom is a common concern with fruit tarts, but my recipe has several safeguards. First, the addition of shortening in the crust helps create a barrier. Second, the flour tossed with the peaches absorbs excess juice. Most importantly, ensure you don’t add any extra liquid from the peach bowl to the dough. Also, baking it on a rimmed baking sheet (or placing another one underneath) and allowing ample cooling time on a wire rack are critical for a crisp bottom.
What’s the best way to make a galette dough from scratch?
The best way, in my professional opinion, is using a food processor for speed and consistency. It ensures the butter and shortening stay incredibly cold and are cut into small, even pieces, which are essential for flakiness. Just pulse briefly until it resembles coarse crumbs, then continue pulsing until it just forms a ball. Avoid overmixing! Hand mixing is also an option, but ensure your ingredients and hands are very cold.
How long does a peach galette need to cool before serving?
Patience is a virtue, especially when it comes to fruit galettes! While the aroma is irresistible, I recommend letting your peach galette cool on a wire rack for at least 20-30 minutes before slicing. This cooling time allows the hot peach filling to set properly, preventing it from oozing out when cut. If you cut it too soon, it will be messy and the slices won’t hold their shape, although it will still taste delicious!
Can I make the galette dough ahead of time?
Absolutely! Preparing the dough in advance is a fantastic way to break up your baking process and make this recipe even easier. After making the dough, wrap it tightly in plastic wrap and store it in the refrigerator for up to 2-3 days. When you’re ready to bake, simply remove it from the fridge, let it sit for about 10-15 minutes to soften just enough to roll out, and then proceed with the recipe. This chilling time actually enhances the dough’s flavor and flakiness!
What kind of peaches are best for a peach galette?
For the absolute best results in a peach galette recipe, I always recommend using fresh, ripe freestone peaches. These are peaches where the flesh easily separates from the pit, making them incredibly simple to slice. Look for peaches that have a sweet, fragrant aroma and yield slightly to gentle pressure. If you can only find clingstone peaches, they will still work, but may require a bit more effort to slice neatly.
Share Your Version!
I poured my heart into perfecting this Peach Galette Recipe, blending my Moroccan roots with my French training right here in my NYC kitchen, and I truly hope you love it as much as I do. Nothing makes a chef happier than seeing her recipes come alive in your homes!
If you try this easy peach galette, please come back and leave a star rating and a comment below – your feedback means the world to me. And if you snap a photo, share it on Instagram or Pinterest and tag @exorecipes. I can’t wait to see your beautiful creations! Did you try a fun variation? Let me know!
From my NYC kitchen to yours — I hope this recipe brings as much warmth to your table as it does to mine. — mia 🧡
Love This Recipe? Save It to Pinterest!
If you enjoyed this Peach Galette Recipe – The Best! recipe, don’t let it get lost in your browser tabs! 😄 Pin it now so you can find it again anytime — and explore hundreds more tried-and-tested recipes waiting for you on my Pinterest boards.
👉 Follow mia on Pinterest @chefrecipes2
📌 Pin this recipe · 🔁 Re-pin your favorites · 💬 Tag me when you make it — I love seeing your creations!

Peach Galette Recipe
Description
This Peach Galette Recipe is so simple to make and it tastes delicious. If you want the flavor of a peach pie, this is a nice alternative.
Ingredients
- 1½ cup flour
- ½ cup butter (chilled and cut into ½-inch pieces)
- 3 tbsp shortening (chill)
- 2 tbsp sugar
- 1 pinch salt
- milk
- raw sugar (You can use granulated sugar for sprinkling on crust.)
- ½ cup sugar
- 3 tbsp flour
- ½ tsp cinnamon
- 4 or 5 peaches (skinned and sliced)
Instructions
- Place flour, butter, shortening, sugar, and salt in a Cuisinart blender.
- Pulse the blender at first, and the dough will resemble a very coarse meal.
- Continue to mix the pastry dough until it forms a round soft ball.
- Sprinkle a piece of parchment or wax paper with flour and place the dough on the paper. Flatten into a small disk shape.
- Wrap up the dough in the parchment paper and refrigerate for at least two hours.
- Preheat the oven to 375° F.
- Peel and slice peaches into ¼ – ½" thick wedges.
- In a medium-size bowl, stir the granulated sugar, flour, and cinnamon.
- Gently toss prepared peaches into the sugar mixture. You can add a tiny bit more sugar if your peaches are tart,
- Remove dough from the refrigerator. Place on a floured piece of parchment measuring 12" long and wide. I transfer the dough and paper to a rimless baking sheet.
- Beat your ball of chilled dough with a rolling pin and knead the dough briefly around the edges to soften slightly. Moving from below center, roll the dough out to the edge. Lift the dough, turn it slightly, and give another roll. Sprinkle dough on the top and bottom with flour and keep rolling.
- Create an 11" circle with the dough. I needed the edges a bit thicker to lift it over the top of the galette.
- Starting 1 to 1½ inches from the edge of the round, arrange the peach wedges in a single layer in concentric circles until you reach the center of the circle. When placing the peaches on the dough, leave the extra juice in the bowl and not on your galette.
- Fold the outer edges of the pastry over the peaches, creating overlapping folds as you work around the perimeter. Once you form the galette, ensure no cracks in the dough where the peach filling can seep.
- Brush the top of the pastry with the milk and sprinkle with sugar.
- If your galette is juicy, place another baking sheet underneath to catch any juices overflowing.
- Bake for 50 to 60 minutes, until the crust is golden and the filling is cooked. I covered my galette loosely with tin foil and the last 10 minutes of baking uncovered it.
- Let the galette cool on the baking sheet on a wire rack. Cut into wedges and serve warm.
Nutrition
- Calories: 300 kcal
- Sugar: 16 g
- Fat: 17 g
- Carbohydrates: 36 g
- Protein: 3 g

Tried This Recipe? Leave a Comment!
Did you make this recipe? I’d love to hear how it turned out! Please leave a comment and a rating below. Your feedback helps other home cooks and supports cheerychop.com!
For more delicious inspiration, follow me on Pinterest!
