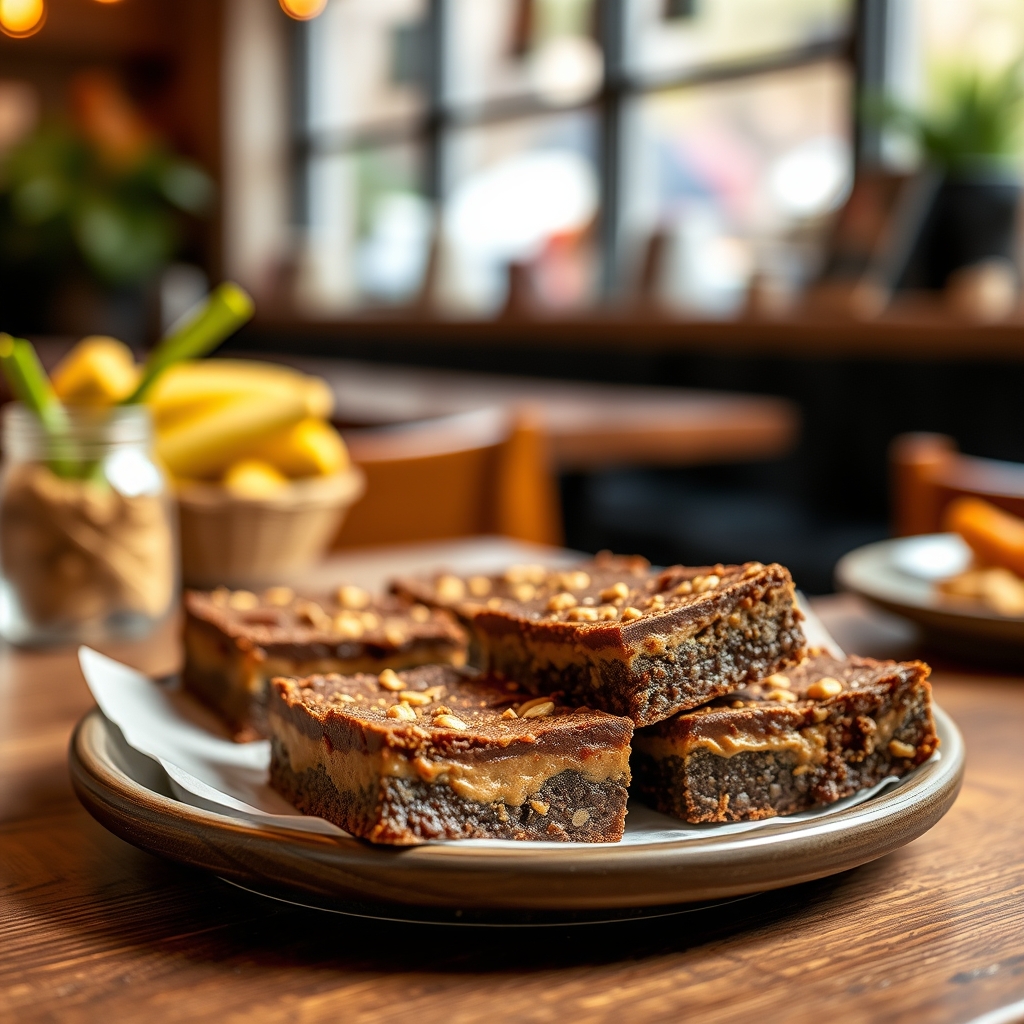
No-Bake Chocolate Peanut Butter Bars
There’s something undeniably magical about the combination of chocolate and peanut butter. It’s a pairing that never fails to delight, and these No-Bake Chocolate Peanut Butter Bars are proof of that. Whether you’re craving a quick dessert, need a last-minute treat for a gathering, or simply want to indulge in a rich and satisfying snack, this recipe is your answer. Best of all, it requires no oven time—just a few simple ingredients and a little patience while they set. Let’s dive into the delicious details.
Why You’ll Love This Recipe
If you’re still on the fence about making these irresistible bars, here are a few reasons why they’ll become a staple in your dessert rotation.
- Effortless Preparation – No baking means no fuss. Just mix, press, and chill. Even beginners can nail this recipe.
- Rich and Satisfying – The creamy peanut butter layer paired with a decadent chocolate topping creates a perfect balance of flavors and textures.
- Crowd-Pleasing – These bars are a guaranteed hit at parties, potlucks, or family gatherings. Kids and adults alike will be reaching for seconds.
- Customizable – Easily adapt the recipe to suit dietary needs or personal preferences with simple swaps.
- Perfect for Any Occasion – Whether it’s a casual weeknight treat or a special dessert for guests, these bars fit the bill.
Ingredients Breakdown
Understanding the role of each ingredient helps ensure success, so let’s break it down.
- Peanut Butter – The star of the show. Use creamy peanut butter for a smooth texture, or crunchy for added bite. Natural peanut butter works, but ensure it’s well-stirred to avoid separation.
- Graham Crackers – These provide structure and a slight crunch. Crushed into fine crumbs, they form the base of the peanut butter layer.
- Butter – Melted butter binds the crust together, giving it a firm yet tender texture. Unsalted butter is best to control the overall saltiness.
- Powdered Sugar – Adds sweetness and helps thicken the peanut butter filling.
- Chocolate Chips – Semi-sweet or dark chocolate works beautifully for the topping, balancing the sweetness of the peanut butter layer.
- Heavy Cream or Coconut Milk – A splash of cream ensures a silky-smooth chocolate ganache. For a dairy-free option, coconut milk is a great substitute.
How to Make No-Bake Chocolate Peanut Butter Bars
Follow these simple steps for perfect results every time.
- Prepare the Pan – Line an 8×8-inch baking dish with parchment paper, leaving an overhang for easy removal later.
- Make the Crust – In a large bowl, combine graham cracker crumbs, melted butter, and powdered sugar. Press firmly into the prepared pan to form an even layer.
- Create the Peanut Butter Layer – Spread a generous layer of peanut butter over the crust. Smooth it out with a spatula for an even finish.
- Melt the Chocolate – In a microwave-safe bowl or double boiler, melt chocolate chips with heavy cream, stirring until smooth and glossy.
- Add the Chocolate Topping – Pour the melted chocolate over the peanut butter layer, spreading it evenly with a spatula.
- Chill Until Set – Refrigerate for at least 2 hours, or until firm. For quicker setting, place in the freezer for 30-45 minutes.
- Slice and Serve – Use a sharp knife to cut into squares. For clean cuts, wipe the knife with a warm towel between slices.
Pro Tips for the Best Results
- Room Temperature Peanut Butter – If your peanut butter is too thick, warm it slightly for easier spreading.
- Press Firmly – A tightly packed crust prevents crumbling when slicing.
- Quality Chocolate Matters – Opt for high-quality chocolate chips or bars for the best flavor and texture.
- Add a Pinch of Salt – A sprinkle of flaky sea salt on top enhances the sweet and salty contrast.
- Let Them Rest – Allow the bars to sit at room temperature for 5 minutes before serving for the best texture.
Variations and Substitutions
Customize these bars to suit your taste or dietary needs.
- Gluten-Free – Swap graham crackers for gluten-free cookies or oats.
- Vegan – Use coconut oil instead of butter and dairy-free chocolate with coconut milk.
- Nut-Free – Substitute sunflower seed butter for peanut butter.
- Extra Crunch – Stir chopped peanuts or pretzels into the peanut butter layer.
- Flavor Twists – Add a teaspoon of vanilla extract or a dash of cinnamon for extra depth.
What to Serve With It
These bars are delicious on their own, but pairing them with the right accompaniments can elevate the experience.
- Ice Cream – A scoop of vanilla or chocolate ice cream turns these bars into a decadent dessert.
- Fresh Berries – Strawberries or raspberries add a refreshing contrast.
- Whipped Cream – A dollop of lightly sweetened whipped cream enhances the richness.
- Coffee or Milk – A cold glass of milk or a hot cup of coffee balances the sweetness perfectly.
How to Store and Reheat
Proper storage keeps these bars fresh and delicious.
- Refrigeration – Store in an airtight container in the fridge for up to a week.
- Freezing – Wrap individual bars in parchment paper and freeze for up to 3 months. Thaw in the fridge before serving.
- Room Temperature – If serving within 24 hours, they can be kept at room temperature in a cool place.
- No Reheating Needed – These bars are best enjoyed chilled or at room temperature.
Frequently Asked Questions (FAQs)
Here are answers to common questions about this recipe.
- Can I use natural peanut butter? – Yes, but ensure it’s well-mixed to avoid oil separation. You may need to adjust the powdered sugar slightly for consistency.
- Why is my chocolate layer cracking? – This can happen if the bars are too cold when sliced. Let them sit briefly at room temperature before cutting.
- Can I make these ahead of time? – Absolutely. These bars actually taste better after chilling overnight, making them perfect for prepping in advance.
- What can I use instead of graham crackers? – Digestive biscuits, vanilla wafers, or even crushed pretzels work as substitutes.
- How do I get clean cuts? – Use a sharp knife and wipe it clean between slices. For extra neat bars, chill the knife briefly before cutting.
Final Thoughts
No-Bake Chocolate Peanut Butter Bars are the ultimate treat for anyone who loves the classic combination of chocolate and peanut butter. They’re quick, easy, and endlessly adaptable, making them a go-to recipe for any occasion. Whether you’re making them for a party, a late-night snack, or just because, these bars are sure to impress. So grab your ingredients, whip up a batch, and get ready to enjoy a little slice of heaven—no oven required.
Print
No-Bake Chocolate Peanut Butter Bars
Description
These no-bake chocolate peanut butter bars are rich, creamy, and incredibly easy to make. Perfect for satisfying your sweet tooth without turning on the oven!
Ingredients
For the Crust:
- For the crust:
- 2 cups graham cracker crumbs
- 1/2 cup unsalted butter, melted
- 1/4 cup granulated sugar
- For the peanut butter layer:
- 1 cup creamy peanut butter
- 1/2 cup unsalted butter, softened
- 2 cups powdered sugar
- 1 teaspoon vanilla extract
- For the chocolate topping:
- 1 1/2 cups semi-sweet chocolate chips
- 1/4 cup creamy peanut butter
- 1 tablespoon unsalted butter
Instructions
1. Prepare the Crust:
- Line an 8×8-inch baking dish with parchment paper, leaving an overhang for easy removal.
- Make the crust: In a medium bowl, mix graham cracker crumbs, melted butter, and sugar until combined. Press firmly into the prepared dish. Chill for 10 minutes.
- Make the peanut butter layer: In a large bowl, beat peanut butter and softened butter until smooth. Gradually add powdered sugar and vanilla, mixing until thick and creamy. Spread evenly over the crust.
- Make the chocolate topping: In a microwave-safe bowl, melt chocolate chips, peanut butter, and butter in 30-second intervals, stirring until smooth. Pour over the peanut butter layer and spread evenly.
- Refrigerate for at least 2 hours or until set. Lift out using parchment paper, slice into bars, and serve.
Notes
Store bars in an airtight container in the refrigerator for up to 1 week. For firmer bars, freeze for 15 minutes before slicing.
