“`html
Table of Contents
Muddy Buddy Cookies & Puppy Chow Cookies: A Chocolate Peanut Butter Dream
Growing up in my mother’s bustling kitchen in Marrakech, I learned the magic of transforming simple ingredients into pure joy. One of my earliest memories involves the comforting aroma of peanut butter and chocolate, a combination that, even then, felt like a little piece of heaven. Now, here in my vibrant New York City apartment, I’ve taken that beloved nostalgic flavor profile and reimagined it into these delightful Muddy Buddy Cookies. These aren’t your typical no-bake muddy buddies that you shake up in a bag; these are soft, chewy cookies infused with that classic chocolate and peanut butter goodness, then topped with a drizzle of melted chocolate and a dusting of powdered sugar, reminiscent of the iconic puppy chow cookies we all adore.
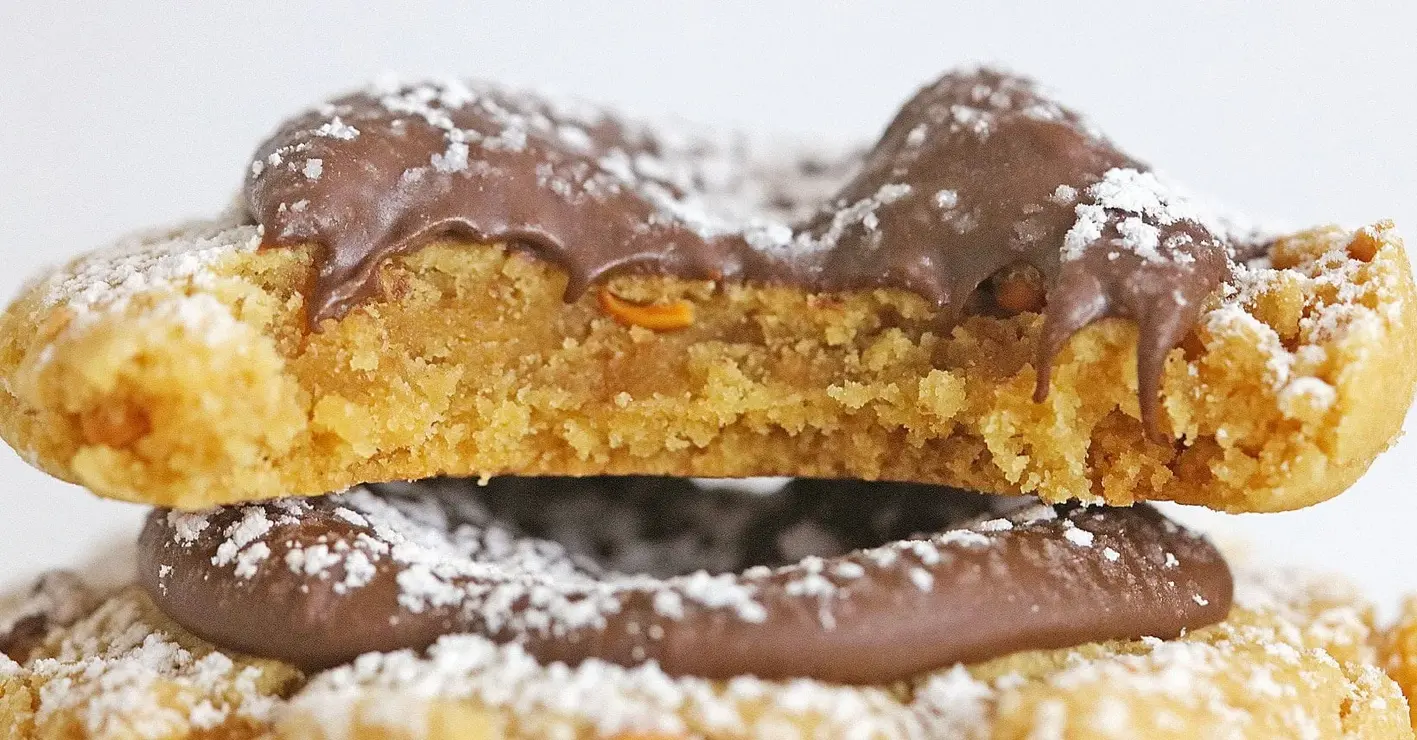
Imagine biting into a cookie that’s perfectly tender, with a rich, nutty peanut butter base that melts in your mouth. The slightly crisp edges give way to a wonderfully soft center, offering a delightful textural contrast. Each bite is a harmonious dance between sweet, creamy peanut butter and decadent chocolate, with a whisper of vanilla and a subtle salty undertone that makes everything pop. The final dusting of powdered sugar adds a playful, snowy finish, making these cookies as beautiful to look at as they are delicious to devour. It’s a flavor experience that’s deeply comforting and incredibly satisfying, a true celebration of two beloved flavors in cookie form.
What sets my Muddy Buddy Cookies recipe apart is the simple yet effective technique I learned during my pastry training in Paris: the gentle “smash” after baking. This technique creates little craters perfect for holding that luscious chocolate topping, while also ensuring a perfectly baked interior. I’m excited to share this approach with you, along with a key tip for achieving that signature chewyness without any fuss. A common mistake many home bakers make is overmixing the dough once the flour is added, which can lead to tough cookies. I’ll show you exactly how to avoid that pitfall, ensuring your Muddy Buddy Cookies are irresistibly tender every single time.
Why This Muddy Buddy Cookies Recipe Is the Best
The true magic of these Muddy Buddy Cookies lies in their perfect balance of nostalgic flavor and elevated texture. My unique approach, a blend of my Moroccan heritage’s focus on rich, comforting flavors and my Parisian culinary training’s emphasis on precise technique, ensures that each cookie is a masterpiece. Unlike simpler no-bake muddy buddies, these cookies offer a complex flavor profile with a satisfying chew, all thanks to the careful selection of ingredients and the gentle smashing technique that creates the ideal surface for the chocolate drizzle. It’s a taste of childhood, refined.
From my time mastering patisserie in Paris, I learned that even the simplest cookie can be extraordinary with the right technique. The post-bake “smash” is my secret weapon. It’s not just about creating a well for the chocolate; it’s about controlling the cookie’s final shape and texture. This gentle press encourages the cookie to spread slightly while still retaining its interior moisture, resulting in that coveted soft, chewy center that’s simply irresistible. This simple but crucial step elevates these cookies from good to absolutely unforgettable.
What makes this muddy buddy dessert so approachable is its foolproof nature. Despite the chef-inspired touches, the recipe is incredibly straightforward, perfect for bakers of all levels, especially those looking for quick, delightful treats. There are no complex chilling times or finicky doughs involved. You can whip up a batch of these chocolate peanut butter cookies in under an hour, making them ideal for last-minute cravings, bake sales, or simply a spontaneous desire for something sweet and comforting that tastes like no-bake muddy buddies.
Muddy Buddy Cookies Ingredients
When I’m back in New York City, I often find myself at the Union Square Greenmarket for the freshest produce, but for pantry staples like flour, sugar, and chocolate chips, my local Whole Foods or even the corner bodega usually do the trick. These ingredients are readily available and consistently good. If I’m feeling a little nostalgic for Morocco, I might add a pinch of warming spices, but for this classic version, simple, high-quality ingredients are key. My mother always said good food starts with good ingredients, and that philosophy holds true for these Muddy Buddy Cookies.
Ingredients List
- 1/2 cup Butter (softened)
- 1/2 cup Peanut Butter
- 1/2 cup Granulated Sugar (plus to roll cookie balls in)
- 1/2 cup Brown Sugar
- 1 teaspoon Vanilla extract
- 1 Egg
- 1/4 teaspoon Salt
- 1 teaspoon Baking Soda
- 2 cups all-purpose Flour
- 1 cup Milk Chocolate Chips
- 1/4 cup Powdered Sugar (to sprinkle tops of cookies)
Ingredient Spotlight
Peanut Butter: This is the heart and soul of our cookie base. I prefer using a standard creamy peanut butter, like Jif or Skippy, as it’s already processed and emulsified, which contributes to a consistent texture in the dough. Avoid natural peanut butters where the oil separates, as they can make the dough too oily and affect the bake. If you use natural peanut butter, ensure it’s very well stirred before measuring.
Milk Chocolate Chips: These add pockets of melty chocolate goodness and form the signature drizzle reminiscent of no-bake muddy buddies. I opt for good quality milk chocolate chips; brands like Ghirardelli or Guittard offer a rich, creamy flavor. You can absolutely use semi-sweet or dark chocolate chips if that’s your preference, or even a mix! The key is to ensure they melt smoothly for that beautiful finish.
All-Purpose Flour: This provides the structure for our cookies. It’s essential to measure flour correctly to avoid dry, tough cookies. I always recommend spooning the flour into your measuring cup and leveling it off with a straight edge, rather than scooping directly from the bag. This prevents compacting too much flour into the cup, which is a common mistake leading to an incorrect dough consistency.
| Original Ingredient | Best Substitution | Flavor / Texture Impact |
|---|---|---|
| Peanut Butter | Almond Butter or Cashew Butter | Slightly different nutty profile, nuttier flavor. Texture remains similar. |
| Milk Chocolate Chips | Semi-Sweet or Dark Chocolate Chips | Less sweet, more intense chocolate flavor. Drizzle will be less milky but still delicious. |
| Butter | Margarine (stick form, not tub) | May result in a slightly less rich flavor; ensure it’s stick margarine for best results. |
How to Make Muddy Buddy Cookies — Step-by-Step
Follow these simple steps and you’ll be enjoying these delightful chocolate peanut butter cookies in no time!
Step 1: Cream Wet Ingredients
In the bowl of a stand mixer fitted with the paddle attachment, combine the softened butter and peanut butter. Cream them together on medium speed until smooth and creamy, about 2–3 minutes. Gradually add the granulated sugar and brown sugar, mixing until well combined and the mixture is light and fluffy. Scrape down the sides of the bowl as needed. Beat in the vanilla extract and the egg until fully incorporated.
💡 mia’s Pro Tip: Ensure your butter is properly softened, not melted. It should yield to gentle pressure but not be greasy. This is crucial for achieving that fluffy, airy texture in the cookie base.
Step 2: Add Dry Ingredients
In a separate medium bowl, whisk together the all-purpose flour, salt, and baking soda until well combined. With the mixer on low speed, gradually add the dry ingredients to the wet ingredients, mixing until just combined. Be careful not to overmix at this stage, as it can develop the gluten too much, leading to tough cookies.
⚠️ Common Mistake to Avoid: Overmixing the dough once the flour is added. Mix only until the flour streaks have just disappeared. Overdeveloped gluten chains will result in cookies that are dense and chewy, rather than tender and soft.
Step 3: Prepare for Baking
Line two or three baking sheets with parchment paper. Preheat your oven to 350°F (175°C). This step ensures that the cookies won’t stick to the baking sheets and makes for easy cleanup.
Step 4: Shape, Bake, and Flatten
Scoop tablespoon-sized balls of dough and roll them between your hands to form smooth spheres. Roll each dough ball lightly in the extra granulated sugar you set aside. Place the sugared balls onto the prepared baking sheets, spacing them about 2 inches apart. Bake for 10 minutes, or until the edges are lightly golden brown and the centers look slightly cracked. Immediately after removing them from the oven, gently press the center of each cookie down with the bottom of a flat glass or a tortilla press. Leave the cookies on the baking sheet for about 5 minutes to set slightly, then carefully transfer them to a wire rack to cool completely.
💡 mia’s Pro Tip: The gentle “smash” after baking is key! It creates a perfect little well for the chocolate drizzle and ensures the cookie is slightly thinner, leading to that wonderfully tender texture we’re after.
Step 5: Melt and Add Chocolate
Once all the cookies have been baked and are cooling, place the milk chocolate chips in a microwave-safe bowl. Microwave on 50% power in 15-second intervals, stirring well between each interval, until the chocolate is completely melted and smooth. Be patient; overheating chocolate can cause it to seize. Spoon about a teaspoon of the melted chocolate into the indented center of each cooled cookie. Let the cookies sit for at least an hour, or until the chocolate has begun to set.
Step 6: Finish and Serve
Once the chocolate topping has set on the cookies, sprinkle a little powdered sugar over the tops for that classic Muddy BuddyCookie look and a touch of extra sweetness. Serve immediately and enjoy the delightful combination of flavors and textures!
| Step | Action | Duration | Key Visual Cue |
|---|---|---|---|
| 1 | Cream wet ingredients | 3-5 mins | Light and fluffy mixture |
| 2 | Add dry ingredients | 1-2 mins | Smooth dough formed, no streaks of flour |
| 3 | Prepare for baking | Prep time | Oven preheating, baking sheets lined |
| 4 | Shape, bake, and flatten | 10 mins bake + 5 mins set | Golden brown edges, slightly cracked centers; flattened cookies |
| 5 | Melt and add chocolate | 5 mins melt + 1 hr set | Smooth melted chocolate; set chocolate topping |
| 6 | Finish and serve | As needed | Powdered sugar dusted cookies |
Serving & Presentation
These Muddy Buddy Cookies are delightful served on their own, showcasing their perfect blend of chocolate and peanut butter. For a more elaborate presentation, I love arranging them on a rustic ceramic platter, perhaps one reminiscent of those found in my grandmother’s home in Morocco, alongside a cup of strong coffee or a glass of cold milk. In my NYC kitchen, I often serve them as a casual dessert during weekend brunches, letting guests help themselves from a charming cookie jar.
A light dusting of powdered sugar is usually all the garnish these beauties need, but if you want to add a little extra flair, consider a few tiny chocolate sprinkles or a drizzle of white chocolate alongside the milk chocolate. They are fantastic on a dessert buffet, nestled amongst other treats, or packed into colorful tins as edible gifts for friends and family. Their familiar flavor makes them universally loved, and their cheerful appearance adds a touch of fun to any gathering.
| Pairing Type | Suggestions | Why It Works |
|---|---|---|
| Side Dish | Fresh berries (raspberries, strawberries) | The tartness cuts through the sweetness and richness of the cookies. |
| Sauce / Dip | Raspberry coulis or a light caramel sauce | Complements the chocolate and peanut butter beautifully with added flavor dimension. |
| Beverage | Glass of cold milk, strong coffee, or a Moroccan mint tea | Milk and coffee are classic pairings; mint tea offers a refreshing contrast. |
| Garnish | A sprinkle of sea salt flakes or mini chocolate chips | Enhances flavor and adds a touch of elegance or extra texture. |
Make-Ahead, Storage & Reheating
As a busy New Yorker, I appreciate recipes that can be prepped ahead. These Muddy Buddy Cookies are fantastic for making in advance! You can bake them completely, let them cool, and then store them. The chocolate topping holds up well, making them a reliable treat for unexpected guests or a sweet moment during a hectic week.
| Method | Container | Duration | Reheating Tip |
|---|---|---|---|
| Refrigerator | Airtight container | Up to 5 days | Serve chilled or bring to room temperature. |
| Freezer | Freezer-safe bag or container, with parchment between layers | Up to 2 months | Thaw overnight in the refrigerator. Reheat briefly in a toaster oven if desired for crispness. |
| Make-Ahead | Airtight container, once completely cooled. | Up to 3 days in advance. | Add powdered sugar right before serving to keep it looking fresh. |
If you’ve stored them in the refrigerator, I find they are best brought to room temperature for about 15-20 minutes before serving to allow the cookie to soften up again. If you’re reheating them slightly to revive crispness, a few minutes in a toaster oven or a very low oven (around 250°F/120°C) will do the trick, but watch them closely so the chocolate doesn’t melt!
Variations & Easy Swaps
| Variation | Key Change | Best For | Difficulty Impact |
|---|---|---|---|
| Spiced Moroccan Twist | Add 1/4 tsp cinnamon and a pinch of ginger to dry ingredients. | Adding warmth and complexity to the flavor. | Minimal impact; simply add spices. |
| Gluten-Free, Dairy-Free | Use a gluten-free all-purpose flour blend and dairy-free chocolate chips. | Dietary restrictions. | Uses common GF/DF swaps; texture may vary slightly. |
| Seasonal Citrus Zest | Add zest of 1 orange or lemon to the dough. | A bright, refreshing twist. | Easy to incorporate during the creaming stage. |
Spiced Moroccan Twist
Inspired by the fragrant spice markets of my homeland, I love to add a touch of warmth to these cookies. Simply incorporate 1/4 teaspoon of ground cinnamon and a pinch of ground ginger into the dry ingredients along with the flour. This subtle addition creates a beautiful depth of flavor that pairs wonderfully with the peanut butter and chocolate, offering a more complex and comforting profile, reminiscent of my mother’s spiced treats.
Gluten-Free, Dairy-Free Muddy Buddy Cookies
To make these Muddy Buddy Cookies gluten-free and dairy-free, swap the all-purpose flour for a good quality gluten-free all-purpose baking blend (one that contains xanthan gum). For the dairy-free aspect, use dairy-free milk chocolate chips. The texture might be slightly different depending on your flour blend, but the flavor will still be wonderfully chocolatey and peanut buttery. I tested this with a Bob’s Red Mill 1-to-1 Baking Flour, and it worked beautifully.
Seasonal Citrus Zest
For a delightful change of pace, especially in spring and summer, I love adding the zest of one orange or lemon directly into the cookie dough during the creaming stage. This brightens up the flavors and adds a subtle floral or tangy note that plays beautifully against the rich peanut butter and chocolate. Procuring fresh citrus from the farmer’s market here in NYC always inspires me to experiment with these kinds of fresh, seasonal twists.
What is the difference between Muddy Buddy Cookies and regular Muddy Buddies (puppy chow)?
Regular Muddy Buddies, often called “puppy chow,” are typically made by coating cereal pieces (like Chex) in a mixture of melted chocolate, peanut butter, butter, and powdered sugar, then tossing them in more powdered sugar and letting them dry. Muddy Buddy Cookies, on the other hand, are actual cookies made from a peanut butter cookie dough base, baked, and then topped with a drizzle of melted chocolate and a dusting of powdered sugar, mimicking the flavors and appearance of the classic snack.
Can I make Muddy Buddy Cookies gluten-free, and what flour substitute works best?
Yes, you absolutely can make these Muddy Buddy Cookies gluten-free! The best flour substitute is a good quality 1-to-1 gluten-free baking blend that already contains xanthan gum. Brands like Bob’s Red Mill 1-to-1 Baking Flour or King Arthur Baking Company’s Measure for Measure Flour are excellent choices. These blends are designed to mimic the properties of all-purpose flour, so you can typically swap them directly in a 1:1 ratio without needing to adjust other ingredients. Be aware that the texture might be slightly different, but they will still be wonderfully delicious.
How do you keep Muddy Buddy Cookies from turning out too dry or crumbly?
To prevent your Muddy Buddy Cookies from becoming dry or crumbly, precise ingredient measurement is key. Ensure you are not over-measuring your flour; spoon it into the cup and level it off, don’t scoop directly. Also, be mindful not to overmix the dough once the flour is added, as this develops gluten and can lead to a tougher, drier cookie. The post-bake “smash” technique used in this recipe actually helps retain moisture in the center, contributing to a chewy texture. Proper storage in an airtight container after cooling is also crucial for maintaining freshness and preventing them from drying out.
How should I store Muddy Buddy Cookies to keep them fresh and crunchy?
To keep your Muddy Buddy Cookies fresh and maintain their desirable texture, it’s best to store them in an airtight container at room temperature. Once they’ve completely cooled, place them in a container, layering them with parchment paper if you’re stacking them to prevent the chocolate from sticking. Consumed within 3-5 days, they will retain their soft, chewy center and the crisp edges. If you need to store them for longer, freezing them in a freezer-safe container or bag is an excellent option. Thawing them overnight in the refrigerator ensures they’re ready to enjoy without becoming soggy.
Can I use a different type of peanut butter, like chunky or natural?
You definitely can experiment with chunky or natural peanut butter, but it’s important to be aware of how it might affect the texture and consistency of your Muddy Buddy Cookies. Chunky peanut butter will add small pieces of peanuts, providing a pleasant crunch. Natural peanut butter, especially those where the oils separate, can make the dough greasier and affect how the cookies spread. If you use natural peanut butter, make sure to stir it exceptionally well before measuring to ensure even emulsification. For the most consistent results, especially if you’re new to the recipe, a standard creamy peanut butter is recommended.
How do you get the chocolate to set properly on top?
Getting the chocolate to set properly is quite straightforward with these Muddy Buddy Cookies. After spooning the melted chocolate into the slightly pressed center of each cookie, the key is patience. Simply let the cookies sit at room temperature for about an hour. The air circulation and moderate temperature allow the chocolate to set firm without becoming brittle or chalky. If you’re in a rush or have a very warm kitchen, you can place them in the refrigerator for about 15-20 minutes to speed up the setting process, but be sure to bring them back to room temperature before serving for the best texture.
Can I make these cookies ahead of time for a party?
Absolutely! These Muddy Buddy Cookies are perfect for making ahead of time. Once they are completely cooled, you can store them in an airtight container for up to 3–4 days. I often bake a batch a couple of days before a party or gathering. Just before serving, I’ll give them a fresh dusting of powdered sugar to make them look their best. They are a guaranteed crowd-pleaser, and the fact that they can be prepared in advance makes them a stress-free addition to any event or cookie platter.
What is the “smash” technique, and why is it important?
The “smash” technique, which I learned during my culinary training, is a simple yet effective way to perfect the texture of these Muddy Buddy Cookies. It involves gently pressing down the center of each cookie with a flat object (like the bottom of a glass) immediately after they come out of the oven. This creates a slightly flatter cookie with a concentrated softer center and helps prevent the edges from becoming too crispy while keeping the interior wonderfully moist and chewy. It also creates a small well, which is perfect for holding that decadent chocolate topping, much like the inspiration from no-bake muddy buddies.
Share Your Version!
I truly hope you adore these Muddy Buddy Cookies as much as I do. They are a little bite of comfort and nostalgia that always brings a smile. If you remake this recipe, please take a moment to leave a star rating and a comment below – your feedback means the world to me! I also love seeing your creations come to life, so snap a photo and tag me on Instagram or Pinterest @exorecipe. I’m always curious to know: which flavor variation – the Moroccan spices, citrus zest, or the GF/DF option – appeals to you the most?
From my NYC kitchen to yours — I hope this recipe brings as much warmth to your table as it does to mine. — mia 🧡
Love This Recipe? Save It to Pinterest!
If you enjoyed this Muddy Buddy Cookies recipe, don’t let it get lost in your browser tabs! 😄 Pin it now so you can find it again anytime — and explore hundreds more tried-and-tested recipes waiting for you on my Pinterest boards.
👉 Follow mia on Pinterest @chefrecipes2
📌 Pin this recipe · 🔁 Re-pin your favorites · 💬 Tag me when you make it — I love seeing your creations!
“`
Print
Muddy Buddy Cookies
Description
Muddy Buddy Cookies are the perfect blend of chocolate and peanut butter flavor in every bite. These cookies are made with rich peanut butter cookie dough and topped with chocolate and powdered sugar.
Ingredients
- 1/2 cup Butter (softened)
- 1/2 cup Peanut Butter
- 1/2 cup Granulated Sugar (plus to roll cookie balls in)
- 1/2 cup Brown Sugar
- 1 teaspoon Vanilla extract
- 1 Egg
- 1/4 teaspoon Salt
- 1 teaspoon Baking Soda
- 2 cups all-purpose Flour
- 1 cup Milk Chocolate Chips
- 1/4 cup Powdered Sugar (to Sprinkle tops of Cookies)
Instructions
- In the mixing bowl of a stand mixer, mix the Butter, Peanut Butter, Sugar, and Brown Sugar, until creamy and smooth. Add the Vanilla, and Egg, and blend well.
- In a separate bowl, mix the flour, salt, and baking soda until well combined. Add the mixing bowl, and blend between additions. Mix until smooth dough forms.
- Line a Cookie Sheet with Parchment paper, and set the oven to 350 degrees.
- Roll the dough into Tablespoon size balls, and roll in sugar, then place on the Parchment lined cookie sheet. Bake for 10 minutes, or until cookies have turned golden brown, and have begun to crack . Remove the cookie sheet from the oven, and gently smash the cookies, with the bottom of a flat glass, pushing the center in slightly. Leave cookies on cookie sheet for about 5 minutes, then remove to a wire rack to cool completely.
- When all cookies have been baked, place the Chocolate chips in a microwave safe bowl, and melt the chocolate chips at 15 second intervals, stirring between, until chocolate chips are melted. Spoon melted chocolate into the center of each cookie, and let cookies sit for about an hour, until chocolate begins to set.
- Once chocolate is set in the center of the cookies, sprinkle the powdered Sugar over the cookies. Serve, and Enjoy!
Nutrition
- Calories: 140 kcal
- Sugar: 9 g
- Fat: 7 g
- Carbohydrates: 18 g
- Protein: 3 g

Tried This Recipe? Leave a Comment!
Did you make this recipe? I’d love to hear how it turned out! Please leave a comment and a rating below. Your feedback helps other home cooks and supports cheerychop.com!
