Table of Contents
Lemon Meringue Rice Krispie Treats
Introduction
Did you know that over 85% of home bakers crave a dessert that’s both nostalgic and excitingly new? If you’re searching for a fun and tasty twist on a classic, you’ve found it. These Lemon Meringue Rice Krispie Treats are the perfect answer. They combine the beloved, crispy-chewy texture of the original with a vibrant, sunny burst of lemon, rich white chocolate, and a confetti of sprinkles. This recipe transforms the simple, three-ingredient staple into a show-stopping treat that’s perfect for any occasion, from spring picnics to birthday parties. The best part? They’re incredibly easy to make, requiring no baking and just a handful of pantry-friendly ingredients. Get ready to elevate your snack game with these irresistible, lemon-packed squares that are guaranteed to bring smiles.
Ingredients List
Gather these simple ingredients for a treat that’s bursting with bright, citrus flavor and delightful crunch. Sensory notes are included to help you understand the role of each component.
- 6 cups Rice Krispies cereal – The star that provides the iconic, airy snap, crackle, and pop texture. For a gluten-free version, ensure your cereal is certified GF.
- 10 oz (about 40 regular) marshmallows – The sticky, sweet binder that melts into a glossy, gooey cloud. Use fresh marshmallows for the best melt.
- 3 tablespoons unsalted butter – Adds a rich, creamy mouthfeel and helps prevent the marshmallows from sticking. You’ll smell its nutty, comforting aroma as it melts.
- Zest of 2 large lemons – This is where the intense, fragrant lemon oil lives. The bright yellow zest delivers a powerful citrus punch without added liquid.
- 3 tablespoons lemon juice (freshly squeezed) – Provides the tangy, puckery acidity that balances the sweetness, creating that classic “lemon meringue” flavor profile.
- 1 teaspoon pure vanilla extract – A warm, floral note that rounds out the sharp citrus and enhances the overall sweetness.
- Pinch of fine sea salt – The secret weapon! It heightens all the other flavors and prevents the treats from tasting one-dimensionally sweet.
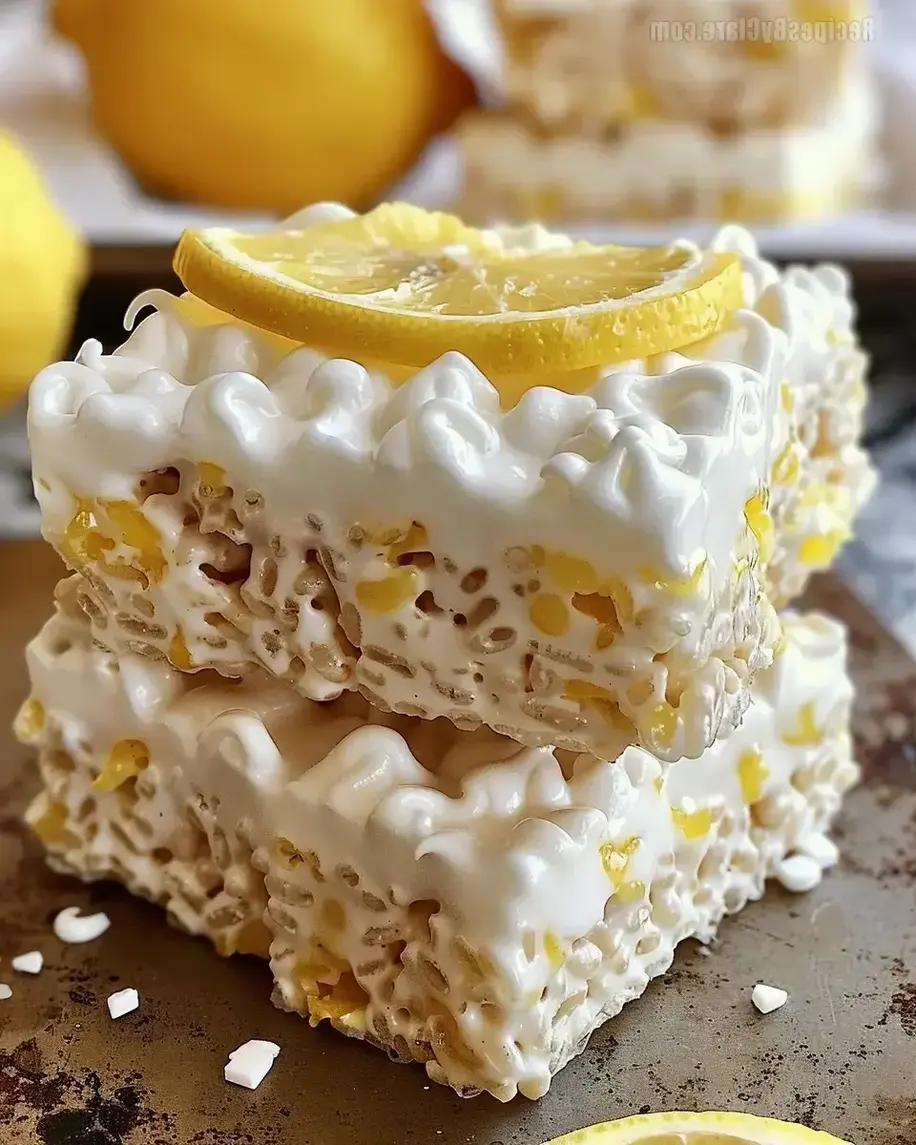
- 1 cup white chocolate chips – For the topping. They melt into a smooth, creamy, and sweet layer that mimics the look and mild flavor of meringue.
- 1 teaspoon coconut oil or shortening – Added to the white chocolate to help it melt smoothly and set with a slight sheen.
- Rainbow sprinkles (jimmies or nonpareils) – For a festive, colorful finish that adds a slight crunch and visual joy.
Substitutions: For a different citrus twist, try lime or orange zest and juice. Vegan butter and vegan marshmallows work perfectly for a dairy-free version. You can substitute the white chocolate with yellow candy melts for a more intense lemon color, or even a simple vanilla glaze.
Timing
Compared to the average Rice Krispie treat recipe, which takes about 15 minutes total, this version adds a mere 10 extra minutes of active time. This slight investment allows you to infuse the classic with a sophisticated lemon flavor and a beautiful white chocolate topping, transforming it from a quick snack into a dessert worthy of any celebration. The majority of the time is hands-off cooling, allowing the treats to set perfectly for clean slicing.
Bright, cheerful, and bursting with lemon flavor—these treats are a visual and tasty delight!
Step-by-Step Instructions
Step 1: Prepare Your Pan and Melt the Butter
Lightly grease a 9×13 inch baking pan with butter or non-stick spray. You can also line it with parchment paper, leaving an overhang on two sides for easy removal later. In a large pot or Dutch oven (I recommend using one with a heavy bottom for even heat), melt the 3 tablespoons of butter over low heat. Swirl it around until it’s completely liquid and just beginning to foam. This gentle heat prevents the butter from browning, which could alter the flavor of your final treats.
Step 2: Create the Lemon Marshmallow Mixture
With the butter melted, add all the marshmallows to the pot. Stir constantly with a sturdy silicone spatula or wooden spoon until the marshmallows are completely melted and the mixture is smooth. This should take about 5-7 minutes. Now, remove the pot from the heat. This is crucial! Immediately stir in the fresh lemon zest, lemon juice, vanilla extract, and that all-important pinch of salt. The mixture will sizzle slightly and become incredibly fragrant—like a sweet, citrusy cloud. Stir vigorously until everything is fully incorporated.
Step 3: Combine with Cereal
Quickly add all 6 cups of Rice Krispies cereal to the marshmallow mixture. Using your spatula, gently fold and stir until every single piece of cereal is thoroughly coated in the glossy, lemon-scented marshmallow. Work efficiently but gently to avoid crushing the cereal. You want to maintain as much of that airy texture as possible.
Step 4: Press and Cool
Transfer the mixture into your prepared pan. To prevent sticking, lightly grease your hands with butter or non-stick spray, then use them to press the mixture into an even, compact layer. Don’t press too hard, or the treats will become dense; aim for a firm, uniform surface. Let the pan cool at room temperature for at least 1 hour, or until completely set and firm to the touch. For faster setting, you can place it in the refrigerator for 30 minutes.
Step 5: Melt the White Chocolate Topping
Once the base is set, lift it out of the pan using the parchment paper overhang and place it on a cutting board. In a microwave-safe bowl, combine the white chocolate chips and coconut oil. Microwave in 20-second bursts, stirring thoroughly after each, until completely smooth and fluid. Alternatively, you can use a double boiler. Using an offset spatula or the back of a spoon, quickly spread the melted white chocolate in an even layer over the entire surface of the treats. Immediately sprinkle generously with rainbow sprinkles so they adhere before the chocolate sets.
Step 6: Slice and Serve
Allow the white chocolate topping to set completely, which takes about 15-20 minutes at room temperature. For a cleaner cut, use a large, sharp knife, wiping it clean between slices. Cut into squares or bars. For a professional look, you can trim off the edges first (a treat for the chef!).
Nutritional Information
The following is an approximate nutritional breakdown per serving (based on cutting into 16 squares).
- Calories: 210 kcal
- Total Fat: 7g
- Saturated Fat: 4.5g
- Carbohydrates: 36g
- Fiber: 0g
- Sugars: 24g
- Protein: 2g
- Sodium: 115mg
Healthier Alternatives
You can easily adapt this recipe for a more nutrition-conscious version without sacrificing the fun and tasty twist.
- Reduce Sugar: Use reduced-sugar marshmallows and a high-quality, sugar-free white chocolate alternative.
- Boost Fiber: Swap half the Rice Krispies for a whole-grain, high-fiber puffed cereal (like brown rice cereal). The texture will be slightly different but still delicious.
- Healthy Fats: Replace the butter with an equal amount of coconut oil. It adds a subtle tropical note that pairs wonderfully with lemon.
- Topping Swap: Instead of a full white chocolate layer, drizzle lightly with a simple glaze made from powdered erythritol and lemon juice, and top with a sprinkle of crushed, freeze-dried raspberries for tartness and color.
Serving Suggestions
These treats are stars on their own, but you can elevate them further. Serve them on a platter with other citrus desserts for a themed brunch. Crumble one over a scoop of vanilla bean ice cream or lemon sorbet for an incredible sundae. For a party, cut them into smaller, bite-sized pieces and serve in colorful paper liners. Pair with a glass of iced tea, lemonade, or a frothy cappuccino to balance the sweetness.
Common Mistakes
- Overheating the Marshmallows: High heat will cause the sugar to crystallize, making the treats hard and chewy instead of soft. Always use low heat and stir constantly.
- Adding Lemon Juice to Hot Marshmallows Off-Heat: If you add the lemon juice while the pot is still on the burner, the liquid can cause the marshmallow to seize up. Always remove from heat first.
- Pressing Too Firmly: Compacting the mixture with too much force squeezes out the air, resulting in a dense, brick-like bar. A gentle, even press is key.
- Using Old/Hard Marshmallows: Stale marshmallows don’t melt as smoothly. Fresh ones are essential for that perfect, gooey consistency.
Storing Tips
Store these treats in an airtight container at room temperature for up to 3 days. For longer storage (up to a week), keep them in the refrigerator—this also helps the white chocolate topping stay firm, especially in warm climates. You can freeze them for up to 2 months. Layer them between sheets of parchment paper in a freezer-safe container. Thaw at room temperature for an hour before serving. Do not store in a humid environment, as the cereal will lose its crispness.
