
Table of Contents
Gooey S’mores Bars with a Soft Chewy Cookie Base – Campfire Magic, Indoors!
Growing up in Morocco, s’mores weren’t part of our culinary landscape, but when I moved to New York City and first experienced the magic of a campfire s’more, I was instantly hooked. The combination of toasted marshmallow, melted chocolate, and crisp graham cracker layers became an obsession! But let’s be honest, not everyone has access to a campfire, especially living in a bustling city like mine. That’s why I channeled my inner pâtissier from my Paris training to create these incredible gooey s’mores bars – bringing all the joy of the classic treat right into your kitchen, with a soft, chewy cookie base that truly sets them apart.
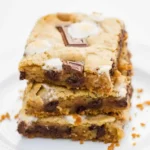
Imagine biting into a soft, golden-brown cookie bar, studded with rich semi-sweet chocolate chips and pockets of melted mini marshmallows. Beneath that indulgent top layer, you find a delicate, buttery graham cracker crust, providing that essential crunch. And then, the grand finale: generous chunks of milk chocolate bar, gloriously melted and blended with even more toasted marshmallows. The aroma that fills your kitchen while these bake is pure comfort, a sweet symphony of vanilla, toasted sugar, and deep cocoa notes that would make my mother’s kitchen in Casablanca proud – albeit with a very American twist!
My journey through Moroccan spices, French pastry, and American comfort food has taught me that the best recipes often bridge traditions. These easy s’mores bars are proof of that. While many s’mores bar recipes rely on a simple cookie dough, I’ve perfected a soft chewy cookie base that ensures these bars stay incredibly moist and tender. I’ll share a pro tip on how to achieve that perfect gooey marshmallow pull, and a common mistake to avoid so your chocolate stays perfectly melted and never seized. Get ready for a dessert that’s guaranteed to be a crowd-pleaser!
Why This S’mores Bar Recipe Is the Best
What truly elevates these gooey s’mores bars from good to absolutely unforgettable is the careful balance of textures and flavors. My French culinary training taught me the importance of precision, and here, it means getting that cookie base just right – soft enough to yield, but substantial enough to hold all that wonderful marshmallow and chocolate. It’s not just a vehicle for the toppings; it’s an integral part of the s’mores experience, adding a depth that other recipes often miss.
Achieving that perfectly gooey marshmallow layer and melted chocolate without scorching is a delicate art. I’ve tweaked the baking temperature and timing to ensure the marshmallows on top get beautifully golden and caramelized, while the chocolate underneath softens to a luscious, melting consistency. It’s about creating layers of indulgence, from the crisp graham cracker to the chewy cookie, and finally, that irresistible molten s’mores topping. This specific technique prevents the marshmallows from turning into hard, crunchy bits, ensuring a soft, yielding experience with every bite.
I know life in NYC can be hectic, and not everyone has hours to spend in the kitchen. That’s why I designed this recipe to be foolproof and relatively fast. While it has layers, each step is straightforward, using common pantry ingredients. My goal was to create easy s’mores bars that deliver maximum flavor and impact with minimal stress. Even if you’re new to baking, you’ll feel confident making these, and your friends will think you spent all day perfecting them!
Gooey S’mores Bars Ingredients
For me, exploring the diverse food markets of NYC is a constant source of inspiration, and when it comes to these gooey s’mores bars, quality ingredients make all the difference. I love picking up fresh butter from the Union Square Greenmarket and choosing my favorite milk chocolate bar – a little luxury for a classic comfort food. Even the simplest ingredients can shine when you give them attention.
Ingredients List
- 1/2 cup butter (melted)
- 1 1/2 cups graham cracker crumbs
- 2 cups light brown sugar
- 2/3 cup salted butter (softened)
- 2 eggs
- 2 1/2 cups all-purpose flour
- 2 1/4 teaspoons baking powder
- 1/2 teaspoon salt
- 1 teaspoon vanilla extract
- 1 cup semi-sweet chocolate chips
- 1 cup mini marshmallows (for the dough)
- 1 milk chocolate candy bar (broken into pieces)
- 1 graham cracker (broken into pieces, for topping)
- 1/2 cup mini marshmallows (for topping)
Ingredient Spotlight
Light Brown Sugar: This isn’t just for sweetness; brown sugar gives our cookie base that incredible soft, chewy texture and a lovely caramel note inherent to the s’mores experience. When selecting, look for a fresh, moist package. If yours has hardened, place it in a sealed container with a slice of apple or a small piece of bread overnight to re-moisten. You can substitute with dark brown sugar for a deeper molasses flavor, or granulated sugar, but expect a slightly less chewy and more crisp bar.
Salted Butter: I specify salted butter because the hint of salt perfectly balances the sweetness, just like a pinch of salt enhances many Moroccan pastries. Softened butter is key for creaming easily with sugar. If you only have unsalted butter, simply add an extra pinch (about 1/8 teaspoon) of salt to the dry ingredients. Margarine could be a substitute in a pinch, but the flavor won’t be as rich or creamy, affecting the overall chewiness.
Semi-Sweet Chocolate Chips: These provide a classic chocolate flavor that melts beautifully without being overly sweet. When choosing, look for a good quality brand you enjoy eating on its own. For a richer bar, you could use dark chocolate chips (60-70% cacao), which will give a more intense, less sugary profile. Milk chocolate chips can also be used, but the bars will be much sweeter, and the chocolate might disappear into the dough more. White chocolate chips are not recommended for this recipe, as their flavor profile doesn’t quite match the s’mores expectation.
| Original Ingredient | Best Substitution | Flavor / Texture Impact |
|---|---|---|
| Light Brown Sugar | Dark Brown Sugar | Deeper molasses flavor, similar chewiness. |
| Salted Butter | Unsalted butter + 1/8 tsp salt | Identical flavor, just an extra step. |
| Semi-Sweet Chocolate Chips | Dark Chocolate Chips | Richer, less sweet chocolate flavor. |

How to Make S’mores Bar Recipe — Step-by-Step
Making these gooey s’mores bars is a truly delightful process, bringing a little bit of campfire magic into your home. Follow these steps, and you’ll have perfect, soft chewy cookie bars every time.
Step 1: Prep Your Pan
Preheat your oven to 325°F (160°C). This ensures your oven is at the correct temperature for even baking. Line a 9×13 inch baking dish with foil, allowing some overhang on the sides – this will create ‘handles’ to lift the cooled bars out easily. Spray the foil generously with nonstick spray. This prevents sticking and makes for clean removal of your delicious dessert.
💡 mia’s Pro Tip: Make sure the foil extends over the edges! This isn’t just for easy removal; it helps protect the edges of your bars from getting too crispy, keeping them perfectly soft and gooey.
Step 2: Make the Graham Cracker Crust
In a small bowl, combine 1/2 cup melted butter and 1 1/2 cups graham cracker crumbs. Use a fork to mix until the crumbs are thoroughly moistened. Press this mixture firmly and evenly into the bottom of your prepared baking dish. A glass or the flat bottom of a measuring cup works wonders for getting a compact, even crust.
⚠️ Common Mistake to Avoid: Don’t skimp on pressing the crust. A loosely packed crust will fall apart when serving. Really get in there to create a solid foundation for your gooey s’mores bars!
Step 3: Prepare the Cookie Dough
In a large bowl, cream together the 2/3 cup softened salted butter and 2 cups light brown sugar until light and fluffy. This step is crucial for incorporating air and creating a tender cookie base, a technique I recall from my pâtisserie days in Paris. Add the 2 eggs and 1 teaspoon vanilla extract, mixing until just combined. In a separate bowl, whisk together 2 1/4 teaspoons baking powder, 1/2 teaspoon salt, and 1 cup of the all-purpose flour. Gradually add this flour mixture to the butter mixture, stirring until just combined, then add the remaining 1 1/2 cups of flour. Finally, fold in the 1 cup semi-sweet chocolate chips and 1 cup mini marshmallows.
Step 4: Assemble the Bars
Once your dough is ready, press it evenly over the graham cracker crust in the baking pan. A rubber spatula or floured hands will help prevent sticking. Then, arrange the broken milk chocolate bar pieces, additional graham cracker pieces, and the remaining 1/2 cup of mini marshmallows over the top of the dough. Don’t worry if it looks a little messy; that’s part of the rustic charm of gooey s’mores bars!
💡 mia’s Pro Tip: For extra richness, use a good quality milk chocolate bar for the topping – the kind you love eating on its own. It makes all the difference in the final melted chocolate.
Step 5: Bake to Perfection
Bake for 30-35 minutes, or until the edges are lightly browned and a toothpick inserted into the center of the cookie dough (avoiding the marshmallow and chocolate pockets) comes out with moist crumbs. Oven temperatures can vary, so keep an eye on them. The top marshmallows should be golden and puffed. Remember, the center should remain soft for that ultimate gooey texture!
⚠️ Common Mistake to Avoid: Overbaking is the enemy of gooey s’mores bars! If the toothpick comes out completely clean, you’ve likely baked them too long. A few moist crumbs are what you’re looking for to ensure a soft interior.
Step 6: Cool and Enjoy
This is the hardest part – patience! Allow the bars to cool completely in the pan on a wire rack. While they’ll be tempting to devour warm, cooling allows the layers to set and makes them much easier to cut into neat squares. Once cooled, lift them out using the foil handles, cut, and enjoy with a scoop of vanilla ice cream or a cold glass of milk. Pure comfort!
| Step | Action | Duration | Key Visual Cue |
|---|---|---|---|
| 1 | Prep Pan | 5 mins | Foil-lined, sprayed 9×13 pan. |
| 2 | Make Crust | 5 mins | Evenly pressed graham cracker layer. |
| 3 | Prep Dough | 10 mins | Smooth, creamy mixture, folded in chips/marshmallows. |
| 4 | Assemble Bars | 5 mins | Dough over crust, toppings evenly distributed. |
| 5 | Bake | 30-35 mins | Lightly browned edges, golden marshmallows, moist toothpick crumbs. |
| 6 | Cool | Until set | Bars firm enough to cut without crumbling. |
Serving & Presentation
These gooey s’mores bars are a dessert that doesn’t need much fuss to shine, but a few touches can really elevate the experience. When I serve them in my NYC apartment, I like to cut them into generous squares – they’re rich, so a little goes a long way, but everyone will want a hearty slice! For an extra special touch, a light dusting of cocoa powder or a drizzle of homemade chocolate sauce can add a touch of elegance, nodding to my French pastry background.
Pairing these bars is all about embracing comfort. A scoop of rich vanilla bean ice cream melting over a still-slightly-warm bar is pure heaven. The cool creaminess cuts through the sweetness and adds another layer of indulgence. For a simpler pairing, a tall glass of cold milk is the ultimate classic, making you feel like a kid again. You could also get a little fancy with a strong espresso, or even a glass of robust Moroccan mint tea for a cultural twist, creating a beautiful contrast with the sweet chocolate and marshmallow.
Don’t be afraid to add a playful garnish! A few extra mini marshmallows, lightly toasted with a kitchen torch (if you’re feeling adventurous!), or artfully placed graham cracker crumbs on the plate emphasize the s’mores theme. Imagine these served on a rustic wooden platter for a cozy gathering, or individually on small white plates for a more polished look. The key is to let the gooey, melty allure of these bars speak for itself!
| Pairing Type | Suggestions | Why It Works |
|---|---|---|
| Side Dish | Vanilla bean ice cream, a dollop of whipped cream | Adds a cool, creamy contrast and balances richness. |
| Sauce / Dip | Warm chocolate ganache, raspberry coulis | Enhances chocolate flavor, adds a tart counterpoint. |
| Beverage | Cold milk, strong coffee or espresso, mint tea | Classic comfort, cuts sweetness, or offers an exotic blend. |
| Garnish | Lightly toasted mini marshmallows, chocolate shavings, a dusting of cocoa powder | Visually appealing, adds textural interest, and reinforces the s’mores theme. |
Make-Ahead, Storage & Reheating
Living in New York City means I’m always juggling a packed schedule, so make-ahead options are a lifesaver in my kitchen. These easy s’mores bars are fantastic for preparing in advance, whether you’re bringing them to a potluck or just want a sweet treat ready for unexpected guests. Properly stored, they stay wonderfully gooey and fresh, making them perfect for meal prepping your desserts.
| Method | Container | Duration | Reheating Tip |
|---|---|---|---|
| Refrigerator | Airtight container, individual wrap if desired | Up to 5 days | Pop in microwave for 10-15 seconds, or oven at 250°F for 5-7 mins. |
| Freezer | Layered with parchment in an airtight container | Up to 3 months | Thaw at room temp, then reheat as above. |
| Make-Ahead | Baked and cooled completely | Up to 2 days before serving | Store at room temp, then reheat briefly if preferred. |
For best results, always let the bars cool completely before cutting and storing. This helps the chocolate and marshmallow set, making them less sticky and easier to handle. If you’re stacking them, place a piece of parchment paper between layers to prevent them from sticking together and preserve that lovely gooey topping.
When reheating, I find that a quick zap in the microwave works wonders for bringing back that warm, gooey texture, making your gooey s’mores bars feel freshly baked. Just be careful not to overheat, as marshmallows can turn rubbery. For a crispier edge and even melty interior, a few minutes in a low oven will do the trick. It’s like a mini campfire experience, right in your home!
Variations & Easy Swaps
One of the joys of baking is experimenting and making a recipe your own. These gooey s’mores bars are a fantastic canvas for creativity. While I adore the classic, sometimes a little twist, perhaps inspired by a flavor I discovered at a French market or a seasonal ingredient from a NYC farmers market, can make them even more special.
| Variation | Key Change | Best For | Difficulty Impact |
|---|---|---|---|
| Salted Caramel S’mores Bars | Add a swirl of salted caramel sauce before the final marshmallow topping. | Dessert lovers seeking a complex sweet-and-salty profile. | Slightly increased (making caramel from scratch). |
| Gluten-Free S’mores Bars | Swap regular graham crackers for gluten-free; use a 1:1 gluten-free flour blend. | Those with gluten sensitivities or dietary restrictions. | Minimal (ensure 1:1 blend). |
| Peppermint Chocolate S’mores Bars | Add 1/2 tsp peppermint extract to cookie dough; use dark chocolate & crushed candy canes for topping. | Holiday baking or those who love mint-chocolate combinations. | Minimal (flavor swap). |
Salted Caramel S’mores Bars
For a touch of decadence that reminds me of some of the exquisite salted caramel confections I sampled in Paris, try adding a swirl of homemade or high-quality store-bought salted caramel sauce. Drizzle it over the cookie dough layer just before adding the final marshmallow and chocolate toppings. The salty-sweet balance combined with the gooey s’mores will be absolutely divine and create a sophisticated twist on these easy s’mores bars.
Gluten-Free S’mores Bars
Making these accessible for everyone is important to me, which is why I’ve ensured this recipe adapts well to gluten-free options. Simply swap out your regular graham cracker crumbs for a certified gluten-free version, and substitute the all-purpose flour with a 1:1 gluten-free baking blend that contains xanthan gum. I’ve tested this, and the texture remains wonderfully moist and chewy, so no one has to miss out on these fantastic chocolate graham cracker dessert bars.
Peppermint Chocolate S’mores Bars
During the colder months, especially around the holidays here in NYC, I love a seasonal spin. Incorporate 1/2 teaspoon of pure peppermint extract into the cookie dough for a festive flavor. For the topping, use dark chocolate pieces and, after baking, sprinkle with crushed candy canes or peppermint candies once the bars have cooled slightly. This creates a vibrant, refreshing contrast that makes these gooey s’mores bars perfect for winter gatherings.
How do you keep s’mores bars from getting too hard after baking?
The key to keeping your gooey s’mores bars soft and chewy is to avoid overbaking. The moment the edges are lightly golden and a toothpick inserted into the cookie dough (not the marshmallow or chocolate parts) comes out with moist crumbs, they are done. The residual heat will continue to cook them as they cool. Also, using light brown sugar helps retain moisture. Once cooled, store them in an airtight container at room temperature to prevent them from drying out.
Can I make s’mores bars without a graham cracker crust?
Absolutely! While the graham cracker crust adds a wonderful classic s’mores element, you can omit it entirely if you prefer. The cookie dough base is robust enough to stand on its own. If you skip the crust, simply press the cookie dough directly into the greased, foil-lined pan, then add your chocolate and marshmallow toppings. The bars will still be incredibly delicious, with the soft chewy cookie base taking center stage in your easy s’mores bars.
What’s the best way to get a gooey marshmallow layer in s’mores bars?
To achieve that perfectly gooey, slightly toasted marshmallow layer, the timing is crucial. I recommend using mini marshmallows for the topping, as they melt and toast more evenly than larger ones without over-browning the bars. Place them over the cookie dough during the last 10-15 minutes of baking, or even closer to the end, to allow them to puff and brown without becoming brittle. A quick flash under the broiler for 30-60 seconds (watch carefully!) can also give them that delightful charred look just before serving.
Can s’mores bars be made ahead of time and how do you store them?
Yes, gooey s’mores bars are an excellent make-ahead dessert! They can be baked and stored at room temperature in an airtight container for up to 3 days, or in the refrigerator for up to 5 days. For longer storage, you can freeze individual bars, wrapped tightly in plastic wrap and then foil, for up to 3 months. Thaw them at room temperature, then for ultimate gooeyness, reheat briefly in the microwave (10-15 seconds) or a low oven (250°F / 120°C for 5-7 minutes) before serving.
What kind of chocolate should I use for s’mores bars?
For the best gooey s’mores bars, I recommend using a combination of semi-sweet chocolate chips folded into the cookie dough and good quality milk chocolate bar pieces for the topping. The chocolate chips melt nicely into the cookie, while the chocolate bar pieces on top provide those irresistible pockets of molten chocolate. If you prefer a richer, less sweet flavor, you could use dark chocolate for the topping, but stick with milk chocolate for that quintessential s’mores taste. Avoid chocolate with a very high cacao percentage for the topping, as it may not melt into the same gooey consistency.
Share Your Version!
I truly hope these gooey s’mores bars bring a little bit of that campfire magic to your home, just as they do to mine here in NYC. There’s something so comforting about the blend of graham, chocolate, and toasted marshmallow, and this soft chewy cookie base takes it to a new level.
When you try this easy s’mores bars recipe, I’d be absolutely thrilled to hear from you! Please leave a star rating and a comment below to let me know how they turned out. Did you customize them? Which chocolate did you use? And don’t forget to snap a photo and share it on Instagram or Pinterest, tagging @exorecipes so I can see your beautiful creations! I especially love seeing how you’ve perfected that gooey marshmallow pull – it’s always the best part!
From my NYC kitchen to yours — I hope this recipe brings as much warmth to your table as it does to mine. — mia 🧡
Love This Recipe? Save It to Pinterest!
If you enjoyed this S’mores Bar Recipe recipe, don’t let it get lost in your browser tabs! 😄 Pin it now so you can find it again anytime — and explore hundreds more tried-and-tested recipes waiting for you on my Pinterest boards.
👉 Follow mia on Pinterest @chefrecipes2
📌 Pin this recipe · 🔁 Re-pin your favorites · 💬 Tag me when you make it — I love seeing your creations!
S’mores Bar Recipe
Description
These gooey smores bars have all the flavor of the classic campfire treat with a graham cracker crust, chocolate bar pieces and marshmallows in a soft chewy cookie bar!
Ingredients
- 1/2 cup butter (, melted )
- 1 1/2 cups graham cracker crumbs
- 2 cups light brown sugar
- 2/3 cup salted butter (, softened)
- 2 eggs
- 2 1/2 cups all-purpose flour
- 2 1/4 teaspoons baking powder
- 1/2 teaspoon salt
- 1 teaspoon vanilla extract
- 1 cup semi-sweet chocolate chips
- 1 cup mini marshmallows
- 1 milk chocolate candy bar (, broken into pieces)
- 1 graham cracker (, broken into pieces)
- 1/2 cup marshmallows
Instructions
- Prep. Preheat oven to 325°F and line a 9×13" baking dish with foil. Spray with nonstick spray.
- Combine 1/2 cup melted butter and 1 1/2 cups graham cracker crumbs into a small bowl with a fork. Then press down crust in baking dish on top of foil.
- Cream 2/3 cup butter and 2 cups brown sugar in a large bowl. Add in 2 eggs and 1 teaspoon vanilla and stir until combined. In a separate bowl, mix the 2 1/4 teaspoons baking powder and 1/2 teaspoon salt with 1 cup of flour. Pour flour mixture into the butter mixture and stir in the rest of the flour. Fold in 1 cup chocolate chips and 1 cup marshmallows.
- Press dough into pan with a spatula or flour on your hands. The dough goes right on top of the crust. Then add the candy bar pieces, graham cracker pieces and marshmallows on top.
- Bake for 30-35 minutes, or until lightly browned. Oven temps will vary. Test with a tooth pick. The dough should be soft in the center.
- Allow bars to cool and then enjoy with a scoop of ice cream or cold glass of milk!
Nutrition
- Calories: 282 kcal
- Sugar: 24 g
- Fat: 12 g
- Carbohydrates: 39 g
- Protein: 2 g

Tried This Recipe? Leave a Comment!
Did you make this recipe? I’d love to hear how it turned out! Please leave a comment and a rating below. Your feedback helps other home cooks and supports cheerychop.com!
