Table of Contents
Easy S’mores Bars with a Gooey Marshmallow Top – Your New Favorite No-Bake Treat!
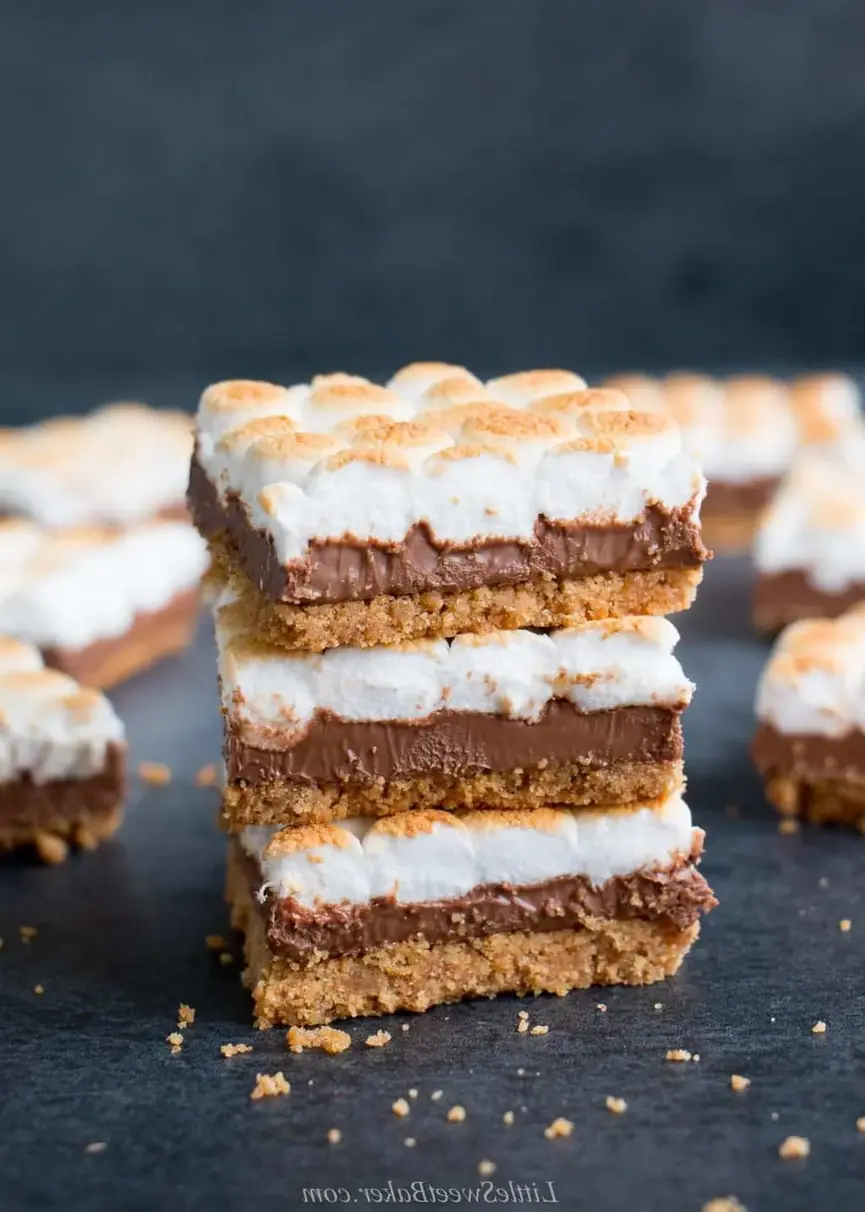
Growing up in Morocco, s’mores were an exotic American treat I only heard about in movies. But when I moved to New York City and discovered their magic, I knew I had to create a version that captured that perfect campfire nostalgia without needing a fire pit! These easy s’mores bars are my answer: all the ooey-gooey goodness of a classic s’more, transformed into a convenient and utterly irresistible dessert bar. Forget the mess of individual s’mores; this recipe delivers the ideal ratio of buttery graham cracker crust, dreamy milk chocolate, and perfectly toasted, pillowy marshmallow in every single bite. They are truly a no-bake s’mores bars dream come true!
Imagine biting into a rich, buttery base Redolent of honey and oats, immediately followed by the smooth, melting sweetness of milk chocolate that coats your palate. Then comes the star: a cloud of golden-brown marshmallow, caramelized on top and delightfully soft and chewy within, pulling apart in sweet, stretchy strands. It’s a symphony of textures and flavors – crunchy, creamy, gooey, and utterly comforting. My culinary training in Paris taught me the art of balancing sweetness and richness, and here, the slight hint of salt in the graham cracker crust is my little nod to that French mastery, cutting through the sweetness just enough to make you crave another bite.
As a professional cook, I’ve seen countless s’mores bar recipes, but many miss the mark on texture or convenience. My version focuses on simplicity without sacrificing that authentic s’mores experience. The secret lies in a quick pre-bake for the crust, a brief warm-up for the chocolate, and strategic broiling for the marshmallows – all designed to prevent common pitfalls like a soggy crust or burnt topping. I’ll share a pro tip on achieving that perfect golden marshmallow, and we’ll tackle one common mistake that can turn your dreamy dessert into a sticky situation. Get ready for a dessert that simplifies joy!
Why This Easy S’mores Bars Recipe Is the Best
The Flavor Secret: My mother always said the best food comes from simple, quality ingredients, and that’s precisely the philosophy behind these easy s’mores bars. By using genuine Hershey’s milk chocolate bars – the quintessential s’mores chocolate – we capture that authentic, creamy taste. Paired with a robust graham cracker crust, it’s a flavor profile that transports you straight to a campfire under the stars, even if you’re just enjoying it from your NYC apartment.
Perfected Texture: Achieving the right texture is crucial, and my Parisian pastry training shines through here. The crust is firm but crumbly, providing a satisfying crunch that contrasts beautifully with the melted, yielding chocolate and the supremely gooey, slightly caramelized marshmallow. The quick pre-bake of the crust ensures it stands up to the toppings, and the swift broil gives you that perfect golden-brown marshmallow without turning it rubbery or burnt.
Foolproof & Fast: I know life in NYC is busy, so I designed this s’mores bars recipe to be incredibly straightforward and quick. With minimal cooking steps and clever use of the oven’s residual heat, you’ll have a show-stopping dessert with less fuss. It’s perfect for last-minute gatherings, a casual weeknight treat, or when you simply need that sweet, nostalgic escape without a tent or a campfire.
Easy S’mores Bars Ingredients
In my NYC kitchen, I always strive for the best ingredients, often sourced from local markets or specialty stores. But for these easy s’mores bars, I appreciate the accessibility of pantry staples that deliver big on classic flavor. It’s a taste of Americana, and sometimes, the familiar brands are exactly what you need to hit that nostalgic note. I still remember the first time I saw graham crackers here; they were such a unique discovery!
Ingredients List
- 2 cups (230g) graham cracker crumbs
- 1/2 cup (125ml) melted butter (plus 1-2 Tbsp more if needed)
- 6 extra-large Hershey’s milk chocolate bars (100-124g each)
- 4 cups (200g) mini marshmallows
Ingredient Spotlight
Graham Cracker Crumbs: These form the crunchy, sweet, and slightly spiced base of our s’mores bars. For the best flavor, I recommend using classic honey graham crackers. You can buy them pre-crushed or crush whole crackers yourself in a food processor for a coarser, more rustic texture. This ensures a fresh flavor and perfect crumb consistency. If you’re in a pinch, digestive biscuits can work, but the flavor will be a bit different.
Melted Butter: Unsalted butter is my preferred choice for baking as it gives me control over the salt levels. The butter binds the graham cracker crumbs together, creating a firm and flavorful crust. Make sure your butter is fully melted but not boiling hot. Coconut oil can be a good dairy-free alternative, though it might impart a subtle coconut flavor.
Hershey’s Milk Chocolate Bars: This is non-negotiable for authentic s’mores flavor! The extra-large bars are perfect because they spread beautifully when warmed, creating a smooth, uninterrupted layer of chocolate. Skip the chocolate chips here; their melting properties are different and won’t give you that signature creamy layer. While other milk chocolate bars could technically work, Hershey’s is key for that nostalgic taste.
Mini Marshmallows: Mini marshmallows are ideal because their smaller size allows for more even toasting under the broiler and they melt into that glorious gooey layer faster. Full-sized marshmallows can be used, but you’ll need to cut them to fit, and they might take slightly longer to brown, increasing the risk of burning. Avoid using flavored marshmallows, as they can overpower the classic s’mores taste.
| Original Ingredient | Best Substitution | Flavor / Texture Impact |
|---|---|---|
| Graham Cracker Crumbs | Digestive Biscuits (crushed) | Slightly less honey flavor, firmer texture. |
| Melted Butter | Melted Coconut Oil (refined) | Subtle coconut flavor, still good bind. |
| Hershey’s Milk Chocolate Bars | Cadbury’s Milk Chocolate (flat bars) | Richer, less classic “s’mores” taste. |
| Mini Marshmallows | Large Marshmallows (cut into quarters) | Still gooey, but may toast less evenly. |

How to Make Easy S’mores Bars — Step-by-Step
Making these easy s’mores bars is a delightful and straightforward process. Just follow these steps, and you’ll have a wonderfully gooey dessert that tastes like pure happiness!
Step 1: Prepare Your Pan and Crust
Preheat your oven to 350°F (175°C). Line a 9×13-inch baking pan with aluminum foil, making sure the foil extends over the sides to create “handles” for easy removal later. Spray the foil with non-stick cooking spray generously. In a mixing bowl, combine the 2 cups of graham cracker crumbs and 1/2 cup of melted butter. Mix thoroughly until all crumbs are moistened. If the mixture still appears dry and not easily pressed together, add 1 to 2 tablespoons more melted butter until it resembles wet sand. Evenly and firmly pat this mixture into the bottom of the prepared pan. A flat-bottomed glass or the back of a spoon helps create a dense, even crust.
💡 mia’s Pro Tip: For a perfectly neat crust that won’t crumble when cut, ensure you press the crumbs down very firmly and uniformly. This creates a solid foundation for your luscious layers.
Step 2: Bake the Graham Cracker Crust
Place the pan with the crust into the preheated oven and bake for 8-10 minutes, or just until the edges begin to turn a light golden brown and you can smell the aromatic graham cracker. This brief bake sets the crust, making it sturdy and preventing it from becoming soggy under the chocolate and marshmallow layers. Once baked, turn off the oven completely. We’ll use the residual heat for the next step, a classic Parisian technique for gentle melting.
⚠️ Common Mistake to Avoid: Do not overbake the crust. It should only be lightly golden, as it will continue to cook slightly with the warm chocolate. Overbaking can lead to a hard, dry crust.
Step 3: Melt the Chocolate Bars
Immediately after turning off the oven, arrange the 6 extra-large Hershey’s milk chocolate bars over the warm graham cracker crust. Break them into pieces if needed to cover the entire surface without gaps. Place the pan back into the warm, turned-off oven for just 1 minute. The residual heat will gently soften and melt the chocolate, making it easy to spread. Remove from the oven and, using an offset spatula or the back of a spoon, gently spread the chocolate into an even layer, ensuring it reaches all edges of the crust.
Step 4: Add and Toast Marshmallows
Nestle the 4 cups of mini marshmallows onto the melted chocolate layer, arranging them in neat, close rows to cover all the chocolate. There’s no need to press them down. Once the marshmallows are arranged, switch your oven to broiler mode (or turn it back on to a high setting if it previously cooled). Place the pan back into the oven, keeping a very close eye on it. Broil for 1-2 minutes, or until the marshmallows are beautifully golden brown and lightly caramelized on top. Do not walk away – marshmallows can burn very quickly!
💡 mia’s Pro Tip: To achieve that perfect, even golden-brown marshmallow top, place your pan on the top rack of the oven, close to the broiler element. Rotate the pan halfway through the broiling time for consistent browning and watch it continuously!
Step 5: Cool and Cut
Remove the pan from the oven as soon as the marshmallows reach your desired golden hue. Let the s’mores bars cool completely on a wire rack at room temperature. This is crucial for clean cuts, as the chocolate needs to re-set. If you’re in a hurry, you can place the pan in the refrigerator for about 30-45 minutes after it has cooled on the counter for 15 minutes. Once fully cooled, use the foil “handles” to lift the entire slab out of the pan. Place it on a cutting board and use a large, sharp, non-serrated knife to cut into squares. For extra clean cuts, run your knife under hot water and wipe it dry between each slice.
⚠️ Common Mistake to Avoid: Cutting the bars while still warm. This will result in a messy, sticky goo rather than neat squares. Patience is key here for perfect easy s’mores bars!
| Step | Action | Duration | Key Visual Cue |
|---|---|---|---|
| 1 | Prepare Pan & Crust | 5-7 mins | Crumbles evenly moistened, pressed firmly. |
| 2 | Bake Crust | 8-10 mins | Edges lightly browned, fragrant. |
| 3 | Melt Chocolate | 1 minute (in warm oven) | Chocolate slightly shiny, easily spreadable. |
| 4 | Add & Toast Marshmallows | 1-2 mins (broil) | Marshmallows golden brown and puffed. |
| 5 | Cool & Cut | 1-2 hours (room temp, or 30-45 mins fridge) | Bars firm to the touch, chocolate re-set. |
Serving & Presentation
These easy s’mores bars are so inherently charming, they almost present themselves! For a casual gathering, simply arranging them on a rustic wooden board or a slate platter instantly evokes that charming campfire feel. Because they are quite rich, I like to cut them into smaller, two-bite squares, making them perfect for potlucks, parties, or just a treat after wandering through a busy NYC street market. If you’re feeling fancy, a light dusting of cocoa powder or a drizzle of chocolate sauce can add an elegant touch.
Back in Morocco, we often serve sweet mint tea with our desserts to balance the richness, and a refreshing beverage is perfect here too. For a fun, modern NYC twist, I sometimes serve these with mini ice cream scoops in complementary flavors like vanilla bean or coffee. The cold, creamy ice cream provides a delightful contrast to the warm, gooey bars, creating a truly decadent experience.
Thinking about my French pastry training, the concept of “mise en place” extends to presentation. Prepare your cutting board and a sharp knife beforehand for clean lines. The beauty of these easy s’mores bars is their humble, comforting charm; they don’t need much fuss to shine. They’re a celebration of simple pleasures, reminiscent of childhood summers and good company.
| Pairing Type | Suggestions | Why It Works |
|---|---|---|
| Side Dish | Vanilla Bean Ice Cream, Fresh Berries (raspberries/strawberries) | Cold ice cream contrasts warm bars; berries add tartness. |
| Sauce / Dip | Caramel Sauce, Chocolate Ganache | Adds another layer of richness and sweetness. |
| Beverage | Cold Milk, Hot Coffee/Espresso, Mint Tea | Classic pairings; coffee cuts sweetness, tea is refreshing. |
| Garnish | Coarse Sea Salt, Chopped Nuts, Extra Chocolate Shavings | Enhances flavor, adds texture, visual appeal. |
Make-Ahead, Storage & Reheating
These easy s’mores bars are fantastic for making ahead, which is a lifesaver in my often-hectic NYC schedule. Whether you’re preparing for a party or just want to have a sweet treat on hand for those unexpected cravings, proper storage ensures they remain as delicious as the day they were made. I often prepare a batch on a lazy Sunday afternoon so I have a little something special ready for the week.
| Method | Container | Duration | Reheating Tip |
|---|---|---|---|
| Refrigerator | Airtight container | Up to 5 days | Bring to room temperature for 15-20 min, or microwave 10-15s. |
| Freezer | Layered with parchment paper in airtight container | Up to 3 months | Thaw at room temperature for 1-2 hours or microwave briefly. |
| Make-Ahead | Fully assembled, uncut in pan, covered tightly | Up to 2 days in advance | Cut just before serving, or re-broil briefly if marshmallows aren’t gooey enough. |
When storing in the refrigerator, it’s best to place parchment paper between layers of bars to prevent them from sticking together. The chocolate will firm up nicely, and the graham cracker crust will retain its crunch. If you’re reheating, a quick 10-15 seconds in the microwave is usually enough to bring back that delightful gooey marshmallow, but be careful not to overheat, or the marshmallow can become chewy.
For freezing, make sure the bars are individually wrapped or separated by parchment paper. This makes it easy to grab just one or two when a craving hits. Thawing at room temperature usually yields the best texture; they return to their original deliciousness without any fuss. It’s all about convenience without compromise, a lesson I learned living in a fast-paced city like New York.
Variations & Easy Swaps
| Variation | Key Change | Best For | Difficulty Impact |
|---|---|---|---|
| Dark Chocolate S’mores | Swap milk chocolate for dark chocolate bars. | Those who prefer a less sweet, more intense chocolate flavor. | None |
| Gluten-Free S’mores | Use gluten-free graham crackers. | Addressing dietary needs without sacrificing the classic taste. | Minor ingredient swap, no technique change. |
| Spiced S’mores Bars with a Moroccan Twist | Add cinnamon, nutmeg, a pinch of cardamom to crust. | Adding warmth and complexity to the flavor profile. | Minor, just an extra step for spices. |
Dark Chocolate S’mores Bars
For those who appreciate a deeper, less sweet chocolate experience, swap out the milk chocolate bars for a good quality dark chocolate (around 60-70% cacao). This will create a more sophisticated flavor profile, with the slight bitterness of the dark chocolate beautifully complementing the sweet marshmallow and graham cracker. It’s still an easy s’mores bar, but with a grown-up twist!
Gluten-Free S’mores Bars
Making these easy s’mores bars gluten-free is incredibly simple! Just swap traditional graham crackers for your favorite brand of gluten-free graham crackers. The texture and binding properties are usually quite similar, so no other adjustments to the recipe are typically needed. Mia has personally tested several brands available in NYC, and they work perfectly, offering a delicious alternative for those with dietary restrictions.
Spiced S’mores Bars with a Moroccan Twist
To infuse a hint of my Moroccan heritage, I sometimes add a touch of warm spices to the graham cracker crust. A quarter teaspoon of ground cinnamon, a pinch of nutmeg, and maybe even a tiny whisper of cardamom mixed into the crumbs before adding the butter will elevate the flavor profile. It adds a subtle warmth and complexity that is utterly delightful, reminiscent of the aromatic spices often used in Moroccan pastries.
Can I make s’mores bars without a graham cracker crust?
While the graham cracker crust is iconic to s’mores, you can certainly experiment! You could use a crushed shortbread cookie crust for a richer, more buttery base, or even an Oreo cookie crust for a chocolatey twist. Keep in mind that different crumbs might absorb butter differently, so you might need to adjust the amount of melted butter slightly to achieve the right consistency for pressing into the pan. The crunch of the crust is essential for texture, so don’t skip a base entirely!
How do you prevent the marshmallows from burning when baking s’mores bars?
The key to perfectly toasted, not burnt, marshmallows is vigilance! The best method is to use the broiler, but you must watch them continuously. Place the pan on the top rack under the broiler, and keep your oven door ajar so you can see them. Marshmallows can go from perfectly golden to charred in seconds. As soon as they reach your desired color (usually 1-2 minutes), remove them immediately. Turning the pan once during broiling can also help ensure even toasting.
Can I use milk chocolate chips instead of semi-sweet in s’mores bars?
Absolutely, you can use milk chocolate chips if you prefer their classic sweetness in your s’mores bars. However, for a truly authentic s’mores experience and the smoothest, most unbroken chocolate layer, I strongly recommend using large, flat milk chocolate bars like Hershey’s. Chocolate chips contain stabilizers that help them hold their shape when baked, which means they won’t melt into a perfectly smooth, even layer quite as well as solid chocolate bars do. But for flavor, milk chocolate chips are a delicious alternative.
How long do homemade s’mores bars last and how should they be stored?
Your homemade easy s’mores bars will last best when stored in an airtight container at room temperature for up to 3-4 days. If your kitchen is particularly warm, or if you prefer them firmer, they can be stored in the refrigerator for up to 5 days. Just make sure to bring them to room temperature or give them a quick microwave zap before serving to restore that lovely gooey texture. You can also freeze them for up to 3 months, well-wrapped to prevent freezer burn.
Why did my s’mores bars become hard after cooling?
If your s’mores bars are too hard after cooling, it could be a couple of factors. Overbaking the graham cracker crust can make it too dense and dry. Also, if you let the chocolate cool too much before adding the marshmallows, it might seize up. Marshmallows naturally firm up as they cool, so expecting them to be perfectly gooey when cold might be unrealistic. A quick reheat in the microwave for 10-15 seconds will usually soften them right back up to that desirable squishy texture.
Can I use homemade marshmallows for this recipe?
Yes, you absolutely can use homemade marshmallows, and they would add an extra layer of gourmet flair to your easy s’mores bars! Just be aware that homemade marshmallows often have a different density and moisture content than store-bought ones. They might brown slightly faster or slower under the broiler, so keep an even closer watch on them. Also, they tend to be softer, which can make cutting the bars a bit more challenging if not fully cooled.
What’s the best way to cut s’mores bars without them sticking?
The trick to clean cuts is patience and a hot, sharp knife! First, ensure the bars are completely cooled and the chocolate has set. Lift the entire slab out of the pan using the foil handles. For each cut, run a large, sharp, non-serrated knife under hot water for about 10-15 seconds, then quickly wipe it dry. Slice straight down. The warm blade will cut through the sticky marshmallow and chocolate much more easily. Repeat the heating and wiping for each cut.
Share Your Version!
I absolutely adore hearing from you all and seeing your kitchen creations! If you whip up these easy s’mores bars, please come back and leave a star rating and a comment below. Your feedback means the world to me and helps other home cooks too.
And please, don’t be shy! Share a photo of your irresistible s’mores bars on Instagram or Pinterest and tag @exorecipes. I genuinely love to see how you bring my recipes to life in your own kitchens. Did you try the Moroccan spice twist? Tell me all about it!
From my NYC kitchen to yours — I hope this recipe brings as much warmth to your table as it does to mine. — mia 🧡
Love This Recipe? Save It to Pinterest!
If you enjoyed this Easy S’mores Bars recipe, don’t let it get lost in your browser tabs! 😄 Pin it now so you can find it again anytime — and explore hundreds more tried-and-tested recipes waiting for you on my Pinterest boards.
👉 Follow mia on Pinterest @chefrecipes2
📌 Pin this recipe · 🔁 Re-pin your favorites · 💬 Tag me when you make it — I love seeing your creations!
Easy S’mores Bars
Description
These easy s’mores bars are the perfect ratio of buttery graham cracker, creamy milk chocolate, and toasted gooey marshmallow in every bite!
Ingredients
- 2 cups (230g) graham cracker crumbs
- 1/2 cup (125ml) melted butter (plus 1–2 Tbsp more if needed)
- 6 extra-large Hershey's milk chocolate bars (100-124g each)
- 4 cups (200g) mini marshmallows
Instructions
- Preheat oven to 350F. Line a 9×13" pan with foil and spray with non-stick cooking spray. Set aside.
- Mix the graham cracker crumbs and melted butter together until all is moistened. Add 1-2 tbsp more butter if the mixture still seems dry. Evenly and firmly pat the mixture into the bottom of the prepared pan.
- Bake for 8-10 minutes just until the edges are lightly browned. Turn off the oven.
- Lay the Hershey's chocolate bars on top of the graham cracker crust and put the pan back into the warm oven for 1 minute.
- Nestle the marshmallows into neat rows, covering all of the melted chocolate.
- Put back in the oven and broil for 1-2 minutes until the marshmallows are golden brown. Do not step away from the oven. Keep a close eye the whole time and remove the pan from the oven as soon as it turns golden on top.
- Let cool completely before cutting into squares with a sharp knife. You can place it on the fridge after it has cooled on the counter for 15 minutes to speed up the process. See tip below on how to cut.**
Nutrition
- Calories: 126 kcal
- Sugar: 10 g
- Fat: 7 g
- Carbohydrates: 16 g
- Protein: 1 g

Tried This Recipe? Leave a Comment!
Did you make this recipe? I’d love to hear how it turned out! Please leave a comment and a rating below. Your feedback helps other home cooks and supports cheerychop.com!
