Table of Contents
Easy S’mores Bars Recipe: No-Bake Campfire Treats
Growing up in Morocco, campfires were a rare treat, but the joy of sweets was an everyday pleasure in my mother’s kitchen. After moving to New York City and experiencing my first true American s’more, I was instantly captivated by the magic of toasted marshmallow, melted chocolate, and crisp graham crackers. This experience inspired me to create something that captured that same nostalgic campfire feeling, but in a more convenient, no-bake style bar format. This easy s’mores bars recipe perfectly blends that classic taste with a simple method that brings the campfire right into your home kitchen, no kindling required!
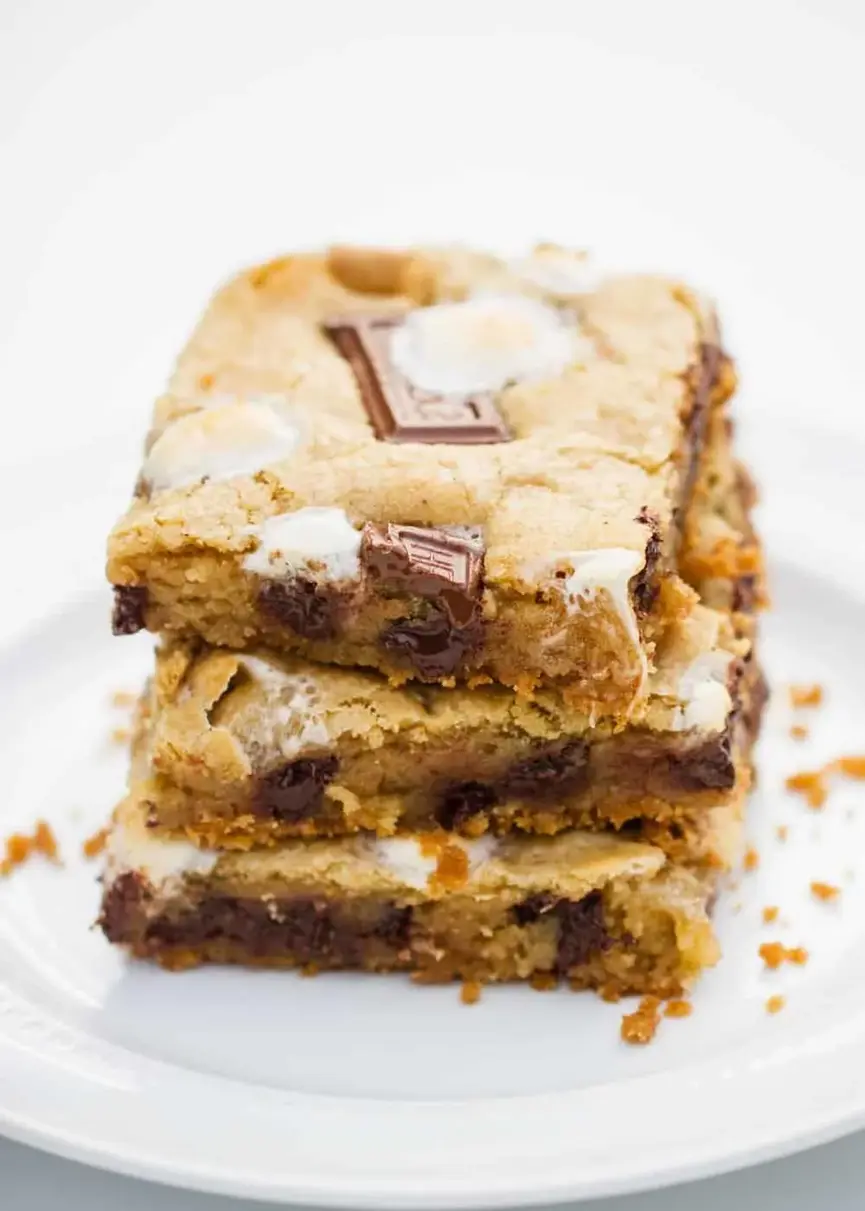
When you bite into these gooey chocolate marshmallow bars, prepare for a symphony of textures and flavors. The base is a buttery, slightly crumbly graham cracker crust, fragrant with warm spices, reminiscent of a crackling fire. Above that, a dense, chewy cookie bar layered with pockets of melty semi-sweet chocolate and soft mini marshmallows, creating an irresistible pull. On top, more chocolate bar pieces and toasted marshmallows form a golden, bubbly crown. It’s comforting, playful, and utterly delicious – a true celebration of all things sweet and indulgent.
I’ve spent countless hours in the kitchen perfecting this recipe, drawing upon my French pastry training to ensure a balanced sweetness and a perfectly tender crumb. My secret? A precise ratio of butter and brown sugar creates that wonderfully chewy texture, a technique I often apply to my cookie recipes. You’ll be surprised how simple it is to achieve such a decadent result! I’ll also share a pro tip to get that perfect marshmallow top and highlight a common mistake you’ll definitely want to avoid, so your graham cracker dessert bars turn out flawlessly every single time.
Why This S’mores Bars Recipe Is the Best
The Flavor Secret: My unique take on these easy s’mores bars lies in balancing the deep, fudgy chocolate with the buttery graham cracker base. Unlike traditional s’mores that can sometimes be overly sweet, I fine-tune the sugar content to let the rich chocolate and the subtle spice of the graham crackers truly shine. It’s a method I learned in Paris — understanding how each component plays a role in the overall symphony of flavors – ensuring every bite is perfectly balanced.
Mastering the Perfected Texture: The texture of these no-bake s’mores bars is paramount. I’ve engineered this recipe to deliver a soft, chewy cookie bar right above a crisp graham cracker crust, all crowned with delightfully gooey, slightly caramelized marshmallows. The key is in the precise amount of softened butter and the specific blend of flour to create a dough that’s sturdy enough to hold its shape but tender once baked – a precision I demand from all my dessert recipes.
Foolproof & Fast: This recipe is designed so anyone, regardless of their baking experience, can create a show-stopping dessert. With clear, concise steps and ingredients you likely already have in your pantry, it comes together quickly. And hey, for those busy NYC weeknights, a quick dessert that feels gourmet is always a win in my book!
S’mores Bars Ingredients
Gathering the right ingredients is half the battle, and luckily for these s’mores bars, everything is readily available. I love hitting up local markets here in NYC for the freshest dairy, but sometimes a good quality store brand works just fine for these pantry staples.
Ingredients List
- 1/2 cup butter (melted)
- 1 1/2 cups graham cracker crumbs
- 2 cups light brown sugar
- 2/3 cup salted butter (softened)
- 2 eggs
- 2 1/2 cups all-purpose flour
- 2 1/4 teaspoons baking powder
- 1/2 teaspoon salt
- 1 teaspoon vanilla extract
- 1 cup semi-sweet chocolate chips
- 1 cup mini marshmallows
- 1 milk chocolate candy bar (broken into pieces)
- 1 graham cracker (broken into pieces)
- 1/2 cup marshmallows (for topping)
Ingredient Spotlight
Graham Cracker Crumbs: These form the foundational crust, providing that signature slightly sweet, slightly spiced flavor and crumbly texture. You can buy pre-crushed graham cracker crumbs, or for a fresher taste, crush whole graham crackers yourself in a food processor or by hand. If you’re out of graham crackers, digestive biscuits or even vanilla wafers can work in a pinch for a slightly different, but still delicious, crust.
Light Brown Sugar: This isn’t just for sweetness; it contributes significantly to the chewy texture and adds a subtle molasses flavor that complements the chocolate beautifully. When selecting, look for a soft, pliable brown sugar. If you only have dark brown sugar, that’s fine, but it will result in a slightly deeper caramel flavor and a darker bar. Granulated sugar won’t give you the same chewy result, so I don’t recommend a straight substitution here.
Salted Butter: I specify salted butter because the hint of salt perfectly cuts through the sweetness and enhances the overall flavor profile – a little trick I picked up during my pastry training in Paris. Ensure it’s softened for the cookie bar component to cream properly with the sugar. If you only have unsalted butter, just add an extra pinch (about 1/4 teaspoon) of fine sea salt to the dry ingredients.
Mini Marshmallows: These little pockets of sweet, airy goodness are essential for the classic s’mores experience. Using mini marshmallows for the bar itself allows for even distribution and uniform melt-in-your-mouth gooiness. For the topping, you can use either mini or regular-sized marshmallows for that coveted toasted top. There isn’t a good substitute for marshmallows if you’re aiming for that iconic texture and flavor.
Semi-Sweet Chocolate Chips & Milk Chocolate Candy Bar: A combination of semi-sweet chocolate chips inside the bar provides a rich, balanced bitterness, while the milk chocolate candy bar pieces on top deliver that familiar, creamy s’mores sweetness. Choose a good quality chocolate bar for melting; it really makes a difference. You can use all semi-sweet or all milk chocolate, but the blend offers the best of both worlds. Dark chocolate can be used if you prefer a less sweet, more intense chocolate flavor.
| Original Ingredient | Best Substitution | Flavor / Texture Impact |
|---|---|---|
| Graham Cracker Crumbs | Digestive Biscuits / Vanilla Wafers | Slightly different flavor profile, similar crumbly texture. |
| Light Brown Sugar | Dark Brown Sugar | Deeper molasses flavor, slightly darker bar. |
| Salted Butter | Unsalted Butter + 1/4 tsp salt | Identical results, just adjust salt. |
| Semi-Sweet Chocolate Chips | Dark Chocolate Chips | Less sweet, more intense chocolate flavor. |
| Milk Chocolate Candy Bar | Any chocolate bar, chopped | Flavor will vary based on chocolate chosen. |

How to Make S’mores Bars — Step-by-Step
Making these s’mores bars is a delightful process, and I’m here to guide you to success. Follow these steps, and you’ll have perfect gooey bars in no time!
Step 1: Prep the Pan and Oven
Preheat your oven to 325°F (160°C). Line a 9×13-inch baking dish with aluminum foil, making sure to leave an overhang on the sides. This overhang will act as handles for easy removal of the bars once cooled. Spray the foil generously with nonstick cooking spray to prevent sticking, especially from the gooey marshmallows.
💡 mia’s Pro Tip: Always ensure your foil overhangs the pan. It makes lifting the entire slab of bars out for cutting incredibly easy and minimizes cleanup – a lifesaver in any kitchen, especially a tiny NYC one!
Step 2: Make the Graham Cracker Crust
In a small bowl, combine 1/2 cup of melted butter and 1 1/2 cups of graham cracker crumbs. Use a fork to mix until the crumbs are evenly moistened. Press the mixture firmly and evenly into the bottom of your prepared baking dish. A glass or the bottom of a measuring cup can help you achieve a compact, uniform crust.
⚠️ Common Mistake to Avoid: Don’t pack the crust too loosely. A firm, even base is crucial for structural integrity when you slice the bars later, preventing a crumbly mess.
Step 3: Prepare the Cookie Bar Dough
In a large bowl, cream together 2/3 cup of softened butter and 2 cups of light brown sugar until light and fluffy. This can take a few minutes with an electric mixer. Add in 2 eggs and 1 teaspoon of vanilla extract, mixing until just combined. In a separate medium bowl, whisk together 2 1/2 cups all-purpose flour, 2 1/4 teaspoons baking powder, and 1/2 teaspoon salt. Gradually add the dry mixture to the wet ingredients, mixing on low speed until just combined. Be careful not to overmix. Finally, fold in 1 cup of semi-sweet chocolate chips and 1 cup of mini marshmallows.
💡 mia’s Pro Tip: European chefs are meticulous about bringing butter and eggs to room temperature. This ensures they emulsify properly with the sugar, leading to a smoother batter and a more tender, even-textured bar.
Step 4: Assemble and Top
Evenly press the cookie dough mixture over the graham cracker crust in the baking pan. This can be a bit sticky, so using a spatula or lightly floured hands helps. Once the dough is spread, scatter the pieces of your milk chocolate candy bar, the broken graham cracker pieces, and the remaining 1/2 cup of marshmallows evenly over the top.
Step 5: Bake to Golden Perfection
Bake the bars for 30-35 minutes, or until the edges are lightly golden brown and the marshmallows on top are puffed and slightly toasted. Oven temperatures can vary, so keep an eye on them. A toothpick inserted into the center should come out with moist crumbs, not wet batter, and the center should still feel relatively soft; it will set as it cools.
⚠️ Common Mistake to Avoid: Overbaking these bars will result in a dry, hard texture. You want them to be soft and chewy, so slightly underbaked is better than overbaked. The center will continue to cook as it cools outside the oven.
Step 6: Cool and Enjoy
Allow the s’mores bars to cool completely in the pan on a wire rack before attempting to cut them. This is crucial as the gooey chocolate and marshmallows need time to set. Once cooled, use the foil overhang to lift the entire batch out of the pan. Slice into squares and serve! They’re absolutely divine with a scoop of vanilla ice cream or a cold glass of milk.
| Step | Action | Duration | Key Visual Cue |
|---|---|---|---|
| 1 | Prep Oven & Pan | 5-10 min | Oven to 325°F, pan foiled & sprayed |
| 2 | Make Graham Crust | 5 min | Crumbs moistened, pressed firmly |
| 3 | Cookie Dough | 10-15 min | Fluffy butter, combined, no overmixing |
| 4 | Assemble & Top | 5 min | Dough spread over crust, toppings scattered |
| 5 | Bake | 30-35 min | Golden edges, puffed marshmallows, toothpick with moist crumbs |
| 6 | Cool & Serve | Full cooling | Set, firm texture for clean slices |
Serving & Presentation
These s’mores bars are truly a treat straight from the pan, but a little thoughtful presentation can elevate them even further. For a rustic, homestyle feel, I love serving them directly from the baking dish after they’ve cooled and I’ve lifted them out using the foil. Cut into generous squares or even smaller bites for a party spread.
To truly embrace the indulgence, serve your s’mores bars slightly warm (reheated briefly in the microwave or a low oven) with a generous scoop of good vanilla bean ice cream. The cold, creamy ice cream against the warm, gooey bar is pure bliss. A light dusting of cocoa powder or a drizzle of homemade chocolate sauce can add a touch of Parisian elegance, reminiscent of my culinary school days.
For a more casual, fun presentation, consider a sprinkle of flaky sea salt—my favorite way to enhance anything chocolate! Or, for a true nod to the campfire, you can lightly toast a few extra mini marshmallows with a kitchen torch just before serving. These easy s’mores bars are perfect for a casual weeknight dessert, a potluck, or a special gathering with friends and family.
| Pairing Type | Suggestions | Why It Works |
|---|---|---|
| Side Dish | Vanilla Bean Ice Cream, Fresh Berries (raspberries, strawberries) | Creamy texture and cool contrast; tartness cuts richness. |
| Sauce / Dip | Chocolate Ganache, Salted Caramel Sauce | Adds extra decadence and moisture; salt enhances chocolate. |
| Beverage | Cold Milk, Hot Coffee/Espresso, Decaf Tea | Classic pairing with milk; bitterness of coffee balances sweetness. |
| Garnish | Flaky Sea Salt, Powdered Sugar, Toasted Mini Marshmallows | Enhances flavor, adds visual appeal, mimics campfire char. |
Make-Ahead, Storage & Reheating
Living in a city like New York means life is always moving fast. That’s why I appreciate recipes that lend themselves well to make-ahead prep and easy storage. These s’mores bars are absolutely perfect for that!
| Method | Container | Duration | Reheating Tip |
|---|---|---|---|
| Refrigerator | Airtight container | Up to 5 days | Bring to room temp or microwave 10-15 seconds. |
| Freezer | Layered with parchment in airtight container or wrapped tightly | Up to 3 months | Thaw at room temp for a few hours, then optional reheat. |
| Make-Ahead | Baked completely, cooled, and stored at room temp/fridge | Up to 2 days (room temp), 5 days (fridge) | Assemble crust and dough layers up to 1 day ahead, bake fresh. |
For best results, always store your s’mores bars in an airtight container to keep them fresh and prevent them from drying out. If you’re planning to freeze them, I recommend wrapping individual bars or small portions tightly in plastic wrap before placing them in a freezer-safe container. This helps prevent freezer burn and makes it easy to grab just what you need.
When reheating, especially from the freezer, patience is key. A gentle warmth in the microwave will bring back that gooey softness, but don’t overheat, or your marshmallows will melt too much. A low oven (around 250°F / 120°C) for 5-10 minutes also works beautifully to revive that fresh-baked feel, re-toasting the marshmallow topping slightly.
Variations & Easy Swaps
One of the joys of baking is experimenting and making a recipe your own. These s’mores bars are a fantastic canvas for creative variations. Here are some of my favorite ways to tweak them, inspired by flavors I love from around the world and right here in my NYC kitchen.
| Variation | Key Change | Best For | Difficulty Impact |
|---|---|---|---|
| Salted Caramel S’mores Bars | Swirl salted caramel into the dough layer and drizzle on top. | Sweet & salty lovers; adds a sophisticated touch. | Slightly increased (making caramel). |
| Gluten-Free S’mores Bars | Use gluten-free graham crackers and an all-purpose GF flour blend. | Dietary restrictions; maintains integrity. | Minimal (swap ingredients). |
| Chocolate Hazelnut S’mores Bars | Add a tablespoon of hazelnut extract and chocolate-hazelnut spread. | Nutella fans; adds a rich, nutty depth. | Minimal (additions). |
Salted Caramel S’mores Bars
For an extra layer of decadence, try creating salted caramel s’mores bars. Prepare a batch of easy salted caramel sauce (or use your favorite store-bought variety). Before baking, swirl about 1/4 cup of the caramel into the cookie dough mixture. After they cool, drizzle more caramel generously over the top. The salt perfectly balances the sweetness, a technique I often employ in my dessert creations, giving a wonderful depth of flavor.
Gluten-Free S’mores Bars
Making these accessible for everyone is important to me! To create delicious gluten-free s’mores bars, simply swap out regular graham crackers for a certified gluten-free brand. For the flour, use a one-to-one gluten-free all-purpose flour blend (like Bob’s Red Mill or King Arthur’s GF blend). I’ve tested this myself, and the texture remains beautifully chewy, with no compromise on the gooey goodness.
Chocolate Hazelnut S’mores Bars
Inspired by the European passion for hazelnut, this variation is a true winner. Replace some of the semi-sweet chocolate chips with chopped chocolate-hazelnut spread (like Nutella) swirled into the dough, or even chopped hazelnuts. You could also add a touch of hazelnut extract alongside the vanilla. The rich, nutty notes pair fantastically with the marshmallow and graham cracker, adding a sophisticated twist that reminds me of pastries from a Parisian patisserie.
How do you make s’mores bars without a graham cracker crust?
If you’re looking to omit the graham cracker crust in your s’mores bars, you can certainly do so! The recipe works well by simply pressing the cookie dough mixture directly into the prepared baking pan. You might want to lightly grease and flour the pan, or just use the foil lining as instructed for the full recipe. The resulting bar will be an even chewier, more cookie-like experience with all the delightful gooey chocolate and marshmallow goodness. You could also experiment with a crushed shortbread cookie crust or even a blondie-style base if you’re feeling adventurous and want to diverge from the traditional graham flavor.
Can you make s’mores bars ahead of time and freeze them?
Absolutely, these s’mores bars are excellent for making ahead and freezing! Once the bars are completely cooled and set, slice them into individual portions. Wrap each bar tightly in plastic wrap, then place them in a freezer-safe airtight container or a heavy-duty freezer bag. They will keep well in the freezer for up to 3 months. When you’re ready to enjoy, simply let them thaw at room temperature for a few hours, or warm them gently in the microwave for that fresh-baked, gooey experience. It’s a fantastic solution for meal prepping desserts, especially for busy weeks here in the city.
What is the best way to get a gooey marshmallow layer in s’mores bars?
Achieving that perfect gooey marshmallow layer is all about timing and placement. For the marshmallows mixed into the dough, using mini marshmallows ensures they melt evenly throughout the bar, creating those delightful stretchy pockets. For the topping, scatter your marshmallows (mini or regular-sized works here) over the bars during the last 10-15 minutes of baking, or after the main bake time, then returning them to the oven. This allows them to puff up and toast without completely disappearing. If you want a truly golden, charred top like a campfire s’more, a quick blast under the broiler for 30-60 seconds (watch carefully!) after baking gives that authentic look and taste.
How long do s’mores bars need to cool before cutting?
Patience is a virtue, especially when it comes to cutting these delicious s’mores bars! They need to cool completely, and I mean completely, in the pan. This usually takes at least 2-3 hours at room temperature, or even longer. For the cleanest cuts, I sometimes even pop them in the refrigerator for 30-60 minutes after they’ve reached room temperature. The melted chocolate and gooey marshmallows need ample time to firm up. If you try to cut them while warm, they’ll be a delicious, but messy, heap, sticking to your knife and making a less-than-perfect presentation.
Can I use different types of chocolate in these s’mores bars?
Absolutely! The beauty of these s’mores bars is their versatility. While I’ve specified semi-sweet chips and a milk chocolate bar for a classic balance, feel free to experiment with your favorite chocolates. Dark chocolate chips will give a richer, less sweet flavor, perfect for those who prefer intense chocolate. White chocolate chips could add a creamy, sweeter dynamic. You could also use chopped peanut butter cups, pieces of caramel-filled chocolate bars, or even a mix of dark and milk chocolate for a more complex profile. Just ensure the total quantity of chocolate remains roughly the same for optimal texture.
Share Your Version!
I hope you enjoy making and devouring these easy s’mores bars as much as I do. There’s something truly special about capturing that campfire magic in a simple, bake-at-home treat. I love hearing from you!
Did you try a fun variation? Or did they remind you of a nostalgic moment? Leave a star rating and comment below to let me know how your chocolate marshmallow bars turned out! Don’t forget to snap a photo and share it on Instagram or Pinterest, tagging @exorecipes so I can see your beautiful creations. What’s your favorite s’mores topping – classic, or do you have a secret ingredient?
From my NYC kitchen to yours — I hope this recipe brings as much warmth to your table as it does to mine. — mia 🧡
Love This Recipe? Save It to Pinterest!
If you enjoyed this S’mores Bars recipe, don’t let it get lost in your browser tabs! 😄 Pin it now so you can find it again anytime — and explore hundreds more tried-and-tested recipes waiting for you on my Pinterest boards.
👉 Follow mia on Pinterest @chefrecipes2
📌 Pin this recipe · 🔁 Re-pin your favorites · 💬 Tag me when you make it — I love seeing your creations!
S’mores Bar Recipe
Description
These gooey smores bars have all the flavor of the classic campfire treat with a graham cracker crust, chocolate bar pieces and marshmallows in a soft chewy cookie bar!
Ingredients
- 1/2 cup butter (, melted )
- 1 1/2 cups graham cracker crumbs
- 2 cups light brown sugar
- 2/3 cup salted butter (, softened)
- 2 eggs
- 2 1/2 cups all-purpose flour
- 2 1/4 teaspoons baking powder
- 1/2 teaspoon salt
- 1 teaspoon vanilla extract
- 1 cup semi-sweet chocolate chips
- 1 cup mini marshmallows
- 1 milk chocolate candy bar (, broken into pieces)
- 1 graham cracker (, broken into pieces)
- 1/2 cup marshmallows
Instructions
- Prep. Preheat oven to 325°F and line a 9×13" baking dish with foil. Spray with nonstick spray.
- Combine 1/2 cup melted butter and 1 1/2 cups graham cracker crumbs into a small bowl with a fork. Then press down crust in baking dish on top of foil.
- Cream 2/3 cup butter and 2 cups brown sugar in a large bowl. Add in 2 eggs and 1 teaspoon vanilla and stir until combined. In a separate bowl, mix the 2 1/4 teaspoons baking powder and 1/2 teaspoon salt with 1 cup of flour. Pour flour mixture into the butter mixture and stir in the rest of the flour. Fold in 1 cup chocolate chips and 1 cup marshmallows.
- Press dough into pan with a spatula or flour on your hands. The dough goes right on top of the crust. Then add the candy bar pieces, graham cracker pieces and marshmallows on top.
- Bake for 30-35 minutes, or until lightly browned. Oven temps will vary. Test with a tooth pick. The dough should be soft in the center.
- Allow bars to cool and then enjoy with a scoop of ice cream or cold glass of milk!
Nutrition
- Calories: 282 kcal
- Sugar: 24 g
- Fat: 12 g
- Carbohydrates: 39 g
- Protein: 2 g

Tried This Recipe? Leave a Comment!
Did you make this recipe? I’d love to hear how it turned out! Please leave a comment and a rating below. Your feedback helps other home cooks and supports cheerychop.com!
For more delicious inspiration, follow me on Pinterest!
