Table of Contents
Easy Crème Brûlée Recipe – Foolproof Classic Custard with a Crackling Caramel Top
The first time I made a classic Crème Brûlée in my tiny Parisian apartment, I was nervous. I had just finished my pastry training at Le Cordon Bleu, and I wanted to impress my French neighbors with something elegant yet simple. I remember cracking the caramelized sugar with the back of a spoon and hearing that perfect sharp snap—my heart skipped a beat. That moment taught me that this easy Crème Brûlée recipe is about mastering a few careful techniques rather than a long list of ingredients. Now, in my NYC kitchen, I still get that same thrill every time I torch the sugar topping. This Crème Brûlée recipe is my go-to for dinner parties, date nights, or whenever I need a touch of indulgent luxury.
Imagine dipping your spoon into a velvety, vanilla-flecked custard that is so creamy it practically melts on your tongue, then cracking through a thin, brittle layer of caramelized sugar. The contrast is pure magic—the silky richness of the cream against the shatteringly sweet topping. The aroma of warm vanilla and toasted sugar fills your kitchen, and the golden amber surface glistens under the light. This is a dessert that feels both decadent and comforting, and it is surprisingly simple to pull off at home.
I’m sharing my foolproof method, honed through years of testing in my French pastry kitchen and adapted for home cooks here in the US. The key is gentle heat and patience—a low oven, a hot water bath, and a careful torch. I’ll also share one of my favorite pro tips to prevent a watery custard, and point out a common mistake that can ruin the texture. With just five ingredients and a little know-how, you’ll be making a homemade Crème Brûlée that rivals any restaurant version.
Why This Crème Brûlée Recipe Is the Best
The Flavor Secret: Growing up in Morocco, I learned to appreciate simple, high-quality ingredients. My mother always used fresh cream and eggs from the market, and that principle guides this recipe. I use pure vanilla extract—not imitation—to give the custard a warm, floral depth. This isn’t about complicating things; it’s about letting each ingredient shine. A touch of salt (which I sometimes add) balances the sweetness and enhances the vanilla, a trick I picked up in a Parisian patisserie.
Perfected Texture: After years of making Crème Brûlée, I’ve found that the secret to a perfectly smooth custard lies in the tempering and the water bath. You slowly whisk the hot cream into the egg yolks to avoid scrambling them, then you strain the mixture to catch any bits. The water bath—or bain-marie—surrounds the ramekins with gentle, even heat, ensuring the custard cooks through without curdling. The result is a silky, wobble-perfect texture that is worth every minute of attention.
Foolproof & Fast: This recipe uses just four base ingredients plus sugar for the topping, and the active prep time is only about 20 minutes. It’s easy enough for a beginner, but the technique produces a dessert that feels like it came from a professional kitchen. The oven does the work while you relax, and the make-ahead nature is a lifesaver for busy schedules. I’ve tested it countless times—this Crème Brûlée recipe truly delivers every single time.
Easy Crème Brûlée Ingredients
When I shop for these ingredients at my local farmers market in NYC, I always look for the highest quality I can find. Fresh, local eggs and cream make a huge difference here. This recipe brings back memories of my mother’s kitchen in Morocco, where we would use farm-fresh eggs for everything. Let’s take a closer look at what you’ll need and why each ingredient matters.
Ingredients List
- 6 large egg yolks
- 1/3 cup (70 grams) granulated sugar
- 2 cups (480 ml) heavy whipping cream
- 1 and 1/2 teaspoons pure vanilla extract
- 2 tablespoons (25 grams) granulated sugar (for the caramelized topping)
Ingredient Spotlight
Egg Yolks: Yolks are the heart of this custard—they provide richness and structure. Use large, fresh eggs from a trusted source. The yolks should be bright orange and firm. If you can’t find large eggs, you can adjust by weight; 6 large yolks is about 110 grams. Room-temperature yolks blend more easily, so let your eggs sit out for 15 minutes if you can.
Heavy Whipping Cream: This gives the Crème Brûlée its signature silky texture. Use heavy whipping cream with at least 36% milk fat. Avoid light cream or half-and-half—they won’t set properly and will result in a thin, watery custard. I always buy cream from a local dairy when possible; the flavor is richer.
Vanilla Extract: Pure vanilla extract is non-negotiable for the best flavor. Imitation vanilla will taste artificial and flat. You can also use a vanilla bean—split it open, scrape the seeds into the cream, and steep the pod for an even more intense vanilla flavor. This is a small upgrade that makes a big impact.
| Original Ingredient | Best Substitution | Flavor / Texture Impact |
|---|---|---|
| Large egg yolks | 5 duck egg yolks | Richer, denser texture |
| Heavy whipping cream | Half-and-half (not recommended) | Thinner, less creamy custard |
| Pure vanilla extract | 1 whole vanilla bean | More intense vanilla, visible seeds |
How to Make Crème Brûlée — Step-by-Step
Follow these steps carefully, and you’ll have a perfect Crème Brûlée. The key is to be gentle with the heat and patient with the chilling time. Let’s get started!
Step 1: Prepare the Oven and Water Bath
Preheat your oven to 325°F (163°C). Fill a large pot with water and bring it to a boil on the stove. You’ll use this water to create a bain-marie, which ensures even, gentle cooking. Place your 8-inch square baking dish (or any oven-safe pan that fits your ramekins) nearby.
💡 mia’s Pro Tip: Use a deep baking dish so the water comes about halfway up the sides of the ramekins. A shallow pan can cause the water to evaporate too quickly.
Step 2: Whisk the Egg Yolks and Sugar
In a large mixing bowl, whisk together the 6 egg yolks and 1/3 cup (70 g) granulated sugar. Whisk until the mixture is well blended and just starts to lighten in color—about 1 minute. Don’t over-whisk or incorporate too much air; you want a smooth, thick paste.
⚠️ Common Mistake to Avoid: Over-whisking the yolks can create foam that results in a bubbly custard. Whisk just until combined.
Step 3: Heat the Cream
Pour the 2 cups of heavy whipping cream into a medium-sized saucepan. Heat over medium heat, stirring occasionally, until the cream is warm and you see small bubbles forming around the edges—do not let it boil. This should take about 3-4 minutes. Remove from the heat and stir in the 1 and 1/2 teaspoons of vanilla extract.
💡 mia’s Pro Tip: To test the cream’s temperature, dip a clean finger in—it should feel very warm but not burning hot. If it boils, the custard can curdle.
Step 4: Temper the Egg Mixture
Slowly pour about 1/2 cup of the warm cream into the egg yolk mixture while whisking constantly. This step is crucial—it gradually raises the temperature of the yolks without scrambling them. Then, slowly pour in the remaining cream, continuing to whisk until everything is fully combined. If you see a thin layer of foam on top, skim it off with a spoon for a smoother custard.
⚠️ Common Mistake to Avoid: Adding the hot cream too quickly can cook the yolks into small lumps. Pour in a steady stream and whisk like you mean it!
Step 5: Strain and Fill Ramekins
Pour the custard mixture through a fine-mesh strainer into a clean bowl or large measuring cup. This catches any stray bits of cooked egg or chalaza (the white string in eggs). Then, evenly distribute the custard between four 6-ounce ramekins. Tap each ramekin gently on the counter to release any air bubbles.
💡 mia’s Pro Tip: Straining is non-negotiable. It ensures a silky, professional texture. I learned this in Paris—every patisserie strains their custards.
Step 6: Bake in a Water Bath
Place the filled ramekins in the baking dish. Pour the boiling water from your pot into the dish until it comes about halfway up the sides of the ramekins. Be careful not to splash water into the custards. Carefully transfer the dish to the oven. Bake at 325°F for 35 to 45 minutes. The edges should be set, and the center should jiggle slightly when shaken—like a soft Jell-O.
⚠️ Common Mistake to Avoid: Overbaking is the #1 reason for watery or curdled Crème Brûlée. Check at the 35-minute mark; the center should still move. It will continue to set as it cools.
Step 7: Chill the Custards
Remove the ramekins from the water bath using tongs or pot holders and place them on a wire rack. Let them cool completely at room temperature—about 30 minutes. Then, cover each ramekin tightly with plastic wrap and refrigerate for at least 4 hours, or overnight. This step is essential for the texture to fully set.
💡 mia’s Pro Tip: For the best flavor, let the custards chill overnight. I often make them a day ahead for dinner parties—it saves stress and the taste deepens.
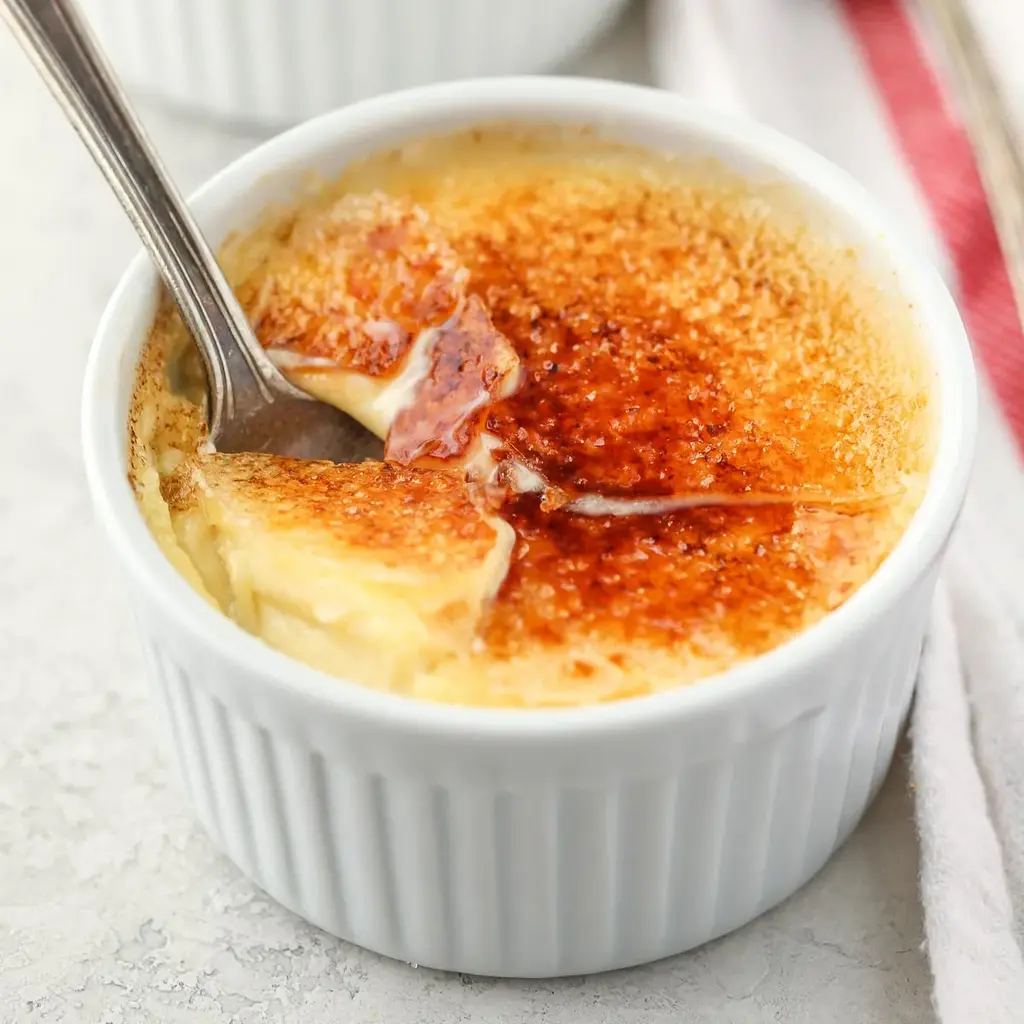
Step 8: Caramelize the Sugar
Just before serving, blot the tops of each custard with a paper towel to remove any condensation. Sprinkle about 1 and 1/2 teaspoons of granulated sugar evenly over each custard. Tilt the ramekin to spread the sugar in a thin, even layer. Use a small kitchen torch to carefully caramelize the sugar, moving the flame in a circular motion until it turns golden brown and bubbly. Let the sugar harden for 1 to 2 minutes, then serve immediately. You can also refrigerate for a few hours if needed, but the sugar may soften slightly.
⚠️ Common Mistake to Avoid: If the sugar is too thick or uneven, it can burn or not caramelize properly. Aim for a single, thin layer.
| Step | Action | Duration | Key Visual Cue |
|---|---|---|---|
| 1 | Preheat oven & boil water | 10 mins | Oven at 325°F, water boiling |
| 2 | Whisk yolks & sugar | 1 min | Slightly lighter color, smooth paste |
| 3 | Heat cream | 3-4 mins | Bubbles at edges, not boiling |
| 4 | Temper eggs | 2 mins | No lumps, smooth consistency |
| 5 | Strain & fill ramekins | 3 mins | Smooth liquid, no solids |
| 6 | Bake in water bath | 35-45 mins | Edges set, center jiggles |
| 7 | Chill | 4+ hrs | Firm custard, holds shape |
| 8 | Caramelize sugar | 2-3 mins | Golden amber, bubbling top |
Serving & Presentation
Crème Brûlée is a showstopper on its own, but I love to dress it up for special occasions. When I serve this in my NYC apartment, I often place each ramekin on a small plate and add a few fresh berries—raspberries or strawberries—for a pop of color. A sprig of mint or a dusting of powdered sugar adds a beautiful contrast. For a truly decadent touch, I sometimes serve it with a dollop of lightly sweetened whipped cream or a drizzle of berry coulis.
The classic way to enjoy Crème Brûlée is right after caramelizing the sugar, when the top is still warm and the custard is cold. The sensory contrast is unmatched. For a dinner party, you can caramelize the sugar just before serving, which also creates a wonderful theatrical moment as your guests watch the torch work. I learned this trick from a Parisian chef who said, “The crack is the signature.”
For a Moroccan-inspired twist, I sometimes add a pinch of ground cinnamon or a drop of rose water to the custard before baking. It’s a subtle nod to my heritage that pairs beautifully with the vanilla. In NYC, I’ve also seen Crème Brûlée served alongside a small cup of espresso—the bitter coffee balances the sweetness perfectly.
| Pairing Type | Suggestions | Why It Works |
|---|---|---|
| Side Dish | Fresh berries, shortbread cookies | Acidity cuts richness, crunch adds texture |
| Sauce / Dip |
 Tried This Recipe? Leave a Comment!Did you make this recipe? I’d love to hear how it turned out! Please leave a comment and a rating below. Your feedback helps other home cooks and supports cheerychop.com! For more delicious inspiration, follow me on Pinterest!  Hi, I’m Ema! Let’s make every bite unforgettable! ABOUT MELet's connect |