Table of Contents
Classic Chicken Pot Pie: Mastering the Perfect Flaky Crust and Velvety Filling
I still remember the first time I made a chicken pot pie that truly tasted like home. It was a chilly autumn evening in my tiny Manhattan kitchen, and I was homesick for the North African stews my mother used to simmer on Fridays. But that night, I wanted something deeply American yet comforting—something with a golden, flaky crust and a creamy filling that hugged every spoonful. This classic chicken pot pie recipe is the result of years of testing, blending the French pastry technique I mastered in Paris with the hearty, soul-satisfying flavors I grew up loving. The key, as my Parisian chef taught me, is in the crust: cold butter, ice water, and a gentle hand create layers that shatter with each bite.
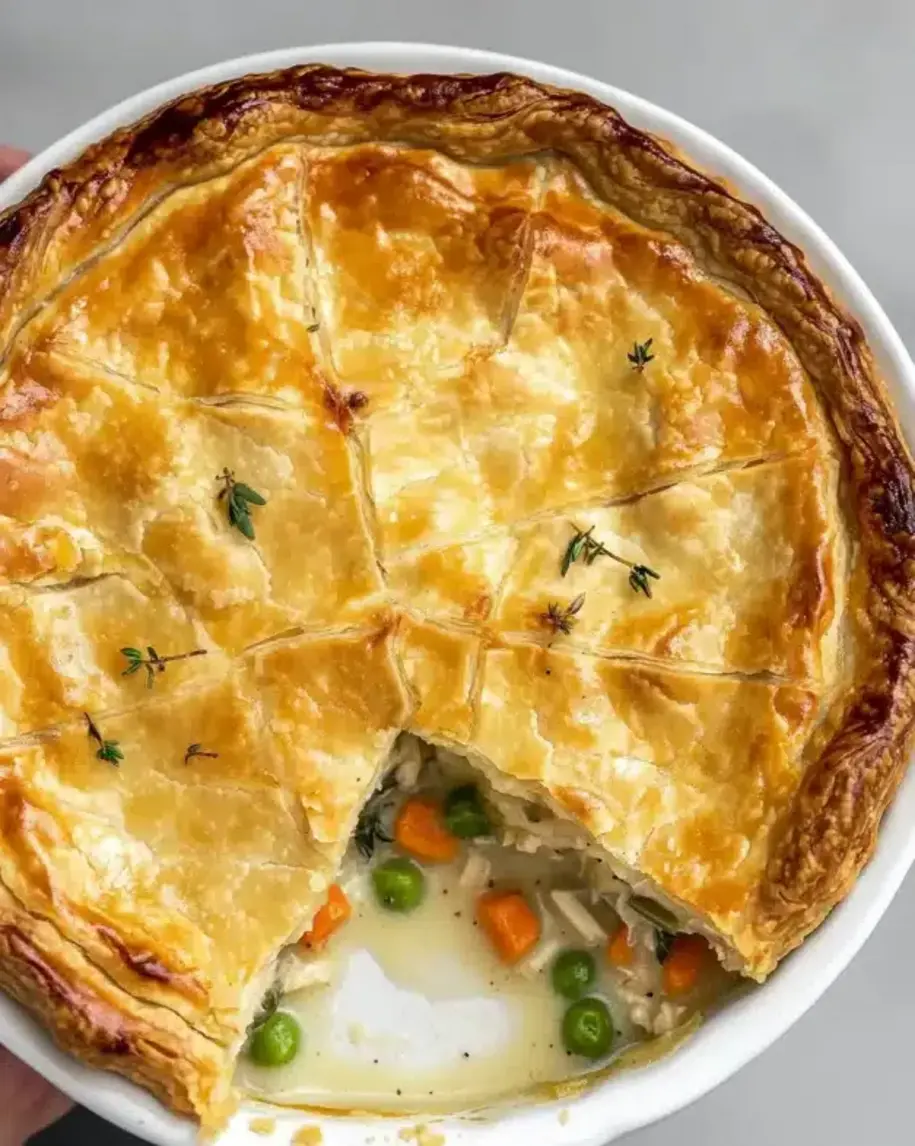
Imagine pulling that pie from the oven: the top crust is a deep golden brown, puffed and cracked in places, revealing steam that smells of thyme and butter. You cut into it—the knife meets resistance for a second, then glides through. Beneath the crust, the filling is thick and creamy, studded with tender shreds of chicken, sweet carrots, and bright green peas. The sauce clings luxuriously to every vegetable and piece of meat. This is not a soupy pot pie; it’s a velvety, rich one, thanks to a careful roux and the perfect amount of milk and broth. I always add a hint of rosemary—a nod to my time in Provence—which pairs beautifully with the subtle garlic and thyme.
Over the years, I’ve made this dish for dinner parties, quiet weeknights, and even a Super Bowl gathering. Every time, it disappears. What sets my version apart is the attention to texture and temperature: pre-cooking the vegetables just enough, letting the filling cool slightly before adding the top crust (so the bottom doesn’t steam into paste), and using a combination of butter and technique that guarantees flakiness. I’ll show you the common mistake that ruins bottom crusts and a pro tip that keeps it crisp. Whether you’re a beginner or a seasoned cook, this recipe will become your go-to comfort classic. Let’s get started.
Why This Classic Chicken Pot Pie Recipe Is the Best
The Flavor Secret: The foundation of any great pot pie is the sauce. I build mine with a classic French roux—butter and flour cooked to a pale blonde—then slowly whisk in chicken broth and whole milk. This yields a luscious, velvety base without any heavy cream. The secret spice blend (thyme, rosemary, a whisper of garlic powder) echoes my Moroccan roots, where dried herbs and spices are used with restraint to enhance, not overpower. A touch of black pepper and salt at the end brightens everything.
Perfected Texture: The crust is the heart of this recipe. I learned in Paris that the key is to keep the butter cold and the water ice-cold. I cut the butter into the flour until pea-sized pieces remain, then add just enough water to bring the dough together. Resting in the fridge for at least 30 minutes relaxes the gluten and re-chills the fat, ensuring that the crust bakes up flaky, not tough. I also pre-cool the filling before topping—this simple step prevents the dreaded soggy bottom.
Foolproof & Fast: This recipe uses rotisserie chicken (a beloved NYC shortcut) and frozen veggies, making it weeknight-friendly. Yet it tastes like you spent hours. The steps are detailed with visual cues, so even if you’ve never made a double-crust pie, you’ll succeed. I’ve included a common mistake alert and pro tips throughout to guide you. It’s the kind of recipe that builds confidence and becomes a family tradition.
Chicken Pot Pie Ingredients
I usually pick up my veggies at the Union Square Greenmarket—sweet carrots, crisp celery, and earthy onions. The butter I use is always unsalted and European-style (like Plugrá) for extra richness. For the chicken, a rotisserie from the store is a time-saver, but leftover roast chicken works beautifully too. Below is everything you’ll need, split into filling and crust.
Ingredients List
For the Filling:
- 1/3 cup (75g) unsalted butter
- 1 cup (120g) finely diced yellow onion (about 1 medium)
- 3/4 cup (90g) finely chopped celery (about 2 stalks)
- 3/4 cup (90g) finely chopped carrots (about 2 medium)
- 1/2 cup (60g) all-purpose flour
- 3 cups (720ml) low-sodium chicken broth
- 1 cup (240ml) whole milk
- 1/2 teaspoon salt, plus more to taste
- 1/4 teaspoon black pepper, plus more to taste
- 1/4 teaspoon dried thyme
- 1/4 teaspoon dried rosemary
- 1/8 teaspoon garlic powder
- 3 cups (about 1 pound) cooked, shredded chicken (from rotisserie or leftover)
- 1 cup (150g) frozen peas, thawed
- 1/2 cup (75g) frozen corn, thawed
For the Crust:
- 2 1/2 cups (300g) all-purpose flour, plus more for rolling
- 1 teaspoon salt
- 1 cup (225g) cold unsalted butter, cut into small cubes
- 1/2 cup (120ml) ice water (more if needed)
- 1 large egg, beaten, for egg wash
Ingredient Spotlight
Butter: The star of the crust. Use cold, high-fat butter (82% fat content or higher). European-style butters like Plugrá or Kerrygold have less water, resulting in a flakier pastry. Avoid margarine or spreads—they contain water and will make the dough tough.
Chicken Broth: Low-sodium is essential here; you control the salt level. A good-quality store-bought broth works well, but if you have homemade, even better. The broth forms the backbone of the sauce, so avoid watery or overly salty brands.
Frozen Peas & Corn: Thawing them before adding prevents the filling from cooling down too much and ensures they heat evenly. Fresh vegetables are great, but frozen are picked at peak ripeness and add sweetness without extra prep. If using fresh, blanch them briefly first.
| Original Ingredient | Best Substitution | Flavor / Texture Impact |
|---|---|---|
| Unsalted butter (filling & crust) | Vegan butter (e.g., Miyoko’s) for dairy-free | Less flaky crust; sauce may need extra starch |
| Whole milk | 2% milk + 1 tbsp melted butter, or unsweetened oat milk | Slightly less creamy; oat milk adds subtle sweetness |
| All-purpose flour | Gluten-free all-purpose blend (with xanthan gum) | Crust will be more tender but less flaky; filling still thickens |
| Shredded chicken | Shredded leftover turkey, or canned chickpeas (vegetarian) | Turkey works perfectly; chickpeas change the flavor profile |
How to Make Classic Chicken Pot Pie — Step-by-Step
This process is straightforward, but I’ll walk you through each stage with the same care I use in my own kitchen. Follow the visual cues, and you’ll have a showstopper pot pie.
Step 1: Cook the Vegetables
In a large pot or Dutch oven over medium heat, melt the 1/3 cup butter. Add the onion, celery, and carrots. Cook, stirring occasionally, until soft and translucent—about 5 to 7 minutes. You want them tender but not brown. This sweated base is the flavor foundation.
💡 mia’s Pro Tip: Dice the vegetables uniformly (about 1/4-inch). Even pieces cook at the same rate and give a more polished final dish.
Step 2: Make the Roux
Sprinkle the flour over the cooked vegetables and stir to coat everything. Cook for 1 minute, stirring constantly. This step cooks out the raw flour taste and helps the sauce thicken properly. The mixture will look pasty and smell nutty—that’s perfect.
⚠️ Common Mistake to Avoid: Don’t let the roux brown. You want a pale blonde color for a creamy sauce; browning adds a toastier flavor that can overpower the filling.
Step 3: Build the Sauce
Slowly pour in the chicken broth and milk while whisking constantly. Whisk vigorously to prevent lumps—the mixture will smooth out as you go. Continue whisking over medium heat until the sauce thickens enough to coat the back of a spoon, about 5 minutes. It should have a silky, pourable consistency.
💡 mia’s Pro Tip: Switch to a silicone whisk to protect your pot’s surface, but a metal whisk works fine in stainless steel.
Step 4: Season and Add Chicken
Stir in the salt, pepper, thyme, rosemary, and garlic powder. Add the shredded chicken, peas, and corn. Simmer for 2 to 3 minutes, stirring occasionally, until the chicken is heated through and the flavors meld. Remove from heat and set aside to cool slightly while you prepare the crust.
⚠️ Common Mistake to Avoid: Adding frozen peas and corn directly can cool the filling too much, making it harder to assemble. Always thaw them first under cool water or let them sit in a bowl.
Step 5: Make the Crust
Preheat your oven to 400°F (200°C). In a large bowl, whisk together 2 1/2 cups flour and 1 teaspoon salt. Scatter the cold butter cubes over the flour. Use a pastry cutter or two knives to cut the butter into the flour until the mixture resembles coarse meal with some pea-sized butter chunks remaining. Drizzle the ice water over the mixture and stir with a fork until the dough just begins to come together. It should look shaggy, not a smooth ball.
💡 mia’s Pro Tip: Test the dough by squeezing a small handful: if it holds together without crumbling, you have enough water. If not, add 1 tablespoon more, no more.
Step 6: Chill and Roll the Dough
Turn the dough out onto a lightly floured surface, gather it into a ball, and divide in half. Flatten each half into a disk about 1 inch thick, wrap in plastic wrap, and refrigerate for at least 30 minutes. This relaxes the gluten and firms the butter—critical for flakiness.
⚠️ Common Mistake to Avoid: Skipping the chilling step. The dough will shrink in the oven and become tough. Patience is key.
Step 7: Line the Pie Dish
On a floured surface, roll one dough disk into a 12-inch circle (large enough to fit a 9-inch pie dish with overhang). Carefully transfer the dough to the dish, pressing it gently into the bottom and sides. Allow the excess to hang over the edges—do not trim yet.
💡 mia’s Pro Tip: If the dough cracks at the edges, pinch it back together. Don’t overwork it; just patch gently.
Step 8: Fill and Top
Pour the cooled filling into the crust, spreading it evenly. Roll the second dough disk into another 12-inch circle and place it on top. Press the edges together to seal, then crimp decoratively (press with fork tines or pinch between thumb and forefinger). Cut several slits in the top crust to allow steam to escape.
⚠️ Common Mistake to Avoid: Forgetting the steam vents. Without them, the steam can’t escape, making the crust soggy and potentially causing a filling explosion.
Step 9: Bake
Brush the top crust with the beaten egg wash (this gives a beautiful golden shine). Place the pot pie on a baking sheet to catch any drips. Bake for 35 to 40 minutes, until the crust is deep golden brown and the filling is bubbling through the vents. If the edges brown too quickly, cover them with foil strips.
💡 mia’s Pro Tip: Let the pie rest on a wire rack for at least 10 minutes before slicing. This allows the filling to set and prevents it from running out everywhere.
| Step | Action | Duration | Key Visual Cue |
|---|---|---|---|
| 1 | Cook vegetables | 5-7 min | Onions translucent, no browning |
| 2 | Make roux | 1 min | Pasty, nutty aroma, no browning |
| 3 | Build sauce | ~5 min | Thickens, coats spoon |
| 4 | Add chicken & veggies | 2-3 min | Fully combined, heated through |
| 5 | Make crust | ~10 min | Pea-sized butter pieces, shaggy dough |
| 6 | Chill dough | 30 min+ | Dough firm, not sticky |
| 7 | Roll bottom crust | ~5 min | 12-inch circle, even thickness |
| 8 | Fill, top, seal | ~5 min | Crimped edges, steam vents |
| 9 | Bake | 35-40 min | Deep golden, bubbling filling |
Serving & Presentation
In my NYC apartment, a chicken pot pie is often the centerpiece of a cozy Sunday dinner. I like to serve it straight from the oven, placed on a trivet at the table. The aroma is irresistible—buttery pastry mingling with herbs. Let it rest for 10 minutes before slicing (I know it’s hard to wait). Use a sharp, thin-bladed knife to cut clean wedges, and serve with a large spoon to catch every drop of the creamy filling.
I usually pair it with a simple side salad tossed with a bright vinaigrette—the acidity cuts through the richness. Sometimes I add a dollop of cranberry sauce for a sweet-tart contrast, a habit I picked up from my mother’s holiday table in Morocco. For a full American comfort meal, serve alongside roasted green beans or mashed potatoes (though the pot pie is plenty filling). A glass of crisp Chardonnay or a cold IPA works beautifully.
| Pairing Type | Suggestions | Why It Works |
|---|---|---|
| Side Dish | Simple green salad with lemon vinaigrette, steamed broccoli, or roasted asparagus | Adds freshness and acidity to balance richness |
| Sauce / Dip | Cranberry sauce, whole-grain mustard, or a drizzle of truffle oil | Enhances savory notes; cranberry adds sweetness |
| Beverage | Chardonnay, Sauvignon Blanc, or a pale ale | White wine cuts fat; beer complements pie crust |
| Garnish | Fresh thyme sprigs, flaky sea salt, or chopped parsley | Visual appeal and a fresh herby note |
Make-Ahead, Storage & Reheating
My busy NYC schedule means I often prepare this pot pie in stages. You can make the filling and the dough a day ahead and assemble just before baking. Or bake the whole pie, cool it, and reheat later. Here’s how to handle leftovers and planning.
| Method | Container | Duration | Reheating Tip |
|---|---|---|---|
| Refrigerator | Covered with foil or plastic wrap | Up to 3 days | Reheat in 350°F oven (uncovered) for 15-20 min, or microwave individual portions for 2 min |
| Freezer | Wrap entire pie (cooled) in plastic wrap + foil, or freeze unbaked assembled pie | Up to 3 months | Thaw overnight in fridge. Bake frozen (unthawed) at 375°F for 50-60 min, covering edges if needed |
| Make-Ahead | Filling in one container, dough disks wrapped separately | Filling 2 days ahead; dough 2 days ahead | Assemble and bake as directed, adding 5-10 min if filling is cold |
Pro tip for leftover pot pie: The crust might lose some crispness. To revive it, place leftovers on a baking sheet in a 350°F oven for 10-15 minutes, uncovered. The direct heat re-crisps the pastry while warming the filling. Avoid the microwave if you want a flaky crust.
Variations & Easy Swaps
This classic chicken pot pie is endlessly adaptable. I’ve made versions inspired by my travels and what’s seasonal at the market. Below are three of my favorite twists.
| Variation | Key Change | Best For | Difficulty Impact |
|---|---|---|---|
| Moroccan-Spiced | Add 1 tsp cumin, 1/2 tsp cinnamon, 1/4 tsp ginger to filling; substitute peas with raisins and chickpeas | Adventurous palates, holiday leftovers | Easy (no extra steps) |
| Dairy-Free / Gluten-Free | Use GF all-purpose flour for crust and roux, oat milk for milk, vegan butter | Allergies, vegan guests | Medium (crust more delicate) |
| Spring Vegetable | Replace half the chicken with asparagus tips, mushrooms, and leeks; use fresh tarragon instead of rosemary | Seasonal cooking, lighter meal | Easy (same technique) |
Moroccan-Spiced Pot Pie
Growing up in Morocco, we often used warm spices like cumin and cinnamon in savory dishes. For this twist, I add 1 teaspoon cumin, 1/2 teaspoon cinnamon, and 1/4 teaspoon ginger to the filling along with the chicken. I swap the peas for a handful of golden raisins and add a can of drained chickpeas for extra heartiness. The result is a fragrant, slightly sweet pot pie that pairs beautifully with a side of harissa yogurt. It’s become a favorite in my NYC home.
Dairy-Free / Gluten-Free Pot Pie
For guests with dietary restrictions, I’ve tested this using a high-quality gluten-free all-purpose flour blend (containing xanthan gum) for both the crust and the roux. Use vegan butter (I like Miyoko’s) and unsweetened oat milk for the sauce. The crust will be more delicate and less flaky than the classic, but still delicious. The filling thickens well, though you may need an extra minute of simmering. Everyone deserves a comforting pot pie.
Spring Vegetable Pot Pie
When the Union Square Greenmarket is bursting with asparagus and leeks, I lighten up the filling. I keep only 1 cup of chicken and add 1 cup trimmed asparagus pieces, 1 cup sliced mushrooms, and 1 leek (white and light green parts) cooked with the onions. I swap rosemary for fresh tarragon—its anise-like flavor brightens the whole dish. This version is perfect for Easter or a spring dinner party.
Can I use rotisserie chicken for a classic chicken pot pie?
Absolutely! In fact, I do it all the time. Rotisserie chicken is a fantastic shortcut that adds flavor (the skin is usually seasoned) and saves time. Simply remove the skin and bones, then shred or chop the meat. You need about 3 cups (roughly 1 pound), which is about half a large rotisserie chicken. Leftover roasted turkey or even canned chicken (drained) can also work, but rotisserie gives the best texture and taste.
How do you keep the bottom crust of a chicken pot pie from getting soggy?
This is the number one question I get. The key is to prevent the filling from soaking into the raw bottom crust before it has a chance to bake. First, make sure your filling is cooled to lukewarm before adding it to the bottom crust—a hot filling will melt the butter and create steam. Second, blind bake the bottom crust for 10 minutes at 400°F if you want extra insurance (just prick it with a fork and line with parchment and pie weights). Finally, place your pot pie on the lowest oven rack to ensure the bottom gets direct heat. These three steps will give you a crisp, not soggy, bottom crust.
What can I substitute for heavy cream in chicken pot pie?
You don’t need heavy cream at all! My recipe uses whole milk, which creates a beautifully creamy sauce without the extra fat. If you want an even richer sauce, you can use half-and-half or a combination of milk and a tablespoon of melted butter. For a dairy-free option, unsweetened oat milk or full-fat coconut milk (the canned kind, not the carton) works—coconut milk will add a faint sweetness that pairs nicely with the herbs. Just be sure to simmer the sauce a little longer to thicken it, since non-dairy milks have less natural thickening power.
Do you need to pre-cook the vegetables for chicken pot pie?
Yes, you should pre-cook the aromatics (onion, celery, carrots) before adding the flour and liquid. This softens them and releases their natural sweetness, which builds the flavor base. The frozen peas and corn are added later and thawed, so they don’t need pre-cooking—they just heat through in the hot sauce. If you’re using fresh green beans or asparagus, blanch them first for 2-3 minutes in boiling water, then shock in ice water. Pre-cooking ensures all vegetables are tender in the final bake without making the sauce watery.
Can I make chicken pot pie ahead of time and bake later?
Absolutely! This is a great make-ahead dish. You can assemble the entire pot pie (unbaked), cover it tightly with plastic wrap and foil, and refrigerate for up to 24 hours before baking. To bake from the fridge, add 5-10 minutes to the baking time, and check that the filling is bubbling in the center. You can also freeze the unbaked pot pie for up to 3 months—bake directly from frozen, adding 15-20 minutes and covering the edges if they brown too quickly. Let me caution you: if you bake from frozen, do not thaw first; that can make the crust soggy.
Why is my chicken pot pie filling runny?
A runny filling usually means the roux wasn’t cooked long enough or the sauce didn’t reduce properly. Make sure you cook the flour-butter mixture for a full minute—this step eliminates the raw flour taste and helps the sauce thicken. Also, whisk continuously when adding the liquid and let it simmer until it visibly thickens, about 5 minutes. If you add too much liquid or the flour measurement is off, it will be thin. Another culprit: overfilling the pie with too much sauce (the filling should be thick enough to mound on a spoon). If your pot pie is already baked and runny, let it rest longer—the starch will continue to set as it cools.
What is the best pie crust for chicken pot pie?
I’m partial to an all-butter crust for the best flavor and flakiness. This recipe uses a classic pâte brisée—simple flour, salt, butter, and ice water. The key is keeping everything cold. You can also use a store-bought double crust if you’re short on time; look for rolled refrigerated crusts (like Pillsbury) or a frozen deep-dish pie shell. If you use store-bought, you’ll still get a decent result, but the homemade version really elevates the dish. I also love adding a pinch of fresh thyme or black pepper to the dough for extra flavor.
How do I reheat leftover chicken pot pie so the crust stays crispy?
The best way to keep the crust crispy is to reheat in the oven, not the microwave. Preheat your oven to 350°F, place the leftover pot pie (or a slice) on a baking sheet, and heat for 10-15 minutes uncovered. This allows the heat to crisp the pastry while warming the filling through. If you’re in a hurry, you can microwave individual servings for about 2 minutes, but the crust will become soft. For larger quantity, I recommend covering with foil halfway through to prevent burning the edges while the center heats up.
Share Your Version!
Cooking is about connection, and I’d love to hear how your classic chicken pot pie turns out. Did you try any of the variations? Did you master the flaky crust on your first try? Tag me in your photos on Pinterest @exorecipes or Instagram @chefrecipes2—I always smile when I see your creations. Drop a comment below with a star rating if you loved this recipe. And if you have any questions about a step or substitution, just ask. I read every comment and reply from my little kitchen in New York.
To help me improve, tell me: What’s your favorite part of a pot pie—the filling, the top crust, or the crispy edge? Or was there a tip in this post that made the biggest difference for you? I’m always looking for feedback to make these recipes more helpful.
From my NYC kitchen to yours — I hope this recipe brings as much warmth to your table as it does to mine. — mia 🧡
Love This Recipe? Save It to Pinterest!
If you enjoyed this Classic Chicken Pot Pie recipe, don’t let it get lost in your browser tabs! 😄 Pin it now so you can find it again anytime — and explore hundreds more tried-and-tested recipes waiting for you on my Pinterest boards.
👉 Follow mia on Pinterest @exorecipe
📌 Pin this recipe · 🔁 Re-pin your favorites · 💬 Tag me when you make it — I love seeing your creations!

Classic Chicken Pot Pie Recipe
- Prep Time: 30 minutes
- Cook Time: 50 minutes
- Total Time: 1 hour 20 minutes
- Yield: 6 servings 1x
- Method: Main Course
- Cuisine: American
Description
A comforting and hearty classic chicken pot pie with a flaky, buttery crust and creamy filling packed with tender chicken and vegetables.
Ingredients
- For the Filling:
- 1/3 cup (75g) unsalted butter
- 1 cup (120g) finely diced yellow onion (about 1 medium)
- 3/4 cup (90g) finely chopped celery (about 2 stalks)
- 3/4 cup (90g) finely chopped carrots (about 2 medium)
- 1/2 cup (60g) all-purpose flour
- 3 cups (720ml) chicken broth, low sodium
- 1 cup (240ml) whole milk
- 1/2 teaspoon salt, plus more to taste
- 1/4 teaspoon black pepper, plus more to taste
- 1/4 teaspoon dried thyme
- 1/4 teaspoon dried rosemary
- 1/8 teaspoon garlic powder
- 3 cups (about 1 pound) cooked, shredded chicken (from rotisserie or leftover)
- 1 cup (150g) frozen peas (thawed)
- 1/2 cup (75g) frozen corn (thawed)
- For the Crust:
- 2 1/2 cups (300g) all-purpose flour, plus more for rolling
- 1 teaspoon salt
- 1 cup (225g) cold unsalted butter, cut into small cubes
- 1/2 cup (120ml) ice water (more if needed)
- 1 large egg, beaten, for egg wash
Instructions
- Make the filling: In a large pot or Dutch oven over medium heat, melt the butter. Add onion, celery, and carrots; cook until softened, about 5-7 minutes.
- Sprinkle the flour over the vegetables and stir to coat. Cook for 1 minute, stirring constantly.
- Slowly pour in the chicken broth and milk, whisking constantly to avoid lumps. Continue whisking until the mixture thickens, about 5 minutes.
- Season with salt, pepper, dried thyme, dried rosemary, and garlic powder. Stir in the shredded chicken, peas, and corn. Simmer for 2-3 minutes, then remove from heat. Set aside to cool slightly.
- Preheat your oven to 400°F (200°C).
- Make the crust: In a large bowl, whisk together flour and salt. Add cold butter cubes and cut in with a pastry cutter or two knives until mixture resembles coarse meal with pea-sized butter pieces.
- Drizzle ice water over the mixture and stir with a fork until dough just comes together. Turn out onto a floured surface and gather into a ball. Divide in half, flatten each into a disk, wrap in plastic wrap, and refrigerate at least 30 minutes.
- On a floured surface, roll out one dough disk to a 12-inch circle (or large enough to fit a 9-inch pie dish). Line the dish with the dough, pressing it gently into the bottom and sides, leaving overhang.
- Pour the chicken filling into the crust, spreading evenly.
- Roll out the second dough disk to a 12-inch circle. Place it over the filling. Press the edges together to seal, then crimp decoratively. Cut several slits in the top crust to allow steam to escape.
- Brush the top crust with beaten egg wash.
- Place the pot pie on a baking sheet (to catch drips) and bake for 35-40 minutes, until the crust is deep golden brown and the filling is bubbling. Let cool for 10 minutes before serving.
- Leftovers: Store in the refrigerator for up to 3 days. Rewarm in a 350°F oven or microwave.
Notes
For a shortcut, use a store-bought double crust or refrigerated pie crusts. You can substitute leftover turkey for chicken, and add any vegetables like green beans or potatoes.
Nutrition
- Calories: 520
- Sugar: 6g
- Fat: 32g
- Carbohydrates: 38g
- Protein: 22g

Tried This Recipe? Leave a Comment!
Did you make this recipe? I’d love to hear how it turned out! Please leave a comment and a rating below. Your feedback helps other home cooks and supports cheerychop.com!
For more delicious inspiration, follow me on Pinterest!
