Table of Contents
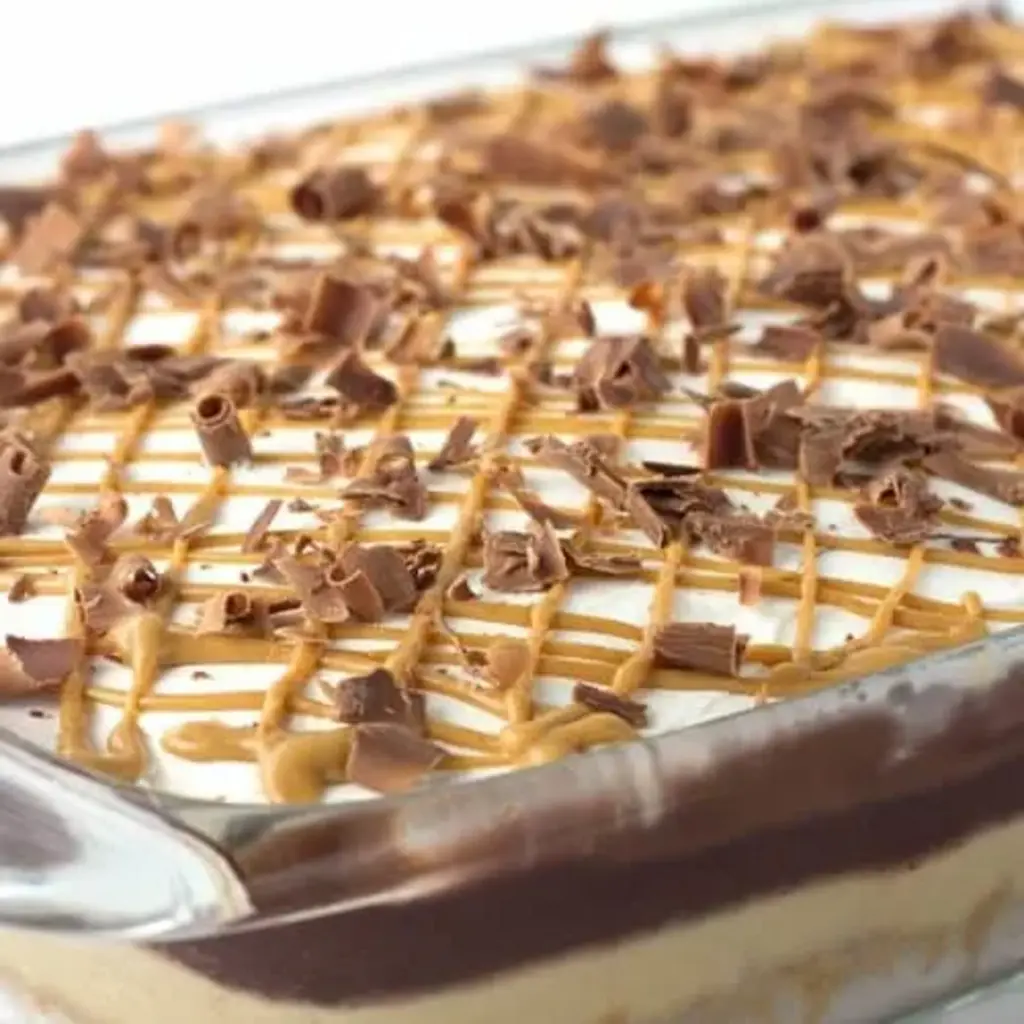
Chocolate Peanut Butter Layer Dessert: No-Bake Layered Perfection
As a chef who has spent years perfecting techniques in bustling NYC kitchens and cherishing memories of my mother’s fragrant tagines in our Moroccan home, I’m always looking for ways to bring comfort and elegance to the table. This layered chocolate peanut butter dessert recipe is a prime example of that blend – it’s incredibly decadent, surprisingly easy to make, and appeals to that universal craving for the perfect sweet and salty combination. It’s a true showstopper, perfect for any gathering, and a testament to how simple ingredients can create something truly magical. The crunchy pretzel crust alone is worth writing home about, providing a delightful salty counterpoint to the rich, creamy layers above. My goal was to create a no-bake chocolate peanut butter dessert that felt gourmet but was accessible to everyone, and I’ve achieved just that with this recipe.
Imagine tucking into a slice: the initial bite offers a satisfying crunch from the salted pretzel base, followed by a luxuriously smooth, cool, and tangy cream cheese and peanut butter filling. Then comes the intensely flavored, velvety chocolate pudding layer, a classic pairing that never disappoints. To crown it all, a generous drizzle of warm, gooey hot fudge sauce melts into a fluffy cloud of whipped topping, all finished with delicate ribbons of melted peanut butter. It’s a symphony of textures and flavors – creamy, crunchy, smooth, rich, sweet, and salty – a true delight for the senses that I’ve refined from my French pastry training and my New York City culinary adventures.
What sets this specific chocolate peanut butter dessert apart from others you might find is the deliberate balance of sweetness and saltiness, achieved through the unique pretzel crust and a few secret touches in the filling. I’ve also made sure that each layer is distinct and holds its structure beautifully, preventing the common pitfall of a soggy bottom or a muddled flavor profile. Through trial and error in my kitchen, I’ve fine-tuned the ratios for optimal texture and taste, and I’m excited to share a pro tip on achieving that perfect creamy consistency that will elevate your dessert game. You’ll also learn a common mistake to avoid that can significantly impact the final result, ensuring your dessert is a triumph every single time.
Why This Chocolate Peanut Butter Layer Dessert Recipe Is the Best
The true magic of this layered chocolate peanut butter dessert lies in its sophisticated yet simple flavor profile, a signature of my culinary approach that blends my Moroccan heritage with my French training. Instead of a standard graham cracker crust, I opted for a salted pretzel base. This not only provides a fantastic salty crunch but also acts as a sturdy foundation that can hold up to the rich layers. The subtle tang from the cream cheese, combined with the deep, nutty flavor of peanut butter, creates a complex base that complements the sweetness without being overwhelming. It’s this thoughtful layering of flavors, a technique I learned while mastering sauces in Paris, that makes this dessert so addictive.
From a textural standpoint, this recipe is a dream. I’ve spent countless hours in pastry kitchens ensuring every element has its perfect mouthfeel. The no-bake cream cheese filling is whipped to an airy lightness, then gently folded with heavy cream to maintain its fluffy integrity, preventing it from becoming dense or heavy. The chocolate pudding layer is made with instant pudding, which sets up quickly and provides a smooth, dense contrast to the cream cheese. Even the hot fudge topping is warmed just enough to be drizzled, creating beautiful ribbons without melting the layers beneath. This attention to detail in texture is what separates a good dessert from an unforgettable one.
This recipe is designed to be remarkably foolproof, even for novice bakers. The no-bake aspect of the cream cheese filling and the instant pudding means you don’t need to worry about oven temperatures or cake rises. The crust is baked for just 10 minutes, mainly to set it, and then cooled. Preparing each layer is straightforward, relying on simple mixing and spreading techniques. Even the drizzling of the hot fudge and peanut butter is more about visual appeal than precise execution. I’ve tested this recipe countless times in my busy NYC apartment kitchen, and it consistently comes out beautifully, making it the perfect easy peanut butter chocolate dessert for any occasion when you want maximum impact with minimal stress.
Chocolate Peanut Butter Dessert Recipe Ingredients
When I’m developing recipes, especially for a beloved classic like this chocolate peanut butter dessert, I always think about sourcing the best ingredients. For the pretzels, I usually head to a local deli here in New York for their freshly baked options, but any good quality salted pretzels will do. The peanut butter is key – I prefer a good creamy peanut butter like Jif or Skippy for its consistent smoothness and classic flavor profile, which is crucial for that cheesecake layer. For the chocolate pudding, I always opt for the family-size box of instant pudding; it ensures a rich, deep chocolate flavor without any cooking required. And of course, a high-quality hot fudge topping is non-negotiable. I love exploring the specialty food aisles at places like Eataly for inspiration on toppings, but a good jar from your local supermarket works perfectly well.
Ingredients List
- 2 1/2 cups pretzels (crushed)
- 1/4 cup granulated sugar
- 3/4 cup butter (melted)
- 8 ounces cream cheese (room temperature)
- 1 cup creamy peanut butter
- 1 tablespoon butter (room temperature)
- 1 cup granulated sugar
- 1 teaspoon vanilla extract
- 1 cup heavy cream (whipped to stiff peaks)
- 5.85 ounce box instant chocolate pudding (family size)
- 2 cups whole milk
- 11.75 ounce jar hot fudge topping
- 8 ounces whipped topping (thawed)
- 1 1/2 tablespoons creamy peanut butter
Ingredient Spotlight
Pretzels: The crushed pretzels form the base of our dessert, offering a delightful salty contrast to the sweet layers. For the best flavor and texture, I recommend using classic salted pretzel sticks or twists; they crush easily into a coarse meal that bakes into a wonderfully crisp crust. If you can find them, small pretzel rods also work beautifully. Avoid sourdough or very thin pretzel crisps as they might not provide the right texture when crushed.
Cream Cheese: This is the foundation of our luscious no-bake filling. Ensure your cream cheese is at room temperature. This is crucial for achieving a smooth, lump-free consistency when beaten with the peanut butter and the tablespoon of butter. Using cold cream cheese will result in a lumpy filling. If you happen to have cold cream cheese, you can gently warm it in the microwave for about 20-30 seconds on low power, stirring halfway through, until it’s pliable but not melted.
Instant Chocolate Pudding: This layer provides the rich chocolatey decadence. Using instant pudding is a fantastic time-saver for this layered dessert. Make sure you use the “instant” variety, not the “cook-and-serve” type, as it’s formulated to thicken without cooking when mixed with milk. The family-size box is perfect for achieving a substantial chocolate layer that balances the other components of the dessert.
| Original Ingredient | Best Substitution | Flavor / Texture Impact |
|---|---|---|
| Salted Pretzels | Salted crackers (like Ritz), crushed butter cookies, or even gingersnap cookies | Will alter the salt-sweet balance and texture; crackers will be more tender, cookies more sweet and crumbly. |
| Cream Cheese | Mascarpone cheese or softened ricotta cheese | Mascarpone will yield a richer, slightly sweeter filling. Ricotta will be lighter and tangier, potentially with a slightly grainier texture unless well-drained. |
| Creamy Peanut Butter | Crunchy peanut butter, almond butter, or cashew butter | Crunchy will add texture variation; other nut butters will change the core flavor profile but can be delicious. |
| Instant Chocolate Pudding | Instant vanilla or butterscotch pudding | Will change the dessert to a chocolate-vanilla or chocolate-butterscotch layered dessert, still delicious! Ensure it’s instant. |
How to Make Chocolate Peanut Butter Layer Dessert — Step-by-Step
Crafting this easy peanut butter chocolate dessert is a delightful journey, layer by delicious layer. Follow these steps carefully, and you’ll have a showstopper in no time!
Step 1: Preheat and Prepare the Crust
Preheat your oven to 350°F (175°C). In a 9×13 inch baking pan, combine the crushed pretzels, 1/4 cup granulated sugar, and the melted 3/4 cup butter. Stir everything together thoroughly to ensure all the pretzel pieces are evenly coated in the butter mixture. This step ensures that the crust will bake up beautifully crisp!
💡 mia’s Pro Tip: For perfectly crushed pretzels, place them in a large zip-top bag and use a rolling pin or the bottom of a sturdy pan to crush them. Aim for a mix of fine crumbs and small pretzel chunks for the best texture in the crust.
Step 2: Bake and Cool the Crust
Firmly press the pretzel mixture into the bottom of the 9×13 inch pan, creating an even crust. Place the pan in the preheated oven and bake for 10 minutes. This short baking time toasts the pretzels and helps the butter bind everything together. Once baked, remove the pan from the oven and let it cool completely on a wire rack before proceeding. Cooling is essential so the hot crust doesn’t melt the subsequent layers.
Step 3: Create the Cheesecake Filling
While the crust cools, begin preparing the luscious cheesecake filling. In a medium mixing bowl, add the 8 ounces of room-temperature cream cheese, 1 cup of creamy peanut butter, and the 1 tablespoon of room-temperature butter. Using an electric mixer on medium-high speed, beat these ingredients together until they are light, fluffy, and completely smooth. Make sure to scrape down the sides of the bowl as needed.
⚠️ Common Mistake to Avoid: Using cold cream cheese. It will lead to lumps in your filling, no matter how long you beat it. Always ensure your cream cheese is fully softened to room temperature for the silkiest texture.
Step 4: Add Sugar and Vanilla
To the cream cheese and peanut butter mixture, add the remaining 1 cup of granulated sugar and 1 teaspoon of vanilla extract. Continue to beat with the electric mixer until these ingredients are fully incorporated and the mixture is smooth and creamy. The sugar adds sweetness, and the vanilla extract enhances the overall flavor profile.
Step 5: Lighten the Filling
Gently add about one-quarter of the whipped heavy cream to the cream cheese mixture. Fold it in carefully using a spatula or whisk. This initial folding helps to lighten the dense cream cheese base, making it easier to incorporate the rest of the whipped cream without deflating it too much. This technique is borrowed from my French pastry training for achieving ethereal textures.
Step 6: Fold in Remaining Whipped Cream
Add the remaining whipped heavy cream to the bowl. Now, very carefully fold it into the cream cheese and peanut butter mixture. Use a gentle, sweeping motion with your spatula, cutting down through the center and then bringing the batter up and over. The goal is to combine everything while retaining as much air as possible, resulting in a light and fluffy filling.
Step 7: Spread the Cheesecake Layer
Pour or spoon the lightened cheesecake filling over the cooled pretzel crust. Spread it evenly all the way to the edges of the pan, ensuring a consistent layer. Pay close attention to the edges and corners to seal off any potential gaps or holes. This step is crucial to prevent the chocolate pudding layer from seeping down into the crust, which could make it soggy.
Step 8: Prepare the Chocolate Pudding
In a separate mixing bowl (preferably a larger one for easier mixing), add the family-size box (5.85 oz) of instant chocolate pudding mix. Pour in the 2 cups of whole milk. Using a hand mixer on medium speed, beat the mixture until it is just combined and starting to thicken. Let it sit for about 5 minutes to allow it to set up to a pudding consistency.
Step 9: Add the Pudding Layer
Once the pudding has thickened, carefully spread it evenly over the top of the peanut butter cream cheese layer. Again, ensure you get the pudding all the way to the edges of the pan to create a clean, defined layer. This adds a rich, chocolatey dimension to the dessert.
Step 10: Warm and Prepare Hot Fudge
For the hot fudge drizzle, remove the lid from the 11.75 ounce jar of hot fudge topping. Microwave it for about 45 seconds, or until it’s warm and pourable. Stir it well to ensure a smooth consistency. It’s important not to overheat it, as it can become too liquidy or even scorch.
💡 mia’s Pro Tip: If your hot fudge topping is very thick, you can stir in a teaspoon of milk or a splash of heavy cream to thin it out slightly for easier drizzling without compromising flavor.
Step 11: Drizzle the Hot Fudge
Spoon the warmed hot fudge topping into a small sandwich bag or a piping bag. Snip off a very small corner of the bag to create a fine opening. Drizzle the hot fudge decoratively all over the top of the chocolate pudding layer. I like to start from one corner and go back and forth in zigzag patterns until the surface is nicely covered with luscious chocolate ribbons.
Step 12: Apply the Whipped Topping
Gently spread the thawed 8 ounces of whipped topping evenly over the hot fudge layer. Use an offset spatula or the back of a spoon to create a smooth, fluffy top layer. Make sure to spread the topping all the way to the edges of the pan, creating a clean finish and sealing in all the delicious layers below.
Step 13: Warm and Prepare Peanut Butter Drizzle
For the final touch, place the 1 1/2 tablespoons of creamy peanut butter into a small, microwave-safe bowl or a separate sandwich bag. Microwave it for about 15-20 seconds, just until it becomes runny and smooth. Squish the bag between your fingers to ensure it’s completely liquid and easy to drizzle.
Step 14: Drizzle the Peanut Butter
Snip a tiny hole in the corner of the sandwich bag containing the warmed peanut butter. Drizzle it artfully over the entire top of the dessert. I usually go in one direction all the way across, and then repeat in the opposite direction, creating a beautiful crisscross pattern that adds visual appeal and an extra peanut butter kick.
| Step | Action | Duration | Key Visual Cue |
|---|---|---|---|
| 1-2 | Prepare & Bake Crust | 10-15 mins (bake) + cooling | Lightly golden, firm crust |
| 3-6 | Make Cheesecake Filling | 10-15 mins | Light, fluffy, smooth consistency |
| 7 | Spread Cheesecake Layer | 2-3 mins | Even layer, sealed edges |
| 8-9 | Prepare & Add Pudding | 5-7 mins | Thickened pudding, evenly spread |
| 10-11 | Warm & Drizzle Hot Fudge | 2 mins | Patterned ribbons |
| 12 | Spread Whipped Topping | 2 mins | Smooth, fluffy top layer |
| 13-14 | Warm & Drizzle Peanut Butter | 1-2 mins | Crisscross drizzle |
Serving & Presentation
This layered chocolate peanut butter dessert is a feast for the eyes as much as it is for the palate. I love to serve it chilled, directly from the 9×13 inch pan, to showcase the distinct, colorful layers. A sprinkle of chopped roasted peanuts or a few mini chocolate chips on top can add a touch of elegance and extra texture. When I’m feeling a bit more inspired, perhaps after a stroll through Union Square Greenmarket, I might garnish with a few fresh raspberries for a pop of color and a hint of tartness to cut through the richness. This dessert, much like many of my Moroccan-inspired dishes, is about bold flavors and satisfying combinations.
For an even more refined presentation, cut individual servings. Use a sharp knife dipped in hot water and wiped dry before each cut to ensure clean slices. You can serve each piece on a small dessert plate. A dusting of cocoa powder or a dollop of extra whipped cream on the side also elevates the presentation. It’s these little touches that transform a home-style dessert into something truly special, reminiscent of the fine pastries I learned to create in Paris.
| Pairing Type | Suggestions | Why It Works |
|---|---|---|
| Side Dish | Not applicable for this dessert. | As this is a rich, decadent dessert, it stands on its own. |
| Sauce / Dip | Extra hot fudge sauce, caramel sauce, or raspberry coulis. | Adds another layer of flavor intensity or a bright, fruity contrast. |
| Beverage | Cold milk, black coffee, espresso, or a dessert wine like a Tawny Port. | Milk and coffee complement the chocolate and peanut butter. Port offers a rich, fruity note that pairs beautifully with chocolate. |
| Garnish | Chopped roasted peanuts, chocolate shavings, mini chocolate chips, or fresh raspberries. | Adds textural interest, visual appeal, and complementary flavors. |
Make-Ahead, Storage & Reheating
For busy New Yorkers like myself, knowing this dessert can be made ahead is a godsend. I often prepare the entire layered chocolate peanut butter dessert the day before a party or a family dinner. It needs to chill for at least a few hours to set properly, so making it a day in advance doesn’t compromise its integrity – in fact, chilling often allows the flavors to meld even more beautifully. I usually cover it tightly with plastic wrap, making sure the wrap doesn’t touch the topping.
| Method | Container | Duration | Reheating Tip |
|---|---|---|---|
| Refrigerator | Airtight container or pan with plastic wrap | 3-4 days | Serve chilled or allow to come to room temperature for 15-20 minutes before serving. |
| Freezer | Airtight, freezer-safe container or pan wrapped tightly in plastic and foil | Up to 1 month | Thaw overnight in the refrigerator. The texture of the whipped topping may change slightly. |
| Make-Ahead | Fully assembled dessert, chilled | 1 day in advance | Simply remove from the refrigerator and serve. For best results, allow to sit at room temp for 10 mins before slicing. |
If your dessert has been refrigerated for a day or two, the pretzel crust will have softened slightly. This is normal and can actually enhance the overall melt-in-your-mouth experience. However, if you prefer a crisper crust, you can briefly re-bake the individual servings in a low oven (around 250°F/120°C) for 5-7 minutes, but be very careful not to melt the whipped topping or pudding layers.
Freezing is a good option if you want to prepare this far in advance. Ensure the dessert is completely frozen before wrapping. When thawing, always do it in the refrigerator to maintain the integrity of the layers and prevent condensation. The texture is usually excellent; however, the whipped topping might become a bit softer or more watery than when freshly made.
Variations & Easy Swaps
| Variation | Key Change | Best For | Difficulty Impact |
|---|---|---|---|
| Chocolate Lover’s Dream | Add chocolate chips to crust, use chocolate pudding, drizzle with chocolate ganache instead of fudge. | Intense chocolate lovers wanting a double dose. | Same – Easy |
| Gluten-Free / Dairy-Free | Use GF pretzels/crackers, dairy-free cream cheese & milk, coconut whipped cream. | Dietary restrictions without sacrificing flavor. | Slightly more complex sourcing, but easy execution. |
| Seasonal Spiced Twist | Add cinnamon to crust. Use chai or gingerbread flavored pudding. Drizzle with caramel. | Fall and winter holidays, or for those who love warm spices. | Same – Easy |
Chocolate Lover’s Dream
If you believe you can never have too much chocolate, this variation is for you. Incorporate a handful of mini chocolate chips directly into the pretzel crust mixture before baking. For an even deeper chocolate experience, consider using chocolate pudding instead of the standard flavor, or even better, prepare a quick homemade chocolate ganache to drizzle instead of the hot fudge. This version is for the true chocoholics, amplifying the dessert’s richness and appealing directly to that intense chocolate craving we all sometimes get.
Gluten-Free & Dairy-Free Options
Creating a no bake chocolate peanut butter dessert that caters to dietary needs is close to my heart. For a gluten-free version, simply swap the pretzel crust for crushed gluten-free pretzels, graham crackers, or even a mixture of almond flour, melted butter, and a touch of sugar. To make it dairy-free, use a dairy-free cream cheese alternative (many good ones are available now!), a plant-based milk for the pudding, and ensure your whipped topping and hot fudge are dairy-free. I’ve found that coconut whipped cream works wonderfully here, adding a subtle tropical note that pairs surprisingly well with peanut butter and chocolate.
Seasonal Spiced Twist
To bring a touch of seasonal warmth to this layered dessert, consider infusing the components with spices. A pinch of cinnamon or a whisper of nutmeg blended into the pretzel crust mixture before baking adds a cozy aroma and flavor. For the pudding layer, you could experiment with chai-spiced instant pudding or even a gingerbread-flavored one, especially during the holidays. A drizzle of caramel sauce in place of or alongside the hot fudge would also complement these warm spice notes beautifully. This variation is perfect for autumn gatherings or a festive winter treat.
Can I use crunchy peanut butter instead of creamy in a chocolate peanut butter layer dessert?
Absolutely! Using crunchy peanut butter instead of creamy is a fantastic idea if you enjoy a bit more texture in your desserts. It will add little bits of peanuts throughout the cheesecake layer, creating a delightful contrast to the smooth pudding and hot fudge. Just make sure to beat it well with the cream cheese and butter to distribute it evenly. The overall flavor will remain wonderfully chocolatey and peanut buttery; you’ll just have an added textural element.
How long does chocolate peanut butter layer dessert need to chill before serving?
For this layered chocolate peanut butter dessert recipe, it’s best to chill it for at least 2-3 hours before serving. This allows all the layers to set properly, and importantly, it lets the flavors meld together beautifully. If you have the time, chilling it overnight is even better as it allows the crust to soften just enough to be tender and the creamy layers to fully stabilize. You want the dessert to be firm enough to slice cleanly.
What can I substitute for cream cheese in a chocolate peanut butter layer dessert?
If you need to substitute cream cheese in this chocolate peanut butter dessert, mascarpone cheese is an excellent option for a richer, smoother texture. Softened ricotta cheese can also work, but be sure to drain it very well to avoid a watery filling; it will result in a lighter, tangier flavor profile. For a dairy-free alternative, many dairy-free cream cheese substitutes are available and work very well, maintaining a similar creamy consistency and tangy note.
Should I use instant or cook-and-serve pudding for the chocolate layer?
For this specific no-bake layered chocolate peanut butter dessert, you absolutely must use instant chocolate pudding. Instant pudding is designed to thicken on its own when mixed with milk, requiring no cooking. Cook-and-serve pudding requires cooking on the stovetop to activate its thickening agents. Using the wrong type will result in a pudding layer that is either too runny (if you cook cook-and-serve pudding incorrectly) or won’t set up properly for this dessert structure.
Can I make the pretzel crust ahead of time?
Yes, you can certainly make the pretzel crust ahead of time for this chocolate peanut butter dessert. Bake it as instructed, then let it cool completely. Once cooled, you can wrap it tightly in plastic wrap and store it at room temperature for up to 24 hours. If you plan to make it further in advance, you can even freeze the crust. Just be aware that storing it for extended periods might slightly soften its crispness.
What is the best way to cut this layered dessert cleanly?
To cut this layered chocolate peanut butter dessert cleanly, the best method is to use a long, sharp knife. Dip the knife into hot water, then wipe it dry before making each cut. This helps the knife glide through the layers, especially the creamy filling and fudge topping, without dragging or smearing. Wiping the knife clean between cuts also prevents residue from transferring and creating messy slices. Ensure the dessert is well-chilled for best results.
Can I make the peanut butter drizzle more pronounced?
To make the peanut butter drizzle more pronounced, you can increase the amount of peanut butter used for drizzling, or use a slightly thicker consistency. You could also try drizzling it in a more concentrated pattern, perhaps creating more defined lines or swirls. For an even stronger peanut butter flavor, consider adding a tablespoon more of peanut butter to the main cheesecake filling itself, ensuring it’s thoroughly beaten in for smoothness.
Is this considered a no-bake chocolate peanut butter dessert?
Yes, this is absolutely a no-bake chocolate peanut butter dessert in terms of its primary layers. The crust does require a short bake to set it, but the majority of the dessert – the creamy peanut butter filling, chocolate pudding layer, and toppings – require no baking at all. This makes it incredibly convenient, especially during warmer months when you want to avoid heating up the kitchen, and perfect for a quick yet impressive dessert.
Share Your Version!
I truly hope you adore making and sharing this layered chocolate peanut butter dessert as much as I do. Its unique pretzel crust and balanced flavors have made it a favorite in my NYC kitchen, and I can’t wait for it to become a hit in yours, too. When you create this recipe, please consider leaving a star rating and a comment below – your feedback is invaluable to me and other home cooks! It also helps other people discover the joy of this easy peanut butter chocolate dessert.
If you snap a photo of your creation, please share it on Instagram or Pinterest (tagging me @exorecipes so I can see it!) – I absolutely love seeing how you bring my recipes to life. And to those of you who’ve tried it, what’s your favorite way to customize this layered chocolate peanut butter dessert to make it uniquely yours? I’m always curious about the creative twists my readers come up with!
From my NYC kitchen to yours — I hope this recipe brings as much warmth to your table as it does to mine. — mia 🧡
Love This Recipe? Save It to Pinterest!
If you enjoyed this Chocolate Peanut Butter Layer Dessert recipe, don’t let it get lost in your browser tabs! 😄 Pin it now so you can find it again anytime — and explore hundreds more tried-and-tested recipes waiting for you on my Pinterest boards.
👉 Follow mia on Pinterest @chefrecipes2
📌 Pin this recipe · 🔁 Re-pin your favorites · 💬 Tag me when you make it — I love seeing your creations!
Chocolate Peanut Butter Layer Dessert
Description
Love peanut butter desserts? This rich chocolate peanut butter layer dessert recipe will do the trick. The sweet and salty pretzel crust is amazing!
Ingredients
- 2 1/2 cups pretzels (crushed)
- 1/4 cup granulated sugar
- 3/4 cup butter (melted)
- 8 ounces cream cheese (room temperature)
- 1 cup creamy peanut butter
- 1 tablespoon butter (room temperature)
- 1 cup granulated sugar
- 1 teaspoon vanilla extract
- 1 cup heavy cream (whipped to stiff peaks)
- 5.85 ounce box instant chocolate pudding (family size)
- 2 cups whole milk
- 11.75 ounce jar hot fudge topping
- 8 ounces whipped topping (thawed)
- 1 1/2 tablespoons creamy peanut butter
Instructions
- Preheat oven to 350 degrees F.
- In a 9×13 pan, add in the crushed 2 1/2 cups pretzels, 1/4 cup granulated sugar, and melted 3/4 cup butter. Stir to coat all the pretzels in the melted butter.
- Firmly press the crushed pretzels into the pan.
- Place into the oven and bake for 10 minutes. Remove from the oven and let cool. Begin working on the cheesecake filling.
- In a medium bowl, add in the 8 ounces cream cheese, 1 cup creamy peanut butter, and 1 tablespoon butter Beat on medium/high until light and fluffy.
- Add in the 1 cup granulated sugar and 1 teaspoon vanilla extract Beat until incorporated.
- Add in a quarter of the whipped cream and fold it into the cream cheese mixture. This will lighten up the mixture before adding the remaining whipped cream and deflating it all.
- Add in the remaining whipped cream and carefully fold it in.
- Spread the filling into the cooled crust. Be sure to get to all of the edges of the crust. Seal off any holes on the edges to prevent the pudding from seeping through and making our pretzel crust soggy.
- In a mixing bowl, add in the 5.85 ounce box instant chocolate pudding mix and 2 cups whole milk. Using a handmixer, beat on medium until incorporated. Let thicken about 5 minutes before spreading on top of the cheesecake layer.
- Spread the pudding evenly over top of the peanut butter cream cheese layer. Be sure to get to the edges.
- Remove the lid from the 11.75 ounce jar hot fudge topping and microwave for 45 seconds. Stir well.
- Scoop all of the fudge topping into a sandwich bag. Cut a small hole out of the corner of the sandwich bag.
- Drizzle the hot fudge topping all over the top of the pudding. I started from the corner and drizzled back and forth until everything was covered.
- Spread the thawed 8 ounces whipped topping all over the top of the dessert. Again, make sure to take the topping all the way over to the edges.
- Add the 1 1/2 tablespoons creamy peanut butter into a sandwich bag. Place into the microwave for about 20 seconds. Squish it around in your hand to make sure it's all runny.
- Cut a small hole in the corner of the sandwich bag. Drizzle peanut butter on top of the dessert. I drizzled one direction all the way across the dessert and then drizzled in the opposite direction all the way across.
Nutrition
- Calories: 723 kcal
- Sugar: 49 g
- Fat: 43 g
- Carbohydrates: 75 g
- Protein: 12 g

Tried This Recipe? Leave a Comment!
Did you make this recipe? I’d love to hear how it turned out! Please leave a comment and a rating below. Your feedback helps other home cooks and supports cheerychop.com!
For more delicious inspiration, follow me on Pinterest!
