Table of Contents
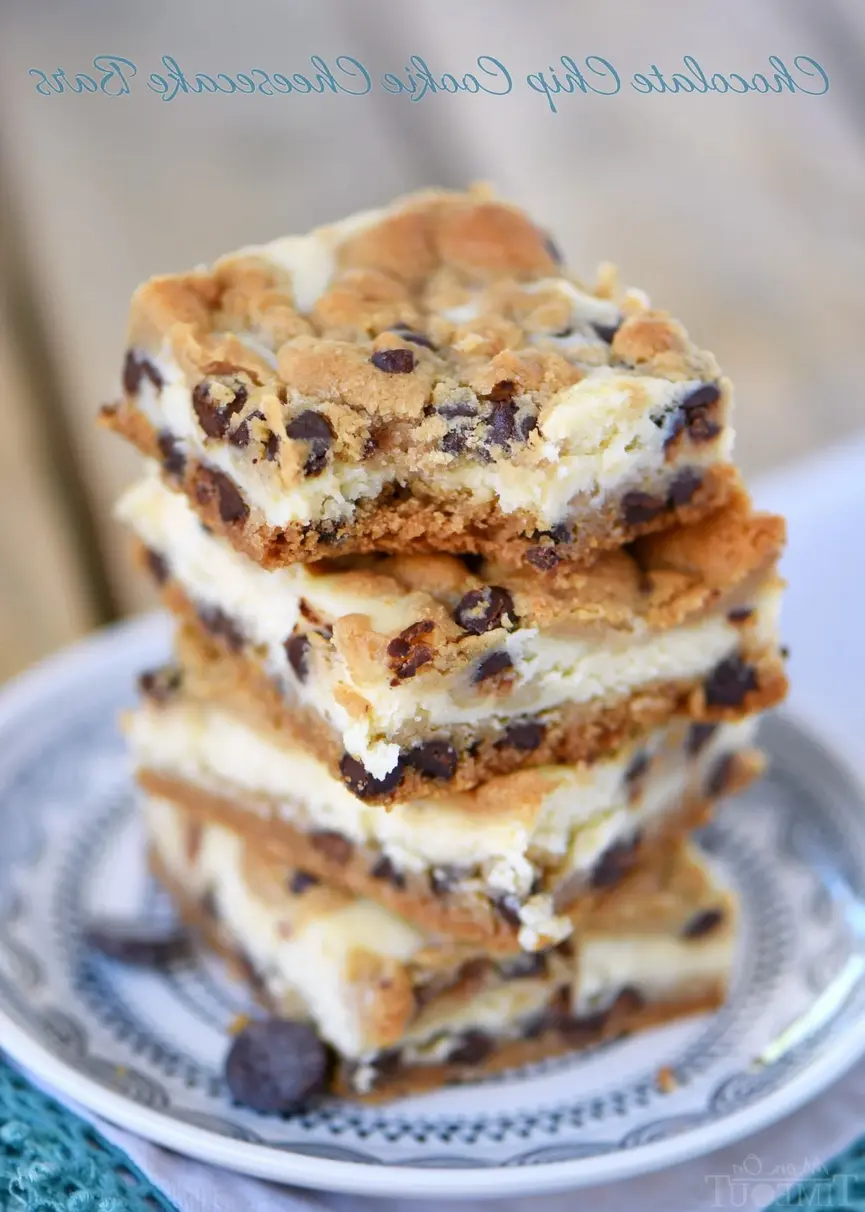
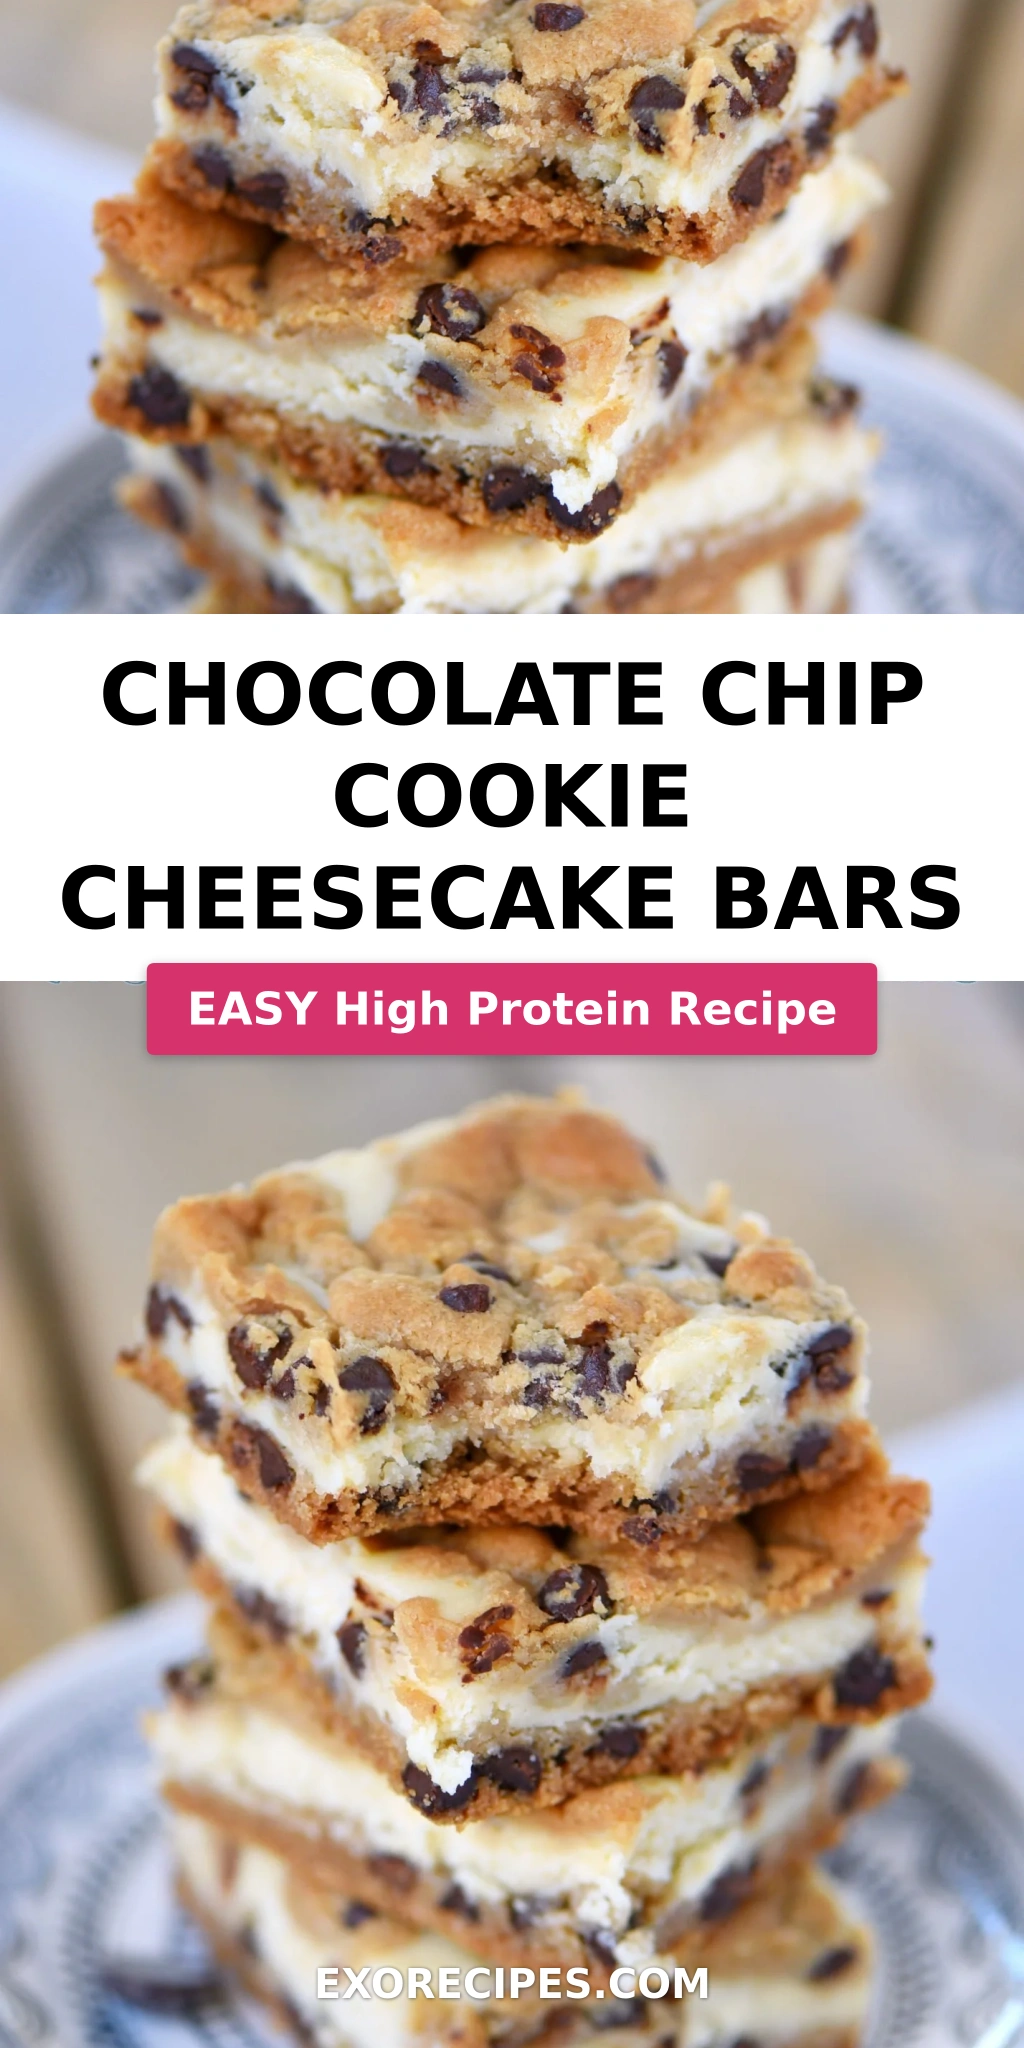
Chocolate Chip Cookie Cheesecake Bars – 5-Ingredient Easy Dessert
Growing up in Morocco, my mother always said that the best desserts are the ones that bring people together without a lot of fuss. These Chocolate Chip Cookie Cheesecake Bars are exactly that — a dreamy, no-fuss dessert that layers two beloved treats into one irresistible bar. With just five ingredients and a clever shortcut using refrigerated cookie dough, this easy cheesecake bars recipe delivers all the creamy, crunchy, chocolatey goodness you crave without spending hours in the kitchen. It’s the kind of dessert I make when I want to impress guests at my NYC dinner parties but still have time to actually enjoy the evening.
Imagine sinking your teeth into a buttery, golden cookie base that gives way to a luxuriously smooth cheesecake filling, all topped with crumbled cookie dough that bakes into crisp, caramelized bits. Each bite offers a perfect contrast — the slight tang of cream cheese mellowed by vanilla and sugar, punctuated by pockets of melted chocolate chips from the dough. It’s the same comforting contrast I fell in love with at a patisserie in Paris, where they layered shortbread with fromage blanc. I’ve reimagined that memory here using ingredients you can find at any US grocery store, making this chocolate chip cookie cheesecake recipe as accessible as it is indulgent.
What sets my version apart is the technique: par-baking the cookie base ever so slightly so it stays crisp against the creamy cheesecake layer — a trick I learned during my pastry training in Paris. I’ll also share my foolproof method for cutting clean bars every single time, plus a common mistake that can turn your cheesecake layer rubbery. Whether you’re a seasoned baker or someone who’s never made cheesecake before, these cookie cheesecake dessert bars are practically guaranteed to turn out beautifully. Trust me — your family is going to ask for this one again and again.
Why This Chocolate Chip Cookie Cheesecake Bars Recipe Is the Best
The Flavor Secret. Using refrigerated chocolate chip cookie dough as both the crust and the topping isn’t just a shortcut — it’s a flavor powerhouse. The pre-made dough is formulated with the perfect balance of brown and granulated sugar, giving the bars a deep caramelized sweetness that complements the tangy cheesecake layer beautifully. My training in French pastry taught me the importance of contrast, and here the sweet, buttery cookie base plays off the cool, creamy cheesecake filling in the most satisfying way.
Perfected Texture. The key to great cheesecake bars is a silky, lump-free filling that bakes up dense yet creamy. By beating the cream cheese alone first until it’s light and fluffy — a classic French technique — you ensure there are no lumps before adding the sugar and egg. This extra minute of mixing is the difference between a grainy filling and a velvety one. The crumbled cookie topping bakes into crunchy, golden clusters, while the base stays firm enough to hold the bar together.
Foolproof & Fast. This easy cheesecake bars recipe requires zero fancy equipment, no water bath, and no complicated steps. It’s designed for real life — busy weeknights, last-minute potlucks, and moments when you need a showstopper dessert without the stress. The ingredients are pantry-friendly and the technique is forgiving. Even if you over-bake slightly, the cookie layers provide enough moisture and structure to keep the bars delicious. I’ve tested this recipe a dozen times in my tiny NYC kitchen, and it works every single time.
Chocolate Chip Cookie Cheesecake Bars Ingredients
I love that I can grab almost everything for this chocolate chip cookie cheesecake recipe from my local bodega on the Upper West Side. The refrigerated cookie dough is the hero ingredient — it’s what keeps this recipe blessedly simple while still delivering that homemade taste I insist on. When I was training in Paris, I learned that the best desserts honor their ingredients, and here each of the five components plays a distinct role.
Ingredients List
- 1 (18 oz) roll refrigerated chocolate chip cookie dough
- 8 oz cream cheese, softened
- 1/2 cup granulated sugar
- 1 large egg, room temperature
- 1/2 tsp vanilla extract
Ingredient Spotlight
Refrigerated Chocolate Chip Cookie Dough. This is the backbone of the recipe. I recommend using a good-quality brand like Pillsbury or Nestlé Toll House. The dough should be soft and pliable — if it’s been sitting in a cold fridge, let it sit at room temperature for 10 minutes so it spreads easily. Substitution: You can use homemade chocolate chip cookie dough, but the texture and spread will vary. If using homemade, chill it for 30 minutes before pressing into the pan.
Cream Cheese. Full-fat cream cheese is non-negotiable here for the creamiest, most stable filling. I use Philadelphia brand almost exclusively. The cream cheese must be softened to room temperature — cold cream cheese will create lumps that no amount of beating can fully smooth out. Substitution: Neufchâtel cheese (⅓ less fat) works well with a slightly less rich result. Avoid fat-free cream cheese, which can make the filling watery.
Granulated Sugar. Plain white granulated sugar dissolves cleanly into the cream cheese, giving the filling sweetness without altering its delicate vanilla flavor. Substitution: You can use coconut sugar or a monk fruit blend, but the texture will be slightly grainier and the color will be darker. For a less tangy result, reduce sugar by 2 tablespoons — the filling will be slightly less firm.
Egg. One room-temperature egg provides the structure that allows the cheesecake layer to set without cracking. Using a cold egg straight from the fridge can cause the filling to seize up. Substitution: For an egg-free version, use 2 tablespoons of cornstarch mixed with 3 tablespoons of water — the texture will be denser but still delicious.
Vanilla Extract. Pure vanilla extract adds warmth and rounds out the tang of the cream cheese. I prefer Madagascar vanilla for its floral notes. Substitution: Vanilla bean paste or the seeds from half a vanilla bean work beautifully. Avoid imitation vanilla if you can — the flavor difference is noticeable in a simple recipe like this.
| Original Ingredient | Best Substitution | Flavor / Texture Impact |
|---|---|---|
| Refrigerated cookie dough | Homemade chocolate chip cookie dough | Less consistent spread; may need chilling |
| Full-fat cream cheese | Neufchâtel (⅓ less fat) | Slightly less rich, still creamy |
| Granulated sugar | Coconut sugar or monk fruit blend | Grainier texture, darker color, less sweet |
| Egg | Cornstarch + water slurry | Denser filling, still set properly |
| Vanilla extract | Vanilla bean paste | More pronounced vanilla specks, richer flavor |
How to Make Chocolate Chip Cookie Cheesecake Bars — Step-by-Step
I’ve broken this down into simple, foolproof steps so you can follow along with confidence. The whole process takes about 15 minutes of active time — the oven does the rest of the work.
Step 1: Preheat and Prep
Preheat your oven to 350°F. Line a 9-inch square baking dish with parchment paper, leaving overhang on two opposite sides — this creates handles that make lifting the bars out a breeze. If using non-stick foil, press it firmly into the corners. Set the dish aside.
💡 mia’s Pro Tip: Spray the dish lightly with cooking spray before adding parchment — it helps the paper stay in place while you press the dough down.
Step 2: Press the Cookie Base
Scoop out a little more than half of the refrigerated cookie dough and place it in the prepared dish. Using your fingertips or the back of a measuring cup, press the dough into an even layer that covers the entire bottom of the dish. Take your time here — an even base means even baking.
⚠️ Common Mistake to Avoid: Don’t press the dough too thin in the center or too thick at the edges. Aim for an even ¼-inch thickness across the whole pan. Uneven dough leads to uneven baking.
Step 3: Make the Cheesecake Filling
In a large mixing bowl, beat the softened cream cheese with a stand mixer or hand-held mixer on medium speed until it’s light, fluffy, and completely smooth — about 2 minutes. Scrape down the bowl and the beater. Add the granulated sugar and beat for another minute until fully incorporated and the mixture looks glossy.
💡 mia’s Pro Tip: Always scrape down the bowl and beater at least twice during this step. Cream cheese loves to hide in the crevices, and those hidden lumps will show up in your final bars.
Step 4: Add Egg and Vanilla
Add the room-temperature egg and vanilla extract to the cream cheese mixture. Beat on low speed just until combined — about 30 seconds. Over-mixing at this stage can incorporate too much air, which may cause the filling to puff up and crack during baking. The mixture should be smooth, pourable, and pale ivory in color.
⚠️ Common Mistake to Avoid: Never add a cold egg to your cream cheese mixture. A cold egg can cause the fat in the cream cheese to seize, creating a lumpy, curdled-looking filling. Let your egg sit on the counter for 30 minutes before using.
Step 5: Assemble and Top
Pour the cheesecake filling over the cookie dough base and spread it gently into an even layer. Crumble the remaining cookie dough into small pieces — about ½-inch chunks — and scatter them evenly over the top. Don’t press them into the filling; let them sit on top so they bake into crispy, golden clusters.
💡 mia’s Pro Tip: For the best crumble texture, pinch the dough into irregular pieces rather than rolling them into balls. Irregular edges caramelize more and create those irresistible crunchy bits.
Step 6: Bake and Cool
Bake for 30 to 35 minutes. The edges should be golden brown and the center should be set — it will still jiggle slightly when you gently shake the pan. A toothpick inserted near the center should come out mostly clean with just a few moist crumbs. Let the bars cool completely in the pan on a wire rack — this is crucial for clean slices.
⚠️ Common Mistake to Avoid: Do not cut into the bars while they are still warm! The cheesecake filling needs time to firm up as it cools. Cutting too early will result in messy, gooey slices. Wait at least 2 hours for the bars to reach room temperature, then refrigerate for 30 minutes before slicing.
| Step | Action | Duration | Key Visual Cue |
|---|---|---|---|
| 1 | Preheat & line pan | 5 mins | Oven at 350°F, parchment overhang |
| 2 | Press cookie base | 3 mins | Even ¼-inch dough layer |
| 3 | Beat cream cheese & sugar | 3 mins | Light, fluffy, glossy |
| 4 | Add egg & vanilla | 30 sec | Smooth, pale, pourable |
| 5 | Assemble & crumble top | 3 mins | Even filling, irregular dough pieces |
| 6 | Bake & cool | 30–35 mins + 2 hrs cool | Golden edges, center barely jiggles |
Serving & Presentation
These Chocolate Chip Cookie Cheesecake Bars are stunning served at room temperature or slightly chilled. I love to cut them into neat 3-inch squares using a long, sharp knife that I wipe clean between cuts — this gives you those bakery-style clean edges. For an extra touch, dust the tops lightly with powdered sugar just before serving. It adds a beautiful snow-capped look that contrasts with the golden cookie crumbles.
In my NYC apartment, I often serve these bars with a dollop of lightly sweetened whipped cream and a handful of fresh raspberries on the side. The tartness of the berries cuts through the richness of the cheesecake and cookie layers beautifully. My mother in Morocco would serve something similar with a side of mint tea — and honestly, that combination works just as well here. For a truly decadent experience, warm a bar for 10 seconds in the microwave and top with a scoop of vanilla bean ice cream.
| Pairing Type | Suggestions | Why It Works |
|---|---|---|
| Side Dish | Fresh berries, sliced strawberries, fruit compote | Bright acidity balances the rich, sweet bars |
| Sauce / Dip | Caramel sauce, chocolate ganache, berry coulis | Adds a layer of indulgence and visual appeal |
| Beverage | Hot coffee, cold milk, Moroccan mint tea, espresso | Coffee and tea cut the sweetness; milk is classic |
| Garnish | Powdered sugar, chocolate shavings, fresh mint leaves | Adds a polished, bakery-fresh finish |
Make-Ahead, Storage & Reheating
As a busy NYC food blogger and mom, I rely on make-ahead desserts that actually taste better after a day in the fridge — and these cheesecake bars are a perfect example. The filling sets more firmly and the flavors meld beautifully overnight. Here’s how I store and reheat them for the best results every time.
| Method | Container | Duration | Reheating Tip |
|---|---|---|---|
| Refrigerator | Airtight container, parchment between layers | Up to 5 days | Serve cold or microwave 10–12 sec for soft texture |
| Freezer | Freezer-safe wrap + foil or freezer bag | Up to 3 months | Thaw overnight in fridge; warm 15 sec in microwave |
| Make-Ahead | Bake, cool, cover tightly in pan | 2 days in advance | Add powdered sugar just before serving |
For the very best texture, I recommend making these bars a day ahead and refrigerating them overnight. The cookie layers soften slightly from the cheesecake’s moisture, creating a more cohesive, sliceable bar that tastes like it came from a fancy bakery. If you prefer a firmer cookie base, serve them the same day after cooling completely. And if you’re freezing a batch for later, wrap each bar individually in plastic wrap, then foil — they thaw beautifully and taste nearly as good as fresh.
Variations & Easy Swaps
One of the things I love most about this easy cheesecake bars recipe is how easily it adapts to different tastes and dietary needs. Whether you’re craving a seasonal twist or need a gluten-free option, these variations deliver.
| Variation | Key Change | Best For | Difficulty Impact |
|---|---|---|---|
| Peanut Butter Swirl | Swirl ¼ cup peanut butter into filling | Peanut butter & chocolate lovers | Same — just swirl gently |
| Gluten-Free | Use gluten-free refrigerated cookie dough | Gluten-sensitive guests | Same — check dough consistency |
| S’mores Style | Add ½ cup mini marshmallows + 2 tbsp graham cracker crumbs on top | Campfire cravings at home | Same — sprinkle on before baking |
Peanut Butter Swirl
This variation is a nod to the classic peanut butter and chocolate pairing that I grew up loving in American cafés after moving to NYC. Warm ¼ cup of smooth peanut butter for 15 seconds in the microwave, then drop tablespoons of it onto the cheesecake filling before adding the cookie crumble top. Use a knife to swirl it gently — just three or four figure-eight motions is enough. The peanut butter bakes into rich, salty pockets that complement the sweet cookie base beautifully.
Gluten-Free Version
For a gluten-free chocolate chip cookie cheesecake, simply swap the refrigerated cookie dough for a gluten-free variety. I’ve tested this with Sweet Loren’s and Pillsbury gluten-free doughs, and both work wonderfully. The gluten-free dough tends to be stickier and a bit more crumbly, so wet your fingers slightly when pressing it into the pan. The cheesecake filling is naturally gluten-free, so no changes needed there. The texture is slightly more delicate, but the flavor is just as satisfying.
S’mores Style
This variation was born from a late-summer farmers market trip in NYC when I couldn’t resist a bag of artisan marshmallows. Sprinkle ½ cup of mini marshmallows and 2 tablespoons of graham cracker crumbs over the top of the assembled bars just before baking. The marshmallows puff up and turn golden, while the graham crackers add a toasty, honeyed crunch. If you want an even campfire effect, broil the bars for 60 seconds at the very end — watch them like a hawk so they don’t burn.
How do you prevent the cookie layer from getting soggy under the cheesecake filling?
The key to preventing a soggy cookie layer is to press the cookie dough firmly and evenly into the pan so it forms a solid, compact base. I also recommend using the full amount of dough for the base — a little more than half of the 18-ounce roll — and pressing it well into the corners. The dense dough acts as a barrier that resists moisture absorption from the cheesecake filling. Additionally, letting the bars cool completely in the pan before refrigerating allows the cookie layer to set fully. If you want extra insurance, you can par-bake the cookie base for 8 minutes before adding the filling, but I’ve found it’s not necessary with this recipe.
Can I use a boxed cookie mix instead of making the cookie dough from scratch?
Absolutely — in fact, that’s exactly what this recipe calls for! A standard 18-ounce roll of refrigerated chocolate chip cookie dough is the shortcut that makes these bars so quick and easy. If you prefer to use a boxed dry cookie mix like Betty Crocker or Pillsbury, prepare the dough according to the package directions for drop cookies, then refrigerate it for 20 minutes so it firms up enough to press into the pan. You’ll need about one full batch of prepared dough. Keep in mind that boxed mix dough is often softer than refrigerated roll dough, so the base layer may spread slightly more during baking — just be sure to press it evenly and not too thin.
How long should I let the cheesecake bars cool before cutting them into squares?
Patience is the most important ingredient here! Let the bars cool completely in the pan on a wire rack — this takes about 2 hours at room temperature. The center will still be slightly warm but the filling should be fully set. After that, I recommend refrigerating the bars for at least 30 minutes before slicing. Chilling firms up the cheesecake layer so you get clean, sharp edges instead of messy, gooey cuts. For the absolute cleanest slices, use a long, sharp knife and wipe it clean with a damp paper towel between each cut. This cooling and chilling process is the trick I learned in pastry school for bakery-worthy bars every time.
Can I substitute cream cheese for any other ingredient to make these bars less tangy?
If you want a milder, less tangy flavor, you have several good options. The simplest swap is to use 4 ounces of cream cheese and 4 ounces of mascarpone — mascarpone is much sweeter and less tangy, with a silky, buttery texture. Another option is to use “brick-style” plain Neufchâtel cheese, which has about a third less fat and a slightly milder tang than full-fat cream cheese. You can also add 2 tablespoons of sour cream or Greek yogurt to the filling along with an extra tablespoon of sugar; the dairy softens the tang while the sugar balances it. Avoid using fat-free cream cheese — it has a noticeable artificial tang and a watery texture that won’t set properly.
Can I make these cheesecake bars in a different size pan?
Yes, you can adapt this recipe for other pan sizes, but you’ll need to adjust the baking time. For an 8×8-inch square pan, the bars will be slightly thicker — bake for 35 to 40 minutes and check for doneness by gently shaking the pan; the center should jiggle just slightly. For a 9×13-inch rectangular pan, the bars will be thinner and bake more quickly — start checking at 22 minutes. I do not recommend using a round pan because the corners of a square pan help the cookie base hold its shape. Whatever pan you choose, always line it with parchment paper with overhang for easy removal.
Why did my cheesecake filling crack on top?
Cracks in the cheesecake layer are usually caused by over-mixing the filling after adding the egg, or by over-baking. When you beat the egg into the cream cheese mixture too vigorously or for too long, you incorporate excess air that expands in the oven and then deflates, causing cracks. To avoid this, mix on low speed and stop as soon as the egg and vanilla are fully incorporated — about 30 seconds. Over-baking is the other culprit; the bars are done when the edges are golden and the center still has a slight wobble. A toothpick inserted near the center should come out with a few moist crumbs, not completely clean. Letting the bars cool gradually in the pan also helps prevent cracking.
Can I add chocolate chips or other mix-ins to the cheesecake layer?
Definitely! This recipe welcomes creativity. Fold in ¼ cup of mini chocolate chips, white chocolate chips, or butterscotch chips into the cheesecake filling just before pouring it into the pan. If you want to add larger mix-ins like chopped nuts or toffee bits, stick to 2 to 3 tablespoons so you don’t overwhelm the filling. For a citrusy contrast, add 1 teaspoon of finely grated orange or lemon zest to the cream cheese mixture — it’s a lovely pairing with the chocolate cookie base. Just remember that any add-ins should be folded in gently on low speed to avoid deflating the filling.
How do I know when the bars are fully baked?
There are three reliable tests. First, the edges of the bars will be golden brown and may start pulling away slightly from the sides of the pan. Second, gently shake the pan — the center should jiggle softly like firm Jell-O, not ripple like liquid. Third, insert a toothpick or thin knife about 1 inch from the center; it should come out with a few moist crumbs attached, not wet batter. The internal temperature of the cheesecake layer should be around 150°F to 155°F if you want to use an instant-read thermometer. Remember that the bars will continue to set as they cool, so it’s better to under-bake slightly than to over-bake until the center is completely firm.
Can I use homemade chocolate chip cookie dough instead of refrigerated?
Absolutely, and I often do! If using homemade dough, prepare your favorite chocolate chip cookie recipe but omit the leavening agents (baking soda and baking powder) so the base stays dense and doesn’t puff up too much. You’ll need about 2 cups of prepared homemade dough. Chill the dough for 30 minutes before pressing it into the pan — homemade dough is softer than refrigerated roll dough and can be tricky to spread when warm. The baking time may need an extra 2 to 3 minutes since homemade dough has a different moisture content. The flavor is wonderful and worth the extra effort if you have the time.
What’s the best way to store leftover cheesecake bars?
Store leftover bars in an airtight container in the refrigerator for up to 5 days. Place a sheet of parchment paper between layers if you’re stacking them to prevent sticking. The bars actually taste even better on the second day as the flavors meld and the texture becomes more cohesive. For longer storage, wrap each bar individually in plastic wrap, then place them in a freezer-safe bag or container. They freeze beautifully for up to 3 months. To thaw, transfer them to the refrigerator overnight. If you want to enjoy them warm, microwave a single bar for 10 to 12 seconds — this softens the cookie layers while keeping the cheesecake cool and creamy in the center.
Share Your Version!
I absolutely love seeing how these Chocolate Chip Cookie Cheesecake Bars turn out in your kitchen! Did you try the peanut butter swirl variation? Did your kids help crumble the cookie dough on top? Drop a comment below and let me know how it went — your feedback helps other home bakers feel confident trying the recipe too. And if you’re on Instagram or Pinterest, snap a photo of your beautiful bars and tag me @exorecipes. I personally look at every single tag and it genuinely makes my day.
One question I’d love for you to answer: What’s your favorite way to make this recipe your own — do you add extra chocolate chips, a swirl of something special, or a unique topping? Your ideas might just inspire the next variation I develop in my NYC kitchen!
From my NYC kitchen to yours — I hope this recipe brings as much warmth to your table as it does to mine. — mia 🧡
Love This Recipe? Save It to Pinterest!
If you enjoyed this Chocolate Chip Cookie Cheesecake Bars recipe, don’t let it get lost in your browser tabs! 😄 Pin it now so you can find it again anytime — and explore hundreds more tried-and-tested recipes waiting for you on my Pinterest boards.
👉 Follow mia on Pinterest @exorecipe
📌 Pin this recipe · 🔁 Re-pin your favorites · 💬 Tag me when you make it — I love seeing your creations!
⭐ Did you make this recipe? I’d love to hear how it turned out! Leave a star rating and comment below — your feedback helps me create better recipes for you and helps other readers too. Happy baking! 🍪🧡
Chocolate Chip Cookie Cheesecake Bars
Description
These easy Chocolate Chip Cookie Cheesecake Bars are made with just five ingredients! This easy dessert recipe will satisfy all your cravings!
Ingredients
- 1 18 oz roll refrigerated chocolate chip cookie dough
- 8 oz cream cheese (softened)
- 1/2 cup granulated sugar
- 1 egg (room temperature)
- 1/2 tsp vanilla extract
Instructions
- Preheat oven to 350 F.
- Line a 9-inch square baking dish with parchment paper or non-stick foil. Set aside.
- Spread a little more than half of the cookie dough onto the bottom of the baking dish and press down firmly creating an even layer.
- Using a stand mixer or hand held mixer, beat the cream cheese until light and fluffy.
- Add in the sugar and beat until combined.
- Beat in the egg and vanilla extract until smooth.
- Pour the cheesecake filling over the top of the cookie dough base.
- Crumble the remaining cookie dough over the top.
- Bake for 30 to 35 minutes.
- Let cool completely before cutting into bars.
- Store in an airtight container in the refrigerator.
Nutrition
- Calories: 223 kcal
- Sugar: 19 g
- Fat: 11 g
- Carbohydrates: 27 g
- Protein: 2 g
Tried This Recipe? Leave a Comment!
Did you make this recipe? I’d love to hear how it turned out! Please leave a comment and a rating below. Your feedback helps other home cooks and supports cheerychop.com!
