Table of Contents
Chinese Orange Chicken: Better Than Takeout!
Ah, Chinese Orange Chicken! Just the name brings back memories of bustling food stalls in Marrakech, where vibrant citrus fruits perfumed the air. Though my roots are in North African flavors, my culinary journey took me through the rigorous, technique-driven kitchens of Paris, and now I call New York City home, a melting pot of global tastes. This easy Orange Chicken recipe is my love letter to that diverse culinary landscape, a way to bring a restaurant-quality dish right into your own home. Forget greasy, overly sweet takeout versions; this homemade Orange Chicken is bursting with bright, authentic citrus flavor and features a delightful crispy texture that will have you reaching for more. I first developed this recipe when I was craving something punchy and satisfying, something that felt both familiar and exciting, and I am thrilled to share my perfected version with you today.
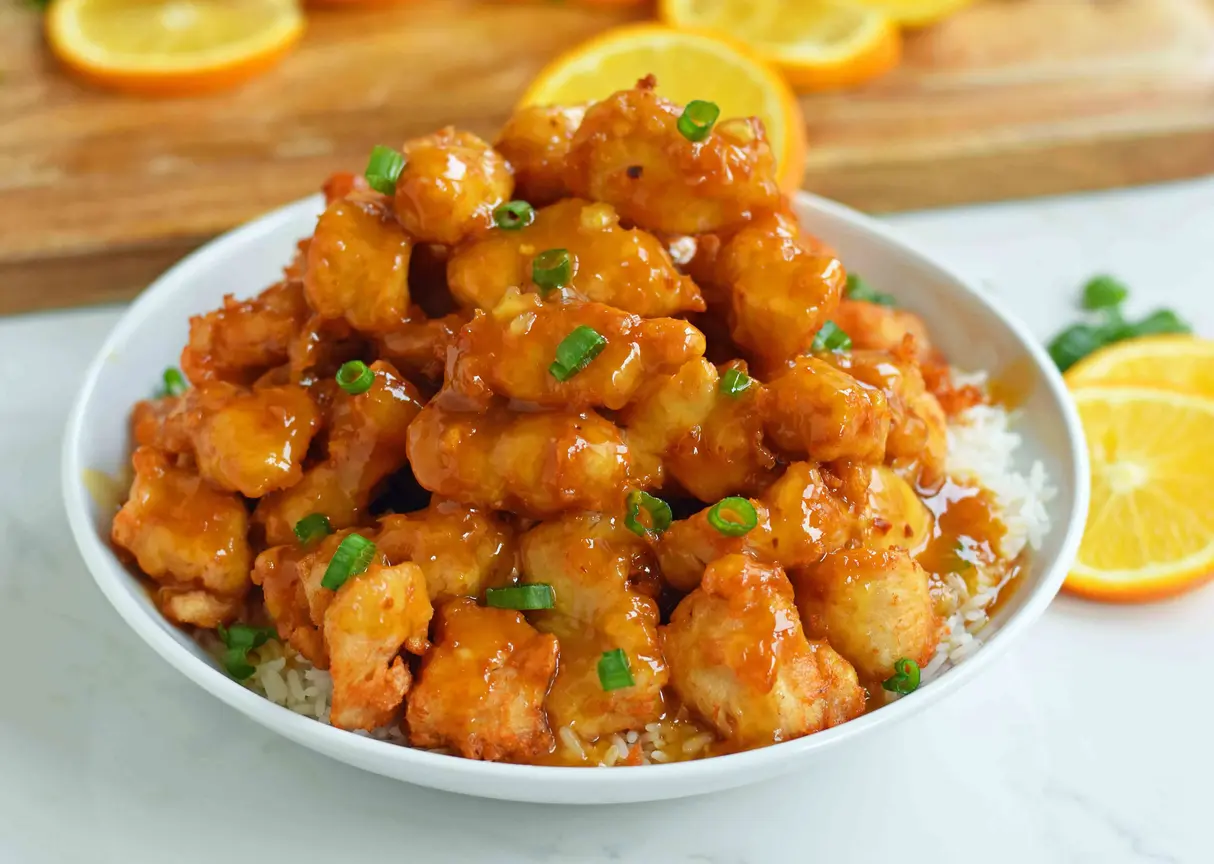
Imagine tender, succulent pieces of chicken, coated in a light, shatteringly crisp shell, all tossed in a glossy, aromatic sauce that balances sweet orange zest and juice with a tangy vinegar undertone and a whisper of warming ginger and garlic. The aroma alone is intoxicating, a fragrant promise of the deliciousness to come. I’ve honed the technique for achieving that perfect crispness, drawing from French frying methods to ensure each bite is just right. This isn’t just about throwing ingredients together; it’s about understanding how heat, starch, and citrus can create magic. My mother’s tagines taught me the power of slow, deep flavor development, and my Parisian training taught me precision and balance. This Orange Chicken stir fry is where those worlds collide, creating something truly special.
What makes my Chinese Orange Chicken recipe truly stand out? It’s that perfect balance of crispy exterior and juicy interior, achieved through a simple yet crucial dredging and frying technique that I’ll walk you through. I’ll also share my secret for a sauce that’s vibrant and fresh, not cloying. As a professional cook, I know how frustrating it can be to end up with soggy chicken or a sauce that’s too thick or too thin! I’ll guide you to avoid common pitfalls, ensuring your homemade Orange Chicken is a resounding success. Get ready for a flavor explosion that will make you never want to order takeout again.
Why This Chinese Orange Chicken Recipe Is the Best
My philosophy in the kitchen, whether it’s my Moroccan heritage or my Parisian training, is to build layers of flavor and texture. For this Chinese Orange Chicken, that means using fresh orange zest and juice for that incredible aromatic lift, rather than relying solely on artificial flavorings. The touch of rice vinegar provides a subtle zing that cuts through the richness, a trick I learned in mastering classic French sauces, ensuring every bite is perfectly balanced and utterly delicious. This recipe elevates the humble orange chicken into something truly special.
Achieving that coveted crispy texture is key to any great Orange Chicken stir fry, and I’ve refined this process to be incredibly effective. By double-dredging the chicken pieces – first in egg and then in a precise cornstarch and flour mixture – and frying them at the correct temperature, we create a beautiful, crunchy coating that holds up even after being coated in sauce. This method ensures each piece of chicken remains delightfully crisp, a testament to the importance of proper technique, even in straightforward dishes.
This recipe is designed with home cooks in mind who want incredible flavor without spending hours in the kitchen. The ingredient list is straightforward, and the steps are clearly outlined, making it genuinely easy Orange Chicken to tackle. I’ve tested and tweaked this recipe extensively to ensure it’s foolproof. You’ll find that with a little preparation, this vibrant dish comes together surprisingly quickly, proving that impressive homemade meals are well within your reach, even on a busy weeknight in NYC.
Chinese Orange Chicken Ingredients
When I’m developing recipes here in my New York City apartment kitchen, I always think about accessibility. Most of these ingredients can be found at your local grocery store. For the freshest citrus, I love visiting the farmers’ markets in Union Square, especially during the fall and winter months – the zest from those oranges is unparalleled! If you can’t find rice vinegar, a good quality white wine vinegar will work in a pinch, though the subtle nutty notes of rice vinegar are worth seeking out.
Ingredients List
- 4 Boneless Skinless Chicken Breasts (cut into 1-inch bite-size pieces)
- 3 large Eggs (whisked)
- 1/3 cup Cornstarch (for dredging)
- 1/3 cup All-Purpose Flour
- Salt (to taste)
- Vegetable Oil or Canola Oil (for frying, about 2-3 inches deep in pot)
- 1 cup Fresh Orange Juice (from about 2-3 oranges)
- 1/2 cup Granulated Sugar
- 2 Tablespoons Rice Vinegar (or White Vinegar)
- 2 Tablespoons Soy Sauce (use tamari for a gluten-free dish)
- 1/4 teaspoon Ground Ginger (or 1 tsp finely minced fresh ginger)
- 1/4 teaspoon Garlic Powder (or 2 cloves garlic, finely minced)
- 1/2 teaspoon Red Chili Flakes (optional, for a touch of heat)
- Zest of 1 large Orange (for sauce)
- 1 Tablespoon Cornstarch (for thickening sauce)
- 2 Tablespoons Water (for cornstarch slurry)
- 2 Green Onions, thinly sliced (for garnish)
- Extra Orange Zest (for garnish, optional)
Ingredient Spotlight
Orange Juice & Zest: This is the heart of our dish! For the best flavor, I always recommend using freshly squeezed orange juice and the zest from the peel. While bottled juice can work in a pinch, it often lacks that bright, floral aroma that true oranges provide. If you can’t find large navel oranges, clementines or tangerines can also work, but you might need to adjust the sugar slightly based on their sweetness. Always zest before juicing!
Cornstarch: This humble pantry staple is your secret weapon for achieving that signature crispy coating on the chicken and for thickening the sauce to a beautiful glaze. It’s essential for both dredging the chicken pieces before frying and for creating the cornstarch slurry that thickens the orange sauce. Make sure you have enough for both applications – it’s surprisingly versatile!
Chicken Breasts: For this recipe, boneless, skinless chicken breasts are ideal because they cook quickly and evenly, absorbing the sauce beautifully. I cut them into uniform, bite-sized pieces to ensure they cook through without drying out. If you prefer dark meat, boneless, skinless chicken thighs are a fantastic substitute and are often more forgiving, staying moister even if slightly overcooked.
| Original Ingredient | Best Substitution | Flavor / Texture Impact |
|---|---|---|
| Orange Juice | 1 cup Cranberry Juice or Apple Juice | Slightly tarter and fruitier (cranberry) or sweeter and milder (apple). The orange notes will be lost. |
| Rice Vinegar | White Vinegar or Apple Cider Vinegar | A bit harsher (white vinegar) or fruitier (apple cider vinegar). Rice vinegar offers a more subtle, balanced tang. |
| Chicken Breasts | Boneless, Skinless Chicken Thighs | More tender and moist; may require slightly longer cooking time as they are denser. Thighs have a richer flavor. |
How to Make Chinese Orange Chicken — Step-by-Step
Let’s get cooking! This recipe is designed to be straightforward, but paying attention to a few key details will make all the difference in achieving that perfect, restaurant-quality result.
Step 1: Prepare the Orange Sauce
In a medium saucepan, combine the 1 cup of orange juice, 1/2 cup sugar, 2 tablespoons rice vinegar, 2 tablespoons soy sauce, 1/4 teaspoon ground ginger, 1/4 teaspoon garlic powder, and 1/2 teaspoon red chili flakes (if using). Heat over medium heat, stirring occasionally, for about 3 minutes until the sugar is dissolved and the mixture is hot.
💡 mia’s Pro Tip: Don’t boil the sauce vigorously at this stage; you just want to gently heat the ingredients and dissolve the sugar. This helps keep the flavors bright and fresh.
Step 2: Thicken the Sauce
In a small bowl, whisk together 1 tablespoon of cornstarch with 2 tablespoons of water until you have a smooth paste (this is called a slurry). Pour this slurry into the simmering orange sauce and whisk constantly. Continue to cook for another 5 minutes, or until the sauce has thickened to a syrupy consistency that coats the back of a spoon. Remove from heat.
Step 3: Add Orange Zest
Once the sauce has thickened and is off the heat, stir in the zest of one large orange. This is crucial! Adding the zest at the end preserves its bright, aromatic oils, infusing the sauce with a powerful orange essence that makes this homemade Orange Chicken truly special.
Step 4: Prepare for Breading
Set up your breading station. In a shallow dish or pie plate, combine 1/3 cup cornstarch and 1/3 cup flour. Add a generous pinch of salt and stir to combine. In a second shallow dish, whisk the 3 eggs until well beaten.
⚠️ Common Mistake to Avoid: Don’t overcrowd the dishes with your chicken pieces. Work in batches to ensure each piece is fully coated. Also, make sure your flour and cornstarch mixture is well-stirred so you get an even coating.
Step 5: Bread the Chicken
Take your bite-sized chicken pieces and dip each one first into the whisked egg mixture, letting any excess drip off. Then, transfer the eggy chicken to the cornstarch-flour mixture and dredge thoroughly, pressing gently to ensure it adheres. Place the breaded chicken pieces onto a clean plate in a single layer, making sure they don’t touch too much.
Step 6: Heat the Oil
Pour 2-3 inches of vegetable or canola oil into a heavy-bottomed pot or Dutch oven. Heat the oil over medium-high heat until it reaches 350°F (175°C) on a deep-fry thermometer. Maintaining the correct oil temperature is critical for crispy, not greasy, chicken.
💡 mia’s Pro Tip: Use a thermometer! It’s the easiest way to ensure your oil is at the perfect temperature. If it’s too low, the chicken will absorb too much oil and be greasy. Too high, and it will burn before cooking through.
Step 7: Fry the Chicken
Working in small batches to avoid lowering the oil temperature too much, carefully place the breaded chicken pieces into the hot oil. Fry for 2-3 minutes per side, turning occasionally, until golden brown and cooked through. Use a slotted spoon or spider strainer to remove the chicken from the oil and place it on a plate lined with paper towels to drain off excess grease.
⚠️ Common Mistake to Avoid: Do NOT overcrowd the pot. Frying too many pieces at once will drastically lower the oil temperature, resulting in soggy, oil-logged chicken. Be patient and fry in batches!
Step 8: Toss and Serve
Once all the chicken is fried, place the crispy chicken pieces in a large bowl. Pour the prepared orange sauce over the chicken and toss gently until all pieces are evenly coated. You may reserve some of the sauce to drizzle over rice. Serve the Chinese Orange Chicken immediately, garnished with thinly sliced green onions and a little extra orange zest if desired.
| Step | Action | Duration | Key Visual Cue |
|---|---|---|---|
| 1 & 2 | Simmer & Thicken Sauce | 3 mins + 5 mins | Sauce coats spoon |
| 4 & 5 | Bread Chicken | ~5 mins per batch | Chicken pieces evenly coated |
| 6 | Heat Frying Oil | ~8-10 mins | Oil reaches 350°F (175°C) |
| 7 | Fry Chicken | 2-3 mins per batch | Golden brown and cooked through |
| 8 | Toss & Serve | ~2 mins | Evenly coated in glossy sauce |
Serving & Presentation
This Chinese Orange Chicken is a star on its own, but it truly shines when served with fluffy white or brown rice to soak up that glorious sauce. In my NYC kitchen, I often serve it alongside stir-fried seasonal vegetables from the local market, like broccoli florets, bell peppers, or snap peas, adding color and a fresh crunch. For a more authentic feel reminiscent of the bustling food stalls I remember from my travels, a sprinkle of toasted sesame seeds adds a lovely nutty note and visual appeal.
The vibrant orange hue of the sauce, contrasted with the golden-brown chicken and the fresh green of the scallions, makes for a beautiful plate. Don’t shy away from adding that extra bit of orange zest as a garnish; it provides a final burst of fragrance that elevates the entire dish. It’s these little touches, a habit from my pastry days in Paris where presentation is paramount, that transform a good dish into a memorable one.
| Pairing Type | Suggestions | Why It Works |
|---|---|---|
| Side Dish | Steamed Jasmine or Basmati Rice, Cauliflower Rice, Quinoa | Provides a neutral base to absorb the flavorful sauce and adds substance to the meal. |
| Vegetables | Steamed Broccoli, Sautéed Green Beans, Roasted Asparagus, Stir-fried Bell Peppers & Onions | Adds color, texture, and essential nutrients, balancing the richness of the chicken dish. |
| Beverage | Unsweetened Iced Tea, Green Tea, Riesling or Gewürztraminer Wine | The slight sweetness and crispness of these drinks complement the dish without overpowering it. |
| Garnish | Fresh Green Onions, Toasted Sesame Seeds, Extra Orange Zest | Adds a fresh aroma, visual appeal, and a final touch of brightness and texture. |
Make-Ahead, Storage & Reheating
Life in New York is always on the go, so I love knowing how to prep ahead. While this Chinese Orange Chicken is best enjoyed fresh for maximum crispness, it stores and reheats surprisingly well. You can prepare the orange sauce and bread the chicken a day in advance, storing them separately in airtight containers in the refrigerator. This makes the final cooking process on a busy weeknight incredibly fast!
| Method | Container | Duration | Reheating Tip |
|---|---|---|---|
| Refrigerator | Airtight container | 2-3 days | Warm gently in a skillet over medium-low heat to try and preserve some crispness. Add a splash of water if sauce is too thick. |
| Freezer | Freezer-safe container or bag | 1-2 months | Thaw overnight in the refrigerator then reheat as above. Some crispness will be lost. Ideal to freeze sauce separately. |
| Make-Ahead | Sauce in one container, breaded chicken in another | 1 day in advance | Fry chicken directly from the fridge, then toss with warmed sauce. |
When reheating, I find the stovetop method in a skillet yields the best results for getting some of that crispness back. Avoid the microwave if possible, as it tends to make the chicken casing soft and steamy. If your sauce has become too thick after refrigeration, add a tablespoon or two of water or orange juice and whisk it in while warming. Remember, for the absolute best texture, this dish is intended to be eaten soon after it’s made, but these tips will help you enjoy it even if you have leftovers!
Variations & Easy Swaps
| Variation | Key Change | Best For | Difficulty Impact |
|---|---|---|---|
| Spicy Orange Chicken | Add more red chili flakes, or a tablespoon of Sriracha to the sauce. | Those who love a kick! | Adds minimal difficulty. |
| Sweet & Sour Twist | Add pineapple juice to the sauce and a touch of honey. | A different flavor profile. | Slightly sweeter, may need to adjust sugar. |
| Ginger-Garlic Boost | Use fresh minced ginger and garlic instead of powder. | Deeper fresh flavor. | Requires extra prep for mincing. |
Gluten-Free Orange Chicken
To make this gluten-free, simply swap out the all-purpose flour for a gluten-free all-purpose flour blend in the dredging mixture. The cornstarch is naturally gluten-free, which is a great advantage here. For the soy sauce, use a good quality tamari, which is typically gluten-free. This substitution will give you a delicious Chinese Orange Chicken recipe that everyone can enjoy, with no noticeable difference in texture or taste!
Vegetarian Orange Chicken
For a vegetarian twist, that pays homage to the North African vegetable tagines I grew up with, try using extra-firm tofu or cauliflower florets instead of chicken. Press the tofu very well to remove excess water, then cube it and proceed with the breading and frying steps. Cauliflower florets can be tossed directly in the egg and then the flour mixture before frying. The sauce remains the same, providing that wonderful sweet and tart flavor.
Thai-Inspired Orange Chicken
Inspired by the vibrant flavors of Thailand, you can give this recipe a unique Southeast Asian flair. Add a tablespoon of fish sauce to the sauce mixture along with the soy sauce for an umami boost. A teaspoon of finely minced lemongrass or a bit of lime zest in the sauce can add another layer of aromatic complexity, reminiscent of Thai curries. Garnish with fresh cilantro along with the green onions.
How do you make Chinese orange chicken crispy instead of soggy?
The key to crispy orange chicken is a two-step process: proper dredging and precise frying. First, ensure your chicken is well-coated in the cornstarch and flour mixture after dipping it in egg; press gently to help it adhere. Second, and most importantly, fry the chicken in oil that is preheated to exactly 350°F (175°C). Fry in small batches to prevent the oil temperature from dropping, and cook each batch until golden brown. Draining the fried chicken on paper towels immediately after removes excess oil, preserving its crispness.
What is the best substitute for orange juice in orange chicken?
If you’re out of orange juice, you can use a combination of other fruit juices for a similar flavor profile, though it won’t be exactly the same. About half apple juice and half pineapple juice, or a full cup of cranberry juice, can provide the necessary sweetness and acidity. For a more tart flavor, you could use grapefruit juice. Remember that substitutes may alter the sweetness level, so you might need to adjust the sugar accordingly. Using fresh orange zest is still highly recommended to retain some of that essential orange aroma.
Can I use chicken thighs instead of chicken breast for orange chicken?
Absolutely! Chicken thighs are an excellent alternative to chicken breasts for this Chinese Orange Chicken recipe. They are naturally more tender and moist due to their higher fat content, making them more forgiving if you accidentally overcook them slightly. The flavor is also a bit richer. Just ensure they are cut into similar bite-sized pieces and be aware they might take a minute or two longer to cook through during the frying stage compared to chicken breasts. The end result will be wonderfully juicy and flavorful.
How long does it take to cook orange chicken from scratch?
Making this Chinese Orange Chicken recipe from scratch typically takes about 45 minutes in total. This includes approximately 20 minutes for preparation, which involves cutting the chicken, making the sauce ingredients, and setting up the breading station. The cooking time itself is around 25 minutes, covering the sauce thickening and the frying of the chicken in batches. It’s a relatively quick process when you break it down, making it a perfect weeknight meal that feels special.
Can I make the orange sauce ahead of time?
Yes, you can definitely make the orange sauce ahead of time! I often prepare the sauce and store it in an airtight container in the refrigerator for up to 2 days. When you’re ready to serve, gently reheat the sauce on the stovetop, whisking in a tablespoon or two of water or orange juice if it has thickened too much. This step is crucial for making your weeknight cooking much smoother and faster, ensuring you have a delicious meal ready in no time.
What kind of oil is best for frying chicken?
For deep-frying chicken to achieve that perfect crispy texture, it’s best to use a neutral oil with a high smoke point. Common choices include vegetable oil, canola oil, or peanut oil. These oils can withstand the high temperatures required for frying (around 350°F or 175°C) without burning or imparting an unwanted flavor into your delicious Chinese Orange Chicken. Ensure you use enough oil, at least 2-3 inches deep in your pot, for the chicken to fry evenly.
How do I get the sauce to coat the chicken and not pool at the bottom?
The key to getting the sauce to coat the chicken beautifully is achieving the correct sauce consistency and tossing immediately. Make sure your sauce has thickened properly using the cornstarch slurry; it should be syrupy and coat the back of a spoon. Once the chicken is fried and drained, add it to a bowl with the warm sauce and toss quickly and thoroughly until every piece is coated. Serving it immediately over rice also helps the sauce cling to the chicken and rice.
Can I bake or air fry this orange chicken instead of deep frying?
While deep-frying is my preferred method for achieving that authentic crispy texture, you can certainly bake or air fry this recipe for a lighter version. For baking, spread the breaded chicken on a wire rack set over a baking sheet and bake at 400°F (200°C) for about 20-25 minutes, flipping halfway through, until golden and cooked. For the air fryer, cook at 380°F (190°C) for about 10-12 minutes, shaking the basket halfway. Keep in mind that the crispness will be less pronounced than with deep frying, but it’s still a delicious way to enjoy it!
Share Your Version!
I absolutely love seeing your culinary creations! If you make this easy Chinese Orange Chicken recipe, please leave a comment below and share your thoughts. A star rating is incredibly helpful for other home cooks too! And if you snap any photos, please tag me on Instagram or Pinterest at @exorecipes – I’d be thrilled to see how it turned out! I’m always curious to hear how people adapt recipes, so let me know: did you try any of the flavor variations, and how did they turn out for you?
From my NYC kitchen to yours — I hope this recipe brings as much warmth to your table as it does to mine. — mia 🧡
Love This Recipe? Save It to Pinterest!
If you enjoyed this Chinese Orange Chicken recipe, don’t let it get lost in your browser tabs! 😄 Pin it now so you can find it again anytime — and explore hundreds more tried-and-tested recipes waiting for you on my Pinterest boards.
👉 Follow mia on Pinterest @chefrecipes2
📌 Pin this recipe · 🔁 Re-pin your favorites · 💬 Tag me when you make it — I love seeing your creations!
Have a question about this crispy Orange Chicken recipe?
Drop it in the comments below! I’m here to help make your homemade Orange Chicken absolutely perfect, just the way you like it.
Chinese Orange Chicken
Description
Chinese Orange Chicken that is way better than take-out!
Ingredients
- 4 Boneless Skinless Chicken Breasts (cut into bite-size pieces)
- 3 Eggs (whisked)
- 1/3 cup Cornstarch
- 1/3 cup Flour
- Salt
- Oil (for frying)
- 1 cup Orange Juice
- 1/2 cup Sugar
- 2 Tablespoons Rice Vinegar (or White Vinegar)
- 2 Tablespoons Soy Sauce (use tamari for a gluten-free dish)
- 1/4 teaspoon Ginger
- 1/4 teaspoon Garlic Powder (or 2 garlic cloves, finely diced)
- 1/2 teaspoon Red Chili Flakes
- Orange Zest (from 1 orange)
- 1 Tablespoon Cornstarch
- Green Onions
- Orange Zest
Instructions
- To make orange sauce:
- In a medium pot, add orange juice, sugar, vinegar, soy sauce, ginger, garlic, and red chili flakes. Heat for 3 minutes.
- In a small bowl, whisk 1 Tablespoon of cornstarch with 2 Tablespoons of water to form a paste. Add to orange sauce and whisk together. Continue to cook for 5 minutes, until the mixture begins to thicken. Once the sauce is thickened, remove from heat and add orange zest.
- To make chicken:
- Place flour and cornstarch in a shallow dish or pie plate. Add a generous pinch of salt. Stir.
- Whisk eggs in shallow dish.
- Dip chicken pieces in egg mixture and then flour mixture. Place on plate.
- Heat 2 -3 inches of oil in a heavy-bottomed pot over medium-high heat. Using a thermometer, watch for it to reach 350 degrees.
- Working in batches, cook several chicken pieces at a time. Cook for 2 – 3 minutes, turning often until golden brown. Place chicken on a paper-towel-lined plate. Repeat.
- Toss chicken with orange sauce. You may reserve some of the sauce to place on rice. Serve it with a sprinkling of green onion and orange zest, if so desired.

Tried This Recipe? Leave a Comment!
Did you make this recipe? I’d love to hear how it turned out! Please leave a comment and a rating below. Your feedback helps other home cooks and supports cheerychop.com!
