
Table of Contents
Chicken Fried Chicken: Crispy and Flavorful! The Ultimate Comfort Food
Growing up in my mother’s kitchen in Marrakech, I learned the magic of transforming simple ingredients into a feast. The aromas of cumin, paprika, and slow-cooked tagines filled our home. While my heart will always hold those Moroccan spices dear, my culinary journey took me through the precise techniques of Paris, where I mastered the art of sauces and the perfect crisp crust. Now, living in the vibrant culinary tapestry of New York City, I find endless inspiration. This Chicken Fried Chicken recipe is a testament to that journey—a comforting classic that I’ve refined to ensure you get that incredibly crispy, golden exterior and juicy interior every single time. It’s proof that even the most beloved homestyle dishes can benefit from a touch of professional polish.
Imagine biting into a piece of perfectly fried chicken, the coating shattering with an audible crunch, giving way to moist, succulent meat. That’s what this dish is all about. The aroma is intoxicating—a savory blend of seasoned flour and hot oil, hinting at the richness to come. The final touch of creamy, dreamy gravy, made right in the same pan, ties everything together. We achieve that amazing texture not just through proper frying temperatures, but through a thoughtfully seasoned flour mixture and a buttermilk marinade that tenderizes the chicken beautifully. It’s a symphony of textures and a comforting hug on a plate, perfect for a family dinner or a weekend treat.
What sets this specific chicken fried chicken recipe apart? It’s the blend of classic techniques with my own chef’s insights. I’ve found that using a combination of baking powder and baking soda in the flour dredge is key for that extra lightness and crispness, something I learned was crucial for achieving ethereal textures in French pastry, but applied here to savory fried chicken. I’ll also share a tip on how to make sure your breading stays put, no matter what. And watch out for the common mistake of overcrowding the pan, which is the enemy of crispy fried chicken!
Why This Chicken Fried Chicken Recipe Is the Best
My approach to this chicken fried chicken recipe is rooted in bringing together my diverse culinary experiences. The initial inspiration came from the soul-warming dishes of the American South, but I’ve infused it with my Moroccan heritage and French training. From Marrakech, I’ve inherited an appreciation for layering flavors, using aromatic spices that sing. From Paris, I’ve learned the importance of technique—precise temperatures, proper dredging, and balanced seasoning. This recipe marries those influences, creating a deeply flavorful and perfectly textured fried chicken that’s both comforting and sophisticated. It’s a taste of my journey, right in your kitchen.
Achieving that coveted crispy coating is an art, but one I’ve demystified for you. The secret lies in the double dredge, ensuring a thick, craggy crust, and crucially, in the buttermilk marinade. Buttermilk’s acidity not only tenderizes the chicken but also helps the flour mixture adhere like magic. Then, frying at the correct temperature, a technique I honed while perfecting French confit, ensures the outside is golden brown and crispy without drying out the tender interior. It’s about building layers of flavor and texture that are both delightful and reliable.
Even if you’re new to making homemade fried chicken, this recipe is designed to be incredibly approachable. I’ve streamlined the process and provided clear, actionable steps. The ingredient list is straightforward, using items you likely already have in your pantry. I’ve also included tips to prevent common pitfalls, like soggy breading or uneven cooking. This means you can confidently serve up a plate of truly spectacular, crispy fried chicken that will have everyone asking for seconds, all without feeling overwhelmed.
Chicken Fried Chicken Ingredients
When I’m in New York, I love picking up my chicken from a local butcher shop in the West Village, they always have the freshest cuts. For my pantry staples like flour and spices, I rely on the fantastic selection at Kalustyan’s on 3rd Avenue, a true treasure trove. This recipe uses simple ingredients that come together to create something truly special, reminding me of the resourceful cooking I grew up with.
Ingredients List
- 6-8 thin sliced boneless, skinless chicken breasts (or pounded thin)
- 2 cups all-purpose flour (for dredging)
- 2 tsp baking powder
- 1 tsp baking soda
- 1 tsp salt
- 1 tsp black pepper
- 1 tsp garlic powder
- 1 ½ cups buttermilk
- 1 large egg
- 1 Tbs hot sauce (like Frank’s RedHot or Texas Pete)
- Vegetable oil or other high-smoke point oil for frying (about 3-4 cups depending on pot size)
- ¼ cup reserved oil from frying (for gravy)
- ⅓ cup all-purpose flour (for gravy)
- 2 cups milk (whole or 2% recommended)
- Salt and freshly ground black pepper (for gravy, to taste)
Ingredient Spotlight
Chicken Breasts: For this recipe, I prefer using thin-sliced chicken breasts, or pounding regular breasts to about ½-inch thickness. This ensures they cook quickly and evenly, staying moist inside while the exterior crisps up. You can find thin-sliced chicken breasts at most major US grocery stores, or easily create them by placing chicken breasts between two sheets of plastic wrap and gently pounding with a meat mallet or rolling pin. This even thickness is crucial for perfectly cooked chicken.
Buttermilk: Buttermilk is the secret weapon for tenderizing chicken and helping the breading adhere. Its acidity breaks down the chicken’s proteins, making it incredibly tender, while its thickness creates a rich coating. If you don’t have buttermilk, you can easily make a substitute: pour 1 ½ tablespoons of white vinegar or lemon juice into a liquid measuring cup, then add enough milk to reach the 1 ½ cup line. Let it sit for 5-10 minutes until it thickens and curdles slightly. This homemade version works beautifully!
All-Purpose Flour: This forms the base of our crispy coating and is also used to thicken the gravy. For the best results, use a good quality all-purpose flour. Make sure to season your flour mixture generously with salt, pepper, and garlic powder, as this is where a lot of the flavor comes from. If you need a gluten-free version, a good gluten-free all-purpose flour blend specifically designed for baking and frying will work, though the texture might be slightly different.
| Original Ingredient | Best Substitution | Flavor / Texture Impact |
|---|---|---|
| Buttermilk | Homemade buttermilk (milk + vinegar/lemon juice) | Virtually identical in tenderizing and adhesion. |
| Thin-sliced Chicken Breasts | Chicken thighs, pounded thin | Thighs are more forgiving and moister, but may take slightly longer to cook. |
| All-purpose Flour | Gluten-free all-purpose flour blend | May result in a slightly less crisp or slightly grittier texture depending on the blend. |
How to Make Chicken Fried Chicken — Step-by-Step
Ready? Let’s get frying! Each step is designed to build that perfect crispy fried chicken.
Step 1: Prepare the Marinade and Dredge
First, in a large bowl, whisk together the 2 cups of flour, baking powder, baking soda, salt, pepper, and garlic powder. This is your dry dredge mixture. In a separate medium bowl, whisk together the buttermilk, egg, and hot sauce until well combined. This forms your wet marinade.
💡 mia’s Pro Tip: Make sure your buttermilk mixture is well-whisked. The egg helps bind everything together and gives the flour something extra to cling to, creating a more robust crust.
Step 2: Dredge the Chicken
Take each thin chicken breast and dredge it thoroughly in the seasoned flour mixture, pressing gently to ensure it’s well-coated. Then, dip it into the buttermilk mixture, letting any excess drip off, and immediately return it to the flour mixture. Press the flour onto the chicken again, ensuring a good, even coating. This double-dredging process is key for that extra crispy texture.
⚠️ Common Mistake to Avoid: Don’t skip the second dredge! A single coating can become thin and may not adhere well. The double dredge creates a thicker, more textured crust that stays on during frying.
Step 3: Heat the Oil
In a deep fryer or a large, heavy-bottomed pot on the stove, pour in enough oil to reach a depth of about 3-4 inches. Heat the oil to 325°F (160°C). It’s important to maintain this temperature for the best results; a thermometer is highly recommended.
Step 4: Fry the Chicken
Carefully place the flour-coated chicken pieces into the hot oil, being careful not to overcrowd the pot (fry in batches if necessary). Fry for 6-8 minutes per side, or until the chicken is golden brown, crispy, and cooked through. The internal temperature should reach 165°F (74°C).
💡 mia’s Pro Tip: Resist the urge to constantly move the chicken. Let it develop a crust and brown on one side before flipping. This helps prevent the coating from breaking apart.
Step 5: Drain and Rest
Using a slotted spoon or spider strainer, remove the fried chicken from the oil and place it on a wire rack set over a baking sheet or on a plate lined with paper towels. Let it drain and rest for a few minutes. This allows excess oil to drip off and the crust to set further.
Step 6: Make the Gravy
Once all the chicken is fried, carefully pour out most of the frying oil, leaving about ¼ cup in the pan. Return the pan to medium-high heat. Whisk in the ⅓ cup of flour until it forms a smooth paste, cooking for about 1 minute to toast the flour slightly.
Step 7: Finish the Gravy
Slowly whisk in the 2 cups of milk, a little at a time, ensuring no lumps form. Continue to cook, whisking constantly, until the gravy thickens to your desired consistency. Season generously with salt and pepper to taste.
💡 mia’s Pro Tip: For an ultra-smooth gravy, you can strain it through a fine-mesh sieve after whisking in the milk, before seasoning. This removes any small lumps and gives it a professional finish.
| Step | Action | Duration | Key Visual Cue |
|---|---|---|---|
| 1 | Prepare Marinade & Dredge | 5 mins | Dry mix and wet mix ready. |
| 2 | Dredge Chicken | 5-7 mins | Chicken fully coated, double-layered. |
| 3 | Heat Oil | 10-15 mins | Oil reaches 325°F (160°C). |
| 4 | Fry Chicken | 12-16 mins (per batch) | Golden brown, crispy, cooked through. |
| 5 | Drain & Rest | 5 mins | Chicken on rack, excess oil drips. |
| 6 | Start Gravy | 2 mins | Flour paste forms. |
| 7 | Finish Gravy | 5-7 mins | Smooth, thickened gravy. |
Serving & Presentation
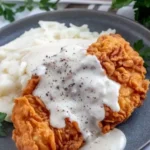
This golden, crispy fried chicken is a sight to behold! I love to serve it family-style, piled high on a platter, with a generous ladleful of the warm, creamy gravy poured right over the top. It’s a dish that truly brings people together, reminiscent of lively Sunday dinners in my family, or the buzzing energy of a casual eatery in NYC’s West Village. Garnish with a sprinkle of fresh parsley for a pop of color and freshness that cuts through the richness.
For a truly comforting meal, pair this chicken fried chicken with classic Southern sides. Creamy mashed potatoes are essential for soaking up that delicious gravy. A crisp, simple coleslaw or a fresh green salad provides a lovely contrast in texture and flavor. Another favorite of mine, especially during the warmer months here in NYC, is a vibrant succotash or some grilled corn on the cob. Don’t forget a slice of warm cornbread or even a light, flaky biscuit to round out the meal.
| Pairing Type | Suggestions | Why It Works |
|---|---|---|
| Side Dish | Creamy Mashed Potatoes, Macaroni and Cheese, Candied Yams | Classic Southern comfort food that perfectly complements the chicken and gravy. |
| Vegetable | Collard Greens, Biscuits and Honey, Cornbread | Adds a balance of savory, sweet, and hearty elements to the meal. |
| Beverage | Iced Tea, Lemonade, Pale Ale | Refreshing drinks cut through the richness of the fried chicken. |
| Garnish | Fresh Parsley, Chives | A simple garnish adds a touch of freshness and visual appeal. |
Make-Ahead, Storage & Reheating
Like many New Yorkers, my schedule can be hectic, so I often rely on smart meal prep. While chicken fried chicken is best enjoyed fresh for maximum crispness, I’ve tested various methods to ensure you can enjoy leftovers too. The key is storing it properly to minimize sogginess and reheating it carefully.
| Method | Container | Duration | Reheating Tip |
|---|---|---|---|
| Refrigerator | Airtight container or wrap tightly | 3-4 days | Reheat in a 375°F oven or air fryer for best results. |
| Freezer | Heavy-duty freezer bag or container | 1-2 months | Thaw in the refrigerator overnight, then reheat in oven or air fryer. |
| Gravy | Airtight container | 3-4 days | Gently reheat on the stovetop over low heat, adding a splash of milk if needed. |
For reheating, my preferred method is to skip the microwave altogether, as it can make fried chicken soggy. Instead, I’ll reheat leftover chicken fried chicken in a preheated oven at 375°F (190°C) for about 10-15 minutes, or until heated through and the crust has regained some of its crispness. An air fryer is also fantastic for this, usually taking just 5-8 minutes. For the gravy, gently warm it on the stovetop over low heat, whisking occasionally. If it’s too thick, a little splash of milk or water will help thin it out perfectly.
Variations & Easy Swaps
| Variation | Key Change | Best For | Difficulty Impact |
|---|---|---|---|
| Spicy Southern Fried Chicken | Add cayenne pepper and smoked paprika to flour dredge. | Those who love a kick of heat. | Easy |
| Gluten-Free Version | Use a gluten-free flour blend for dredging and gravy. | Celiac or gluten-sensitive diners. | Slightly more complex; texture may vary. |
| Herb-Infused Fried Chicken | Add chopped fresh herbs like rosemary and thyme to the buttermilk marinade. | A more fragrant and nuanced flavor profile. | Easy |
Spicy Southern Fried Chicken
For a little heat that reminds me of the vibrant spices found in North Africa, simply add ½ teaspoon of cayenne pepper and ½ teaspoon of smoked paprika to your flour dredge. This gives the chicken a warm, subtle spice that complements the savory flavors beautifully. This is perfect for those who enjoy a bit of a kick, turning your homemade fried chicken into a fiery delight.
Gluten-Free Chicken Fried Chicken
To make this recipe gluten-free, swap the all-purpose flour for a good quality gluten-free all-purpose flour blend that’s suitable for baking and frying. Ensure your blend contains a binder like xanthan gum for best results. The flavor will be similar, but the texture might be slightly different; some GF blends can result in a less uniformly crisp coating. I’ve found that using a blend designed for frying works best for minimizing textural changes.
Herb-Infused Fried Chicken
Inspired by the fragrant herb gardens of Provence, I love infusing this chicken with fresh herbs. Finely chop about 1 tablespoon each of fresh rosemary and thyme, and whisk them into the buttermilk marinade. The herbs will infuse the chicken as it marinates, adding a lovely aromatic depth to the final dish. This variation is particularly wonderful when serving alongside roasted vegetables.
What is the difference between chicken fried chicken and country fried chicken?
The primary difference lies in the gravy and the dredging process. Chicken Fried Chicken is typically breaded with flour, then fried, and served with a white gravy (often made from the pan drippings and milk). Country Fried Chicken is often dredged in seasoned flour, sometimes without an egg wash, fried, and always served with a brown gravy. My recipe focuses on the classic chicken fried chicken style with a creamy white gravy.
What kind of oil is best for frying chicken fried chicken?
For the best results when frying chicken, you want an oil with a high smoke point to prevent it from burning at the temperatures needed for crispy frying. Excellent choices include vegetable oil, canola oil, peanut oil, or even a blend of vegetable oils. These oils are relatively neutral in flavor, allowing the chicken and seasoning to shine through, and they maintain their integrity at frying temperatures of around 325-350°F.
How do you keep the breading from falling off when frying chicken fried chicken?
There are a few key techniques to ensure your breading stays put. First, make sure the chicken is properly dredged and pressed firmly into the flour. The buttermilk marinade is crucial for adhesion. Second, don’t overcrowd the pan; this lowers the oil temperature and can cause the coating to become gummy and detach. Finally, I find that a double dredge (flour, egg/buttermilk, flour again) creates a more robust crust that adheres exceptionally well.
Can you make chicken fried chicken in an air fryer instead of deep frying?
Yes, you can achieve a delicious, crispy result using an air fryer, though it won’t be exactly the same as deep frying. Spray the breaded chicken generously with oil and air fry at around 375°F (190°C) for 15-20 minutes, flipping halfway through, until golden brown and cooked through. It’s a healthier alternative that still delivers a satisfying crunch, though deep frying is traditional for the ultimate crispy coating.
Should the chicken be marinated in buttermilk before frying?
Absolutely! Marinating the chicken in buttermilk is a crucial step for both tenderizing the meat and helping the flour coating adhere better. The acidity in buttermilk tenderizes the chicken from the inside out, ensuring it stays moist and succulent during the frying process. It also creates a richer, slightly tangy base for the seasoned flour to cling to, resulting in a more flavorful and crisper crust.
What temperature should the oil be for frying?
For authentic, perfectly crispy fried chicken, maintaining the correct oil temperature is vital. I recommend frying at 325°F (160°C) when you first put the chicken in. This allows the chicken to cook through without the exterior burning. As you add more chicken, the temperature might drop, so you may need to adjust the heat to bring it back up slightly, ideally keeping it between 300-325°F (150-160°C) during frying.
Can I use chicken thighs instead of breasts?
Yes, you absolutely can use chicken thighs! In fact, many people prefer thighs for their extra moisture and flavor. If using bone-in thighs, they will take longer to cook than thin-sliced breasts, so adjust your frying time accordingly, ensuring they reach an internal temperature of 165°F (74°C). Boneless, skinless thighs are also a great option and will cook similarly to breasts.
How do I make sure the chicken is cooked through?
The most reliable way to ensure your chicken fried chicken is cooked through is by using an instant-read thermometer. Insert it into the thickest part of the chicken, avoiding bone if applicable. The chicken is done when it reaches an internal temperature of 165°F (74°C). Visually, it should be opaque white throughout, with juices running clear.
Share Your Version!
I always love to see what you create in your own kitchens! If you try this chicken fried chicken recipe, please leave a comment and a star rating below. It helps other home cooks know what to expect! If you share a photo of your masterpiece on Instagram or Pinterest, please tag me at @exorecipe – I can’t wait to see your beautiful creations! Have you ever experimented with different flavor profiles for your fried chicken using spices from your own heritage? I’d love to hear about it!
From my NYC kitchen to yours — I hope this recipe brings as much warmth to your table as it does to mine. — mia 🧡
Love This Recipe? Save It to Pinterest!
If you enjoyed this Chicken Fried Chicken recipe, don’t let it get lost in your browser tabs! 😄 Pin it now so you can find it again anytime — and explore hundreds more tried-and-tested recipes waiting for you on my Pinterest boards.
👉 Follow mia on Pinterest @chefrecipes2
📌 Pin this recipe · 🔁 Re-pin your favorites · 💬 Tag me when you make it — I love seeing your creations!
Chicken Fried Chicken
Description
Easy and delicious this Chicken Fried Chicken is a quick and flavorful dinnertime recipe that brings the whole family to the table, with minimal ingredients it’s a simple and comforting meal.
Ingredients
- 6–8 thin sliced chicken breasts
- 2 cups flour
- 2 tsp baking powder
- 1 tsp baking soda
- 1 tsp salt
- 1 tsp pepper
- 1 tsp garlic powder
- 1 1/2 cup buttermilk
- 1 egg
- 1 Tbs hot sauce
- Oil for frying
- 1/4 cup reserved oil from frying
- 1/3 cup flour
- 2 cup milk
- Salt & pepper
Instructions
- Heat oil in deep fryer or large pan on stove (a few inches deep) to 325.
- In large bowl whisk together your flour, baking powder, baking soda, salt, pepper and garlic powder.
- In another bowl whisk together buttermilk, egg and hot sauce.
- Dredge your chicken in the flour mixture then dip into the egg mixture than back into the flour mixture making sure to press down flour to get stuck on the steak real good.
- Place chicken in pan/deep fryer and fry on each side 3-5 minutes until golden brown, remove and drain on paper towel lined plate, repeat with all chicken.
- To make your gravy, in large pan add 1/4" of oil from cooking and heat on medium-high, stir in your flour until absorbed and cook for about 1 minute.
- Slowly add in your milk whisking to blend and heat until thickened then stir in salt and pepper to desired taste.
- Pour gravy over individual chicken before serving.
Nutrition
- Calories: 490 kcal
- Sugar: 7 g
- Fat: 18 g
- Carbohydrates: 45 g
- Protein: 35 g

Tried This Recipe? Leave a Comment!
Did you make this recipe? I’d love to hear how it turned out! Please leave a comment and a rating below. Your feedback helps other home cooks and supports cheerychop.com!
