“`html
Table of Contents
Cheesy Taco Sliders with Ground Beef – The Ultimate Easy Party Snack
There is something magical about a tray of warm, cheesy taco sliders fresh from the oven — the way the melted cheese stretches with every pull, the aroma of toasted buns brushed with buttery taco seasoning, and the rich, savory scent of seasoned ground beef that fills your entire kitchen. I first fell in love with sliders during my years at culinary school in Paris, where we learned the art of the perfect bite: balanced, bold, and beautiful. But this recipe? It has my heart because it brings together everything I love about Mexican-American comfort food with a touch of New York energy — fast, bold, and endlessly shareable. These cheesy taco sliders are the easy party snack you have been searching for, and I promise they will disappear before halftime.
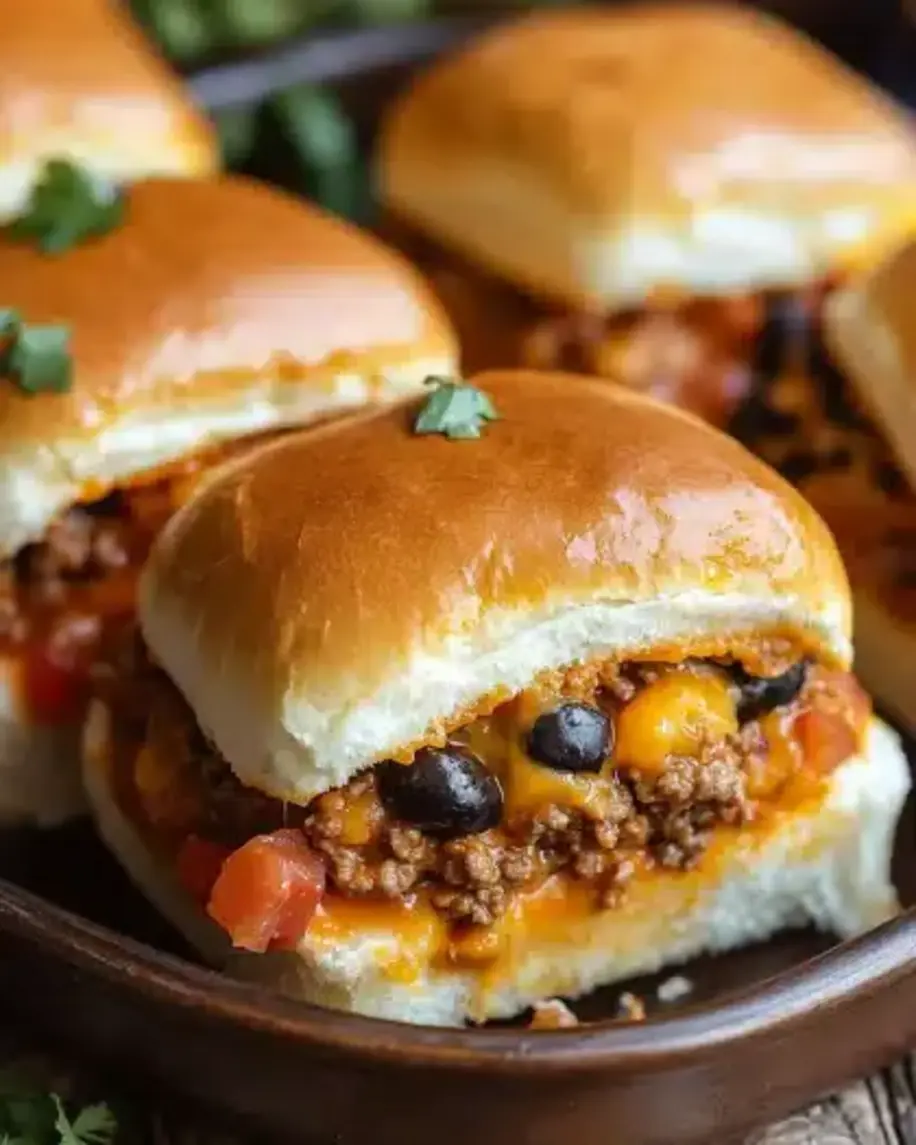
Imagine sinking your teeth into a soft, buttery Hawaiian sweet roll that has been toasted to a gentle golden crisp on top, with a layer of juicy, taco-spiced ground beef tucked beneath a blanket of gooey Mexican blend cheese, all finished with a creamy, tangy swirl of sour cream, mayo, and salsa. The optional crushed tortilla chips? They add that little crunch that makes every bite sing. These sliders are messy in the best way — the kind of food that brings people together around the table, reaching for seconds before they have even finished their first. Whether you are hosting a game day party, a birthday gathering, or just a weeknight dinner that feels like a celebration, this taco sliders appetizer is the one that steals the show.
What sets my version apart is a technique I picked up in a tiny pastry shop in the 9th arrondissement of Paris: brushing the tops with seasoned butter before baking. It creates a shiny, flavorful crust that seals in moisture and adds an extra layer of taco goodness. I have tested this ground beef sliders recipe countless times in my own NYC kitchen — tweaking the seasoning, adjusting the bake time, and perfecting the ratio of cheese to beef so that every slider is perfectly balanced. One common mistake I see is overloading the buns with wet ingredients, which makes them soggy. I will show you exactly how to avoid that and get the perfect texture every time. Let us dive in, friend.
Why This Cheesy Taco Sliders Recipe Is the Best
The Flavor Secret. The combination of rich, seasoned ground beef, creamy sauce, and buttery taco-seasoned tops baked to golden perfection on sweet Hawaiian rolls is pure magic. I learned in Paris that layering flavors is an art — each component here builds on the last, from the cumin and chili notes in the taco seasoning to the tangy salsa and sour cream that cuts through the richness. It is bold, satisfying, and absolutely crowd-pleasing.
Perfected Texture. The key is the butter topping. Brushing the buns with melted butter mixed with extra taco seasoning before baking gives them a beautiful golden crust with a slight crunch, while the inside stays pillowy soft. The crushed tortilla chips add a subtle crunch in the middle — a trick I borrowed from a Moroccan street food stall in Marrakech, where layers of texture are everything.
Foolproof & Fast. With only 15 minutes of prep and a handful of everyday ingredients, this recipe is designed for busy home cooks. Whether you are a beginner or a seasoned pro, the step-by-step process is straightforward and forgiving. Plus, it scales beautifully — double the batch for a larger crowd with zero extra effort.
Cheesy Taco Sliders Ingredients
I love picking up fresh ingredients for these sliders at the Union Square Greenmarket in NYC — the smell of fresh cilantro and the sight of ripe tomatoes always reminds me of the souks in Marrakech. For the best results, choose high-quality ground beef (80/20 is ideal for flavor) and use a good Mexican blend cheese that melts beautifully. Here is everything you will need:
Ingredients List
- 1 lb ground beef (80/20 recommended)
- 1 packet (1 oz) taco seasoning
- 1/2 cup water
- 12 slider buns (Hawaiian sweet rolls recommended)
- 2 cups shredded Mexican blend cheese
- 1/4 cup mayonnaise
- 1/4 cup sour cream
- 1/4 cup salsa
- 1/2 cup crushed tortilla chips (optional, for crunch)
- 1/4 cup melted butter
- 1 tablespoon taco seasoning (extra, for topping)
- Optional toppings: shredded lettuce, diced tomatoes, sliced jalapeños, chopped cilantro
Ingredient Spotlight
Ground Beef (80/20): The 20% fat content ensures juicy, flavorful sliders. If you use leaner beef (90/10), add a tablespoon of olive oil to the skillet to prevent dryness. For a lighter option, ground turkey works well — just add an extra tablespoon of taco seasoning to boost flavor.
Hawaiin Sweet Rolls: Their soft, slightly sweet texture is the perfect canvas for savory fillings. King’s Hawaiian is my go-to. If unavailable, brioche slider buns are an excellent substitute — they add richness and hold up well to baking.
Mexican Blend Cheese: This pre-shredded mix typically includes cheddar, Monterey Jack, asadero, and queso quesadilla. It melts beautifully and has a mild, creamy flavor. For a sharper kick, substitute with extra-sharp cheddar or pepper Jack for heat.
| Original Ingredient | Best Substitution | Flavor / Texture Impact |
|---|---|---|
| Ground Beef (80/20) | Ground Turkey + 1 tbsp olive oil | Milder flavor, slightly drier — add extra seasoning |
| Hawaiian Sweet Rolls | Brioche slider buns | Richer, more buttery — equally soft and sturdy |
| Mexican Blend Cheese | Pepper Jack or sharp cheddar | More heat (Pepper Jack) or sharper tang (cheddar) |
| Sour Cream | Greek yogurt (plain, full-fat) | Tangier, slightly thicker — equally creamy |
| Tortilla Chips (crushed) | Panko breadcrumbs + pinch of cumin | Less crunch, but adds subtle texture and spice |
How to Make Cheesy Taco Sliders — Step-by-Step
Trust me, this ground beef sliders recipe is as easy as it gets. Follow these steps and you will have a tray of golden, cheesy perfection ready in about 40 minutes.
Step 1: Preheat and Prep the Dish
Preheat your oven to 350°F (175°C). Lightly grease a 9×13-inch baking dish with butter or non-stick spray. This ensures the buns don not stick and the bottoms get a gentle crisp.
💡 mia’s Pro Tip: Use a metal or ceramic baking dish — glass dishes retain more moisture and can make the bottoms of the buns slightly soggy.
Step 2: Cook the Ground Beef
Place a large skillet over medium-high heat. Add the ground beef and cook, breaking it apart with a wooden spoon, until it is fully browned — about 5 to 6 minutes. Drain any excess fat (leave about 1 tablespoon in the pan for flavor).
⚠️ Common Mistake to Avoid: Do not over-crowd the pan. If you are doubling the recipe, cook the beef in two batches so it browns properly instead of steaming.
Step 3: Season the Beef
Sprinkle the entire packet of taco seasoning over the browned beef, then add 1/2 cup of water. Stir well and let it simmer for 2 to 3 minutes until the sauce thickens and coats the meat. Remove from heat and set aside.
💡 mia’s Pro Tip: Let the seasoned beef cool for 2 minutes before assembling — this prevents the buns from getting too soggy from the hot moisture.
Step 4: Assemble the Bottom Layer
Take the entire pack of slider buns and slice them in half horizontally, keeping them connected as a single sheet. Place the bottom half in the greased baking dish. Spread the cooked ground beef evenly over the bottom buns, making sure every bite gets some meat.
⚠️ Common Mistake to Avoid: Do not press the beef down too hard — you want a light, even layer so the cheese can melt around it.
Step 5: Build the Cheesy Center
Sprinkle 1 1/2 cups of shredded Mexican blend cheese evenly over the beef. In a small bowl, mix the mayonnaise, sour cream, and salsa until smooth. Spread this creamy mixture over the cheese layer. If you are using crushed tortilla chips, sprinkle them on top now, followed by the remaining 1/2 cup of cheese.
💡 mia’s Pro Tip: For the creamiest texture, let the sour cream and mayo come to room temperature before mixing — it spreads more evenly and bakes into a velvety layer.
Step 6: Top and Brush
Place the top half of the slider buns over the filling. In a separate small bowl, mix the melted butter with 1 tablespoon of taco seasoning. Brush this mixture generously over the tops of the buns, making sure every bun gets coated.
⚠️ Common Mistake to Avoid: Do not skip the butter topping — it is what gives these sliders their iconic golden, flavorful crust. Use a pastry brush for even coverage.
Step 7: Bake and Serve
Cover the dish with foil and bake for 15 minutes. Remove the foil and bake for an additional 5 to 7 minutes, until the tops are golden brown and the cheese is bubbly around the edges. Let the sliders rest for 5 minutes before slicing into individual portions. Serve with your favorite toppings.
💡 mia’s Pro Tip: For an extra-crispy top, switch the oven to broil for the last 1 to 2 minutes (watch closely to prevent burning).
| Step | Action | Duration | Key Visual Cue |
|---|---|---|---|
| 1 | Preheat oven & grease dish | — | Dish is lightly coated, oven ready |
| 2 | Brown ground beef | 5–6 min | No pink remains; meat is crumbly |
| 3 | Add taco seasoning & water | 2–3 min | Sauce thickens, coats the beef |
| 4 | Assemble bottom buns & beef | 2 min | Even meat layer over buns |
| 5 | Add cheese, creamy sauce, chips | 3 min | Layers are visible and even |
| 6 | Top buns & brush with butter | 2 min | Tops are evenly glossy |
| 7 | Bake (covered + uncovered) | 20–22 min | Golden tops, bubbly cheese edges |
Serving & Presentation
I love serving these sliders straight from the baking dish — it feels casual and inviting, the way my mother used to serve tagine in Morocco, with everyone gathering around and digging in together. Arrange the sliders on a large wooden board or a platter lined with parchment paper, and let guests top their own with shredded lettuce, diced tomatoes, sliced jalapeños, and a generous sprinkle of fresh cilantro. A dollop of extra sour cream or guacamole on the side takes them over the top.
For a party spread, pair these taco sliders with a bowl of black bean dip, fresh pico de gallo, and a tray of sliced bell peppers and jicama sticks. In NYC, I love serving them alongside a crisp, citrusy slaw with lime and cilantro — the acidity cuts through the richness beautifully. And of course, a cold Mexican lager or a spicy margarita never hurts.
| Pairing Type | Suggestions | Why It Works |
|---|---|---|
| Side Dish | Black bean dip, pico de gallo, lime-cilantro slaw | Adds freshness, acidity, and contrast to rich sliders |
| Sauce / Dip | Guacamole, chipotle crema, extra salsa | Enhances creaminess and adds smoky heat |
| Beverage | Mexican lager, spicy margarita, iced horchata | Refreshing, cuts richness, complements spices |
| Garnish | Fresh cilantro, pickled jalapeños, radish slices | Brightens the plate and adds fresh flavor |
Make-Ahead, Storage & Reheating
Between my busy NYC schedule and hosting friends on weekends, I rely on make-ahead meals that still taste incredible. These sliders are perfect for prepping ahead — you can assemble them the night before and bake just before serving. Leftovers store beautifully, too, making this a recipe that keeps on giving.
| Method | Container | Duration | Reheating Tip |
|---|---|---|---|
| Refrigerator | Airtight container | Up to 3 days | Oven at 350°F for 8–10 min, covered with foil |
| Freezer | Wrap individually in foil then bag | Up to 2 months | Thaw overnight, then oven at 350°F for 12–15 min |
| Make-Ahead | Assembled in dish, covered, refrigerated | Up to 24 hours in advance | Add 5 min to covered bake time if starting cold |
When reheating, the oven is your best friend — it restores the buns’ gentle crisp and melts the cheese back to gooey perfection. The microwave works in a pinch, but the buns will be softer. For a quick fix, I sometimes reheat individual sliders in an air fryer at 350°F for 4 minutes — they come out wonderfully crispy on top and warm all the way through.
Variations & Easy Swaps
One of the things I love most about this taco sliders appetizer is how endlessly adaptable it is. Whether you are feeding a vegetarian friend, avoiding gluten, or just craving something different, these variations have you covered. I have tested every single one in my own kitchen — and they all deliver big on flavor.
| Variation | Key Change | Best For | Difficulty Impact |
|---|---|---|---|
| Chicken Taco Sliders | Ground chicken instead of beef | Lighter protein, poultry lovers | No change in difficulty |
| Gluten-Free / Low-Carb | Gluten-free buns or large lettuce wraps | Gluten-sensitive, low-carb diets | Slightly more delicate assembly |
| Spicy Black Bean & Corn | Black beans, corn, and queso fresco | Vegetarian, meatless Monday | No change in difficulty |
Chicken Taco Sliders
Swap the ground beef for 1 pound of ground chicken. Add 1 tablespoon of olive oil to the skillet since chicken is leaner. Season exactly the same way with taco seasoning and water. The result is a lighter, slightly milder slider that pairs beautifully with a fresh cilantro-lime crema. This version reminds me of the delicate chicken tagine my mother made with preserved lemons — gentle, fragrant, and comforting.
Gluten-Free / Low-Carb Option
Use your favorite gluten-free slider buns (I like the ones from Trader Joe’s or a local NYC bakery). For a low-carb version, use large, sturdy lettuce leaves like romaine or butter lettuce as wraps. Assemble the sliders in a baking dish lined with parchment, and reduce the bake time by 5 minutes since the buns are more delicate. The filling stays the same — all the taco flavor, none of the gluten.
Spicy Black Bean & Corn Sliders
For a vegetarian twist that still feels hearty, replace the beef with 1 can of drained black beans (mashed slightly) and 1 cup of corn kernels. Sauté with 1 tablespoon of olive oil, then season with taco seasoning and water as directed. Add a pinch of cayenne for heat. Top with crumbled queso fresco instead of shredded cheese for a authentic Mexican touch. This version is bright, colorful, and always a hit at parties.
What is the best way to keep cheesy taco sliders from getting soggy?
The absolute best way to prevent soggy sliders is to control the moisture in your fillings. First, drain the cooked ground beef thoroughly after browning — excess grease is a common culprit. Second, let the seasoned beef cool for 2 to 3 minutes before spreading it over the buns so the steam does not soften them. Third, place the creamy sauce (mayo, sour cream, salsa) on top of the cheese, not directly on the buns, so the cheese acts as a barrier. Finally, brushing the tops with butter and baking covered then uncovered creates a protective crust that keeps the buns from absorbing too much moisture.
Can I use a different type of cheese instead of cheddar for these taco sliders?
Absolutely — this recipe is very forgiving when it comes to cheese. While I recommend a Mexican blend for its meltability and mild flavor, you can absolutely use other cheeses. Pepper Jack adds wonderful heat and creaminess, making each slider a little spicier. Sharp cheddar gives a bolder, tangier flavor that cuts through the richness of the beef. Monterey Jack melts beautifully and has a mild, buttery taste. A smoked Gouda would also work beautifully, adding a subtle smokiness that pairs well with taco seasoning. Just avoid pre-shredded cheeses that contain anti-caking agents — they do not melt as smoothly. Shred your own for the best results.
How long should I bake cheesy taco sliders for the perfect melt?
For the perfect melt, bake the sliders covered with foil at 350°F for 15 minutes — this traps steam and gently melts the cheese all the way through without drying out the buns. Then remove the foil and bake for another 5 to 7 minutes. This second uncovered stage allows the tops to turn golden brown and the cheese at the edges to become bubbly and slightly crisp. If you want an even more golden, slightly crunchy top, switch the oven to broil for the final 1 to 2 minutes. Watch carefully, as broiler times vary. Total oven time is about 20 to 22 minutes for perfectly melted, gooey, golden sliders.
What can I serve with cheesy taco sliders for a party spread?
These sliders are the star of any party table, but they pair beautifully with a variety of sides and dips. I love serving them with a big bowl of black bean dip or refried beans, fresh pico de gallo, guacamole, and a tangy lime-cilantro slaw. For crunch, add tortilla chips with a smoky chipotle salsa. A tray of fresh vegetables like bell pepper strips, jicama sticks, and cucumber rounds balances the richness. For drinks, a cold Mexican lager, spicy margarita, or even a pitcher of horchata keeps things festive. And do not forget the extra toppings — shredded lettuce, diced tomatoes, pickled jalapeños, and fresh cilantro let guests customize their sliders.
Can I make these cheesy taco sliders ahead of time for a party?
Yes, you can assemble the sliders up to 24 hours in advance, which makes them perfect for entertaining. Follow the recipe all the way through brushing the tops with butter, then cover the dish tightly with plastic wrap or foil and refrigerate. When you are ready to bake, add 5 extra minutes to the covered baking time to account for the cold dish. You can also fully bake the sliders, let them cool, and refrigerate for up to 3 days. Reheat in a 350°F oven, covered, for about 10 minutes. I do this all the time for my NYC get-togethers — it takes the stress out of party prep.
What type of ground beef is best for taco sliders?
I recommend using 80/20 ground beef (80% lean, 20% fat) for these sliders. The fat content keeps the meat juicy and flavorful, which is essential for a satisfying bite. If you use leaner beef like 90/10 or 93/7, the meat can turn out dry and crumbly — but you can fix that by adding a tablespoon of olive oil to the skillet before cooking. Ground chuck is another excellent choice because it has a good meat-to-fat ratio and rich flavor. For the best texture, avoid pre-frozen beef that has been thawed, as it tends to release more water and steam instead of browning properly.
Can I freeze cheesy taco sliders for later?
Yes, these sliders freeze beautifully, which makes them a fantastic make-ahead meal. For best results, bake the sliders completely, let them cool to room temperature, then wrap each slider individually in aluminum foil. Place the wrapped sliders in a freezer-safe zip-top bag or airtight container, and they will keep for up to 2 months. To reheat, thaw overnight in the refrigerator, then warm them in a 350°F oven, still wrapped in foil, for 12 to 15 minutes. If you are in a hurry, you can reheat directly from frozen — just add 5 to 7 minutes to the oven time. The buns stay soft and the cheese remains gooey.
How do I keep the slider buns from getting too hard on top?
The key to soft-but-golden tops is the butter brush and the covered baking step. Brushing the buns with a mixture of melted butter and taco seasoning adds flavor and moisture while helping them brown. Baking covered with foil for the first 15 minutes traps steam, which keeps the buns soft and prevents them from drying out. Only during the final uncovered 5 to 7 minutes do the tops get golden. If you find your buns are still too hard, reduce the uncovered bake time by 2 minutes, or tent loosely with foil for the last few minutes. Every oven runs a little differently, so check at the 5-minute mark.
Share Your Version!
I would love to see how these cheesy taco sliders turn out in your kitchen! Did you add extra jalapeños for heat? Did you try the black bean variation? Or maybe you discovered a new topping combination that your whole family loved — drop a comment below and let me know. Your insights help other home cooks try new things and build confidence in the kitchen. And if you snap a photo of your slider tray, tag me on Instagram or Pinterest at @exorecipes — I feature my favorites in my stories every week.
If this easy party snack recipe brought a little warmth to your table, please leave a star rating and share it with a friend who loves great food. From my NYC kitchen to yours — I hope this recipe brings as much warmth to your table as it does to mine. — mia 🧡
Love This Recipe? Save It to Pinterest!
If you enjoyed this Cheesy Taco Sliders with Ground Beef recipe, do not let it get lost in your browser tabs! 😄 Pin it now so you can find it again anytime — and explore hundreds more tried-and-tested recipes waiting for you on my Pinterest boards.
👉 Follow mia on Pinterest @exorecipe
📌 Pin this recipe · 🔁 Re-pin your favorites · 💬 Tag me when you make it — I love seeing your creations!
🧡 Did you make this recipe?
I would love to hear how it turned out! Leave a comment below, rate the recipe, and tag @exorecipes on Instagram or Pinterest with your photos. Your feedback helps this little NYC kitchen grow — thank you for being here! 🧡
“`
Print

Cheesy Taco Sliders with Ground Beef Easy Party Snack Recipe
- Prep Time: 15 minutes
- Cook Time: 25 minutes
- Total Time: 40 minutes
- Yield: 12 sliders 1x
- Method: Appetizer, Main Course
- Cuisine: Mexican-American
Description
These cheesy taco sliders with ground beef are the perfect easy party snack. Loaded with seasoned beef, melty cheese, and all your favorite taco toppings, they’re baked on soft slider buns until golden and gooey.
Ingredients
- 1 lb ground beef
- 1 packet (1 oz) taco seasoning
- 1/2 cup water
- 12 slider buns (Hawaiian sweet rolls recommended)
- 2 cups shredded Mexican blend cheese
- 1/4 cup mayonnaise
- 1/4 cup sour cream
- 1/4 cup salsa
- 1/2 cup crushed tortilla chips (optional, for crunch)
- 1/4 cup melted butter
- 1 tablespoon taco seasoning (extra, for topping)
- Optional toppings: shredded lettuce, diced tomatoes, sliced jalapeños, chopped cilantro
Instructions
- Preheat oven to 350°F (175°C). Lightly grease a 9×13-inch baking dish.
- In a large skillet over medium-high heat, cook ground beef breaking it apart until browned. Drain excess fat.
- Add 1 packet taco seasoning and 1/2 cup water. Stir and simmer for 2-3 minutes until thickened. Remove from heat.
- Slice the entire pack of slider buns in half horizontally (keeping them connected). Place the bottom half in the prepared baking dish.
- Spread the cooked ground beef evenly over the bottom buns.
- Sprinkle 1 1/2 cups of shredded cheese over the beef.
- In a small bowl, mix mayonnaise, sour cream, and salsa. Spread this mixture over the cheese layer.
- If using, sprinkle crushed tortilla chips on top.
- Add the remaining 1/2 cup cheese over the chips.
- Place the top half of the slider buns on top.
- In another small bowl, mix melted butter and 1 tablespoon taco seasoning. Brush this mixture over the tops of the buns.
- Cover with foil and bake for 15 minutes. Remove foil and bake for an additional 5-7 minutes until tops are golden and cheese is bubbly.
- Let cool for 5 minutes. Slice into individual sliders and serve with desired toppings.
Notes
For extra flavor, you can toast the buns lightly before assembling. Leftover sliders can be stored in an airtight container in the refrigerator for up to 3 days. Reheat in the oven or microwave.
Nutrition
- Calories: 380
- Sugar: 7 g
- Fat: 22 g
- Carbohydrates: 28 g
- Protein: 18 g

Tried This Recipe? Leave a Comment!
Did you make this recipe? I’d love to hear how it turned out! Please leave a comment and a rating below. Your feedback helps other home cooks and supports cheerychop.com!
For more delicious inspiration, follow me on Pinterest!
