Table of Contents
Cheesy Garlic Biscuit Bites – Pull-Apart Gooey Goodness: The Ultimate Crowd-Pleasing Appetizer
I still remember the first time I made these cheesy garlic biscuit bites for a Super Bowl party in my tiny NYC walk-up. My neighbor from two floors down—a self-proclaimed “biscuit snob” from Georgia—knocked on my door after one bite and asked for the recipe on the spot. That’s the power of a truly great, gooey, pull-apart garlic biscuit. These aren’t just any easy cheesy biscuits; they’re the ones that disappear from the platter in under five minutes, every single time.
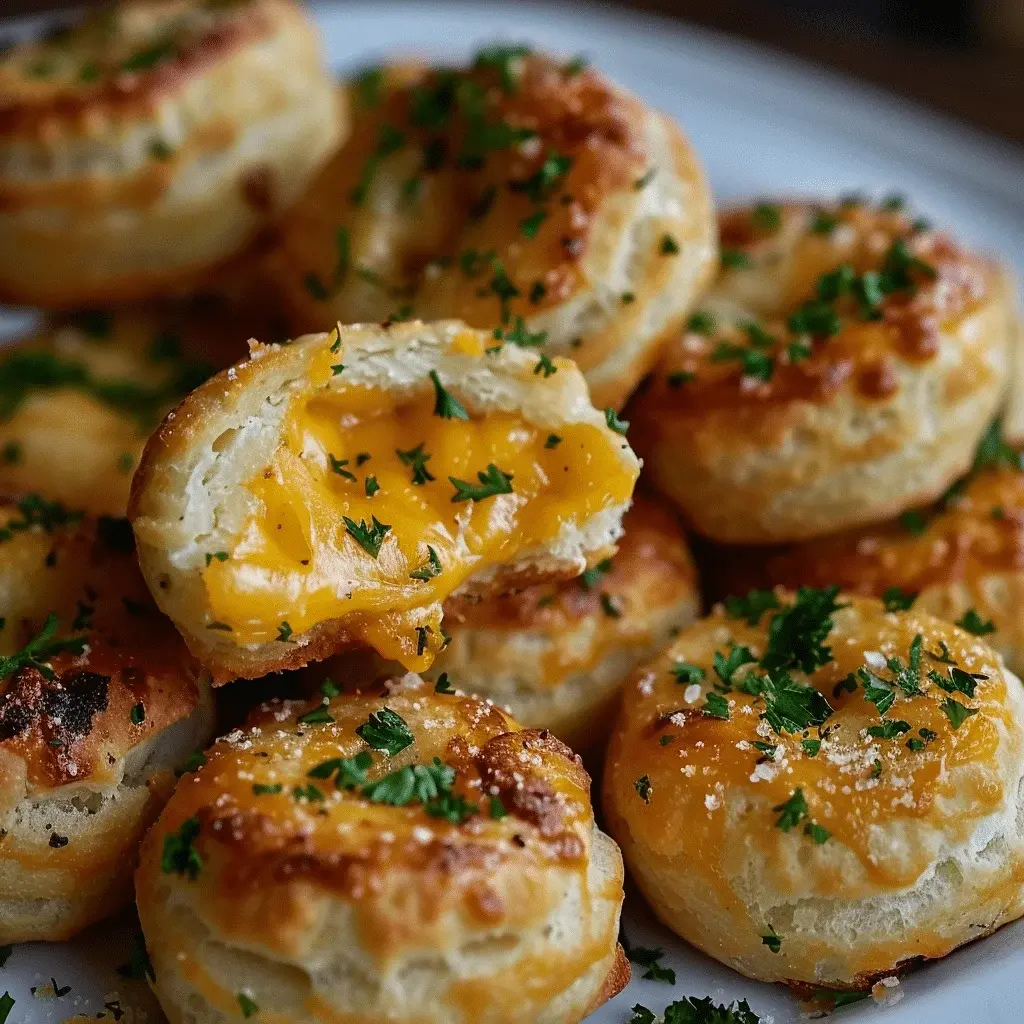
Imagine this: a golden-brown exterior that shatters slightly as you pull it apart, revealing a ribbon of melted, stretchy cheese that clings to every piece. The garlic butter—infused with fresh herbs and a whisper of heat—drips down your fingers, and the first bite is a perfect balance of salty, buttery, and savory. The aroma alone, with garlic and cheese mingling as they bake, will have everyone hovering in your kitchen before you even pull the pan out of the oven.
My version of these pull apart garlic biscuits draws from three culinary worlds. The buttery, flaky base is pure French technique—I trained in Paris on laminated dough and biscuit methods. The bold garlic and herb profile comes straight from my mother’s kitchen in Morocco, where garlic and olive oil are foundational. And the generous, unapologetic cheese? That’s classic NYC—go big or go home. This easy cheesy biscuits recipe is designed to be foolproof, fast, and absolutely irresistible. I’ll show you the one pro tip that keeps them gooey (never dry) and the common mistake to avoid for that perfect pull-apart texture every time.
Why This Cheesy Garlic Biscuit Bites Recipe Is the Best
The Flavor Secret. Most recipes just sprinkle garlic powder on top and call it a day. I take it further: I steep fresh minced garlic in warm melted butter with a pinch of smoked paprika and dried oregano—a trick I learned from a spice merchant in the Marrakech souk. That infused butter gets brushed between every layer of biscuit dough, so the garlic flavor permeates every bite, not just the surface. Combined with a blend of sharp cheddar and low-moisture mozzarella, the flavor is deep, savory, and absolutely addictive.
Perfected Texture. The secret to the ideal cheesy bread bite texture—crispy edges, tender center, stretchy cheese—is in the dough handling. I use a cold butter and buttermilk biscuit base (no shortening) and fold the dough just three times before cutting. This creates distinct, flaky layers that separate beautifully when baked, allowing the cheese to melt into the crevices. The pull-apart factor is next-level: each piece comes away with its own generous cheese pocket.
Foolproof & Fast. From start to finish, these come together in 30 minutes. There’s no yeast, no rising time, no special equipment. My Paris-trained pastry chef precision means every measurement is tested to work with standard US ingredients. Whether you’re using a pre-made mix or making the dough from scratch, the method stays the same. This is the kind of recipe that makes you look like a pro even if you’ve never baked a biscuit in your life.
Cheesy Garlic Biscuit Bites Ingredients
I source my cheese from a dairy stand at the Union Square Greenmarket and my garlic from the little Italian market on Arthur Avenue in the Bronx. But everything here is available at any US grocery store. Let me walk you through what you’ll need and why each ingredient matters.
Ingredients List
- 2 cups all-purpose flour (spooned and leveled)
- 1 tablespoon baking powder
- 1 teaspoon granulated sugar
- ½ teaspoon fine sea salt
- 6 tablespoons cold unsalted butter, cubed
- ¾ cup cold buttermilk (plus 2 tablespoons for brushing)
- 1½ cups shredded sharp cheddar cheese
- ½ cup shredded low-moisture mozzarella cheese
- 3 tablespoons unsalted butter, melted
- 4 cloves fresh garlic, minced (about 2 teaspoons)
- ½ teaspoon smoked paprika
- ½ teaspoon dried oregano
- 2 tablespoons chopped fresh parsley (optional, for garnish)
- Flaky sea salt for finishing (optional)
Ingredient Spotlight
Sharp Cheddar Cheese: This is the backbone of flavor in these garlic cheese biscuit bites. I recommend a block of sharp cheddar that you shred yourself—pre-shredded cheese contains anti-caking agents that prevent it from melting into that creamy, gooey consistency we’re after. Look for a cheddar aged at least 6 months for maximum flavor punch.
Low-Moisture Mozzarella: This is the stretch factor. Fresh mozzarella is too watery and will make your biscuits soggy. Low-moisture mozzarella (the kind that comes in blocks or pre-shredded bags) melts into long, elastic strands that pull apart beautifully. It’s the secret to the “Instagram-worthy cheese pull.”
Buttermilk: The acidity in buttermilk reacts with the baking powder to create lift and tenderness. It also adds a subtle tang that balances the richness of the cheese and butter. If you don’t have buttermilk, you can make a quick substitute: add 2 teaspoons of white vinegar or lemon juice to ¾ cup of whole milk and let it sit for 5 minutes.
Fresh Garlic vs. Garlic Powder: I always use fresh garlic here. Garlic powder tends to taste dusty and one-dimensional. When you steep fresh minced garlic in warm melted butter—even just for a minute—the flavor softens and sweetens, becoming far more aromatic and complex.
| Original Ingredient | Best Substitution | Flavor / Texture Impact |
|---|---|---|
| Sharp Cheddar Cheese | Gouda or Gruyère | Smokier, creamier melt; slightly less sharp |
| Buttermilk | Whole milk + 2 tsp lemon juice | Slightly less tang, still tender |
| Smoked Paprika | Regular paprika + pinch of cumin | Less smoky, more earthy warmth |
| Fresh Garlic | 1 tsp garlic powder (not pre-minced in jar) | Milder, less complex; use ½ the amount |
How to Make Cheesy Garlic Biscuit Bites — Step-by-Step
Trust me when I say this is one of the most forgiving and rewarding recipes you’ll make. Follow these steps, and you’ll have a platter of irresistible cheesy bread bites that will make you the hero of any gathering.
Step 1: Prepare the Garlic Butter
In a small saucepan over low heat, melt 3 tablespoons of unsalted butter. Once melted, add the minced garlic, smoked paprika, and dried oregano. Let it simmer gently for 60–90 seconds, stirring constantly, until the garlic is fragrant but not browned. Remove from heat and set aside. This short infusion is what gives the garlic depth without any raw bitterness.
💡 mia’s Pro Tip: If you accidentally brown the garlic, start over. Burnt garlic tastes acrid and will overpower the entire batch. Low and slow is your friend here.
Step 2: Make the Biscuit Dough
In a large bowl, whisk together the flour, baking powder, sugar, and salt. Add the cold cubed butter and, using a pastry blender or your fingertips, cut it into the flour until the mixture resembles coarse meal with pea-sized butter pieces. Make a well in the center, pour in the cold buttermilk, and stir with a fork just until a shaggy dough forms. Do not overmix. Turn the dough onto a lightly floured surface and gently bring it together with three quick folds—fold the dough over itself, press down, turn, repeat.
⚠️ Common Mistake to Avoid: Overworking the dough develops gluten, making your biscuits tough. Mix until just combined, and handle the dough as little as possible. Those visible butter pieces are exactly what you want—they create steam pockets for flaky layers.
Step 3: Assemble the Bites
Pat the dough into a ½-inch thick rectangle. Brush the surface with the prepared garlic butter (reserve about 2 tablespoons for the top). Sprinkle two-thirds of the shredded cheddar and mozzarella evenly over the buttered dough. Using a sharp knife or bench scraper, cut the dough into 1-inch squares. Gently gather the squares and place them upright in a lightly greased 8-inch round cake pan or small cast-iron skillet, arranging them so they’re touching but not packed too tightly. The gaps allow the cheese to bubble up and create those irresistible golden edges.
💡 mia’s Pro Tip: Don’t press the squares down. Let them sit however they fall—some flat, some on their sides. The uneven surface creates nooks and crannies that catch the garlic butter and cheese, giving you little pockets of extra flavor in every pull-apart piece.
Step 4: Bake and Finish
Preheat your oven to 425°F. Brush the top of the assembled biscuit bites with the reserved garlic butter and sprinkle the remaining shredded cheese on top. Bake for 14–16 minutes, rotating the pan halfway through, until the biscuits are deep golden brown and the cheese is bubbly and browned in spots. Remove from the oven and let rest for 3 minutes—this is crucial for the cheese to set slightly so it pulls apart rather than sliding off. Garnish with fresh parsley and a sprinkle of flaky sea salt, if desired.
⚠️ Common Mistake to Avoid: Skipping the rest time after baking is the #1 reason people end up with a cheesy mess instead of beautiful pull-apart bites. Those 3 minutes allow the cheese structure to firm up just enough to stretch when you pull, rather than pooling on the plate.
| Step | Action | Duration | Key Visual Cue |
|---|---|---|---|
| 1 | Infuse garlic in melted butter | 60–90 sec | Garlic fragrant, butter not bubbling |
| 2 | Cut butter into dry ingredients | 3–4 min | Pea-sized butter pieces in coarse meal |
| 3 | Mix and fold dough | 1–2 min | Shaggy dough, not smooth |
| 4 | Assemble and bake | 14–16 min at 425°F | Deep golden brown, bubbly cheese |
| 5 | Rest before serving | 3 min | Cheese sets slightly, holds shape |
Serving & Presentation
I serve these pull apart garlic biscuits straight from the skillet on a wooden board, with a small bowl of warm marinara sauce on the side for dipping. The contrast between the garlicky, cheesy biscuit and the bright, tangy tomato sauce is absolutely perfect. For a Moroccan twist, I sometimes offer a side of harissa-spiked yogurt or a simple honey drizzle—the sweet heat is a stunning counterpoint to the savory richness.
In NYC, I’ve seen these paired with everything from game-day wings to a simple green salad for a quick weeknight dinner. They’re also incredible alongside a bowl of tomato soup or chili. The key is to serve them warm, when the cheese is still stretchy and the garlic butter is at its most aromatic. I like to scatter a few extra fresh parsley leaves and a pinch of flaky sea salt over the top right before serving—it makes the platter look beautiful and adds a fresh finish.
| Pairing Type | Suggestions | Why It Works |
|---|---|---|
| Side Dish | Tomato soup, chili, green salad | Acidity and freshness balance the rich cheese and butter |
| Sauce / Dip | Marinara, garlic aioli, harissa yogurt | Adds moisture and a contrasting flavor note |
| Beverage | Light lager, rosé, iced tea | Crisp, cold drinks cut through the richness |
| Garnish | Fresh parsley, flaky sea salt, red pepper flakes | Adds color, texture, and a final flavor pop |
Make-Ahead, Storage & Reheating
My NYC schedule means I’m always looking for smart shortcuts. These cheesy garlic biscuit bites are actually wonderful for meal prep—you can assemble them entirely (minus the final brush of garlic butter and top cheese) and refrigerate for up to 24 hours before baking. Just add 2–3 minutes to the bake time if starting from cold. They also freeze beautifully, which is a lifesaver when you need an instant appetizer.
| Method | Container | Duration | Reheating Tip |
|---|---|---|---|
| Refrigerator | Airtight container | Up to 3 days | Oven at 350°F for 5 min, not microwave |
| Freezer | Freezer-safe bag or container | Up to 2 months | Bake from frozen at 425°F for 18 min |
| Make-Ahead | Covered pan in fridge | Up to 24 hours before baking | Add brush and top cheese just before baking |
To reheat, I always use the oven (never the microwave—it makes the biscuits soggy and the cheese rubbery). Place leftover bites on a baking sheet and warm at 350°F for 5 minutes. For frozen unbaked assembled bites, bake directly from frozen at 425°F for 18–20 minutes, adding the remaining cheese and garlic butter for the last 5 minutes. The texture will still be beautifully flaky and gooey.
Variations & Easy Swaps
One of the things I love most about this easy cheesy biscuits recipe is how adaptable it is. Over the years, I’ve played with countless variations—some inspired by my Moroccan roots, others by what I find at the farmers market on any given Saturday. Here are three of my favorite ways to switch it up.
| Variation | Key Change | Best For | Difficulty Impact |
|---|---|---|---|
| Moroccan Spiced | Add ras el hanout, swap cheddar for feta & Monterey Jack | Bold flavor lovers, dinner party starter | Easy + ingredient swap |
| Gluten-Free | Use 1:1 gluten-free flour blend + ½ tsp xanthan gum | Gluten-free guests, texture still flaky | Same difficulty |
| Everything Bagel | Top with everything bagel seasoning | Brunch, game day, NYC nostalgia | Effortless |
Moroccan Spiced Version
This variation is very close to my heart. Add 1½ teaspoons of ras el hanout (a fragrant Moroccan spice blend) to the flour mixture. Replace the cheddar with 1 cup of crumbled feta and ½ cup of shredded Monterey Jack. The feta doesn’t melt the same way, but it creates little salty, tangy pockets throughout the biscuit. Finish with a drizzle of honey and a sprinkle of sesame seeds. It’s the version I serve when I want to share a piece of my heritage with friends.
Gluten-Free / Dairy-Free Version
I tested this for a friend with celiac, and it works beautifully. Use a high-quality 1:1 gluten-free flour blend (I like King Arthur Measure for Measure) and add ½ teaspoon of xanthan gum if your blend doesn’t already include it. For dairy-free, substitute the butter with a good vegan butter stick (not tub) and use a plant-based cheddar shred that melts well. The texture will be slightly more tender and less flaky, but the gooey, pull-apart factor is still very much there. I recommend baking it for 2–3 minutes longer to help the gluten-free flour set properly.
Everything Bagel Twist
This one is pure NYC energy. After brushing the top with the final layer of garlic butter and cheese, sprinkle generously with everything bagel seasoning—sesame seeds, poppy seeds, dried garlic flakes, dried onion flakes, and salt. The result is a cheesy garlic biscuit bite that tastes like the best bagel shop in Brooklyn collided with a Southern biscuit. I love serving these alongside a bowl of creamy dill dip or chive cream cheese.
How do you keep cheesy garlic biscuit bites gooey and not dry?
The key to keeping these garlic cheese biscuit bites perfectly gooey starts with the fat-to-flour ratio—using enough cold butter in the dough and brushing with infused garlic butter before baking creates steam that keeps the interior tender. Also, using a mix of sharp cheddar and low-moisture mozzarella ensures the cheese stays creamy rather than oily. Don’t overbake: pull them at 14–16 minutes when the cheese is bubbly and the edges are golden. Finally, let them rest for 3 minutes after baking so the cheese sets into a stretchy, pull-apart consistency instead of running out.
Can I use pre-made biscuit dough for cheesy garlic biscuit bites?
Absolutely—pre-made biscuit dough works wonderfully as a shortcut for this easy cheesy biscuits recipe. I recommend using the refrigerated flaky biscuit tubes (like Pillsbury Grands) for best results. Simply cut each biscuit into quarters, toss with the shredded cheese and garlic butter mixture, and arrange in a skillet. Bake as directed, checking at the 12-minute mark. The texture will be slightly less layered than homemade, but the gooey cheese and garlic flavor will still be outstanding. This is my go-to version when I’m short on time or making these with kids.
What cheese works best for cheesy garlic biscuit bites?
For the very best cheesy bread bites, I recommend a combination of two cheeses: sharp cheddar for bold flavor and low-moisture mozzarella for that Instagram-worthy stretch. The cheddar brings tang and depth, while the mozzarella creates the gooey, elastic pull. If you want to experiment, Gouda adds a smoky creaminess, Gruyère offers nuttiness, and Pepper Jack gives a spicy kick. Avoid pre-shredded cheeses if possible, as the anti-caking coating can prevent smooth melting. Shred from a block right before baking for the creamiest results.
How long should you bake cheesy garlic biscuit bites for the best texture?
Bake these pull apart garlic biscuits at 425°F for 14–16 minutes. The high temperature is essential—it creates steam from the cold butter and buttermilk, giving you flaky layers rather than dense, dry biscuits. Rotate the pan halfway through for even browning. You’ll know they’re done when the tops are deep golden brown, the cheese is bubbly with a few browned spots, and the edges of the pan show bubbling butter. Let them rest in the pan for exactly 3 minutes after baking before serving; this allows the cheese to set into a stretchy consistency that pulls apart beautifully.
What dipping sauces go best with cheesy garlic biscuit bites?
Warm marinara sauce is the classic choice—its bright acidity cuts through the rich cheese and butter perfectly. I also love a creamy garlic aioli (just mix mayo with a touch of roasted garlic and lemon juice) or a spicy harissa yogurt for a Moroccan-inspired twist. For something truly indulgent, try a warm honey drizzle with red pepper flakes. The sweet-heat combination is absolutely addictive with the savory, cheesy biscuits. If you’re serving them as a side, they’re also fantastic dipped directly into a bowl of tomato soup or chili.
Can I make cheesy garlic biscuit bites ahead for a party?
Yes, and it’s a total game-changer for party prep. You can assemble the biscuit bites completely—including the cheese and garlic butter—in your baking pan, cover tightly with plastic wrap, and refrigerate for up to 24 hours before baking. When you’re ready, simply remove the plastic, brush with the reserved garlic butter, and bake at 425°F for 16–18 minutes (adding 2 minutes since the dough is cold). You can also freeze the assembled unbaked bites for up to 2 months. Bake from frozen at 425°F for 18–20 minutes. This make-ahead flexibility is one of the reasons this recipe is my most-requested for gatherings.
What can I serve with cheesy garlic biscuit bites for a complete meal?
These easy cheesy biscuits are incredibly versatile. For a weeknight dinner, I serve them alongside a simple roasted chicken or a big bowl of tomato soup. They also make a fantastic base for a breakfast dish—top them with a fried egg and a drizzle of hot sauce. For a party, pair them with grilled sausages, a fresh green salad with lemon vinaigrette, or a bowl of chili. In my NYC kitchen, I often serve them with a quick cucumber and tomato salad dressed with olive oil and mint—a nod to my Moroccan roots that refreshes the palate between each rich, cheesy bite.
Why are my cheesy garlic biscuit bites dry and tough?
Dry, tough biscuits are usually the result of overmixing the dough or overbaking. When you mix the dough, stir only until the flour is just incorporated—a shaggy dough is exactly what you want. Overworking develops gluten, which makes biscuits dense and hard. Additionally, measure your flour correctly by spooning it into the cup and leveling it off (not scooping directly from the bag), as too much flour is a common culprit. Finally, bake at 425°F and check at 14 minutes. Every minute past golden-brown is a step toward dryness. The interior should be tender and the cheese should still be visibly gooey when you pull the pan out.
Can I add meat to cheesy garlic biscuit bites?
Absolutely—this is a great way to turn them into a heartier dish. Cooked and crumbled Italian sausage, crispy bacon bits, or chopped pepperoni are all fantastic additions. Add about ½ cup of cooked meat to the cheese mixture before assembling. If you’re adding sausage or bacon, I recommend reducing the salt in the dough slightly to compensate. For a smoky touch, try diced andouille or chorizo. I often make a loaded version with bacon and sharp cheddar for game day, and it disappears faster than anything else on the table. Just be sure the meat is fully cooked before adding it to the biscuits.
How do I reheat leftover cheesy garlic biscuit bites without losing texture?
The absolute best way to reheat these cheesy bread bites is in the oven. Preheat to 350°F, place the leftover bites on a baking sheet, and warm for 5–7 minutes. This restores the crispy edges and re-melts the cheese without making the biscuits soggy. If you’re in a hurry, you can use an air fryer at 350°F for 3–4 minutes. Avoid the microwave at all costs—it turns the biscuits rubbery and the cheese oily. If you stored them in the refrigerator, let them sit at room temperature for 10 minutes before reheating so they warm more evenly. They’ll taste almost as good as fresh-baked.
Share Your Version!
I absolutely love hearing how this recipe turns out in your kitchen—and trust me, I read every single comment and tag. If you make these cheesy garlic biscuit bites, please leave a star rating and a comment below. Did you add a twist? Use a different cheese? Make the Moroccan-spiced version with honey? Tell me all about it! Your feedback helps other home cooks discover new ways to make this recipe their own.
Snap a photo of your pull-apart masterpiece and share it on Instagram or Pinterest—tag @exorecipes so I can see your creation and share it with our community. And here’s a question I’d love you to answer: what’s the one dish you’re most proud of pulling off for a crowd? For me, it’s these biscuits—the way they bring people together around the table reminds me of my mother’s kitchen in Morocco, where food was always about connection and joy. From my NYC kitchen to yours — I hope this recipe brings as much warmth to your table as it does to mine. — mia 🧡
Love This Recipe? Save It to Pinterest!
If you enjoyed these Cheesy Garlic Biscuit Bites, don’t let them get lost in your browser tabs! 😄 Pin them now so you can find them again anytime — and explore hundreds more tried-and-tested recipes waiting for you on my Pinterest boards.
👉 Follow mia on Pinterest @exorecipe
📌 Pin this recipe · 🔁 Re-pin your favorites · 💬 Tag me when you make it — I love seeing your creations!
💬 Made this recipe? Tell me how it went!
What cheese combination did you use? Did you try a variation? Drop a comment below and let’s talk biscuits!

Cheesy Garlic Biscuit Bites: Irresistibly Gooey and Flavor-Packed
Instructions

Tried This Recipe? Leave a Comment!
Did you make this recipe? I’d love to hear how it turned out! Please leave a comment and a rating below. Your feedback helps other home cooks and supports cheerychop.com!
For more delicious inspiration, follow me on Pinterest!
