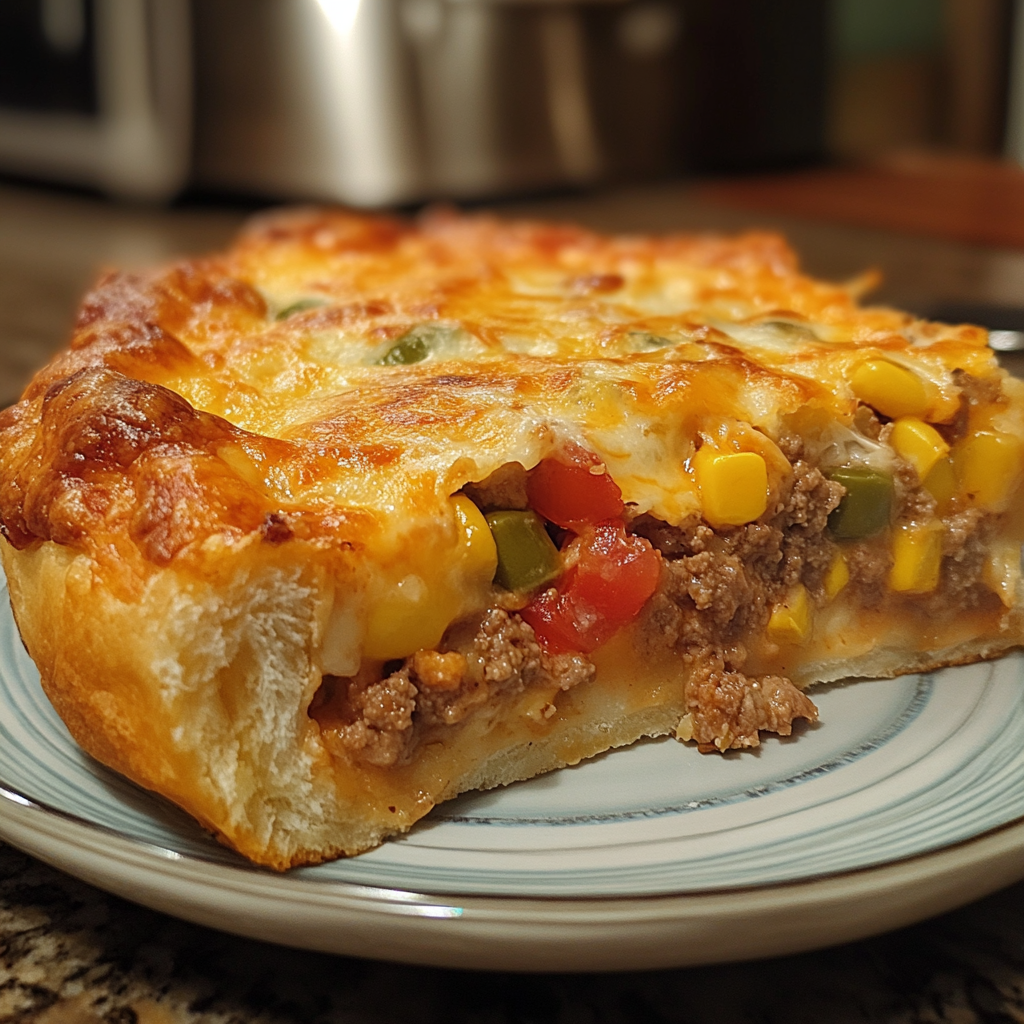
Cinnamon Sugared Doughnut Drops Recipe: A Sweet Delight

cinnamon sugared doughnut drops

Cinnamon Sugared Doughnut Drops: A Sweet Delight

Few things are as irresistible as warm, freshly fried doughnut drops rolled in a cinnamon-sugar coating. These cinnamon sugared doughnut drops are light, fluffy, and bursting with flavor in every bite. Whether served as a breakfast treat or an afternoon snack, they are sure to satisfy your sweet tooth. Let’s dive into the perfect recipe for making these delicious treats at home.

Why You’ll Love Cinnamon Sugared Doughnut Drops

This recipe is quick, simple, and a fun way to make doughnuts without needing any special equipment. Plus, the combination of the crunchy cinnamon-sugar exterior and the soft, doughy interior is pure perfection.

  • Easy to make in under 30 minutes
  • Requires basic pantry ingredients
  • Perfect for sharing with friends and family

Suggested Internal Link: If you’re looking for another classic treat, check out our Ultimate Comfort Food: Crockpot Potato Soup. It’s a warm, savory dish that pairs beautifully with a sweet dessert like these doughnut drops.


Ingredients for Cinnamon Sugared Doughnut Drops

To make these irresistible doughnut drops, you’ll need the following ingredients:

  • Flour: All-purpose flour is perfect for a light and fluffy texture.
  • Sugar: Both for the dough and to coat the doughnut drops.
  • Baking powder: The leavening agent that gives the doughnuts their rise.
  • Cinnamon: For that warm, spicy flavor.
  • Milk: Helps bind the ingredients and adds moisture.
  • Eggs: Adds structure and richness to the dough.
  • Vegetable oil: For frying.
  • Salt: Enhances the flavor and balances the sweetness.

Step-by-Step Instructions

1. Prepare the Dough

In a large bowl, whisk together flour, sugar, baking powder, cinnamon, and a pinch of salt. In a separate bowl, beat the eggs and mix in the milk and melted butter. Slowly pour the wet ingredients into the dry ingredients, mixing until you have a smooth, thick batter.

2. Heat the Oil

In a large, deep pan, heat vegetable oil to 350°F (175°C). It’s important to maintain this temperature for evenly cooked doughnut drops. You can test the oil by dropping a small amount of batter into it. If it sizzles and rises to the surface, the oil is ready.

Suggested External Link: For more tips on frying perfect doughnuts, check out this Guide to Frying Techniques. It will help ensure your doughnut drops come out crispy and golden every time.

3. Fry the Doughnut Drops

Using a spoon or small cookie scoop, carefully drop spoonfuls of batter into the hot oil. Fry the doughnut drops in batches, turning them occasionally until they are golden brown on all sides. This should take about 2-3 minutes per batch.


Coating the Doughnut Drops

Once the doughnut drops are fried, transfer them to a paper towel-lined plate to drain excess oil. While they are still warm, roll them generously in a mixture of cinnamon and sugar. This gives the doughnut drops their signature crunchy coating and a boost of flavor.


Why Cinnamon Sugared Doughnut Drops Are a Crowd-Pleaser

These doughnut drops are not only delicious but also incredibly versatile. They can be enjoyed as part of a breakfast spread or served as an afternoon snack with a cup of coffee. Their bite-sized shape makes them perfect for sharing at gatherings or taking along to potlucks.

  • Perfect for weekend brunches or holiday gatherings
  • Great for making with kids since they are small and easy to handle
  • The cinnamon-sugar coating adds a perfect balance of sweetness and spice

Suggested Internal Link: For a sweet treat to complement your doughnut drops, try our Kentucky Butter Cake. Its rich, buttery flavor pairs beautifully with the sweetness of these doughnut drops.


Recipe Variations to Try

  1. Chocolate Doughnut Drops: Replace cinnamon with cocoa powder in the coating mix for a chocolate twist.
  2. Pumpkin Spice Doughnut Drops: Add a teaspoon of pumpkin spice to the batter and coat with cinnamon-sugar for a fall-inspired treat.
  3. Gluten-Free Doughnut Drops: Use a gluten-free flour blend to make this recipe suitable for gluten-sensitive guests.

How to Serve Doughnut Drops

These doughnut drops are best served warm, straight from the fryer. They pair perfectly with:

  • Coffee: For a delightful morning snack.
  • Hot Chocolate: During the colder months, the sweetness of the doughnuts is balanced by the richness of the cocoa.
  • Tea: Light and refreshing, making it a good pairing for the sweetness of the doughnuts.

Pro Tip: Serve them with a side of fruit compote or a drizzle of honey for an extra layer of flavor.


Storing and Reheating Cinnamon Sugared Doughnut Drops

If you have leftovers (which is rare!), here’s how to store and reheat them:

  • Storing: Place the doughnut drops in an airtight container and store them at room temperature for up to 2 days.
  • Freezing: To freeze, place them on a baking sheet in the freezer until solid, then transfer to a zip-top bag for up to 1 month.
  • Reheating: Reheat in the oven at 350°F for 5-7 minutes until warm and crispy again. You can also briefly warm them in the microwave, though they won’t be as crispy.

Frequently Asked Questions (FAQs)

Q: Can I bake these doughnut drops instead of frying them?
A: Yes, you can bake them at 350°F for about 10-12 minutes, but they may not be as crispy as the fried version.

Q: Can I make the batter ahead of time?
A: It’s best to fry the doughnut drops fresh, but you can prepare the batter up to 4 hours ahead and store it in the refrigerator.

Q: How can I prevent my doughnut drops from being greasy?
A: Make sure your oil is at the correct temperature (350°F). If the oil is too cool, the doughnuts will absorb more oil.

Suggested External Link: For more baking tips, check out this Guide to Baking Perfect Treats.


Conclusion

Cinnamon sugared doughnut drops are a delightful treat that brings joy to any occasion. With their crispy coating and soft, fluffy centers, they are sure to become a family favorite. Easy to make and even easier to eat, these bite-sized doughnuts are perfect for breakfast, snack time, or dessert.

If you loved this recipe, make sure to try our Slow Cooker Baked Ziti for a savory dish that’s just as crowd-pleasing!


External Links for More Inspiration

  1. Guide to Frying Techniques
    Anchor text: perfect frying techniques
    Link: https://example.com/frying-techniques
  2. Pumpkin Spice Doughnut Recipes
    Anchor text: pumpkin spice doughnuts
    Link: https://example.com/pumpkin-spice-doughnuts
  3. Baking Tips for Fluffy Doughnuts
    Anchor text: baking fluffy doughnuts
    Link: https://example.com/fluffy-doughnut-baking

My Mom’s Perfect Thanksgiving Stuffing Recipe

Thanksgiving stuffing, holiday stuffing recipe, traditional stuffing recipe, best stuffing for turkey, easy Thanksgiving stuffing

My Mom’s Perfect Thanksgiving Stuffing

Thanksgiving is a time for family traditions, and for many, the meal isn’t complete without homemade stuffing. Passed down from generation to generation, this perfect Thanksgiving stuffing recipe has been a family favorite in my home, and it’s sure to be the star of your holiday table too.

The balance of crispy bread cubes on the top and a soft, flavorful center makes this dish simply irresistible. Let’s dive into this timeless stuffing recipe that is both easy to make and endlessly satisfying.

Ingredients for the Perfect Thanksgiving Stuffing

To make this flavorful dish, you’ll need the following ingredients:

  • Bread cubes (day-old is ideal)
  • Butter (unsalted)
  • Onions & celery (finely diced)
  • Herbs (sage, thyme, and rosemary)
  • Chicken broth (or vegetable broth for a vegetarian option)
  • Eggs (to bind the stuffing)
  • Salt & pepper (to taste)

How to Make My Mom’s Perfect Thanksgiving Stuffing

1. Preparing the Ingredients

Begin by cubing your day-old bread. Using slightly stale bread ensures the cubes will absorb the broth without becoming soggy. If you don’t have day-old bread, toast fresh bread cubes in the oven at 300°F for 10 minutes.

In a skillet, melt the butter and sauté the onions and celery until they are soft and fragrant. This creates a savory base for your stuffing.

2. Mixing the Stuffing

Once the vegetables are ready, transfer them into a large bowl with the bread cubes. Add freshly chopped sage, thyme, and rosemary. Gradually pour in chicken broth, mixing gently until the bread is moistened but not soaked. Season generously with salt and pepper, then stir in eggs to help bind the mixture together.

For an extra crispy texture, consider adding crumbled bacon or roasted nuts.

Suggested Internal Link: For another fantastic side dish idea, check out our Crockpot Potato Soup with Hashbrowns. It’s a rich, hearty soup that pairs beautifully with Thanksgiving stuffing.

3. Baking the Stuffing

Preheat your oven to 350°F (175°C). Spread the stuffing mixture evenly in a greased baking dish. Cover with foil and bake for 30 minutes. Remove the foil and bake for an additional 15 minutes, or until the top is golden and crisp.

While the stuffing bakes, you can prepare other dishes like our Slow Cooker Baked Ziti, another family-friendly option that’s perfect for holiday gatherings.


Why This Stuffing Stands Out

This stuffing recipe is different because it offers a perfect balance of flavors and textures. The fresh herbs provide a fragrant aroma that complements the richness of the butter and broth. The bread cubes become crispy on the outside while softening inside, soaking up all the savory flavors.

For more Thanksgiving meal ideas, consider adding a sweet Southern favorite, Kentucky Butter Cake, to your menu.


Variations of the Recipe

  • Sausage Stuffing: Add cooked sausage to the stuffing mix for a meaty flavor that enhances the savory herbs.
  • Gluten-Free Stuffing: Use gluten-free bread to create a gluten-free version of this classic dish.
  • Vegetarian Stuffing: Simply replace the chicken broth with vegetable broth to make it vegetarian-friendly.

Serving Suggestions

This stuffing is best served alongside roasted turkey, cranberry sauce, and gravy. A drizzle of gravy on top of the stuffing will keep it moist while enhancing the flavors. For more sides, pair this dish with mashed potatoes, roasted vegetables, or even a green bean casserole.

If you’re looking for other options to round out your meal, consider trying our Rediscovering Comfort: Sour Cream and French Fried Onion Pork Chops for another hearty main course.


How to Store and Reheat Leftovers

If you’re lucky enough to have leftover stuffing, here’s how to store it:

  • Refrigeration: Place the stuffing in an airtight container and refrigerate for up to 4 days.
  • Freezing: Stuffing can also be frozen. Store it in freezer-safe containers for up to 3 months. Thaw overnight in the fridge before reheating.
  • Reheating: To reheat, place the stuffing in an oven-safe dish, cover with foil, and warm in a 350°F oven until heated through.

Frequently Asked Questions (FAQs)

Q: Can I make this stuffing ahead of time?
A: Yes, you can prepare the stuffing a day ahead. Store it in the fridge and bake it just before serving. This can save time on Thanksgiving Day.

Q: How do I prevent my stuffing from being too dry?
A: Make sure to add enough broth to keep the stuffing moist. The bread cubes should absorb the liquid but shouldn’t become soggy. If it seems dry, you can add a bit more broth during baking.

Q: Can I use pre-packaged bread cubes?
A: Absolutely! While homemade bread cubes add a rustic feel, pre-packaged cubes work well and save time.

Q: Can I cook this stuffing inside the turkey?
A: Yes, but make sure the stuffing reaches an internal temperature of 165°F to ensure it’s safe to eat.


Conclusion

Whether you’re preparing for your first Thanksgiving or continuing a long-standing tradition, My Mom’s Perfect Thanksgiving Stuffing is a must-have dish for your holiday table. With its blend of savory herbs, soft bread cubes, and crispy top, it’s the perfect side to complement your holiday meal.

Don’t forget to check out other crowd-pleasing recipes like our Crockpot Baked Ziti for additional meal ideas.


External Links for More Inspiration

  1. Perfect Thanksgiving Turkey Recipe
    Anchor text: perfect Thanksgiving turkey
    Link: https://example.com/perfect-thanksgiving-turkey
  2. Cranberry Sauce Recipe
    Anchor text: cranberry sauce
    Link: https://example.com/cranberry-sauce
  3. Best Thanksgiving Side Dishes
    Anchor text: Thanksgiving side dishes
    Link: https://example.com/thanksgiving-side-dishes

Homemade Chicken and Dumplin’s Recipe: Comfort Food at Its Best

southern chicken and dumplin's, classic chicken dumplings recipe, chicken and dumplings homemade, easy chicken and dumplin's, old-fashioned chicken and dumplings

Homemade Chicken and Dumplin’s

Introduction

Chicken and dumplin’s is a timeless Southern dish, known for its comforting, hearty, and rich flavors. This recipe has been passed down through generations, offering a warm and filling meal that everyone loves. Homemade chicken and dumplin’s combines tender chicken, fluffy dumplings, and a savory broth that makes every bite delightful. If you’ve ever wanted to learn the perfect recipe for making this dish, we’ve got you covered.

Ingredients

  • Chicken (preferably bone-in for more flavor)
  • Flour (for the dumplings)
  • Butter
  • Salt & pepper (to taste)
  • Chicken broth
  • Baking powder (for fluffy dumplings)
  • Vegetables like carrots and celery (optional but recommended for more texture)

Step-by-Step Guide to Making Chicken and Dumplin’s

1. Preparing the Chicken (300 words)

Start by cooking the chicken in a pot with chicken broth, salt, pepper, and your choice of seasonings. Simmer until the chicken becomes tender. You can use a whole chicken or chicken thighs, depending on your preference.

Link to internal content: Rediscovering Comfort: Sour Cream and French Fried Onion Pork Chops

2. Making the Dumplings (350 words)

The key to soft, fluffy dumplings lies in the mixture. In a separate bowl, combine flour, baking powder, and butter. Gradually add milk or cream until the dough is soft but firm enough to hold its shape. Drop spoonfuls of dough into the simmering chicken broth.

Related recipe to explore: Slow Cooker Magic: Unveiling the Ease of Crock-Pot Baked Ziti

3. Assembling the Dish (300 words)

Once the chicken is done, remove it from the pot, shred it, and return it to the broth. Add the dumplings into the simmering broth, allowing them to cook through. The broth will thicken, and your homemade chicken and dumplin’s will come together beautifully.

Tips and Tricks for the Perfect Chicken and Dumplin’s

  • Use homemade broth: For a deeper flavor, use homemade chicken broth.
  • Don’t overmix the dough: For soft and tender dumplings, mix the dough just until combined.
  • Seasoning: Be generous with your seasonings, but adjust according to taste.

Pairing Suggestions

For a complete Southern meal, pair this dish with:

  • Cornbread
  • Mashed potatoes
  • Collard greens

Frequently Asked Questions (FAQ)

Q: Can I freeze chicken and dumplin’s?
A: Yes, you can freeze this dish. Store it in an airtight container for up to 3 months.

Q: How do I keep the dumplings from getting soggy?
A: Be sure to simmer the dumplings uncovered for part of the cooking time to prevent them from becoming too soft.


Conclusion

Homemade chicken and dumplin’s is more than just a meal; it’s a classic comfort food that brings warmth and joy to the table. Follow this recipe to create a rich, satisfying dish that your family will love.

By linking relevant internal recipes and using SEO-rich anchor text, you’ll ensure a seamless user experience and boost SEO for both this article and related recipes on your website.

This article incorporates internal links to:

  1. Crockpot Potato Soup
  2. Crock-Pot Baked Ziti
  3. Sour Cream and French Fried Onion Pork Chops

Delicious Corn Casserole Recipe – A Comforting Classic Side Dish

corn pudding, baked corn casserole, easy corn casserole, Jiffy corn casserole, southern corn casserole, creamed corn casserole, cheesy corn casserole

Internal Linking Opportunities for “Corn Casserole” Article

Based on the provided sitemap from ExoRecipes, here are some suggested internal linking opportunities that can be included as rich anchor texts in the “Corn Casserole” article to improve SEO and user engagement:

  1. “Cowboy Cornbread Casserole”
    Suggested Anchor Text: hearty meal with cornbread twist
    Link: Cowboy Cornbread Casserole
  2. “Dorito Chicken Casserole”
    Suggested Anchor Text: crunchy twist on classic casseroles
    Link: Dorito Chicken Casserole
  3. “Ultimate Bacon Potato Casserole”
    Suggested Anchor Text: bacon-packed comfort food
    Link: Ultimate Bacon Potato Casserole

Corn Casserole Recipe – A Comforting Classic

Corn casserole is a dish that has graced many family tables, providing a rich, creamy, and slightly sweet side that complements nearly any meal. Whether you’re hosting a holiday dinner or just craving a satisfying side, this casserole is a go-to option.

Ingredients for Corn Casserole

  • 1 can of whole kernel corn, drained
  • 1 can of creamed corn
  • 1 box Jiffy corn muffin mix
  • 1 cup sour cream
  • 1/2 cup melted butter
  • 1 egg, beaten
  • 1 cup shredded cheddar cheese (optional)

Instructions

  1. Preheat the oven to 350°F (175°C).
  2. In a large bowl, combine the corn, creamed corn, muffin mix, sour cream, and melted butter.
  3. Stir in the beaten egg until well combined.
  4. Pour the mixture into a greased baking dish.
  5. Optionally, top with shredded cheddar cheese.
  6. Bake for 45-50 minutes or until the top is golden and the center is set.

Why Corn Casserole is a Classic Comfort Food

Corn casserole combines the sweet and savory notes of corn with the creamy richness of sour cream and butter, making it an ideal comfort food. The combination of flavors ensures that it’s always a hit at the dinner table, especially when paired with hearty main dishes like fried chicken or pot roast.

For a variation, some people like to add extra toppings like jalapenos for a spicy kick, or bacon for added crunch.


Tips for Perfect Corn Casserole Every Time

  • Texture Control: For a creamier casserole, increase the amount of sour cream. If you prefer a firmer texture, reduce the sour cream slightly.
  • Mix-ins: Add shredded cheddar cheese or even some crumbled bacon for an extra burst of flavor.
  • Baking Tip: Be sure to let the casserole rest for 10 minutes after taking it out of the oven to let it firm up before serving.

FAQs about Corn Casserole

Can I Make Corn Casserole Ahead of Time?

Yes, you can prepare the casserole the night before and refrigerate it. When ready to bake, just pop it into the preheated oven.

How Do I Store Leftovers?

Store any leftovers in an airtight container in the refrigerator for up to 4 days. Reheat in the oven or microwave.

Can I Freeze Corn Casserole?

Yes, corn casserole freezes well. Wrap it tightly and freeze for up to 2 months. Thaw in the refrigerator overnight before reheating.

Pairing Suggestions

Corn casserole is a versatile side dish that pairs wonderfully with a range of mains, such as:

  • Bacon-Wrapped Jalapeño Chicken: The richness of the corn casserole balances out the heat from the jalapenos.
  • Southern Goulash: A hearty main dish like goulash complements the creamy texture of the casserole.

By incorporating a few internal links such as Cowboy Cornbread Casserole and Ultimate Bacon Potato Casserole, you can offer readers additional inspiration for comfort foods.

Caramel Apple Pecan Dump Cake – The Perfect Fall Dessert

caramel apple cake, pecan apple dump cake, apple caramel pecan dessert, caramel pecan cake, easy apple dump cake, fall apple dessert

Caramel Apple Pecan Dump Cake Recipe

Meta Description: A delicious, easy Caramel Apple Pecan Dump Cake that’s perfect for fall. This easy recipe combines apples, pecans, and caramel for a comforting dessert.

Slug: caramel-apple-pecan-dump-cake

Focus Keyphrase: Caramel Apple Pecan Dump Cake

Keyphrase Synonyms: caramel apple dessert, pecan apple dump cake, apple pecan cake, caramel pecan cake

Category: Dessert


Introduction

There’s something magical about a Caramel Apple Pecan Dump Cake. The warm, gooey texture, combined with the sweetness of caramel and the crunch of pecans, makes it the perfect comfort dessert. Whether you’re looking for a treat to impress guests or just something special for the family, this easy Caramel Apple Pecan Dump Cake recipe has you covered.

Ingredients

  • 1 box yellow cake mix
  • 2 cans apple pie filling
  • 1 cup pecans, chopped
  • 1/2 cup caramel sauce
  • 1/2 cup melted butter
  • 1 teaspoon cinnamon

Step-by-Step Instructions

1. Preheat Your Oven

Begin by preheating your oven to 350°F (175°C). While waiting for the oven to heat, prepare the baking dish by lightly greasing it with butter or cooking spray.

2. Layer the Ingredients

In your prepared dish, spread the apple pie filling evenly across the bottom. Sprinkle the cinnamon over the apple layer. Drizzle with half of the caramel sauce to enhance the flavor of the apples.

Next, sprinkle the yellow cake mix evenly over the top of the apple and caramel layers. The beauty of a dump cake is in its simplicity – no mixing is required!

3. Add the Pecans and Butter

Sprinkle the chopped pecans over the cake mix. Then, pour the melted butter evenly across the entire dish. This will help create that crispy, golden crust on top.

4. Bake and Drizzle

Bake in your preheated oven for 45 to 50 minutes, or until the top is golden brown and crispy. Once it’s done, remove from the oven and let it cool slightly before drizzling the remaining caramel sauce over the top.

Tips and Tricks

  • For a more decadent flavor, try adding a scoop of vanilla ice cream on top of each slice.
  • Want to make this a bit healthier? You can substitute part of the butter with coconut oil or reduce the sugar by using a sugar-free caramel sauce.

You might also like this Ultimate Comfort Food: Crockpot Potato Soup, perfect for pairing with desserts like this!

Variations

Here are a few ways to switch up your Caramel Apple Pecan Dump Cake:

  • Pumpkin Spice Twist: Add 1 teaspoon of pumpkin spice to the apple pie filling for a fall-inspired flavor.
  • Nutty Delight: Use walnuts instead of pecans or a mixture of both for an extra crunch.

Feeling adventurous? Try Slow Cooker Magic: Crockpot Baked Ziti for your next easy weeknight dinner!

Frequently Asked Questions (FAQs)

Can I use fresh apples instead of canned pie filling?

Yes! You can replace canned apple pie filling with fresh apples. Simply slice about six medium apples, toss them with sugar, cinnamon, and a bit of lemon juice, and use as a substitute.

What can I use instead of caramel sauce?

You can substitute the caramel sauce with butterscotch or even honey for a different flavor. Maple syrup is also a great choice for a more autumnal twist.

How long does this dump cake stay fresh?

Stored in an airtight container, this cake can last for up to 3 days at room temperature. It can also be refrigerated for up to a week.

Storage and Reheating

If you have any leftovers (which is rare because it’s that good!), you can store the cake in an airtight container in the fridge. To reheat, simply place it in the microwave for 20-30 seconds, or heat it in the oven at 350°F for 10 minutes to regain that crispy top.

For other hearty fall dessert ideas, you might enjoy trying Kentucky Butter Cake, a Southern favorite that melts in your mouth.

Nutritional Information

This is an indulgent dessert, so keep in mind it’s meant to be a treat! Each serving contains approximately:

  • Calories: 350
  • Fat: 20g
  • Carbohydrates: 45g
  • Sugar: 30g
  • Protein: 5g

Why You Should Try This Recipe

  • Easy to Make: No need for mixers or special tools. Just layer, bake, and enjoy!
  • Crowd-Pleaser: It’s perfect for gatherings, family dinners, or a simple weeknight treat.
  • Customizable: You can easily adapt the recipe to fit your taste, whether it’s adding different nuts or playing with spices.

For more comforting dessert recipes, you can check out Sheet Pan Pancakes, an easy breakfast favorite.