Delicious Chicken Spaghetti Recipe: A Comforting Southern Classic

creamy chicken spaghetti, Southern chicken spaghetti, cheesy chicken spaghetti, easy chicken spaghetti

Chicken Spaghetti: A Comforting Southern Classic

Chicken Spaghetti is a creamy, cheesy, and savory comfort food that’s perfect for family dinners or gatherings. Its roots in Southern cooking make it a beloved dish for many, combining tender chicken with a rich sauce and perfectly cooked spaghetti.

Ingredients for Chicken Spaghetti:

  • Cooked Chicken: Rotisserie chicken or boiled and shredded chicken.
  • Spaghetti: Classic pasta for this dish.
  • Cheese: Cheddar, mozzarella, or Velveeta for a creamy texture.
  • Creamy Soup Base: Cream of mushroom or cream of chicken soup for a smooth sauce.
  • Rotel Tomatoes: Adds a slight spice to the sauce.

For a delightful pairing, try serving this with Crockpot Potato Soup with Hashbrowns, another excellent comfort food recipe.


How to Make Chicken Spaghetti

Step 1: Cook the Spaghetti

Start by boiling the spaghetti in salted water until it’s al dente. Drain the water and set the pasta aside. You can use other pasta shapes, but spaghetti gives the dish its signature texture.

Step 2: Prepare the Sauce

Sauté onions and garlic in a large skillet, then add the cream of mushroom soup, chicken broth, Rotel tomatoes, and cream cheese. Stir until everything is melted and combined. If you’re looking for slow-cooker inspiration for this dish, consider trying Slow Cooker Baked Ziti, a similar comfort food made effortlessly.


Variations and Tips

  • Rotel Chicken Spaghetti: For a spicy kick, use Rotel tomatoes with green chilies.
  • Casserole Version: Add a breadcrumb topping and bake for extra texture.
  • Add Vegetables: You can include mushrooms, bell peppers, or jalapeños for added flavor.

For those who enjoy Tex-Mex influences, check out Dorito Chicken Casserole, which adds a crunchy and flavorful twist to the classic chicken casserole.


Conclusion

Chicken Spaghetti is the perfect blend of creamy, cheesy goodness and tender chicken. Whether you keep it traditional or add your own variations, it’s sure to become a family favorite. Pair it with a side of garlic bread or a green salad for a complete meal.

Lazy Daisy Cake: A Delicious Vintage Dessert with a Coconut Topping

vintage lazy daisy cake, daisy cake recipe, old-fashioned lazy daisy cake, coconut lazy daisy cake

Lazy Daisy Cake: A Vintage Recipe to Savor

Lazy Daisy Cake is a classic vintage recipe cherished for its simplicity and delightful caramelized coconut topping. Its rich flavor, combined with the nostalgia it evokes, makes it a perfect treat for any occasion. Let’s walk through the steps to create this beloved dessert!

The History of Lazy Daisy Cake

This cake originated in the early 20th century when recipes emphasized simplicity and flavor. Lazy Daisy Cake became a household name, especially because of its easy preparation. With only a few ingredients and minimal time in the kitchen, it’s no wonder this cake has stood the test of time.


Ingredients You’ll Need:

  • 2 large eggs
  • 1 cup granulated sugar
  • 1 cup all-purpose flour
  • 1/2 cup milk
  • 1/4 cup butter
  • 1 tsp vanilla extract
  • Pinch of salt
  • For the topping:
    • 1/4 cup butter
    • 1/2 cup brown sugar
    • 1/2 cup shredded coconut

Italicize important keywords like Lazy Daisy Cake, and vintage recipes for better SEO readability.


Step-by-Step Instructions

Step 1: Preparing the Batter

  • Preheat the oven to 350°F (175°C). Grease an 8×8-inch baking dish.
  • Whisk the eggs and sugar in a large bowl until smooth. In a saucepan, heat the milk and butter until melted. Add the milk mixture to the egg mixture.
  • Sift the flour and salt into the wet ingredients, gently folding until just combined.
  • Pour the batter into the prepared baking dish and bake for 25–30 minutes or until golden brown.

Pro Tip: You can pair this cake with a cup of coffee or tea, making it an excellent snack for any time of day.


Step 2: The Delicious Broiled Topping

  • While the cake is baking, prepare the topping. In a small saucepan, melt the butter and brown sugar. Stir in the shredded coconut.
  • Once the cake is done baking, spread the coconut mixture on top of the warm cake and place it under the broiler for 2–3 minutes until the topping is bubbly and golden.

Internal Linking Opportunities

To further enhance this recipe, you can link to related recipes on ExoRecipes:

  1. Crockpot Potato Soup: This comforting soup pairs wonderfully with a slice of Lazy Daisy Cake, especially during cooler months.
  2. Pineapple Upside-Down Cake: Another vintage favorite, this recipe offers a fruity variation if you’re in the mood for a more tropical dessert.
  3. Kentucky Butter Cake: For those who love rich and moist cakes, this Southern classic provides a similar texture and flavor profile to Lazy Daisy Cake.

Use these rich anchor texts to create internal links and boost SEO through relevant content interlinking.


Serving Suggestions for Lazy Daisy Cake

  • Best served warm with a dollop of whipped cream.
  • Add a scoop of vanilla ice cream to take it up a notch!

Frequently Asked Questions (FAQs)

Q: Can I substitute the coconut topping with something else?
A: Yes! You can use chopped nuts or oats for a different texture, but the broiled coconut topping is the signature touch of Lazy Daisy Cake.

Q: How long does Lazy Daisy Cake stay fresh?
A: It stays fresh for up to 3 days in an airtight container. If you want to keep it longer, refrigerating it will extend its shelf life to a week.

Q: Can I make this cake ahead of time?
A: Absolutely! You can prepare the cake in advance, store it, and broil the topping just before serving for that fresh, caramelized flavor.


Conclusion

Lazy Daisy Cake may be a vintage recipe, but its timeless appeal ensures it remains a go-to dessert for generations to come. Whether you’re looking to indulge in nostalgia or discover a new favorite, this cake is a delightful choice.

By following this guide, you’ll not only enjoy making this dessert but also have the option to experiment with flavors or pairings. The simplicity of the ingredients makes it a versatile recipe, perfect for any occasion.


External Links for Further Reading:

  1. Classic Lazy Daisy Cake Recipe – King Arthur Baking
    • Anchor Text: Classic Lazy Daisy Cake Recipe
      A detailed breakdown of a traditional Lazy Daisy Cake recipe.
  2. Lazy Daisy Cake History – Simply Recipes
    • Anchor Text: Lazy Daisy Cake History
      Discover the history and origins of this vintage dessert.
  3. Old Fashioned Lazy Daisy Cake – Lana’s Cooking
    • Anchor Text: Old-Fashioned Lazy Daisy Cake
      Another variant of this old-school dessert that adds more flavor notes.

Mee Maw’s Chocolate Cake: A Classic Family Recipe for the Ultimate Chocolate Treat

classic chocolate cake, family chocolate cake recipe, old fashioned chocolate cake, moist chocolate cake, easy chocolate cake recipe

Mee Maw’s Chocolate Cake: A Classic Recipe

Mee Maw’s Chocolate Cake is a beloved recipe passed down through generations. It’s known for its rich, chocolatey flavor and soft, moist texture. This cake is perfect for special occasions or a simple family dessert. Whether you’re making it for a birthday party or a weekend treat, it’s guaranteed to impress.

Ingredients You’ll Need:

  • To make the best Mee Maw’s Chocolate Cake, you’ll need basic pantry ingredients:
    • Flour
    • Sugar
    • Cocoa Powder
    • Eggs
    • Butter or Oil
    • Vanilla Extract
    • Baking Soda
    • Baking Powder
    • Milk or Buttermilk

Mixing these ingredients in the right order will give you the rich, moist texture this cake is famous for.

Preparing the Cake Batter

  • Start by preheating your oven to 350°F (175°C).
  • Grease two round cake pans with butter or oil, then lightly dust with flour to prevent sticking.
  • In a large bowl, whisk the dry ingredients—flour, sugar, cocoa powder, baking soda, and baking powder.
  • Cream together the butter (or oil) and sugar until fluffy. Add in the eggs one at a time, followed by the vanilla extract.
  • Slowly add the dry ingredients to the wet mixture, alternating with milk, until just combined.

For more detailed baking tips, check out this helpful guide on classic chocolate cakes.

Baking the Cake

Pour the cake batter into your prepared pans and bake for 30-35 minutes. Check the cake’s doneness by inserting a toothpick into the center. If it comes out clean, your cake is ready to cool.

Transfer the cakes to a cooling rack and let them rest for 10 minutes in their pans before gently removing them. This ensures the cake doesn’t stick or break apart during transfer. Let the cakes cool completely before frosting.

Making the Chocolate Frosting

The chocolate frosting for Mee Maw’s Chocolate Cake is just as delicious as the cake itself:

  • You’ll need:
    • Butter
    • Cocoa powder
    • Powdered sugar
    • Vanilla
    • A little milk

To prepare:

  1. Beat the butter until fluffy. Slowly add the cocoa powder, then powdered sugar, a bit at a time.
  2. Mix in a splash of milk and vanilla extract until you achieve a smooth consistency.

For a more detailed frosting guide, check out this chocolate cake frosting guide.

Adding the Final Touches

Once your cake is completely cool, frost it generously. Start with a thin layer of frosting between the cake layers. Apply a thick coat over the top and sides for an indulgent finish.

To elevate your cake even more, consider adding decorative elements like chocolate shavings, sprinkles, or even a drizzle of ganache. Check out baking tips to improve your cake decoration.


Variations on Mee Maw’s Chocolate Cake

If you want to give your chocolate cake a twist, try out these variations:

German Chocolate Cake

For a classic twist, add a layer of coconut-pecan frosting to transform Mee Maw’s Chocolate Cake into a rich German Chocolate Cake.

Chocolate Espresso Cake

Enhance the flavor with a tablespoon of instant espresso powder in the batter. The coffee accentuates the richness of the chocolate, giving it a bold and decadent taste.

Double Chocolate Cake

To make an even more indulgent version, mix chocolate chips into the batter. This adds a gooey, melty texture that pairs perfectly with the frosting.


FAQs About Mee Maw’s Chocolate Cake

  1. How can I make this cake in advance? You can bake the cake layers a day or two before serving. Wrap them tightly in plastic wrap and store them at room temperature or refrigerate for up to three days.
  2. Can I freeze this cake? Yes! Wrap each cake layer individually in plastic wrap, followed by aluminum foil. The cakes can be frozen for up to three months. Thaw them in the refrigerator overnight before frosting and serving.
  3. Can I use a different frosting? Yes, this cake pairs well with many types of frosting like cream cheese, buttercream, or even whipped ganache.
  4. What is the secret to a moist cake? The combination of using butter (or oil) with buttermilk ensures a tender and moist crumb.

Internal Linking Opportunities

While discussing chocolate cake variations and cake-making tips, you can create internal links to other relevant recipes on Exorecipes to provide more value to your readers.

  1. Kentucky Butter Cake
    For readers who love moist, rich cakes, check out the Kentucky Butter Cake, another beloved family recipe.
  2. Homemade Donuts
    If you’re craving something sweet but don’t want a cake, why not try these Classic Homemade Donuts for a simpler dessert?
  3. Gone to Heaven Chocolate Pie
    For more chocolate indulgence, the Gone to Heaven Chocolate Pie will hit the spot!

By utilizing both internal and external links, you ensure readers stay engaged on the site, while also building a well-optimized SEO structure. Make sure to use anchor text that naturally blends into the content and strategically place the internal links where readers are most likely to click.

Raspberry Shortbread with White Chocolate Drizzle: A Sweet and Elegant Dessert

raspberry shortbread cookies, white chocolate raspberry cookies, shortbread with raspberry filling, raspberry thumbprint cookies, shortbread with white chocolate

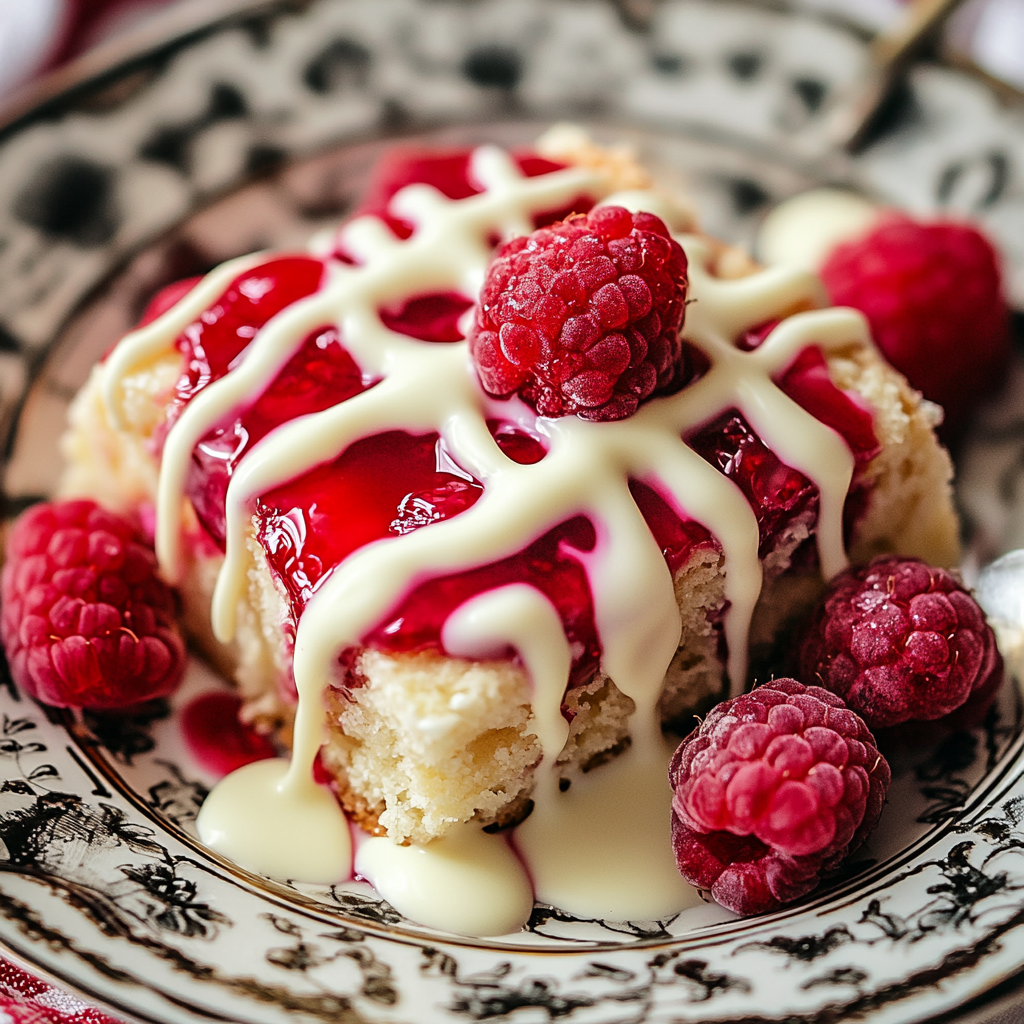
Raspberry Shortbread with a White Chocolate Drizzle: A Perfect Balance of Tart and Sweet

If you’re a fan of rich, buttery shortbread cookies combined with the sweet and tart flavor of raspberries, this raspberry shortbread with a white chocolate drizzle recipe is the perfect dessert for you. The buttery base of shortbread provides the perfect canvas for a layer of raspberry preserves, and the final touch of a delicate white chocolate drizzle brings the whole dish together, creating an indulgent, melt-in-your-mouth treat. Perfect for holidays, tea time, or any special occasion, this recipe is sure to impress your family and friends.

For other creative cookie recipes, you can check out delicious white chocolate raspberry cookies, a treat that offers the same classic combination of flavors but in a different presentation.


Ingredients for Raspberry Shortbread with White Chocolate Drizzle

The ingredients for this dessert are simple, yet each plays an essential role in bringing out the delicious flavors and textures of the final dish.

Core Ingredients:

  • Unsalted butter: Use high-quality butter for a rich, flaky shortbread base.
  • Granulated sugar: Adds sweetness and structure to the shortbread.
  • All-purpose flour: Provides the foundation for the shortbread dough, giving it a tender, crumbly texture.
  • Raspberry preserves: For the sweet, fruity filling.
  • White chocolate chips or bars: Melted for the elegant drizzle on top.
  • Vanilla extract: To enhance the flavor of the shortbread.
  • Salt: To balance the sweetness.

Each of these ingredients works together to create a beautiful harmony of flavors, making this dessert both simple to prepare and impressive to serve. For a similar raspberry-filled treat, check out these easy raspberry jam thumbprint cookies to explore another take on raspberry-filled cookies.


Step-by-Step Guide to Making Raspberry Shortbread with White Chocolate Drizzle

1. Preparing the Shortbread Dough

The base of this recipe is a traditional shortbread dough, which is known for its buttery and crumbly texture. Here’s how to prepare it:

Instructions:

  1. Cream the butter and sugar: In a large mixing bowl, cream together 1 cup of unsalted butter and ½ cup of granulated sugar until light and fluffy.
  2. Add vanilla extract: Mix in 1 teaspoon of vanilla extract and ¼ teaspoon of salt.
  3. Incorporate the flour: Gradually add 2 cups of all-purpose flour, mixing until the dough just comes together. Be careful not to overmix, as this can result in tough shortbread.
  4. Chill the dough: Wrap the dough in plastic wrap and refrigerate for at least 30 minutes. This helps the dough firm up and makes it easier to roll out later.

2. Rolling and Cutting the Shortbread

Once the dough is properly chilled, it’s time to roll and cut it into the desired shapes.

Instructions:

  1. Preheat the oven: Preheat your oven to 350°F (175°C).
  2. Roll out the dough: On a lightly floured surface, roll the dough to about ¼-inch thickness.
  3. Cut into shapes: Using a cookie cutter or knife, cut the dough into squares, rounds, or any shape you prefer.
  4. Transfer to a baking sheet: Line a baking sheet with parchment paper and place the cut-out cookies on the sheet, leaving a little space between each one.

3. Baking the Shortbread

This step brings out the buttery, golden texture of the shortbread.

Instructions:

  1. Bake the cookies: Bake the shortbread cookies for 10-12 minutes, or until they just begin to turn golden around the edges.
  2. Cool the cookies: Remove from the oven and let the cookies cool on the baking sheet for 5 minutes before transferring them to a wire rack to cool completely.

4. Adding the Raspberry Filling

The sweet and tart flavor of raspberry preserves adds the perfect contrast to the rich shortbread.

Instructions:

  1. Spread the preserves: Once the cookies are cool, spread about 1 teaspoon of raspberry preserves on half of the cookies.
  2. Sandwich the cookies: Top the raspberry-covered cookies with the remaining plain cookies, creating a sandwich.

5. Drizzling the White Chocolate

The final touch of white chocolate adds an extra layer of sweetness and elegance to this dessert.

Instructions:

  1. Melt the white chocolate: Melt 1 cup of white chocolate chips or chopped white chocolate in a microwave-safe bowl in 30-second intervals, stirring in between until fully melted.
  2. Drizzle the chocolate: Use a spoon, fork, or piping bag to drizzle the white chocolate over the sandwiched cookies in a decorative pattern.
  3. Let the drizzle set: Allow the white chocolate to set completely before serving or packaging the cookies.

Variations of Raspberry Shortbread

Shortbread is incredibly versatile, and you can easily customize this recipe to suit different tastes or occasions.

1. Almond Raspberry Shortbread

Add almond extract to the dough for a sweet, nutty twist.

Instructions:

  • Almond extract: Add ½ teaspoon of almond extract to the shortbread dough for a nutty flavor that pairs beautifully with the raspberry preserves.
  • Serving suggestions: These cookies are perfect for afternoon tea or as a holiday gift.

2. Lemon Raspberry Shortbread

Brighten up your shortbread with the fresh flavor of lemon.

Instructions:

  • Lemon zest: Add 1 tablespoon of freshly grated lemon zest to the dough for a citrusy twist that complements the tartness of the raspberries.
  • Serving suggestions: Pair with a light lemon glaze or serve with a cup of Earl Grey tea for a refreshing treat.

3. Chocolate-Dipped Raspberry Shortbread

For a more indulgent version, dip the cookies in chocolate.

Instructions:

  • Chocolate dip: After sandwiching the cookies, dip half of each cookie in melted dark or milk chocolate before drizzling with white chocolate.
  • Serving suggestions: This decadent version is perfect for special occasions like Valentine’s Day or anniversaries.

FAQs About Raspberry Shortbread with White Chocolate Drizzle

1. Can I use fresh raspberries instead of preserves?

Fresh raspberries can be mashed with a little sugar to create a homemade filling, but the consistency will differ from store-bought preserves. If you prefer a smoother texture, stick with raspberry preserves for this recipe.

2. How long can I store these cookies?

Raspberry shortbread cookies can be stored in an airtight container at room temperature for up to 5 days. For longer storage, refrigerate them for up to 7 days.

3. Can I freeze these cookies?

Yes, unfilled shortbread cookies can be frozen for up to 3 months. Wait to fill and drizzle them with white chocolate until after they’ve been defrosted for the best texture.

4. What if I don’t have white chocolate?

You can substitute the white chocolate with dark or milk chocolate for a different flavor profile. This will change the overall sweetness of the dessert, but it will still be delicious.


Conclusion: A Sweet, Elegant Dessert for Every Occasion

Raspberry shortbread with a white chocolate drizzle is the perfect combination of buttery shortbread, tart raspberries, and sweet white chocolate. Whether you’re preparing these cookies for a special occasion, a holiday gathering, or simply to enjoy with a cup of tea, they’re sure to be a hit. Experiment with different flavors, such as adding almond or lemon, to make this recipe your own.

For more inspiration, check out this simple classic shortbread recipe to explore the foundation of creating perfect shortbread, and start customizing your own.

The BEST Mashed Potatoes Recipe: Creamy, Fluffy, and Full of Flavor

creamy mashed potatoes, perfect mashed potatoes, fluffy mashed potatoes, easy mashed potatoes recipe, homemade mashed potatoes

The BEST Mashed Potatoes Recipe: Creamy, Fluffy, and Absolutely Delicious

There’s nothing quite like mashed potatoes when it comes to side dishes. They are a staple at nearly every holiday table, from Thanksgiving to Christmas, and even make the perfect complement to any regular family dinner. With the right balance of creaminess, fluffiness, and a little butter, mashed potatoes can elevate any meal.

But what makes a perfect batch of mashed potatoes? The secret lies in the type of potato, the right amount of seasoning, and incorporating just the right amount of cream and butter. This recipe will guide you through every step to ensure your mashed potatoes come out perfectly every time. For more mashed potato tips, check out this perfect mashed potatoes recipe, which includes a step-by-step guide to making them fluffy and creamy.


Ingredients for the BEST Mashed Potatoes

To make the best mashed potatoes, you only need a few simple ingredients, but the quality of each ingredient plays a big role in achieving the best results.

Core Ingredients:

  • Yukon Gold or Russet potatoes: These are the best options for mashed potatoes. Yukon Gold potatoes have a naturally buttery flavor, while Russet potatoes offer fluffiness.
  • Unsalted butter: Adds richness and smoothness to the mashed potatoes.
  • Heavy cream or whole milk: Cream creates a richer and creamier texture, while milk provides a lighter, fluffier consistency.
  • Garlic (optional): Roasted or sautéed garlic can be mixed in for added flavor.
  • Salt and pepper: To taste.
  • Optional toppings: Fresh chives, sour cream, or shredded cheese.

Each of these ingredients plays an essential role in delivering perfectly creamy mashed potatoes. If you’re interested in exploring more variations, check out this creamy mashed potatoes recipe for some inspiration.


Step-by-Step Guide to Making the Best Mashed Potatoes

Follow these detailed steps to achieve mashed potatoes that are both fluffy and creamy, perfect for any meal.

1. Choosing the Right Potatoes

The type of potatoes you use will make a big difference in the texture of your mashed potatoes.

Instructions:

  1. Yukon Gold vs. Russet Potatoes: Yukon Gold potatoes give a naturally creamy, buttery texture without needing too much added fat. Russet potatoes, on the other hand, result in lighter, fluffier mashed potatoes.
  2. Preparing the Potatoes: Peel the potatoes and cut them into even-sized chunks. This ensures that they cook evenly and at the same rate.
  3. Soaking (optional): For extra fluffiness, soak the potatoes in cold water for about 30 minutes before cooking to remove excess starch.

2. Boiling the Potatoes

Boiling is a crucial step for perfectly tender mashed potatoes.

Instructions:

  1. Salting the Water: Add a generous amount of salt to the water. This helps season the potatoes as they cook.
  2. Cooking Time: Boil the potatoes for 15-20 minutes, or until they are fork-tender. Be careful not to overcook them, as this can make the potatoes too watery.
  3. Draining the Potatoes: Drain the potatoes in a colander, making sure to let them sit for a minute or two to allow any excess moisture to evaporate.

3. Mashing the Potatoes

Now it’s time to turn those boiled potatoes into a creamy, fluffy masterpiece.

Instructions:

  1. Choosing the Right Tool: You can use a potato masher for a rustic, slightly chunky texture, a potato ricer for smoothness, or a hand mixer for extra fluffiness. Avoid using a food processor, as it can make the potatoes gluey.
  2. Adding Butter and Cream: Gently heat the butter and cream (or milk) before adding them to the mashed potatoes. Warm butter and cream help the potatoes absorb the fat more evenly, resulting in a smoother consistency.
  3. Mashing Tips: Start by mashing the potatoes, then gradually add the butter and cream mixture, stirring until the potatoes reach your desired texture.

4. Seasoning and Serving the Mashed Potatoes

Once your mashed potatoes have reached the perfect consistency, it’s time to season and serve them.

Instructions:

  1. Season to Taste: Add salt and pepper, tasting as you go. Be careful not to over-season, as the butter and cream will already add richness.
  2. Optional Add-ins: For extra flavor, consider mixing in roasted garlic, cream cheese, or shredded Parmesan. Fresh herbs like chives or parsley also make a great addition.
  3. Garnishing Tips: Serve your mashed potatoes with a small dollop of butter on top and a sprinkle of fresh chives for a polished look.

Variations of Mashed Potatoes

Mashed potatoes are a versatile dish, and you can easily customize the recipe to fit your preferences or the occasion.

1. Garlic Mashed Potatoes

Add roasted garlic for a savory twist on the classic mashed potato recipe.

Instructions:

  • Roast the garlic: Cut the top off a garlic bulb, drizzle with olive oil, and roast at 400°F for about 30 minutes. Squeeze the roasted garlic into the mashed potatoes and stir.
  • Serving Suggestion: Serve with roasted meats or grilled vegetables.

2. Sour Cream and Chive Mashed Potatoes

Adding sour cream gives mashed potatoes a tangy flavor, while chives bring a fresh element.

Instructions:

  • Mix in sour cream: Add ½ cup of sour cream to your mashed potatoes for a tangy, creamy finish.
  • Sprinkle with chives: Top with fresh chives just before serving for a burst of color and flavor.

3. Parmesan Mashed Potatoes

Parmesan cheese adds a rich, nutty flavor to mashed potatoes.

Instructions:

  • Incorporate Parmesan: Stir in ½ cup of freshly grated Parmesan just before serving.
  • Serving Suggestion: Pair with a hearty beef roast or grilled steak for a deliciously rich side dish.

FAQs About Mashed Potatoes

1. What kind of potatoes are best for mashed potatoes?

Yukon Gold and Russet potatoes are the best choices. Yukon Golds give a buttery, creamy texture, while Russets result in light, fluffy mashed potatoes.

2. Can I make mashed potatoes ahead of time?

Yes! You can make mashed potatoes in advance and reheat them. Add a bit of extra butter and cream when reheating to restore their creamy texture.

3. Why did my mashed potatoes turn out gluey?

Mashed potatoes can become gluey if they are overworked or if a food processor is used. For fluffy potatoes, use a potato masher or ricer and mash gently.

4. Can I freeze mashed potatoes?

Yes, mashed potatoes freeze well. To freeze, let them cool completely, then store them in an airtight container. When reheating, add butter or cream to revive their texture.


Conclusion: Mastering the BEST Mashed Potatoes Recipe

With a little attention to detail and the right ingredients, you can make the best mashed potatoes that are creamy, fluffy, and flavorful. Whether you’re preparing them for a holiday feast or a weeknight dinner, this recipe will ensure that your mashed potatoes are the highlight of the meal. Feel free to experiment with add-ins like garlic, sour cream, or Parmesan to make this recipe your own.

For more mashed potato variations, take a look at this step-by-step mashed potatoes guide. You’ll discover even more ways to perfect your mashed potato game.