Moist Homemade Chocolate Cake with Creamy Peanut Butter Frosting

chocolate peanut butter cake, peanut butter frosting, easy chocolate cake recipe, homemade cake with frosting

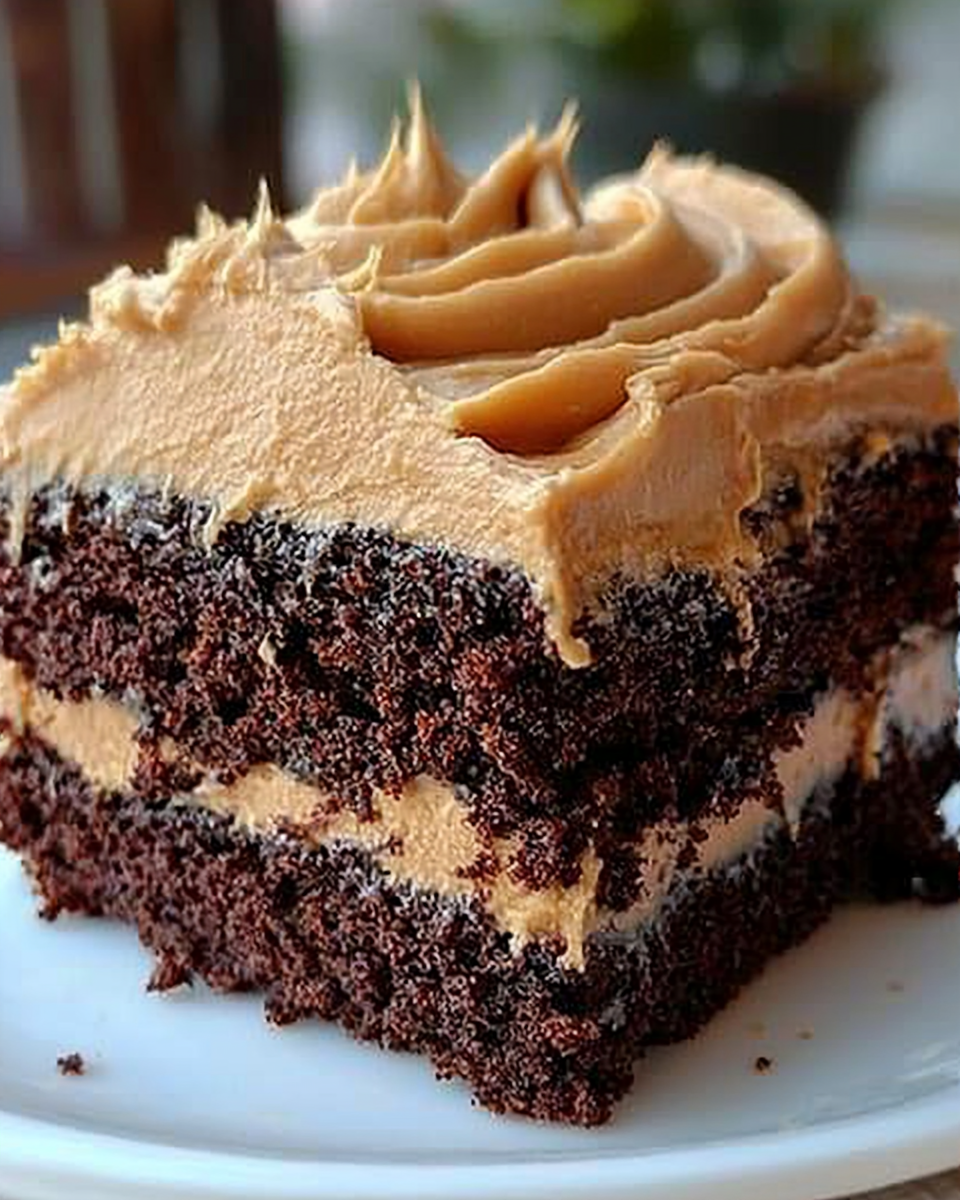
Homemade Chocolate Cake with Peanut Butter Frosting: A Decadent Delight

Making homemade chocolate cake with peanut butter frosting is the ultimate treat for those who love the combination of rich, moist chocolate and creamy, nutty peanut butter. This recipe combines the best of both worlds, creating a cake that’s not only indulgent but also surprisingly easy to make. Below is a step-by-step guide to crafting this perfect dessert.


Ingredients for Chocolate Cake and Peanut Butter Frosting

Chocolate Cake Ingredients:

  • 2 cups all-purpose flour
  • 2 cups sugar
  • ¾ cup unsweetened cocoa powder
  • 1 ½ tsp baking powder
  • 1 ½ tsp baking soda
  • 1 tsp salt
  • 1 cup buttermilk, room temperature
  • 2 large eggs, room temperature
  • 1 cup strong brewed coffee, hot
  • ½ cup vegetable oil
  • 1 ½ tsp vanilla extract

Peanut Butter Frosting Ingredients:

  • ½ cup unsalted butter, softened
  • 1 cup creamy peanut butter
  • 3 cups powdered sugar
  • 4-6 tbsp milk (as needed for consistency)
  • 1 tsp vanilla extract

Step-by-Step Recipe for Homemade Chocolate Cake with Peanut Butter Frosting

1. Preheat and Prepare

  • Preheat the oven to 350°F (175°C).
  • Grease and flour two 9-inch round cake pans, or line them with parchment paper for easy removal.

2. Make the Chocolate Cake Batter

  • In a large bowl, whisk together the flour, sugar, cocoa powder, baking powder, baking soda, and salt.
  • Add the eggs, buttermilk, vegetable oil, and vanilla extract. Beat on medium speed until smooth.
  • Slowly pour in the hot brewed coffee and stir until combined. The batter will be thin, which is perfect for creating a moist cake.

3. Bake the Cake

  • Divide the batter evenly between the prepared pans.
  • Bake for 30-35 minutes, or until a toothpick inserted into the center comes out clean.
  • Let the cakes cool in the pans for 10 minutes before transferring them to a wire rack to cool completely.

Making the Peanut Butter Frosting

1. Beat the Butter and Peanut Butter

  • In a large mixing bowl, beat the softened butter and peanut butter together until creamy and smooth.

2. Add the Powdered Sugar

  • Gradually add the powdered sugar, one cup at a time, beating well after each addition.
  • Add milk, one tablespoon at a time, until the frosting reaches your desired spreading consistency.

3. Frost the Cake

  • Once the cakes are completely cool, spread a layer of frosting over the top of one cake layer.
  • Place the second cake layer on top and frost the top and sides of the cake.

For more inspiration on peanut butter desserts, check out Peanut Butter Blossoms.


Tips for the Perfect Cake

  • Using Coffee in Chocolate Cake: Coffee intensifies the flavor of the chocolate, making it richer without giving the cake a coffee taste.
  • Room Temperature Ingredients: Ensure the eggs and buttermilk are at room temperature for a smoother batter and better cake texture.
  • Don’t Overmix: Once the wet and dry ingredients are combined, avoid overmixing to keep the cake light and fluffy.

Variations to Try

  • Double Chocolate Peanut Butter Cake: Add a layer of chocolate ganache between the cake layers for extra indulgence.
  • Peanut Butter Cup Topping: Sprinkle chopped peanut butter cups over the top of the cake for a fun and decadent twist.
  • Gluten-Free Option: Use a gluten-free flour blend to make this cake suitable for those with gluten sensitivities.

If you’re looking for a simpler chocolate treat, you might like Chocolate Magic Shell Yogurt Cup.


Storage and Serving Tips

  • Storage: Store the cake in an airtight container at room temperature for up to 3 days, or in the refrigerator for up to a week.
  • Freezing: You can freeze the unfrosted cake layers for up to 3 months. Thaw in the fridge overnight before frosting.
  • Serving Suggestions: Serve with a scoop of vanilla ice cream or a drizzle of chocolate sauce for an extra special dessert.

For more tips on homemade desserts, visit Classic Homemade Donuts.


FAQs About Homemade Chocolate Cake with Peanut Butter Frosting

Q: Can I use natural peanut butter for the frosting?
A: Yes, but natural peanut butter may result in a slightly less creamy frosting. Ensure it’s well-stirred before using.

Q: How do I make this cake more moist?
A: Using buttermilk and hot coffee helps to keep the cake moist. You can also add a tablespoon of sour cream to the batter for extra moisture.

Q: Can I make this cake ahead of time?
A: Absolutely! You can bake the cake layers a day in advance and frost them the next day. Store the layers tightly wrapped in plastic wrap.

Q: How long should I let the cake cool before frosting?
A: Let the cake cool completely, which takes about 2 hours. Frosting a warm cake will cause the frosting to melt and slide.


Conclusion

This homemade chocolate cake with peanut butter frosting is the perfect dessert for chocolate and peanut butter lovers alike. The combination of moist, rich chocolate cake and creamy peanut butter frosting makes it an irresistible treat for any occasion.

Make sure to explore similar recipes on ExoRecipes like No-Bake Banana Pudding Cheesecake and Ultimate Peanut Butter Pie for more delicious dessert ideas.

Easy and Delicious Chicken Spaghetti: The Ultimate Comfort Food

creamy chicken spaghetti, chicken spaghetti casserole, baked chicken spaghetti, easy chicken pasta

Chicken Spaghetti: A Comfort Food Classic

Chicken spaghetti is a delicious, hearty meal that blends tender chicken, pasta, and a creamy, cheesy sauce into a satisfying dish the whole family will love. In this article, we’ll walk you through an easy recipe for this Southern classic, explore some variations, and provide tips to make your chicken spaghetti the best it can be. Plus, we’ll link to some related recipes that you might enjoy trying next.


Ingredients for Chicken Spaghetti

To prepare this comforting dish, you’ll need the following ingredients:

  • 2 cups cooked, shredded chicken (rotisserie chicken works great)
  • 8 oz spaghetti (cooked al dente)
  • 1 can cream of mushroom soup
  • 1 can cream of chicken soup
  • 1 cup chicken broth
  • 1 cup shredded cheddar cheese
  • 1/2 cup diced green bell pepper
  • 1/2 cup diced onion
  • Salt and pepper to taste

For a guide on how to make the perfect homemade chicken broth, check out this helpful article: Best Chicken Broth Substitutes.


Step-by-Step Instructions

Step 1: Prepare the Chicken and Spaghetti

  • Cook the chicken if it’s not already prepared. Rotisserie chicken is a great shortcut.
  • Boil spaghetti according to package instructions until al dente. Drain and set aside.

Step 2: Make the Sauce

  • In a large skillet, sauté the onions and bell peppers until they’re soft.
  • Stir in the cream of mushroom soup, cream of chicken soup, and chicken broth, mixing until smooth.
  • Add the shredded chicken and stir to combine.

Step 3: Assemble the Casserole

  • Preheat the oven to 350°F.
  • Combine the cooked spaghetti with the sauce mixture and stir well.
  • Transfer the mixture into a greased 9×13-inch baking dish.
  • Top with shredded cheddar cheese and bake for 25-30 minutes, or until bubbly and golden on top.

For more make-ahead casserole ideas, you might want to check out Make-Ahead Casserole Tips.


Variations and Add-Ons

  • Spicy Chicken Spaghetti: Add some chopped jalapeños or a teaspoon of cayenne pepper to the sauce for a spicy kick.
  • Vegetable Chicken Spaghetti: Mix in frozen peas, carrots, or spinach to sneak in some extra veggies.
  • Mexican-Inspired Chicken Spaghetti: Add a can of Rotel diced tomatoes and green chilies, and swap the cheddar cheese for pepper jack.

Nutritional Information and Healthier Options

Nutritional Breakdown (Per Serving)

  • Calories: 400-450
  • Fat: 20g
  • Carbs: 35g
  • Protein: 25g

Healthier Alternatives:

  • Lower-Calorie Version: Use reduced-fat cheese and soups to cut down on calories.
  • Gluten-Free Version: Replace the spaghetti with gluten-free pasta, available in most grocery stores.

Storing and Reheating Chicken Spaghetti

  • Refrigeration: Leftovers can be stored in an airtight container for up to 4 days.
  • Freezing: You can freeze unbaked chicken spaghetti for up to 3 months. Just cover the dish with aluminum foil, and thaw in the refrigerator overnight before baking.
  • Reheating: Reheat leftovers in the oven at 350°F, covered with foil to retain moisture.

Internal Linking Opportunities

Based on the ExoRecipes post sitemap, here are a few internal links that would complement this article well:


Frequently Asked Questions (FAQs)

Q: Can I use a different type of pasta for chicken spaghetti?
A: Yes, feel free to use any pasta shape you prefer, such as penne or rotini. Just ensure it’s cooked al dente before mixing it into the casserole.

Q: How can I make chicken spaghetti ahead of time?
A: Assemble the casserole as instructed but don’t bake it. Cover and refrigerate for up to 2 days, or freeze for longer storage. When ready to bake, thaw it overnight in the refrigerator if frozen, and bake according to the instructions.

Q: Can I add other cheeses to chicken spaghetti?
A: Absolutely! Feel free to mix in mozzarella, Parmesan, or even cream cheese for extra creaminess.

Q: How do I keep my chicken spaghetti from drying out?
A: Adding extra chicken broth or a little cream to the sauce can help keep the casserole moist. Also, reheating covered with foil helps retain moisture.


Conclusion

Chicken spaghetti is a classic, easy-to-make dish that’s perfect for busy weeknights or a comforting weekend meal. Its creamy, cheesy sauce paired with tender chicken and pasta makes it a family favorite. Whether you make it with a spicy twist or load it up with vegetables, chicken spaghetti can easily be tailored to your taste.

Try some of the variations suggested above, and don’t forget to explore other comfort food recipes from ExoRecipes like Crockpot Potato Soup and Slow Cooker Baked Ziti.

Cream Cheese Sugar Cookies: Soft, Delicious, and Easy to Make

cream cheese cookies, soft sugar cookies, easy sugar cookies, frosted sugar cookies, sugar cookie recipe

Cream Cheese Sugar Cookies Recipe: A Soft and Delicious Treat

Cream cheese sugar cookies offer a unique twist on the classic sugar cookie, making them softer and richer in flavor thanks to the cream cheese. Perfect for any occasion, these cookies are easy to make, highly customizable, and melt in your mouth with every bite. Whether you want a simple dessert or a beautifully frosted cookie for special events, this recipe is sure to become a favorite in your baking repertoire.


Ingredients for Cream Cheese Sugar Cookies

To make these delightful cookies, you’ll need the following ingredients:

  • For the Cookies:
    • 3 cups all-purpose flour
    • 1 ½ teaspoons baking powder
    • ½ teaspoon salt
    • 1 cup unsalted butter, softened
    • 2 ounces cream cheese, softened
    • 1 cup sugar
    • 1 large egg
    • 2 teaspoons vanilla extract
    • ½ teaspoon almond extract (optional)
  • For the Frosting:
    • 4 ounces cream cheese, softened
    • ¼ cup unsalted butter, softened
    • 2 cups powdered sugar
    • 1 teaspoon vanilla extract

For more on frosting techniques, see Homemade Cream Cheese Frosting.


Step-by-Step Instructions for Cream Cheese Sugar Cookies

Step 1: Prepare the Dough

  1. In a medium bowl, whisk together the flour, baking powder, and salt.
  2. In a separate bowl, beat the softened butter and cream cheese until smooth and creamy.
  3. Gradually add sugar and beat until fluffy. Add the egg, vanilla, and almond extract (if using), and mix until combined.
  4. Slowly incorporate the dry ingredients into the wet mixture until a dough forms.
  5. Cover the dough and chill it in the refrigerator for at least one hour.

Step 2: Shaping and Baking

  1. Preheat your oven to 350°F (175°C).
  2. Roll out the dough on a floured surface or scoop into balls. Flatten the balls slightly before placing them on a lined baking sheet.
  3. Bake for 10-12 minutes or until the edges are slightly golden.
  4. Allow cookies to cool completely before frosting.

If you love classic cookies, don’t miss out on the Ultimate Guide to Chocolate Chip Cookies.


Frosting and Decorating Your Cookies

For the perfect frosting:

  1. Beat the softened cream cheese and butter until smooth.
  2. Gradually add powdered sugar and vanilla extract, continuing to beat until fluffy.
  3. Spread or pipe the frosting onto cooled cookies, adding sprinkles or other toppings if desired.

For more decorating inspiration, check out Easy Frosting Ideas for Beginners.


Tips for Perfect Cream Cheese Sugar Cookies

  • Chill the Dough: Chilling helps prevent the cookies from spreading too much, giving them a perfect shape.
  • Room Temperature Ingredients: Ensure your butter, cream cheese, and eggs are at room temperature to avoid lumps in the dough.
  • Customize with Extracts: Feel free to switch up the flavors by using different extracts, like lemon or peppermint.

For more cookie-making tips, check out Cookie Baking Basics.


Variations of Cream Cheese Sugar Cookies

  • Chocolate-Dipped Cream Cheese Cookies: Dip half of each baked cookie into melted chocolate for a decadent twist.
  • Holiday-Themed Cookies: Add food coloring to the frosting and decorate with festive sprinkles for special occasions like Christmas or Easter.
  • Gluten-Free Option: Use gluten-free all-purpose flour to make these cookies gluten-friendly without losing their soft texture.

Nutritional Information and Healthier Alternatives

Nutritional Estimate Per Cookie:

  • Calories: 160
  • Fat: 9g
  • Carbohydrates: 18g
  • Protein: 2g

Healthier Substitutions:

  • Low-Fat: Replace full-fat cream cheese with a reduced-fat version.
  • Lower Sugar: Use a sugar substitute like stevia in both the cookie dough and frosting to reduce sugar content.

For more low-sugar dessert recipes, see Healthy Dessert Ideas.


Storing and Freezing Cream Cheese Sugar Cookies

  • Storing: Keep these cookies in an airtight container at room temperature for up to 5 days.
  • Freezing: Freeze the unbaked cookie dough for up to 3 months. Bake frozen dough balls directly from the freezer, adding 1-2 minutes to the baking time.

Check out Make-Ahead Dessert Ideas for more freezer-friendly recipes.


FAQs About Cream Cheese Sugar Cookies

Q: Can I make these cookies without cream cheese?

  • Yes, but the cream cheese adds extra softness and a subtle tang. Without it, the cookies will be more like traditional sugar cookies.

Q: How long should I chill the dough?

  • It’s best to chill the dough for at least 1 hour, but for even better results, chill overnight.

Q: Can I freeze these cookies after baking?

  • Yes! Once cooled, you can freeze the cookies in an airtight container for up to 3 months. Thaw them at room temperature before serving.

Q: What can I use instead of cream cheese for frosting?

  • If you’re out of cream cheese, you can use buttercream frosting or whipped cream as a lighter option.

Internal Linking Opportunities

Here are some relevant internal links from ExoRecipes that can enhance the depth and interconnectivity of this article:


Conclusion

Cream cheese sugar cookies are a versatile, easy-to-make dessert that brings a new level of softness and flavor to the traditional sugar cookie recipe. Whether you’re preparing them for holidays or just want a simple treat, this recipe offers endless possibilities for customization. With the addition of cream cheese in both the dough and frosting, these cookies are sure to be a hit at your next gathering.

For more delightful dessert inspiration, don’t forget to check out our Ultimate Comfort Food Recipe Collection!

Mamaw’s No-Bake Cherry Cheesecake: A Classic Dessert Recipe

no-bake cheesecake, cherry cheesecake recipe, easy no-bake cheesecake, creamy cherry cheesecake, no-bake dessert

Mamaw’s No-Bake Cherry Cheesecake Recipe

Mamaw’s no-bake cherry cheesecake is a delightful and easy dessert that captures the essence of nostalgic family gatherings. This cheesecake requires no oven time, making it an ideal treat for busy schedules while still delivering the creamy, rich texture everyone loves. Whether you’re preparing this for a holiday celebration or just craving a sweet treat, this recipe is sure to become a staple in your home.


Ingredients for Mamaw’s No-Bake Cherry Cheesecake

To make this delicious dessert, you’ll need the following ingredients:

  • Graham Cracker Crust:
    • 1 ½ cups graham cracker crumbs
    • ¼ cup sugar
    • ½ cup melted butter
  • Cheesecake Filling:
    • 16 oz cream cheese (softened)
    • 1 cup powdered sugar
    • 1 teaspoon vanilla extract
    • 1 ½ cups whipped topping (or freshly whipped cream)
  • Cherry Topping:
    • 1 can of cherry pie filling

For more creative and easy dessert options, check out Easy No-Bake Banana Split Cheesecake Recipe.


Step-by-Step Instructions for Mamaw’s No-Bake Cherry Cheesecake

Step 1: Making the Graham Cracker Crust

  • Mix the graham cracker crumbs, sugar, and melted butter in a bowl.
  • Press the mixture firmly into the bottom of a springform pan or pie dish.
  • Refrigerate the crust for at least 30 minutes to set it properly.

Step 2: Preparing the Cheesecake Filling

  • Beat the softened cream cheese until smooth.
  • Gradually add powdered sugar and vanilla extract, continuing to mix until fully combined.
  • Gently fold in the whipped topping or freshly whipped cream until the mixture becomes light and fluffy.

Step 3: Assembling the Cheesecake

  • Spread the cheesecake filling evenly over the chilled graham cracker crust.
  • Smooth the top with a spatula to ensure an even layer.

Step 4: Adding the Cherry Topping

  • Spoon the cherry pie filling over the cheesecake layer, spreading it evenly.

Step 5: Chilling the Cheesecake

  • Cover the cheesecake and refrigerate for at least 4 hours, or overnight, for the best results.

For more step-by-step recipes, explore the delightful Strawberry Freezer Pie on our site.


Tips for the Perfect No-Bake Cherry Cheesecake

  • Chill Time: The longer the cheesecake chills, the better the texture. Refrigerating it overnight will yield a firmer, creamier cheesecake.
  • Whipped Topping vs. Fresh Whipped Cream: While store-bought whipped topping is convenient, freshly whipped cream gives the cheesecake a lighter, airier texture.
  • Softened Cream Cheese: To avoid lumps in your cheesecake, make sure the cream cheese is fully softened before mixing.

Variations on Mamaw’s No-Bake Cherry Cheesecake

  • Chocolate Cherry Cheesecake: Add a layer of melted chocolate to the graham cracker crust before adding the cheesecake filling for a decadent twist.
  • Mixed Berry Cheesecake: Swap out the cherry pie filling for a homemade mixed berry compote or other pie fillings like blueberry or strawberry.
  • Lemon Cheesecake: For a tangy version, add 2 tablespoons of lemon juice and some lemon zest to the cream cheese mixture and top with a lemon curd instead of cherry pie filling.

For more sweet variations, consider trying Raspberry Cheesecake Brownie Bites for a chocolatey take on cheesecake.


Nutritional Information and Healthier Alternatives

Nutritional Estimate Per Serving:

  • Calories: 400
  • Fat: 25g
  • Carbohydrates: 40g
  • Protein: 4g

Healthier Alternatives:

  • Low-Fat Option: Use low-fat cream cheese and light whipped topping to reduce the calorie and fat content.
  • Lower Sugar Version: Substitute powdered sugar with a sugar alternative like stevia, and use a no-sugar-added cherry topping.
  • Gluten-Free Crust: Opt for gluten-free graham crackers for those with gluten sensitivities.

Storing and Serving Mamaw’s No-Bake Cherry Cheesecake

  • Storing: Keep the cheesecake in the refrigerator for up to 4-5 days, ensuring it’s covered to prevent it from drying out.
  • Freezing: You can freeze the cheesecake without the cherry topping. Once thawed, add the topping right before serving.
  • Serving: Serve chilled and garnish each slice with a dollop of whipped cream or fresh cherries for an extra touch of indulgence.

For more no-bake dessert ideas, check out No-Bake Pumpkin Cheesecake to stay in the fall spirit.


FAQs About Mamaw’s No-Bake Cherry Cheesecake

Q: Can I make this cheesecake without a graham cracker crust?

  • Yes! You can substitute the graham cracker crust with other options like Oreo crust or digestive biscuits, depending on your taste preferences.

Q: How long does the cheesecake need to chill?

  • Ideally, the cheesecake should chill for at least 4 hours, but for the best texture, overnight chilling is recommended.

Q: Can I use fresh cherries instead of canned pie filling?

  • Absolutely! You can make your own cherry topping by cooking fresh or frozen cherries with sugar and cornstarch to thicken the mixture.

Q: Can I freeze Mamaw’s no-bake cherry cheesecake?

  • Yes, you can freeze it, but for the best texture, freeze it without the cherry topping and add it after thawing.

Conclusion

Mamaw’s no-bake cherry cheesecake is a simple yet satisfying dessert perfect for any occasion. Whether you’re hosting a family gathering or simply craving a creamy treat, this cheesecake delivers flavor with minimal effort. With a variety of variations and easy-to-find ingredients, it’s a recipe you’ll come back to again and again. For more sweet inspiration, be sure to check out other no-bake favorites on our site.

Explore more delightful treats like Kentucky Butter Cake and create a dessert spread that will impress everyone.

Fluffy Biscuits: The Perfect Homemade Recipe for Soft, Airy Biscuits

Fluffy Biscuits Recipe: Light, Tender, and Delicious

Fluffy biscuits are a timeless classic, known for their soft, airy texture and rich, buttery flavor. Whether served alongside savory dishes or enjoyed on their own with jam or honey, these biscuits are sure to impress. Follow this recipe to achieve the perfect fluffy biscuits every time.


Ingredients for Fluffy Biscuits

For these deliciously fluffy biscuits, you’ll need the following ingredients:

  • 2 cups all-purpose flour
  • 1 tablespoon baking powder
  • 1/2 teaspoon salt
  • 1/2 cup cold unsalted butter (cubed)
  • 3/4 cup buttermilk (or substitute by mixing milk with lemon juice)

For more comfort food recipes, check out Crockpot Potato Soup with Hashbrowns, perfect for pairing with these biscuits.


Step-by-Step Instructions for Perfect Fluffy Biscuits

Step 1: Prepare the Dough

  • In a large bowl, combine flour, baking powder, and salt.
  • Cut in cold butter using a pastry cutter or your fingers until the mixture resembles coarse crumbs.
  • Gradually add buttermilk, stirring gently until just combined. Avoid overmixing to ensure the dough remains tender.

Step 2: Roll Out and Cut the Biscuits

  • Turn the dough out onto a floured surface and pat it down to about ½ inch thickness.
  • Fold the dough over itself a few times to create layers, which will result in extra fluffiness.
  • Use a biscuit cutter to cut out the dough into rounds.

For more tips on achieving the ideal dough consistency, see Mastering the Art of Biscuit Dough.


Baking the Biscuits

Step 3: Baking the Biscuits

  • Preheat your oven to 425°F (220°C) and line a baking sheet with parchment paper.
  • Arrange the biscuit rounds on the sheet, making sure they are close together but not touching.
  • Bake for 12-15 minutes or until the tops are golden brown. Brush with melted butter immediately after removing from the oven for added flavor.

These biscuits pair wonderfully with Kentucky Butter Cake, offering another indulgent Southern treat.


Tips for Perfectly Fluffy Biscuits

  • Use Cold Butter: Cold butter helps create steam pockets in the dough, which leads to a light and fluffy texture.
  • Don’t Overmix the Dough: Overworking the dough will result in tough biscuits. Mix until just combined.
  • Layer the Dough: Folding the dough creates layers that help the biscuits rise and maintain a tender, flaky texture.

Variations on Fluffy Biscuits

  • Cheesy Biscuits: Add 1 cup of shredded cheddar cheese to the dough for a savory twist.
  • Herb Biscuits: Incorporate chopped fresh herbs like rosemary or thyme for added flavor.
  • Sweet Biscuits: Add 2 tablespoons of sugar to the dry ingredients and top with honey or jam for a sweet version.

If you’re looking for a complementary dish, try Slow Cooker Baked Ziti for a hearty, comforting meal.


Storing and Reheating Biscuits

  • Storage: Store biscuits in an airtight container at room temperature for up to 3 days.
  • Freezing: Freeze biscuits in a single layer on a baking sheet, then transfer to a freezer-safe bag. Reheat directly in the oven at 350°F until warmed through.
  • Reheating: For best results, reheat biscuits in the oven to preserve their fluffy texture.

Nutritional Information and Healthier Alternatives

Nutritional Estimate Per Biscuit:

  • Calories: 210
  • Fat: 12g
  • Carbohydrates: 22g
  • Protein: 4g

Healthier Alternatives:

  • Whole Wheat Biscuits: Swap half of the all-purpose flour for whole wheat flour to boost the fiber content.
  • Low-Fat Biscuits: Use low-fat buttermilk and reduce the butter for a lighter option.
  • Gluten-Free Biscuits: Replace the flour with a gluten-free flour blend to accommodate gluten-free diets.

FAQs About Fluffy Biscuits

Q: How do I make my biscuits fluffier?

  • The key to fluffy biscuits is using cold butter, handling the dough gently, and not overworking it. Folding the dough also helps create layers that add to the fluffiness.

Q: Can I substitute regular milk for buttermilk in biscuits?

  • Yes, but the buttermilk’s acidity reacts with the baking powder, making the biscuits rise higher. You can make a substitute by adding a tablespoon of lemon juice or vinegar to regular milk.

Q: Why are my biscuits hard instead of fluffy?

  • Overmixing the dough or using melted butter can lead to tough biscuits. Ensure your butter is cold and handle the dough as little as possible.

Conclusion

In conclusion, fluffy biscuits are a delightful addition to any meal, whether served as a side or enjoyed on their own. With the right ingredients and techniques, you can achieve tender, airy biscuits every time. Experiment with different variations, such as adding cheese or herbs, to make the recipe your own. For more delicious and easy-to-make recipes, explore Homemade Pizza Sticks for another crowd-pleaser.