Banana Cake with Buttercream Frosting: A Deliciously Moist and Sweet Treat
If you’re looking for a moist, flavorful, and decadent dessert, banana cake with buttercream frosting is an excellent choice. Combining the natural sweetness of ripe bananas with the richness of creamy buttercream frosting, this cake is perfect for birthdays, gatherings, or even just as an indulgent weekend treat. With its soft texture and irresistible taste, this cake will quickly become a family favorite.
For more comfort food baking inspiration, check out this recipe for Kentucky Butter Cake, a Southern favorite that is just as rich and delicious.
Why You’ll Love This Recipe
- Incredibly Moist: Bananas naturally make the cake soft and moist, ensuring it stays fresh for days.
- Simple Ingredients: Most of the ingredients are pantry staples, making it an easy cake to whip up.
- Perfectly Sweet: The buttercream frosting adds just the right amount of sweetness to balance the flavors.
Looking for another delicious dessert idea? Be sure to check out this recipe for Crockpot Potato Soup, a comfort food classic that pairs well with any sweet treat.
Ingredients for Banana Cake with Buttercream Frosting
To create the perfect banana cake, you’ll need the following ingredients:
For the Cake:
- 3 ripe bananas, mashed
- 1 1/2 cups all-purpose flour
- 1 teaspoon baking soda
- 1/4 teaspoon salt
- 1/2 cup unsalted butter, softened
- 3/4 cup granulated sugar
- 1/4 cup brown sugar
- 2 large eggs
- 1/2 cup buttermilk
- 1 teaspoon vanilla extract
For the Buttercream Frosting:
- 1 cup unsalted butter, softened
- 4 cups powdered sugar
- 2-3 tablespoons heavy cream
- 2 teaspoons vanilla extract
- A pinch of salt
These ingredients come together to create a fluffy, flavorful cake, while the buttercream frosting is rich and creamy, offering the perfect complement to the moist banana base.
Step-by-Step Guide to Making Banana Cake with Buttercream Frosting
1. Prepare the Cake Batter
Start by preheating your oven to 350°F (175°C). Grease and line two 9-inch round cake pans with parchment paper.
Step-by-Step Instructions for the Cake Batter:
- Mash the Bananas: In a small bowl, mash the bananas until smooth. Set aside.
- Mix Dry Ingredients: In another bowl, combine flour, baking soda, and salt. Whisk together to combine.
- Cream Butter and Sugars: In a large bowl, use an electric mixer to cream the softened butter with the granulated and brown sugars until light and fluffy (about 3-4 minutes).
- Add Eggs: Beat in the eggs one at a time, followed by the mashed bananas and vanilla extract.
- Combine Wet and Dry Ingredients: Gradually add the dry ingredients into the banana mixture, alternating with the buttermilk. Mix until everything is fully incorporated.
2. Bake the Cake
Divide the batter evenly between the prepared cake pans. Smooth the tops with a spatula and bake for 25-30 minutes, or until a toothpick inserted into the center comes out clean.
Allow the cakes to cool in the pans for 10 minutes, then transfer them to a wire rack to cool completely before frosting.
For another fruity dessert, try this Delightful Mini Pineapple Upside-Down Cakes, which pairs tropical flavors with a sweet, sticky glaze.
3. Prepare the Buttercream Frosting
While the cakes are cooling, it’s time to make the buttercream frosting. This frosting is rich, creamy, and perfect for spreading over a banana cake.
Step-by-Step Instructions for the Buttercream Frosting:
- Cream the Butter: In a large bowl, beat the softened butter with an electric mixer on medium speed until smooth (about 2 minutes).
- Add Powdered Sugar: Gradually add the powdered sugar, one cup at a time, while mixing on low speed.
- Add Vanilla and Cream: Once all the sugar is incorporated, add the vanilla extract, salt, and 2 tablespoons of heavy cream. Beat on medium-high speed for 2-3 minutes until light and fluffy. If the frosting is too thick, add the extra tablespoon of cream.
- Adjust for Taste and Texture: Taste the frosting and add a pinch more salt if it’s too sweet.
4. Frost and Assemble the Cake
Once the cakes are completely cool, it’s time to assemble:
- Level the Cake Layers: Use a serrated knife to level the tops of the cake layers if they have domed during baking. This will ensure a smooth, even finish when you frost the cake.
- Apply the Frosting: Place one layer of cake on a serving plate or cake stand. Spread an even layer of buttercream frosting over the top, then place the second cake layer on top. Frost the top and sides of the cake, smoothing it out with an offset spatula.
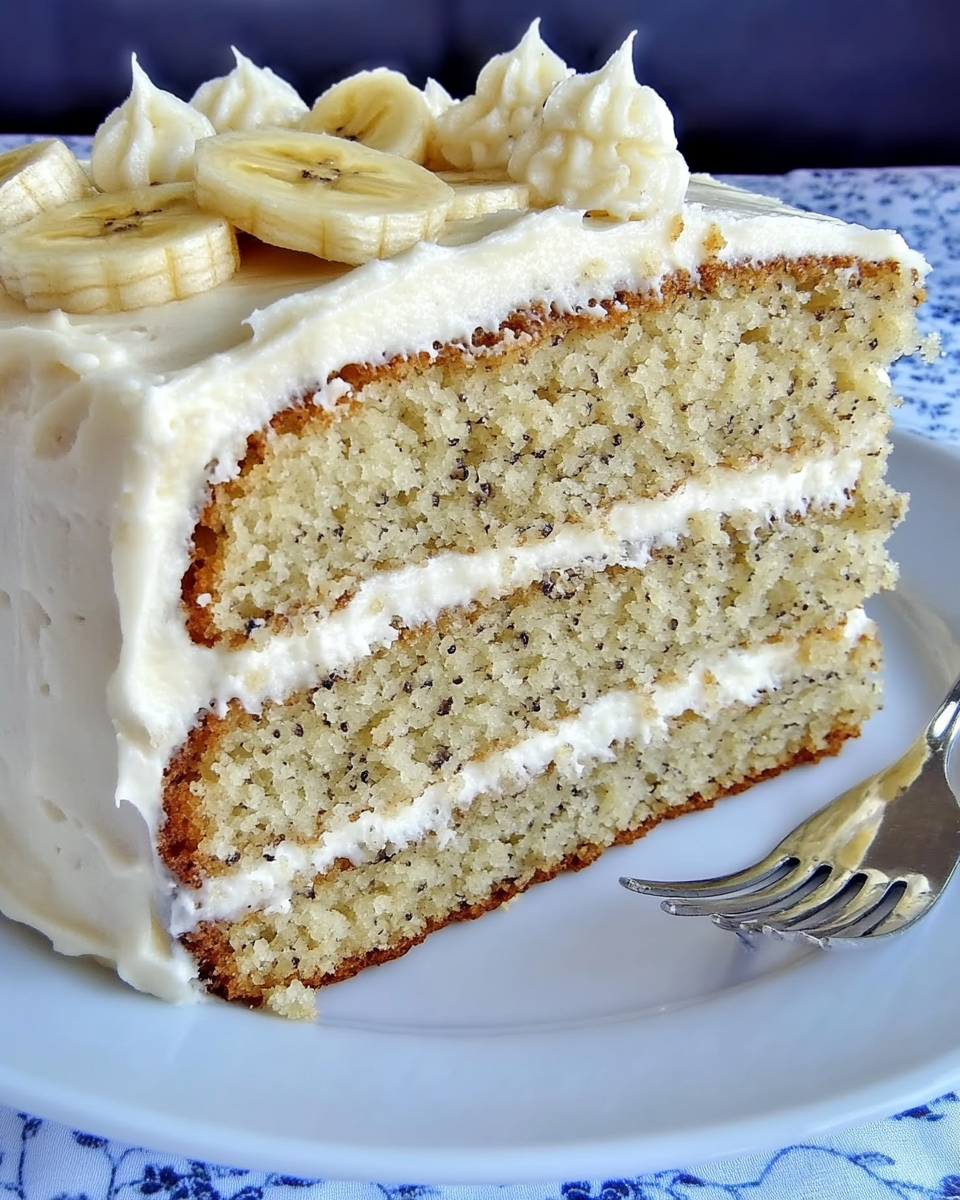
- Decorate: For an extra touch, decorate the cake with banana slices, chopped nuts, or a drizzle of caramel sauce.
Popular Variations of Banana Cake
If you want to add your own twist to banana cake with buttercream frosting, here are some popular variations:
1. Banana Cake with Cream Cheese Frosting (250 words)
For a tangy contrast, replace the buttercream with cream cheese frosting. Cream cheese pairs wonderfully with the sweetness of bananas, adding a bit of tartness that cuts through the richness.
2. Gluten-Free Banana Cake (250 words)
Use a gluten-free all-purpose flour blend to create a gluten-free version of this cake. Be sure to check that your baking powder and other ingredients are also gluten-free for a fully allergy-friendly dessert.
3. Chocolate Banana Cake (250 words)
Add 1/2 cup of cocoa powder to the cake batter for a delicious chocolate banana cake. Pair it with chocolate buttercream frosting for a decadent, indulgent dessert.
Tips for Perfect Banana Cake
- Use Overripe Bananas: The more overripe your bananas are, the sweeter and more flavorful your cake will be.
- Room Temperature Ingredients: Make sure all your ingredients, especially butter and eggs, are at room temperature for a smooth batter.
- Don’t Overmix: Overmixing the batter can result in a dense cake, so mix just until combined.
FAQs About Banana Cake
Can I Freeze Banana Cake?
Yes, you can freeze banana cake. Wrap the cake layers tightly in plastic wrap before freezing. When you’re ready to frost, let the cake thaw completely at room temperature.
How Long Does Banana Cake Last?
Banana cake can last for up to 3 days at room temperature in an airtight container, or you can refrigerate it for up to 5 days.
Can I Make the Frosting Ahead of Time?
Yes, you can make the frosting up to 3 days in advance. Store it in an airtight container in the refrigerator, and let it come to room temperature before using.
Nutritional Information and Healthier Substitutes
Nutritional Breakdown (250 words): Each slice of banana cake with buttercream frosting contains approximately:
- Calories: 450
- Fat: 20g
- Carbohydrates: 65g
- Protein: 5g
Healthier Alternatives:
- Replace Sugar: Swap out white sugar for coconut sugar or a sugar substitute like stevia.
- Use Greek Yogurt: Substitute some of the butter in the cake with Greek yogurt for a lighter version.
- Reduce the Frosting: If you’re looking to cut calories, reduce the amount of frosting or use a lighter glaze instead.
Conclusion
Banana cake with buttercream frosting is a timeless dessert that is sure to impress. Its moist texture, combined with the sweetness of buttercream, creates a truly unforgettable cake experience. Whether you’re baking it for a special occasion or simply to satisfy your sweet tooth, this cake will quickly become a favorite.
For more delicious desserts, try Chocolate Magic Shell Yogurt Cups or Easy No-Bake Banana Split Cheesecake, two other treats that highlight how simple ingredients can create incredible results.