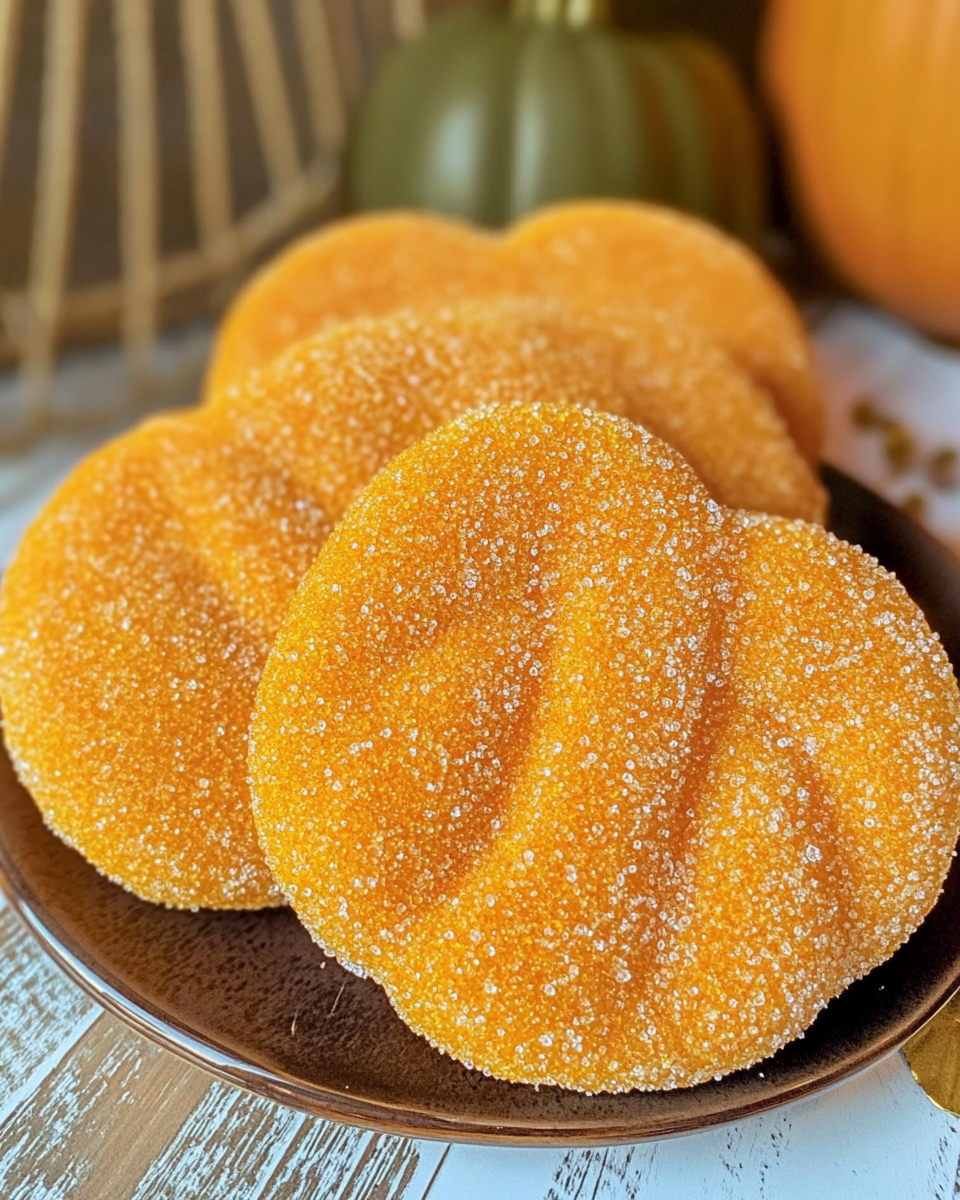
Homemade Saltwater Taffy Recipe: Classic Candy with Easy Step-by-Step Instructions

DIY saltwater taffy, homemade candy recipes, old-fashioned saltwater taffy, classic taffy recipe, saltwater taffy flavors

Homemade Saltwater Taffy: A Classic Candy Recipe to Make at Home

Saltwater taffy is a nostalgic, chewy candy often associated with seaside boardwalks and vacation memories. This delightful treat, which can be customized with various flavors and colors, is surprisingly easy to make at home. With a few key ingredients and some careful steps, you can recreate the classic saltwater taffy experience in your kitchen.

For those interested in other homemade treats, check out the Easy Apple Hand Pies recipe on ExoRecipes, another fun and simple dessert to make at home.


What is Saltwater Taffy?

Saltwater taffy is a soft, stretchy candy with a history tracing back to the 1880s in Atlantic City. Contrary to popular belief, it doesn’t contain seawater, but the name is believed to have originated from a candy shop owner who jokingly referred to it as “saltwater taffy” after a boardwalk flood.

If you enjoy old-fashioned treats, you might also like the Classic Apple Dumplings on ExoRecipes, which brings traditional flavors to the dessert table.


Key Ingredients and Equipment for Saltwater Taffy

Essential Ingredients

  • Sugar: The base of the candy that gives sweetness.
  • Corn Syrup: Prevents crystallization, keeping the taffy smooth.
  • Butter: Adds a slight richness and makes the taffy softer.
  • Salt: Enhances flavor.
  • Flavor Extracts: Vanilla, peppermint, or fruit flavors are commonly used.
  • Food Coloring: Optional for aesthetic appeal.

Recommended Equipment

  • Heavy-Bottom Saucepan: Essential for even heating.
  • Candy Thermometer: Necessary for reaching the right temperature.
  • Spatula: For stirring the mixture.
  • Kitchen Gloves: Helpful for safely pulling the hot taffy.

For another treat that requires careful ingredient selection, explore the Gone to Heaven Chocolate Pie on ExoRecipes, a creamy and rich dessert that’s both easy and impressive.


Step-by-Step Recipe for Homemade Saltwater Taffy

1. Preparing the Ingredients

  • Measure out all ingredients before starting.
  • Line a baking sheet with butter or wax paper for cooling.

2. Cooking the Taffy Base

  • In a saucepan, combine sugar, corn syrup, butter, and water.
  • Stir constantly over medium heat until the sugar dissolves, then bring to a boil.
  • Attach the candy thermometer, cooking until the mixture reaches 260°F (127°C).

3. Adding Flavor and Color

  • Once at the desired temperature, remove from heat.
  • Stir in flavor extracts and food coloring, mixing until fully incorporated.

4. Cooling the Taffy

  • Pour the mixture onto the prepared baking sheet.
  • Allow it to cool slightly until it’s safe to handle but still warm.

5. Pulling the Taffy

  • Dust your hands with powdered sugar or wear gloves.
  • Stretch the taffy by pulling it away from you, folding it back, and repeating until it becomes lighter and more opaque.

6. Shaping and Wrapping the Taffy

  • Roll the taffy into long ropes and cut it into small pieces.
  • Wrap each piece in wax paper and twist the ends to seal.

Flavor Variations and Customizations

Popular Flavors

  1. Vanilla and Peppermint: Classics that highlight the taffy’s natural sweetness.
  2. Fruit Extracts: Orange, strawberry, and lemon extracts bring bright flavors to the candy.

Unique Flavor Ideas

  1. Coconut Taffy: Add a tropical touch with coconut extract.
  2. Spiced Taffy: For a twist, try cinnamon or nutmeg for fall-themed taffy.

For more candy recipes, check out Chocolate Magic Shell Yogurt Cup for a chocolatey treat with a unique twist.


Serving and Storage Tips

Serving Ideas

  • Arrange taffy pieces in a decorative jar for a festive display.
  • Serve alongside other homemade sweets at parties or gatherings.

Storage Tips

  • Room Temperature: Store wrapped taffy in an airtight container at room temperature for up to two weeks.
  • Freezing: For longer storage, freeze taffy in a sealed container.

FAQs About Homemade Saltwater Taffy

Why is it called saltwater taffy if it doesn’t contain seawater?

The name likely originated from a joke by a candy shop owner. Despite its name, the recipe doesn’t include seawater—just a bit of salt.

Can I make saltwater taffy without corn syrup?

Yes, though corn syrup helps prevent crystallization, you can substitute it with other liquid sweeteners for a different texture.

What’s the best way to prevent the taffy from sticking to my hands?

Lightly dust your hands with powdered sugar or use kitchen gloves for a non-stick solution.

Is saltwater taffy gluten-free?

Yes, most saltwater taffy recipes are naturally gluten-free, but it’s always best to check ingredient labels if you have dietary restrictions.

For more insights on using corn syrup substitutes, see Serious Eats’ Tips on Using Candy Thermometers for best practices.


Nutritional Information and Healthier Alternatives

Saltwater taffy is typically high in sugar, but here are some tips for a lighter version:

  • Reduce Sugar: Use a sugar substitute suitable for candy-making to reduce calorie content.
  • Low-Fat Taffy: Consider using a smaller amount of butter or omitting it entirely for a lower-fat version.

Wrapping Up

Homemade Saltwater Taffy is a nostalgic, delightful candy that’s perfect for sharing and gifting. The pulling process can be a fun, hands-on activity, and the variety of flavors makes it versatile for any occasion. For more nostalgic sweets, don’t miss out on the County Fair Funnel Cakes recipe on ExoRecipes—a beloved classic that pairs well with taffy for a complete candy experience.

White German Chocolate Cake: Light and Creamy Twist on a Classic Recipe

white chocolate German cake, light German chocolate cake, white chocolate cake with coconut, German chocolate with white twist, coconut pecan white cake

White German Chocolate Cake: A Light and Luscious Twist on a Classic

White German Chocolate Cake is a delicious twist on the traditional German chocolate cake, featuring a white chocolate base rather than the classic dark chocolate. This variation keeps the classic coconut-pecan frosting that fans adore, but the flavor is lightened with white chocolate, making it a perfect choice for those who enjoy a subtler chocolate taste.

For fans of unique takes on classic recipes, this cake is a must-try. If you’re interested in other light yet decadent desserts, check out Coconut Cream Pie Deluxe on ExoRecipes, which also celebrates rich, creamy flavors without the heavy chocolate taste.


What is White German Chocolate Cake?

White German Chocolate Cake takes inspiration from the traditional German chocolate cake, substituting white chocolate for a lighter flavor and appearance. The cake is still layered with a classic coconut-pecan frosting, offering the same richness and nutty flavor in every bite.

Traditional German chocolate cake dates back to the 1850s when a chocolate maker, Samuel German, developed a mild, sweet chocolate. Over the years, it became a staple in American dessert culture, and many variations have emerged. For those who prefer a different take on this classic, the white chocolate version provides a delightful alternative.


Key Ingredients for White German Chocolate Cake

Cake Ingredients

  1. White Chocolate: This forms the base of the cake, giving it a mild, creamy flavor.
  2. Butter: Adds moisture and richness.
  3. Buttermilk: Enhances the cake’s softness and tender crumb.
  4. Eggs: For structure and texture.
  5. All-Purpose Flour: The primary dry ingredient.
  6. Vanilla Extract: Provides an additional layer of flavor.

Frosting Ingredients

  1. Sweetened Condensed Milk: Used in the coconut-pecan frosting for a creamy texture.
  2. Butter and Sugar: Adds sweetness and richness to the frosting.
  3. Shredded Coconut: Provides the classic texture and tropical flavor.
  4. Chopped Pecans: Adds crunch and nutty notes.

For tips on choosing quality white chocolate, check out Epicurious’ Guide to Choosing the Best White Chocolate for Baking.


Step-by-Step Recipe for White German Chocolate Cake

1. Prepare Ingredients and Oven

  • Preheat the Oven: Set your oven to 350°F (175°C).
  • Prepare Pans: Grease and flour two round cake pans to ensure easy removal.

2. Make the Cake Batter

  • Cream Butter and Sugar: In a large bowl, cream butter and sugar until light and fluffy.
  • Add Eggs and Melted White Chocolate: Mix in the eggs, one at a time, followed by the melted white chocolate.
  • Incorporate Dry Ingredients: Gradually add flour, baking powder, and salt.
  • Add Buttermilk and Vanilla Extract: For the final steps, add buttermilk and vanilla extract, mixing until just combined.

3. Bake the Cakes

  • Divide Batter: Pour the batter evenly between the prepared pans.
  • Bake: Bake for 25-30 minutes, or until a toothpick inserted into the center comes out clean.
  • Cool: Allow the cakes to cool in the pans for 10 minutes, then transfer to a wire rack to cool completely.

Coconut-Pecan Frosting

The frosting is a highlight of German chocolate cake, and the white version is no exception. Here’s how to make it:

  1. Melt Butter and Sweetened Condensed Milk: In a saucepan over medium heat, melt the butter and stir in the sweetened condensed milk.
  2. Add Sugar and Cook Until Thickened: Add sugar and cook until the mixture thickens slightly.
  3. Stir in Coconut and Pecans: Remove from heat and stir in shredded coconut and chopped pecans.

This frosting should cool before spreading on the cake layers. For a similar texture with a different flavor profile, you might also like Gone to Heaven Chocolate Pie, which offers a rich chocolate experience paired with whipped topping.


Assembling the Cake

  • Layer the Cake: Place one cake layer on a serving plate and spread a generous amount of coconut-pecan frosting on top.
  • Add the Second Layer: Place the second cake layer on top and spread frosting over the top and sides.
  • Decorate: Optionally, garnish with toasted coconut flakes or extra pecans for added texture and presentation.

Creative Variations and Customizations

  1. White Chocolate Ganache Drip
    • Add a white chocolate ganache drip for extra flavor and a dramatic visual.
  2. Fruit Filling
    • Add a layer of raspberry or strawberry filling between the cake layers for a fruity twist.
  3. Nut Substitutions
    • Substitute pecans with walnuts or macadamia nuts for a different nutty flavor.
  4. Buttercream Frosting
    • If you prefer a creamier texture, consider using a white chocolate buttercream frosting.

For another cake that embraces customization, try the Classic Apple Dumplings recipe, which can be personalized with different fillings.


Serving Suggestions and Storage Tips

White German Chocolate Cake is best served fresh, but here’s how to maximize enjoyment over time:

Serving Ideas

  • Fresh Berries: Serve with fresh berries like raspberries or strawberries.
  • Whipped Cream: Add a dollop of whipped cream on each slice for an airy contrast.

Storage Tips

  • Refrigeration: Store in an airtight container in the refrigerator for up to 5 days.
  • Freezing: For longer storage, freeze individual slices in freezer-safe containers for up to 3 months. Thaw in the refrigerator before serving.

FAQs About White German Chocolate Cake

Can I use dark chocolate instead of white?

While it changes the flavor profile, dark chocolate can be used for a richer taste.

Is it possible to make this cake without coconut?

Yes, you can omit the coconut in the frosting or substitute with another texture, like crushed nuts.

Can I make this cake gluten-free?

Yes, substitute the all-purpose flour with a gluten-free blend to make it gluten-free.

How do I keep my white chocolate from burning?

White chocolate melts best over low heat or in a double boiler to prevent burning. See The Spruce Eats’ Guide to Melting Chocolate for Baking for detailed tips.


Nutritional Information and Health Tips

This cake is rich, but here are a few tips to make it lighter:

  • Reduce Sugar: Use a sugar substitute in the cake and frosting to lower the calorie count.
  • Whole Wheat Flour: Substitute some of the all-purpose flour with whole wheat flour for added fiber.
  • Light Frosting: Consider using a lighter frosting, like whipped cream, instead of the traditional coconut-pecan.

Wrapping Up

White German Chocolate Cake is a sophisticated and flavorful dessert that combines the creamy notes of white chocolate with the traditional coconut-pecan frosting. Perfect for special occasions, this cake offers a light twist on a classic that can be enjoyed by chocolate lovers and those who prefer subtler flavors alike. For more creative twists on classic desserts, try Easy Apple Cheesecake Tacos for a fun, unique treat to pair with this cake.

Reese’s Stuffed Peanut Butter Chocolate Chip Cookies: The Ultimate Indulgent Treat

peanut butter Reese’s cookies, Reese’s stuffed cookies, chocolate chip cookies with Reese’s, stuffed peanut butter cookies, chocolate and peanut butter cookies

Reese’s Stuffed Peanut Butter Chocolate Chip Cookies: A Delight for Peanut Butter Lovers

Reese’s Stuffed Peanut Butter Chocolate Chip Cookies combine the best of both worlds—soft, chewy peanut butter cookies with gooey Reese’s peanut butter cups hidden inside. This dessert is a dream for peanut butter and chocolate enthusiasts alike. These stuffed cookies are easy to make, satisfyingly indulgent, and perfect for any gathering.

If you love exploring unique and decadent treats, this cookie recipe will add a twist to your traditional dessert lineup. You might also enjoy the Reese’s Pieces Chocolate Chip Cookie Bars on ExoRecipes for another peanut butter and chocolate delight.


Why You’ll Love Reese’s Stuffed Cookies

Reese’s Stuffed Peanut Butter Chocolate Chip Cookies are all about bringing out the creamy, peanutty richness of Reese’s cups, wrapped in a soft, chewy cookie. This recipe elevates a simple chocolate chip cookie by adding Reese’s in the center, giving it an extra level of indulgence. Each bite has the perfect balance of chocolate chips, peanut butter flavor, and creamy Reese’s filling.

For those who appreciate unique takes on traditional treats, try Homemade Oreo Donuts from ExoRecipes for another delightful fusion dessert that pairs well with these cookies.


Ingredients for Reese’s Stuffed Peanut Butter Chocolate Chip Cookies

To make these stuffed cookies, you’ll need:

  • Butter: Adds richness and moisture.
  • Peanut Butter: Creamy peanut butter works best to provide the right consistency and flavor.
  • Sugars: Both white and brown sugar for balanced sweetness and chewiness.
  • Eggs: Bind the ingredients and add structure.
  • All-Purpose Flour: Forms the base for the dough.
  • Baking Soda: Helps the cookies rise and prevents them from being too dense.
  • Salt: Enhances all flavors.
  • Chocolate Chips: Adds additional chocolatey goodness to complement the Reese’s.
  • Reese’s Peanut Butter Cups: Full-size or mini Reese’s, depending on the level of chocolate desired in each bite.

Ingredient Tips

  • Peanut Butter Type: Creamy is ideal, but if you want extra texture, consider using chunky peanut butter.
  • Reese’s Choice: Full-size Reese’s cups create a gooier center, while mini Reese’s distribute the peanut butter flavor more subtly.

For more guidance on using peanut butter in baking, check out King Arthur’s Guide to Baking with Peanut Butter.


Step-by-Step Recipe for Reese’s Stuffed Peanut Butter Chocolate Chip Cookies

Here’s how to make these delicious cookies from scratch:

1. Prepare the Ingredients

  • Preheat your oven to 350°F (175°C).
  • Line a baking sheet with parchment paper to prevent sticking and make clean-up easier.

2. Cream Butter and Sugars

  • In a large mixing bowl, cream the butter, peanut butter, white sugar, and brown sugar until light and fluffy.
  • Add eggs, one at a time, mixing well after each addition.

3. Mix the Dry Ingredients

  • In a separate bowl, whisk together flour, baking soda, and salt.
  • Gradually add the dry ingredients to the wet mixture, mixing until fully incorporated.

4. Fold in the Chocolate Chips

  • Gently fold in chocolate chips until evenly distributed throughout the dough.
  • Chill the dough for at least 30 minutes to help prevent spreading during baking.

5. Stuff with Reese’s Cups

  • Scoop a generous spoonful of dough and flatten it slightly.
  • Place a Reese’s cup in the center, then wrap the dough around it, sealing the edges.
  • Arrange dough balls on the baking sheet, spacing them about two inches apart.

6. Bake

  • Bake for 10-12 minutes, or until the edges are golden brown. The center may look slightly underbaked but will set as it cools.
  • Let cookies cool on the baking sheet for a few minutes, then transfer to a wire rack.

For another twist on a peanut butter treat, you might like the No-Bake Peanut Butter Oatmeal Cookies on ExoRecipes, which pairs well with these cookies for a peanut butter-inspired dessert spread.


Creative Variations for Reese’s Stuffed Cookies

  1. White Chocolate Reese’s Cookies
    • Use white chocolate Reese’s cups for a sweeter, creamier filling.
  2. Almond Butter Variation
    • Swap peanut butter with almond butter for a slightly different flavor. Add almond extract for a richer nutty taste.
  3. Holiday-Themed Cookies
    • Use themed Reese’s cups (like mini Christmas tree shapes) for a festive touch.
  4. Sea Salt Sprinkle
    • Top cookies with a pinch of sea salt before baking to balance the sweetness.
  5. Mini Reese’s Pieces
    • Fold in mini Reese’s pieces for added crunch and color.

Serving Ideas and Storage Tips

These cookies are delicious on their own, but you can elevate the experience with creative serving suggestions:

  • Warm with Ice Cream: Serve warm with a scoop of vanilla ice cream for an extra-indulgent dessert.
  • Chocolate Drizzle: For an added layer of richness, drizzle melted chocolate over the cookies before serving.

Storage Tips

  • Room Temperature: Store cookies in an airtight container at room temperature for up to 3 days.
  • Freezing: These cookies freeze well. Wrap them individually and store in a freezer-safe container for up to 3 months.

FAQs About Reese’s Stuffed Peanut Butter Chocolate Chip Cookies

Can I use different types of Reese’s cups?

Yes, you can experiment with different sizes and flavors, such as Reese’s Thins, Reese’s Dark Chocolate, or Reese’s Mini Cups.

How do I keep the Reese’s from melting too much?

Chilling the dough before baking helps the Reese’s stay intact, and placing the cookie sheet in the fridge for a few minutes before baking can also help.

Do I need to chill the dough before baking?

Chilling the dough prevents the cookies from spreading too much, so it’s recommended, especially if your dough is soft.

Can these cookies be made gluten-free?

Yes, use a 1:1 gluten-free flour substitute to make these cookies gluten-free.

For more cookie-baking insights, see Bon Appétit’s Tips on Perfecting Cookie Dough Consistency.


Nutritional Information and Tips for Lightening Up the Recipe

Nutritional Overview

These cookies are indulgent, offering around 200-250 calories per cookie with a higher amount of sugar and fat due to the Reese’s filling and chocolate chips.

Lightening the Recipe

  • Reduce Sugar: Try using a sugar substitute to decrease the calorie count.
  • Dark Chocolate Chips: Opt for dark chocolate chips, which have lower sugar than milk chocolate.

Conclusion

Reese’s Stuffed Peanut Butter Chocolate Chip Cookies are an indulgent, chocolatey treat that’s sure to impress. These cookies combine the richness of peanut butter with the creamy sweetness of Reese’s in every bite, making them a standout dessert. Perfect for sharing or gifting, this recipe is versatile and easy to customize with your favorite Reese’s products.

For another classic peanut butter dessert, check out ExoRecipes’ Ultimate Peanut Butter Pie for a no-bake option that’s equally satisfying.

Churro Cracker Candy Recipe: Easy, Sweet, and Perfectly Crunchy Treat

cinnamon cracker candy, churro-inspired candy, sweet cracker treat, easy candy recipe, churro cracker toffee, homemade churro candy, churro-flavored candy

Churro Cracker Candy: A Quick, Sweet Treat with a Crunch

Churro Cracker Candy combines the cinnamon-sugar delight of churros with a sweet, crispy cracker base, creating a treat that’s both delicious and easy to make. This simple recipe takes just a few ingredients and little time, making it perfect for gatherings, gifts, or an everyday snack. With its familiar flavors and texture, this candy is a hit among all ages.

For those who enjoy experimenting with unique desserts, you’ll love how easily this recipe comes together. If you’re craving other sweet and simple recipes, you might also enjoy the Strawberry Freezer Pie for a refreshing, no-bake dessert.


What is Churro Cracker Candy?

Churro Cracker Candy is inspired by the traditional flavors of churros—a popular Spanish and Latin American treat featuring fried dough rolled in cinnamon sugar. In this candy, a layer of crackers forms the base, topped with a buttery, cinnamon-sugar mixture and optional chocolate drizzle. Once it’s baked and cooled, the candy hardens into a delightful, crunchy treat reminiscent of churros.

For those interested in churro-inspired desserts, ExoRecipes has a range of delicious options like Easy Apple Hand Pies that also bring warm, spiced flavors into each bite.


Ingredients for Churro Cracker Candy

This candy recipe uses basic pantry ingredients, making it both affordable and accessible:

  • Saltine Crackers: These create the crispy, crunchy base.
  • Butter: Adds richness and helps the sugar layer adhere to the crackers.
  • Brown Sugar: Combines with butter to form a caramel-like layer that hardens into candy.
  • Cinnamon: Provides the classic churro flavor.
  • Chocolate Chips (optional): For a drizzle or layer of chocolate on top.
  • Vanilla Extract: Adds warmth and depth to the flavor.

Ingredient Tips

  • Graham Crackers or Ritz Crackers: Substitute saltines with graham crackers for a sweeter base or Ritz crackers for a buttery option.
  • Dark Chocolate: Use dark chocolate chips for a more intense chocolate flavor.

For more tips on selecting ingredients, check out the Guide to Melting Chocolate for Desserts.


How to Make Churro Cracker Candy: Step-by-Step Guide

Here’s a breakdown of how to make this delightful candy:

1. Prepare Your Baking Sheet

  • Preheat your oven to 350°F (175°C).
  • Line a baking sheet with parchment paper, and arrange the saltine crackers in a single layer.

2. Make the Caramel Layer

  • In a saucepan, melt the butter and brown sugar over medium heat, stirring continuously.
  • Once the mixture comes to a boil, let it cook for 3-4 minutes until it thickens.
  • Pour the caramel mixture over the crackers, spreading it evenly.

3. Bake the Candy

  • Place the baking sheet in the oven and bake for 8-10 minutes, or until the caramel layer is bubbly and golden.
  • Remove the tray from the oven and sprinkle with cinnamon sugar while hot.

4. Add Chocolate (Optional)

  • While the candy is still hot, sprinkle chocolate chips on top. Let them melt for a minute, then spread the chocolate evenly.
  • For a fun twist, drizzle white chocolate over the dark chocolate layer for a decorative look.

5. Cool and Break into Pieces

  • Allow the candy to cool completely, either at room temperature or in the refrigerator.
  • Once hardened, break it into pieces and serve.

Creative Variations for Churro Cracker Candy

One of the best parts of this recipe is its adaptability. Here are some exciting variations:

Sweet Variations

  1. Chocolate Layer: For chocolate lovers, create a thicker chocolate layer on top of the candy.
  2. Spicy Cinnamon: Add a hint of cayenne pepper for a spicy kick to the cinnamon sugar.
  3. Nutty Churro Candy: Sprinkle chopped almonds or pecans on top for extra crunch and flavor.

Savory Options

  1. Pretzel Base: Replace crackers with mini pretzels for a sweet-salty twist.
  2. Coconut and White Chocolate: Drizzle white chocolate and sprinkle with shredded coconut.

Serving Suggestions and Storage Tips

Churro Cracker Candy is versatile enough for any occasion. Here are some tips for serving and storing:

Serving Ideas

  • Holiday Platters: Arrange the candy on a dessert platter with seasonal treats like Easy Apple Cheesecake Tacos.
  • Gifts: Package in small bags tied with ribbon as a festive gift.
  • Pairings: Serve with hot drinks like coffee, hot chocolate, or spiced tea.

Storage Tips

  • Room Temperature: Store in an airtight container for up to a week to maintain freshness.
  • Freezing: Churro Cracker Candy can be frozen in a sealed container for up to three months. Let it thaw at room temperature before serving.

FAQs About Churro Cracker Candy

1. Can I make Churro Cracker Candy without cinnamon?

Yes! If you’re not a fan of cinnamon, you can simply skip it or try nutmeg or vanilla sugar for a different flavor profile.

2. What type of crackers work best for this recipe?

Saltine crackers are most commonly used, but graham crackers and Ritz crackers also work well.

3. Can I store Churro Cracker Candy at room temperature?

Yes, it keeps well at room temperature for up to a week in an airtight container.

4. What is the best way to melt chocolate for this recipe?

For a smooth chocolate layer, melt the chocolate chips on low heat and stir frequently. Alternatively, microwave in short intervals or use a double boiler.


Nutritional Information and Tips for a Healthier Version

While Churro Cracker Candy is an indulgent treat, here are some tips to make it a bit lighter:

  • Less Sugar: Reduce the sugar in the caramel layer for a slightly less sweet version.
  • Dark Chocolate: Use dark chocolate instead of milk chocolate to reduce sugar.
  • Light Butter: Opt for a light butter substitute if desired.

Wrapping Up

Churro Cracker Candy is a fun and flavorful treat that’s perfect for any occasion. With minimal ingredients and simple steps, it’s a quick way to bring the delicious flavors of churros to your table. Experiment with the variations and enjoy this crunchy, cinnamon-sugar delight. For more easy and festive dessert ideas, check out ExoRecipes and try the Raspberry Cheesecake Brownie Bites for another crowd-pleaser.

Crazy Crust Pie Recipe: Easy, Self-Making Crust for Sweet & Savory Fillings

self-making pie crust, easy pie recipe, crazy pie crust, quick pie recipe, homemade crazy crust pie, unique pie crust ideas, no-roll crust pie

Crazy Crust Pie: The Ultimate Easy Pie Recipe with a Self-Making Crust

Crazy Crust Pie is a unique and creative dessert that practically makes its own crust as it bakes. This vintage recipe has seen a resurgence, thanks to its simplicity and versatility. With just a few pantry ingredients, you can create a delicious pie that works with sweet fillings like apples, berries, or even savory options.

For pie enthusiasts, this fuss-free recipe removes the need for rolling or chilling traditional dough. It’s ideal for both beginners and seasoned bakers who appreciate quick, delicious desserts. For another unique dessert, you might enjoy the Kentucky Butter Cake on ExoRecipes, which also boasts rich flavors and an easy preparation.


What is Crazy Crust Pie?

Crazy Crust Pie stands out because it doesn’t require traditional pie dough. Instead, a batter forms the crust around the filling as it bakes, creating a texture that’s a cross between a pie and a cobbler. This recipe is adaptable to many flavors, so you can make it with various fillings or enjoy it with a sweet or savory twist.

With its origins in the 1970s, this recipe is a throwback to when simple, homemade desserts were cherished. Another easy and comforting vintage dessert you might like is the Classic Apple Dumplings—an old-fashioned recipe that pairs perfectly with Crazy Crust Pie for a nostalgic dessert spread.


Essential Ingredients for Crazy Crust Pie

The ingredients in Crazy Crust Pie are straightforward, with most items likely already in your pantry:

  • Flour: Forms the base of the crust.
  • Baking powder: Helps the batter rise around the filling.
  • Sugar: Adds sweetness and a slight crispiness to the crust.
  • Butter: Contributes to a rich, golden crust.
  • Egg and milk: These bind the ingredients together and add moisture.
  • Fruit filling: Commonly apple or berry, but you can experiment with flavors.

Ingredient Substitutions and Tips

  • Gluten-Free: Substitute with a gluten-free flour blend for a gluten-free crust.
  • Vegan Option: Replace butter with coconut oil or a vegan alternative and use a plant-based milk.

To enhance the flavors, opt for high-quality butter and fresh fruits. For those who love fruity flavors in their desserts, check out the Strawberry Freezer Pie for another refreshing treat.


How to Make Crazy Crust Pie: Step-by-Step Instructions

This recipe is easy to follow and requires minimal preparation. Here’s how to make it:

1. Prepare Your Ingredients

  • Preheat the oven to 350°F (175°C).
  • Grease a pie dish and set it aside.

2. Make the Crust Batter

  • In a mixing bowl, whisk together flour, baking powder, and sugar.
  • Add melted butter, milk, and a beaten egg, mixing until smooth.

3. Add the Filling

  • Pour the batter into the prepared pie dish, creating an even layer.
  • Gently spoon your choice of filling (apple, berry, or even savory vegetables) into the batter. As it bakes, the batter will rise around the filling, forming a crust.

4. Bake the Pie

  • Place the pie dish in the preheated oven and bake for 40-45 minutes, or until the crust is golden and set.

Recipe Variations and Customizations

Crazy Crust Pie is versatile and allows for several creative adjustments:

Sweet Variations

  1. Apple Cinnamon: Mix diced apples with cinnamon and sugar for a warm, comforting filling.
  2. Berry Mix: Use a combination of blueberries, raspberries, and strawberries.
  3. Peach & Cream: Add a layer of cream cheese with sliced peaches for a creamy, fruity pie.

Savory Options

  1. Taco Pie: Fill with seasoned ground beef, cheese, and diced tomatoes for a savory meal.
  2. Spinach & Cheese: Add sautéed spinach and shredded cheese for a vegetable twist.

Crazy Crust Pie can be an adventurous dish, so feel free to experiment with flavors. For another quick and easy pie idea, you may enjoy the Easy Apple Hand Pies recipe, a fun option for on-the-go treats.


Serving and Storage Tips

Crazy Crust Pie is best served fresh, but here are some tips for enjoying it over time:

Serving Suggestions

  • Serve warm with a scoop of vanilla ice cream or whipped cream.
  • For a decadent dessert, drizzle with caramel or chocolate sauce.

Storage Tips

  • Refrigeration: Store leftovers in an airtight container in the refrigerator for up to 3 days.
  • Freezing: To freeze, wrap the pie tightly in plastic wrap and aluminum foil. Freeze for up to 3 months. Thaw in the refrigerator overnight before reheating.

FAQs About Crazy Crust Pie

1. What makes Crazy Crust Pie different from traditional pies?

Crazy Crust Pie doesn’t require a pre-made or rolled crust. The batter creates a crust as it bakes, making it simpler and faster to prepare.

2. Can I make Crazy Crust Pie gluten-free?

Yes, substitute the flour with a gluten-free baking mix for a gluten-free version.

3. What fillings work best with Crazy Crust Pie?

Fruit fillings like apple, berry, or peach work well. You can also try savory fillings, such as taco-seasoned beef or cheese and vegetables.

4. How should I store Crazy Crust Pie after baking?

Store Crazy Crust Pie in the refrigerator for up to 3 days. For longer storage, freeze the pie and reheat when ready to enjoy.


Nutritional Information and Tips for Healthier Options

Crazy Crust Pie is rich and delicious, but here are a few tips for lightening it up:

  • Reduced Sugar: Use a natural sweetener like honey or stevia to reduce sugar content.
  • Whole Wheat Flour: Swap half of the flour with whole wheat for added fiber.

This pie’s versatility extends to its nutritional profile, allowing you to adjust it based on your preferences. If you’re interested in exploring more health-conscious desserts, check out our No-Bake Pumpkin Cheesecake for a creamy, low-sugar option.


Final Thoughts

Crazy Crust Pie is a fun, easy dessert that fits any occasion. With its self-making crust and adaptable filling options, it’s a fantastic addition to any home cook’s recipe collection. Whether you prefer a classic apple filling or want to explore savory combinations, this pie is a surefire hit. For more creative pies and vintage-inspired desserts, explore ExoRecipes and try out our Gone to Heaven Chocolate Pie for another sweet treat to enjoy with loved ones.