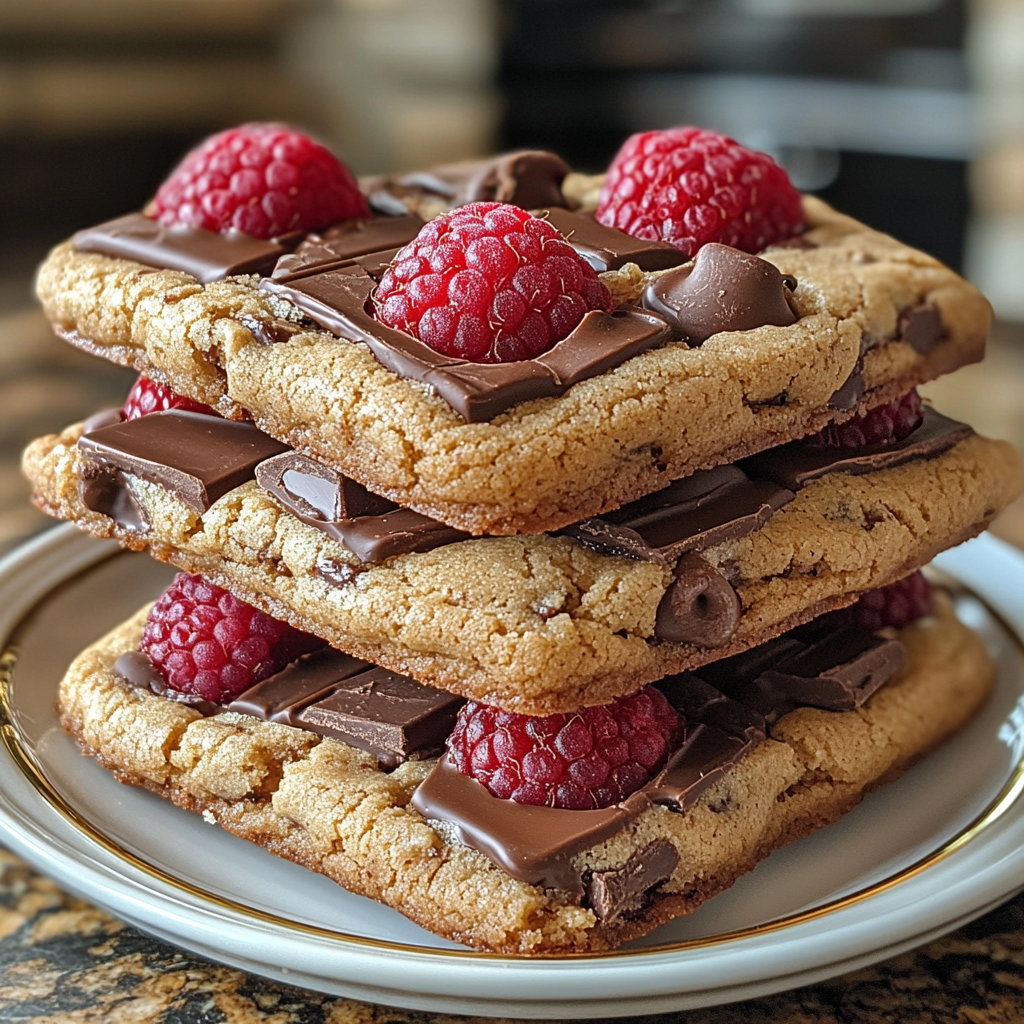
Million Dollar Ravioli Casserole: The Ultimate Cheesy Comfort Food

cheesy ravioli bake, baked ravioli casserole, rich pasta casserole, creamy ravioli lasagna, comfort food casserole

Million Dollar Ravioli Casserole: The Ultimate Comfort Food

Looking for a deliciously rich and satisfying dinner that’s easy to prepare? Million Dollar Ravioli Casserole combines the indulgent flavors of cheese-filled ravioli, hearty meat sauce, and creamy cheeses baked to perfection. This casserole is the ultimate comfort food, perfect for family dinners or special gatherings where you want to impress without the fuss.

If you’re interested in more comforting pasta dishes, try our Slow Cooker Magic: Crockpot Baked Ziti, another low-prep meal that’s sure to please!

Ingredients for Million Dollar Ravioli Casserole

The beauty of this casserole lies in its simplicity. Here’s a breakdown of the key ingredients and their roles in creating this rich and flavorful dish.

Core Ingredients

  • Ravioli: Cheese-filled ravioli is ideal, though you can use meat or spinach-filled ravioli for variety.
  • Ground Beef or Italian Sausage: Adds a meaty richness; ground turkey can be a lighter alternative.
  • Marinara Sauce: Provides a tomato base that balances the cheese and meat.
  • Cream Cheese, Sour Cream, and Mozzarella: These cheeses create a creamy, layered texture that’s signature to this casserole.
  • Parmesan: Adds a salty, sharp flavor to the topping, balancing the richness.

For Another Rich Italian Dish: Try our Creamy Garlic Parmesan Chicken for a creamy, garlicky take on comfort food.

Step-by-Step Recipe Guide for Million Dollar Ravioli Casserole

This casserole is simple to make with easy steps, so anyone can recreate this dish in their kitchen.

Step 1: Prepare the Meat Sauce

  • Brown the Meat: In a skillet, cook the ground beef or sausage over medium heat. Drain excess grease and season with salt, pepper, and Italian seasoning.
  • Add Marinara Sauce: Stir in the marinara sauce, letting it simmer to absorb flavors.

Step 2: Prepare the Cheese Mixture

  • Mix Cream Cheese and Sour Cream: In a bowl, combine cream cheese and sour cream until smooth. Add half of the mozzarella and a pinch of salt for extra flavor.

Step 3: Layer the Casserole

  • First Layer: Spread a thin layer of meat sauce on the bottom of a greased baking dish.
  • Add Ravioli: Arrange half of the ravioli on top of the sauce.
  • Cheese Mixture and Meat Sauce: Layer half of the cheese mixture and more meat sauce, repeating with the remaining ravioli, sauce, and cheese mixture.

Step 4: Bake and Serve

  • Top with Mozzarella and Parmesan: Sprinkle the remaining mozzarella and Parmesan on top.
  • Bake Until Bubbly: Bake at 375°F for 30-40 minutes, or until the cheese is melted and golden.

For an extra cozy meal idea, try our Italian Sausage Pasta—a savory one-pan pasta that complements this casserole wonderfully.

Flavor Variations for Million Dollar Ravioli Casserole

This casserole is versatile and can be customized to fit various tastes.

  • Add Vegetables: Include mushrooms, bell peppers, or spinach to increase nutrients and flavor.
  • Swap Ravioli Types: Use meat, spinach, or even lobster ravioli for unique flavors.
  • Different Cheese Blends: Substitute with a mix of provolone, gouda, or fontina for a twist on the cheesy goodness.

Nutritional Insights and Healthier Options

This casserole is indulgent, but here are a few ways to lighten it up without sacrificing flavor.

Health Benefits of Key Ingredients

  • Protein-Rich Meat: Provides essential protein for energy and satiety.
  • Calcium from Cheese: The various cheeses provide calcium for strong bones.
  • Nutrient-Packed Marinara: The tomato sauce is a source of vitamins and antioxidants.

Healthier Alternatives

  • Lean Ground Meat: Opt for ground turkey or chicken for a lower-fat version.
  • Whole-Wheat Ravioli: Adds fiber and makes the dish more filling.
  • Reduced-Fat Cheese: Lighten the dish by using reduced-fat cream cheese or mozzarella.

For tips on balancing flavors with healthier ingredients, check out our Ultimate Guide to Healthier Casseroles.

Expert Tips for Perfect Million Dollar Ravioli Casserole

Perfecting this casserole is simple with a few expert tips.

  1. Use Quality Ravioli: Fresh or frozen ravioli works best. Avoid canned ravioli, as it may affect the texture and taste.
  2. Don’t Overbake: Bake until bubbly to avoid a dry casserole.
  3. Let It Rest: Allow the casserole to cool for a few minutes before serving for easier slicing and better texture.

FAQs About Million Dollar Ravioli Casserole

Can I Make This Casserole Ahead of Time?

Yes, assemble the casserole, cover, and refrigerate for up to 24 hours before baking.

What’s the Best Way to Freeze Million Dollar Ravioli Casserole?

Wrap tightly with plastic wrap and foil. Freeze for up to 3 months. Thaw in the refrigerator before baking.

Can I Add Extra Vegetables?

Absolutely! Try mushrooms, spinach, or bell peppers for added flavor and nutrition.

Is It Possible to Make a Gluten-Free Version?

Yes, use gluten-free ravioli and ensure the marinara sauce is gluten-free.

For more meal-prep friendly casserole recipes, check out our No Peek Beef Tips Casserole for another effortless dinner idea.

Storage, Reheating, and Serving Suggestions

Proper storage and reheating can keep this casserole tasting fresh and delicious.

  • Refrigeration: Store leftovers in an airtight container in the fridge for up to 3 days.
  • Freezing for Long-Term Storage: Freeze in individual portions or as a whole casserole.
  • Reheating Tips: Reheat in the oven for best results, covering with foil to retain moisture.

Conclusion

Million Dollar Ravioli Casserole is the ultimate dish when you’re craving something indulgent yet easy to prepare. The creamy layers of cheese, meat sauce, and ravioli are sure to make it a family favorite. Whether it’s a busy weeknight or a special occasion, this casserole delivers on flavor and comfort, making it a must-try.

If you loved this recipe, you’ll also enjoy our Dorito Chicken Casserole, which adds a crunchy twist to traditional casserole recipes!

Chicken Pot Pie Pasta: Creamy Comfort in Every Bite

Chicken Pot Pie Pasta: A Comforting Fusion Recipe

Craving a cozy meal that brings together the creamy richness of chicken pot pie with the heartiness of pasta? Chicken Pot Pie Pasta is the answer! This dish combines the classic flavors of a traditional pot pie with the convenience and texture of pasta, making it ideal for weeknight dinners or family gatherings. With tender pieces of chicken, a medley of vegetables, and a creamy sauce, this meal is sure to become a household favorite.

For another comforting one-pot dish, try Creamy Garlic Parmesan Chicken: A Symphony of Flavors. Like Chicken Pot Pie Pasta, it’s loaded with flavor and is wonderfully easy to prepare.

Ingredients for Chicken Pot Pie Pasta

Each ingredient in this dish contributes to its rich, comforting flavor. Here’s a breakdown of what you’ll need and the role of each component.

Core Ingredients

  • Chicken Breast: Provides lean protein. Chicken thighs can also be used for a richer taste.
  • Pasta: Short pasta types like rotini or penne are ideal for holding the creamy sauce.
  • Mixed Vegetables: A classic blend of peas, carrots, and corn replicates the pot pie flavor.
  • Heavy Cream and Chicken Broth: Create a rich, smooth sauce that brings everything together.
  • Seasonings: Garlic, onion powder, thyme, salt, and pepper for depth of flavor.

For More One-Pan Dinners: Our Italian Sausage Pasta offers a similar comforting experience with bold Italian flavors.

Step-by-Step Recipe Guide for Chicken Pot Pie Pasta

This recipe is straightforward and easy to follow, making it perfect for both beginners and experienced cooks.

Step 1: Preparing the Chicken and Vegetables

  • Sauté Chicken: In a large skillet, cook diced chicken seasoned with salt and pepper until golden brown. Remove and set aside.
  • Cook Vegetables: In the same skillet, add a bit more oil if necessary, and sauté garlic and mixed vegetables until tender.

Step 2: Making the Creamy Sauce

  • Create a Roux: Add a bit of butter and flour to the skillet, whisking until golden.
  • Add Liquids: Gradually whisk in chicken broth and heavy cream, stirring until thickened. Season with onion powder, thyme, and additional salt and pepper to taste.

Step 3: Cooking and Adding the Pasta

  • Cook Pasta Separately: Prepare pasta according to package directions, drain, and add it to the skillet along with the chicken and vegetables.
  • Combine and Simmer: Stir everything together, allowing the pasta to absorb the creamy sauce for a few minutes.

Step 4: Garnishing and Serving

  • Serve Hot: Garnish with fresh parsley or shredded cheese if desired, and serve immediately for a warm, comforting meal.

For a twist on this cozy dish, check out Ultimate Guide to Homemade Chicken and Dumplings—it’s packed with flavors that pair well with pasta and creamy sauces.

Flavor Variations for Chicken Pot Pie Pasta

One of the best things about Chicken Pot Pie Pasta is its versatility. Here are some ideas to make it your own:

  • Add Bacon: A handful of cooked, crumbled bacon adds a smoky, salty flavor.
  • Swap the Protein: Substitute chicken with turkey for a seasonal twist.
  • Use Different Vegetables: Add mushrooms, bell peppers, or spinach for extra nutrition and flavor.

Nutritional Breakdown and Healthier Alternatives

This dish offers a balanced mix of protein, carbs, and fats, making it a hearty choice for a main course.

Nutritional Benefits

  • Chicken: A lean protein that supports muscle health and keeps you full.
  • Vegetables: Loaded with vitamins and fiber, contributing to overall health.
  • Cream and Pasta: While rich in calories, they make this dish satisfying and indulgent.

Healthier Adjustments

  • Low-Fat Dairy: Substitute heavy cream with half-and-half or a mixture of milk and Greek yogurt.
  • Whole Wheat Pasta: For added fiber, use whole wheat or chickpea pasta.
  • Reduced Sodium: Choose low-sodium chicken broth and season with herbs rather than salt.

For More Ideas on Healthier Comfort Food: Check out our Ultimate Guide to Healthier Casseroles for tips on balancing flavor with nutrition.

Expert Tips for Perfecting Chicken Pot Pie Pasta

Creating the perfect Chicken Pot Pie Pasta is easy with these expert tips:

  1. Season at Every Step: Adding salt and pepper as you cook each component helps layer flavors.
  2. Don’t Overcook the Pasta: Slightly undercook the pasta before adding it to the skillet so it can absorb the sauce without becoming mushy.
  3. Use Fresh Herbs for Garnish: Fresh parsley or thyme at the end adds brightness to the dish, balancing the creaminess.

FAQs About Chicken Pot Pie Pasta

Can I Use Rotisserie Chicken for This Recipe?

Yes, rotisserie chicken is an excellent shortcut. Simply shred it and add during the final steps.

How Can I Make This Dish Gluten-Free?

Use gluten-free pasta and a gluten-free flour alternative for the sauce.

Is This Recipe Freezer-Friendly?

While you can freeze it, the cream sauce may separate. It’s best enjoyed fresh or reheated from refrigerated leftovers.

Can I Add Cheese to the Sauce?

Absolutely! Stirring in a handful of shredded cheddar or parmesan will make the sauce even richer and more indulgent.

For more pasta-based comfort food ideas, check out One-Pot Cheesy Smoked Sausage Pasta for another rich and creamy one-pan meal.

Storage and Reheating Tips

Storing and reheating Chicken Pot Pie Pasta is simple with these tips.

  • Refrigerate: Place leftovers in an airtight container and refrigerate for up to 3 days.
  • Freeze with Caution: For best results, avoid freezing, as cream-based sauces tend to separate.
  • Reheat on the Stovetop: For best results, reheat on the stovetop over low heat, adding a splash of broth or milk to restore creaminess.

Conclusion

Chicken Pot Pie Pasta is the ultimate comfort meal that combines creamy textures, hearty ingredients, and classic pot pie flavors in a single dish. Whether you’re cooking for family or hosting a casual dinner, this recipe is sure to impress. With its versatility, ease, and rich flavor, it’s bound to become a staple in your meal rotation.

For more easy and comforting pasta ideas, explore our Baked Ziti: The Ultimate Comfort Food recipe—it’s another dish that’s perfect for cozy nights in.

Carrot & Pumpkin Chews for Dogs: Nutritious Homemade Dog Treats

dog treats with pumpkin, carrot pumpkin dog snacks, homemade dog chews, pumpkin carrot pet chews, healthy dog snacks

Carrot & Pumpkin Chews for Dogs: A Nutritious Homemade Treat

Making homemade treats for your dog can be a rewarding way to give them a nutritious and tasty snack. Carrot & Pumpkin Chews are especially popular for their health benefits, easy preparation, and appeal to dogs of all ages. Carrots are loaded with beta carotene and fiber, while pumpkin provides essential vitamins and aids digestion, making this a snack you can feel good about giving your pet. Plus, making treats at home ensures they’re free from preservatives and artificial ingredients.

For a similar snack with added flavor, try our Honey Garlic Butter Roasted Carrots—though a bit too sweet for dogs, they’re perfect for humans!

Ingredients for Carrot & Pumpkin Dog Chews

Each ingredient in these chews serves a purpose, providing nutritional benefits while keeping the treats tasty and easy to digest.

Core Ingredients

  • Pumpkin Puree: Rich in fiber, beta carotene, and vitamins A and C.
  • Carrots: Known for their high beta carotene content, beneficial for eye health.
  • Whole Wheat or Oat Flour: Acts as a binding agent, adding texture to the treats.
  • Egg: Provides protein and helps bind the ingredients together.
  • Optional Add-Ins: A dash of cinnamon for flavor or a spoonful of peanut butter for added richness.

For More Nutritious Dog-Friendly Recipes: Check out our Healthy Avocado Egg Salad Roll-Ups, which offers ideas on nutrient-rich ingredients that are safe for humans.

Step-by-Step Recipe Guide for Carrot & Pumpkin Dog Chews

Here’s a straightforward recipe guide to creating these nutritious treats for your dog.

1. Preparing the Ingredients

  • Peel and Grate the Carrots: Fresh carrots can be grated finely or roughly depending on the chew texture desired.
  • Measure Pumpkin Puree: Opt for pure pumpkin puree without added sugars or spices.

2. Mixing the Ingredients

  • Combine Wet Ingredients: In a bowl, mix the pumpkin puree, egg, and grated carrots until smooth.
  • Add Flour Gradually: Add the whole wheat or oat flour slowly to create a dough that can be rolled or shaped easily.

3. Baking the Chews

  • Preheat and Prepare Baking Sheets: Preheat your oven to 325°F and line a baking sheet with parchment paper.
  • Shape the Chews: Roll the dough and cut it into small pieces suitable for your dog’s size.
  • Bake and Cool: Bake for 20-30 minutes until the chews are firm. Let them cool completely before serving.

Variations and Additional Flavor Options

These chews are versatile and can be customized to your dog’s taste preferences and dietary needs.

  • Peanut Butter Addition: Add a spoonful of peanut butter for extra flavor, but ensure it is xylitol-free.
  • Apple Cinnamon Chews: Replace pumpkin with unsweetened apple puree and add a pinch of cinnamon for a new twist.
  • Veggie Mix: Mix in small amounts of sweet potato or zucchini for a nutrient boost.

For another homemade treat option, try our Peanut Butter Fudge (suitable for humans) or Healthy Homemade Dog Snacks for additional dog-friendly recipes.

Nutritional Benefits of Carrot & Pumpkin Chews

Health Benefits for Dogs

  • Improved Digestion: The fiber in pumpkin promotes gut health, helping dogs with both constipation and diarrhea.
  • Vision Support: Beta carotene in carrots converts to vitamin A, which is essential for eye health.
  • Hydration: Both pumpkin and carrots have high water content, which helps keep your pet hydrated.

For More About Digestive-Friendly Ingredients: Learn about ingredients that aid digestion in our Ultimate Guide to Making Perfect Pumpkin Desserts (while tailored for human recipes, the guide includes insights into the benefits of pumpkin).

Storage and Shelf Life

Proper storage is key to keeping these chews fresh and delicious.

  • Refrigerate for Daily Use: Store chews in an airtight container in the fridge for up to a week.
  • Freezing for Long-Term Storage: For extended freshness, place them in a freezer-safe container for up to three months.
  • Reheat for Softer Texture: If your dog prefers softer treats, reheat in the microwave for a few seconds.

FAQs About Carrot & Pumpkin Chews for Dogs

Are Carrot & Pumpkin Chews Safe for Puppies?

Yes, these treats are generally safe for puppies, but introduce them in small amounts to monitor for any food sensitivities.

Can I Make These Chews Gluten-Free?

Absolutely. Substitute oat flour or a certified gluten-free flour blend instead of wheat flour.

How Many Treats Can I Give My Dog Daily?

The amount depends on your dog’s size and dietary needs. Generally, one or two treats per day as a supplement to their diet is recommended.

Can I Use Fresh Pumpkin Instead of Canned?

Yes, fresh pumpkin can be used, but make sure it’s pureed thoroughly for the best consistency in the chews.

Safety Tips and Ingredients to Avoid in Homemade Dog Treats

When making homemade treats, it’s essential to avoid certain ingredients that can harm dogs.

  • Avoid Sweeteners: Xylitol, a common sweetener in human foods, is toxic to dogs.
  • Limit Spices: Stick to dog-safe spices like cinnamon; avoid nutmeg, which is toxic.
  • Watch Peanut Butter Ingredients: Ensure peanut butter is free from xylitol and added sugars.

For additional tips on safe ingredients for pets, refer to our Best Ingredients for Homemade Dog Treats guide.

Conclusion: Why Carrot & Pumpkin Chews are the Perfect Homemade Treat

With their simple ingredients, high nutritional value, and ease of customization, Carrot & Pumpkin Chews are a fantastic option for any dog owner. They offer a tasty, healthy alternative to store-bought treats, allowing you to provide a snack that supports your dog’s well-being. Plus, these chews can be made in batches, making it easy to have fresh treats on hand all the time.

If you’re interested in more homemade snack ideas, check out our Crunchy Carrot Chips for Dogs—another nutritious option that your dog is sure to love.

Peach Cobbler Cheesecake Cake: The Ultimate Fusion Dessert Recipe

peach cobbler cheesecake dessert, layered peach cheesecake, peach cobbler cake recipe, creamy peach cake, fruit cobbler cheesecake

Peach Cobbler Cheesecake Cake: A Delightful Fusion of Flavors

Imagine a dessert that brings together the creamy richness of cheesecake, the fruity sweetness of peach cobbler, and the moist texture of a classic cake. That’s exactly what Peach Cobbler Cheesecake Cake offers. This unique recipe combines layers of cake, creamy cheesecake, and a peach cobbler filling, making it perfect for celebrations, gatherings, or simply as a treat for yourself. This fusion dessert is sure to impress your guests and elevate any occasion.

For another show-stopping dessert idea, check out Decadent Caramel Chocolate Cupcakes: Sweet Bliss for an indulgent caramel twist on a classic chocolate cupcake. It’s an equally crowd-pleasing treat!

Ingredients for Peach Cobbler Cheesecake Cake

Creating this dessert involves layering different elements, each with its unique flavor. Here’s a breakdown of the ingredients required for each component:

Core Ingredients

  • For the Cheesecake Layer: Cream cheese, sugar, eggs, and vanilla extract are essential for a smooth, creamy texture.
  • For the Peach Cobbler Layer: Peaches (fresh or canned), brown sugar, cinnamon, and nutmeg.
  • For the Cake Layers: Flour, sugar, eggs, vanilla extract, and baking powder make up the base of the cake layers.
  • Optional Toppings: Whipped cream, caramel drizzle, or chopped pecans for added texture and presentation.

For an Additional Peach Recipe: Explore our Jalapeño Peach Glazed Ribs if you’re a peach lover looking for a savory twist with a hint of heat.

Step-by-Step Guide to Making Peach Cobbler Cheesecake Cake

Crafting this impressive dessert involves several steps, but the result is well worth the effort. Here’s a step-by-step guide to help you create the perfect Peach Cobbler Cheesecake Cake.

Step 1: Preparing the Cheesecake Layer

  1. Mix the Cheesecake Ingredients: In a large bowl, beat the cream cheese, sugar, and vanilla extract until smooth. Add the eggs one at a time, beating after each addition.
  2. Bake the Cheesecake Layer: Pour the mixture into a prepared pan and bake at 325°F for 40–45 minutes or until the center is just set. Let it cool completely.

Step 2: Making the Peach Cobbler Layer

  1. Prepare the Peach Filling: In a saucepan, combine peaches, brown sugar, cinnamon, and nutmeg. Simmer until the peaches soften and the mixture becomes syrupy.
  2. Add a Crumble Topping (Optional): For added texture, prepare a crumble topping by mixing flour, butter, and sugar until crumbly.

Step 3: Baking the Cake Layers

  1. Mix the Cake Batter: Cream the butter and sugar together, then add the eggs and vanilla. Gradually incorporate the dry ingredients.
  2. Bake the Cake Layers: Divide the batter between two pans and bake at 350°F for 25–30 minutes until golden and a toothpick inserted comes out clean.

Step 4: Assembling the Layers

  1. Layer the Cake, Cheesecake, and Peach Cobbler: Place one cake layer on a serving plate, spread the peach cobbler mixture on top, followed by the cheesecake layer. Top with the second cake layer.
  2. Final Touches: Add whipped cream, caramel drizzle, or extra peach slices for garnish.

Flavor Variations for Peach Cobbler Cheesecake Cake

This recipe is versatile and can be adapted with different flavors. Here are some ideas to make this dessert uniquely yours:

  • Add a Hint of Almond: Add a few drops of almond extract to the cake batter for a nutty undertone.
  • Cinnamon Crumble Topping: Mix flour, butter, cinnamon, and sugar to create a crumble topping for added texture.
  • Bourbon-Infused Peaches: Add a splash of bourbon to the peach filling for a sophisticated twist.

For More Southern-Inspired Desserts: Try our Kentucky Butter Cake: A Slice of Southern Comfort, which brings the rich, buttery flavor of Southern baking into your home.

Nutritional Insights and Healthier Alternatives

This dessert is indulgent, and while it’s meant to be enjoyed in moderation, here are some ideas for making a slightly lighter version:

  • Use Low-Fat Cream Cheese: Substitute full-fat cream cheese with a lower-fat version.
  • Reduce Sugar: Cut down the sugar in the peach cobbler layer or use a sugar substitute.
  • Greek Yogurt for Creaminess: Swap half of the cream cheese with Greek yogurt for a protein boost and lighter texture.

This modified version still provides the classic flavors of peach cobbler and cheesecake with fewer calories.

Expert Tips for a Perfect Peach Cobbler Cheesecake Cake

Achieving a picture-perfect Peach Cobbler Cheesecake Cake is easy if you follow these expert tips:

  • Avoid Cheesecake Cracks: Bake the cheesecake layer in a water bath or place a pan of water on the bottom oven rack to maintain moisture.
  • Use Fresh Peaches When in Season: Fresh peaches add a natural sweetness that canned peaches can’t fully replicate.
  • Allow Each Layer to Cool: Ensure that the cheesecake and cake layers are completely cool before assembling to avoid a melting mess.

FAQs about Peach Cobbler Cheesecake Cake

Can I Use Frozen Peaches?

Yes, you can use frozen peaches; just let them thaw and drain excess water before using.

How Long Does This Cake Last in the Fridge?

Store the cake in an airtight container in the fridge for up to five days.

Can This Cake Be Made in Advance?

Absolutely! Prepare and assemble the layers, refrigerate, and add toppings just before serving.

Is There a Way to Make This Recipe Gluten-Free?

Yes, substitute the all-purpose flour with a 1:1 gluten-free baking mix for both the cake and crumble.

For Tips on Storing and Serving Desserts: Read our Guide to Storing Baked Goods for Freshness for the best ways to keep your cakes and pastries fresh.

Storage and Serving Tips

For a dessert with layers like this, proper storage ensures the cake stays fresh and flavorful.

  • Refrigerate in an Airtight Container: Store any leftovers in the fridge to keep the cheesecake layer firm.
  • Freezing Option: To freeze, wrap the individual slices in plastic wrap, then in aluminum foil, and freeze for up to three months.
  • Serve at Room Temperature: For the best texture and flavor, let the cake sit at room temperature for 10–15 minutes before serving.

Conclusion

Peach Cobbler Cheesecake Cake combines everything we love about dessert in one delightful bite: creamy cheesecake, fruity cobbler, and moist cake. This recipe is perfect for special occasions or any time you want to treat yourself to something truly indulgent. With its layers of flavor and stunning presentation, it’s a dessert that’s sure to impress.

Looking for more ways to experiment with flavors and textures? Try our Cinnamon Roll Cake with Cream Cheese Glaze for another layered dessert that’s as beautiful as it is delicious!

Dill Pickle Chex Mix: The Perfect Tangy Party Snack Recipe

pickle-flavored Chex mix, tangy Chex snack, dill pickle snack mix, crunchy dill snack, dill pickle party mix

Dill Pickle Chex Mix: A Tangy Twist on a Classic Snack

If you’re a fan of both dill pickles and Chex Mix, this Dill Pickle Chex Mix is about to become your go-to snack! Combining the tangy flavor of pickles with the crunch of classic Chex cereal, this snack mix is the perfect choice for parties, movie nights, or just a flavorful treat to keep on hand. This recipe is not only easy to make but also incredibly versatile. By adding a few key ingredients, you can create a snack that is uniquely flavorful and deeply satisfying.

For more ways to elevate your snack game, try pairing this Chex Mix with our Homemade Cheddar Bacon Potato Chips. Adding a salty side can perfectly complement the tanginess of the dill pickle seasoning.

Ingredients for Dill Pickle Chex Mix

The beauty of Dill Pickle Chex Mix is that it uses everyday ingredients to create a snack with an extraordinary taste. Here’s what you’ll need:

  • Chex Cereal: The base of the mix, providing a light crunch.
  • Pretzels: Adds a salty contrast and extra texture.
  • Bagel Chips: Thick and hearty, perfect for holding more seasoning.
  • Cashews or Peanuts: Adds a buttery, nutty flavor that complements the dill pickle taste.
  • Seasonings: Dill weed, garlic powder, and onion powder.
  • Dill Pickle Juice: The star of the show, lending that unmistakable tangy flavor.
  • Butter: Helps the seasoning stick to the ingredients and adds richness.

For Another Fun Snack Recipe: Check out our Crunchy Dorito Chicken Casserole, which adds a unique twist to classic comfort food with the flavor of Doritos!

Step-by-Step Recipe Guide

Making this snack mix is easy and only requires a few steps. Here’s how to put it all together:

1. Prepare the Base

  • Mix Ingredients: In a large bowl, combine Chex cereal, pretzels, bagel chips, and nuts. Toss them together to ensure an even mix.

2. Make the Dill Pickle Seasoning

  • Combine Seasonings: In a separate bowl, mix melted butter, dill pickle juice, garlic powder, onion powder, and dill weed. Whisk until the ingredients are thoroughly combined.

3. Coat and Bake

  • Combine and Toss: Pour the seasoning mixture over the cereal mix, tossing to coat each piece evenly.
  • Bake: Spread the mixture onto a baking sheet in a single layer. Bake at a low temperature for about 45 minutes, stirring halfway through to ensure even baking.

4. Cool and Serve

  • Cool Completely: Allow the mixture to cool fully before serving. This step is essential for achieving maximum crunch.

Flavor Variations for Dill Pickle Chex Mix

One of the great things about Dill Pickle Chex Mix is its versatility. Here are some fun variations to try:

  • Spicy Dill Pickle Mix: Add a dash of hot sauce or a sprinkle of red pepper flakes to the seasoning mixture for a spicy kick.
  • Cheesy Twist: Toss in some cheddar-flavored crackers or sprinkle shredded Parmesan before baking.
  • Kid-Friendly Version: Substitute the pretzels with plain popcorn for a lighter texture that kids love.

Looking for More Customizable Snacks? Explore our Homemade Pizza Sticks for a savory, cheesy snack that’s easy to adapt with various toppings.

Nutritional Overview and Healthier Alternatives

This snack mix is a great alternative to store-bought options, as you can control the ingredients and make it more nutritious. Here’s what makes this mix a balanced snack:

  • Lower in Sodium: Using unsalted nuts and pretzels helps reduce sodium.
  • Rich in Fiber: The whole grains in Chex cereal add fiber.
  • Healthy Fats: Adding nuts introduces beneficial fats.

For a lighter option, try using olive oil instead of butter or reducing the amount of dill pickle juice to control the sodium content. These adjustments allow you to enjoy the delicious flavors while keeping it on the healthier side.

Expert Tips for the Perfect Dill Pickle Chex Mix

Creating a perfect batch of Dill Pickle Chex Mix comes down to a few helpful tips:

  • Ensure Even Coating: Toss the mixture well to ensure each piece is fully coated with the seasoning.
  • Low and Slow Baking: Baking at a low temperature prevents burning and allows the seasoning to bake into the mix.
  • Storage: Store in an airtight container to keep the mix fresh and crunchy.

FAQs about Dill Pickle Chex Mix

How Long Does Dill Pickle Chex Mix Last?

Stored in an airtight container, this Chex Mix can last up to 2 weeks. Be sure to keep it in a cool, dry place to maintain its crunch.

Can I Make This Recipe Gluten-Free?

Yes, you can make it gluten-free by using gluten-free pretzels, bagel chips, and Chex cereal.

Is It Possible to Add Different Seasonings?

Absolutely! Try adding ranch seasoning or substituting dill with chives for a different herb profile.

What’s the Best Way to Make It Spicy?

Adding a small amount of cayenne pepper, hot sauce, or red pepper flakes can bring a nice heat to this snack mix.

For More Snack Ideas That Last: Check out Homemade KFC-Style Famous Bowl Casserole for another crowd-pleaser that’s great for gatherings and stays delicious for days.

Storage and Serving Suggestions

Storing Dill Pickle Chex Mix is simple, and this snack can be made in large batches to enjoy over time. Here are some best practices:

  • Keep It Airtight: Use an airtight container to maintain freshness.
  • Separate for Parties: For parties, consider portioning the mix into small bowls or snack bags for easy, mess-free serving.
  • Freeze for Later: If you want to make a large batch, freeze the mix in freezer bags for up to 3 months.

Conclusion: Why Dill Pickle Chex Mix Should Be Your Next Party Snack

With its bold, tangy flavor and irresistible crunch, Dill Pickle Chex Mix is a unique twist on a classic snack. Perfect for gatherings, parties, or even as a flavorful treat to keep at home, this recipe is easy to make and endlessly customizable. Whether you’re a pickle lover or simply looking for something new, this recipe is sure to impress.

For more tangy snack ideas, don’t miss our Refreshing Pickle Slushy Recipe for Summer Fun—a refreshing way to enjoy that dill pickle flavor in a totally different form!