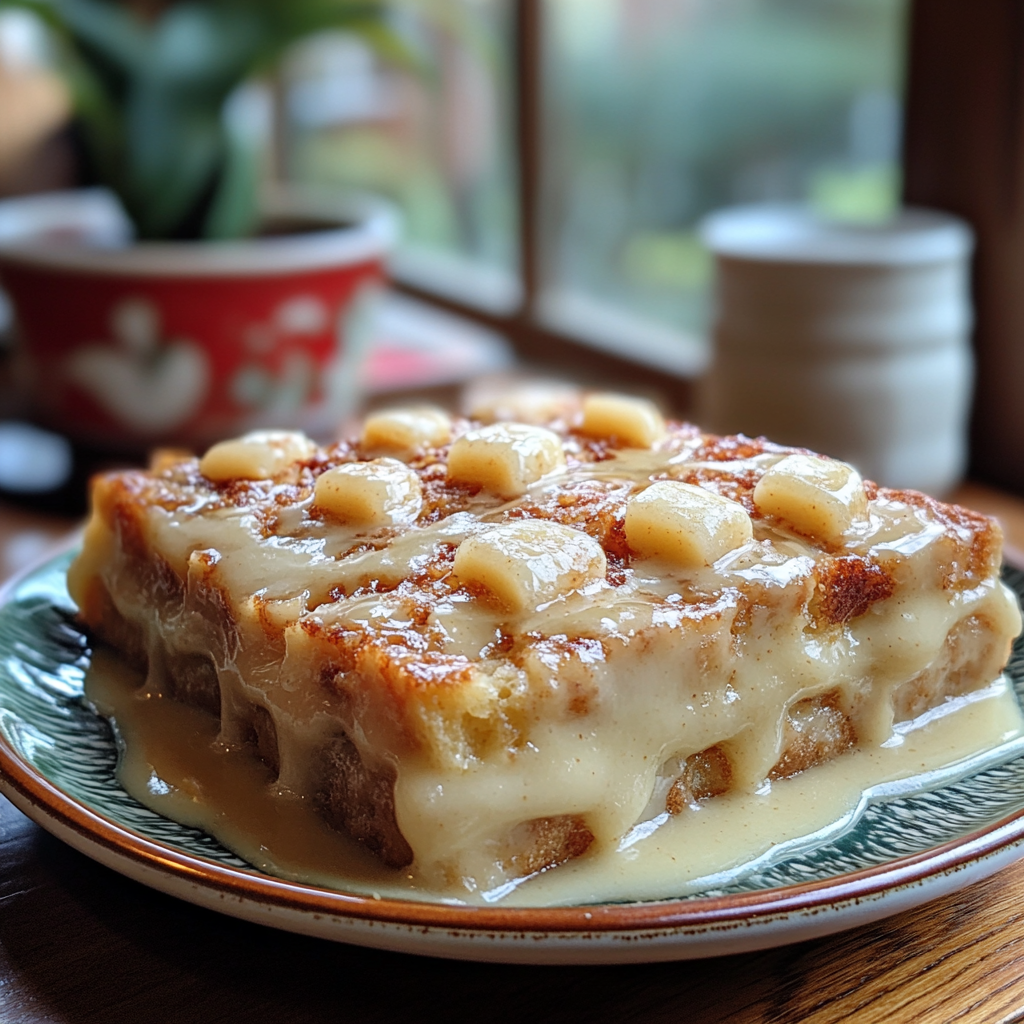
Honey Garlic Roasted Baby Carrots – Sweet and Savory Side Dish Recipe

honey glazed carrots, garlic roasted carrots, sweet roasted carrots, caramelized baby carrots, roasted vegetable side dish, honey garlic carrots

Honey Garlic Roasted Baby Carrots: A Simple Yet Delicious Side Dish

If you’re looking to add a burst of flavor to your side dishes, Honey Garlic Roasted Baby Carrots could be your next go-to recipe. This dish combines the natural sweetness of honey with savory garlic, offering a caramelized texture that enhances the flavor of the carrots. It’s an ideal choice for both casual meals and holiday dinners, adding a colorful, nutritious element to your table.

For those interested in easy yet flavor-packed recipes, these roasted carrots are a great addition. They’re quick to make and versatile enough to pair with various main courses, from roast chicken to beef. Plus, you can customize this dish to suit your taste preferences by experimenting with additional spices or herbs. You might also enjoy our guide to making a rich and satisfying Crockpot Potato Soup with Hashbrowns, a cozy dish that complements these roasted carrots perfectly.


Why Choose Honey Garlic Roasted Baby Carrots?

Honey garlic roasted carrots offer a delicious combination of flavors that appeals to both children and adults. Here’s why this dish has become a popular choice:

  • Quick and Easy: With minimal prep time, you can have a flavorful side dish ready in under 30 minutes.
  • Nutrient-Rich: Carrots are loaded with beta-carotene, fiber, and antioxidants, making this a nutritious choice.
  • Perfect for Any Occasion: Whether it’s a family dinner or a holiday feast, roasted carrots fit seamlessly into any menu.

Health Benefits of Carrots

Carrots aren’t just tasty—they’re packed with nutrients that benefit your health. High in Vitamin A, carrots support eye health and immune function. Additionally, antioxidants in carrots help fight inflammation. For a deeper look into nutrient-dense sides, try pairing these carrots with a dish like our Slow-Cooked Baked Ziti.


Ingredients for Honey Garlic Roasted Baby Carrots

Creating Honey Garlic Roasted Baby Carrots is simple and requires only a few ingredients:

  • Baby Carrots: These are perfect for roasting due to their size and sweetness.
  • Honey: Adds a natural sweetness that caramelizes beautifully when roasted.
  • Garlic: Freshly minced garlic enhances the savory aspect of the dish.
  • Olive Oil or Butter: Choose olive oil for a lighter flavor or butter for richness.
  • Salt and Pepper: Essential seasonings that bring out the natural flavors of the carrots.
  • Optional Herbs: Fresh rosemary, thyme, or parsley can be added for a touch of herbal flavor.

Step-by-Step Recipe Guide for Honey Garlic Roasted Baby Carrots

Step 1: Preheat the Oven and Prep Ingredients (5 minutes)

Preheat your oven to 400°F (200°C). While the oven heats, wash and pat dry the baby carrots. In a large mixing bowl, toss the carrots with olive oil, honey, minced garlic, salt, and pepper.

Step 2: Arrange and Roast (20 minutes)

Spread the carrots evenly on a baking sheet lined with parchment paper. This ensures they roast evenly without sticking. Place the baking sheet in the oven and roast for 20-25 minutes, stirring halfway through for even caramelization.

Step 3: Finish and Serve (5 minutes)

Remove the carrots from the oven once they’re tender and slightly caramelized. For added flavor, garnish with fresh herbs like parsley or thyme. Serve warm and enjoy the blend of honey and garlic with each bite.

For a perfect pairing, consider serving these carrots alongside our Cheesy Bacon Jalapeno Corn Dip, which brings a complementary savory flavor.


Tips for Making Perfect Honey Garlic Roasted Carrots

Creating the best honey garlic roasted carrots is all about balancing flavors and achieving the right texture. Here are some tips:

  • Use Fresh Ingredients: Fresh garlic and herbs provide the best flavor compared to dried versions.
  • Don’t Overcrowd the Baking Sheet: Give the carrots space to roast rather than steam.
  • Experiment with Sweetness: If you find honey too sweet, try maple syrup for a different, earthy sweetness.
  • Achieve a Balanced Flavor: Add a pinch of red pepper flakes for a hint of spice to balance the sweetness.

Recipe Variations to Try

One of the best aspects of this recipe is its versatility. You can easily adjust the ingredients to create new flavors:

  • Spicy Honey Garlic Carrots: Add crushed red pepper flakes or cayenne for a spicy twist.
  • Herbed Honey Garlic Carrots: Mix in rosemary, thyme, or even sage for a more aromatic flavor profile.
  • Maple Garlic Roasted Carrots: Substitute honey with maple syrup to give a subtle maple flavor.
  • Brown Butter Garlic Carrots: Use browned butter instead of olive oil for a rich, nutty flavor.

Popular Pairings

Honey garlic roasted carrots pair well with various main courses, from hearty meat dishes to vegetarian entrées. Try serving them alongside our Kentucky Butter Cake, a classic dessert that provides a delightful finish to the meal.


Frequently Asked Questions (FAQs)

How do I prevent the honey from burning?

  • To avoid burning, stir the carrots halfway through roasting, and don’t exceed 400°F. Honey can burn if exposed to high heat for too long.

Can I use whole carrots instead of baby carrots?

  • Absolutely! Simply cut whole carrots into similar-sized pieces to ensure even cooking.

What’s the best way to reheat honey garlic roasted carrots?

  • Reheat in the oven at 350°F for about 10 minutes to maintain their texture. Microwaving can make them mushy.

Can I make these carrots vegan?

  • Yes, substitute honey with maple syrup to keep the recipe vegan-friendly.

How long can I store roasted carrots?

  • Store in an airtight container in the refrigerator for up to 3 days. Reheat in the oven for best results.

Nutritional Value of Honey Garlic Roasted Baby Carrots

This side dish is not only flavorful but also nutritious. Carrots are high in fiber, Vitamin A, and antioxidants, while garlic and olive oil add heart-healthy benefits. For those interested in lower-calorie options, you can reduce the honey slightly and skip the butter.


Conclusion: Why Honey Garlic Roasted Baby Carrots Belong on Your Table

With their vibrant color, sweet and savory flavor, and simple preparation, Honey Garlic Roasted Baby Carrots make a wonderful addition to any meal. Whether you’re cooking for a holiday gathering or a weeknight dinner, this dish brings warmth, flavor, and nutrition to the table.

For more comforting side dishes, try our Cheesy Bacon Ranch Potatoes or explore our collection of Classic Comfort Foods. Each recipe offers something unique to elevate your meal.

Creamy Chicken Pot Pie Soup Recipe – Ultimate Comfort Food

chicken pot pie stew, creamy chicken soup, pot pie soup, easy chicken pot pie soup, chicken vegetable soup, homemade chicken soup

Chicken Pot Pie Soup: The Ultimate Comfort Food for Cozy Days

When the cold weather starts setting in, there’s no better way to keep warm than with a big bowl of Chicken Pot Pie Soup. This recipe takes all the classic flavors of a traditional chicken pot pie and transforms it into a creamy, comforting soup. With chunks of chicken, hearty vegetables, and a creamy base, this soup offers a satisfying and easy meal for any day of the week.

Why This Recipe Is a Family Favorite

Chicken Pot Pie Soup combines everything we love about comfort food—warmth, heartiness, and a rich flavor. This recipe is:

  • Quick to Prepare: With minimal prep and a few essential ingredients, you’ll have a delicious meal in under 30 minutes.
  • Customizable: From adding more veggies to changing the dairy for a lighter touch, this recipe suits all preferences.
  • Perfect for Leftovers: The flavors get even better the next day, making it ideal for meal prep.

For more cozy, slow-cooker recipes, check out The Ultimate Comfort Food Crockpot Potato Soup, which brings the same warm, comforting feel.


Ingredients for Chicken Pot Pie Soup

Creating a delicious Chicken Pot Pie Soup starts with fresh ingredients. Here’s what you’ll need:

  • Chicken: Opt for boneless, skinless chicken breasts or thighs. Rotisserie chicken also works well for added convenience.
  • Vegetables: Classic choices include carrots, celery, onions, and peas, but you can add corn or mushrooms for extra flavor.
  • Broth and Dairy: Use chicken broth and either heavy cream or milk to create a smooth, rich base.
  • Herbs and Seasoning: Salt, pepper, thyme, and a bay leaf are essential for layering flavors.

For those who enjoy experimenting with flavors, adding a dash of garlic or even a hint of smoked paprika can elevate the dish. Curious about adding bacon? Discover more in our Cheesy Bacon Jalapeno Corn Dip recipe.


Step-by-Step Guide to Making Chicken Pot Pie Soup

Step 1: Sauté the Vegetables (5 minutes)

Heat butter or oil in a large pot over medium heat. Add onions, carrots, and celery, and sauté until they’re soft and fragrant. This step enhances the flavor and sweetness of the vegetables.

Step 2: Cook the Chicken (5-7 minutes)

Add diced chicken to the pot and season with salt and pepper. Cook until the chicken is no longer pink. For a detailed guide on preparing chicken for soups, check our Perfect Shredded Chicken recipe.

Step 3: Create the Creamy Broth (10 minutes)

Pour in the chicken broth, stirring to scrape up any browned bits from the pot. Add the herbs and bring the mixture to a simmer. This is where the flavors meld and deepen.

Step 4: Add Dairy and Finish (5-10 minutes)

Stir in the cream or milk to create that signature creamy base. Let everything simmer for an additional 5-10 minutes until the soup reaches your desired thickness.


Tips for Perfect Chicken Pot Pie Soup

Making Chicken Pot Pie Soup isn’t difficult, but a few tips can take your soup to the next level:

  • Use fresh herbs whenever possible. Fresh thyme and rosemary give a much more robust flavor.
  • Adjust the thickness: For a thicker soup, mix a tablespoon of cornstarch with water and add it to the pot, stirring as it simmers.
  • Consider a pastry topping: If you crave that classic pot pie experience, bake puff pastry squares to serve on top of each bowl of soup.

For another unique topping idea, explore our Creamy Garlic Parmesan Chicken, which complements savory dishes beautifully.


Variations and Customizations

One of the best parts about this recipe is its versatility. Here are some popular ways to customize Chicken Pot Pie Soup:

  • Make It Gluten-Free: Swap out regular flour for a gluten-free alternative if you want to thicken the soup.
  • Dairy-Free Option: Use coconut or almond milk to achieve a creamy texture without dairy.
  • Vegetarian Twist: Skip the chicken and add more hearty vegetables like potatoes, mushrooms, and zucchini.

If you’re looking for more vegetarian comfort food options, try our Slow-Cooker Magic: Crock Pot Baked Ziti.


Serving Suggestions for Chicken Pot Pie Soup

Pairing this soup with the right sides can make it even more satisfying. Here are a few suggestions:

  • Crusty Bread: A slice of warm, crusty bread is perfect for dipping.
  • Green Salad: Lighten up your meal with a side of fresh greens.
  • Buttermilk Biscuits: The flakiness of buttermilk biscuits adds a delightful contrast.

For a true Southern twist, consider pairing this soup with our popular Kentucky Butter Cake, a treat that balances savory meals wonderfully.


Frequently Asked Questions (FAQs)

  1. Can I freeze Chicken Pot Pie Soup?
    • Yes, but for best results, add the dairy only after reheating, as it can sometimes separate in the freezer.
  2. What’s the best way to reheat this soup?
    • Reheat on the stovetop over medium heat, stirring occasionally, or microwave in 1-minute intervals until hot.
  3. Can I make this recipe ahead of time?
    • Absolutely! The flavors get even better the next day. Just store it in the fridge and reheat before serving.
  4. What type of chicken is best for this recipe?
    • Boneless, skinless chicken breasts or thighs work well. Rotisserie chicken is also a great option for added flavor.
  5. How can I make this soup thicker?
    • A simple cornstarch slurry can thicken the soup, or you can reduce the broth for a creamier consistency.

Nutritional Highlights of Chicken Pot Pie Soup

Not only is this Chicken Pot Pie Soup comforting, but it also offers several nutritional benefits. Chicken is a great source of protein, while vegetables provide fiber, vitamins, and minerals. Using milk instead of cream can lighten the dish, making it a balanced, satisfying meal.


Conclusion: Cozy Up with a Bowl of Chicken Pot Pie Soup

With its creamy texture, hearty ingredients, and comforting flavors, Chicken Pot Pie Soup is an ideal recipe to enjoy on a chilly day. Whether you’re serving it as a family dinner or prepping it for leftovers, this dish offers warmth and satisfaction. For those who enjoy experimenting, consider adding your own twist with extra spices or toppings.

For more cozy recipes to enjoy this season, explore our Hearty Ham Potato Soup or discover new flavor combinations with our Cheesy Ranch Chicken Quesadillas. Each recipe brings its own level of comfort and richness to your table.

Snickers Fudge Recipe: Easy No-Bake Chocolate Peanut Treat

homemade Snickers fudge, Snickers-inspired fudge, chocolate peanut fudge, no-bake Snickers treat, layered caramel fudge, candy bar fudge recipe

Snickers Fudge Recipe: A Decadent No-Bake Treat

If you’re a fan of Snickers and homemade fudge, this Snickers Fudge Recipe is the ultimate indulgence that combines the best of both worlds. This layered treat offers creamy chocolate, caramel, and crunchy peanuts, making it a favorite for holidays, parties, or anytime you want a deliciously sweet snack. For a similar no-bake dessert, check out our Peanut Butter Blossoms, which are also perfect for satisfying sweet cravings.

Why Snickers Fudge is a Must-Try Dessert

Snickers fudge is a fun, simple recipe that can be made without an oven. It’s an ideal dessert for anyone who loves candy-inspired treats and requires minimal effort. This layered fudge is filled with chocolate, caramel, and a peanut butter base, creating a balance of flavors and textures that’s simply irresistible. If you’re looking to explore more no-bake options, try our Chocolate Magic Shell Yogurt Cups, a refreshing dessert with a creamy center and crunchy chocolate shell.

Ingredients for Snickers Fudge

This Snickers fudge recipe includes classic ingredients that come together to recreate the signature candy bar flavor:

  • Milk Chocolate: Provides a creamy, rich base.
  • Sweetened Condensed Milk: Adds sweetness and smoothness.
  • Caramel Bits: Offers the gooey caramel layer.
  • Peanut Butter: Adds depth and the signature Snickers nutty flavor.
  • Crushed Peanuts: For extra crunch and texture.
  • Butter: Adds richness and binds ingredients.

Optional Additions

  • Marshmallow Fluff: For a lighter texture.
  • White Chocolate Drizzle: Adds contrast and a decorative touch.
  • Sea Salt: Enhances the chocolate and caramel flavors.

For more peanut butter-based desserts, see our Ultimate Peanut Butter Pie, which is rich and decadent, just like this fudge.


Preparing Snickers Fudge: A Step-by-Step Guide

  1. Layering the Chocolate Base
    • Melt the milk chocolate with sweetened condensed milk, stirring until smooth.
    • Pour the mixture into a lined baking dish as the base layer.
  2. Adding the Caramel and Peanut Butter Layer
    • Melt caramel bits and a little butter in the microwave, stirring until smooth.
    • Spread over the chocolate layer, followed by a layer of peanut butter for that classic Snickers taste.

For more tips on working with caramel, try our Salted Caramel Rice Krispie Treats, which combines caramel and crunch.

  1. Finishing with Chocolate and Peanuts
    • Top with melted chocolate and sprinkle crushed peanuts for a crunchy finish.
    • Refrigerate the fudge for several hours to allow it to set before cutting.

Serving Suggestions for Snickers Fudge

  • On a Dessert Platter: Arrange the fudge on a platter with other bite-sized treats.
  • Gift Box Treats: Package individual pieces in decorative boxes for holiday gifts.
  • As Part of a Dessert Bar: Serve alongside mini cheesecakes, cookies, and truffles.

For a holiday dessert idea, check out our Dorito Chicken Casserole for a savory dish that balances out the sweetness of this fudge.

Storing and Freezing Snickers Fudge

  1. Refrigeration: Store in an airtight container in the fridge for up to one week.
  2. Freezing: Freeze in individual portions for up to two months. Wrap tightly to prevent freezer burn.
  3. Thawing: Let thaw in the refrigerator overnight before serving.

For more freezer-friendly treats, explore our Big Freezer Meal Prep Guide for tips on storing homemade goodies.

Health and Nutritional Considerations

While Snickers fudge is a rich dessert, you can make modifications:

  • Use Dark Chocolate: Reduces sugar content while enhancing flavor.
  • Add Protein Powder: Mix into the base for a protein boost.
  • Reduce Caramel: For a lighter option, decrease the caramel layer.

If you’re interested in healthier dessert options, try our Healthy Avocado Egg Salad Roll-Ups.


Frequently Asked Questions (FAQs)

1. Can I Make Snickers Fudge Without Peanut Butter?

Yes, you can substitute almond butter or omit it if needed, though the flavor will differ slightly.

2. How Do I Keep the Fudge from Sticking to the Pan?

Line the pan with parchment paper to ensure easy removal of the fudge once it sets.

3. Can I Add a Layer of Marshmallow to the Fudge?

Absolutely! Adding marshmallow fluff between the layers gives a softer texture.

4. How Long Does Snickers Fudge Need to Set?

It’s best to refrigerate it for at least two hours to ensure the fudge holds together well.

5. Can I Use White Chocolate Instead of Milk Chocolate?

Yes, white chocolate offers a sweeter flavor profile and works well as a variation.


Troubleshooting Common Issues

  • Sticky Fudge: Allow it to chill completely before cutting to avoid stickiness.
  • Crumbly Texture: Ensure the fudge base is smooth before adding layers to prevent separation.
  • Uneven Layers: Spread each layer evenly to ensure consistency and a clean appearance.

Final Thoughts on Snickers Fudge

This Snickers Fudge Recipe combines creamy chocolate, peanut butter, and caramel for a deliciously rich treat that’s hard to resist. Whether you’re gifting it or indulging at home, this fudge is a crowd-pleaser. For more candy-inspired recipes, visit ExoRecipes, where you’ll find sweet and savory options for every occasion.

Christmas Chocolate Rice Krispie Balls: Easy No-Bake Holiday Treats

oliday Rice Krispie treats, chocolate-covered Rice Krispie balls, festive Rice Krispie balls, Christmas Rice Krispie dessert, easy holiday treats, no-bake chocolate balls

Christmas Chocolate Rice Krispie Balls: A Festive No-Bake Treat

Bring some holiday magic to your dessert table with Christmas Chocolate Rice Krispie Balls! These festive treats combine the satisfying crunch of Rice Krispies with a decadent chocolate coating, making them perfect for holiday parties, family gatherings, or as a thoughtful edible gift. This recipe is simple, requires no baking, and is highly customizable. If you’re looking for more festive inspiration, check out our Salted Caramel Rice Krispie Treats for a caramel twist on the classic.

Why Christmas Chocolate Rice Krispie Balls Are a Holiday Hit

Christmas Rice Krispie Balls are a quick, versatile treat that brings together the joy of chocolate, peanut butter, and Rice Krispies in a fun, bite-sized form. These are ideal for making with kids or as a last-minute holiday dessert. If you’re interested in more no-bake dessert options, consider our No-Bake Banana Pudding Cheesecake, which offers a creamy and easy-to-make alternative.

Ingredients Needed for Christmas Chocolate Rice Krispie Balls

To make this festive treat, gather the following ingredients:

  • Rice Krispies: Provides a crunchy, airy texture.
  • Chocolate: Milk or dark chocolate for coating, depending on taste preference.
  • Peanut Butter: Adds creaminess and helps bind the mixture.
  • Powdered Sugar: Sweetens and thickens the filling.
  • Butter: Adds richness and helps create the filling consistency.

Optional Additions for Extra Festive Flair

  • Sprinkles: Red, green, or holiday-themed for decoration.
  • White Chocolate Drizzle: Adds contrast and extra sweetness.
  • Crushed Candy Canes: For a peppermint twist.

For more holiday dessert ideas, see our recipe for Pecan Pie Balls, another bite-sized treat perfect for Christmas.


Preparing the Rice Krispie Balls

  1. Mixing the Filling
    • Combine peanut butter, powdered sugar, and Rice Krispies in a large bowl.
    • Stir until evenly mixed; this forms the base of the Rice Krispie balls.
  2. Forming the Balls
    • Using your hands, roll the mixture into even-sized balls, about one inch in diameter.
    • Place the balls on a lined baking sheet and refrigerate to set.

For more chocolate treats, try our Chocolate Magic Shell Yogurt Cups for a unique twist on dessert cups.


Melting and Coating the Balls in Chocolate

Melting the Chocolate

  • Double Boiler Method: Slowly melt chocolate in a heatproof bowl over simmering water.
  • Microwave Method: Melt chocolate in 20-second intervals, stirring between each until smooth.

Coating the Balls

  • Using a fork, dip each Rice Krispie ball into the melted chocolate, ensuring an even coating.
  • Allow excess chocolate to drip off, then place on parchment paper to cool.

For more on working with chocolate, check out our Ultimate Guide to Chocolate Desserts.


Decorating Your Christmas Chocolate Rice Krispie Balls

  1. Sprinkles and Toppings
    • Decorate each chocolate-covered ball with holiday sprinkles before the chocolate sets.
    • For a peppermint twist, sprinkle crushed candy canes on top.
  2. Drizzling White Chocolate
    • For a festive contrast, drizzle melted white chocolate over the balls once the first chocolate layer has set.
  3. Setting the Decorations
    • Place decorated balls in the refrigerator to fully set before serving or storing.

Serving Suggestions for Christmas Chocolate Rice Krispie Balls

Christmas Chocolate Rice Krispie Balls are versatile for any holiday occasion. Here’s how to make the most of them:

  • On a Dessert Tray: Arrange with other holiday treats, like our Gingerbread Cookies and peppermint bark, for a festive spread.
  • Gift Boxes: Place in holiday-themed tins or treat bags as a gift for friends, family, or coworkers.
  • Pairing with Hot Cocoa: These treats pair perfectly with a warm drink, adding extra holiday cheer.

Storing and Freezing Rice Krispie Balls

  1. Refrigeration: Store in an airtight container in the refrigerator for up to one week.
  2. Freezing: Freeze the balls individually on a tray, then transfer them to a freezer-safe container for up to two months.
  3. Thawing: Thaw in the refrigerator for a few hours before serving to maintain texture.

Health and Nutritional Insights

While Christmas Chocolate Rice Krispie Balls are indulgent, they offer a balance of textures and flavors. Here are a few ways to lighten them:

  • Use dark chocolate for added antioxidants and lower sugar content.
  • Opt for natural peanut butter to reduce added sugars.
  • Try low-sugar substitutes for powdered sugar to reduce calorie content.

Frequently Asked Questions (FAQs)

1. Can I Make These Without Peanut Butter?

Yes, almond butter or sunflower seed butter can be used as a substitute if needed.

2. How Do I Keep the Chocolate Coating from Cracking?

Make sure the Rice Krispie balls are at room temperature before dipping, and allow them to cool slowly.

3. Can I Make These Ahead of Time?

Yes, these treats store well in the fridge or freezer, making them ideal for early preparation.

4. How Can I Make Them Gluten-Free?

Use certified gluten-free Rice Krispies and check that all ingredients are labeled gluten-free.

5. Can I Add More Flavors?

Yes! Mix in cinnamon, nutmeg, or crushed peppermint for a holiday flavor twist.


Troubleshooting Common Issues

  • Crumbly Texture: If the mixture doesn’t hold together, add a bit more peanut butter or melted butter.
  • Chocolate Melting Issues: Use a small amount of coconut oil in the chocolate to make it smoother and easier to dip.
  • Uneven Coating: Dip using a fork and tap gently to remove excess chocolate for a smoother finish.

Final Thoughts: A Simple, Festive Treat for All Ages

Christmas Chocolate Rice Krispie Balls offer a quick, festive way to satisfy holiday sweet cravings. With minimal ingredients and endless decorating options, they’re a fun, easy project for bakers of all levels. For more holiday-inspired sweets, check out our Holiday Cookie Collection, featuring everything from classics to creative new twists.

Farmhouse Hamburger and Potato Bake: A Hearty Family Casserole Recipe

hamburger potato casserole, ground beef and potato bake, rustic hamburger bake, cheesy hamburger casserole, hamburger and potato recipe, comfort food casserole

Farmhouse Hamburger and Potato Bake: A Hearty Family Favorite

The farmhouse hamburger and potato bake is a classic comfort food, blending flavorful ground beef with tender potatoes in a rich, cheesy casserole. This recipe is easy to prepare and perfect for weeknight dinners or family gatherings, combining layers of flavor and warmth. If you’re interested in more rustic casseroles, check out our Ultimate Comfort Food: Crockpot Potato Soup with Hashbrowns for another comforting dish.

Why the Farmhouse Hamburger and Potato Bake is a Hit

This dish combines accessible, affordable ingredients, making it a perfect choice for budget-friendly meals. The hearty flavors and creamy, cheesy topping make it an instant favorite with all ages. For another quick and filling option, try our Slow Cooker Magic: Crockpot Baked Ziti, ideal for busy days.

Ingredients for Farmhouse Hamburger and Potato Bake

To make this delicious bake, gather these ingredients:

  • Ground Beef: A versatile protein source; use lean or regular ground beef as preferred.
  • Potatoes: Russet or Yukon Gold for their sturdy texture and flavor.
  • Onion and Garlic: Essential for flavor depth.
  • Cheddar Cheese: Adds richness and creaminess.
  • Cream of Mushroom Soup: Acts as a binder and flavor enhancer.
  • Seasonings: Salt, pepper, garlic powder, and smoked paprika.

Optional Additions

  • Bacon Bits: For a smoky touch.
  • Bell Peppers: Adds color and texture.
  • Sour Cream: For an added creamy finish.

For a similar ingredient setup, see our One-Pan Pork Chops and New Potatoes Recipe that also combines meat and potatoes in a single dish.


Preparing the Ingredients

  1. Selecting the Right Beef and Potatoes
    • Ground Beef: Choose between lean for less fat or regular for added flavor.
    • Potatoes: Russets work well for a creamy texture, while Yukon Gold provides a buttery taste.
  2. Prepping and Browning the Beef
    • Begin by browning the ground beef with seasonings to build a flavor base.
    • Drain any excess fat if desired.
  3. Slicing the Potatoes
    • Slice potatoes thinly to ensure even cooking.
    • You can parboil them for a softer texture if preferred.

For more one-dish meals, try our Cowboy Cornbread Casserole, a delicious option with a hint of Southern flavor.


Layering the Hamburger and Potato Bake

Step-by-Step Guide

  1. First Layer: Potatoes
    • Arrange a layer of potato slices on the bottom of the baking dish.
  2. Add the Beef and Onion Mixture
    • Spread the seasoned beef and onions evenly over the potatoes.
  3. Layer with Cream of Mushroom Soup
    • Pour the cream of mushroom soup over the beef, spreading it for even coverage.
  4. Top with Cheese
    • Generously sprinkle cheddar cheese over the entire dish for a rich, melty topping.

For more layered casseroles, explore our Dorito Chicken Casserole, which adds a Tex-Mex twist.


Baking and Serving the Casserole

Baking Tips

  • Temperature and Time: Bake at 350°F for about 1 to 1.5 hours until potatoes are tender and cheese is bubbly.
  • Checking Doneness: Use a fork to test the potatoes for softness.

Serving Suggestions

Serve the farmhouse bake with:

  • Garnishes: Chopped parsley or green onions for color and freshness.
  • Side Dishes: A simple salad or roasted green beans complement the casserole well.

For another robust side, try our Creamy Garlic Parmesan Chicken that pairs beautifully with this bake.


Storing and Reheating Leftovers

  1. Refrigeration: Store leftovers in an airtight container for up to 3 days.
  2. Freezing: Freeze portions in individual containers for up to 2 months.
  3. Reheating: Reheat in the oven or microwave until warmed through.

For more tips on storage and reheating, check out our guide on Best Casserole Storage Practices.


Health and Nutritional Insights

Farmhouse hamburger and potato bake is rich in protein and carbs, providing energy and satiety. To make it lighter, consider:

  • Using ground turkey instead of beef.
  • Reducing cheese and adding more vegetables for fiber.

Frequently Asked Questions (FAQs)

1. Can I Make Farmhouse Hamburger and Potato Bake Without Cheese?

Yes, you can skip the cheese, though it adds creaminess. Try a dairy-free cheese alternative if needed.

2. How Do I Keep the Potatoes from Getting Mushy?

Slice potatoes thinly and consider parboiling to ensure even, firm texture.

3. Can I Prepare the Bake Ahead of Time?

Absolutely! Assemble the casserole, cover it, and refrigerate. Bake fresh when ready.

4. Can I Substitute the Cream of Mushroom Soup?

Yes, cream of chicken or a homemade white sauce works as a substitute.

5. How Do I Prevent the Bake from Becoming Too Greasy?

Opt for lean ground beef and drain excess fat before layering in the casserole.


Troubleshooting Common Issues

  • Soggy Potatoes: Slice thinly or parboil to prevent mushiness.
  • Excess Grease: Drain ground beef thoroughly before adding to the dish.
  • Dry Casserole: Cover with foil if the top browns too quickly.

For more comfort food recipes with practical tips, visit our Comfort Food Collection.


Final Thoughts: A Rustic Dish to Warm the Heart

The farmhouse hamburger and potato bake is a cozy, flavorful casserole that brings together simple ingredients in a deliciously satisfying way. With easy-to-find ingredients and minimal prep, this recipe is ideal for family dinners, potlucks, or busy weeknights. For more hearty and homestyle recipes, explore ExoRecipes, where you’ll find delicious meals for every occasion.