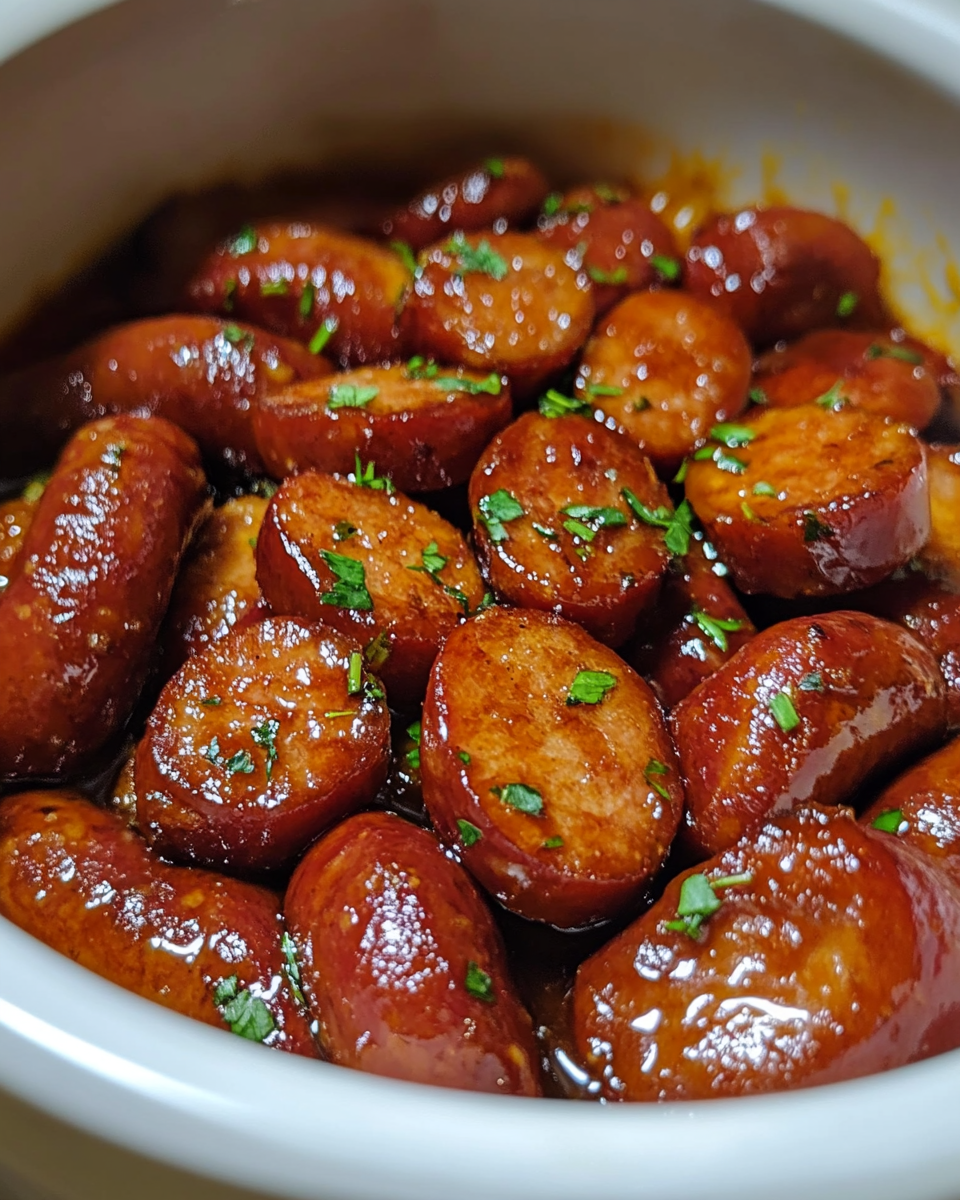
Cookies Made from Brownie Mix: Easy Recipe for Chewy, Fudgy Cookies

brownie mix cookies, easy brownie cookies, chewy cookies from brownie mix, fudgy brownie mix cookies, chocolate brownie cookies, brownie cookies recipe

Cookies Made From Brownie Mix: A Quick and Delicious Recipe Hack

Craving cookies but only have brownie mix on hand? This easy recipe hack transforms a simple box of brownie mix into chewy, delicious cookies in no time! With minimal ingredients, you can create cookies that offer the rich, fudgy texture of brownies combined with the convenient size and shape of cookies. This guide will walk you through how to turn a classic brownie mix into a crowd-pleasing cookie with fun add-ins and variations.

For another quick and sweet treat, try S’mores Jars for an Indoor Campfire Experience from ExoRecipes, perfect for satisfying chocolate cravings.


Why Make Cookies from Brownie Mix?

Cookies made from brownie mix are a fantastic way to enjoy the fudgy, chewy goodness of brownies in a smaller, easy-to-eat form. This recipe is:

  • Quick and Easy: With just a few pantry staples and a box of brownie mix, you’re ready to bake.
  • Versatile: Customize your cookies with mix-ins like chocolate chips, nuts, or candy.
  • Kid-Friendly: The simple steps make it a great recipe to involve kids in the kitchen.

For tips on achieving the perfect chewy texture, you might also enjoy this Ultimate Guide to Baking Thick and Gooey Cookies.


Ingredients Needed

To make these delicious cookies, you only need a few basic ingredients:

  • 1 box of brownie mix (about 20 oz)
  • 2 large eggs
  • 1/3 cup vegetable oil
  • Optional: chocolate chips, chopped nuts, or sprinkles for added flavor and texture

Note: Adjusting the amount of oil or adding a bit of flour can affect the texture, so feel free to experiment based on your preference for fudgy or cakey cookies.


Step-by-Step Instructions

1. Prepare the Dough

  • In a large mixing bowl, combine the brownie mix, eggs, and oil.
  • Stir until everything is well-mixed, creating a thick dough.

2. Add Mix-Ins (Optional)

  • Fold in chocolate chips, nuts, or other add-ins of choice. This step adds an extra layer of texture and flavor to your cookies.

3. Shape and Bake

  • Scoop out tablespoon-sized portions of dough and place them on a baking sheet lined with parchment paper.
  • Bake at 350°F for 8-10 minutes, or until the edges are set but the centers are still slightly soft. Allow cookies to cool on the baking sheet for a few minutes before transferring to a wire rack.

For other easy dessert ideas, try Peanut Butter Blossoms for a classic cookie with a nutty twist.


Flavor Variations for Brownie Mix Cookies

One of the best parts of making cookies from brownie mix is the opportunity to experiment with different flavors. Here are some popular variations:

  • Double Chocolate: Add extra chocolate chips or chunks for an ultra-chocolatey experience.
  • Mint Chocolate: Mix in a few drops of peppermint extract and sprinkle with crushed peppermint candies.
  • Nutty Brownie Cookies: Stir in chopped walnuts, pecans, or almonds for a crunchy texture.

For more dessert customization ideas, check out No-Bake Peanut Butter Oatmeal Cookies on ExoRecipes for another easy cookie alternative.


Tips for the Perfect Texture

Achieving the right texture is key to making cookies from brownie mix stand out. Here are some tips:

  • Don’t Overbake: Brownie cookies are best when slightly underbaked for that fudgy center.
  • Add Flour for a Cakier Texture: If you prefer cakey cookies, add 1-2 tablespoons of flour to the mix.
  • Use a Cookie Scoop: This ensures even sizing, which helps each cookie bake uniformly.

For more tips on perfecting dessert textures, explore this Guide to Fudgy vs. Cakey Brownies.


Nutritional Information

Each cookie (depending on size and mix-ins) is approximately:

  • Calories: ~150
  • Fat: ~8g
  • Carbohydrates: ~20g
  • Protein: ~2g

Note: Nutritional values vary based on additional ingredients like chocolate chips or nuts.


Frequently Asked Questions

1. Can I make these cookies without eggs?

Yes, you can substitute eggs with alternatives like unsweetened applesauce (1/4 cup per egg) or a flax egg (1 tablespoon flaxseed meal mixed with 3 tablespoons water).

2. What if my dough is too runny?

If your dough is too runny, add a tablespoon or two of flour to thicken it up for easier scooping.

3. Can I freeze the dough for later?

Absolutely! Portion the dough into balls and freeze them on a baking sheet. Once solid, transfer to a zip-top bag and freeze for up to three months. Bake directly from frozen, adding an extra 1-2 minutes to the bake time.

4. How do I store leftover cookies?

Store these cookies in an airtight container at room temperature for up to 5 days or freeze for longer storage.


Conclusion

Cookies made from brownie mix are a quick, easy, and delicious solution for chocolate cravings, combining the rich flavor of brownies with the convenience of cookies. Experiment with various mix-ins and flavors to make each batch unique and suited to your taste.

For other unique twists on classic recipes, explore ExoRecipes’ Cool Whip Cookies, a fun and simple recipe that brings a new texture to traditional cookies.

Fried Potatoes and Onions with Smoked Sausage: A Savory Skillet Recipe

sausage and potatoes skillet, potatoes and onions with sausage, fried potatoes with smoked sausage, easy sausage skillet recipe, Southern skillet potatoes

Fried Potatoes and Onions with Smoked Sausage: A Hearty Skillet Meal

For those seeking a quick, satisfying meal that combines rich flavors with ease of preparation, look no further than fried potatoes and onions with smoked sausage. This Southern-inspired dish brings together crispy potatoes, caramelized onions, and smoky sausage in a hearty, one-pan recipe that’s perfect for any time of day.

Check out other cozy, one-pan meals on ExoRecipes, like their Ultimate Comfort Food Crockpot Potato Soup with Hashbrowns for more meal inspiration.


Why Fried Potatoes and Smoked Sausage?

The combination of fried potatoes, onions, and smoked sausage is a timeless classic known for its delicious simplicity. This meal is not only easy to make but also packed with flavors from the caramelized onions and smoked sausage, making it an ideal option for busy weeknights or lazy weekends.

But why choose smoked sausage? The intense, savory taste of smoked sausage infuses the potatoes and onions with a deep, satisfying flavor, taking this simple recipe to the next level. For more tips on incorporating smoked sausage in other dishes, refer to The Spruce Eats’ Guide to Smoked Sausages.


Ingredients You’ll Need

  • Potatoes: Use russet or Yukon gold for best results.
  • Smoked Sausage: Kielbasa, Polish sausage, or any smoked variety.
  • Onions: Yellow onions add a nice sweetness when caramelized.
  • Optional Add-ins: Bell peppers, garlic, and herbs like thyme or parsley.

Choosing the Best Sausage

When it comes to smoked sausage, there are multiple options, each bringing unique flavors to the dish. Here are a few favorites:

  • Polish Kielbasa: Adds a traditional smoked flavor.
  • Andouille Sausage: A bit spicier and works well if you prefer some heat.
  • Turkey or Chicken Sausage: Healthier alternatives that still deliver on taste.

If you’re interested in other sausage-based recipes, explore ExoRecipes’ Kielbasa, Potatoes, and Green Beans for a lighter twist on a classic.


Step-by-Step Cooking Instructions

Step 1: Prepare Ingredients

  1. Slice the potatoes and onions thinly to ensure even frying.
  2. If adding bell peppers, slice them similarly to match the texture and cook time of the other vegetables.

Step 2: Preheat the Skillet

Use a large skillet over medium heat with a little oil. Preheating the skillet is essential for achieving a good sear on the potatoes and sausage, which enhances the flavor.

For tips on skillet cooking, refer to Bon Appétit’s Guide to the Best Skillet Cooking Techniques.

Step 3: Fry the Potatoes

  1. Add potatoes to the preheated skillet and cook for about 8-10 minutes, flipping occasionally until they are golden brown.
  2. Season with salt, pepper, and optional spices like paprika or garlic powder for added depth.

If you’re looking for other potato-based dishes, consider ExoRecipes’ Twice Baked Potato Casserole as a complementary side.

Step 4: Add Onions and Sausage

  1. Once the potatoes begin to crisp up, add the onions and cook until they start to caramelize.
  2. Add in the smoked sausage and cook until it’s heated through, typically 5-7 minutes.

Step 5: Final Searing and Serve

  1. Mix everything well to ensure even distribution of flavors.
  2. Adjust seasoning to taste, garnish with fresh herbs, and serve hot.

Creative Add-ins and Variations

Add Vegetables for Extra Flavor

Consider adding sliced bell peppers, mushrooms, or zucchini for a more colorful, nutrient-dense meal. Bell peppers, in particular, complement the smoky flavor of the sausage.

Make It Spicy

For those who love a kick, add red pepper flakes or jalapeño slices during the cooking process. This adds a subtle heat that pairs perfectly with the sweetness of caramelized onions.

Swap Sausage Types

If you’re looking to try something different, you could substitute the smoked sausage with:

  • Chorizo: Adds a spicier, Spanish flair to the dish.
  • Breakfast Sausage Links: Makes this recipe suitable for a hearty brunch option.

Nutritional Information

This dish is high in protein from the sausage and provides a good amount of carbs from the potatoes, making it filling and satisfying. Here’s a general nutritional breakdown per serving:

  • Calories: ~450
  • Protein: 15g
  • Carbohydrates: 35g
  • Fat: 25g

To make it a bit lighter, you can opt for turkey or chicken sausage, which offers fewer calories and less fat without sacrificing taste.


Serving Suggestions

Complementary Side Dishes

  • Fresh Salad: Adds a refreshing contrast to the richness of the main dish.
  • Garlic Bread: Perfect for soaking up any leftover juices from the sausage and onions.
  • Cornbread: For a Southern-inspired meal, serve this with a slice of buttery cornbread on the side.

Explore other sides on ExoRecipes like their Creamy Baked Macaroni and Cheese for a cozy meal pairing.

Perfect for Meal Prep

This dish reheats well, making it a great option for meal prep. Store leftovers in an airtight container, and it can last up to three days in the fridge.


Frequently Asked Questions

Can I use different types of potatoes?

Yes, while russet and Yukon gold are ideal, red potatoes or fingerling potatoes work as well. The Spruce Eats offers a great guide on Choosing the Right Potatoes for various recipes.

What pan is best for frying potatoes and sausage?

A cast-iron skillet is ideal as it provides even heating and helps achieve a nice crispiness on the potatoes. However, a non-stick skillet also works well, especially if you’re using less oil.

How do I keep the potatoes from sticking to the pan?

Make sure to preheat the skillet well and use enough oil. Avoid overcrowding the pan, as this can cause the potatoes to steam rather than fry.

Can I make this dish ahead of time?

Yes, you can prep the potatoes and onions in advance. Cooked potatoes and sausage can also be stored and reheated, although they’re best enjoyed fresh.


Final Thoughts

Fried potatoes and onions with smoked sausage is a meal that brings comfort and satisfaction with every bite. Whether you’re preparing it for breakfast, lunch, or dinner, this dish is versatile, easy to make, and always delicious. Customize it with different vegetables, spices, or sausage types to make it uniquely yours.

For those who want to explore other hearty skillet meals, ExoRecipes has a great collection, including the Ham and Potato Casserole. This recipe, like many other one-pan dishes, offers both convenience and a burst of flavor, perfect for any meal.

Easy No-Bake Peanut Butter Haystacks Recipe: Simple, Sweet, and Crunchy Treats

no-bake peanut butter treats, easy haystack cookies, peanut butter haystack recipe, no-bake cookies with peanut butter, peanut butter and butterscotch haystacks

Easy No-Bake Peanut Butter Haystacks: A Sweet and Simple Treat

No-bake desserts are an easy and delightful way to satisfy your sweet tooth without the hassle of an oven. No-Bake Peanut Butter Haystacks are a classic treat, perfect for when you need a quick dessert with minimal ingredients and effort. This recipe combines creamy peanut butter, crunchy chow mein noodles, and sweet butterscotch to create a unique texture and irresistible taste that’s loved by kids and adults alike. Here, we’ll guide you through the ingredients, steps, and creative variations, ensuring you make perfect haystacks every time.

What Are Peanut Butter Haystacks?

Peanut butter haystacks are a no-bake dessert made with just a handful of ingredients. The simplicity of this treat makes it ideal for busy days, last-minute gatherings, or just when you’re craving something sweet but don’t want to spend time baking. Traditionally, haystacks are made with chow mein noodles, peanut butter, and butterscotch chips, forming a crispy, chewy snack.

Ingredients Needed for Peanut Butter Haystacks

Here’s what you’ll need to whip up these tasty no-bake peanut butter haystacks:

  • 1 cup butterscotch chips
  • ½ cup creamy peanut butter (opt for non-natural peanut butter for best consistency)
  • 2 cups chow mein noodles
  • Optional add-ins: Mini marshmallows, peanuts, or chocolate chips for extra flavor and texture

Each ingredient plays a key role, contributing to the haystacks’ texture and taste. The chow mein noodles add crunch, while the peanut butter and butterscotch bind everything together with a sweet and creamy flavor.

Pro Tip: Check out Food Network’s guide on peanut butter for baking and cooking for insights on selecting the best peanut butter consistency.

Step-by-Step Instructions

1. Prepare Ingredients

  • Before you begin, measure out all ingredients. Ensuring you have everything at hand makes the process smoother and avoids the butterscotch from cooling too quickly.

2. Melt Butterscotch and Peanut Butter

  • In a microwave-safe bowl, melt the butterscotch chips and peanut butter. Microwave in short 20-30 second intervals, stirring in between until smooth. Be careful not to overheat, as butterscotch can burn easily.

Tip: For more on melting techniques, Kitchn offers a comprehensive guide to melting butterscotch.

3. Mix with Chow Mein Noodles

  • Add the chow mein noodles to the melted mixture, stirring carefully until each noodle is coated. If desired, fold in optional add-ins like marshmallows or chocolate chips.

4. Shape Haystacks

  • Using a spoon, scoop out the mixture and place it in small mounds on a parchment-lined tray. Let the haystacks cool at room temperature until they’re firm and ready to serve.

Creative Variations on the Classic Haystack

While the classic peanut butter haystacks are delicious, here are some ways to elevate the recipe:

  • Chocolate Peanut Butter Haystacks: Substitute half of the butterscotch chips with chocolate chips for a richer flavor.
  • Holiday Haystacks: Add colored sprinkles or drizzle white chocolate over the top for a festive look.
  • Healthier Haystacks: Use dark chocolate chips and reduced-sugar peanut butter for a lighter treat. You can even incorporate oats or shredded coconut for added fiber.

For more dessert inspiration, see the Salted Caramel Rice Krispie Treats at ExoRecipes, another easy no-bake option that’s just as delightful!

Troubleshooting Tips for Perfect Haystacks

Achieving the right texture with haystacks can be tricky. Here are some common issues and tips to avoid them:

  • Haystacks Too Hard: If the mixture hardens too quickly, try adding a small amount of vegetable oil to the melted butterscotch to keep it smooth.
  • Overly Sticky Haystacks: Using natural peanut butter can sometimes result in a stickier consistency. For best results, stick to traditional, creamy peanut butter.
  • Crumbling Haystacks: If your haystacks crumble, they may not have enough binding agents. Ensure the noodles are fully coated in the peanut butter and butterscotch mixture.

How to Store Peanut Butter Haystacks

Peanut butter haystacks are simple to store, making them a convenient snack or dessert to have on hand.

  • Room Temperature: Store in an airtight container for up to a week.
  • Refrigerator: They can be refrigerated to extend shelf life, though they may become firmer.
  • Freezing: Freeze in a sealed container, separating layers with parchment paper to prevent sticking. Thaw at room temperature before enjoying.

Nutritional Information

While peanut butter haystacks are a treat, it’s helpful to know their approximate nutritional value. A standard haystack (based on the basic recipe) is around:

  • Calories: ~150
  • Fat: ~8g
  • Carbohydrates: ~20g
  • Protein: ~3g

This treat is relatively high in fat due to peanut butter and butterscotch, so enjoy in moderation.

Allergen Alert: Haystacks contain common allergens like peanuts and may include gluten if using chow mein noodles that aren’t gluten-free.

Serving Suggestions and Pairing Ideas

Peanut butter haystacks are versatile and can be served in various ways to suit any occasion:

  • Party Platters: Serve on a colorful platter alongside other no-bake treats like No-Bake Banana Pudding Cheesecake from ExoRecipes.
  • Holiday Treats: Arrange in decorative tins with festive candies for a holiday gift.

Frequently Asked Questions

1. Can I use a different type of nut butter?
Yes, almond or sunflower butter can replace peanut butter, making it suitable for those with peanut allergies. However, the flavor will differ slightly.

2. Why are my haystacks crumbly?
Crumbly haystacks may result from not enough binding agents. Make sure the noodles are fully coated in the peanut butter and butterscotch mixture.

3. Can I freeze peanut butter haystacks?
Absolutely! Just separate layers with parchment paper to prevent sticking, and thaw before serving.

4. How long do haystacks last?
Stored in an airtight container, they can last up to a week at room temperature or longer in the fridge.

5. What can I add to make my haystacks more festive?
Consider holiday sprinkles, white chocolate drizzle, or even edible glitter for a festive look.

Conclusion

Easy No-Bake Peanut Butter Haystacks offer the perfect blend of simplicity and flavor, making them an ideal dessert or snack. With their creamy, crunchy texture and sweet peanut butter taste, they’re a favorite for both kids and adults. Whether you’re looking to whip up a quick treat for a party or a last-minute dessert, peanut butter haystacks are sure to impress. So gather your ingredients, follow our easy steps, and enjoy these delicious treats!

Big Mac Smash Burger Tacos Recipe: The Ultimate Fast-Food Fusion

smash burger tacos, Big Mac tacos, burger taco fusion, fast-food style tacos, smash burger recipe, homemade Big Mac tacos, burger-inspired tacos

Big Mac Smash Burger Tacos: A New Twist on a Classic Favorite

Craving the iconic Big Mac flavors in a fun, handheld form? Enter Big Mac Smash Burger Tacos, a delicious fusion that brings the best of fast-food burgers and tacos together in one tasty package. This easy-to-follow recipe captures the essence of the classic Big Mac while offering a unique twist on the smash burger technique. Let’s dive into everything you need to know to make the ultimate Big Mac Smash Burger Tacos!


Ingredients and Essentials

  1. Ground Beef – For juicy, flavorful patties.
  2. Taco Shells – Soft flour or corn tortillas to create a base for the taco.
  3. Big Mac Sauce – Recreate the iconic flavor with a homemade sauce.
  4. Toppings – Lettuce, pickles, onions, and cheese for the authentic Big Mac experience.
  5. Seasonings – Salt, pepper, and optional garlic powder for added flavor.

Pro Tip: To master the smash burger method, check out the perfect smash burger technique for tips on how to achieve the ideal texture and flavor.


Step-by-Step Recipe Guide

Preparing the Beef

  • Begin by forming small beef balls to press into the tortillas, creating the classic smash burger style.
  • Season the meat before pressing down to ensure the flavors cook into the beef.

Crafting the Big Mac Sauce

This essential ingredient elevates your taco, giving it that unmistakable Big Mac taste. To make the sauce, combine:

  • Mayo, mustard, and a dash of relish
  • Vinegar, garlic powder, and paprika for a balanced flavor

For more sauce variations, you may want to consult this Big Mac sauce recipe guide to add your own twist!

Assembling the Tacos

  1. Lay each tortilla flat, adding a layer of Big Mac sauce.
  2. Place the smashed beef on top, followed by shredded lettuce, diced onions, pickles, and cheese.
  3. Fold or leave open for easy serving.

For additional inspiration, the Fusion at Its Finest article on ExoRecipes also explores creative ways to combine flavors into unique, mouth-watering dishes.


Flavor Variations and Customizations

Try adding a few twists to make this recipe your own:

  • Cheeseburger Smash Tacos – Add an extra layer of melted cheese.
  • Spicy Big Mac Tacos – Include sliced jalapeños or hot sauce for a kick.
  • Lettuce Wrap Version – For a low-carb alternative, swap the taco shell with a lettuce wrap.

If you’re looking for more ways to experiment, the Ultimate BBQ Pulled Pork Grilled Cheese Recipe is another excellent fusion recipe that showcases how different flavors can come together in surprising ways.


Common FAQs About Big Mac Smash Burger Tacos

  • Can I make the sauce in advance?
    • Yes, the sauce can be prepared up to three days in advance and stored in the fridge.
  • What’s the best type of cheese for this recipe?
    • American cheese or cheddar works well, as they melt smoothly and complement the flavors.
  • How do I prevent the tacos from becoming soggy?
    • Serve immediately after assembling to maintain crispness.
  • Can I use different meats?
    • Ground turkey or plant-based meats are great alternatives for dietary preferences.

For even more taco-inspired recipes, check out ExoRecipes’ Taco Pasta, which offers another way to enjoy bold flavors in taco form.


Serving and Pairing Suggestions

These Big Mac Smash Burger Tacos pair wonderfully with classic sides like French fries, onion rings, or a simple coleslaw. To round out the meal, consider pairing with milkshakes or a cold iced tea for a nostalgic fast-food vibe.


Conclusion

Big Mac Smash Burger Tacos provide a creative way to enjoy the flavors of an iconic fast-food burger in a new, exciting format. Whether you’re looking for a unique party dish or a fun family meal, these tacos are sure to impress. Don’t forget to experiment with different toppings and variations to make it your own!

How to Make the Best S’mores Crunchwraps: A Campfire-Inspired Dessert Wrap

s’mores dessert wrap, campfire s’mores recipe, chocolate marshmallow crunchwrap, tortilla dessert wrap, easy s’mores recipe

S’mores Crunchwraps: A Delicious Twist on a Campfire Classic

Imagine the gooey, sweet goodness of traditional s’mores packed into a portable, crispy tortilla wrap—S’mores Crunchwraps combine the iconic campfire treat with the convenience of a handheld snack. This fun dessert is perfect for gatherings, kids’ parties, or even as an indulgent midnight treat. Let’s dive into everything you need to know to make the ultimate S’mores Crunchwrap.


Essential Ingredients and Tools

To craft your S’mores Crunchwraps, you’ll need:

  • Graham Crackers – These form the base layer, providing a familiar, crunchy texture.
  • Chocolate Bars – Opt for milk or dark chocolate that melts well, enhancing the gooey factor.
  • Marshmallows – Standard or mini marshmallows work best, but marshmallow fluff can be an alternative for smoother layering.
  • Flour Tortilla – Choose a large, soft tortilla to securely wrap all the ingredients without tearing.
  • Butter or Oil – For achieving a golden, crispy exterior.
  • Optional: Nutella, peanut butter, or caramel drizzle for added flavor dimensions.

For tools, you’ll need a skillet or griddle, spatula, and some parchment paper for assembly ease.


How to Make S’mores Crunchwraps: Step-by-Step

Creating a S’mores Crunchwrap involves layering, folding, and cooking to perfection. Here’s a detailed guide:

  1. Prepare Ingredients and Work Area
    • Crush the graham crackers slightly to help them fit in the wrap, and break the chocolate bars into smaller pieces.
    • Preheat your skillet over medium heat, adding a touch of butter for flavor.
  2. Layer the Filling
    • Start with a piece of tortilla on a flat surface. Place a small pile of crushed graham crackers in the center.
    • Add a layer of chocolate pieces, followed by marshmallows. Consider trying a few variations, like a Nutella spread or a sprinkle of sea salt on the chocolate for added depth.
  3. Fold the Tortilla
    • Carefully fold the edges of the tortilla inward, creating a sealed wrap around the filling. Use a technique similar to folding a burrito but ensure all sides are sealed to prevent leaking during cooking.
  4. Cook the Wrap
    • Place the Crunchwrap in the skillet, seam side down, and cook for about 2-3 minutes on each side or until golden and crisp. The goal is to achieve a crunchy exterior while allowing the chocolate and marshmallow to melt inside.

For a more detailed method, you can check out this guide on creative s’mores variations, which includes additional twists on the classic dessert.


Creative Variations to Try

Once you’ve mastered the basic S’mores Crunchwrap, explore these flavor variations:

  • Peanut Butter S’mores Crunchwrap: Spread peanut butter on the tortilla before adding graham crackers, chocolate, and marshmallows.
  • Salted Caramel: Drizzle caramel sauce over the filling and add a pinch of sea salt for a sweet and savory experience.
  • Cookies and Cream: Substitute graham crackers with crushed Oreos and use white chocolate for a new twist.
  • Seasonal Variations: For example, adding peppermint bark during the holiday season or pumpkin spice in the fall can make your Crunchwraps seasonally festive.

Experimenting with these twists can turn a simple recipe into a versatile dessert that surprises and delights.


Tips for the Perfect S’mores Crunchwrap

To elevate your S’mores Crunchwrap game, keep these expert tips in mind:

  • Avoid Overfilling: Too much filling can make the wrap hard to seal and may lead to ingredient leaks while cooking.
  • Seal Securely: A secure seal is crucial for even cooking. Consider using a toothpick to hold edges in place while cooking (just remember to remove it before serving).
  • Low to Medium Heat: Cooking over high heat may cause the tortilla to burn before the filling has melted. Medium heat is ideal for a crispy wrap with a molten center.

For more dessert wrap ideas, refer to this recipe guide on crafting unique handheld desserts, which provides inspiration for portable treats like the S’mores Crunchwrap.


Healthier and Vegan-Friendly Options

If you’re looking to make a lighter or vegan version of this treat, try these substitutions:

  • Vegan Marshmallows: There are several brands of vegan marshmallows available that mimic the traditional texture.
  • Dark Chocolate: Opt for dairy-free dark chocolate.
  • Whole-Wheat or Gluten-Free Tortillas: These can add a healthy twist without compromising on taste.

For a healthier spin, consider reducing the chocolate or opting for a lower-sugar dark chocolate.


FAQs About S’mores Crunchwraps

Q: Can I bake S’mores Crunchwraps instead of pan-frying?
A: Yes, baking at 350°F for about 8-10 minutes can work, though you may not achieve the same crispiness as with pan-frying.

Q: What’s the best way to store leftover Crunchwraps?
A: Allow them to cool completely, wrap tightly in foil, and store in the fridge for up to 3 days. Reheat in a toaster oven to retain crispiness.

Q: Can I add fruits like bananas or strawberries?
A: Absolutely! Adding thinly sliced fruits can introduce a fresh, tangy balance to the sweetness of the S’mores Crunchwrap.


Final Thoughts and Serving Suggestions

S’mores Crunchwraps are a fun, versatile way to enjoy the essence of campfire s’mores all year round. Serve with a side of vanilla ice cream or a drizzle of chocolate sauce for an indulgent experience. The convenience and ease of this recipe make it a hit for parties or family nights.


Internal Linking Opportunities

Based on the sitemap, here are some articles from ExoRecipes that make for ideal internal links to enhance user engagement and SEO:

  1. Homemade S’mores JarsFor a unique presentation of s’mores, link to ExoRecipes’ S’mores Jars recipe to suggest an alternative way to enjoy this campfire classic at home.
  2. Chocolate Magic Shell Yogurt CupFor chocolate lovers, guide readers to this recipe, which pairs well with the S’mores Crunchwraps for a dessert-focused night.
  3. Cinnamon Sugared Doughnut Drops Recipe – Perfect as a companion dessert suggestion in the “Serving Suggestions” section.