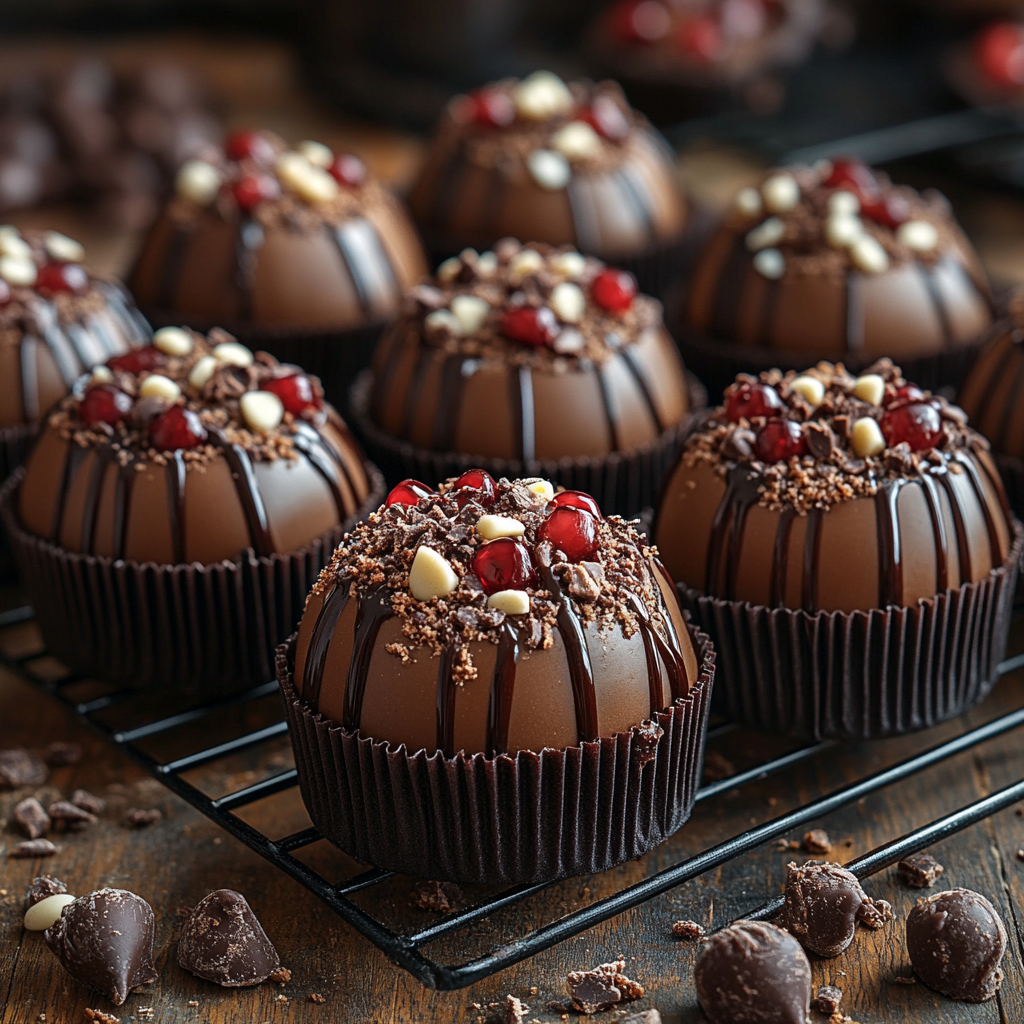
Banana Bread Brownies: The Perfect Combination of Moist and Fudgy

banana brownies, banana bread bars, banana brownie recipe, fudgy banana brownies, moist banana brownies, chocolate banana bread

Banana Bread Brownies: A Deliciously Moist and Fudgy Recipe

For those who can’t decide between banana bread and brownies, this recipe combines the best of both worlds! Imagine the soft, moist texture of banana bread infused with the rich, fudgy taste of a brownie. This hybrid dessert has quickly become a favorite, satisfying cravings for both fruit-infused bakes and chocolatey decadence. If you love creative recipes that elevate classic flavors, you’ll also want to check out how to make this Kentucky Butter Cake for another dessert twist.

Why You’ll Love Banana Bread Brownies

Banana bread brownies bring together the sweetness of ripe bananas and the decadent richness of brownies. The result is a dessert that’s incredibly moist, chewy, and perfect for any occasion, from weekend brunches to after-dinner treats. Whether you’re a fan of banana bread, brownies, or both, this recipe will surely become a staple in your kitchen.

For more on creating balanced textures in baking, explore these essential baking techniques to refine your skills and enjoy a professional finish every time.

Ingredients for Banana Bread Brownies

Here’s what you’ll need to make the ultimate banana bread brownies. Each ingredient adds to the texture, flavor, and moistness of the dessert.

  • Ripe Bananas: Adds natural sweetness and moisture.
  • All-Purpose Flour: Forms the base for the brownie structure.
  • Butter: Provides richness and a fudgy texture.
  • Sugar: Balances the bananas’ sweetness and deepens the flavor.
  • Eggs: Essential for binding ingredients and adding moisture.
  • Sour Cream or Greek Yogurt: Adds a slight tang and keeps the texture soft.
  • Vanilla Extract: Enhances the overall flavor profile.
  • Optional Mix-ins: Chocolate chips, nuts, or cinnamon for additional texture and flavor.

For an equally indulgent twist on dessert classics, try this Two-Ingredient Lemon Pie Filling for a quick, tangy treat.

Step-by-Step Guide to Making Banana Bread Brownies

Here’s a simple step-by-step guide to making banana bread brownies that are both fudgy and flavorful.

Step 1: Prep Your Ingredients and Baking Dish

  • Preheat your oven to 350°F (175°C).
  • Grease a 9×13-inch baking pan and set it aside.
  • Gather your mixing bowls, electric mixer, and all measured ingredients.

Step 2: Combine the Wet Ingredients

  • In a large bowl, mash the ripe bananas until smooth.
  • Add the melted butter, sugar, eggs, sour cream, and vanilla extract. Mix until well combined.

Step 3: Mix in the Dry Ingredients

  • In another bowl, whisk together the flour and a pinch of salt.
  • Gradually fold the dry ingredients into the wet mixture until just combined, being careful not to overmix.

Step 4: Pour and Bake

  • Pour the batter into the prepared baking dish and spread it evenly.
  • Bake for 25–30 minutes or until a toothpick inserted into the center comes out clean.
  • Let the brownies cool completely before slicing for the best texture.

For more detailed guidance on achieving the perfect bake, see tips on Mastering Old-Fashioned Peach Cobbler, where balance and timing are key.

Delicious Frosting Options

A topping can take these banana bread brownies to the next level. Here are some popular options to enhance their flavor.

Brown Butter Glaze

The nutty richness of brown butter glaze perfectly complements the sweet bananas.

  • Ingredients: Butter, powdered sugar, vanilla extract, and milk.
  • Method: Melt butter until browned, then mix with powdered sugar and a splash of milk until smooth.

Cream Cheese Frosting

For a tangy contrast, opt for a cream cheese frosting. It pairs beautifully with the banana base.

  • Ingredients: Cream cheese, powdered sugar, and a hint of vanilla.
  • Method: Beat cream cheese with powdered sugar until smooth, then spread over cooled brownies.

For more inspiration on frostings and glazes, consider browsing through Cake Frosting Tips, where you can learn techniques for achieving that perfect creamy consistency.

Customizing Your Banana Bread Brownies

Personalize your banana bread brownies with these fun and delicious variations:

  • Add Nuts: Walnuts or pecans add a crunchy texture.
  • Chocolate Chips: Dark, milk, or white chocolate chips make the brownies extra indulgent.
  • Swirl in Peanut Butter: For a nutty twist, swirl peanut butter into the batter before baking.
  • Sprinkle Cinnamon: Add a touch of warmth with ground cinnamon.

If you’re a fan of flavorful add-ins, you might also enjoy the nutty richness in our Blue Ribbon Blueberry Coffee Cake, which brings layers of texture and taste.

Baking Tips for Success

Here are some essential tips to help you make the best banana bread brownies:

  • Use Ripe Bananas: Ripe bananas bring out the sweetness and moisture in the brownies.
  • Avoid Overmixing: Overmixing can make the brownies dense. Mix until the ingredients are just combined.
  • Check for Doneness: Use a toothpick to check if the brownies are done. They should be moist but not undercooked.

FAQs About Banana Bread Brownies

Q1: Can I freeze banana bread brownies?
Yes! Wrap the brownies individually in plastic wrap, then store them in an airtight container in the freezer. They’ll last up to 3 months.

Q2: What’s the best way to store banana bread brownies?
Store them in an airtight container at room temperature for up to 3 days, or refrigerate for up to a week.

Q3: Can I make this recipe gluten-free?
Yes, substitute all-purpose flour with a 1:1 gluten-free baking mix.

Q4: Can I add extra bananas for flavor?
Adding more bananas can alter the texture, making them too moist. Stick to the recipe amount for the best results.

Q5: How can I make this recipe without eggs?
Try using a flax egg or applesauce as an egg substitute. This can change the texture slightly but works well as an alternative.

For more dessert tips and common questions, our recipe for Mom’s Lemon Cream Pie also explores storage and ingredient substitutions for longevity and flavor.

Nutritional Information and Serving Ideas

A single serving of banana bread brownies provides approximately 250–300 calories, depending on the frosting and mix-ins.

Serving Suggestions

  • Top with Ice Cream: A scoop of vanilla or chocolate ice cream adds a creamy, refreshing element.
  • Pair with Coffee: These brownies are perfect alongside a cup of coffee or a latte.
  • Drizzle with Caramel Sauce: For extra indulgence, drizzle a bit of caramel sauce over the brownies before serving.

Why Banana Bread Brownies are a Must-Try Dessert

The combination of banana bread’s moistness and brownies’ richness makes this recipe an unforgettable dessert. It’s versatile enough to serve as a special treat or a casual family snack. With easy-to-follow steps and customizable options, banana bread brownies are a wonderful addition to your baking repertoire.

If you’re looking to explore more unique dessert combinations, try our Ultimate Peanut Butter Pie, another dessert that combines flavors in unexpected and delightful ways.

A Lemon Cake to Die For: The Ultimate Recipe for Tangy Sweetness

lemon cake recipe, best lemon cake, moist lemon cake, lemon dessert, tangy lemon cake, ultimate lemon cake

A Lemon Cake to Die For: Unleashing the Perfect Recipe

If you’re on a quest to find a dessert that’s a perfect balance of sweet, tangy, and utterly irresistible, look no further than this lemon cake recipe. Known for its refreshing twist and soft, moist texture, a lemon cake brings a burst of flavor and aroma that captivates any audience. Whether for a casual weekend or a grand celebration, this lemon cake promises to be the talk of the table.

This recipe will walk you through every step, from selecting ingredients to achieving a flawlessly moist texture. If you enjoy experimenting with flavors, consider these essential baking techniques to elevate your baking skills and enhance each bite. For those aiming to master the art of lemon-based desserts, a similar recipe, like the Kentucky Butter Cake, is worth exploring.

Why Lemon Cake?

Lemon cake stands out for its zesty flavor profile and light, airy texture, making it ideal for anyone who enjoys a balanced sweetness. Lemon zest and fresh juice create a cake that’s not only fragrant but also lively and unique. Here’s why you’ll want to make this lemon cake your go-to recipe:

  • It’s refreshingly different from the usual chocolate and vanilla options.
  • The tangy lemon cuts through sweetness, making each bite feel light and refreshing.
  • It pairs wonderfully with fresh berries, whipped cream, or a drizzle of lemon glaze.

Ingredients for the Perfect Lemon Cake

Creating the perfect lemon cake starts with choosing the right ingredients. For an extra moist cake, try adding a touch of sour cream or Greek yogurt.

  • Fresh Lemons: Both lemon zest and lemon juice are essential for that tangy flavor.
  • All-Purpose Flour: Provides a stable base for the cake.
  • Butter and Sugar: Gives a tender crumb and balanced sweetness.
  • Eggs: Essential for structure and moisture.
  • Sour Cream or Greek Yogurt: Adds creaminess and a richer taste.
  • Vanilla Extract: Enhances the flavor depth.
  • Baking Powder: Ensures the cake rises perfectly.

For more inspiration on ingredient selection, check out the guide on Two-Ingredient Lemon Pie Filling for a simpler approach to lemon desserts.

Pro Tip: Fresh is Best

Whenever possible, use fresh lemons over bottled lemon juice to achieve the best flavor and fragrance. The zest, in particular, holds essential oils that add a rich, aromatic quality.

Step-by-Step Recipe for a Lemon Cake to Die For

Follow this detailed recipe to achieve a lemon cake that’s moist, tender, and flavorful.

Step 1: Prepare Your Ingredients and Equipment

  • Preheat your oven to 350°F (175°C).
  • Grease and line two 9-inch round cake pans.
  • Gather mixing bowls, an electric mixer, and a zester.

Step 2: Mix the Batter

  • Dry Ingredients: In a medium bowl, whisk together flour, baking powder, and salt.
  • Cream Butter and Sugar: In a large bowl, beat softened butter and sugar until light and fluffy (about 2–3 minutes).
  • Incorporate Eggs: Add eggs one at a time, ensuring each is well mixed.
  • Alternate Wet and Dry: Add the dry ingredients alternately with sour cream or yogurt, starting and ending with dry ingredients.
  • Add Lemon Zest and Juice: Fold in the lemon zest and juice for that vibrant lemon flavor.

Step 3: Bake

  • Divide the batter evenly between the prepared pans.
  • Bake for 25–30 minutes or until a toothpick comes out clean.
  • Let the cakes cool in their pans for 10 minutes before transferring them to a wire rack.

Try experimenting with different baking times if you’re aiming for a more dense or fluffy texture. For more baking tips, refer to The Ultimate Guide to Making Old-Fashioned Peach Cobbler, which provides tips on achieving ideal consistency.

Creating the Perfect Lemon Frosting and Glaze

A good lemon cake isn’t complete without a complementary frosting. Here are two topping options to consider:

Cream Cheese Lemon Frosting

  • Ingredients: Cream cheese, powdered sugar, lemon zest, and vanilla extract.
  • Instructions: Beat cream cheese with powdered sugar until smooth, then fold in lemon zest and vanilla.

Lemon Glaze

  • Ingredients: Powdered sugar, fresh lemon juice.
  • Instructions: Mix until smooth, adding lemon juice gradually until you reach the desired consistency.

For more ideas on decorating and frosting cakes, take a look at Cake Frosting Tips to achieve a professional finish.

Customizing Your Lemon Cake

One of the joys of a lemon cake recipe is its versatility. Here are some delightful twists to consider:

  • Add Berries: Blueberries or raspberries make great additions, adding color and extra flavor.
  • Layer with Lemon Curd: Spread lemon curd between cake layers for an extra punch of citrus.
  • Garnish with Coconut: Shredded coconut provides a tropical flair.

For a more indulgent cake, explore the Black Magic Cake recipe on ExoRecipes for ideas on creating rich, memorable desserts.

Troubleshooting Common Lemon Cake Issues

Here are answers to some frequently asked questions to help you troubleshoot common baking problems:

  1. Why is my cake dense instead of fluffy?
    • Answer: Over-mixing can deflate the batter, so mix only until ingredients are just combined.
  2. How do I prevent my cake from drying out?
    • Answer: Avoid over-baking and consider adding a tablespoon of milk if the batter feels too thick.
  3. Can I freeze lemon cake?
    • Answer: Yes, wrap tightly in plastic wrap and store in the freezer for up to 2 months.
  4. How can I make the lemon flavor stronger?
    • Answer: Increase the lemon zest and juice or add a drop of lemon extract.
  5. What’s the best way to store lemon cake?
    • Answer: Store in an airtight container at room temperature for up to 3 days or refrigerate for a week.

For more questions on perfecting dessert recipes, consider reading the Raspberry Lemon Bars article, which provides more insights into balancing flavors.

Nutritional Information and Serving Suggestions

A typical slice of lemon cake provides around 300 calories, depending on the ingredients and serving size.

Serving Ideas

  • With Fresh Berries: Serve with a side of strawberries or blueberries.
  • A Dollop of Whipped Cream: Lightly sweetened whipped cream complements the lemon.
  • Pair with Tea or Coffee: Lemon cake pairs beautifully with tea, making it a perfect afternoon treat.

Why This Lemon Cake Recipe Stands Out

This lemon cake recipe is a delightful addition to any dessert repertoire. Its balance of tanginess and sweetness, paired with a tender crumb, makes it a surefire hit. The flexibility to add berries, coconut, or even an extra layer of lemon curd allows for creativity, making this recipe adaptable to any occasion.

For more recipes that blend sweet and tangy flavors, check out Mom’s Lemon Cream Pie, another classic lemon-based treat that captures the essence of homemade comfort.

Final Thoughts on A Lemon Cake to Die For

A lemon cake that combines zesty brightness with a soft, melt-in-your-mouth texture is bound to become a favorite. It’s versatile, easy to make, and always leaves a lasting impression. Whether you’re a seasoned baker or a beginner, this recipe offers a straightforward way to enjoy a classic dessert with a refreshing twist. So gather your ingredients, preheat your oven, and get ready to bake a lemon cake that’s truly to die for!

Buddy the Elf Jello Shots: Festive Holiday Fun for Party Season

Elf-inspired jello shots, holiday jello shots, Christmas jello shots, Buddy Elf jello recipe, festive jello shots, holiday party drinks, Elf movie drinks

Buddy the Elf Jello Shots: Festive and Fun for the Holidays

For fans of the holiday classic Elf, Buddy the Elf Jello Shots bring the film’s cheerful spirit straight to your holiday party. These jello shots, inspired by Buddy’s love for all things sweet, combine fun flavors, vibrant colors, and holiday-inspired decorations, making them perfect for Christmas gatherings. This guide will take you through the ingredients, step-by-step preparation, and festive decoration ideas to create unforgettable jello shots worthy of Buddy’s unique tastes.

Looking for other holiday treats? Try ExoRecipes’ S’mores Jars for a campfire-inspired dessert that’s perfect for chilly nights.


Why Buddy the Elf Jello Shots Are Perfect for Holiday Parties

These jello shots are an exciting way to add some holiday cheer to your menu. Inspired by Buddy’s favorite food groups (candy, candy canes, candy corn, and syrup), each shot is crafted to be both delicious and visually fun. Here are some reasons why these shots are a hit:

  • Fun and Nostalgic: With their colors and toppings, these jello shots capture the playful essence of Elf.
  • Customizable Flavors: You can use different types of alcohol, colors, and garnishes to create a variety of flavors.
  • Perfect for the Holidays: These jello shots add a whimsical, festive touch to any holiday party.

If you’re looking for another crowd-pleaser, check out ExoRecipes’ Sweet and Sour Cocktail Meatballs, which pair perfectly with holiday beverages.


Ingredients and Supplies You’ll Need

For this recipe, gather these main ingredients and supplies:

  • Lemon-lime or green Jello: Creates a vibrant green base for the shots.
  • Vodka or flavored alcohol: Citrus vodka, coconut rum, or even peppermint schnapps can be used.
  • Maple syrup: A nod to Buddy’s love for sweet flavors.
  • Whipped cream: Adds a festive topping to each shot.
  • Candy decorations: Candy corns, M&Ms, or crushed candy canes for a colorful finish.

Supplies Needed

  • Small plastic cups or shot glasses
  • Mixing bowls and measuring cups
  • Mini spoons for serving

Tip: You can also make a non-alcoholic version by replacing the vodka with flavored soda or juice.


Step-by-Step Instructions

1. Prepare the Jello Base

  • Boil water and add it to the Jello powder according to package instructions, then stir until fully dissolved.
  • Add cold water and vodka (or your choice of alcohol) to the mixture, then stir well to combine.

2. Add Buddy’s Iconic Flavors

  • For a unique twist, add a tablespoon of maple syrup to the mixture. This subtle sweetness brings Buddy’s love for syrup into each jello shot.

For tips on creating the perfect jello shot texture, check out Bon Appétit’s Guide to Jello Shots.

3. Pour and Set the Shots

  • Carefully pour the mixture into shot cups, filling each about 3/4 full. Place them in the refrigerator and let them chill for at least 4 hours, or until fully set.

Fun Variations for Buddy the Elf Jello Shots

These jello shots are highly customizable! Here are some variations to try:

Try Different Alcohols

  • Flavored Vodka: Citrus or vanilla vodka adds extra flavor depth.
  • Coconut Rum: A tropical twist for a sweeter taste.
  • Peppermint Schnapps: Adds a refreshing holiday mint flavor.

Non-Alcoholic Version

Replace the vodka with lemon-lime soda or apple juice for a kid-friendly option. This version is equally fun and perfect for a family-friendly holiday gathering.

For more festive drink ideas, explore ExoRecipes’ Creamy Baked Macaroni and Cheese, which pairs well with holiday parties and cozy gatherings.


Decorating and Presenting Buddy the Elf Jello Shots

Presentation is everything with Buddy the Elf Jello Shots. Here are some ideas for making them truly festive:

Decorate with Holiday Candy

Top each shot with whipped cream, then add colorful candy toppings like candy corns, mini M&Ms, or crushed candy canes. These toppings mimic Buddy’s favorite “food groups” from the movie.

Festive Serving Ideas

  • Arrange the jello shots on a tray lined with holiday-themed napkins.
  • Garnish each shot with a mini candy cane or sprinkle edible glitter for an extra sparkle.

If you love holiday treats, you’ll also enjoy ExoRecipes’ Holiday Sweets and Treats Collection, featuring recipes perfect for festive gatherings.


Nutritional Information

Each jello shot is approximately 50-70 calories, depending on the toppings and alcohol used. For a lower-calorie option, consider these adjustments:

  • Use sugar-free Jello: Reduces calorie count without sacrificing flavor.
  • Opt for low-calorie alcohol: Light vodkas or flavored seltzers are great substitutes.

Quick Nutritional Breakdown

  • Calories: ~50 per shot
  • Sugars: ~8g
  • Alcohol Content: Varies based on the alcohol-to-water ratio

Frequently Asked Questions

1. Can I make these jello shots without alcohol?

Yes! Simply replace the alcohol with lemon-lime soda, apple juice, or another flavored beverage. This version is ideal for family-friendly events.

2. How far in advance can I make Buddy the Elf Jello Shots?

These shots can be prepared up to 3 days in advance. Store them in the refrigerator, covered with plastic wrap to prevent them from drying out.

3. How long do jello shots last in the fridge?

Properly stored, jello shots can last up to a week in the refrigerator, although they are best enjoyed within 3-4 days for the freshest flavor.

4. Can I use other Jello flavors?

Absolutely! While lemon-lime or green Jello is recommended for the “Buddy the Elf” theme, you can experiment with flavors like strawberry, cherry, or even blue raspberry for a unique twist.

5. How do I keep the candy from sinking?

Wait until the jello shots are almost set before adding whipped cream and candy toppings. This will keep the candy from sinking to the bottom.


Conclusion: Festive and Fun Buddy the Elf Jello Shots

Buddy the Elf Jello Shots are a delightful way to bring the holiday spirit to your next party. With vibrant colors, fun toppings, and a hint of sweetness, these jello shots capture the playful essence of Elf. Whether you make them for an adult gathering or a family-friendly celebration, they’re sure to be a hit!

For more holiday-themed ideas, explore ExoRecipes’ Cool Whip Cookies, another festive treat that’s easy to make and full of cheer.

Tuscan White Bean Soup: Hearty and Healthy Italian Comfort Food

Italian white bean soup, healthy Tuscan soup, cannellini bean soup, white bean vegetable soup, vegan Tuscan soup, Tuscan bean stew

Tuscan White Bean Soup: A Cozy Italian Classic

Tuscan White Bean Soup is a comforting, hearty dish inspired by the flavors of Italy. With its creamy white beans, fresh herbs, and savory vegetables, this soup is both nutritious and filling, making it a perfect choice for colder days or when you need a healthy, satisfying meal. This guide will take you through the ingredients, cooking tips, and flavor variations for creating an authentic bowl of Tuscan white bean soup.

For a similar comforting recipe, try Crockpot Potato Soup with Hashbrowns from ExoRecipes, which brings a creamy twist to traditional potato soup.


Why You’ll Love Tuscan White Bean Soup

Tuscan White Bean Soup is not only delicious but also offers a range of health benefits. Packed with fiber-rich beans, this soup is both heart-healthy and filling. Here are a few reasons why this soup is a great addition to your recipe collection:

  • Nutritious and Filling: White beans are high in protein and fiber, making the soup hearty and satisfying.
  • Simple Ingredients: You don’t need a long list of ingredients to achieve authentic Italian flavors.
  • Adaptable: Add leafy greens, sausage, or extra herbs to customize it to your taste.

For more Italian-inspired meals, consider Crockpot Baked Ziti, which uses a similar slow-cooked approach to create rich flavors with minimal effort.


Ingredients for Tuscan White Bean Soup

To make a classic Tuscan White Bean Soup, you’ll need the following ingredients:

  • White Beans: Cannellini beans or Great Northern beans are ideal for their creamy texture.
  • Olive Oil: High-quality olive oil enhances the flavor base.
  • Vegetables: Carrots, celery, onions, and garlic add depth and balance to the soup.
  • Herbs: Fresh rosemary and thyme bring authentic Tuscan aromas.
  • Broth: Vegetable or chicken broth for the base.
  • Optional Add-Ins: Parmesan rind for added flavor, chopped kale or spinach for texture, and pancetta for a richer taste.

Tip: If you’re using dried beans, soak them overnight to reduce cooking time. Canned beans work well too if you’re short on time.


Step-by-Step Instructions

1. Sauté the Vegetables

  • Begin by heating olive oil in a large pot. Sauté onions, carrots, celery, and garlic until softened, about 5 minutes.

2. Add Herbs and Beans

  • Stir in the rosemary and thyme, followed by the beans. The herbs will infuse the beans with a wonderful fragrance and taste.

3. Simmer with Broth

  • Add the broth, bring it to a boil, then reduce the heat and let it simmer for 30-40 minutes. If you’re using a Parmesan rind, add it at this stage to infuse more flavor.

4. Adjust Consistency (Optional)

  • For a creamier soup, use an immersion blender to partially blend some of the beans. This thickens the soup without the need for cream.

Looking for more creamy soups? Try ExoRecipes’ Creamy Baked Macaroni and Cheese, a cozy side dish that pairs well with Italian meals.


Flavor Variations for Tuscan White Bean Soup

One of the best parts of this soup is its versatility. Here are a few ways to enhance and customize your soup:

Add Leafy Greens

For added nutrients and color, stir in a handful of kale, spinach, or Swiss chard in the last 10 minutes of cooking.

Make It Spicy

Add a pinch of red pepper flakes or a splash of hot sauce for a subtle kick that complements the creamy beans.

Protein-Rich Additions

Add Italian sausage or diced pancetta for a heartier soup. Brown the sausage or pancetta in the pot first, then remove it before sautéing the vegetables.

For more hearty one-pot recipes, you might enjoy Ham and Potato Casserole, which combines protein and potatoes for a filling, warming dish.


Nutritional Benefits of Tuscan White Bean Soup

White beans are the star of this soup, providing numerous health benefits:

  • High in Fiber: Helps support digestion and heart health.
  • Rich in Protein: Keeps you full for longer, making it a great option for lunch or dinner.
  • Packed with Antioxidants: The fresh herbs and vegetables offer vitamins and antioxidants that support immune health.

A bowl of this soup is approximately 200 calories, with a balance of protein, fiber, and low fat, especially if made with a vegetable broth.


Serving Suggestions and Pairing Ideas

Tuscan White Bean Soup is versatile and pairs wonderfully with various sides. Here are a few ideas:

  • Crusty Bread: A slice of warm focaccia or a baguette is perfect for dipping.
  • Simple Salad: A fresh arugula or mixed greens salad balances the rich flavors of the soup.
  • Parmesan Cheese: Top with freshly grated Parmesan for an extra touch of flavor.

For an added dose of Italian comfort, consider serving with Garlic Rosemary Steak and Potatoes, a hearty side that complements the Tuscan flavors.


Frequently Asked Questions

1. Can I use canned beans instead of dried beans?

Yes, canned beans work well and save time. Simply rinse them before adding to the soup to reduce excess sodium.

2. How long does this soup keep?

Store in an airtight container in the refrigerator for up to 4 days. It also freezes well for up to 3 months.

3. Can I make this soup vegan?

Absolutely! Use vegetable broth and skip the Parmesan rind to keep it vegan.

4. What’s the best way to thicken the soup?

Use an immersion blender to blend a portion of the soup. This adds creaminess without needing dairy.

5. Can I add pasta to this soup?

Yes, adding a small pasta like ditalini or orzo enhances the texture and makes it more filling. Just add cooked pasta toward the end of cooking.


Conclusion: A Bowl of Comfort

Tuscan White Bean Soup is a cozy, nourishing meal that brings Italian flavors to your table. Simple, adaptable, and nutritious, this soup is perfect for any season. Whether you enjoy it as a light lunch or serve it alongside a heartier dish, it’s bound to be a favorite.

For more Italian-inspired recipes, try ExoRecipes’ Chicken Bacon Ranch Potatoes, which adds a flavorful twist to classic potatoes for a side that pairs beautifully with this soup.

Slow Cooker Candied Kielbasa: Easy Sweet and Savory Sausage Recipe

candied kielbasa slow cooker, sweet kielbasa recipe, glazed kielbasa, slow-cooked candied sausage, crockpot candied kielbasa, sausage in sweet sauce

Slow Cooker Candied Kielbasa: A Perfectly Sweet and Savory Appetizer

Slow Cooker Candied Kielbasa is an easy, mouthwatering appetizer that perfectly balances sweet and savory flavors. With just a handful of ingredients, this dish turns smoky kielbasa sausage into a glazed, caramelized delight that is perfect for parties, potlucks, or a cozy family meal. This recipe requires minimal prep, and the slow cooker does all the work to achieve that tender, sticky coating on each sausage slice.

For other slow cooker comfort foods, try ExoRecipes’ Crockpot Potato Soup with Hashbrowns, an easy, creamy soup perfect for colder months.


Why Make Candied Kielbasa in a Slow Cooker?

Using a slow cooker allows the flavors to meld together over time, creating a deeply caramelized, sticky glaze that clings to each slice of kielbasa. Additionally, the slow cooking method enhances the smoky flavor of the sausage, making it a true crowd-pleaser.

Benefits of Slow Cooking Kielbasa

  • Effortless Cooking: Just add ingredients and let the slow cooker handle the rest.
  • Enhanced Flavor: Slow cooking allows the brown sugar and spices to deeply infuse the sausage.
  • Perfect for Parties: Keeps warm in the slow cooker, making it an ideal appetizer for gatherings.

For more slow cooker dinner inspiration, check out ExoRecipes’ Crockpot Baked Ziti, another easy option that serves up a lot of flavor with minimal effort.


Ingredients Needed for Slow Cooker Candied Kielbasa

The key to this recipe’s rich flavor lies in its simple yet delicious ingredients:

  • 1-2 lbs of kielbasa: Slice into bite-sized pieces for easy serving.
  • 1 cup brown sugar: Adds sweetness and creates a sticky glaze.
  • 1 cup pineapple juice: Balances the sweetness and adds a hint of acidity.
  • ¼ cup soy sauce: Adds a savory, umami flavor that balances the sugar.
  • Optional add-ins: Maple syrup, honey, or a dash of sriracha for added depth and heat.

Pro Tip: Experiment with the sweetness level by adjusting the brown sugar or substituting with honey for a unique twist.


Choosing the Right Kielbasa

Kielbasa comes in different varieties, including pork, beef, and turkey. Here’s a quick guide to help you choose:

  • Pork Kielbasa: Classic choice, rich and flavorful.
  • Beef Kielbasa: Slightly leaner but still packed with flavor.
  • Turkey Kielbasa: Lower in fat, great for a lighter option.

If you’re interested in more kielbasa recipes, try ExoRecipes’ Kielbasa with Potatoes and Green Beans, a delicious one-pot meal that highlights the versatility of this sausage.


Step-by-Step Preparation for Candied Kielbasa

Here’s a detailed guide on making perfect candied kielbasa in your slow cooker.

Step 1: Prepare the Kielbasa and Sauce

  • Slice the kielbasa into ½-inch pieces.
  • In a mixing bowl, combine brown sugar, pineapple juice, soy sauce, and any optional add-ins like sriracha or honey.

Step 2: Layer in the Slow Cooker

  • Place the sliced kielbasa in the slow cooker.
  • Pour the sauce mixture over the sausage, ensuring all pieces are coated.

Step 3: Set the Temperature and Cook Time

  • Cook on Low for 4 hours or High for 2 hours. Stir halfway through to evenly coat the kielbasa.

Step 4: Reduce the Sauce (Optional)

  • For a thicker glaze, transfer the sauce to a saucepan after cooking and simmer until it reduces.

Tip: Serve the kielbasa directly from the slow cooker to keep it warm, or transfer to a serving dish and garnish with chopped parsley.


Flavor Variations for Candied Kielbasa

One of the great aspects of candied kielbasa is its adaptability. Here are a few variations to try:

Sweet and Spicy Candied Kielbasa

Add a few dashes of hot sauce or a sprinkle of red pepper flakes for a spicy kick that pairs well with the sweet glaze.

Maple-Glazed Kielbasa

Swap the brown sugar for maple syrup for a rich, caramel-like glaze with a hint of smoky sweetness.

Pineapple-Infused Kielbasa

Use crushed pineapple instead of pineapple juice to add a fruity texture, creating a tropical twist.

For other sweet and savory dishes, try ExoRecipes’ Slow Cooker Cabbage, Sausage, and Potatoes for a comforting meal with a hint of sweetness.


Serving Suggestions and Pairing Ideas

Candied kielbasa is versatile and pairs well with a variety of sides and dishes:

  • Serve with Rice: The sticky glaze goes wonderfully over jasmine or brown rice.
  • Pair with Vegetables: Roasted vegetables or a simple salad balance out the richness.
  • Add as an Appetizer: Serve with toothpicks at a party or potluck.

For a complete spread, consider pairing it with ExoRecipes’ Creamy Baked Macaroni and Cheese, a comforting side that complements the flavors of candied kielbasa.


Nutritional Information

Note: Nutritional values will vary based on the type and brand of kielbasa used. Here’s an approximate breakdown per serving:

  • Calories: ~250
  • Fat: ~15g
  • Carbohydrates: ~20g
  • Protein: ~10g

To reduce calories, consider using turkey kielbasa and a low-sodium soy sauce option.


Frequently Asked Questions

1. Can I use a different type of sausage?

Yes, while kielbasa offers a distinct flavor, you can substitute with smoked sausage or andouille for a spicier profile.

2. How long can I store leftovers?

Store leftover candied kielbasa in an airtight container in the refrigerator for up to 3 days.

3. Can I make this recipe without a slow cooker?

Certainly! Cook the sausage and sauce on the stovetop over medium heat until the sauce reduces and forms a glaze.

4. What’s the best way to thicken the glaze?

If the sauce is too thin after cooking, transfer it to a saucepan and simmer until it reaches your desired consistency.

5. Can I make this dish ahead of time?

Yes, prepare the recipe as directed and refrigerate. Reheat in the slow cooker on low for about an hour before serving.


Final Tips and Serving Ideas

Slow Cooker Candied Kielbasa is a surefire hit for any gathering or casual family meal. Its balance of sweetness and savory flavors makes it adaptable, and the slow cooking method ensures a tender, caramelized glaze. Whether served as an appetizer or main course, this dish is guaranteed to impress.

For other simple yet impressive recipes, try ExoRecipes’ Sweet and Sour Meatballs for another slow cooker favorite that combines sweet and tangy flavors in one dish.