Christmas Fudge Delight: A Festive and Creamy Holiday Treat

holiday fudge recipe, festive Christmas fudge, creamy holiday fudge, peppermint chocolate fudge, Christmas candy gift ideas

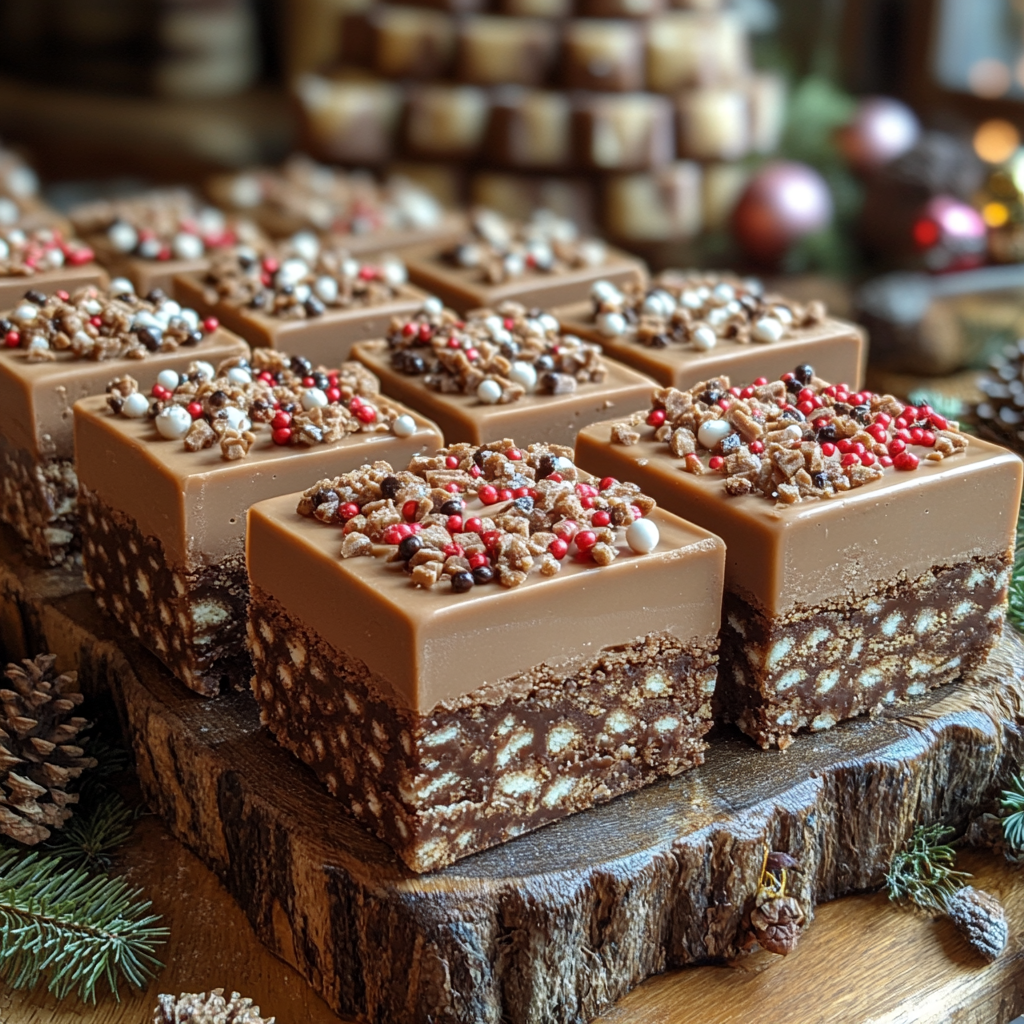
Christmas Fudge Delight: The Ultimate Holiday Treat 🎄🍫

Christmas Fudge Delight is the perfect festive treat to spread holiday cheer! Creamy, rich, and packed with holiday-inspired flavors, this fudge can be customized with your favorite seasonal ingredients and makes an excellent gift for friends and family.

For more fudge inspiration, explore Mama Dee’s Never-Fail Creamy Fudge, a recipe that guarantees perfect texture every time.

Ingredients for Christmas Fudge Delight

To make this delicious fudge, gather these simple ingredients:

  • Sweetened Condensed Milk: Essential for a creamy texture.
  • Chocolate: Choose between semi-sweet, milk, or white chocolate for different flavor profiles.
  • Butter: Adds richness and smoothness to the fudge.
  • Holiday Toppings: Crushed candy canes, dried cranberries, marshmallows, or festive sprinkles.

To make your fudge even richer, consider making your own sweetened condensed milk with this Homemade Sweetened Condensed Milk recipe.

Basic Recipe for Christmas Fudge Delight

  1. Preparing the Base
    • Combine the sweetened condensed milk, chocolate, and butter in a saucepan over low heat.
    • Stir until the chocolate melts and the mixture is smooth.
  2. Adding Flavors
    • Stir in vanilla extract or peppermint extract for a holiday twist.
    • Optional: Add a pinch of salt to enhance the flavors.
  3. Setting the Fudge
    • Pour the mixture into a parchment-lined baking pan and smooth the top.
    • Add your favorite toppings (sprinkles, crushed candy canes) while the fudge is still soft.
    • Refrigerate for 2-3 hours until set.

Creative Variations for Christmas Fudge Delight

Christmas fudge is incredibly versatile! Here are a few delicious variations:

  1. Peppermint Bark Fudge
    • Mix in crushed candy canes and top with extra pieces for a minty, festive treat.
  2. Gingerbread Fudge
    • Add a teaspoon of gingerbread spices (cinnamon, nutmeg, ginger) for a warm, spiced flavor.
  3. White Chocolate Cranberry Fudge
    • Substitute white chocolate and mix in dried cranberries for a fruity twist.

For creamy alternatives, you might also enjoy Peanut Butter Fudge: A Creamy Delight.

Presenting Christmas Fudge Delight

Christmas Fudge Delight can be served in creative ways to elevate your holiday spread:

  • Shape Ideas: Use holiday cookie cutters to make festive shapes like stars, trees, and hearts.
  • Gift Wrapping: Wrap fudge pieces in decorative cellophane or holiday tins for a thoughtful gift.
  • Decorative Toppings: Drizzle white chocolate or add edible glitter for extra holiday sparkle.

Storage and Shelf Life

  • Refrigeration: Store the fudge in an airtight container in the refrigerator for up to two weeks.
  • Freezing: Freeze in single layers separated by parchment paper for up to three months.

Frequently Asked Questions (FAQs)

Can I make Christmas Fudge Delight vegan?

Yes! Substitute the sweetened condensed milk with coconut milk and use dairy-free chocolate for a vegan option.

How do I prevent fudge from becoming grainy?

Stir continuously while melting to avoid grainy texture. Low heat is crucial for a smooth consistency.

Can I add nuts to Christmas fudge?

Absolutely! Chopped pecans, walnuts, or almonds add a delicious crunch to the fudge.

How can I make fudge without condensed milk?

Try using a mixture of heavy cream and sugar or make Homemade Sweetened Condensed Milk as an alternative.


Conclusion

Christmas Fudge Delight is a rich and creamy treat that brings holiday cheer to every bite. Perfect as a dessert or gift, this fudge recipe offers endless ways to customize with festive flavors and toppings. Enjoy sharing this delightful treat with loved ones, and let the holiday spirit shine through every piece!

Shepherd’s Pie Soup Recipe: A Cozy Twist on the Classic Comfort Dish

shepherd's pie in a bowl, hearty shepherd's pie soup, comforting meat and potato soup, shepherd’s pie stew, easy shepherd's pie soup

Shepherd’s Pie Soup: A Cozy, Hearty Twist on a Classic Dish

Shepherd’s Pie Soup combines all the comforting flavors of classic Shepherd’s Pie into a warm, hearty bowl of soup. This soup is perfect for chilly days when you’re craving something both filling and flavorful. Featuring tender potatoes, rich ground meat, and a flavorful broth, this soup has all the beloved ingredients of Shepherd’s Pie but in a slurpable form.

For fans of comforting, creamy soups, you might also enjoy our The Ultimate Comfort Food Crockpot Potato Soup with Hashbrowns recipe. Both dishes bring warmth and comfort to any meal.

Ingredients for Shepherd’s Pie Soup

Here’s a list of ingredients you’ll need to make this hearty soup:

  • Ground Meat: Traditional Shepherd’s Pie uses lamb, but you can substitute with ground beef for a more accessible option.
  • Vegetables: Diced carrots, peas, and onions are classic choices for adding texture and flavor.
  • Potatoes: Yukon gold or russet potatoes work best, as they hold their shape well in the soup.
  • Broth and Seasonings: Beef broth, thyme, rosemary, garlic, and Worcestershire sauce for depth of flavor.
  • Cream or Cheese (Optional): For added creaminess, a bit of cream or shredded cheese on top can enhance the flavor.

For more meal ideas that warm the soul, see our Slow Cooker Magic: Unveiling the Ease of Crock-Pot Baked Ziti, another cozy meal that’s perfect for family dinners.

Preparing the Ingredients

  1. Prepping the Vegetables
    • Dice carrots, onions, and potatoes into bite-sized pieces for easy spoonfuls.
    • Mince the garlic and set it aside to add later with the seasonings.
  2. Cooking the Meat
    • In a large pot, brown the ground meat over medium-high heat, breaking it up as it cooks.
    • Drain any excess fat before adding vegetables.

Cooking the Shepherd’s Pie Soup

  1. Sautéing the Vegetables
    • Add onions, garlic, and carrots to the pot and sauté until they begin to soften, about 5 minutes.
  2. Adding Broth and Seasonings
    • Pour in the beef broth, followed by thyme, rosemary, and Worcestershire sauce. Stir well to combine.
  3. Simmering for Flavor
    • Bring the soup to a simmer, then add the potatoes. Let the soup cook for 20-25 minutes, or until the potatoes are tender and the flavors have melded.
  4. Optional Thickening and Toppings
    • For a thicker consistency, mash some of the potatoes in the pot.
    • Top each bowl with a sprinkle of cheddar cheese or a dollop of sour cream for extra richness.

For fans of hearty, comforting dishes, our Rediscovering Comfort: Sour Cream and French Fried Onion Pork Chops also pairs well with this soup as a main course.


Variations of Shepherd’s Pie Soup

Looking to customize your Shepherd’s Pie Soup? Here are a few creative variations:

  1. Vegetarian Shepherd’s Pie Soup
    • Substitute the ground meat with lentils or mushrooms, and use vegetable broth for a delicious vegetarian option.
  2. Spicy Shepherd’s Pie Soup
    • Add a dash of hot sauce or sprinkle in some red chili flakes for a bit of heat.
  3. Cheesy Shepherd’s Pie Soup
    • Stir in shredded cheddar or Parmesan for a cheesy twist on this classic.

Serving Suggestions and Presentation

  • Serving in Bread Bowls: Ladle the soup into bread bowls for an extra cozy presentation.
  • Garnish with Fresh Herbs: Sprinkle fresh parsley or chives on top for added color and flavor.
  • Pairing Suggestions: Serve alongside a simple green salad or with warm crusty bread for dipping.

Storage and Reheating Tips

  1. Storing Leftovers
    • Store the soup in an airtight container in the refrigerator for up to 4 days.
  2. Freezing Tips
    • Shepherd’s Pie Soup freezes well; just portion into containers and freeze for up to 3 months. Thaw overnight in the fridge and reheat on the stove.

Frequently Asked Questions (FAQs)

Can I make this soup in a slow cooker?

Yes, you can! Brown the meat and vegetables in a skillet, then transfer to a slow cooker with the broth, seasonings, and potatoes. Cook on low for 6-8 hours or high for 3-4 hours.

What type of potatoes work best in this soup?

Yukon gold or russet potatoes are ideal. They hold up well and provide a creamy texture when mashed.

Can I add other vegetables?

Absolutely! Feel free to add celery, bell peppers, or even corn for added texture and flavor.

How do I make this soup thicker?

To thicken, mash some of the potatoes in the pot or add a cornstarch slurry (1 tablespoon cornstarch mixed with 1 tablespoon water).


Conclusion

Shepherd’s Pie Soup is a delightful twist on a beloved comfort food, combining the flavors of a classic Shepherd’s Pie with the ease of a one-pot meal. It’s perfect for chilly days when you want something warm and filling, but easy to make. Enjoy experimenting with variations and sharing this dish with family and friends!

This recipe is not only versatile but also a surefire way to bring a touch of comfort to any meal. Whether you’re trying it with different toppings or in a bread bowl, it’s bound to become a favorite.

How to Make Butter Pecan Cake: A Rich Southern Classic Dessert

butter pecan dessert, pecan cake recipe, Southern pecan cake, homemade butter pecan cake, easy butter pecan cake

Butter Pecan Cake Recipe: A Southern Classic with Rich Flavors

Butter Pecan Cake is a delicious, Southern-inspired dessert filled with toasted pecans and a rich buttery flavor that melts in your mouth. It’s perfect for family gatherings, holidays, and other special occasions when you want to impress your guests with a homemade treat.

For more Southern cake inspiration, check out Kentucky Butter Cake: A Slice of Southern Comfort, another classic cake with a rich buttery profile that pairs well with the nutty flavors in this recipe.

Ingredients for Butter Pecan Cake

To make a delicious Butter Pecan Cake, gather these ingredients:

  • Butter: Adds richness and flavor to the cake
  • Pecans: Toasted for a nutty, crunchy texture
  • Flour and Baking Powder: For structure and lift
  • Brown Sugar and Granulated Sugar: Provides sweetness and depth
  • Eggs: For moisture and binding
  • Vanilla Extract: Adds warmth and depth of flavor
  • Optional Frosting: Cream cheese frosting is a popular choice, but buttercream or whipped cream can work as well

For other comforting dishes perfect for gatherings, explore The Ultimate Comfort Food Crockpot Potato Soup with Hashbrowns.

How to Prepare Pecans for Butter Pecan Cake

  1. Toasting the Pecans
    Toasting pecans is essential for bringing out their nutty flavor. Spread the pecans on a baking sheet and toast at 350°F (175°C) for about 5-7 minutes, stirring halfway through to avoid burning.
  2. Chopping the Pecans
    Once cooled, chop the pecans into small pieces. This helps distribute them evenly throughout the cake batter, ensuring each bite is filled with pecan goodness.

Making the Butter Pecan Cake Batter

  1. Creaming the Butter and Sugar
    In a large mixing bowl, cream the butter with both brown and granulated sugar until light and fluffy. This step is crucial for a moist cake with a tender crumb.
  2. Adding the Eggs and Vanilla
    Add eggs one at a time, beating well after each addition, followed by vanilla extract. This step ensures a smooth, well-incorporated batter.
  3. Incorporating Dry Ingredients
    Gradually add the flour and baking powder, mixing until just combined. Overmixing can lead to a dense cake, so be careful with this step.
  4. Folding in Pecans
    Finally, fold in the toasted pecans, ensuring they are evenly distributed throughout the batter.

Baking the Butter Pecan Cake

  1. Preparing the Cake Pans
    Grease and flour two 9-inch round cake pans to prevent sticking.
  2. Baking the Cake
    Bake at 350°F (175°C) for 25-30 minutes or until a toothpick inserted into the center comes out clean.
  3. Cooling the Cake
    Let the cakes cool in the pans for 10 minutes before transferring them to a wire rack to cool completely.

For more baking tips, you may want to explore MasterClass on Baking Essentials.


Frosting and Decorating Butter Pecan Cake

  1. Cream Cheese Frosting
    Cream cheese frosting is a popular choice for butter pecan cake. To make it, combine cream cheese, butter, powdered sugar, and vanilla extract until smooth.
  2. Buttercream Frosting Option
    For a classic twist, use buttercream frosting. This pairs wonderfully with the cake’s buttery flavors and offers a smooth, creamy texture.
  3. Decorative Ideas
    • Pecans on Top: Decorate the top of the cake with whole or chopped toasted pecans.
    • Caramel Drizzle: Add a caramel drizzle for a touch of elegance and extra flavor.

For easy, comforting meal ideas that pair well with this cake, visit Slow Cooker Magic: Unveiling the Ease of Crock-Pot Baked Ziti.


Butter Pecan Cake Variations

  1. Butter Pecan Pound Cake
    Make a denser version of this cake by following a pound cake recipe. The dense texture highlights the buttery flavor and toasted pecans.
  2. Chocolate Butter Pecan Cake
    Add a small amount of cocoa powder to the batter for a chocolate twist on this classic recipe.
  3. Butter Pecan Cupcakes
    Use the same batter in a cupcake tin for individual servings, perfect for parties and gatherings.

Serving Suggestions and Presentation Tips

  • Pairing Ideas: Serve slices with a scoop of vanilla ice cream or a drizzle of caramel sauce.
  • Garnish Options: Garnish with a sprig of mint or edible flowers for a pop of color.

Frequently Asked Questions (FAQs)

Can I use a different type of nut?

While pecans provide the classic flavor, you can substitute with walnuts or almonds, though the flavor profile will be slightly different.

How should I store Butter Pecan Cake?

Store leftovers in an airtight container in the refrigerator for up to 5 days. You can also freeze the cake (without frosting) for up to 3 months.

Can I make this cake gluten-free?

Yes, simply substitute the all-purpose flour with a 1:1 gluten-free baking blend for a delicious gluten-free version.

Can I add caramel to the cake batter?

Absolutely! Adding a swirl of caramel sauce in the batter adds a delicious, gooey layer to the cake.


Conclusion

Butter Pecan Cake is a decadent dessert that combines the rich flavors of butter and toasted pecans. Whether you’re making it for a family gathering or a holiday feast, this cake is sure to please. Pair it with Kentucky Butter Cake: A Slice of Southern Comfort for a Southern-inspired dessert spread, and enjoy the warm, comforting flavors in every bite.

Indulge in the buttery, nutty goodness of this cake, and let it become a new favorite in your home!

How to Make Cheesecake Deviled Strawberries: A Sweet Party Treat

cheesecake stuffed strawberries, deviled strawberries, cream cheese strawberries, strawberry cheesecake bites, stuffed strawberry dessert

How to Make Cheesecake Deviled Strawberries: The Perfect Party Dessert

Imagine a sweet, creamy, and visually stunning dessert that’s easy to make and ideal for gatherings. Cheesecake Deviled Strawberries are the answer! This unique treat combines the tartness of strawberries with a rich, cheesecake-like filling, creating a delightful, bite-sized dessert.

If you’re planning a cozy gathering or looking for comfort foods that pair well with other crowd-pleasers, check out The Ultimate Comfort Food Crockpot Potato Soup with Hashbrowns. Together, they make an inviting table spread that’s sure to impress.

Ingredients for Cheesecake Deviled Strawberries

To start, you’ll need just a few ingredients to make these cheesecake deviled strawberries truly stand out:

  • Fresh Strawberries: Look for firm, ripe strawberries that hold their shape well.
  • Cream Cheese Filling: This is made with cream cheese, powdered sugar, and a touch of vanilla.
  • Optional Toppings: Graham cracker crumbs, chocolate chips, or a light caramel drizzle for added flair.

For other ideas on layered treats and delicious toppings, S’mores Jars: Bringing the Campfire to Your Kitchen offers some creative inspiration on dessert layering.

Preparing the Strawberries

  1. Selecting the Best Strawberries
    Choose strawberries that are bright red and firm. Soft or overripe strawberries won’t hold the filling as well.
  2. Cleaning and Hollowing
    Gently rinse the strawberries, then pat them dry with a towel. Use a small knife to hollow out the top, creating a pocket for the filling.
  3. Tips for Perfect Presentation
    For a neat look, make sure each strawberry is evenly hollowed out, providing a balanced shape for the filling.

Making the Cheesecake Filling

  1. Cream Cheese Mixture
    Combine softened cream cheese with powdered sugar and vanilla extract. Beat until smooth for a creamy consistency.
  2. Adding Flavors
    For a citrus twist, add a dash of lemon zest. Alternatively, try almond extract or cocoa powder for different flavors.
  3. Piping the Filling
    Place the filling in a piping bag or a resealable plastic bag with the corner snipped off. This will allow for precise, decorative filling.

Assembling the Cheesecake Deviled Strawberries

  1. Filling Each Strawberry
    Carefully pipe the cheesecake mixture into each strawberry, filling it to the top.
  2. Garnishing Options
    • Graham Cracker Crumbs: Sprinkle crumbs on top for a “cheesecake crust” effect.
    • Chocolate Drizzle: Drizzle melted chocolate over each strawberry for extra sweetness.
    • Chopped Nuts: Add crushed pecans or almonds for texture.
  3. Chilling Before Serving
    For the best texture, refrigerate the filled strawberries for at least 30 minutes before serving.

Creative Variations for Cheesecake Deviled Strawberries

If you’re looking to experiment, here are some fun ways to put a twist on this recipe:

  • Chocolate-Covered Strawberries: Dip the strawberries in chocolate before filling them with the cheesecake mixture.
  • Nutty Strawberry Cheesecake Bites: Add crushed pistachios or almonds on top of the filling for extra crunch.
  • Lemon Cheesecake Filling: Add lemon zest and a few drops of lemon juice to the filling for a refreshing, tangy flavor.

For other easy party ideas, Slow Cooker Magic: Unveiling the Ease of Crock-Pot Baked Ziti pairs beautifully with these strawberries, providing a savory option that balances the dessert’s sweetness.

Serving Suggestions and Presentation Tips

  • Garnish Ideas: Serve with a garnish of mint leaves or edible flowers for an elegant look.
  • Platter Presentation: Arrange the strawberries on a decorative platter in rows or a circular pattern.
  • Perfect for Holidays: These make excellent Valentine’s Day or holiday treats when garnished with themed decorations.

Storage and Shelf-Life

  1. Refrigerating Leftovers
    Store any leftovers in an airtight container in the fridge. These can stay fresh for up to 2 days.
  2. Freezing Tips
    While these strawberries are best served fresh, you can freeze them for up to a month. Simply thaw in the fridge before serving.
  3. Avoiding Sogginess
    Serve as soon as possible after preparing to maintain the fresh texture of the strawberries.

Frequently Asked Questions (FAQs)

Can I Make These in Advance?

Yes, you can make cheesecake deviled strawberries up to a day ahead. Just store them in the fridge, covered, and add any toppings right before serving.

Can I Use Frozen Strawberries?

It’s best to use fresh strawberries, as frozen ones tend to be too soft after thawing.

What Can I Use Instead of Cream Cheese?

For a lighter filling, consider using mascarpone or Greek yogurt. You may need to adjust the sugar accordingly.

How Do I Pipe the Filling without a Piping Bag?

If you don’t have a piping bag, use a resealable plastic bag and snip off one corner to create a makeshift piping bag.


Conclusion

Cheesecake Deviled Strawberries are a delightful, eye-catching dessert that’s easy to make and sure to impress. With just a few simple ingredients and endless variations, they’re perfect for gatherings, holidays, or a simple indulgent treat at home. Pair with other creative treats like layered S’mores Jars for a dessert spread that’s bound to satisfy all taste buds.

Enjoy experimenting with flavors, garnishes, and presentations to make these strawberries your own. Whether it’s for a fancy event or a casual get-together, this treat promises a sweet, creamy experience that everyone will love!

Irresistible Butterscotch Graham Cracker Cheesecake Bars Recipe

butterscotch cheesecake bars, graham cracker cheesecake bars, butterscotch dessert bars, cheesecake bars recipe, layered cheesecake bars

How to Make the Best Butterscotch Graham Cracker Cheesecake Bars

Butterscotch Graham Cracker Cheesecake Bars are the perfect blend of creamy cheesecake, crunchy graham crackers, and rich butterscotch flavor. This guide will walk you through the steps to make this crowd-pleasing dessert, ensuring it turns out perfectly every time.

For those who enjoy comfort food classics, you might also love The Ultimate Comfort Food Crockpot Potato Soup with Hashbrowns. Desserts like these bars add a delicious twist to traditional cheesecake recipes, bringing a unique flavor profile that’s hard to resist.

Ingredients for Butterscotch Graham Cracker Cheesecake Bars

To create the perfect butterscotch graham cracker cheesecake bars, gather these ingredients:

  • Graham Cracker Crust: Crushed graham crackers, melted butter, and a dash of sugar.
  • Butterscotch Filling: Butterscotch chips, cream cheese, and heavy cream for the creamy layer.
  • Optional Add-ins: Chopped pecans or a caramel drizzle for added flavor and texture.

For easy dessert layering inspiration, try exploring S’mores Jars: Bringing the Campfire to Your Kitchen for creative ideas.

Preparing the Graham Cracker Crust

  1. Crushing the Graham Crackers
    Start by crushing the graham crackers until fine crumbs form. Mix them with melted butter and sugar, pressing the mixture firmly into the base of your pan.
  2. Ensuring a Firm Base
    Bake the crust briefly to create a sturdy base, which is essential for holding the cheesecake filling and adding a delightful crunch.
  3. Cool Before Adding Filling
    Allow the crust to cool completely before pouring the butterscotch filling on top.

Making the Butterscotch Cheesecake Filling

The filling is what brings the rich, creamy butterscotch flavor to these bars.

  1. Creaming the Ingredients
    In a bowl, beat the cream cheese until smooth, adding sugar and heavy cream gradually. Melt the butterscotch chips separately, then fold them into the cream cheese mixture.
  2. Smooth Consistency
    Ensure the mixture is smooth to avoid lumps, creating a creamy consistency that complements the crunchy crust.

For more creamy, comforting meals, check out Slow Cooker Magic: Unveiling the Ease of Crock-Pot Baked Ziti.

Assembling and Baking the Cheesecake Bars

  1. Layering the Cheesecake Bars
    Pour the butterscotch cheesecake filling over the cooled graham cracker crust, spreading it evenly with a spatula.
  2. Baking Tips
    Bake at 325°F (160°C) for about 30 minutes or until the filling is set but still slightly jiggly in the center.
  3. Cooling and Setting
    Let the bars cool to room temperature, then refrigerate for at least 2 hours to fully set the cheesecake layer.

Adding Final Touches

  1. Butterscotch Drizzle
    Melt some extra butterscotch chips and drizzle over the bars for a rich, decorative touch.
  2. Optional Toppings
    Chopped pecans or a sprinkle of sea salt add extra flavor and texture, enhancing the sweet and salty profile.

Variations to Try

For a twist on this classic recipe, try some of these flavor variations:

  • Nutty Variation: Add a handful of chopped pecans or walnuts for a crunchy bite.
  • Chocolate Butterscotch Combo: Swirl in melted chocolate with the butterscotch for a marbled effect.
  • Salted Caramel: Drizzle salted caramel sauce on top to balance the sweetness.

FAQs about Butterscotch Graham Cracker Cheesecake Bars

How long do these cheesecake bars last?

These cheesecake bars can last up to a week if stored in an airtight container in the refrigerator.

Can I use a different type of crust?

Yes, you can substitute with other types of cookie crusts, like chocolate wafers or digestive biscuits.

Is there a way to make this recipe gluten-free?

Simply use gluten-free graham crackers, and follow the recipe as usual for a delicious gluten-free dessert.

Can I freeze these cheesecake bars?

Yes, you can freeze them. Wrap each bar individually, and store in a freezer-safe container for up to three months.

Conclusion

With their creamy texture, buttery graham cracker base, and rich butterscotch flavor, these Butterscotch Graham Cracker Cheesecake Bars are sure to be a hit at any gathering. Whether you make them for a special occasion or just to treat yourself, these bars are as satisfying as they are easy to make.

Enhance your baking repertoire with more comforting recipes and layer-based treats like these! Enjoy the process and savor each bite of this delightful dessert.