Easy Hamburger Potato Casserole: Hearty, Cheesy Comfort Food for Families

hamburger casserole, beef and potato bake, cheesy beef casserole, ground beef potato casserole, weeknight dinner casserole

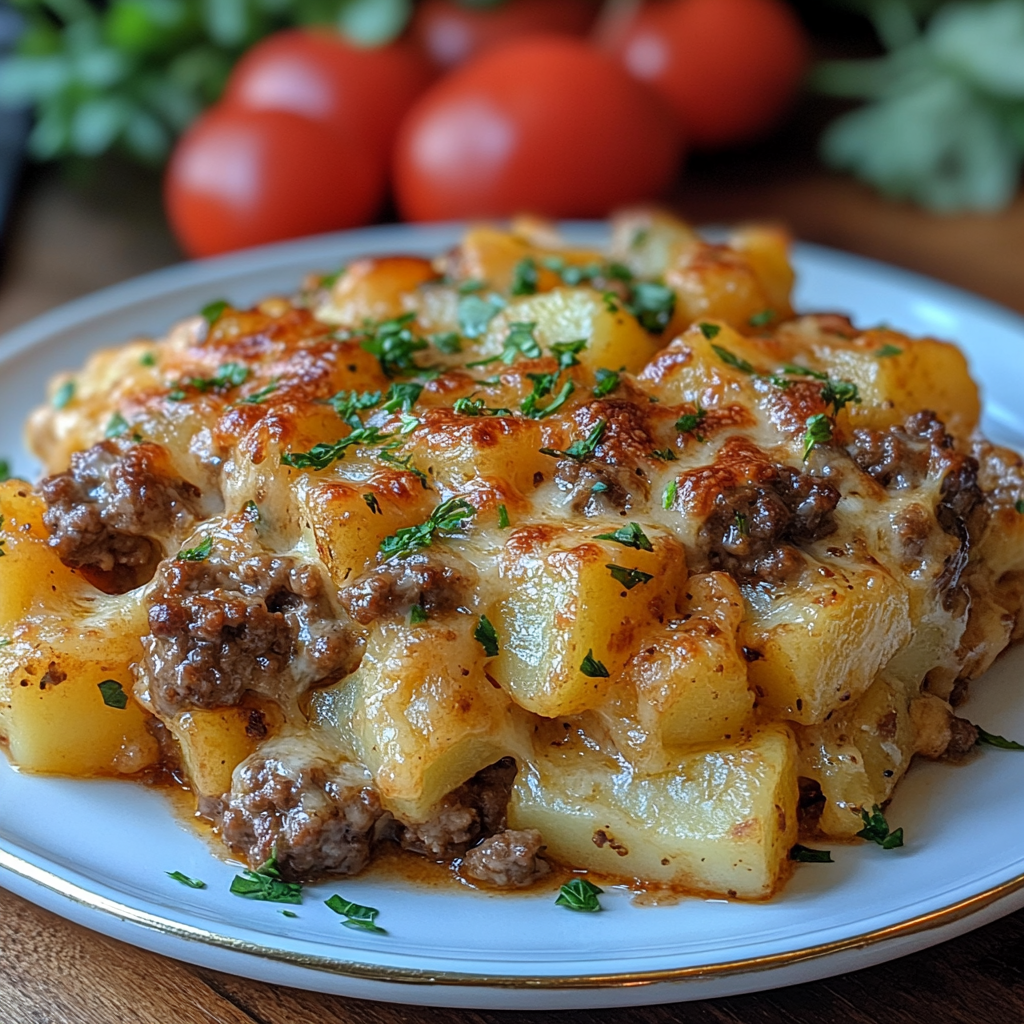
Easy Hamburger Potato Casserole: A Comforting One-Pan Meal for Busy Families

Easy Hamburger Potato Casserole is a classic comfort food that combines seasoned ground beef, tender potatoes, and melted cheese in a single baking dish. This dish is perfect for cozy family dinners or potluck gatherings, with simple ingredients that come together for a hearty, satisfying meal. If you’re looking for another easy-to-make casserole, try our Slow Cooker Magic: Unveiling the Ease of Crock-Pot Baked Ziti, which is also perfect for weeknights.


Ingredients for Easy Hamburger Potato Casserole

This casserole uses affordable, readily available ingredients:

  • Ground Beef: Adds protein and flavor to the casserole.
  • Potatoes: Russet or Yukon Gold potatoes provide a tender base.
  • Cheese: Melted cheddar or mozzarella cheese creates a creamy, gooey layer.
  • Onions and Garlic: Bring depth to the flavor profile.
  • Cream of Mushroom Soup or Cream Sauce: Adds creaminess to the casserole.
  • Salt, Pepper, and Optional Spices: Seasonings such as Italian seasoning or smoked paprika for added flavor.

For a side dish that pairs well with this casserole, consider our The Ultimate Comfort Food: Crockpot Potato Soup with Hashbrowns, a warming and hearty soup.


Preparing the Ingredients for Hamburger Potato Casserole

  1. Browning the Ground Beef: Brown the beef with onions and garlic to ensure a flavorful base for the casserole.
  2. Preparing the Potatoes: Slice potatoes evenly to ensure consistent cooking.
  3. Mixing the Creamy Sauce: Combine cream of mushroom soup with seasonings for a smooth, savory sauce.

If you enjoy creamy dishes with layered flavors, check out our Rediscovering Comfort: Sour Cream and French Fried Onion Pork Chops.


Assembling the Casserole

  1. Layering Process: Place a layer of sliced potatoes at the bottom, followed by the seasoned beef, and finish with the creamy sauce.
  2. Adding Toppings: Sprinkle a generous layer of shredded cheese on top. For extra crunch, add breadcrumbs.
  3. Baking: Bake at 350°F for approximately 1 hour, until the potatoes are tender and the cheese is bubbly.

Flavor Variations and Customizations

  • Cheesy Hamburger Casserole: Add an extra layer of cheese in the middle for a gooier casserole.
  • Vegetable-Packed Casserole: Include diced bell peppers, carrots, or peas for added nutrition.
  • Spicy Twist: Add chopped jalapeños or a sprinkle of chili powder for a kick.
  • Herb-Infused: Sprinkle rosemary or thyme for a fragrant finish.

For another comforting, savory option, try our Rediscovering Comfort: Sour Cream and French Fried Onion Pork Chops.


Serving Suggestions

  • Classic Sides: Pair with a simple green salad, garlic bread, or steamed vegetables.
  • Garnish Ideas: Sprinkle chopped parsley or green onions on top for added color.
  • Family-Style Presentation: Serve directly from the baking dish for a cozy, rustic meal.

Storage, Freezing, and Reheating Tips

  1. Storing Leftovers: Refrigerate in an airtight container for up to 3 days.
  2. Freezing: Portion into individual servings and freeze for up to 3 months.
  3. Reheating: Reheat in the oven at 325°F for best results; add a little broth or milk if the casserole seems dry.

FAQs About Easy Hamburger Potato Casserole

Q: Can I prepare this casserole in advance?
A: Yes, you can assemble it the night before and refrigerate it until you’re ready to bake.

Q: What type of potatoes should I use?
A: Russet or Yukon Gold potatoes work well due to their texture and cooking consistency.

Q: Can I make it dairy-free?
A: Use a dairy-free cheese and substitute the cream of mushroom soup with a plant-based cream sauce.

Q: Can I add other vegetables?
A: Absolutely—carrots, corn, and bell peppers are great additions.

Q: How do I prevent dryness?
A: Make sure the sauce is distributed evenly, and cover with foil during baking if needed.


Conclusion

Easy Hamburger Potato Casserole is a delicious, family-friendly meal that’s perfect for busy weeknights. It combines ground beef, tender potatoes, and gooey cheese for a filling, flavorful dish that’s easy to customize with different spices and add-ins. For more comforting dishes, check out our The Ultimate Comfort Food: Crockpot Potato Soup with Hashbrowns to round out your meal options.

Chocolate Pecan Turtle Clusters: Easy Recipe for a Decadent Treat

chocolate pecan candy, turtle candy clusters, caramel pecan chocolates, homemade turtle clusters, chocolate turtle recipe

Chocolate Pecan Turtle Clusters: A Perfect Homemade Treat

Chocolate Pecan Turtle Clusters combine crunchy pecans, creamy caramel, and rich chocolate to create a decadent candy that’s perfect for gifting or enjoying as a treat. These clusters are surprisingly easy to make and are ideal for holiday gatherings or as a delightful homemade gift. For those who love caramel in desserts, check out our Decadent Caramel Chocolate Cupcakes, another treat to indulge your sweet tooth.


Essential Ingredients for Chocolate Pecan Turtle Clusters

These turtle clusters use a few simple ingredients to create an indulgent treat:

  • Pecans: Toasted pecans add a crunchy, nutty base.
  • Caramel Sauce: Chewy and sweet, the caramel is at the heart of this treat.
  • Chocolate: Choose milk, dark, or semi-sweet chocolate based on your preference.
  • Butter and Corn Syrup: Used to create a smooth homemade caramel.
  • Sea Salt (optional): Adds a touch of saltiness for balance.

For another caramel delight, try our Salted Caramel Rice Krispie Treats, which also pair caramel with a touch of salt.


Preparing the Ingredients

  1. Toasting the Pecans: Toast pecans on a baking sheet in a 350°F oven for 5-7 minutes to bring out their natural oils and enhance flavor.
  2. Making Homemade Caramel: Combine butter, sugar, and corn syrup over medium heat until smooth and golden.
  3. Melting the Chocolate: Melt chocolate slowly to ensure it’s glossy and smooth.

If you’re looking for other pecan-based treats, consider our Pecan Pie Balls, which provide a fun twist on the classic pecan pie.


Assembling and Setting the Turtle Clusters

  1. Layer the Ingredients: Arrange pecans in clusters, spoon caramel over the pecans, and cover with melted chocolate.
  2. Allow to Set: Let the clusters cool and harden at room temperature or in the fridge for faster setting.
  3. Adding Sea Salt: Sprinkle a pinch of sea salt on top of each cluster for a gourmet finish.

Flavor Variations and Customizations

Try these flavor twists:

  • Salted Caramel: Use salted caramel for an enhanced salty-sweet profile.
  • Dark Chocolate: Use dark chocolate for a more intense cocoa flavor.
  • Nut Alternatives: Replace pecans with walnuts, almonds, or cashews.
  • Spicy Turtle Clusters: Add a dash of cayenne or chili powder to the caramel.

For a different take on pecan treats, try our Pecan Pie Balls—they’re just as delicious and unique!


Serving Suggestions

  • Holiday Gift Bags: Wrap clusters in cellophane bags for a festive holiday gift.
  • Party Platters: Arrange clusters on a platter for dessert spreads.
  • Pairing Ideas: Enjoy with coffee, hot chocolate, or a dessert wine for an elevated treat.

Storage, Freezing, and Shelf Life Tips

  1. Storing Leftovers: Store in an airtight container for up to two weeks.
  2. Freezing Tips: Freeze clusters in a single layer, then store in a freezer-safe bag for up to three months.
  3. Refrigeration: Refrigerate clusters to keep chocolate firm, especially in warm climates.

FAQs About Chocolate Pecan Turtle Clusters

Q: Can I use pre-made caramel?
A: Yes, store-bought caramel is a quick alternative.

Q: How do I keep the chocolate from melting?
A: Temper the chocolate or store clusters in a cool place.

Q: Can I make these vegan?
A: Use dairy-free chocolate and a vegan caramel recipe.

Q: What’s the best way to prevent chocolate from seizing?
A: Melt chocolate slowly and avoid water contact.

Q: How do I store these for gifts?
A: Use airtight containers or sealed bags to maintain freshness.


Conclusion

Chocolate Pecan Turtle Clusters are a delicious and impressive homemade treat that’s perfect for any occasion. Their blend of crunchy pecans, creamy caramel, and rich chocolate makes them a crowd-pleaser. For more caramel treats, check out our Salted Caramel Rice Krispie Treats for a sweet and salty delight. Enjoy experimenting with this recipe and make it a part of your dessert repertoire.

Crockpot Hot Dog Chili: Perfect Topping for Game Day and Family Gatherings

slow cooker hot dog chili, easy crockpot chili recipe, hot dog chili topping, game day chili, chili dog recipe

Crockpot Hot Dog Chili: A Hearty, Flavorful Topping for Game Day and Gatherings

Crockpot Hot Dog Chili is the ideal topping for creating delicious chili dogs with minimal effort. This slow-cooked chili adds depth and warmth, making it perfect for topping hot dogs or serving as a standalone dish. If you’re new to crockpot cooking or want more one-pot meal ideas, check out our Slow Cooker Magic: Unveiling the Ease of Crock-Pot Baked Ziti for inspiration.


Essential Ingredients for Crockpot Hot Dog Chili

To make this easy Crockpot Hot Dog Chili, you’ll need:

  • Ground Beef: Adds rich flavor and heartiness.
  • Tomato Sauce, Tomato Paste, and Diced Tomatoes: Build the chili’s saucy base.
  • Onion and Garlic: Essential aromatics for depth.
  • Chili Powder, Cumin, and Paprika: Key spices for warmth and spice.
  • Worcestershire Sauce and Mustard: Enhances flavor with subtle tang.
  • Optional Add-ins: A touch of sugar, hot sauce, or extra jalapeños for added heat.

For a similar cozy dish, try our The Ultimate Comfort Food: Crockpot Potato Soup with Hashbrowns, another slow-cooked recipe perfect for family meals.


Preparing the Ingredients

  1. Browning the Ground Meat: Browning ground beef or turkey before adding it to the crockpot.
  2. Chopping the Aromatics: Finely chop onions and garlic for even cooking.
  3. Mixing the Spices and Sauces: Combine chili powder, cumin, and Worcestershire sauce for consistent flavor.

Assembling and Cooking in the Crockpot

  1. Layer Ingredients in the Crockpot: Add meat, tomato products, spices, and optional add-ins.
  2. Set the Temperature: Cook on low for 4-6 hours or on high for 2-3 hours.
  3. Adjust Consistency as Needed: Stir halfway and add a little broth or water for a saucier chili.

Flavor Variations and Customizations

Experiment with these variations:

  • Spicy Chili: Add jalapeños or hot sauce.
  • Smoky Flavor: Incorporate smoked paprika or a drop of liquid smoke.
  • Vegetarian Option: Substitute beans or tempeh for the meat.
  • Kid-Friendly: Use mild seasonings and add a bit of ketchup.

For a similar comforting meal, try our Rediscovering Comfort: Sour Cream and French Fried Onion Pork Chops, perfect for family dinners.


Serving Suggestions

  • Classic Hot Dog Topping: Layer on hot dogs with diced onions and shredded cheese.
  • Chili Cheese Fries: Use chili as a topping on fries for a tasty snack.
  • As a Standalone Dish: Serve in bowls with cornbread on the side.

Pairing Idea: Serve with our Crockpot Potato Soup for a full comfort-food spread.


Storage, Freezing, and Reheating Tips

  1. Refrigerate Leftovers: Store in an airtight container in the fridge for up to a week.
  2. Freezing Instructions: Portion and freeze for up to 3 months.
  3. Reheating: Reheat in the microwave or on the stovetop, adding a splash of broth if needed.

FAQs About Crockpot Hot Dog Chili

Q: Can I make this chili with ground turkey?
A: Yes, ground turkey works well as a leaner option.

Q: How do I make it less spicy?
A: Use mild chili powder and omit spicy ingredients.

Q: Can I skip browning the meat?
A: Browning adds flavor but can be skipped for convenience.

Q: How do I keep it warm for a party?
A: Use the “keep warm” setting on the crockpot.


Conclusion

Crockpot Hot Dog Chili is the perfect easy, crowd-pleasing dish for any occasion. With simple ingredients and a flavorful blend of spices, this chili is versatile and easy to make. Pair it with our Crockpot Potato Soup for a complete comfort food experience.

Reese’s Pieces Chocolate Chip Cookie Bars: Chewy, Peanut Butter Bliss in Every Bite

peanut butter cookie bars, chocolate chip bars, Reese’s dessert bars, chewy cookie bars, easy peanut butter chocolate dessert

Reese’s Pieces Chocolate Chip Cookie Bars: The Ultimate Peanut Butter and Chocolate Treat

Reese’s Pieces Chocolate Chip Cookie Bars bring together the classic combination of peanut butter and chocolate in a chewy, delicious bar. Perfect for parties, snacks, or a simple family dessert, these bars are easy to make and incredibly satisfying. For a similar chewy delight, check out our Ultimate Guide to Thick, Homemade Chocolate Chip Cookies.


Essential Ingredients for Reese’s Pieces Chocolate Chip Cookie Bars

This recipe requires simple, pantry-friendly ingredients:

  • Reese’s Pieces: Provides a peanut butter crunch.
  • Semi-Sweet Chocolate Chips: Adds rich chocolate flavor without overpowering sweetness.
  • Brown Sugar: Gives a chewy texture and caramel undertones.
  • Butter, Flour, and Vanilla Extract: Create a classic cookie base.
  • Baking Soda: Essential for a soft and thick cookie texture.
  • Optional Toppings: Mini Reese’s cups or chopped peanuts for added flavor and texture.

For those who love peanut butter, try our Peanut Butter Blossoms, another favorite for peanut butter and chocolate lovers.


Preparing the Ingredients

  1. Creaming Butter and Sugar: Cream together butter and sugar until smooth and fluffy.
  2. Mixing Dry and Wet Ingredients: Combine the dry ingredients, then mix with the wet ingredients until just incorporated.
  3. Folding in Candies and Chocolate Chips: Gently fold in Reese’s Pieces and chocolate chips for even distribution.

Pro Tip: Creaming the butter and sugar well is essential for a chewy cookie texture. See our Ultimate Guide to Thick, Homemade Chocolate Chip Cookies for tips.


Assembling and Baking the Cookie Bars

  1. Preparing the Baking Dish: Line an 8×8-inch pan with parchment paper for easy removal.
  2. Pressing Dough into Pan: Evenly spread the dough to ensure even baking.
  3. Baking: Bake at 350°F for 20-25 minutes, checking for a golden-brown top.

For more peanut butter goodness, try our Peanut Butter Blossoms, which pair beautifully with these cookie bars.


Flavor Variations and Customizations

Make these bars your own with these variations:

  • Double Peanut Butter: Add peanut butter to the dough for a stronger peanut flavor.
  • Holiday-Themed Bars: Use holiday-colored Reese’s Pieces for a festive look.
  • Salted Chocolate: Sprinkle sea salt over the bars before baking for a salted chocolate flavor.
  • Nutty Option: Add chopped nuts, like peanuts or pecans, for extra crunch.

For a different flavor twist, consider trying our Classic Brown Sugar Cookies for Cookie Lovers.


Serving Suggestions

Serve these cookie bars with a touch of flair:

  • Cut into Small Squares: Makes them easy to grab for parties.
  • Pair with Ice Cream: A scoop of vanilla ice cream takes this treat to the next level.
  • Holiday Garnish: Add a sprinkle of festive-colored candies for seasonal appeal.

Pairing Tip: Serve with milk or coffee for a delightful dessert experience.


Storage, Freezing, and Reheating Tips

  1. Storing Leftovers: Store in an airtight container for up to a week for optimal freshness.
  2. Freezing Instructions: Wrap individual portions and freeze for a quick, convenient treat.
  3. Reheating: Microwave for 10 seconds to regain a fresh-baked texture.

FAQs About Reese’s Pieces Chocolate Chip Cookie Bars

Q: Can I make these gluten-free?
A: Yes, use a gluten-free baking blend, ensuring all other ingredients are gluten-free.

Q: Can I substitute Reese’s Pieces?
A: Absolutely—try M&Ms or peanut butter chips as substitutes.

Q: How do I keep the bars soft?
A: Store in an airtight container, and avoid overbaking.

Q: Do I need to chill the dough?
A: It’s not required, but chilling for 30 minutes can improve texture.


Conclusion

Reese’s Pieces Chocolate Chip Cookie Bars are the ultimate dessert for peanut butter and chocolate lovers, perfect for any occasion. For more cookie inspiration, check out our Classic Brown Sugar Cookies for Cookie Lovers, which pair wonderfully with these bars.

Garlic Parmesan Chicken & Steak Bake: A Hearty, One-Pan Dinner

creamy garlic Parmesan bake, steak and chicken casserole, garlic Parmesan recipe, one-pan chicken and steak, creamy bake dinner

Garlic Parmesan Chicken & Steak Bake: A Flavorful One-Pan Meal

Garlic Parmesan Chicken & Steak Bake combines tender chicken and steak with a rich garlic-Parmesan sauce for a meal that’s perfect for family dinners or gatherings. This creamy, savory bake is ideal for those who love the bold flavors of garlic and Parmesan. To achieve the perfect steak, check out our Perfect Ribeye Steak Recipe for tips on selecting and preparing your cut.


Essential Ingredients for Garlic Parmesan Chicken & Steak Bake

To create this delicious one-pan meal, you’ll need:

  • Chicken Breasts or Thighs: Provides tender, juicy meat that pairs well with the sauce.
  • Steak (Sirloin or Ribeye): Adds depth with a richer flavor.
  • Parmesan Cheese: The base of the creamy sauce, giving it a rich and savory flavor.
  • Fresh Garlic: For a robust and aromatic flavor.
  • Heavy Cream or Butter: Adds creaminess to the sauce.
  • Italian Seasoning: Complements the garlic and Parmesan with herbaceous notes.
  • Optional Garnishes: Fresh parsley or lemon zest for extra brightness.

For other creamy, cheesy chicken dishes, try our Ultimate Cheesy Ranch Chicken, another family favorite.


Preparing the Ingredients

  1. Prepare the Chicken and Steak: Season the chicken breasts or thighs and steak with salt, pepper, and Italian seasoning.
  2. Make the Garlic Parmesan Sauce: Combine Parmesan, cream or butter, minced garlic, and Italian seasoning to form a thick sauce.
  3. Optional Prep: Add fresh herbs or lemon zest to enhance the dish’s flavors.

Pro Tip: Searing the chicken and steak before baking brings out a deeper, caramelized flavor.


Layering and Assembling the Dish

  1. Sear the Meat: For enhanced flavor, lightly sear both chicken and steak in a skillet before arranging in the baking dish.
  2. Assemble in Baking Dish: Place the seared chicken and steak in a baking dish and pour the garlic Parmesan sauce over everything.
  3. Add Parmesan and Herbs: Sprinkle more Parmesan cheese and add a few sprigs of parsley or thyme for a fresh, aromatic touch.

Baking and Cooking Tips

  • Oven Temperature and Timing: Bake at 375°F for 20-25 minutes until the sauce is bubbly and the meat is cooked through.
  • Avoid Overcooking: Check the steak and chicken to ensure they’re cooked through without drying out.
  • Covering with Foil: If the Parmesan starts to brown too quickly, cover with foil.

To add flavor depth, consider the techniques in our Perfect Ribeye Steak Recipe, which includes tips on perfect steak preparation.


Flavor Variations and Customizations

To customize Garlic Parmesan Chicken & Steak Bake, try these ideas:

  • Herb-Infused Version: Add rosemary or thyme to the sauce for extra aroma.
  • Spicy Kick: Include red pepper flakes or cayenne for heat.
  • Extra Cheesy Topping: Mix shredded mozzarella with Parmesan for a gooey topping.
  • Vegetable-Rich Version: Add sliced bell peppers, mushrooms, or broccoli.

For more ideas, check out our Slow Cooker Chicken and Gravy Over Noodles, another comforting dish with a creamy base.


Serving Suggestions

Serve Garlic Parmesan Chicken & Steak Bake with a selection of sides:

  • Roasted Vegetables: A simple side that balances the creaminess of the bake.
  • Garlic Bread: Adds a crunchy element and complements the garlic flavor.
  • Fresh Salad: A light green salad or Caesar salad pairs well.

Suggested Pairing: A crisp white wine or fresh lemonade enhances the meal.


Storage, Freezing, and Reheating Tips

  1. Refrigerating Leftovers: Store in an airtight container for up to 3 days.
  2. Freezing for Later: Wrap portions in foil or plastic wrap, then freeze.
  3. Reheating: Reheat in the oven at 325°F, adding a splash of broth if needed for moisture.

FAQs About Garlic Parmesan Chicken & Steak Bake

Q: Can I use other cuts of steak?
Yes, other tender cuts like filet or tenderloin work well.

Q: What’s the best way to keep the cheese from burning?
Cover the dish with foil during baking, then uncover in the last 5-10 minutes.

Q: Can I make this dish dairy-free?
Use dairy-free Parmesan and coconut milk or broth as substitutes.

Q: Can I add vegetables?
Absolutely—broccoli, bell peppers, or mushrooms add great flavor.

Q: Do I have to sear the meat first?
Searing is optional but brings out a richer flavor in the finished dish.


Conclusion

Garlic Parmesan Chicken & Steak Bake offers a satisfying and versatile meal that can be customized with additional flavors, herbs, and vegetables. Whether you’re hosting a family dinner or just want a comforting weeknight meal, this dish is a crowd-pleaser.

For more rich and cheesy options, consider our Ultimate Cheesy Ranch Chicken, another easy recipe full of creamy flavor.