Taco Pasta Salad: A Flavorful Twist on Classic Potluck Fare

taco pasta salad recipe, taco pasta with dressing, taco salad pasta, Mexican pasta salad, pasta salad with taco flavors, easy taco pasta

Taco Pasta Salad: A Flavorful Fusion for Any Gathering

If you’re looking for a crowd-pleasing dish that combines the zest of taco flavors with the comfort of pasta salad, then Taco Pasta Salad is the perfect recipe for you. This dish is incredibly versatile, suitable for potlucks, BBQs, or family dinners. With its mix of seasoned ground beef, creamy dressing, and crunchy toppings, this pasta salad brings a unique twist that everyone will love.

For additional easy comfort dishes, consider Crockpot Potato Soup with Hashbrowns as a cozy, hearty option that complements taco pasta salad well.

Ingredients for the Perfect Taco Pasta Salad

Gather these simple ingredients to bring this vibrant Taco Pasta Salad to life:

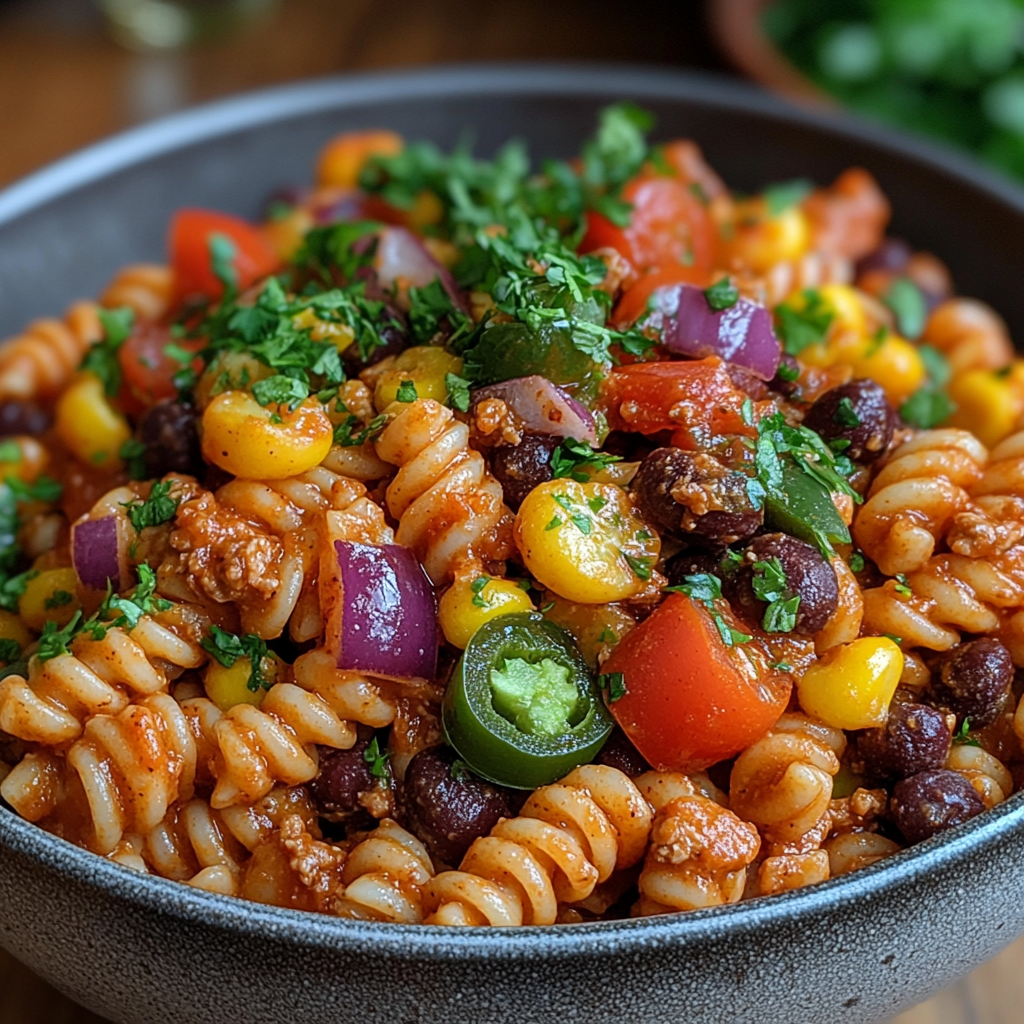
  • Pasta: Bowtie or spiral pasta work best, providing the ideal bite and texture.
  • Ground Beef or Turkey: Seasoned with taco seasoning to give a bold flavor.
  • Vegetables: Chopped tomatoes, bell peppers, corn, and black beans add color and nutrition.
  • Cheese: Shredded cheddar cheese or a Mexican blend.
  • Dressing: Catalina, Ranch, or a creamy homemade dressing (detailed below).
  • Toppings: Chopped green onions, diced avocado, and crushed tortilla chips or Doritos for extra crunch.

For another Tex-Mex favorite that’s sure to be a hit, check out our Dorito Taco Salad for a fresh, crunchy addition to any meal.

How to Make Taco Pasta Salad

Follow this step-by-step guide to prepare your Taco Pasta Salad:

1. Prepare the Pasta

  • Cook pasta according to package directions until al dente, then drain and let cool.
  • Pro Tip: Rinse the pasta with cold water after draining to keep it from sticking.

2. Cook the Ground Meat

  • Brown ground beef or turkey in a skillet over medium heat. Drain any excess fat.
  • Add taco seasoning and a small amount of water, then cook until the meat is well-coated and flavorful.

3. Assemble the Salad

  • In a large bowl, combine pasta, ground beef, chopped vegetables, and cheese.
  • Add your chosen dressing and mix until all ingredients are evenly coated.

4. Add Toppings

  • Just before serving, top with green onions, avocado, and crushed tortilla chips for added crunch and flavor.

For another easy and comforting meal, you might like Crock-Pot Baked Ziti, a great choice for busy weeknights.

Dressings for Taco Pasta Salad

The dressing plays a key role in balancing the flavors of this dish. Here are a few popular options:

  • Catalina Dressing: A tangy, sweet dressing that enhances taco flavors.
  • Ranch Dressing: Creamy and smooth, perfect for a richer taste.
  • Homemade Taco Dressing: Mix ½ cup sour cream, ¼ cup mayonnaise, 2 tablespoons taco seasoning, and a dash of lime juice for a fresh, zesty dressing.

Tips for Perfect Taco Pasta Salad

  • Pasta Choice: Use sturdy pasta shapes like bowtie or spiral to hold the dressing and toppings.
  • Serve Cold: This pasta salad is best served cold; refrigerate for at least 30 minutes before serving.
  • Customizable Toppings: Feel free to add jalapeños, olives, or pickled onions for extra flavor.

Serving Suggestions for Taco Pasta Salad

Taco Pasta Salad works well as a side or a main dish. Here are a few ideas for serving it:

  • BBQs and Picnics: This dish holds up well, even outdoors.
  • As a Main Dish: Add extra protein, like shredded chicken or more beans, for a heartier meal.
  • Potluck Hit: Its colorful presentation and unique flavor make it a crowd favorite at gatherings.

For other flavorful, shareable meals, check out Family Night Favorite: French Bread Pizza, which is easy to customize and serve.


Variations of Taco Pasta Salad

This recipe is highly adaptable. Here are some popular variations:

  1. Vegetarian Taco Pasta Salad: Omit the meat and add more beans or chickpeas for protein.
  2. Low-Carb Option: Use spiralized zucchini or cauliflower pasta instead of traditional pasta.
  3. Spicy Version: Add diced jalapeños or use spicy taco seasoning for extra heat.

Nutritional Benefits of Taco Pasta Salad

This dish is not only flavorful but also offers nutritional value from vegetables, protein, and healthy fats. Here’s a rough nutritional breakdown:

  • Calories: 350 per serving (may vary based on toppings and dressing)
  • Protein: Approximately 18g, from ground meat, beans, and cheese
  • Fiber: High fiber content from beans and vegetables
  • Vitamin C: Tomatoes and bell peppers add immune-boosting nutrients

If you’re looking for more high-protein dishes, try Chicken Bacon Ranch Potatoes for a filling and nutritious addition.

Storing and Reheating Taco Pasta Salad

This pasta salad is great for meal prep, as it stores well:

  • Refrigerate: Store in an airtight container for up to 3 days.
  • Freezing: Not recommended, as freezing affects pasta texture.
  • Reheating: If you prefer it warm, gently microwave individual servings. Add a fresh sprinkle of cheese and toppings before serving.

Frequently Asked Questions (FAQs) About Taco Pasta Salad

Can I Make Taco Pasta Salad Ahead of Time?

Yes, Taco Pasta Salad is perfect for preparing ahead of time. For best results, keep the toppings and dressing separate until serving to prevent sogginess.

What’s the Best Dressing for Taco Pasta Salad?

Catalina, Ranch, or a homemade taco-inspired dressing are popular choices that complement the flavors well.

Can I Make a Vegetarian Version?

Absolutely! Just omit the meat and add more beans or even chickpeas for extra protein.

How Long Does Taco Pasta Salad Last in the Fridge?

When stored properly in an airtight container, it lasts up to 3 days in the refrigerator.

Can I Freeze Taco Pasta Salad?

Freezing is not recommended, as the pasta and vegetables can become mushy after thawing.


Final Thoughts on Taco Pasta Salad

Taco Pasta Salad is a creative, satisfying dish that brings together the best of taco and pasta flavors in one bowl. With its easy preparation and endless customization options, it’s perfect for any occasion, from family dinners to potlucks and picnics. Try pairing it with Baked Ziti for a complete meal or serving it alongside crunchy chips for a Tex-Mex-inspired feast.

Enjoy experimenting with this versatile dish, and don’t hesitate to personalize it with your favorite ingredients. Happy cooking!

Greek Lemon Chicken Soup (Avgolemono): Creamy Comfort with Mediterranean Flavor

avgolemono soup, lemon chicken soup Greek style, Mediterranean lemon soup, creamy chicken soup, Greek comfort soup

Greek Lemon Chicken Soup (Avgolemono): The Ultimate Mediterranean Comfort Food

Greek Lemon Chicken Soup, traditionally called Avgolemono, is a creamy, zesty, and warming dish perfect for any season. This beloved Greek soup combines the tanginess of fresh lemons with a smooth, velvety texture created by an egg-lemon sauce, making it both light and hearty. If you love comforting, flavorful soups, you’re in for a treat with this classic Mediterranean recipe.

For those who enjoy hearty, warming dishes, don’t miss The Ultimate Comfort Food: Crockpot Potato Soup with Hashbrowns, another satisfying recipe perfect for cozy evenings.

Why You’ll Love Greek Lemon Chicken Soup

The unique texture and taste of Avgolemono come from the blend of eggs and lemon juice, which gives the soup its creamy richness without the need for heavy cream. This combination, along with tender chicken and rice or orzo, makes the soup hearty and nourishing.

For more Mediterranean-inspired dishes, you might also enjoy Greek Style Lemon Roasted Potatoes, which pairs beautifully with this soup and is ideal for rounding out your Greek-inspired meal.


Essential Ingredients for Greek Lemon Chicken Soup

To make the perfect Greek Lemon Chicken Soup, gather these ingredients:

  • Chicken Breasts or Thighs: Boneless or bone-in for a richer broth
  • Chicken Broth: Forms the base of the soup, adding depth and warmth
  • Rice or Orzo: Traditional starches used to add body to the soup
  • Eggs: Essential for the creamy texture and thickness
  • Lemon Juice: Adds the tangy, refreshing element
  • Herbs: Fresh dill or parsley for garnish

Tip: Fresh ingredients make a big difference in this recipe. Opt for freshly squeezed lemon juice and high-quality chicken for the best flavor.

How to Make Greek Lemon Chicken Soup

Follow these steps to create an authentic bowl of Avgolemono.

1. Prepare the Chicken and Broth

  • In a large pot, add chicken broth and bring it to a boil.
  • Add chicken breasts or thighs, reduce heat, and simmer until fully cooked. Remove the chicken, shred it, and set aside, keeping the broth warm.

2. Add Rice or Orzo

  • With the broth still simmering, add rice or orzo and cook until tender. This takes about 20 minutes for rice or 10 minutes for orzo.

3. Make the Avgolemono (Egg-Lemon) Sauce

  • In a separate bowl, whisk eggs until frothy, then gradually add lemon juice while whisking.
  • Slowly temper the egg-lemon mixture by adding a few ladles of hot broth, whisking constantly to prevent curdling.

4. Combine and Serve

  • Pour the egg-lemon mixture back into the pot with the broth and rice, stirring continuously to blend and thicken the soup.
  • Add the shredded chicken back into the soup, and serve hot with a garnish of fresh dill or parsley.

For a similar meal that’s easy to prepare and deliciously comforting, check out Slow Cooker Magic: Crock-Pot Baked Ziti, a versatile pasta dish that’s also ideal for family dinners.


Tips for Perfecting Greek Lemon Chicken Soup

Here are some tips to elevate your Avgolemono soup to restaurant-quality:

  • Temper the Eggs Correctly: Add hot broth gradually to the eggs while whisking to avoid curdling.
  • Adjust Lemon Flavor: Start with a smaller amount of lemon juice and adjust to taste for your preferred level of tanginess.
  • Choose Fresh Ingredients: Use fresh lemons and herbs for the best flavor profile.

Variations of Avgolemono Soup

  1. Vegetarian Avgolemono: Use vegetable broth and add chickpeas or other legumes instead of chicken.
  2. Low-Carb Version: Replace rice or orzo with cauliflower rice for a lighter version.
  3. Gluten-Free Option: Use rice or gluten-free pasta instead of orzo.

For a creative twist on traditional flavors, try this Greek Style Lemon Roasted Potatoes recipe, a perfect side dish to pair with your Avgolemono soup.

Nutritional Benefits of Avgolemono Soup

Not only is Avgolemono delicious, but it also offers various health benefits. Here’s a breakdown of its nutritional profile per serving:

  • Calories: Approximately 300
  • Protein: 18g from chicken and eggs
  • Vitamin C: Boosts immunity from fresh lemon juice
  • Amino Acids: Essential for muscle growth, thanks to the egg and chicken content

For another protein-packed option, consider Chicken Bacon Ranch Potatoes, which is hearty and complements the flavors of Mediterranean-inspired meals.

Storing and Reheating Avgolemono Soup

  • Refrigerate: Store in an airtight container in the refrigerator for up to 3 days.
  • Freeze: For longer storage, separate the broth from the egg-lemon mixture. When reheating, re-temper with fresh eggs if necessary.
  • Reheat: Warm gently on low heat and stir continuously to maintain the creamy texture.

FAQs About Greek Lemon Chicken Soup

How do I prevent eggs from curdling in Avgolemono soup?

Tempering the eggs with hot broth is crucial. Whisk constantly as you slowly add the broth to prevent curdling.

What can I substitute for rice in Avgolemono?

Orzo is a popular alternative, but couscous or even quinoa can work well if you’re looking for a healthier option.

Is Greek Lemon Chicken Soup gluten-free?

Yes, as long as you use rice or a gluten-free pasta instead of orzo.

Can I make Avgolemono soup dairy-free?

Yes, Avgolemono is traditionally dairy-free. The creaminess comes from the eggs and lemon, not any dairy product.

How long can I store leftover Avgolemono soup?

Avgolemono soup can be stored in the refrigerator for up to 3 days, but it’s best consumed fresh due to the egg-lemon mixture.

Serving Suggestions

  • Garnishes: Fresh dill or parsley, extra lemon wedges, or a sprinkle of black pepper
  • Sides: Warm pita bread, Greek salad, or olives for a complete Mediterranean experience

For additional pairing ideas, explore Family Night Favorite: Easy French Bread Pizza, which offers a fun, customizable side option to serve alongside your Avgolemono soup.

Final Thoughts

Greek Lemon Chicken Soup, or Avgolemono, is a versatile and comforting dish that’s perfect for those who appreciate bold flavors and creamy textures without the heaviness of traditional cream-based soups. This soup is not only a staple in Greek cuisine but also a nourishing choice for any meal, especially during the colder months.

For more comforting recipes, check out Embracing Autumn: A Bowl of Hearty Chicken Chili, a flavorful option that also highlights the cozy, warming qualities of a well-made soup.

Crack Chicken Noodle Soup Recipe: The Ultimate Comfort Food with Bacon and Ranch

creamy chicken noodle soup, cheesy chicken soup, bacon chicken noodle soup, ranch chicken soup, comfort food soup recipe, creamy bacon soup

Crack Chicken Noodle Soup: A Cozy, Flavorful Comfort Dish

Crack Chicken Noodle Soup is the ultimate blend of creamy, cheesy, and savory flavors, perfect for a chilly night or any time you crave comforting food. This soup combines classic ingredients like tender chicken, rich broth, and noodles, with the addition of bacon and ranch seasoning, giving it that “crack” level of deliciousness.

For those who love creamy soups, you might enjoy The Ultimate Comfort Food: Crockpot Potato Soup with Hashbrowns, a dish that also combines rich textures with a comforting flavor profile.


Ingredients for Crack Chicken Noodle Soup

Creating the perfect Crack Chicken Noodle Soup is all about the right ingredients. Here’s what you’ll need:

  • Chicken Breasts or Thighs: Boneless and skinless for easy cooking.
  • Bacon: Adds a smoky, crispy texture.
  • Egg Noodles: Classic in chicken noodle soup, but can be swapped for any pasta type.
  • Chicken Broth: Forms the soup base.
  • Cream Cheese: Provides a thick, creamy texture.
  • Ranch Seasoning: The key to the soup’s signature flavor.
  • Shredded Cheddar Cheese: Melts perfectly for added richness.
  • Optional Vegetables: Diced carrots, celery, or onions for extra nutrition and flavor.

Step-by-Step Recipe for Crack Chicken Noodle Soup

1. Prepare the Ingredients

  • Cut chicken into bite-sized pieces, season with salt and pepper.
  • Cook bacon until crispy, then crumble and set aside.

2. Begin the Base

  • In a large pot, bring chicken broth to a boil.
  • Add chicken pieces and cook until tender, about 15 minutes.

3. Make the Creamy Broth

  • Add cream cheese and shredded cheddar cheese to the pot, stirring until melted and smooth.
  • Mix in the ranch seasoning for that distinctive “crack” flavor.

4. Add the Noodles

  • Stir in egg noodles and cook until they’re al dente, around 7-10 minutes.
  • You can add diced vegetables like carrots or celery at this stage.

5. Top with Bacon

  • Right before serving, stir in the crispy, crumbled bacon.

For other meal ideas perfect for family dinners, consider this Slow Cooker Magic: Unveiling the Ease of Crock-Pot Baked Ziti, another easy and comforting dish.

Pro Tips for the Best Crack Chicken Noodle Soup

Here are some tips to make your Crack Chicken Noodle Soup taste perfect every time:

  • Use High-Quality Chicken: Opt for organic or free-range for the best flavor.
  • Achieve Creaminess: For an extra thick texture, add a bit more cream cheese.
  • Balance Ranch Flavor: Adjust the amount of ranch seasoning to your taste.
  • Experiment with Noodles: While egg noodles are traditional, feel free to substitute with rotini, bow-tie, or even gluten-free pasta.

Variations and Customizations

  1. Low-Carb Version: Swap noodles for cauliflower rice for a keto-friendly option.
  2. Dairy-Free Option: Substitute cream cheese and cheddar with plant-based alternatives.
  3. Spicy Version: Add diced jalapeños or a dash of hot sauce for a spicy kick.

If you enjoy recipes with a bit of spice, the Dorito Chicken Casserole is a great twist on classic comfort food with added texture and flavor.

Nutritional Information

Each serving of Crack Chicken Noodle Soup is filling and nutritious. Below is an approximate nutritional breakdown per serving:

  • Calories: 450-500
  • Protein: 20-25g
  • Carbohydrates: 30-35g
  • Fat: 25-30g

For a similar meal that’s equally filling, try this recipe for Chicken Bacon Ranch Potatoes, another dish that blends chicken, bacon, and ranch in a satisfying way.

Storing and Reheating Instructions

To keep your Crack Chicken Noodle Soup fresh for leftovers:

  • Refrigerate: Store in an airtight container for up to 3 days.
  • Freeze: For longer storage, freeze portions in individual containers for up to 3 months.
  • Reheat: Warm on medium heat, adding a splash of milk or broth to restore creaminess.

FAQs about Crack Chicken Noodle Soup

Can I use other types of noodles?

Yes, crack chicken noodle soup is versatile. You can swap egg noodles for rotini, bow-tie, or even gluten-free pasta.

How can I make this soup dairy-free?

For a dairy-free version, substitute the cream cheese and cheddar with non-dairy alternatives. Coconut milk can add creaminess, though it may alter the taste slightly.

What can I substitute for ranch seasoning?

If you don’t have ranch seasoning, you can create a similar flavor by mixing garlic powder, onion powder, dried parsley, and dill.

Can I make this in a slow cooker?

Absolutely! Combine all ingredients except noodles and cheese, and cook on low for 6-7 hours. Add noodles and cheese in the last 30 minutes.

How long can I store leftovers?

Stored properly, crack chicken noodle soup will last up to 3 days in the fridge or 3 months in the freezer.

Final Thoughts

Crack chicken noodle soup is a cozy and delightful dish, ideal for a satisfying weeknight dinner or even as a make-ahead meal for the freezer. Its blend of creamy, cheesy, and savory flavors makes it a family favorite. For more comforting dishes, you might enjoy exploring Embracing Autumn: A Bowl of Hearty Chicken Chili for a seasonal take on classic comfort foods.

Homemade Garlic Butter Cheese Bombs: Gooey, Buttery Snack Perfection

cheesy garlic bombs, garlic cheese bites, buttery cheese snacks, homemade cheese bombs, garlic butter cheese rolls

Homemade Garlic Butter Cheese Bombs: The Perfect Cheesy Snack for Any Occasion

Homemade Garlic Butter Cheese Bombs are the ultimate snack or appetizer, combining a golden, buttery exterior with a gooey, cheesy center. They’re perfect for parties, game days, or a cozy night in. Pairing them with other comforting dishes, like our The Ultimate Comfort Food: Crockpot Potato Soup with Hashbrowns, makes for a complete comfort food experience.


Ingredients for Garlic Butter Cheese Bombs

This simple recipe requires only a few main ingredients:

  • Dough: Store-bought or homemade biscuit dough, or even pizza dough for a slightly different texture.
  • Cheese: Mozzarella is perfect for its gooey melt, but cheddar or gouda also work.
  • Butter: Provides richness and ensures a golden-brown crust.
  • Garlic: Freshly minced garlic or garlic powder for flavor.
  • Herbs: Italian seasoning or fresh parsley for added aroma.
  • Optional Toppings: Parmesan cheese, red pepper flakes, or chopped fresh herbs.

For a complete meal idea, consider pairing these cheese bombs with Slow Cooker Magic: Unveiling the Ease of Crock-Pot Baked Ziti, which is another crowd-pleasing, cheesy delight.


Preparing the Ingredients for Garlic Butter Cheese Bombs

  1. Rolling Out the Dough: Divide the dough into small sections, ensuring each piece can wrap around the cheese.
  2. Cutting Cheese Cubes: Use small cubes that fit neatly within the dough for the perfect melt.
  3. Making the Garlic Butter: Combine melted butter with minced garlic and herbs to brush over the cheese bombs.

To achieve that perfect melt in the center, refer to this helpful Guide to Melting Cheese Properly.


Assembling and Baking the Cheese Bombs

  1. Forming the Bombs: Wrap the dough around each cheese piece, ensuring a tight seal.
  2. Brushing with Garlic Butter: Generously coat each cheese bomb with garlic butter for extra flavor.
  3. Baking: Place in a preheated oven at 375°F for 10-15 minutes until golden brown.

Flavor Variations and Customizations

  • Spicy Cheese Bombs: Add red pepper flakes to the garlic butter for a spicy kick.
  • Herb-Crusted: Sprinkle rosemary or thyme on top for an aromatic touch.
  • Cheese Varieties: Experiment with cheddar, gouda, or pepper jack for different flavors.
  • Parmesan-Crusted: Add grated Parmesan on top for extra cheese flavor.

If you’re a fan of savory, creamy dishes, try these with our Rediscovering Comfort: Sour Cream and French Fried Onion Pork Chops, which complements these cheese bombs beautifully.


Serving Suggestions

  • Dipping Sauces: Marinara sauce, ranch, or a simple garlic butter for dipping.
  • Party Platter: Arrange with a variety of sauces for a visually appealing snack tray.
  • Garnish Ideas: Fresh parsley or a sprinkle of grated Parmesan on top for added color and flavor.

Storage, Freezing, and Reheating Tips

  1. Storing Leftovers: Store in an airtight container for up to three days.
  2. Freezing: Freeze unbaked cheese bombs; bake directly from frozen by adding a few extra minutes.
  3. Reheating: Reheat in an oven or air fryer to retain crispiness.

FAQs About Garlic Butter Cheese Bombs

Q: Can I use homemade dough?
A: Yes, homemade dough works perfectly, especially pizza or biscuit dough.

Q: Can I make these cheese bombs in an air fryer?
A: Absolutely—air fry at 350°F for about 8-10 minutes, checking frequently.

Q: What other cheeses can I use?
A: Cheddar, gouda, and pepper jack are great choices for added flavor.

Q: Can I add extra toppings?
A: Yes, sprinkle Parmesan or red pepper flakes before baking for added flavor.

Q: How do I prevent cheese from leaking?
A: Make sure to wrap the dough tightly around the cheese and pinch to seal.


Conclusion

Homemade Garlic Butter Cheese Bombs are a delicious and versatile appetizer, perfect for any occasion. They’re easy to prepare, endlessly customizable, and always a hit at gatherings. For a well-rounded meal, try pairing them with other comforting dishes like our The Ultimate Comfort Food: Crockpot Potato Soup with Hashbrowns.

Monterey Chicken Spaghetti: Creamy, Cheesy Comfort Food Recipe

chicken spaghetti casserole, Monterey Jack chicken pasta, creamy chicken spaghetti, baked chicken spaghetti, chicken pasta bake

Monterey Chicken Spaghetti: A Creamy, Cheesy Family Favorite

Monterey Chicken Spaghetti is a delicious twist on the classic chicken spaghetti casserole, with the smooth, mild flavor of Monterey Jack cheese combined with tender chicken and pasta. This recipe is perfect for those who love hearty, comforting meals that are easy to prepare and ideal for family dinners or potlucks. If you’re looking for another cozy meal option, try our Slow Cooker Magic: Unveiling the Ease of Crock-Pot Baked Ziti for a different twist on baked pasta.


Ingredients for Monterey Chicken Spaghetti

This casserole requires simple, versatile ingredients:

  • Chicken: Shredded rotisserie chicken works perfectly, though cooked chicken breasts are also a great option.
  • Spaghetti: Classic spaghetti noodles make up the base of the dish.
  • Monterey Jack Cheese: This mild, creamy cheese is the star of the dish.
  • Cream of Chicken Soup: For extra creaminess and moisture.
  • Vegetables (optional): Consider adding diced bell peppers or spinach for color and nutrients.
  • French Fried Onions (optional): For a crispy, flavorful topping.

For those who enjoy rich, savory dishes, our Rediscovering Comfort: Sour Cream and French Fried Onion Pork Chops provides another layer of flavor and texture similar to this casserole.


Preparing the Ingredients for Monterey Chicken Spaghetti

  1. Cook and Shred the Chicken: Start with cooked chicken, shredded or diced for even distribution throughout the casserole.
  2. Prepare the Spaghetti: Cook the spaghetti to al dente so it doesn’t overcook when baked.
  3. Mix the Creamy Sauce: Combine cream of chicken soup with seasonings like garlic powder, pepper, and Italian seasoning for a flavorful sauce.

For perfect pasta texture, check out The Spruce Eats’ Guide to Cooking Pasta Al Dente.


Assembling the Casserole

  1. Layer the Ingredients: Spread the cooked spaghetti, followed by the chicken and the creamy sauce.
  2. Add Toppings: Sprinkle Monterey Jack cheese and top with French fried onions for an extra layer of flavor and crunch.
  3. Baking Tips: Bake at 375°F for about 25 minutes, or until bubbly and golden brown.

Flavor Variations and Customizations

  • Cheesy Monterey Chicken Casserole: Add extra cheese like Colby Jack for an even creamier result.
  • Vegetable-Enhanced: Include mushrooms, spinach, or bell peppers for added flavor and color.
  • Spicy Kick: Add diced jalapeños or pepper jack cheese for a bit of heat.
  • Herb Infusion: Use fresh herbs like rosemary or thyme to add aromatic depth.

If you’re a fan of casseroles with bold flavors, consider our Slow Cooker Magic: Unveiling the Ease of Crock-Pot Baked Ziti as another delicious option.


Serving Suggestions and Presentation Tips

  • Side Dishes: Serve with a simple green salad, garlic bread, or roasted vegetables.
  • Garnishing: Fresh parsley or chopped green onions add color and freshness.
  • Family-Style Presentation: Serve directly from the baking dish for a cozy, homey feel.

Storage, Freezing, and Reheating Tips

  1. Storing Leftovers: Store in an airtight container in the refrigerator for up to three days.
  2. Freezing: Portion into freezer-safe containers for up to three months.
  3. Reheating: Reheat in the oven at 325°F or microwave, adding a splash of milk if needed for moisture.

FAQs About Monterey Chicken Spaghetti

Q: Can I make this casserole ahead of time?
A: Yes, you can assemble the casserole, refrigerate, and bake when ready.

Q: What type of pasta works best?
A: Spaghetti is recommended, but other pasta like penne or fettuccine works too.

Q: Can I make this dairy-free?
A: Use a dairy-free cheese and plant-based cream sauce.

Q: How do I keep the casserole from drying out?
A: Add a bit of broth or extra cream sauce if needed before baking.

Q: Can I use rotisserie chicken?
A: Absolutely, shredded rotisserie chicken is a great option.


Conclusion

Monterey Chicken Spaghetti is a comforting, cheesy meal that’s easy to prepare and perfect for any gathering. Its creamy texture, mild flavor, and versatility make it a family favorite that can be customized to suit any preference. For another comforting pasta bake, try our Slow Cooker Magic: Unveiling the Ease of Crock-Pot Baked Ziti.