Chocolate Gooey Butter Cookies: Easy, Decadent, and Perfectly Gooey

gooey chocolate cookies, butter cookies with chocolate, cream cheese chocolate cookies, soft chocolate cookies, chocolate cake mix cookies

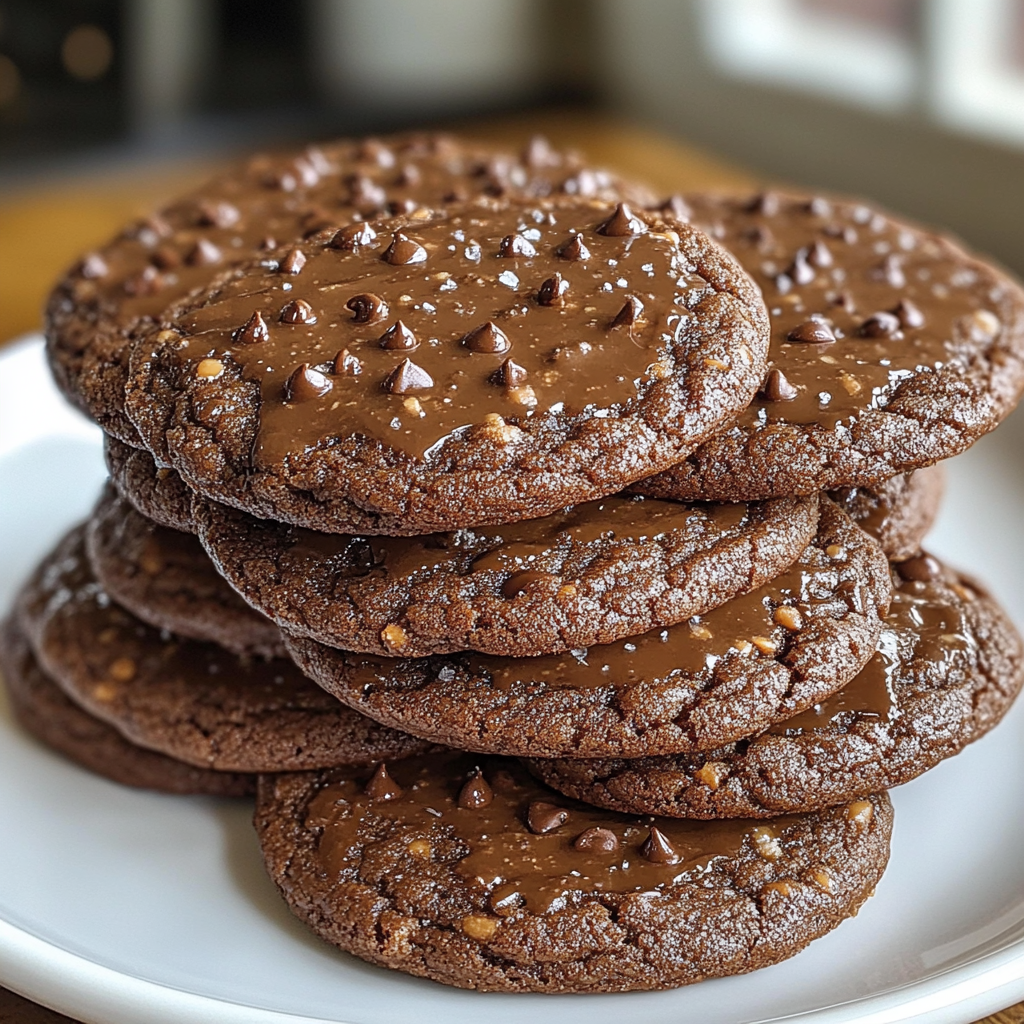
Chocolate Gooey Butter Cookies: A Decadent Delight for Cookie Lovers

Chocolate Gooey Butter Cookies are a rich, indulgent treat that combines the deep flavor of chocolate with the buttery, melt-in-your-mouth texture of classic cookies. These cookies are easy to make and perfect for any occasion, from holiday gatherings to everyday cravings.

Explore more cookie inspirations like Reese’s Pieces Chocolate Chip Cookie Bars for a nutty and chocolatey delight.


Why Chocolate Gooey Butter Cookies Are Special

These cookies offer:

  • Rich Flavor: A combination of cream cheese and chocolate cake mix creates an irresistible taste.
  • Soft Texture: The gooey center ensures each bite is moist and delicious.
  • Ease of Preparation: With minimal ingredients and steps, they are perfect for quick baking sessions.

For another sweet treat, check out Peanut Butter Blossoms: Classic Holiday Cookies.


Ingredients for Chocolate Gooey Butter Cookies

You’ll need these ingredients:

  • 1 package (15.25 oz) chocolate cake mix
  • ½ cup unsalted butter, softened
  • 8 oz cream cheese, softened
  • 1 large egg
  • 1 teaspoon vanilla extract
  • 1 cup powdered sugar (for rolling)

How to Make Chocolate Gooey Butter Cookies

Step 1: Prepare the Dough

  • In a mixing bowl, beat butter and cream cheese until creamy.
  • Add egg and vanilla extract, mixing until combined.
  • Gradually add the chocolate cake mix, blending until a thick dough forms.

Step 2: Chill the Dough

  • Cover the dough and refrigerate for at least 2 hours or until firm.

Step 3: Roll and Coat

  • Preheat the oven to 350°F (175°C).
  • Roll dough into 1-inch balls, then coat generously in powdered sugar.

Step 4: Bake to Perfection

  • Place the coated dough balls on a parchment-lined baking sheet.
  • Bake for 12 minutes or until the edges are set but the centers remain soft.

Tips for Perfect Cookies

  1. Use Chilled Dough: This ensures the cookies maintain their shape.
  2. Generous Coating: Roll cookies twice in powdered sugar for an even finish.
  3. Don’t Overbake: Remove cookies while they’re slightly undercooked in the center to retain their gooey texture.

For another gooey dessert idea, explore S’mores Jars: Bringing the Campfire to Your Kitchen.


Creative Variations

Add-Ins

  • Stir in chocolate chips or white chocolate chunks for extra texture.
  • Sprinkle the tops with crushed peppermint candies for a festive twist.

Dietary Adjustments

  • Substitute gluten-free cake mix for a gluten-free version.
  • Use dairy-free butter and cream cheese for a vegan-friendly option.

Serving Suggestions

  • Dust with additional powdered sugar for presentation.
  • Pair with a glass of milk, coffee, or hot cocoa.
  • Serve as part of a holiday cookie platter with other treats.

Frequently Asked Questions (FAQs)

Can I Freeze the Dough?

Yes, roll the dough into balls and freeze on a baking sheet. Once frozen, transfer to a freezer bag for up to 3 months.

How Should I Store These Cookies?

Store in an airtight container at room temperature for up to 5 days.

Can I Use a Different Cake Mix Flavor?

Absolutely! Try red velvet or vanilla cake mix for unique variations.


Internal Linking Opportunities

Enhance user engagement with these related recipes:


Conclusion

Chocolate Gooey Butter Cookies are a decadent and versatile dessert perfect for any occasion. Their rich flavor, soft texture, and simple preparation make them a favorite for bakers and cookie lovers alike. Try this recipe today and share the joy of gooey, chocolatey goodness with your friends and family.

For more sweet inspirations, visit ExoRecipes, your ultimate destination for delicious and easy-to-make treats!

Hot Chocolate Lasagna: A Decadent No-Bake Dessert Recipe

chocolate lasagna recipe, no-bake chocolate dessert, Oreo chocolate lasagna, creamy chocolate pudding dessert, layered chocolate no-bake treat

Hot Chocolate Lasagna: A No-Bake Dessert Everyone Will Love

Hot Chocolate Lasagna is a rich and decadent no-bake dessert that combines layers of creamy, chocolatey goodness with a crunchy crust. This easy-to-make treat is perfect for holiday parties, family gatherings, or any time you’re craving something sweet and impressive.

For more layered dessert ideas, explore Smores Jars: Bringing the Campfire to Your Kitchen for a portable twist on a classic favorite.


Why Hot Chocolate Lasagna is Irresistible

This dessert stands out for its:

  • No-Bake Simplicity: Perfect for when you want a dessert without turning on the oven.
  • Layered Richness: Creamy pudding, whipped topping, and a crunchy Oreo crust create the ultimate indulgence.
  • Versatility: Customizable for any season with toppings and flavor variations.

For another crowd-pleasing recipe, check out Dunkaroo Dip: A Blast from the Past in Every Bite.


Ingredients for Hot Chocolate Lasagna

You’ll need these simple ingredients to make this no-bake dessert:

  • For the Crust:
    • 1 package (14 oz) Oreo cookies
    • ½ cup melted butter
  • For the Layers:
    • 1 package (8 oz) cream cheese, softened
    • 1 cup powdered sugar
    • 1 container (8 oz) whipped topping
    • 2 packages (3.4 oz each) instant chocolate pudding
    • 3 cups milk
    • Mini marshmallows and chocolate shavings for garnish

How to Make Hot Chocolate Lasagna

Step 1: Prepare the Crust

  • Crush the Oreo cookies into fine crumbs using a food processor. Mix with melted butter.
  • Press the mixture into a 9×13-inch baking dish to form the base. Chill for 20 minutes.

Step 2: Make the Layers

  • Cream Cheese Layer: Beat cream cheese and powdered sugar until smooth. Fold in whipped topping and spread over the crust.
  • Pudding Layer: Whisk together pudding mix and milk until thickened. Spread over the cream cheese layer.
  • Final Layer: Top with remaining whipped topping and garnish with mini marshmallows and chocolate shavings.

Step 3: Chill and Serve

  • Chill the dessert for at least 4 hours before serving to allow the layers to set.

Tips for Success

  1. Firm Layers: Ensure each layer is chilled before adding the next for better structure.
  2. Crust Consistency: Press the Oreo crust firmly into the pan to avoid crumbling.
  3. Fresh Garnishes: Add toppings just before serving to maintain freshness.

For another no-bake treat, try The Ultimate Cheesy Bacon Jalapeño Corn Dip, perfect for parties and game nights.


Creative Variations

Festive Flavors

  • Add peppermint extract to the pudding for a holiday twist.
  • Substitute white chocolate pudding for a lighter variation.

Alternative Toppings

  • Crushed candy canes for a festive look.
  • Caramel drizzle for added richness.

Dietary Adaptations

  • Use gluten-free cookies for the crust.
  • Swap out dairy ingredients with plant-based alternatives for a vegan version.

Serving Suggestions

  • Pair with a hot beverage like coffee or hot cocoa for the ultimate dessert experience.
  • Serve in individual cups for a party-friendly option.
  • Add a dollop of whipped cream to each slice for extra flair.

Frequently Asked Questions (FAQs)

Can I Make Hot Chocolate Lasagna Ahead of Time?

Yes, this dessert can be made a day in advance and stored in the refrigerator.

How Should I Store Leftovers?

Store leftovers in an airtight container in the refrigerator for up to 3 days.

Can I Freeze Hot Chocolate Lasagna?

Freezing is possible, but the texture may change slightly when thawed.


Internal Linking Opportunities

Enhance the reader experience with these relevant links:


Conclusion

Hot Chocolate Lasagna is a delightful no-bake dessert that’s easy to make and impossible to resist. With its rich, creamy layers and versatile ingredients, it’s perfect for holidays, parties, or a sweet indulgence any day of the week. Experiment with flavors, make it your own, and enjoy every bite of this chocolatey masterpiece.

For more innovative dessert ideas and kitchen inspiration, visit ExoRecipes, your go-to source for culinary creativity!

Chicken Pot Pie Pasta: Creamy, Comforting, and Easy to Make

creamy chicken pasta, chicken pot pie-inspired pasta, hearty chicken and vegetable pasta, comfort food chicken pasta, one-pot chicken pasta recipe

Chicken Pot Pie Pasta: A Creamy, Comforting Twist on a Classic

Chicken Pot Pie Pasta brings together the comforting flavors of a classic pot pie with the simplicity of a creamy pasta dish. It’s the perfect recipe for busy weeknights or when you’re craving hearty, wholesome comfort food. With tender chicken, fresh vegetables, and a creamy sauce, this dish is sure to become a family favorite.

For more creative comfort food ideas, check out Chicken Bacon Ranch Potatoes: Your New Favorite Comfort Dish.


Why You’ll Love Chicken Pot Pie Pasta

This dish combines the best of two beloved comfort foods:

  • Creamy and Hearty: The rich, savory sauce ties the dish together.
  • Quick and Easy: Minimal prep and cook time make it a weeknight hero.
  • Customizable: Add your favorite vegetables or seasonings for a personal touch.

For another creamy chicken option, explore Creamy Garlic Parmesan Chicken: A Symphony of Flavors.


Ingredients for Chicken Pot Pie Pasta

Here’s what you’ll need:

  • 12 oz pasta (egg noodles or penne are ideal)
  • 1 lb cooked chicken breast or rotisserie chicken, shredded
  • 1 cup frozen peas and carrots mix
  • ½ cup diced celery
  • 1 small onion, finely chopped
  • 2 cups chicken broth
  • 1 cup heavy cream
  • 3 tablespoons all-purpose flour
  • 2 tablespoons butter
  • ½ teaspoon thyme
  • Salt and pepper to taste

Step-by-Step Recipe Instructions

Step 1: Cook the Pasta

  • Boil pasta in salted water until al dente. Drain and set aside.

Step 2: Prepare the Sauce

  • In a large skillet, melt butter and sauté onion and celery until softened.
  • Stir in flour and cook for 1-2 minutes to create a roux.
  • Gradually add chicken broth, whisking continuously. Simmer until thickened.

Step 3: Combine Ingredients

  • Stir in heavy cream, peas, carrots, thyme, salt, and pepper.
  • Add shredded chicken and cooked pasta to the sauce, mixing until well coated.

Tips for Success

  1. Pasta Choice Matters: Egg noodles and short pasta shapes hold sauce beautifully.
  2. Fresh or Frozen Veggies: Use what you have on hand for convenience.
  3. Consistency Control: Adjust the thickness of the sauce with more broth or cream.

For another hearty pasta recipe, try Slow Cooker Magic: Unveiling the Ease of Crock-Pot Baked Ziti.


Creative Variations

  • Cheesy Twist: Add shredded cheddar or mozzarella for a cheesy version.
  • Spicy Kick: Mix in red pepper flakes or a dash of hot sauce.
  • Vegetarian Option: Replace chicken with sautéed mushrooms and vegetable broth.
  • Low-Carb Version: Swap pasta for zucchini noodles or spaghetti squash.

Serving Suggestions

  • Pair It Up: Serve with garlic bread or a crisp green salad.
  • Family Style: Top with breadcrumbs and bake for a crispy crust.
  • Individual Portions: Use ramekins for a pot-pie-style presentation.

Frequently Asked Questions (FAQs)

Can I Make Chicken Pot Pie Pasta Ahead of Time?

Yes, prepare the dish up to the point of baking. Store in the refrigerator and bake when ready to serve.

How Do I Reheat This Dish?

Reheat on the stovetop or in the microwave, adding a splash of chicken broth to restore creaminess.

What Can I Use Instead of Heavy Cream?

Half-and-half or evaporated milk can be used for a lighter version.


Internal Linking Opportunities

To enhance the user experience, link to these related recipes:


Conclusion

Chicken Pot Pie Pasta is a creamy, comforting dish that’s perfect for any occasion. With its rich flavors, simple preparation, and endless customization options, it’s bound to become a staple in your recipe rotation. Try it today and enjoy a new twist on classic comfort food.

For more comforting recipes and kitchen inspiration, visit ExoRecipes, your home for delicious, family-friendly meals!

Rotel Pasta Fiesta: A Creamy, Cheesy Tex-Mex Delight

Tex-Mex pasta recipe, creamy Rotel pasta, cheesy pasta dish, spicy pasta bake, Rotel tomato pasta, easy pasta dinner

Rotel Pasta Fiesta: A Creamy Tex-Mex Delight

Rotel Pasta Fiesta is a bold, flavorful dish combining creamy cheese, zesty Rotel tomatoes, and perfectly cooked pasta into a one-pan masterpiece. This Tex-Mex-inspired meal is quick, easy, and packed with vibrant flavors that will satisfy the entire family. Whether served on busy weeknights or at festive gatherings, this dish never fails to impress.

For more creative pasta inspirations, try Slow Cooker Magic: Unveiling the Ease of Crock-Pot Baked Ziti.


Why Rotel Pasta Fiesta is a Must-Have

  • Flavorful Fusion: Creamy cheese and spicy Rotel tomatoes create a perfect harmony.
  • Quick and Convenient: Minimal prep and cooking time for busy schedules.
  • Customizable: Add your favorite proteins, vegetables, or toppings for a unique twist.

For another creamy and comforting recipe, check out The Ultimate Comfort Food: Crockpot Potato Soup with Hashbrowns.


Ingredients for Rotel Pasta Fiesta

To create this delicious dish, gather the following ingredients:

  • 12 oz of pasta (rotini, penne, or rigatoni work best)
  • 1 lb ground beef, turkey, or chicken
  • 1 can (10 oz) Rotel tomatoes with green chilies
  • 1 cup shredded cheddar cheese
  • 8 oz Velveeta cheese, cubed
  • 1 cup heavy cream
  • 1 small onion, diced
  • 1 tablespoon taco seasoning
  • Optional toppings: sour cream, green onions, diced avocado

How to Make Rotel Pasta Fiesta

Step 1: Prepare the Pasta

  • Cook pasta in salted water according to package instructions until al dente. Drain and set aside.

Step 2: Cook the Protein

  • In a large skillet, brown the ground beef with diced onions. Drain any excess fat.
  • Stir in taco seasoning and Rotel tomatoes. Simmer for 5 minutes.

Step 3: Make the Sauce

  • Add Velveeta cheese and heavy cream to the skillet. Stir until the cheese melts into a creamy sauce.
  • Fold in the cooked pasta and shredded cheddar. Mix until well-coated.

Step 4: Serve and Garnish

  • Serve immediately, garnished with sour cream, green onions, or diced avocado for added flavor.

Creative Variations

Vegetarian Option

  • Swap the protein for black beans, pinto beans, or chickpeas.
  • Add vegetables like zucchini, bell peppers, or mushrooms for extra nutrition.

Spicy Fiesta

  • Use spicy Rotel and pepper jack cheese for a kick.
  • Top with sliced jalapeños or a drizzle of hot sauce.

Low-Carb Adaptation

  • Replace pasta with zucchini noodles or spaghetti squash.
  • Use light cream and reduced-fat cheese for a healthier alternative.

For more pasta and Tex-Mex-inspired dishes, explore The Ultimate Taco Casserole: A Budget-Friendly Feast.


Tips for Success

  1. Choose the Right Pasta: Shapes like rotini and penne hold sauce better.
  2. Season Generously: Enhance the flavors with taco seasoning, garlic powder, and onion powder.
  3. Storage: Store leftovers in an airtight container for up to three days. Reheat gently to maintain creaminess.

Serving Suggestions

  • Pair with garlic bread or a fresh side salad for a complete meal.
  • Serve as part of a Tex-Mex buffet alongside tortilla chips and guacamole.
  • Use the mixture as a filling for tacos, burritos, or enchiladas.

Frequently Asked Questions (FAQs)

Can I Use Regular Tomatoes Instead of Rotel?

Yes, but add diced green chilies or chili powder for similar spice.

What Cheese Works Best for This Dish?

Velveeta ensures creaminess, but you can substitute with cheddar or Colby Jack.

Can I Freeze Rotel Pasta Fiesta?

Yes! Store in an airtight container for up to three months. Reheat on the stovetop with a splash of cream to restore texture.


Internal Linking Opportunities

Leverage these internal links to enhance user engagement:


Conclusion

Rotel Pasta Fiesta is an easy, versatile, and flavorful dish that brings Tex-Mex flair to your table. With its creamy texture and customizable options, it’s a recipe you’ll return to again and again. Experiment with variations, add your favorite toppings, and enjoy a fiesta of flavors in every bite.

For more creative and delicious recipes, visit ExoRecipes, your go-to destination for comfort food and culinary inspiration!

Best Scalloped Potatoes: Creamy, Cheesy, and Perfect for Any Occasion

creamy scalloped potatoes, cheesy scalloped potatoes, classic potato bake, holiday side dish, best potato casserole, rich potato gratin

Best Scalloped Potatoes: A Creamy and Cheesy Classic Side Dish

Scalloped potatoes are a timeless comfort food that pairs beautifully with a variety of main dishes, from roasted meats to vegetarian entrees. This recipe for the Best Scalloped Potatoes combines thinly sliced potatoes, a rich and creamy sauce, and golden, bubbly cheese to create a dish that’s perfect for holiday feasts or casual family dinners.

Explore more comforting recipes like The Ultimate Comfort Food: Crockpot Potato Soup with Hashbrowns to round out your meal.


Why These Are the Best Scalloped Potatoes

This scalloped potato recipe stands out for several reasons:

  • Rich and Creamy: A perfectly seasoned, velvety sauce ensures each bite is flavorful.
  • Customizable: Add your favorite cheeses or mix in extras like bacon or onions.
  • Simple Preparation: With a few kitchen tools, this dish comes together effortlessly.

For more potato-based inspiration, try Garlic Rosemary Steak and Potatoes Skillet, a savory main to complement this side.


Ingredients for Scalloped Potatoes

Here’s what you’ll need for the perfect scalloped potatoes:

  • 2 lbs Yukon Gold or Russet potatoes, peeled and thinly sliced
  • 1 cup heavy cream
  • 1 cup whole milk
  • 1 clove garlic, minced
  • 1 teaspoon fresh thyme or ½ teaspoon dried thyme
  • 1 cup shredded Gruyere or Cheddar cheese
  • 2 tablespoons unsalted butter
  • Salt and pepper to taste
  • Optional: ½ cup cooked, crumbled bacon for added flavor

How to Make the Best Scalloped Potatoes

Step 1: Prepare the Ingredients

  • Preheat the oven to 375°F (190°C).
  • Peel and slice the potatoes uniformly using a mandoline slicer for even cooking.

Step 2: Make the Sauce

  • In a saucepan, melt butter over medium heat. Sauté garlic until fragrant.
  • Add cream, milk, and thyme. Simmer gently, seasoning with salt and pepper.

Step 3: Assemble the Dish

  • Layer half of the sliced potatoes in a greased baking dish. Pour over half the cream mixture and sprinkle with half the cheese.
  • Repeat with the remaining potatoes, cream, and cheese.

Step 4: Bake to Perfection

  • Cover with foil and bake for 45 minutes. Remove the foil and bake for another 15 minutes or until golden and bubbly.

Creative Variations

Cheesy Scalloped Potatoes

  • Use a blend of Gruyere, Parmesan, and Mozzarella for extra richness.

Loaded Scalloped Potatoes

  • Add cooked bacon, caramelized onions, or sautéed mushrooms between the layers.

Vegan and Dairy-Free Option

  • Substitute the cream and milk with coconut cream and plant-based cheese.

For more unique variations, explore The Ultimate Cheesy Bacon Jalapeño Corn Dip, another cheesy favorite perfect for gatherings.


Tips for Success

  1. Even Slices Are Key: Use a mandoline slicer to ensure uniform thickness for consistent cooking.
  2. Season as You Go: Lightly season each potato layer to enhance the overall flavor.
  3. Don’t Skimp on Cheese: A generous cheese topping creates that golden, bubbly finish.

Serving Suggestions

  • Pair scalloped potatoes with roasted meats such as chicken, turkey, or beef tenderloin.
  • Serve alongside lighter vegetable dishes or a fresh green salad.
  • Use as a standalone vegetarian main with added veggies like spinach or broccoli.

Frequently Asked Questions (FAQs)

What’s the Difference Between Scalloped Potatoes and Au Gratin Potatoes?

Scalloped potatoes are traditionally made with a creamy sauce, while au gratin potatoes include layers of cheese and breadcrumbs for extra texture.

Can I Make Scalloped Potatoes Ahead of Time?

Yes! Assemble the dish and store it in the refrigerator for up to 24 hours. Bake fresh before serving.

How Do I Reheat Leftovers?

Reheat in a preheated oven at 350°F (175°C) for 20-25 minutes, covered with foil to retain moisture.

How Can I Prevent the Sauce from Curdling?

Use fresh cream and milk, and avoid boiling the sauce to prevent separation.


Internal Linking Opportunities

Enhance user experience with these internal links:


Conclusion

Scalloped potatoes are the ultimate side dish for any occasion, offering creamy layers of flavor with a golden, cheesy topping. Whether you’re hosting a holiday gathering or preparing a weeknight dinner, this recipe is a guaranteed hit. Customize it with your favorite add-ins, and enjoy a dish that’s as comforting as it is delicious.

For more creative recipes and cooking tips, visit ExoRecipes and transform your meals into memorable culinary experiences!