Pepperoni Pizza Ring Recipe: A Fun and Delicious Party Snack

pizza ring appetizer, crescent roll pizza ring, easy pizza ring recipe, stuffed pizza ring, pepperoni crescent roll recipe

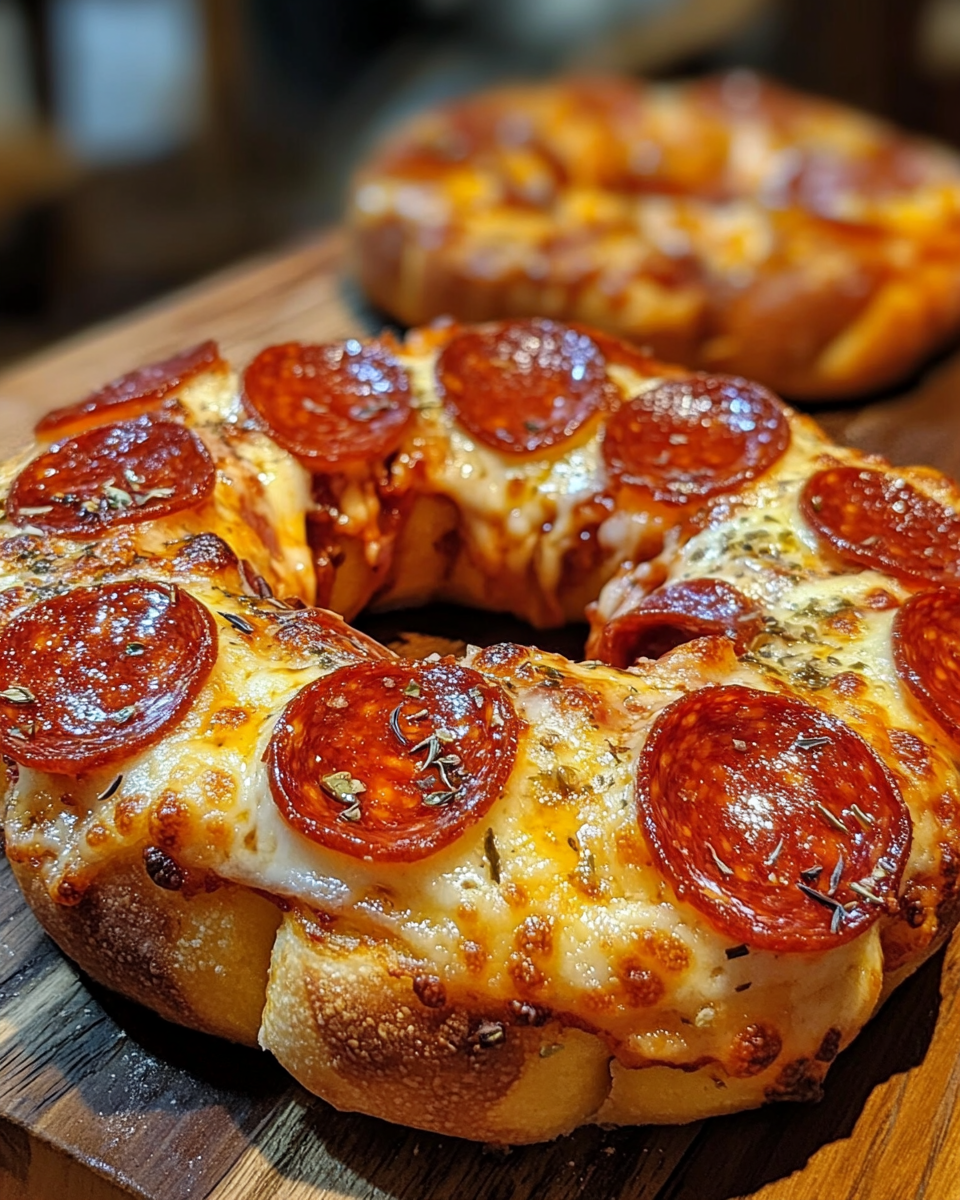
Pepperoni Pizza Ring Recipe: The Ultimate Party Snack

Pepperoni Pizza Ring is a versatile and delicious appetizer that combines classic pizza flavors with a unique presentation. Made using crescent roll dough, this dish is simple to prepare and perfect for gatherings or quick family dinners.


Why You’ll Love This Recipe

This recipe is:

  • Easy to Make: Requires just a few ingredients and minimal preparation time.
  • Crowd-Pleaser: Perfect for parties, game nights, or casual dinners.
  • Customizable: Add your favorite pizza toppings for endless variations.

For similar crowd-pleasing recipes, check out Elevate Your Snack Game with Homemade Pizza Sticks.


Ingredients for a Perfect Pizza Ring

Dough and Filling:

  • 1 can crescent roll dough
  • 1 cup shredded mozzarella cheese
  • ½ cup pizza sauce
  • 20-30 slices of pepperoni

Topping:

  • 2 tablespoons melted butter
  • 1 teaspoon Italian seasoning
  • 1 tablespoon grated Parmesan cheese

Step-by-Step Instructions

Step 1: Assemble the Dough

  1. Arrange crescent roll triangles in a circular pattern on a baking sheet, overlapping the wide ends to create a ring.
  2. Leave the pointed ends extending outward.

Step 2: Add the Filling

  1. Spread pizza sauce along the base of the dough.
  2. Layer pepperoni and sprinkle mozzarella cheese evenly.

For additional variations, check out Italian Stromboli: Rolling Up Comfort in Every Bite.

Step 3: Fold and Bake

  1. Fold the pointed ends over the filling and tuck them under the base to form a sealed ring.
  2. Brush the top with melted butter, sprinkle with Parmesan cheese, and bake at 375°F for 20–25 minutes.

Tips for Perfect Results

  • Prevent Soggy Dough: Don’t overfill or use excessive sauce.
  • Even Baking: Use parchment paper to prevent sticking and ensure even browning.
  • Add Flair: Top with crushed red pepper or extra cheese for added flavor.

Pair this dish with Kentucky Butter Cake for a sweet dessert option.


Creative Variations

  • Veggie Delight: Substitute pepperoni with sautéed mushrooms, bell peppers, and onions.
  • Meat Lover’s Ring: Add sausage crumbles, bacon bits, and ham.
  • Spicy Twist: Include jalapeños and crushed red pepper for heat.

FAQs About Pepperoni Pizza Ring Recipe

Can I Make This Ahead of Time?

Yes, assemble and refrigerate for up to 8 hours before baking.

What Other Dough Can I Use?

Pizza dough works well, but crescent roll dough is quicker and flakier.

How Do I Prevent the Ring from Falling Apart?

Ensure the ends of the dough are securely tucked under the base before baking.


Internal Linking Opportunities


Conclusion

Pepperoni Pizza Ring is a simple yet impressive dish that combines the best of pizza and party snacks. Its versatility, ease of preparation, and crowd-pleasing flavors make it a go-to recipe for any occasion. Try this today and explore endless possibilities with your favorite toppings!

For more exciting recipes, visit ExoRecipes and elevate your home-cooking game!

Avocado Chocolate Cheesecake: A Healthy Twist on Decadence

healthy chocolate cheesecake, avocado cocoa dessert, chocolate avocado cake, no-bake avocado cheesecake, guilt-free cheesecake recipe

Avocado Chocolate Cheesecake: A Creamy and Decadent Dessert

Avocado Chocolate Cheesecake is a luxurious twist on the traditional cheesecake, blending the richness of cocoa with the creamy, health-boosting properties of avocados. This dessert is not only indulgent but also brings a modern, health-conscious perspective to classic cheesecake recipes.

For a similar creative dessert idea, try Crispy Fried Cheesecake Bites.


Why Avocado Chocolate Cheesecake is a Must-Try

This recipe is perfect because it’s:

  • Healthy yet indulgent: Avocados replace heavy cream, offering a smooth texture with added nutrients.
  • Diet-friendly: Customizable for vegan, gluten-free, or keto diets.
  • Unique: A conversation starter that surprises and delights guests.

Pair it with Mini Pineapple Coconut Milk Cheesecakes for a mix of fruity and chocolaty flavors.


Ingredients You’ll Need

For the Crust:

  • 1 ½ cups almond flour or crushed graham crackers
  • 3 tablespoons melted coconut oil

For the Filling:

  • 2 ripe avocados, peeled and pitted
  • 8 oz cream cheese or a dairy-free alternative
  • ½ cup cocoa powder or melted dark chocolate
  • ¾ cup maple syrup or honey

Optional Toppings:

  • Dark chocolate shavings
  • Fresh berries
  • Whipped coconut cream

How to Make Avocado Chocolate Cheesecake

Step 1: Prepare the Crust

  1. Mix almond flour with melted coconut oil until crumbly.
  2. Press into a springform pan to form an even layer.
  3. Chill in the refrigerator while preparing the filling.

Step 2: Blend the Filling

  1. Combine avocados, cream cheese, cocoa powder, and sweetener in a food processor.
  2. Blend until silky smooth, adjusting sweetness to taste.

Step 3: Assemble and Chill

  1. Spread the filling over the prepared crust.
  2. Chill for at least 4–6 hours or overnight for best results.

Pro Tips for Success

  • Choose Ripe Avocados: Ensure they’re soft but not overripe to avoid any bitterness.
  • Sweetness Balance: Adjust sweeteners based on your preferred taste and dietary needs.
  • Chill Thoroughly: Proper chilling ensures the cheesecake sets beautifully.

For more baking inspiration, check out Easy No-Bake Banana Split Cheesecake.


Creative Variations and Ideas

Variations:

  • Keto Version: Use erythritol or stevia as a sweetener.
  • Nut-Free: Replace almond flour with crushed gluten-free cookies.
  • Dairy-Free: Use vegan cream cheese and coconut milk.

Topping Ideas:

  • Sprinkle crushed pistachios for added crunch.
  • Drizzle melted chocolate for a dramatic finish.
  • Add edible flowers for an elegant presentation.

FAQs About Avocado Chocolate Cheesecake

Can I Freeze This Cheesecake?

Yes, it freezes well. Wrap tightly and store for up to 3 months. Thaw overnight in the fridge before serving.

Does It Taste Like Avocado?

No, the chocolate flavor dominates, masking any avocado taste.

How Long Will This Cheesecake Last?

Store in an airtight container in the refrigerator for up to 5 days.


Internal Linking Opportunities


Conclusion

Avocado Chocolate Cheesecake offers a unique, nutritious spin on a classic dessert. Its creamy texture, combined with the bold flavors of chocolate, makes it a standout choice for any occasion. Try this recipe to impress your family and friends with a dessert that’s as healthy as it is indulgent!

For more creative and delicious dessert recipes, visit ExoRecipes!

Black Forest Mini Cheesecakes: A Decadent Bite-Sized Treat

mini chocolate cheesecakes, Black Forest cheesecake bites, cherry chocolate desserts, individual cheesecake recipes, Oreo crust cheesecakes, easy mini desserts

Black Forest Mini Cheesecakes: A Bite-Sized Delight

Black Forest Mini Cheesecakes combine the decadent flavors of chocolate, cream cheese, and cherries into a perfectly portioned dessert. These bite-sized treats are elegant enough for special occasions yet simple enough for everyday indulgence.

For a twist on traditional cheesecake, try Crispy Fried Cheesecake Bites for a crunchy exterior paired with creamy cheesecake filling.


Why Choose Black Forest Mini Cheesecakes?

These mini cheesecakes are:

  • Convenient: Perfectly portioned for individual servings.
  • Festive: Ideal for celebrations like birthdays, holidays, or romantic dinners.
  • Customizable: Adaptable with various toppings and crusts.

Pair these cheesecakes with Mini Pineapple Coconut Milk Cheesecakes for a dessert variety that wows guests.


Ingredients for Black Forest Mini Cheesecakes

For the Crust:

  • 1 cup Oreo cookie crumbs
  • 3 tablespoons melted butter

For the Cheesecake Filling:

  • 8 oz cream cheese, softened
  • ½ cup granulated sugar
  • 1 egg
  • 1 teaspoon vanilla extract
  • 2 tablespoons cocoa powder

For the Cherry Topping:

  • 1 cup pitted cherries (fresh or frozen)
  • 2 tablespoons sugar
  • 1 teaspoon cornstarch

Step-by-Step Instructions

Step 1: Prepare the Crust

  1. Combine Oreo crumbs and melted butter.
  2. Press the mixture into lined muffin tins to create a firm crust.

Step 2: Make the Cheesecake Filling

  1. Beat cream cheese and sugar until smooth.
  2. Mix in the egg, vanilla, and cocoa powder until well combined.
  3. Pour the filling over the crusts in the muffin tins.

Step 3: Bake and Cool

  1. Bake at 325°F (160°C) for 15–18 minutes until the centers are set.
  2. Allow the cheesecakes to cool completely before adding the topping.

For more baking inspiration, check out Kentucky Butter Cake for a classic, buttery treat.


Cherry Topping Preparation

Step 4: Make the Cherry Sauce

  1. Cook cherries and sugar over medium heat until they release their juices.
  2. Stir in a cornstarch slurry and simmer until thickened.
  3. Cool completely before spooning onto the cheesecakes.

Step 5: Assemble and Serve

  1. Top each mini cheesecake with a spoonful of cherry sauce.
  2. Garnish with whipped cream or chocolate shavings if desired.

Pro Tips for Success

  • Room Temperature Ingredients: Ensures a smooth filling without lumps.
  • Avoid Overbaking: Cheesecakes should be slightly jiggly in the center when done.
  • Chill Before Serving: Enhances the flavor and texture of the cheesecakes.

Pair with Easy No-Bake Banana Split Cheesecake for a creamy, chilled dessert option.


Creative Variations

  • White Chocolate Twist: Use white chocolate chips in the filling.
  • Raspberry Alternative: Swap cherry topping with raspberry sauce.
  • Gluten-Free Crust: Use gluten-free cookies for the crust.

FAQs About Black Forest Mini Cheesecakes

Can I Make These Cheesecakes Ahead of Time?

Yes, store them in the refrigerator for up to 3 days or freeze without the topping for up to 3 months.

What Type of Cherries Work Best?

Fresh cherries are ideal, but frozen or canned cherries also work well with slight adjustments to the sugar.

Can I Use a Different Crust?

Absolutely! Graham crackers or digestive biscuits are excellent alternatives.


Internal Linking Opportunities


Conclusion

Black Forest Mini Cheesecakes are a show-stopping dessert that combines the richness of chocolate with the tang of cherries in a compact, easy-to-serve format. Whether you’re hosting a party or indulging in a sweet treat, these mini cheesecakes are sure to impress.

For more exciting dessert recipes, visit ExoRecipes and transform your baking repertoire!

Grinch Oreo Surprise Balls: A Fun and Festive Holiday Treat

Grinch-themed Oreo truffles, no-bake holiday treats, Oreo ball recipes, Christmas dessert ideas, festive Oreo snacks, easy Grinch dessert recipe

Grinch Oreo Surprise Balls: A Festive Holiday Treat

Grinch Oreo Surprise Balls are a delightful, no-bake holiday dessert that combines the richness of crushed Oreos with a festive Grinch-themed presentation. Whether you’re preparing for a holiday party or creating treats for family and friends, these fun and colorful Oreo balls are sure to steal the spotlight.


Why Make Grinch Oreo Surprise Balls?

This recipe is perfect for:

  • Festive Celebrations: Bright green color and heart-shaped sprinkles give them a Grinchy charm.
  • No-Bake Simplicity: Ideal for busy holiday schedules.
  • Kid-Friendly Fun: Great for involving kids in the kitchen.

For other holiday recipes, explore Deep-Fried Oreos, a carnival classic turned festive.


Ingredients You’ll Need

For the Balls:

  • 36 Oreo cookies, finely crushed
  • 8 oz cream cheese, softened

For the Coating:

  • 12 oz green candy melts or white chocolate (colored with green food dye)

For Decoration:

  • Red heart-shaped sprinkles (to represent the Grinch’s growing heart)

How to Make Grinch Oreo Surprise Balls

Step 1: Prepare the Oreo Mixture

  1. Crush Oreos into fine crumbs using a food processor.
  2. Mix crushed Oreos with softened cream cheese until a dough-like consistency forms.

Step 2: Shape the Balls

  1. Roll the mixture into 1-inch balls.
  2. Place them on a parchment-lined baking sheet and chill for at least 30 minutes.

Step 3: Coat and Decorate

  1. Melt green candy melts according to package instructions.
  2. Dip the chilled Oreo balls into the green coating, ensuring they are fully covered.
  3. Place on parchment paper and immediately add a red heart sprinkle on top.

For additional dipping tips, check out Perfect Candy Coating Techniques to master the art of smooth coatings.


Pro Tips for the Best Results

  • Chill Before Coating: This helps the balls maintain their shape during dipping.
  • Use Dipping Tools: Forks or dipping sticks make coating easier and neater.
  • Store Properly: Keep in an airtight container in the refrigerator to maintain freshness.

Pair these Grinch Oreo Surprise Balls with Easy No-Bake Banana Split Cheesecake for a no-bake dessert duo.


Variations and Creative Twists

  • Peppermint Grinch Balls: Add crushed peppermint candy to the Oreo mixture for a minty twist.
  • Chocolate Drizzle: Use white or dark chocolate to add decorative drizzles.
  • Gluten-Free Option: Replace Oreos with gluten-free sandwich cookies.

FAQs About Grinch Oreo Surprise Balls

How Long Do These Treats Last?

Stored in an airtight container, they last up to one week in the fridge.

Can I Freeze Oreo Balls?

Yes, freeze them before coating for up to three months. Dip and decorate after thawing.

What Can I Use Instead of Candy Melts?

White chocolate chips with food coloring work well as an alternative.


Internal Linking Opportunities


Conclusion

Grinch Oreo Surprise Balls are an easy, fun, and festive treat that will bring joy to any holiday gathering. With their vibrant colors and delightful flavors, they’re sure to become a family favorite. Pair them with other no-bake desserts for a hassle-free holiday dessert table.

For more creative recipes and festive ideas, visit ExoRecipes and make your holidays unforgettable!

Berry Custard Pastries with Italian Crema Pasticcera: A Delicious Dessert

custard pastries recipe, Italian dessert with berries, crema pasticcera dessert, puff pastry with custard, berry tart recipe, easy Italian pastry recipe

Berry Custard Pastries with Italian Crema Pasticcera

Indulge in the delightful fusion of Italian tradition and fresh flavors with Berry Custard Pastries with Italian Crema Pasticcera. This dessert combines a flaky pastry base, rich custard filling, and the vibrant sweetness of fresh berries, making it the perfect treat for any occasion.

For another elegant pastry idea, explore Strawberry Shortcake Sushi for a modern twist on a classic.


Why You’ll Love This Recipe

This recipe is:

  • Versatile: Perfect for brunch, desserts, or as a show-stopping centerpiece.
  • Simple Yet Elegant: Easy to prepare while looking sophisticated.
  • Packed with Flavor: Combines the richness of custard with the freshness of berries.

For a lighter dessert option, try Raspberry Lemon Bars for a tangy treat.


Ingredients for Berry Custard Pastries

For the Crema Pasticcera:

  • 2 cups whole milk
  • 4 egg yolks
  • ½ cup granulated sugar
  • ¼ cup cornstarch
  • 1 teaspoon pure vanilla extract

For the Pastry:

  • 1 sheet of puff pastry, thawed
  • 1 egg (for egg wash)

For the Topping:

  • Mixed fresh berries (blueberries, raspberries, strawberries)
  • Optional: Powdered sugar for dusting

Step-by-Step Instructions

Step 1: Make the Crema Pasticcera

  1. Heat milk in a saucepan until warm but not boiling.
  2. Whisk egg yolks, sugar, and cornstarch in a separate bowl until smooth.
  3. Slowly add warm milk to the mixture, whisking constantly.
  4. Return to the saucepan and cook over medium heat until thickened.
  5. Stir in vanilla extract and let cool completely.

Step 2: Prepare the Pastry

  1. Preheat the oven to 375°F (190°C).
  2. Roll out the puff pastry and cut into squares.
  3. Score a smaller square inside each piece to create a border.
  4. Brush edges with egg wash and bake for 15–20 minutes until golden brown.

Step 3: Assemble the Pastries

  1. Fill the cooled pastry bases with crema pasticcera.
  2. Top with fresh berries, arranging them decoratively.
  3. Dust with powdered sugar for a finishing touch.

Tips for Success

  • Consistency Matters: Stir the custard constantly to avoid lumps.
  • Crisp Pastry: Ensure the puff pastry is baked until golden for the best texture.
  • Freshness is Key: Use ripe, fresh berries for optimal flavor.

For more baking inspiration, check out Kentucky Butter Cake for a moist and buttery treat.


Creative Variations

  • Tropical Twist: Swap berries for diced mango and kiwi.
  • Chocolate Custard: Add melted dark chocolate to the custard for a decadent option.
  • Mini Tarts: Use tartlet molds for bite-sized versions.

FAQs About Berry Custard Pastries with Italian Crema Pasticcera

Can I Make the Custard in Advance?

Yes, store the crema pasticcera in the refrigerator for up to two days.

What’s the Best Way to Prevent a Soggy Pastry?

Assemble the pastries just before serving to keep the pastry crisp.

Can I Use Frozen Berries?

Yes, but thaw them first and pat dry to remove excess moisture.


Internal Linking Opportunities


Conclusion

Berry Custard Pastries with Italian Crema Pasticcera bring together the best of traditional Italian dessert techniques and fresh, vibrant ingredients. Whether you’re entertaining guests or treating yourself, these pastries promise to impress with their delicate flavors and stunning presentation.

For more creative recipes and kitchen inspiration, visit ExoRecipes and bring your culinary visions to life!