Root Beer Float Pie: A Creamy, No-Bake Dessert Delight

no-bake root beer pie, creamy soda pie recipe, nostalgic dessert ideas, root beer dessert, easy summer pie recipe

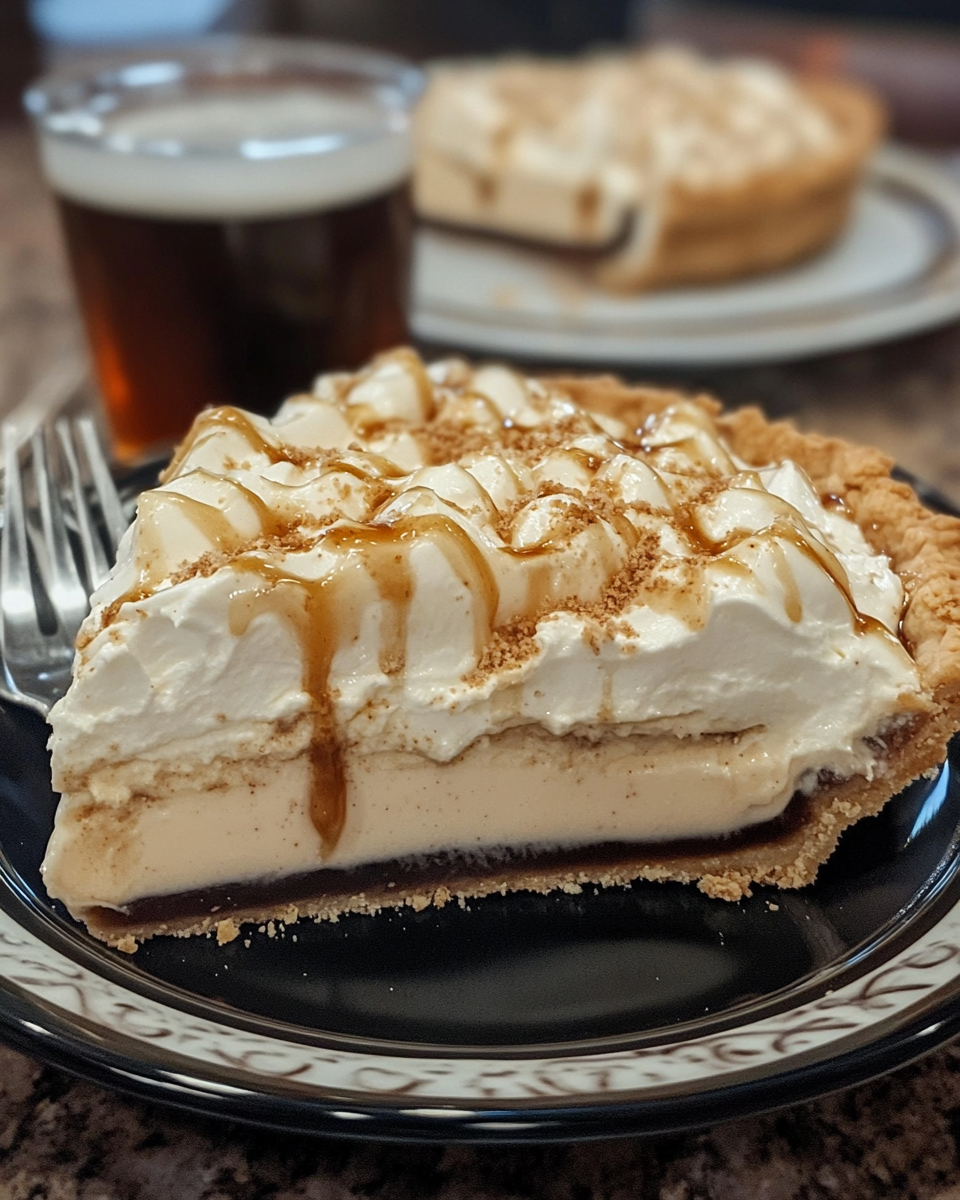
Root Beer Float Pie: A Nostalgic No-Bake Dessert Delight

Root Beer Float Pie is a fun and easy dessert that encapsulates the creamy, fizzy delight of a root beer float in pie form. With minimal ingredients and no oven required, it’s perfect for hot summer days or any occasion where a nostalgic, crowd-pleasing dessert is called for. Pair this delightful treat with Homemade Pineapple Soft Serve Ice Cream for a tropical twist to your dessert lineup.


Why You’ll Love Root Beer Float Pie

This pie is a hit because:

  • Quick and Easy Preparation: No baking required, saving time and effort.
  • Unique Flavor: Combines the fizzy sweetness of root beer with the creamy consistency of a pudding-based filling.
  • Perfect for All Ages: Appeals to both kids and adults with its fun flavor profile.

For more family-friendly dessert ideas, check out Strawberry Freezer Pie.


Ingredients for Root Beer Float Pie

For the Crust:

  • 1 pre-made graham cracker crust or a homemade crust made from:
    • 2 cups graham cracker crumbs
    • 6 tablespoons melted butter
    • 3 tablespoons sugar

For the Filling:

  • 1 cup chilled root beer soda
  • 1 package (3.4 oz) instant vanilla pudding mix
  • 1 cup whipped topping (e.g., Cool Whip)
  • Optional: Root beer extract for a stronger flavor

For the Topping:

  • Whipped cream
  • Maraschino cherries
  • Chocolate sprinkles or grated chocolate

How to Make Root Beer Float Pie

Step 1: Prepare the Crust

  1. If making a homemade crust, combine graham cracker crumbs, melted butter, and sugar.
  2. Press the mixture firmly into a pie pan and chill while preparing the filling.

Step 2: Make the Filling

  1. In a large mixing bowl, whisk together chilled root beer soda and vanilla pudding mix until smooth.
  2. Gently fold in whipped topping to create a light, airy consistency.
  3. Add a few drops of root beer extract for an extra flavor boost, if desired.

Step 3: Assemble the Pie

  1. Pour the filling into the prepared crust.
  2. Smooth the top with a spatula.
  3. Refrigerate for at least 4 hours or until the filling is set.

Step 4: Decorate and Serve

  1. Just before serving, top with whipped cream, maraschino cherries, and sprinkles.
  2. Slice and enjoy this creamy, fizzy delight!

Tips and Tricks for the Perfect Pie

  • Chill Your Ingredients: Ensure the root beer and whipped topping are well-chilled before mixing to help the filling set.
  • Firm Crust: Press the crust mixture firmly into the pie pan to prevent crumbling.
  • Customize the Flavor: Swap out root beer for cream soda or cola for a different twist.

Variations to Try

Frozen Root Beer Float Pie

  • Prepare the filling as instructed but freeze the assembled pie for a refreshing ice cream-like texture.

Mini Root Beer Float Pies

  • Use small tart pans to create individual servings, perfect for parties or picnics.

Chocolate Root Beer Pie

  • Add a layer of chocolate ganache to the crust before pouring in the filling for a rich twist.

Pair these variations with Cool Whip Cookies for a dessert duo that’s as easy as it is delicious.


Serving Suggestions

  • With a Classic Meal: Serve alongside a hearty dish like Dorito Chicken Casserole for a complete comfort food experience.
  • At a Summer BBQ: Complement the pie with grilled treats or fresh fruit salads.

FAQs About Root Beer Float Pie

1. Can I make this pie ahead of time?
Absolutely! Prepare and refrigerate the pie a day before serving. Add toppings just before serving to keep them fresh.

2. How long does this pie last?
Store the pie in the refrigerator for up to 3 days. Cover it with plastic wrap to keep it fresh.

3. Can I use sugar-free ingredients?
Yes, opt for sugar-free pudding mix and diet root beer for a lighter version.

4. What if the filling is too runny?
Ensure you use chilled root beer and let the pie set in the fridge for at least 4 hours.


Internal Linking Opportunities


Conclusion

Root Beer Float Pie is more than just a dessert; it’s a nostalgic trip down memory lane. With its fizzy root beer flavor and creamy texture, this no-bake pie is sure to be a hit at any gathering. Try this recipe today, and let your taste buds enjoy the classic soda shop experience in every bite.

For more unique and easy dessert ideas, visit ExoRecipes and bring joy to your table!

Creamy Beef and Bowtie Pasta: Easy One-Pot Comfort Food Recipe

beef pasta recipe, creamy bowtie pasta, ground beef pasta skillet, one-pot pasta recipe, creamy beef farfalle

Creamy Beef and Bowtie Pasta: A Comforting One-Pot Dinner

Indulge in the hearty flavors of Creamy Beef and Bowtie Pasta, a dish that blends tender bowtie pasta, rich beef, and a creamy sauce. Perfect for weeknight dinners, this recipe is simple, satisfying, and easily customizable.

For more comforting meals, explore The Ultimate Comfort Food: Crockpot Potato Soup.


Why You’ll Love This Recipe

This dish stands out because:

  • One-Pot Simplicity: Fewer dishes to wash while creating maximum flavor.
  • Customizable: Adapt with different veggies or proteins for a unique twist.
  • Kid-Friendly: The creamy texture and mild flavors are perfect for families.

Complement this pasta with Slow Cooker Baked Ziti for a pasta feast.


Ingredients for Creamy Beef and Bowtie Pasta

For the Pasta:

  • 2 cups farfalle (bowtie pasta)
  • 1 pound ground beef

For the Creamy Sauce:

  • 1 cup heavy cream
  • 2 cups beef broth
  • 1 cup grated Parmesan cheese

Optional Add-Ins:

  • 1 cup diced mushrooms
  • ½ cup chopped spinach

How to Make Creamy Beef and Bowtie Pasta

Step 1: Cook the Pasta

  • Boil pasta in salted water until al dente. Drain and set aside.

Step 2: Prepare the Beef and Sauce

  1. Brown the ground beef in a large skillet. Drain excess grease.
  2. Add mushrooms and spinach, cooking until softened.
  3. Stir in beef broth and heavy cream. Bring to a simmer.

Step 3: Combine Pasta and Sauce

  • Toss the cooked pasta into the skillet.
  • Add Parmesan cheese, stirring until the sauce thickens and coats the pasta.

Pair this dish with Creamy Garlic Parmesan Chicken for a complete comfort food experience.


Pro Tips for Success

  • Use Fresh Ingredients: Fresh Parmesan and herbs enhance flavor.
  • Don’t Overcook Pasta: Stop cooking just before it’s fully tender; it will finish in the sauce.
  • Thicker Sauce: Add a cornstarch slurry if the sauce is too thin.

Variations and Serving Suggestions

Creative Variations:

  • Vegetarian Option: Substitute beef with mushrooms or chickpeas.
  • Spicy Kick: Add crushed red pepper flakes.
  • Cheesy Overload: Mix in shredded cheddar or mozzarella for extra creaminess.

Serving Suggestions:


FAQs About Creamy Beef and Bowtie Pasta

Can I Make This Dish Ahead of Time?

Yes, prepare and refrigerate. Reheat on the stove with a splash of cream.

What’s the Best Substitute for Heavy Cream?

Half-and-half or whole milk with a bit of cornstarch works well.

How Do I Store Leftovers?

Store in an airtight container in the fridge for up to three days.


Internal Linking Opportunities


Conclusion

Creamy Beef and Bowtie Pasta is the perfect one-pot meal for busy evenings. It combines ease of preparation with a rich and satisfying flavor profile. Whether for a family dinner or entertaining guests, this recipe is sure to be a hit.

Explore more comforting recipes at ExoRecipes and transform your everyday meals into culinary delights!

Cheesy Sloppy Cheeseburger Pasta: Quick and Delicious Comfort Food

sloppy joe pasta, cheeseburger pasta skillet, one-pot beef pasta recipe, cheesy ground beef pasta, sloppy cheeseburger casserole

Cheesy Sloppy Cheeseburger Pasta: A Comfort Food Delight

This rich and creamy Cheesy Sloppy Cheeseburger Pasta is a delightful twist on two classic comfort foods—sloppy joes and cheesy pasta. It’s a quick, one-pot recipe that’s perfect for busy weeknights or a cozy family dinner.

For more easy weeknight ideas, check out Slow Cooker Magic: Unveiling the Ease of Crockpot Baked Ziti.


Why Cheesy Sloppy Cheeseburger Pasta is a Must-Try

This dish combines:

  • Classic cheeseburger flavors: Ground beef, cheddar cheese, ketchup, and mustard.
  • Quick preparation: Ready in under 30 minutes.
  • One-pot convenience: Minimal cleanup for a hassle-free meal.

Pair this recipe with The Ultimate Comfort Food: Crockpot Potato Soup for the ultimate comfort dinner spread.


Ingredients for Cheesy Sloppy Cheeseburger Pasta

For the Base:

  • 2 cups elbow macaroni (or any small pasta)
  • 1 pound ground beef

For the Sauce:

  • 1 cup ketchup
  • 2 tablespoons mustard
  • 1 teaspoon Worcestershire sauce
  • 1 cup beef broth
  • 2 cups shredded cheddar cheese

Optional Additions:

  • ½ cup diced onions
  • ½ cup chopped pickles for garnish

How to Make Cheesy Sloppy Cheeseburger Pasta

Step 1: Cook the Pasta

  • Boil the pasta in salted water until al dente. Drain and set aside.

Step 2: Prepare the Sauce

  1. In a large skillet, brown ground beef over medium heat. Drain excess grease.
  2. Add onions and sauté until translucent.
  3. Stir in ketchup, mustard, Worcestershire sauce, and beef broth. Bring to a simmer.

Step 3: Combine and Serve

  1. Toss the cooked pasta into the skillet with the beef mixture.
  2. Sprinkle shredded cheese over the top and stir until melted and creamy.
  3. Garnish with chopped pickles for a tangy kick.

For more hearty skillet meals, visit Dorito Chicken Casserole: A Crunchy Twist on Comfort Food.


Pro Tips for Success

  • Prevent Sticky Pasta: Rinse pasta with cold water after draining.
  • Extra Creaminess: Add a splash of heavy cream to the sauce.
  • Customizable: Swap ground beef for ground turkey or chicken for a leaner option.

Creative Variations

  • Bacon Cheeseburger Pasta: Add crumbled bacon for a smoky twist.
  • Spicy Version: Include jalapeños or hot sauce for extra heat.
  • Vegetable Boost: Mix in diced bell peppers, mushrooms, or zucchini.

FAQs About Cheesy Sloppy Cheeseburger Pasta

Can I Make This Dish Ahead?

Yes! Prepare the pasta and sauce separately, then combine and reheat before serving.

What Type of Cheese Works Best?

Cheddar is classic, but Monterey Jack or a cheddar-mozzarella blend works well, too.

How Do I Store Leftovers?

Store in an airtight container in the fridge for up to 3 days. Reheat on the stove with a splash of beef broth.


Internal Linking Opportunities


Conclusion

Cheesy Sloppy Cheeseburger Pasta combines the best of comfort food into one satisfying, easy-to-make dish. Whether you’re hosting a casual dinner or need a quick weeknight meal, this recipe will become a family favorite. Try it tonight and bring joy to your dinner table!

Explore more comforting recipes at ExoRecipes, where inspiration meets flavor.

Christmas Light Cupcakes Recipe: Festive Treats for Your Holiday Celebrations

holiday cupcakes recipe, festive cupcake ideas, Christmas-themed desserts, easy Christmas cupcakes, M&Ms cupcake decorations

Christmas Light Cupcakes Recipe: Festive Treats for the Holidays

Celebrate the joy of the season with Christmas Light Cupcakes! These vibrant and creative treats are perfect for holiday parties, family gatherings, or festive gifts. Combining delicious flavors with eye-catching decorations, they bring a touch of magic to your dessert table.

For more festive dessert ideas, check out Decadent Caramel Chocolate Cupcakes: Sweet Bliss.


Why Make Christmas Light Cupcakes?

These cupcakes are:

  • Fun and Creative: An enjoyable activity for families, especially with kids.
  • Visually Stunning: A surefire hit for Instagram-worthy holiday tables.
  • Versatile: Easy to adapt with different flavors or decorations.

Pair them with Mini Pineapple Upside-Down Cakes for a mix of festive desserts.


Ingredients for Christmas Light Cupcakes

Cupcake Base:

  • 1 ½ cups all-purpose flour
  • 1 cup granulated sugar
  • ½ cup unsalted butter, softened
  • 2 large eggs
  • ½ cup milk
  • 2 teaspoons vanilla extract

Frosting and Decorations:

  • 2 cups powdered sugar
  • ½ cup unsalted butter, softened
  • 2 tablespoons heavy cream
  • Black gel food coloring for “wires”
  • M&Ms, red and green preferred, for lights

How to Make Christmas Light Cupcakes

Step 1: Prepare the Cupcake Batter

  1. Preheat your oven to 350°F (175°C). Line a muffin tin with cupcake liners.
  2. Cream butter and sugar together until light and fluffy.
  3. Add eggs, one at a time, followed by vanilla extract.
  4. Gradually incorporate flour and milk, alternating until a smooth batter forms.
  5. Divide batter evenly into liners and bake for 18–20 minutes.

Step 2: Make the Frosting

  1. Beat butter and powdered sugar until smooth.
  2. Add heavy cream for desired consistency.
  3. Set aside a small portion for coloring with black gel food dye.

Step 3: Decorate the Cupcakes

  1. Pipe white frosting onto each cupcake.
  2. Use black frosting to draw “wires” across the tops.
  3. Attach M&Ms as “lights,” alternating colors for a festive look.

For decorating tips, visit How to Decorate Cupcakes Like a Pro.


Tips for Success

  • Room-Temperature Ingredients: Ensure all ingredients are at room temperature for smooth mixing.
  • Steady Hands for Decoration: Use a fine piping tip for precise wire designs.
  • Store Properly: Keep cupcakes refrigerated if not serving immediately.

Pair these with Christmas-Themed No-Bake Cheesecake for a complementary dessert option.


Variations for Creative Bakers

  • Flavor Twists: Substitute vanilla cupcakes with chocolate, red velvet, or gingerbread.
  • Alternative Decorations: Use mini marshmallows or colorful sprinkles as light bulbs.
  • Theme Colors: Customize with blue and silver for Hanukkah or pink and red for Valentine’s Day.

FAQs About Christmas Light Cupcakes

Can I Use Store-Bought Frosting?

Yes, but homemade frosting offers better flavor and consistency for decorating.

How Long Do These Cupcakes Stay Fresh?

Store in an airtight container in the fridge for up to 5 days.

What’s the Best Way to Transport Decorated Cupcakes?

Use a cupcake carrier to keep decorations intact during transit.


Internal Linking Opportunities


Conclusion

Christmas Light Cupcakes are the perfect addition to your holiday celebrations. Easy to make, fun to decorate, and delightful to eat, they bring festive joy to any occasion. Gather your loved ones and create these magical treats together!

For more festive recipes and tips, visit ExoRecipes today!

Ultimate Meat Lovers Pizza: Packed with Flavor and Easy to Make

meat lovers pizza recipe, loaded pizza with meats, homemade meat pizza, pizza with sausage and pepperoni, cheesy meat pizza

Ultimate Meat Lovers Pizza: A Bold, Flavorful Classic

The Ultimate Meat Lovers Pizza is a hearty dish loaded with rich flavors from various meats, cheeses, and complementary toppings. Whether for game night, a family dinner, or simply indulging your cravings, this pizza is a guaranteed crowd-pleaser.

For more pizza inspiration, check out Italian Stromboli: Rolling Up Comfort in Every Bite.


Why Make the Ultimate Meat Lovers Pizza?

This recipe stands out because it:

  • Features a medley of meats for a flavor-packed experience.
  • Offers flexibility for customization with your favorite toppings.
  • Delivers convenience with easy-to-follow steps for a restaurant-quality pizza at home.

Pair it with The Ultimate Guide to Perfect French Bread Pizza for more cheesy goodness.


Ingredients for Ultimate Meat Lovers Pizza

Dough and Base:

  • 1 store-bought or homemade pizza dough
  • ½ cup pizza sauce (or marinara)

Meats:

  • 1 cup cooked and crumbled Italian sausage
  • ½ cup cooked bacon bits
  • 1 cup sliced pepperoni
  • ½ cup diced ham or pancetta
  • Optional: Ground beef or chicken pieces

Cheese and Toppings:

  • 2 cups shredded mozzarella cheese
  • ½ cup Parmesan cheese
  • Red pepper flakes, oregano, and fresh basil for garnish

Step-by-Step Preparation

Step 1: Prepare the Dough

  1. Roll out the pizza dough on a lightly floured surface to your desired thickness.
  2. Transfer to a baking stone or pizza pan.

For expert crust tips, visit Revolutionizing Weeknight Dinners: The Crescent Roll Pizza Phenomenon.

Step 2: Assemble the Toppings

  1. Spread an even layer of pizza sauce across the dough.
  2. Sprinkle mozzarella cheese generously over the base.
  3. Layer the meats—starting with sausage, followed by pepperoni, ham, and bacon.
  4. Top with a sprinkle of Parmesan cheese and any additional toppings.

Step 3: Bake the Pizza

  1. Preheat the oven to 475°F (245°C).
  2. Bake for 12–15 minutes or until the crust is golden and the cheese is bubbly.
  3. Let cool slightly before slicing and serving.

Tips for Perfect Results

  • Evenly Distribute Toppings: Prevent soggy areas by spreading ingredients uniformly.
  • Par-Bake the Crust: For extra crispness, bake the crust slightly before adding toppings.
  • Enhance Flavors: Add fresh basil or drizzle with olive oil before serving.

Serve alongside Creamy Garlic Parmesan Chicken for a complete meal.


Creative Variations

  • Spicy Meat Lovers: Add jalapeños, hot Italian sausage, and chili flakes.
  • Cheesy Explosion: Mix in gouda, cheddar, or provolone with mozzarella.
  • BBQ Meat Lovers: Swap pizza sauce for BBQ sauce and use smoked meats.

FAQs About Ultimate Meat Lovers Pizza

Can I Use Pre-Cooked Meats?

Yes, pre-cooked meats work perfectly. Just ensure they are drained well to prevent excess grease.

What Cheeses Can I Use?

Mozzarella is a staple, but cheddar, provolone, and gouda add exciting flavor profiles.

How Do I Avoid a Soggy Crust?

Use a light hand with the sauce and toppings, and bake on a preheated pizza stone for best results.


Internal Linking Opportunities


Conclusion

The Ultimate Meat Lovers Pizza is more than a meal—it’s an experience. Packed with savory meats, gooey cheese, and a crispy crust, it’s guaranteed to satisfy even the heartiest appetites. Customize your pizza, and share the joy with friends and family!

For more recipes, visit ExoRecipes and explore your culinary creativity!