Rocky Road Fudge: A Decadent No-Bake Treat

chocolate marshmallow fudge, no-bake fudge recipe, holiday fudge with nuts, easy rocky road dessert, marshmallow chocolate fudge recipe

Rocky Road Fudge: A Classic Treat Made Easy

Rocky Road Fudge is a decadent and simple dessert that combines chocolate, marshmallows, and nuts for a perfectly chewy and crunchy delight. Whether it’s for a holiday gathering, a gift, or a quick sweet fix, this fudge is always a crowd-pleaser. Enhance your dessert spread by serving this alongside Kentucky Butter Cake for a buttery complement.


Why Rocky Road Fudge Stands Out

  • Rich Flavor: The perfect balance of chocolatey sweetness and nutty crunch.
  • Simple Preparation: A no-bake recipe that requires minimal effort.
  • Versatile Treat: Customize the ingredients to suit any occasion.

For a festive variation, try pairing this fudge with Chewy Peppermint Sugar Cookies for a refreshing twist.
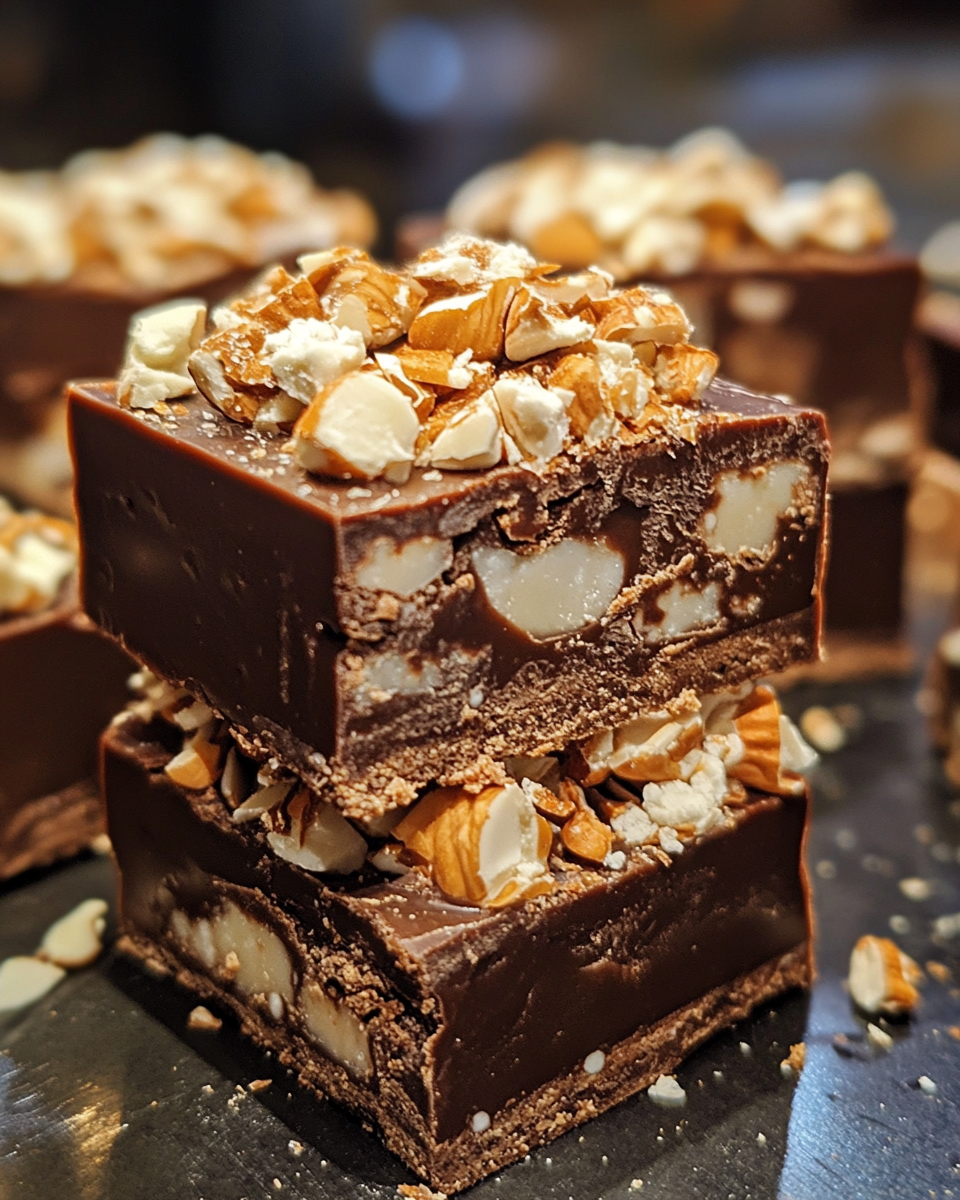

Ingredients Needed

Core Ingredients:

  • Semi-Sweet Chocolate Chips: The base of the fudge.
  • Sweetened Condensed Milk: Adds creaminess and sweetness.
  • Butter: Enhances the smooth texture.
  • Vanilla Extract: For depth of flavor.
  • Mini Marshmallows: Provide a chewy texture.
  • Salted Peanuts: Adds crunch and a savory contrast.

Optional Additions:

  • Walnuts, almonds, or pecans for variation.
  • Crushed peppermint for a holiday touch.

Tools for the Perfect Fudge

  • Mixing Bowls: For combining ingredients.
  • Microwave or Double Boiler: To melt the chocolate.
  • Parchment Paper: Ensures easy removal.
  • Sharp Knife: For clean cuts.

Step-by-Step Preparation

1. Melt and Mix:

  • Combine chocolate chips, butter, and sweetened condensed milk in a microwave-safe bowl.
  • Heat in 30-second intervals, stirring until smooth.

2. Fold and Pour:

  • Add vanilla extract, nuts, and marshmallows to the melted mixture.
  • Pour into a parchment-lined pan and spread evenly.

3. Chill and Serve:

  • Refrigerate for 2–3 hours or until firm.
  • Cut into squares using a sharp knife.

Serve alongside Mini Pineapple Coconut Cheesecakes for a dessert platter that wows.


Creative Variations

Nut-Free Option:

Replace nuts with crispy rice cereal for added crunch.

Double Chocolate Delight:

Use dark chocolate chips and drizzle white chocolate on top.

Festive Rocky Road:

Add holiday sprinkles or a layer of caramel.


Storing Your Fudge

  • Refrigeration: Keep in an airtight container for up to two weeks.
  • Freezing: Store in layers separated by parchment for up to three months.

FAQs About Rocky Road Fudge

Q1: Can I use evaporated milk instead of sweetened condensed milk?
A: No, sweetened condensed milk is essential for the correct texture and sweetness.

Q2: How can I prevent fudge from being too soft?
A: Ensure the chocolate is melted and mixed thoroughly, and chill for the recommended time.

Q3: Can I make this recipe vegan?
A: Yes, use dairy-free chocolate chips and condensed coconut milk.

Q4: What nuts work best for this recipe?
A: Peanuts, walnuts, or almonds provide the best crunch and flavor balance.

Q5: How do I customize the sweetness?
A: Adjust by choosing semi-sweet, milk, or dark chocolate chips.


Internal Linking Opportunities

  1. Kentucky Butter Cake: A buttery dessert to pair with fudge.
  2. Chewy Peppermint Sugar Cookies: Add a festive touch to your dessert spread.
  3. Mini Pineapple Coconut Cheesecakes: For a tropical flair.

Conclusion

Rocky Road Fudge is a timeless and versatile dessert that’s easy to make and perfect for any occasion. Whether you’re preparing for the holidays or a simple family gathering, this fudge is sure to impress. Pair it with Slow Cooker Baked Ziti for a well-rounded meal ending on a sweet note.

Chewy Peppermint Sugar Cookies: A Festive Holiday Favorite

peppermint Christmas cookies, soft sugar cookies with peppermint, holiday mint cookies, chewy holiday cookies, candy cane sugar cookies

Chewy Peppermint Sugar Cookies: A Holiday Delight

Chewy Peppermint Sugar Cookies are a festive treat that combines the refreshing flavor of peppermint with the soft, chewy texture of sugar cookies. Perfect for holiday gatherings or gifting, these cookies are a must-have for the season. Complement this recipe with Kentucky Butter Cake for a diverse dessert table.


Why You’ll Love These Cookies

  • Unique Flavor: A blend of sweet and minty flavors for a refreshing dessert.
  • Easy to Make: Requires simple ingredients and minimal preparation.
  • Versatile: Ideal for Christmas, gift exchanges, or as a year-round favorite.

Pair with Raspberry Lemon Bars for a tangy and sweet contrast on your cookie platter.


Ingredients for Chewy Peppermint Sugar Cookies

Core Ingredients:

  • Butter: Use unsalted for the best flavor.
  • Granulated Sugar: Provides sweetness and a light texture.
  • Eggs: Helps bind the dough.
  • All-Purpose Flour: The base for the cookie structure.
  • Peppermint Extract: Adds the refreshing minty flavor.
  • Crushed Peppermint Candies: For texture and festive appearance.

Optional Add-ins:

  • White chocolate chips for creaminess.
  • Festive sprinkles for a holiday touch.

Tools You’ll Need

  • Mixing Bowls: For combining wet and dry ingredients.
  • Electric Mixer: Ensures a smooth, fluffy batter.
  • Baking Sheets: Lined with parchment paper or silicone mats for even baking.
  • Rolling Pin or Bag: For crushing peppermint candies.

Step-by-Step Instructions

Preparing the Dough:

  1. Mix Wet Ingredients: Cream butter and sugar until fluffy. Add eggs and peppermint extract, blending until smooth.
  2. Combine Dry Ingredients: Gradually mix in flour and salt until just combined.
  3. Add Peppermint Candies: Gently fold in crushed candies for texture and flavor.

Shaping the Dough:

  • Roll dough into 1 1/2-inch balls and slightly flatten before baking.

Baking Instructions

  1. Preheat the oven to 350°F (175°C).
  2. Place dough balls 2 inches apart on prepared baking sheets.
  3. Bake for 8–10 minutes or until edges are set but centers are soft.
  4. Cool on baking sheets for 5 minutes before transferring to a wire rack.

For a richer pairing, serve these cookies with Homemade Hot Cocoa.


Variations to Try

  • Double Chocolate Peppermint: Add cocoa powder to the dough and use dark chocolate chips.
  • Gluten-Free Version: Substitute flour with a gluten-free baking mix.
  • Mint Chocolate Chip: Replace crushed peppermint candies with mini chocolate chips.

Storage Tips

  • At Room Temperature: Store in an airtight container for up to a week.
  • Freezing: Freeze baked cookies or dough for up to 3 months.

Tips for Perfect Peppermint Cookies

  • Chill the Dough: Prevents spreading and ensures a chewier texture.
  • Use Fresh Peppermint Candies: Enhances flavor and crunch.
  • Don’t Overbake: Remove cookies when centers appear slightly underdone for the best chewiness.

FAQs About Chewy Peppermint Sugar Cookies

Q1: Can I use candy canes instead of peppermint candies?
A: Yes, crushed candy canes work perfectly for this recipe.

Q2: How do I make the cookies more festive?
A: Roll the dough in red and green sugar before baking.

Q3: Can I use salted butter?
A: Yes, but reduce the added salt to balance the flavor.

Q4: How do I prevent cookies from becoming hard?
A: Store in an airtight container with a slice of bread to retain moisture.

Q5: Can I make these cookies vegan?
A: Use vegan butter and flaxseed meal mixed with water as an egg substitute.


Internal Linking Opportunities


Conclusion

Chewy Peppermint Sugar Cookies are a festive, flavorful treat that’s easy to make and perfect for any holiday occasion. Pair these cookies with Mini Pineapple Coconut Cheesecakes for a dessert spread that everyone will love!

Raspberry Cake with Lemon Buttercream: A Perfectly Tangy Dessert

lemon raspberry cake, raspberry lemon dessert, tangy buttercream frosting, fresh berry cake recipe, moist lemon cake with raspberries

Raspberry Cake with Lemon Buttercream: A Perfect Dessert for Every Occasion

Raspberry Cake with Lemon Buttercream is a delectable dessert that combines the tartness of fresh raspberries with the creamy sweetness of lemon buttercream. This recipe is ideal for celebrations or as a centerpiece for afternoon tea. To enhance your dessert spread, pair this cake with Raspberry Lemon Bars for a complementary tangy treat.


Why You’ll Love This Recipe

  • Perfect Balance of Flavors: Sweet raspberries and tangy lemon create a harmonious taste.
  • Easy to Customize: Adapt the recipe for gluten-free or vegan options.
  • Versatile Dessert: Great for birthdays, brunches, or tea parties.

For a more indulgent addition, serve this cake alongside Mini Pineapple Coconut Cheesecakes.


Ingredients for Raspberry Cake with Lemon Buttercream

Core Cake Ingredients:

  • Fresh or Frozen Raspberries: Adds natural sweetness and color.
  • All-Purpose Flour: Provides structure and balance.
  • Yogurt: Creates a moist, tender crumb.
  • Lemon Zest and Juice: For tangy freshness.
  • Eggs and Butter: Essential for richness and texture.
  • Sugar: Balances tartness and enhances flavor.

Lemon Buttercream Ingredients:

  • Butter: The base for creaminess.
  • Powdered Sugar: Sweetens and stabilizes the frosting.
  • Lemon Juice: Adds a zesty kick.
  • Optional: Yellow food coloring for aesthetic appeal.

Tools Needed for Success

  • Cake Pans: Two 8-inch or 9-inch pans, greased and lined with parchment.
  • Electric Mixer: For achieving a fluffy batter and smooth frosting.
  • Spatula and Offset Spreader: Ensures even frosting application.

Step-by-Step Instructions

Preparing the Cake Batter:

  1. Preheat oven to 350°F (175°C) and prepare the cake pans.
  2. Cream butter and sugar until light and fluffy.
  3. Add eggs one at a time, beating well after each addition.
  4. Mix in yogurt, lemon zest, and juice for moisture and flavor.
  5. Fold in the dry ingredients and gently stir in raspberries.

Baking the Cake:

  1. Divide the batter evenly between the prepared pans.
  2. Bake for 25–30 minutes or until a toothpick comes out clean.
  3. Let cool in pans for 10 minutes, then transfer to a wire rack.

Crafting the Lemon Buttercream

  1. Beat butter until creamy.
  2. Gradually add powdered sugar, mixing well after each addition.
  3. Incorporate lemon juice and zest, adjusting the consistency with sugar or juice as needed.
  4. Optional: Add yellow food coloring for visual appeal.

Assembling the Cake

  1. Place one cake layer on a serving plate. Spread a generous amount of buttercream on top.
  2. Add the second layer and cover the entire cake with frosting.
  3. Decorate with fresh raspberries, lemon slices, or edible flowers for a stunning finish.

Variations to Try

  • Gluten-Free Option: Use a gluten-free flour blend.
  • Mixed Berry Cake: Combine raspberries with blueberries or strawberries.
  • Vegan Version: Replace butter and eggs with plant-based substitutes.
  • Extra Tang: Add a thin layer of lemon curd between the cake layers.

For savory balance, pair this dessert with Slow Cooker Magic Baked Ziti.


Tips for a Perfect Cake

  • Use Room-Temperature Ingredients: Ensures even mixing and baking.
  • Chill the Layers: Makes assembly and frosting easier.
  • Don’t Overmix: Keeps the cake light and airy.

FAQs About Raspberry Cake with Lemon Buttercream

Q1: Can I freeze the cake layers?
A: Yes, wrap the cooled layers in plastic wrap and freeze for up to 3 months.

Q2: What’s the best way to prevent raspberries from sinking?
A: Toss them in flour before folding into the batter.

Q3: Can I make this as cupcakes?
A: Absolutely! Adjust the baking time to 18–20 minutes.

Q4: How do I store the frosted cake?
A: Keep it in the refrigerator for up to 5 days in an airtight container.

Q5: Can I substitute yogurt with sour cream?
A: Yes, sour cream works equally well for a moist texture.


Internal Linking Opportunities


Conclusion

The Raspberry Cake with Lemon Buttercream combines the best of sweet and tangy flavors in a moist, tender cake. Whether for a celebration or a simple family treat, this recipe is a guaranteed crowd-pleaser. For a complete meal, pair it with Creamy Garlic Parmesan Chicken and enjoy a memorable dining experience!

Chocolate Chip Shortbread Cookies: Buttery, Rich, and Irresistible

buttery shortbread cookies with chocolate chips, easy shortbread cookie recipe, chocolate chip cookie variation, crumbly chocolate chip shortbread

Chocolate Chip Shortbread Cookies: The Perfect Combination of Richness and Simplicity

Chocolate Chip Shortbread Cookies are a timeless treat, blending buttery goodness with pockets of melted chocolate. Perfect for any occasion, these cookies are simple to prepare and even easier to devour. Complement this recipe with Kentucky Butter Cake for a dessert spread that delights every palate.


Why Choose Chocolate Chip Shortbread Cookies?

  • Classic Flavor: A buttery base with bursts of chocolate in every bite.
  • Easy to Make: Requires only a handful of ingredients.
  • Versatile: Ideal for gifting, snacking, or as a festive dessert.

Pair with Raspberry Lemon Bars for a tangy and sweet dessert duo.


Ingredients for Chocolate Chip Shortbread Cookies

Core Ingredients:

  • Butter: Use unsalted for a clean, rich flavor.
  • Sugar: Granulated or powdered for sweetness and texture.
  • Flour: All-purpose flour for a tender crumb.
  • Chocolate Chips: Choose semi-sweet or dark chocolate for a rich contrast.
  • Salt: Enhances flavor and balances sweetness.

Optional Add-Ins:

  • Vanilla extract for depth.
  • Chopped nuts for crunch.
  • Citrus zest for a refreshing twist.

Tools Needed for Perfect Shortbread Cookies

  • A stand mixer or hand mixer for creaming the butter and sugar.
  • Parchment paper and baking trays for non-stick baking.
  • A sharp knife for slicing dough logs.

Step-by-Step Recipe Instructions

Preparing the Dough:

  1. Cream softened butter and sugar until fluffy.
  2. Gradually mix in the flour and salt until a dough forms.
  3. Fold in chocolate chips and optional add-ins.

Shaping the Dough:

  • Option 1: Roll the dough into a log, wrap in plastic, and chill.
  • Option 2: Roll out the dough and use cookie cutters for festive shapes.

Baking Instructions:

  1. Preheat oven to 300°F (150°C).
  2. Slice chilled dough into rounds or place shaped cookies on a baking tray.
  3. Bake for 15–20 minutes until edges are lightly golden.

Variations to Try

  • Nutty Twist: Add chopped almonds or pecans.
  • Espresso Infusion: Mix in a teaspoon of instant espresso powder.
  • Holiday Cheer: Use red and green sprinkles or dip in melted chocolate.

Pair these variations with Mini Pineapple Coconut Cheesecakes for a holiday dessert platter.


Tips for the Best Chocolate Chip Shortbread Cookies

  • Chill the Dough: Prevents spreading during baking.
  • Use Quality Butter: The flavor depends heavily on the butter.
  • Avoid Overmixing: Ensures a tender, crumbly texture.

FAQs About Chocolate Chip Shortbread Cookies

Q1: Can I make these cookies gluten-free?
A: Yes, substitute all-purpose flour with a 1:1 gluten-free baking mix.

Q2: Can I freeze the dough?
A: Absolutely! Wrap the dough tightly in plastic and freeze for up to three months.

Q3: Why is my dough too crumbly?
A: Ensure the butter is soft but not melted, and mix until just combined.

Q4: How do I store the cookies?
A: Keep them in an airtight container at room temperature for up to a week.

Q5: Can I use white chocolate chips?
A: Yes, white chocolate pairs beautifully with this buttery shortbread base.


Internal Linking Opportunities


Conclusion

Chocolate Chip Shortbread Cookies are an easy, versatile, and utterly delicious treat that’s sure to impress. Whether for a quick snack or a holiday gathering, these cookies bring buttery bliss to your table. Pair them with Sheetpan Pancakes for a delightful breakfast or dessert experience!

Crunchy Southwestern Chicken Wrap: Bold Flavors and Easy Meal Prep

southwestern chicken wrap recipe, Tex-Mex chicken wrap, crispy chicken wrap, tortilla chicken wrap with crunch

Detailed Outline for “Crunchy Southwestern Chicken Wrap” Article


Part 1: Introduction and Overview

1. Introduction (200 words)

  • Introduce the Crunchy Southwestern Chicken Wrap as a quick, flavorful, and satisfying meal option.
  • Highlight its appeal: fresh veggies, protein-packed chicken, and a crunchy texture from unique ingredients like Fritos.
  • Mention its versatility: perfect for lunch, dinner, or meal prep.

2. Why Southwestern Chicken Wraps Are Popular (150 words)

  • Combines bold flavors of taco seasoning, salsa, and creamy sour cream sauce.
  • Easy to prepare in under 20 minutes.
  • Suitable for customization with different proteins or toppings.

Part 2: Ingredients and Preparation

3. Key Ingredients (300 words)

  • Tortillas: Large, wrap-size flour tortillas for easy rolling.
  • Cooked Chicken: Shredded or diced for texture.
  • Crunch Factor: Crushed Fritos for a unique twist.
  • Fresh Vegetables: Lettuce, tomatoes, and avocado for freshness.
  • Cheese: Shredded cheddar for creaminess.
  • Southwestern Sauce: Made with sour cream, salsa, and taco seasoning.

4. Tools You’ll Need (150 words)

  • Mixing bowls for sauce preparation.
  • Cutting board and knife for chopping vegetables.
  • Plastic wrap or foil for storing leftovers.

5. Preparing the Ingredients (200 words)

  • Cook or shred chicken if not pre-prepared.
  • Dice vegetables and shred cheese.
  • Mix sour cream, salsa, and taco seasoning for the sauce.

Part 3: Assembling the Wrap

6. Step-by-Step Instructions (250 words)

  • Lay a tortilla flat and spread a tablespoon of sauce on the bottom half.
  • Add lettuce, tomatoes, avocado, shredded chicken, and cheese.
  • Sprinkle crushed Fritos on top for crunch.
  • Drizzle additional sauce before folding.

7. Rolling and Securing the Wrap (150 words)

  • Fold in the sides of the tortilla.
  • Roll tightly to secure the ingredients inside.
  • Cut the wrap in half for easy serving.

Part 4: Tips, Variations, and Serving Suggestions

8. Pro Tips for Perfect Wraps (200 words)

  • Use fresh, ripe avocados for a creamy texture.
  • Roll wraps tightly to prevent them from falling apart.
  • Adjust the sauce to your spice preference by using milder or spicier salsa.

9. Recipe Variations (300 words)

  • Vegetarian Option: Swap chicken for black beans or grilled tofu.
  • Spicy Wraps: Add sliced jalapeños or chili flakes.
  • Cheesy Explosion: Include queso or Pepper Jack cheese for extra creaminess.
  • Healthy Twist: Use whole-wheat tortillas and Greek yogurt in the sauce.

10. Serving Suggestions (200 words)

  • Pair with Air Fryer Green Bean Fries for a healthier side.
  • Serve with a dipping sauce like guacamole or chipotle ranch.
  • Include roasted Brussels sprouts or fresh fruit for balance.

Part 5: Storage, Meal Prep, and FAQs

11. Storing Leftovers (150 words)

  • Wrap securely in plastic wrap and refrigerate for up to 3 days.
  • Note that Fritos may lose their crunch but remain flavorful.

12. Freezing Wraps (150 words)

  • Assemble wraps without fresh vegetables to avoid texture issues.
  • Wrap tightly in foil and freeze for up to 3 months.

13. Frequently Asked Questions (FAQs) (400 words)

Q1: Can I use store-bought taco seasoning?
A: Yes, store-bought taco seasoning works perfectly, or you can make a homemade blend.

Q2: Can I make these wraps ahead of time?
A: Yes, they’re great for meal prep. Assemble and refrigerate, but add Fritos just before serving for crunch.

Q3: Can I use other meats?
A: Shredded turkey, ground beef, or grilled shrimp are excellent alternatives.

Q4: How do I prevent wraps from getting soggy?
A: Ensure lettuce is dry and don’t overfill with sauce.

Q5: What’s the best way to reheat frozen wraps?
A: Thaw overnight in the refrigerator, then warm in a skillet or oven.


Part 6: LSI and NLP Keywords

  • Southwestern chicken recipes
  • Crunchy lunch wraps
  • Easy meal prep wraps
  • Chicken and avocado wraps
  • Healthy tortilla wrap ideas
  • Spicy Frito wraps
  • Tex-Mex chicken recipes
  • Taco-inspired wraps
  • High-protein chicken lunch
  • Quick tortilla roll-ups

Suggested External Links

  1. How to Make Homemade Taco Seasoning – Anchor Text: “Learn to make homemade taco seasoning.”
  2. Tips for Meal Prep Lunches – Anchor Text: “Master meal prep with these tips.”
  3. Pairing Sides with Wraps – Anchor Text: “Find the best sides to serve with wraps.”

Internal Linking Opportunities


Conclusion

The Crunchy Southwestern Chicken Wrap is a quick, flavorful, and versatile recipe that fits any meal plan. Its combination of creamy sauce, fresh vegetables, and crunchy Fritos creates a satisfying experience. Whether for meal prep, a casual lunch, or a family dinner, this recipe is sure to become a favorite. Try it with Kentucky Butter Cake for a delightful ending!

Vous avez dit :
Use WebPilot to read https://exorecipes.com/post-sitemap.xml and suggest internal linking opportunities, for the article about that keyword Using markdown formatting write the article below Format with markdown Italic the most important keywords Use bullet points Ensure it has high SEO readability Link out within the 2nd and 3rd paragraph using the external links, not at the end, to the resources, the article should contain more than 2200 words. and use the suggested internal links as rich anchor text for the previous content Please write in English language. and make sure that the article have more than 2300 words.
ChatGPT a dit :
GPT
Discussion terminée avec gpts.webpilot.ai

Crunchy Southwestern Chicken Wrap: The Ultimate Tex-Mex Delight

Crunchy Southwestern Chicken Wraps are a quick, flavorful meal perfect for lunch, dinner, or on-the-go snacking. These wraps combine tender chicken, fresh vegetables, creamy sauce, and a satisfying crunch, making them a family favorite. Pair this dish with Slow Cooker Chicken and Gravy for a comforting meal idea.


Why You’ll Love This Recipe

  • Easy to Make: Quick preparation with readily available ingredients.
  • Bold Flavors: Features Tex-Mex staples like taco seasoning and salsa.
  • Customizable: Adaptable for various dietary preferences.

For a perfect pairing, try Sheetpan Pancakes as a breakfast-to-lunch twist.


Ingredients for the Crunchy Southwestern Chicken Wrap

Core Ingredients:

  • Tortillas: Large flour tortillas for easy wrapping.
  • Chicken: Grilled, shredded, or diced chicken for protein.
  • Crunch Factor: Crushed tortilla chips or Fritos.
  • Fresh Vegetables: Lettuce, tomatoes, and avocado.
  • Cheese: Cheddar or Monterey Jack for creaminess.
  • Southwestern Sauce: A blend of sour cream, salsa, and taco seasoning.

Optional Add-Ins:

  • Diced jalapeños for spice.
  • Black beans for added protein.
  • Fresh cilantro for a herbal kick.

Tools Needed

  • A skillet for cooking chicken.
  • Mixing bowls for the sauce and filling.
  • Foil or parchment paper for wrapping.

Step-by-Step Instructions

1. Prepare the Ingredients

  • Cook chicken seasoned with taco seasoning until tender.
  • Dice tomatoes, shred lettuce, and slice avocado.
  • Mix sour cream, salsa, and taco seasoning for a creamy Southwestern sauce.

2. Assemble the Wrap

  • Lay the tortilla flat and spread a layer of sauce on one half.
  • Add lettuce, tomatoes, avocado, chicken, and cheese.
  • Sprinkle crushed chips on top for crunch.

3. Wrap and Secure

  • Fold in the sides of the tortilla.
  • Roll tightly to enclose the filling.
  • Slice in half for serving.

Pair these wraps with German Chocolate Poke Cake for a sweet ending to your meal.


Tips for Perfect Wraps

  • Use Fresh Ingredients: Ensures vibrant flavors and textures.
  • Warm the Tortillas: Makes them more pliable for wrapping.
  • Adjust Spice Levels: Tailor the sauce to your preference.

Creative Variations

Vegetarian Wraps:

  • Replace chicken with black beans or grilled tofu.

Spicy Kick:

  • Include diced jalapeños or chili flakes in the filling.

Cheesy Explosion:

  • Add queso or Pepper Jack cheese for extra flavor.

Low-Carb Option:

  • Use lettuce wraps instead of tortillas.

Serving Suggestions


FAQs About Crunchy Southwestern Chicken Wraps

Q1: Can I prepare these wraps ahead of time?
A: Yes, but add the crunchy elements just before serving to maintain texture.

Q2: What’s the best way to store leftovers?
A: Wrap tightly in foil and refrigerate for up to 3 days.

Q3: Can I freeze these wraps?
A: Avoid freezing wraps with fresh vegetables; assemble without them and add fresh veggies after reheating.

Q4: How do I make them gluten-free?
A: Use gluten-free tortillas and chips.

Q5: What’s a good alternative to sour cream in the sauce?
A: Greek yogurt is a great substitute for a healthier option.


Internal Linking Opportunities


Conclusion

The Crunchy Southwestern Chicken Wrap is a flavorful and versatile dish that fits seamlessly into your weekly meal plan. Whether you enjoy it as a quick lunch, a family dinner, or a meal prep option, it offers bold Tex-Mex flavors and satisfying textures. Pair it with other comforting dishes like Slow Cooker Magic Baked Ziti for a complete feast!