Whipped Shortbread Cookies: A Melt-in-Your-Mouth Holiday Delight

Melt-in-your-mouth cookies, buttery shortbread, holiday cookie recipes, festive shortbread cookies, whipped butter cookies, tender shortbread cookies

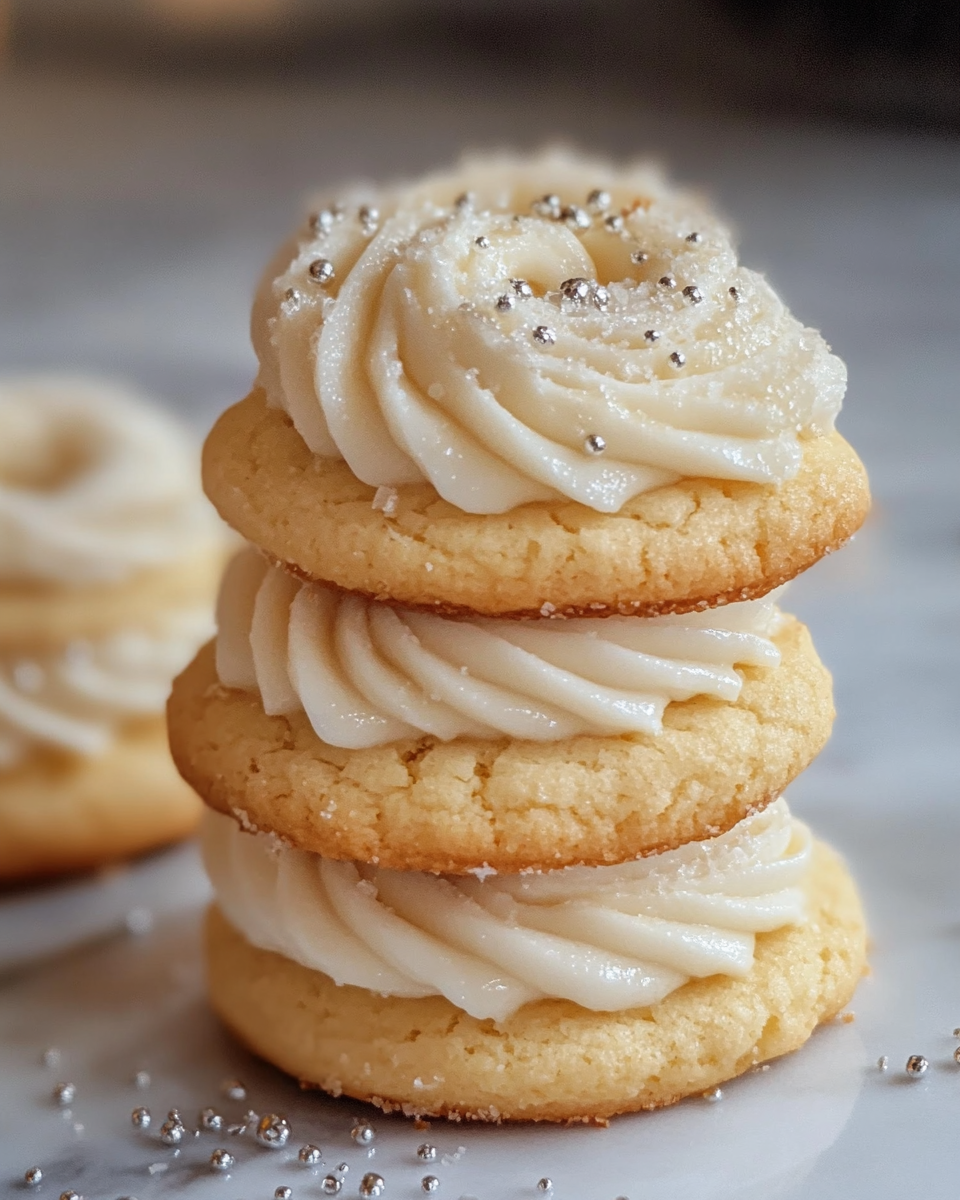
Whipped Shortbread Cookies: A Perfect Melt-in-Your-Mouth Treat

Whipped shortbread cookies are a timeless classic, beloved for their light, buttery texture that melts in your mouth. These delicate cookies are perfect for the holidays, casual gatherings, or simply indulging in a homemade treat.


What Are Whipped Shortbread Cookies?

Whipped shortbread cookies take the traditional shortbread recipe and elevate it by incorporating air into the dough, resulting in an exceptionally soft and airy texture. Originating from Scotland, shortbread has become a universal favorite, particularly during festive seasons.

To enhance your baking, consider learning about the Importance of High-Quality Butter, a key ingredient in creating the perfect shortbread texture.


Why They’re a Holiday Favorite

  • Ease of Preparation: Minimal ingredients and simple techniques make these cookies beginner-friendly.
  • Customizable: Add flavors, toppings, or decorations to suit any occasion.
  • Perfect for Gifting: Packaged in decorative tins, they make thoughtful, homemade holiday gifts.

Understanding the Science of Whipped Butter can help you achieve the ideal dough consistency for these cookies.


Ingredients for Whipped Shortbread Cookies

Core Ingredients

  • Butter: The foundation of the cookies; use unsalted, room-temperature butter for best results.
  • Powdered Sugar: Provides sweetness and contributes to the light texture.
  • All-Purpose Flour: The structure of the cookies.
  • Cornstarch: Optional, but enhances the tender texture.

Optional Add-ins

  • Vanilla extract for flavor.
  • Colored sprinkles, maraschino cherries, or chocolate chips for decoration.

For a festive twist, pair these cookies with other seasonal recipes like our Kentucky Butter Cake.


Step-by-Step Recipe

Ingredients:

  • 1 cup unsalted butter, softened
  • ½ cup powdered sugar
  • 1 ½ cups all-purpose flour
  • ¼ cup cornstarch (optional)

Instructions:

  1. Whip the Butter: Using an electric mixer, whip the softened butter until light and fluffy (approximately 2-3 minutes).
  2. Add the Sugar: Gradually mix in powdered sugar until fully incorporated.
  3. Incorporate Dry Ingredients: Slowly add flour (and cornstarch, if using) to the butter mixture. Beat until the dough is soft and smooth.
  4. Shape the Cookies: Scoop tablespoon-sized portions of dough, roll into balls, and place on a baking sheet lined with parchment paper. Flatten slightly with a fork or the back of a spoon.
  5. Bake: Preheat the oven to 325°F (160°C) and bake for 12-15 minutes, or until the edges are lightly golden.

For more precise baking tips, check out our guide to Slow-Cooker Baked Ziti, which emphasizes timing and consistency.


Creative Variations for Whipped Shortbread Cookies

Festive Decorations

  • Roll the dough in colored sugar or sprinkles before baking for a holiday theme.
  • Press a maraschino cherry or a dollop of jam into the center of each cookie.

Flavor Additions

  • Add a teaspoon of almond extract or lemon zest for a unique flavor profile.
  • Incorporate cocoa powder into the dough for a chocolate twist.

Gluten-Free Option

  • Substitute all-purpose flour with a gluten-free flour blend to cater to dietary restrictions.

Pair these variations with comforting desserts like our Crockpot Potato Soup for a warm and inviting menu.


Tips for Perfect Whipped Shortbread

  1. Use Room-Temperature Butter: It whips more easily and incorporates air effectively.
  2. Avoid Overbaking: The cookies should be light in color, with only slight browning on the edges.
  3. Chill the Dough: If the dough feels too soft, refrigerate it for 15-20 minutes before shaping.

FAQs About Whipped Shortbread Cookies

What makes whipped shortbread different from regular shortbread?

The whipping process incorporates air, making the cookies lighter and more tender than traditional shortbread.

Why is butter temperature important?

Room-temperature butter ensures the dough whips to the correct consistency, creating a fluffy texture.

Can I make these cookies in advance?

Yes, they can be made up to a week ahead. Store in an airtight container to maintain freshness.

How should whipped shortbread cookies be stored?

Store in an airtight container at room temperature for up to 1 week or freeze for up to 3 months.

Can I make gluten-free whipped shortbread cookies?

Yes, simply replace all-purpose flour with a gluten-free blend.


Suggested Internal Links for Enhanced Navigation


Conclusion

Whipped shortbread cookies are a delightful addition to any dessert table. Their melt-in-your-mouth texture, simple preparation, and endless customization options make them a go-to recipe for holidays and beyond. Whether you stick to the classic recipe or experiment with variations, these cookies are sure to impress.

Create a batch today and pair them with comforting recipes like our Kentucky Butter Cake for a memorable treat.

Bacon Cheddar Ranch Cheese Ball: A Crowd-Pleasing Appetizer for Any Occasion

Cheese ball recipe, bacon ranch cheese appetizer, cheddar cheese ball, ranch-flavored cheese ball, bacon cheese spread, creamy party appetizer

Bacon Cheddar Ranch Cheese Ball: The Ultimate Party Appetizer

Hosting a party or a casual get-together? Bacon Cheddar Ranch Cheese Ball is a surefire way to impress your guests. This savory, creamy appetizer combines the bold flavors of bacon, cheddar cheese, and ranch seasoning into one irresistible dish that’s easy to prepare and even easier to devour.

To discover how versatile ranch seasoning can be, check out these Creative Uses for Ranch Seasoning. Let’s dive into everything you need to know to create this crowd-pleasing recipe, from preparation tips to creative variations.


What is a Bacon Cheddar Ranch Cheese Ball?

A cheese ball is a creamy mixture of cheese, seasoning, and other ingredients shaped into a sphere and coated with a flavorful crust. This variation highlights the classic combination of cheddar cheese, bacon bits, and ranch seasoning, making it a versatile appetizer perfect for any occasion.

Pair this cheese ball with crackers or fresh veggies for the ultimate snack. Looking for the perfect drink pairing? Read about Wine Pairing for Cheese Appetizers.


Ingredients for the Perfect Cheese Ball

Here’s what you’ll need to craft this savory delight:

Core Ingredients:

  • Cream cheese (softened) – for a smooth and creamy base.
  • Shredded sharp cheddar cheese – provides bold, cheesy flavor.
  • Bacon bits – for that smoky, savory touch.
  • Ranch seasoning mix – adds tangy, herby flavor.
  • Green onions (optional) – for a fresh pop of color and taste.

Optional Add-ins:

  • Chopped jalapeños for a spicy kick.
  • Crushed nuts like pecans for added crunch.
  • Garlic powder for extra depth.

This dish pairs beautifully with recipes like our Chicken Bacon Ranch Potatoes for a complete ranch-inspired spread.


Step-by-Step Recipe

Ingredients:

  • 8 oz cream cheese (softened)
  • 2 cups shredded cheddar cheese
  • ½ cup cooked and crumbled bacon
  • 1 packet ranch seasoning mix
  • ¼ cup chopped green onions
  • Optional: crushed pecans or herbs for coating

Instructions:

  1. Mix the Base: In a large bowl, combine the softened cream cheese, cheddar cheese, bacon, and ranch seasoning. Mix until fully combined.
  2. Shape the Cheese Ball: Using your hands or a spatula, form the mixture into a sphere.
  3. Chill: Wrap the cheese ball in plastic wrap and refrigerate for at least 2 hours to firm up.
  4. Coat and Serve: Before serving, roll the cheese ball in chopped nuts, herbs, or extra bacon bits for an attractive finish.

For more inspiration on easy party dishes, explore our recipe for Slow-Cooked Pot Roast.


Creative Variations to Try

1. Spicy Jalapeño Cheese Ball

Add diced jalapeños or a pinch of cayenne pepper for heat. Roll in crushed tortilla chips for a fun twist.

2. Nut-Crusted Cheese Ball

Roll the cheese ball in a mix of crushed pecans and walnuts for a crunchy exterior that complements the creamy interior.

3. Mini Cheese Balls

Divide the mixture into bite-sized portions. Roll in various coatings like bacon bits, chives, or cheese shreds for a colorful platter.


Tips for Presentation and Pairing

  • Serving Suggestions: Offer alongside a mix of crackers, fresh veggies (carrots, celery, cucumber), and toasted baguette slices.
  • Holiday Styling: Shape the cheese ball into festive shapes like a Christmas tree or a pumpkin for seasonal gatherings.
  • Storage: Store leftovers in an airtight container in the fridge for up to a week.

For additional serving inspiration, read Cheese Appetizer Serving Tips.


FAQs About Bacon Cheddar Ranch Cheese Ball

How long can the cheese ball be stored?

Refrigerated, it lasts up to 7 days. Ensure it’s tightly wrapped to maintain freshness.

Can you freeze a cheese ball?

Yes, wrap it in plastic wrap and aluminum foil before freezing for up to 3 months. Thaw overnight in the refrigerator before serving.

What dippers work best with this cheese ball?

Crackers, fresh vegetables, pretzel sticks, and even apple slices pair wonderfully.

Can I make it ahead of time?

Absolutely! Prepare the cheese ball up to 2 days in advance. Add the coating just before serving for the best texture.


Suggested Internal Links


Final Thoughts

Bacon Cheddar Ranch Cheese Ball is the perfect addition to your party menu. With its creamy texture, bold flavors, and endless customization options, it’s guaranteed to be a hit. Whether you’re hosting a holiday dinner, potluck, or casual game night, this cheese ball is your ticket to a memorable spread.

The Ultimate Guide to Christmas Chex Mix: Recipes, Tips, and Festive Ideas

Holiday Chex Mix, Christmas party snack, festive snack mix, holiday-themed Chex Mix, Christmas snack ideas, holiday Chex recipes

The Ultimate Guide to Christmas Chex Mix: A Festive Holiday Favorite

When the holiday season rolls around, certain treats stand out as crowd-pleasers. Among them, Christmas Chex Mix takes the crown for being easy to make, highly customizable, and universally loved. This guide will take you through everything you need to know about creating the perfect Christmas Chex Mix, from its origin to creative recipes that suit every palate.

What is Christmas Chex Mix?

Christmas Chex Mix is a festive twist on the classic Chex Mix snack. Featuring a combination of cereals, pretzels, nuts, and candies coated in a sweet or savory mix, it’s a versatile treat that fits perfectly into any holiday celebration.

Why is it a Holiday Favorite?

  • Easy to Make: Even for beginner cooks, creating Christmas Chex Mix is foolproof.
  • Customizable: Swap ingredients to fit dietary needs or personal preferences.
  • Perfect for Gifting: Packaged in festive tins, this mix becomes a thoughtful homemade gift.

For a deep dive into how customizable holiday treats can elevate any celebration, check out Holiday Party Snack Tips.


Ingredients for the Perfect Christmas Chex Mix

Core Ingredients

  • Rice, Corn, or Wheat Chex cereal
  • Mini pretzels
  • Mixed nuts or seeds
  • Red and green M&M’s
  • White chocolate or candy melts

Optional Add-ins

  • Popcorn for extra crunch
  • Crushed peppermint for a holiday touch
  • Dried cranberries or raisins

For those interested in mastering ingredient substitutions, explore this guide on Gluten-Free Holiday Recipes.


Step-by-Step Recipe for Classic Christmas Chex Mix

Here’s a quick recipe to get started.

Ingredients:

  • 6 cups Rice Chex cereal
  • 2 cups mini pretzels
  • 1 cup red and green M&M’s
  • 1 cup white chocolate chips
  • ½ cup peanuts or almonds (optional)

Instructions:

  1. Mix Dry Ingredients: In a large bowl, combine the cereal, pretzels, and nuts.
  2. Melt the Coating: Microwave the white chocolate in 20-second intervals, stirring until smooth.
  3. Coat Evenly: Pour the melted chocolate over the dry mixture, tossing gently to coat.
  4. Add Candy: Once the mixture is slightly cool, add the M&M’s and stir.
  5. Cool and Serve: Spread the mix on parchment paper to set before storing.

Looking for variations? Check out this slow cooker-friendly dessert option inspired by our Crockpot Potato Soup Recipe for ideas to adapt Chex Mix for gatherings.


Creative Variations for Christmas Chex Mix

Sweet Recipes

  • Peppermint Bark Mix: Add crushed candy canes and a drizzle of dark chocolate.
  • Peanut Butter Lovers: Include Reese’s Pieces and melted peanut butter chips.
  • White Chocolate Cranberry Delight: Use dried cranberries and white chocolate.

Savory Options

  • Spiced Herb Mix: Add rosemary, thyme, and garlic powder for a savory twist.
  • Zesty Ranch: Mix in a packet of ranch seasoning and a touch of cayenne.
  • Cheesy Christmas: Toss in grated Parmesan and cheddar seasoning.

Looking to experiment with different textures? Pair ideas with our Puppy Chow Recipe.


Tips for Storing and Serving Christmas Chex Mix

  1. Storage: Use an airtight container to keep your mix fresh for up to two weeks.
  2. Freezing: Store in freezer-safe bags for up to two months.
  3. Serving: Arrange in festive bowls or gift wrap in clear bags tied with red and green ribbons.

Frequently Asked Questions (FAQs)

How long does Christmas Chex Mix last?

Properly stored, it can stay fresh for up to two weeks in an airtight container.

Can it be made ahead of time?

Absolutely! Prepare your mix up to a week in advance to save time during the busy holiday season.

Are there gluten-free options?

Yes, use Rice Chex and gluten-free pretzels to cater to dietary needs.


Internal Linking Opportunities


Final Thoughts

Whether you’re hosting a party, looking for a festive gift idea, or simply craving a seasonal snack, Christmas Chex Mix is a must-try. With endless variations, it’s easy to create a version that perfectly suits your preferences. Start experimenting today and bring joy to your holiday celebrations.

For more inspiration, don’t miss our guide to Family Favorite Slow-Cooked Pot Roast for comforting winter meals.

Cranberry Pepper Jelly: Sweet and Spicy Holiday Treat

cranberry jelly with peppers, spicy cranberry jelly, holiday pepper jelly recipe, sweet and spicy jelly, cranberry preserves with heat

Internal Linking Opportunities for the Article “Cranberry Pepper Jelly”

From the sitemap of ExoRecipes, several relevant internal links can enhance the Cranberry Pepper Jelly article:

Recommended Internal Links

  1. Spicy Pineapple Jalapeño Chutney
    • Anchor Text: “Explore the tangy kick of spicy chutneys with pineapple and jalapeño.”
    • Relevance: Pairing this chutney with Cranberry Pepper Jelly provides complementary spicy-sweet flavors.
  2. Apple Cranberry Walnut Salad
    • Anchor Text: “Pair this jelly with a fresh apple cranberry walnut salad for a festive touch.”
    • Relevance: Links the cranberry theme to other creative culinary applications.
  3. Raspberry Lemon Bars
    • Anchor Text: “Try these raspberry lemon bars for a tangy dessert to complement the spicy jelly.”
    • Relevance: Offers a dessert pairing option for the article readers.

Article: “Cranberry Pepper Jelly: A Sweet and Spicy Delight”

Cranberry Pepper Jelly combines the tang of fresh cranberries with the heat of peppers, creating a versatile condiment perfect for the holiday season or everyday meals. Whether you’re using it as a cheese board topping or glazing your favorite meats, this recipe will add zest to your culinary creations. For more fruity-spicy inspirations, check out Spicy Pineapple Jalapeño Chutney for another bold flavor combination.


Why Cranberry Pepper Jelly is Special

  • Versatile Uses: From a bread spread to meat glazes, its applications are endless.
  • Balanced Flavor: Combines sweet, tart, and spicy notes.
  • Seasonal Favorite: Perfect for gifting or adding to holiday feasts.

To explore additional cranberry recipes, consider Apple Cranberry Walnut Salad for a fresh and festive pairing.


Ingredients for Cranberry Pepper Jelly

Core Ingredients:

  • Fresh cranberries
  • Red and green bell peppers
  • Serrano or jalapeño peppers
  • White vinegar
  • Sugar
  • Pectin (optional for setting)

Optional Additions:

  • Orange zest for a citrusy kick
  • Cinnamon or nutmeg for holiday flavors

Tools You’ll Need

  • A large pot for cooking the jelly.
  • A food processor or knife for chopping ingredients finely.
  • Canning jars and a hot water bath setup for preserving.

Step-by-Step Recipe

1. Preparing the Ingredients

  • Finely chop cranberries, peppers, and jalapeños.
  • Measure out sugar and vinegar for balance.

2. Cooking the Jelly

  • Combine ingredients in a pot and bring to a boil.
  • Simmer and stir until the cranberries burst.
  • Add pectin if desired for a firmer set.

3. Canning and Storage

  • Pour into sterilized jars and process in a hot water bath.
  • Store in a cool, dark place for up to a year.

Creative Uses for Cranberry Pepper Jelly

As a Spread:

  • Serve over cream cheese with crackers.

As a Glaze:

  • Use on roasted chicken or pork.

As a Dressing:

  • Mix into a vinaigrette for salads.

Pair with Raspberry Lemon Bars for a sweet complement to the spice.


Frequently Asked Questions (FAQs)

Q1: Can I use frozen cranberries?
A: Yes, thaw and drain them before use.

Q2: How do I adjust the spice level?
A: Reduce the jalapeños for a milder jelly or add habaneros for extra heat.

Q3: How long does it last?
A: Properly sealed jars can last up to 12 months.

Q4: Can I skip the pectin?
A: Yes, but the jelly will be looser and more sauce-like.


Conclusion

Cranberry Pepper Jelly is a flavorful addition to any pantry. Its sweet-spicy balance elevates meals, snacks, and festive gatherings. Enhance your holiday spreads with this recipe, and don’t forget to pair it with Spicy Pineapple Jalapeño Chutney for a tropical twist!

Fruity Pebbles Breakfast Bread: A Vibrant Start to Your Morning

colorful breakfast bread, fruity cereal bread, moist yogurt bread, breakfast loaf with Fruity Pebbles, vibrant breakfast bread recipe

Fruity Pebbles Breakfast Bread Recipe: Vibrant & Fun Start to the Day

Fruity Pebbles Breakfast Bread combines the nostalgia of colorful cereal with a moist, rich bread base, making it an ideal breakfast or snack. With minimal effort and maximum flavor, this recipe is a must-try for busy mornings, brunches, or sweet cravings. Enhance your menu by serving it alongside Savory Sausage Cheese Breakfast Bread for a balanced spread.


Why Fruity Pebbles Breakfast Bread Is Irresistible

  • Visual Appeal: Vibrant pops of color from the cereal.
  • Moist Texture: Greek yogurt ensures every slice is tender.
  • Easy to Prepare: Great for beginners and seasoned bakers alike.

Pair this bread with Lemon Sugar Cookies for a zesty, complementary dessert.


Ingredients for Success

Core Ingredients:

  • Fruity Pebbles Cereal: The star ingredient for flavor and color.
  • All-Purpose Flour: Provides structure.
  • Baking Powder: Ensures the bread rises perfectly.
  • Sugar: Adds sweetness to balance the tang of Greek yogurt.
  • Greek Yogurt: Keeps the bread moist and rich.
  • Eggs: Bind the ingredients together.

Optional Additions:

  • Nuts like pecans or almonds for crunch.
  • Shredded coconut for tropical flair.

Cream Cheese Glaze:

  • Cream Cheese: For a creamy, tangy topping.
  • Powdered Sugar: Sweetens the glaze.
  • Vanilla Extract: Adds depth of flavor.

Tools You’ll Need

  • Mixing bowls for combining wet and dry ingredients.
  • Electric mixer for a smooth glaze.
  • Loaf pan lined with parchment paper for easy removal.

Step-by-Step Instructions

1. Prepare the Batter:

  • Combine wet ingredients: sugar, eggs, Greek yogurt, and vanilla.
  • Gradually fold in dry ingredients, ensuring a smooth mix.
  • Gently fold in Fruity Pebbles cereal for a burst of color and texture.

2. Bake the Bread:

  • Preheat oven to 350°F (175°C).
  • Pour batter into a greased loaf pan.
  • Bake for 40–50 minutes or until a toothpick inserted in the center comes out clean.

3. Make the Cream Cheese Glaze:

  • Beat cream cheese and powdered sugar until smooth.
  • Add vanilla extract and adjust consistency with milk if needed.

Decorating and Serving

  • Drizzle cream cheese glaze over the cooled bread.
  • Sprinkle additional Fruity Pebbles on top for a festive finish.

Pair your creation with Slow Cooker Baked Ziti for a brunch menu that satisfies both sweet and savory cravings.


Creative Variations

Cocoa Pebbles Twist:

Swap Fruity Pebbles for Cocoa Pebbles to create a chocolate version.

Healthier Option:

Use whole wheat flour and reduce sugar for a nutritious alternative.

Holiday Bread:

Add red and green sprinkles to make it festive for Christmas.

Tropical Theme:

Incorporate shredded coconut and a pineapple glaze for a summer vibe.


Tips for Success

  • Ensure the Fruity Pebbles are folded in just before baking to retain their crunch.
  • Always allow the bread to cool completely before adding the glaze.

FAQs About Fruity Pebbles Breakfast Bread

Q1: Can I make this bread gluten-free?
A: Yes, substitute the all-purpose flour with a gluten-free baking blend.

Q2: How do I store the bread?
A: Wrap in plastic or store in an airtight container for up to 3 days.

Q3: Can I freeze the bread?
A: Absolutely! Wrap slices individually in plastic wrap and freeze for up to 2 months.

Q4: Can I use another cereal?
A: Yes, other cereals like Cocoa Pebbles, Lucky Charms, or Honeycomb work well.

Q5: How do I make the bread dairy-free?
A: Replace Greek yogurt with a dairy-free yogurt alternative.


Internal Linking Opportunities

  1. Savory Sausage Cheese Breakfast Bread: A savory addition to balance the sweetness.
  2. Raspberry Lemon Bars: A tangy treat to complement this bread.
  3. Mini Pineapple Coconut Cheesecakes: Add tropical flavors to your brunch table.

Conclusion

Fruity Pebbles Breakfast Bread is a delightful, colorful treat that’s perfect for any time of the day. Its combination of moist texture, vibrant cereal, and creamy glaze makes it a favorite for kids and adults alike. Pair it with Slow Cooker Chicken and Gravy for a comforting meal with a sweet ending.