Garlic Chicken Fried Rice: A Quick and Flavorful One-Pan Meal

chicken garlic rice, one-pan fried rice, garlic fried rice with chicken, easy chicken fried rice recipe, quick fried rice dinner

Garlic Chicken Fried Rice: A Flavor-Packed One-Pan Dish

Garlic Chicken Fried Rice is a savory, quick-to-make meal that combines tender chicken, fragrant garlic, and perfectly cooked rice for a satisfying dish. Ideal for weeknight dinners or using up leftovers, this recipe delivers a balance of protein, vegetables, and bold flavors, all cooked in one pan.

For those looking for hearty meal ideas, try this Slow Cooker Magic: Crock-Pot Baked Ziti, which is another time-saving recipe packed with flavor.


What Makes Garlic Chicken Fried Rice a Go-To Meal?

This dish is popular for several reasons:

  • Versatility: Works as a main course or a side dish.
  • Budget-Friendly: Uses leftover ingredients to create a filling, nutritious meal.
  • Customizable: Add vegetables or adjust seasonings to suit your taste preferences.

Pair it with the comforting flavors of The Ultimate Comfort Food: Crockpot Potato Soup with Hashbrowns for a complete meal.


Ingredients for Garlic Chicken Fried Rice

Main Ingredients:

  • 2 cups cooked and cooled rice (day-old is best for texture).
  • 2 chicken breasts, cubed.
  • 3 cloves garlic, minced.
  • 2 large eggs.
  • 1 cup mixed vegetables (carrots, peas, corn).

Seasonings and Sauces:

  • 2 tablespoons soy sauce.
  • 1 tablespoon oyster sauce.
  • 1 teaspoon sesame oil.
  • Salt and pepper to taste.

Garnishes:

  • Chopped green onions.
  • Toasted sesame seeds.

How to Prepare Garlic Chicken Fried Rice

Step 1: Prepare Ingredients

  • Cube chicken and season with salt and pepper.
  • Beat eggs in a small bowl.
  • Mince garlic and chop vegetables into small pieces.

Step 2: Cook the Chicken

  • Heat sesame oil in a large wok or skillet over medium-high heat.
  • Sauté chicken until cooked through, about 5 minutes. Remove and set aside.

Step 3: Scramble the Eggs

  • In the same pan, add a little more oil if needed. Scramble the beaten eggs and set aside.

Step 4: Sauté Garlic and Vegetables

  • Add garlic to the pan and cook until fragrant. Toss in vegetables and stir-fry for 2–3 minutes.

Step 5: Combine Everything

  • Add the rice to the pan, breaking up clumps with a spatula.
  • Stir in soy sauce, oyster sauce, and chicken. Toss until well combined.
  • Return scrambled eggs to the pan and mix.

Creative Variations

1. Spicy Garlic Fried Rice:

  • Add Sriracha or chili flakes for a kick of heat.

2. Vegetarian Version:

  • Replace chicken with tofu or mushrooms.

3. Seafood Twist:

  • Substitute chicken with shrimp or scallops for a coastal flavor.

For more creative meal inspirations, check out this Recipe for Creamy Garlic Parmesan Chicken.


Tips for Success

  • Use Cold Rice: Day-old rice is firm and absorbs flavors better.
  • Prep Ingredients First: This dish cooks quickly, so have everything ready to go.
  • Adjust Garlic Levels: Add more or less garlic to suit your taste.

Serving Suggestions

  • Serve hot, garnished with green onions and sesame seeds.
  • Pair with an Asian-style cucumber salad or egg drop soup for a balanced meal.

FAQs About Garlic Chicken Fried Rice

1. Can I use brown rice?

Yes, brown rice adds a nutty flavor and works well in this recipe.

2. How do I store leftovers?

Store in an airtight container in the refrigerator for up to 3 days.

3. Can I freeze it?

Yes, freeze portions in airtight containers for up to 1 month. Reheat in a skillet for the best texture.

4. Can I make it vegan?

Yes, replace chicken with tofu and use tamari instead of soy sauce.


Nutritional Information

Each serving contains approximately:

  • Calories: 320
  • Protein: 25g
  • Carbohydrates: 40g
  • Fat: 8g

Internal Linking Opportunities


Conclusion

Garlic Chicken Fried Rice is a delicious, easy-to-make dish that combines bold flavors and simple ingredients. Whether you’re looking to use up leftovers or create a quick weeknight dinner, this recipe is versatile, customizable, and satisfying. Try it today and bring the flavors of your favorite takeout to your kitchen!

No-Bake Almond Joy Coconut Bites: A Quick and Delicious Treat

coconut almond chocolate bites, almond joy treats, no-bake coconut bites, easy almond joy recipe, coconut chocolate dessert bites

Almond Joy Coconut Bites: A Sweet, No-Bake Treat

Almond Joy Coconut Bites are a delicious, no-bake dessert inspired by the classic Almond Joy candy bar. These bite-sized delights combine the tropical sweetness of coconut, the nuttiness of toasted almonds, and the richness of chocolate. Perfect for holidays, parties, or as a quick snack, they’re a crowd-pleaser that’s both simple and indulgent.

For other no-bake dessert ideas, check out these Crispy Fried Cheesecake Bites to elevate your dessert spread.


Why Make Almond Joy Coconut Bites?

These treats are beloved for their:

  • Ease of Preparation: Minimal ingredients and no baking required.
  • Versatility: Great for holiday platters, snacks, or gifting.
  • Customizable Flavors: Easily tweak the recipe for different preferences or dietary needs.

Pair these with another holiday favorite like Mini Pineapple Coconut Milk Cheesecakes for a tropical dessert duo.


Ingredients You’ll Need

For the Bites:

  • 2 cups sweetened shredded coconut
  • ½ cup sweetened condensed milk
  • 1 teaspoon vanilla extract
  • 20 whole roasted almonds

For the Chocolate Coating:

  • 1 cup semi-sweet chocolate chips
  • 1 teaspoon coconut oil (optional, for smoother melting)

How to Make Almond Joy Coconut Bites

1. Prepare the Coconut Mixture

  • Mix shredded coconut, condensed milk, and vanilla extract in a bowl until a sticky dough forms.
  • Use your hands or a spoon to shape the mixture into small balls, about 1 inch in diameter.

2. Add the Almonds

  • Press one roasted almond into the center of each coconut ball, reforming the ball around the almond.

3. Chill the Bites

  • Place the coconut balls on a parchment-lined baking sheet.
  • Chill in the refrigerator for 1 hour to firm up.

4. Melt the Chocolate

  • In a microwave-safe bowl, melt chocolate chips and coconut oil in 30-second increments, stirring in between, until smooth.

5. Coat the Bites

  • Dip each coconut ball into the melted chocolate using a fork, ensuring they are fully coated.
  • Return to the parchment paper and let the chocolate set in the refrigerator for 30 minutes.

Tips for Success

  • Room Temperature Ingredients: Ensures even mixing of the coconut and condensed milk.
  • Use Parchment Paper: Prevents sticking and makes cleanup easier.
  • Chill Thoroughly: Helps the coconut mixture hold its shape during dipping.

For more tips on handling chocolate, visit Creative Chocolate Dessert Ideas.


Creative Variations

1. Dark Chocolate Delight

  • Substitute semi-sweet chocolate with dark chocolate for a richer flavor.

2. Nut-Free Option

  • Replace almonds with a dried fruit like raisins or omit entirely for allergen-friendly bites.

3. Extra Crunch

  • Roll the coconut mixture in crushed graham crackers before dipping in chocolate.

4. Holiday-Themed

  • Use colored sprinkles or edible glitter for festive occasions.

For another creative twist, check out these S’mores Jars, which are perfect for outdoor-themed events.


Serving and Storage

  • Serving: Arrange in mini cupcake liners for an elegant presentation.
  • Storage: Store in an airtight container in the fridge for up to 7 days or freeze for up to 3 months.

FAQs About Almond Joy Coconut Bites

1. Can I make them vegan?

Yes, use plant-based sweetened condensed milk and dairy-free chocolate.

2. How can I prevent the coconut mixture from sticking to my hands?

Lightly grease your hands with coconut oil or butter.

3. Do I have to toast the almonds?

Toasting enhances the flavor but is optional.

4. Can I skip the chocolate coating?

Yes, but the chocolate adds a signature touch reminiscent of Almond Joy candy bars.


Nutritional Information

Each bite (approx. 20g) contains:

  • Calories: 110
  • Fat: 7g
  • Carbohydrates: 12g
  • Protein: 2g

Internal Linking Opportunities


Conclusion

Almond Joy Coconut Bites are a delightful no-bake treat that combines simplicity with indulgence. With their creamy coconut base, crunchy almond center, and rich chocolate coating, they’re a guaranteed hit for any occasion. Whether you stick to the classic recipe or try a creative variation, these bites are sure to impress. Try making a batch today and enjoy a taste of tropical bliss!

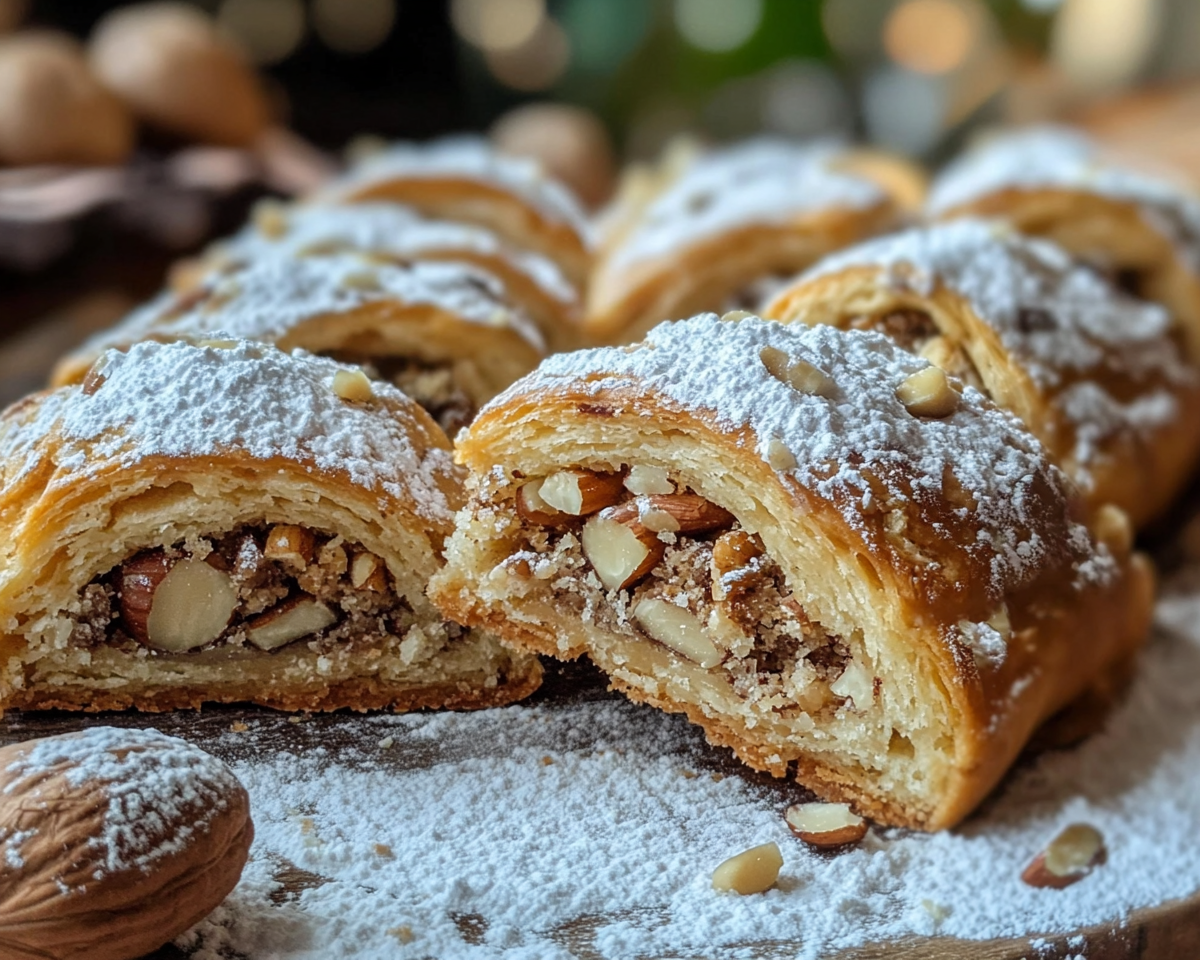
Traditional Italian Nut Roll Cookies Recipe

Italian walnut cookies, nut roll pastry recipe, holiday nut roll cookies, Italian Christmas cookies, traditional Italian dessert cookies

Italian Nut Roll Cookies: A Timeless Classic

Italian Nut Roll Cookies are a testament to the beauty of tradition and indulgence. These pastries combine a buttery, flaky crust with a sweet, nutty filling, making them perfect for holiday gatherings or anytime you crave a taste of nostalgia. Their versatility and rich flavor profile ensure they remain a favorite across generations.

For another comforting Italian-inspired dish, explore the Italian Stromboli Recipe, which brings the essence of Italian baking to your table.


What Makes Italian Nut Roll Cookies Special?

These cookies hold a unique place in the world of desserts:

  • Traditional Appeal: Rooted in Italian heritage, they showcase a harmonious balance of sweet and savory.
  • Perfect for Sharing: Ideal for cookie swaps, holiday parties, or gifting.
  • Customizable: Variations with different nuts or fillings let you make them your own.

For a sweet pairing, consider these Raspberry Cheesecake Brownie Bites, which complement the nutty richness beautifully.


Ingredients for Italian Nut Roll Cookies

For the Dough:

  • 4 ½ cups all-purpose flour
  • 1 pound butter, softened
  • 3 teaspoons baking powder
  • ½ pint sour cream
  • 4 large egg yolks
  • 1 ½ teaspoons granulated sugar

For the Filling:

  • ¾ pound walnuts, finely ground
  • 1 cup granulated sugar
  • 3 large egg whites, divided
  • 1 teaspoon vanilla extract
  • 1 ½ teaspoons honey

For Rolling and Dusting:

  • Powdered sugar mixed with flour (for rolling dough)
  • Additional powdered sugar for coating the finished cookies

Step-by-Step Instructions

1. Prepare the Dough

  • Beat butter and sugar until creamy.
  • Add egg yolks and mix well.
  • Gradually incorporate flour, baking powder, and sour cream until a soft dough forms.
  • Refrigerate overnight for easier handling.

2. Prepare the Filling

  • Beat egg whites until frothy, then add vanilla and honey.
  • In a separate bowl, combine walnuts and sugar.
  • Mix the egg white mixture with the walnut mixture to form a paste.
  • Refrigerate overnight for better consistency.

3. Shape the Cookies

  • Roll the dough thinly on a surface dusted with powdered sugar and flour.
  • Cut into 3-inch squares.
  • Place ½ teaspoon of filling in the center of each square.
  • Fold opposite corners to enclose the filling, sealing the edges tightly.

4. Bake

  • Preheat oven to 375°F (190°C).
  • Place cookies on a parchment-lined baking sheet.
  • Brush with the reserved egg white for a glossy finish.
  • Bake for 12–15 minutes or until lightly golden.

5. Cool and Coat

  • Let cookies cool on a wire rack.
  • Roll in powdered sugar for a festive finish.

Creative Variations

  • Chocolate Nut Rolls: Add a teaspoon of cocoa powder to the filling for a richer flavor.
  • Pecan Substitute: Swap walnuts for pecans for a slightly sweeter profile.
  • Citrus Twist: Incorporate orange or lemon zest into the dough for a fresh, zesty note.

For more creative baking ideas, check out the Cinnamon Roll Cake with Cream Cheese Glaze.


Tips for Success

  • Room Temperature Ingredients: Ensure butter is softened for smooth mixing.
  • Thin Dough: Roll the dough thin for a flaky, delicate crust.
  • Avoid Overfilling: Too much filling can cause the cookies to open during baking.

FAQs About Italian Nut Roll Cookies

1. Can I freeze these cookies?

Yes, freeze them in a single layer before transferring them to an airtight container. They’ll keep for up to 3 months.

2. What’s the best way to grind nuts?

Use a food processor to achieve a fine, consistent texture.

3. Can I use store-bought pastry dough?

While convenient, homemade dough provides a richer flavor and better texture.

4. Are there gluten-free options?

Yes, substitute all-purpose flour with a gluten-free baking mix.


Nutritional Information

Each cookie (approximately 40g) contains:

  • Calories: 150
  • Fat: 10g
  • Carbohydrates: 15g
  • Protein: 2g

Internal Linking Opportunities


Conclusion

Italian Nut Roll Cookies are more than just a dessert—they’re a celebration of tradition, flavor, and artistry. Whether served at a festive gathering or enjoyed with a warm cup of coffee, these cookies offer a timeless indulgence. Try this recipe today, and don’t forget to share the joy with loved ones!

Festive Christmas Ooey Gooey Butter Cookies Recipe

holiday butter cookies, Christmas gooey cookies, festive cookie recipe, cream cheese cookies for Christmas, easy holiday baking ideas

Christmas Ooey Gooey Butter Cookies: A Holiday Delight

When it comes to holiday baking, few recipes rival the indulgence of Christmas Ooey Gooey Butter Cookies. These soft, melt-in-your-mouth cookies combine the rich creaminess of butter and cream cheese with the festive charm of holiday sprinkles. Whether you’re preparing treats for a family gathering, a cookie exchange, or Santa himself, these cookies are guaranteed to bring cheer.

For those exploring festive desserts, consider pairing these cookies with the Easy Apple Cheesecake Tacos for a sweet holiday spread.


Why You’ll Love These Cookies

Christmas Ooey Gooey Butter Cookies stand out for their:

  • Simplicity: Made with minimal ingredients, including cake mix, these cookies are perfect for quick holiday baking.
  • Texture: The addition of cream cheese ensures a soft, gooey consistency that’s hard to resist.
  • Versatility: Change the sprinkles and flavors to suit any festive occasion.

For an equally indulgent option, try this Kentucky Butter Cake, which shares a similar buttery richness.


Ingredients for Christmas Ooey Gooey Butter Cookies

Here’s everything you’ll need to make these holiday treats:

  • Cake Mix: Yellow cake mix works best for a traditional flavor, but chocolate or red velvet are great for a twist.
  • Butter: Use unsalted, softened butter for optimal texture and flavor.
  • Cream Cheese: Adds the signature gooey texture.
  • Egg: Acts as a binder and enhances softness.
  • Vanilla Extract: Provides a subtle sweetness.
  • Powdered Sugar: For rolling the cookies and creating a snowy appearance.
  • Holiday Sprinkles: Red and green sprinkles add a festive touch.

Step-by-Step Instructions

1. Mix the Dough

  • Beat softened butter and cream cheese until light and fluffy.
  • Add the egg and vanilla extract, mixing until smooth.
  • Gradually incorporate the cake mix, stirring until fully combined.

2. Chill the Dough

  • Refrigerate the dough for 30–60 minutes. Chilling makes it easier to roll and prevents spreading during baking.

3. Shape and Coat

  • Roll dough into 1-inch balls.
  • Dip each ball into holiday sprinkles, then roll in powdered sugar until completely coated.

4. Bake

  • Preheat the oven to 350°F (175°C).
  • Arrange the coated dough balls on a parchment-lined baking sheet, leaving space between them.
  • Bake for 10–12 minutes, or until the edges are lightly golden.

5. Cool and Serve

  • Allow cookies to cool on the baking sheet for 5 minutes before transferring them to a wire rack.

Tips for Perfect Cookies

  • Room Temperature Ingredients: Ensure the butter and cream cheese are softened for smooth blending.
  • Chilling the Dough: This step is crucial for maintaining the cookies’ shape while baking.
  • Generous Coating: Fully roll the dough in powdered sugar for the best flavor and presentation.

For another holiday baking tip, explore this Cinnamon Roll Cake recipe, which shares the same cream cheese magic.


Creative Variations

1. Chocolate Ooey Gooey Cookies

  • Use chocolate cake mix for a rich, fudgy twist.

2. Peppermint Butter Cookies

  • Add peppermint extract to the dough and top with crushed candy canes.

3. Red Velvet Cookies

  • Substitute with red velvet cake mix and drizzle with white chocolate.

4. Nutty Gooey Butter Cookies

  • Fold in chopped pecans or walnuts for added texture and flavor.

For more festive cookie ideas, try this recipe for Raspberry Cheesecake Brownie Bites.


FAQs About Christmas Ooey Gooey Butter Cookies

1. Can I make the dough ahead of time?

Yes, the dough can be refrigerated overnight. Wrap it tightly to prevent drying.

2. How do I store these cookies?

Store cookies in an airtight container at room temperature for up to 5 days. For longer storage, freeze them for up to 3 months.

3. Can I substitute oil for butter?

Butter is key to the flavor and texture of these cookies. Oil is not recommended.

4. Can I make these cookies gluten-free?

Yes, simply use a gluten-free cake mix.


Nutritional Information

Each cookie contains approximately:

  • Calories: 150
  • Fat: 6g
  • Carbohydrates: 20g
  • Protein: 2g

Internal Linking Opportunities

To enhance your holiday baking, explore these related recipes:


Conclusion

Christmas Ooey Gooey Butter Cookies are an easy, festive treat that combines the buttery richness of traditional desserts with a holiday twist. Whether you’re gifting them or enjoying them with family, these cookies are a guaranteed hit. Try them today, and don’t forget to experiment with the variations for a personalized touch!

Easy Funnel Cake Bites Recipe for a Quick and Sweet Treat

mini funnel cakes, bite-sized funnel cakes, homemade funnel cake recipe, fair-style funnel cakes, fried dessert bites, powdered sugar funnel cake

Funnel Cake Bites Recipe: A Sweet Delight

Funnel cake bites are the perfect treat to enjoy the fun of a fair in bite-sized portions. These golden, crispy bites of fried batter are dusted with powdered sugar and served warm for the ultimate dessert experience. If you’ve ever wondered how to make them at home, you’re in for a delightful adventure. They are quick, easy, and customizable, making them perfect for any occasion.

For insights into creating delightful desserts, visit Desserts On A Dime, where you can find tips and tricks to make your desserts stand out.


Why Funnel Cake Bites are Irresistible

Funnel cake bites have the light, crispy texture of classic funnel cakes but in smaller, more manageable portions. They are:

  • Perfect for sharing: Bite-sized and easy to grab.
  • Customizable: Pair with your favorite toppings or dipping sauces.
  • Quick to make: A simple batter and frying process yield impressive results.

For additional fried dessert inspiration, explore the Deep Fried Oreos Recipe, another fairground favorite.


Ingredients for Funnel Cake Bites

To whip up these tasty bites, you’ll need the following:

Dry Ingredients:

  • 2 cups all-purpose flour
  • 2 tablespoons sugar
  • 1 teaspoon baking powder
  • ½ teaspoon salt

Wet Ingredients:

  • 1 cup milk
  • 2 large eggs

For Frying:

  • 2 cups vegetable oil (or enough to submerge bites)

Topping:

  • 1 cup powdered sugar (or other desired toppings)

How to Make Funnel Cake Bites

1. Prepare the Batter

  • Mix dry ingredients in one bowl and wet ingredients in another.
  • Slowly combine the two, whisking until smooth.

2. Heat the Oil

  • In a deep frying pan, heat oil over medium-high heat until it reaches about 350°F.

3. Fry the Bites

  • Drop spoonfuls of batter into the oil. Fry until golden brown, turning for even cooking.

4. Drain and Dust

  • Remove the bites with a slotted spoon and drain on paper towels.
  • Dust with powdered sugar immediately for the classic look.

Creative Toppings and Serving Ideas

  • Classic powdered sugar
  • Cinnamon-sugar mix
  • Chocolate or caramel drizzle
  • Whipped cream and fresh berries
  • Ice cream and hot fudge for a sundae twist

For a more gourmet approach, try pairing with this Crispy Fried Cheesecake Bites.


FAQs About Funnel Cake Bites

Can I make these ahead of time?

Funnel cake bites are best enjoyed fresh. However, you can reheat them in an oven at 350°F for 5–7 minutes to restore crispiness.

Can I use an air fryer?

Yes, though results may vary. The batter can be piped into the air fryer on parchment paper for a healthier alternative.

How should I store leftovers?

Store in an airtight container at room temperature for up to two days. Reheat for the best texture.


Variations to Try

  1. Red Velvet Funnel Cake Bites
    • Add cocoa powder and red food coloring to the batter.
  2. Pumpkin Spice Funnel Cake Bites
    • Mix pumpkin puree and pumpkin spice into the batter.
  3. Savory Funnel Cake Bites
    • Skip the sugar and powdered sugar, then pair with dipping sauces like marinara or ranch.

Nutritional Information

Each serving (5 bites) contains:

  • Calories: ~150
  • Fat: 6g
  • Carbohydrates: 20g
  • Protein: 2g

Internal Linking Opportunities

  1. Check out this twist on fried desserts with: Cinnamon Sugared Donut Drops.
  2. For a family-favorite dinner before dessert, explore: Crockpot Ranch Chicken and Potatoes.
  3. Want to try another bite-sized dessert? See: Easy Apple Cheesecake Tacos.

Conclusion

Making funnel cake bites at home is a fun and rewarding experience. These crispy, golden bites are versatile and can be customized with your favorite toppings and flavors. Whether for a party, a special occasion, or a quick indulgence, funnel cake bites are a surefire crowd-pleaser. Get creative with your toppings, and enjoy this sweet treat with loved ones!