Irresistible Cinnamon Swirl Cookies: Perfect Treat for Every Occasion

Cinnamon Swirl Cookies: A Delightful Twist of Flavor and Aroma

⚖️
Difficulty
Intermediate

⏲️
Prep Time
30 mins

🕒
Cook Time
15 mins

⏱️
Total Time
45 mins

🍽️
Servings
24 cookies

Cinnamon Swirl Cookies are a delightful treat that combines the warm, aromatic flavor of cinnamon with the buttery texture of classic cookies. These cookies are perfect for any occasion, adding a touch of elegance to a regular day. Imagine the oven’s aroma filling your kitchen with a sweet and spicy scent, mingling with hints of vanilla and butter. This delicious recipe will take your taste buds on a joyful ride of comforting nostalgia and cozy flavors.

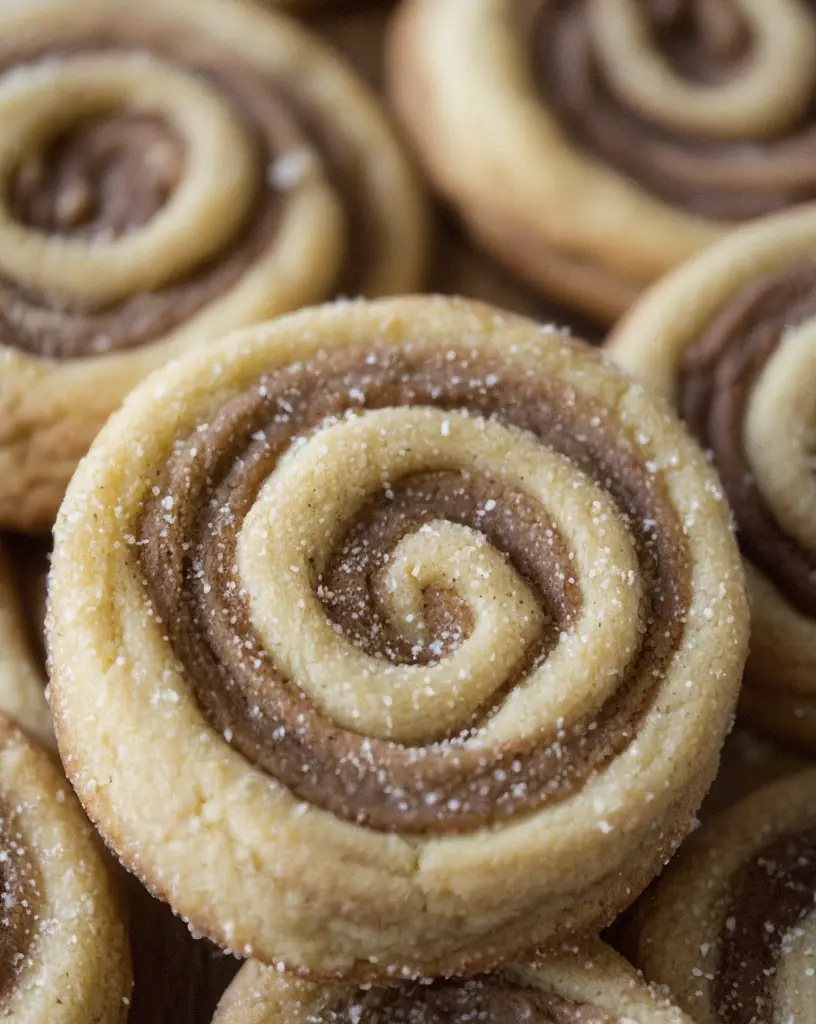
The secret to these cookies lies in their gorgeous swirl of cinnamon and sugar, creating a visually appealing pattern. With each bite, you’ll discover a balance of textures—soft and tender on the inside with a subtle crispness on the outside. Whether you’re a seasoned baker or a novice, this cinnamon swirl recipe will guide you in creating bakery-worthy cookies from your kitchen.

Quick Recipe Highlights

– Flavor Profile: Rich and buttery with a perfect blend of sweet and spicy cinnamon, complemented by a hint of vanilla.
– Texture: Soft and chewy at the center, with a crisp edged texture that creates a delightful contrast.
– Aroma: The enchanting scent of cinnamon rises as the cookies bake, filling your home with warmth and comfort.
– Visual Appeal: The striking cinnamon swirl creates an eye-catching spiral that makes these cookies a visual delight.
– Skill Level Needed: An intermediate skill level is ideal, requiring basic baking techniques but offering room for creative expression.
– Special Equipment: A rolling pin and baking sheet are essential, while parchment paper helps achieve that perfect swirl.

Recipe Overview

– Difficulty Level: Despite its intermediate label, the recipe is accessible with careful attention to detail and patience in creating the swirl.
– Category: Perfect for desserts or tea-time treats where their flavor can shine.
– Cuisine: Traditionally American, these cookies embody the essence of comforting homemade recipes.
– Cost: Affordable, with common pantry ingredients keeping it budget-friendly.
– Season: Best during fall and winter, when cinnamon’s warmth is most appreciated.
– Occasion: Ideal for holidays, gatherings, or as a special weekend baking project.

Why You’ll Love This Recipe

The taste and texture of Cinnamon Swirl Cookies are beyond compare, offering a buttery-rich flavor balanced with sweet, spicy notes that dance on your palate. They are the epitome of convenience, with a prep time of just 30 minutes. Nutritional benefits include cinnamon’s antioxidant properties, making this treat a more wholesome dessert option. Hosting a small gathering? These cookies are a hit at any social event, ensuring your guests remember the occasion. Their cost-effectiveness and the accessibility of ingredients make them a fantastic recipe, providing delightful results without stretching your budget.

Historical Background and Cultural Significance

Cinnamon Swirl Cookies have their roots in the rich spice trade history. Cinnamon, originally sourced from Sri Lanka, was a prized commodity traded throughout Europe and the Middle East. The use of cinnamon in baking started centuries ago, symbolizing warmth and comfort. Through the years, the recipe evolved, with American settlers making it a staple dessert. Today, regional variations continue to celebrate cinnamon, with each version embodying a unique cultural twist, whether it’s added nutmeg in the Netherlands or cardamom in Scandinavian versions.

Ingredient Deep Dive

Cinnamon, the star ingredient, has been cherished for centuries for its distinct flavor and numerous health benefits. It is known for its anti-inflammatory and antioxidant properties. When selecting cinnamon, opt for Ceylon for a sweeter, milder flavor, versus the more robust Cassia variety. Proper storage in an airtight container away from heat and light will preserve its potency. If you’re in a pinch, ground ginger or allspice can be a reasonable substitute.

Butter adds richness and helps achieve that perfect chewy texture. Look for unsalted butter for complete control over the flavor palette. For substitutions, margarine can be used; however, it may alter the texture slightly.

Common Mistakes to Avoid

Failing to chill the dough before rolling can result in a sticky mess that’s hard to work with. Overbaking is another common pitfall; keep an eye on the cookies in the last few minutes to avoid a hard texture. Improper measurement of ingredients, particularly flour, can affect the dough consistency—always spoon and level flour. Using cold butter can lead to uneven baking, so ensure it’s softened. Skipping the parchment paper might result in uneven baking and sticking. Avoid swirling too tightly to prevent collapsing or uneven baking. Neglecting to preheat the oven can cause inconsistent baking. Lastly, using low-quality cinnamon can significantly impact the flavor.

Essential Techniques

Mastering the swirl is crucial for these cookies. Roll the dough evenly to ensure a uniform bake and even distribution of flavors. Perfecting the swirl involves patience and a gentle touch while rolling to maintain the delicate pattern. Additionally, consistently measuring ingredients ensures the proper dough consistency.

Pro Tips for Perfect Cinnamon Swirl Cookies

Rinse your rolling pin and surface with flour to avoid sticking while rolling the dough. Use parchment paper underneath the dough to help lift and roll it into the perfect swirl. Chilling the dough before slicing makes cutting easier and prevents spreading during baking. For a deeper flavor, allow the dough to rest overnight. Experiment with adding nuts or raisins for a twist. Always use fresh cinnamon for the best aroma and taste.

Variations and Adaptations

For a regional variation, try adding nutmeg or allspice. In warmer seasons, a touch of lemon zest can brighten the flavor. Adapting to dietary needs is simple with gluten-free flour or dairy-free butter alternatives. For a tango of flavors, chocolate chips or dried fruit create exciting new palettes. To alter textures, coarsely ground nuts introduce a delightful crunch. Artful drizzle of icing introduces a modern presentation twist.

Serving and Presentation Guide

Present these cookies with a simple yet elegant touch—a sprinkle of powdered sugar or lemon glaze accentuates their appearance. Accompany with a warm cup of tea or coffee for a classic pairing. Serve them slightly warm to complement a scoop of vanilla ice cream, or as a pairing to a cheese platter. Serve on a rustic wooden platter for an inviting look.

Wine and Beverage Pairing

Pairing Cinnamon Swirl Cookies with a rich dessert wine such as a late-harvest Riesling or an ice wine enhances their sweet spice. Non-alcoholic options include a warm chai or spicy masala tea, complementing the cinnamon undertones. For coffee lovers, a robust espresso creates a harmonious balance. Temperature-wise, ensure the pairings are warm to bring out the cookies’ full flavor profile.

Storage and Shelf Life

Store the cookies in an airtight container to maintain their freshness for up to a week. Ensure they are kept in a cool, dry place. If freezing, layer them with parchment paper to prevent sticking. To defrost, bring them to room temperature, avoiding microwaving to preserve their texture. Look for telltale staleness such as a dry texture or loss in flavor.

Make Ahead Strategies

Prepare your dry ingredients in advance and store them in an airtight container. The dough can be made ahead and refrigerated overnight, which enhances the flavor. If necessary, bake ahead and freeze the cookies, ensuring proper thawing before serving for best results.

Scaling Instructions

To halve the recipe, simply divide all ingredients by two, adjusting baking time if necessary. When doubling or tripling, ensure even mixing by dividing the ingredients into separate batches if necessary. Larger baking sheets may be required, and oven adjustments might be needed, so monitor the temperature closely.

Nutritional Deep Dive

Cinnamon Swirl Cookies offer a delightful treat with carbohydrates for energy and some fiber from the cinnamon. The butter provides a moderate amount of fat, contributing to satisfaction and satiety. These cookies offer antioxidant benefits from cinnamon, promoting wellness. Portion control is key, given their calorie content from sugars.

Dietary Adaptations

For gluten-free adaptations, substitute with an appropriate gluten-free flour blend. Dairy-free options include plant-based butters or oils. For a vegan approach, replace eggs with flax eggs. Low-carb seekers may opt for almond flour and sugar substitutes, while keto and paleo followers embrace healthier fat forms.

Troubleshooting Guide

If cookies come out too tough or dry, it may result from overbaking—reduce time or temperature. If lacking flavor, ensure the cinnamon is fresh. For spreading issues, verify correct butter temperature and chilling times. Should you encounter too soft dough, ensure all ingredients are properly measured.

Recipe Success Stories

Numerous readers have shared their successful adaptations of Cinnamon Swirl Cookies, adding their unique flair. One baked an extra batch with chocolate chips and received rave reviews from friends. Another reader adjusted for a vegan lifestyle, finding great success with plant-based choices.

Frequently Asked Questions

Can I freeze the dough before baking?
Yes, freezing the dough is a great option. Simply wrap it tightly in plastic wrap before placing in the freezer.

How should I store the cookies?
Keep them in an airtight container at room temperature for up to a week to retain freshness.

What if I don’t like cinnamon?
Consider substituting with another spice like nutmeg or cardamom.

Can I add nuts?
Absolutely, chopped nuts like walnuts or pecans make a great addition.

How do I keep cookies from spreading?
Ensure the dough is well chilled and avoid using excessively soft butter.

Should they be soft when removed from the oven?
Yes, they will firm up while cooling, so a slightly undercooked center is ideal.

Can this recipe be doubled?
Yes, simply double all of the ingredients and divide into batches for manageable preparation.

What type of cinnamon is best for this recipe?
Ceylon cinnamon is preferred for its milder, sweeter flavor.

Is a rolling pin necessary?
While not mandatory, a rolling pin helps achieve even thickness for optimal baking.

What’s the key to achieving a perfect swirl?
Consistent, even rolling and gentle pressuring while swirling ensure uniformity.

Additional Resources

Explore additional related recipes for inspiration, such as cinnamon rolls or snickerdoodles, which share the same love for cinnamon. Technique guides for perfecting the perfect dough and swirling techniques are invaluable. Investigate the history and different types of cinnamon as a flavor powerhouse.

Join the Conversation

Join our growing community by sharing your version of Cinnamon Swirl Cookies on social media. Tag your photos with #CinnamonSwirlBakery and inspire others. Share your tips and variations in the comments, and let us know how these cookies brightened your day. Join our newsletter for more delightful recipes and culinary insights.

The Recipe

Cinnamon Swirl Cookies

Serves: 24 cookies

Prep Time: 30 mins

Cook Time: 15 mins

Total Time: 45 mins

Kitchen Equipment Needed

  • Rolling pin
  • Baking sheet
  • Parchment paper
  • Mixing bowls
  • Electric mixer

Ingredients

  • 2 1/4 cups all-purpose flour
  • 1 cup unsalted butter, softened
  • 3/4 cup granulated sugar
  • 1/2 cup brown sugar
  • 1 large egg
  • 1 tsp vanilla extract
  • 1 tsp baking soda
  • 1/2 tsp salt
  • 1 tbsp cinnamon

Directions

  1. Preheat your oven to 350°F (175°C). Line a baking sheet with parchment paper.
  2. In a mixing bowl, cream together the butter, granulated sugar, and brown sugar until light and fluffy.
  3. Add the egg and vanilla extract, mixing until well combined.
  4. In another bowl, whisk together the flour, baking soda, and salt.
  5. Gradually add the dry ingredients to the wet ingredients, mixing until a soft dough forms.
  6. On a floured surface, roll the dough into a rectangle about 1/4 inch thick.
  7. Sprinkle the cinnamon evenly over the dough.
  8. Starting at one long edge, roll the dough tightly into a log. Chill for at least 30 minutes.
  9. Slice the dough into 1/4 inch rounds and place them on the prepared baking sheet.
  10. Bake for 12-15 minutes, until the edges are golden. Allow to cool on a wire rack.

Recipe Notes

  • The dough can be chilled overnight for enhanced flavor.
  • Substitute cinnamon for nutmeg or cardamom for a unique twist.
  • Ensure the cinnamon is fresh for the best result.

Slow Cooker General Tso’s Chicken Recipe: Easy, Flavorful, and Perfect for Dinner

General Tso's slow cooker, crockpot General Tso's chicken, easy General Tso's chicken recipe, slow-cooked chicken, General Tso’s chicken in a slow cooker

Article: Slow Cooker General Tso’s Chicken Recipe


Internal Linking Opportunities:


Slow Cooker General Tso’s Chicken Recipe

Introduction to General Tso’s Chicken

General Tso’s Chicken is a hallmark of Chinese-American cuisine, offering a delectable balance of sweet, savory, and tangy flavors. By adapting this classic dish to the slow cooker, it becomes a set-it-and-forget-it dinner solution, perfect for busy households. Learn how this recipe simplifies the cooking process while maintaining the dish’s bold flavors.

For additional tips on mastering slow cooker meals, explore Slow Cooker Baked Ziti for more ideas.


Why Make General Tso’s Chicken in a Slow Cooker?

  • Convenience: Minimal prep and hands-off cooking.
  • Flavor Infusion: Slow cooking enhances the depth of the sauce.
  • Customizable: Adjust sweetness, spice, or saltiness to your taste.

Looking for other easy slow cooker recipes? Check out The Ultimate Comfort Food: Crockpot Potato Soup for more inspiration.


Ingredients You’ll Need

  • Chicken: Boneless, skinless chicken thighs or breasts.
  • Sauce: Soy sauce, hoisin, garlic, ginger, and brown sugar.
  • Optional Vegetables: Broccoli, bell peppers, or carrots.
  • Thickener: Cornstarch for a glossy sauce.

Step-by-Step Instructions

  1. Prep the Chicken
    Trim and cut the chicken into bite-sized pieces.
  2. Make the Sauce
    Mix soy sauce, hoisin, garlic, ginger, and brown sugar in a bowl.
  3. Layer in the Slow Cooker
    Place the chicken in the slow cooker, pour the sauce over, and stir to coat.
  4. Cook
    • Low for 4–5 hours.
    • High for 2–3 hours.
  5. Thicken the Sauce
    Use a cornstarch slurry in the last 30 minutes of cooking.
  6. Serve
    Garnish with sesame seeds and green onions.

Variations

  • Spicy Twist: Add chili paste or Sriracha for heat.
  • Vegetarian Option: Replace chicken with tofu or cauliflower.
  • Healthier Version: Use low-sodium soy sauce and skip the sugar.

Serving Suggestions

  • Rice: Pair with steamed white or jasmine rice.
  • Noodles: Serve over chow mein or lo mein.
  • Vegetables: A side of stir-fried greens or broccoli completes the meal.

Common Questions

1. Can I use frozen chicken?
Yes, but adjust the cooking time for even cooking.

2. What’s the best way to store leftovers?
Refrigerate in an airtight container for up to three days.

3. How do I make the dish spicier?
Add crushed red pepper or Sriracha to the sauce.


Tips for Perfect General Tso’s Chicken

  • Balance the Sauce: Adjust sweetness and saltiness to taste.
  • Thicken with Care: Add cornstarch slurry gradually to avoid clumps.
  • Sear the Chicken: For added flavor, sear chicken before slow cooking.

Conclusion

Slow Cooker General Tso’s Chicken combines convenience with bold flavors, making it a must-try for any home cook. Whether you’re feeding a crowd or meal-prepping for the week, this dish offers unbeatable versatility. Pair it with Garlic Bacon Kale Recipe for a nutritious side.

Irresistible Cheesy Beefy Rolls Perfect for Easy Weeknight Dinners

Cheesy Beefy Rolls: A Savory Delight You Can’t Resist

⚖️
Difficulty
Easy

⏲️
Prep Time
15 mins

🕒
Cook Time
30 mins

⏱️
Total Time
45 mins

🍽️
Servings
4

Imagine biting into a warm, freshly baked roll filled to the brim with tender beef and gooey cheese—our Cheesy Beefy Rolls promise a burst of flavor in every bite. If you crave something comforting and immensely satisfying, these are the perfect fit. With a delicious combination of seasoned beef and cheese snugly wrapped in a soft dough, this recipe not only captivates your taste buds but also offers a delightful texture that simply melts in your mouth. Ideal for a cozy dinner or a festive snack, these rolls are a joy to make and even better to share.

Quick Recipe Highlights

  • Flavor Profile: The Cheesy Beefy Rolls are a medley of savory beef richness complemented by the creamy, salty essence of cheese, delivering mouthfuls of balanced umami tastes.
  • Texture: Expect a delightful contrast between the soft, pillowy dough and the hearty, slightly chewy filling, making each bite an experience of its own.
  • Aroma: These rolls release a tantalizing mix of freshly baked bread and sizzling beef aroma, punctuated by the luscious smell of melted cheese.
  • Visual Appeal: Served fresh out of the oven, they boast a golden-brown exterior, with slight cheese bubbling, making for an enticing presentation.
  • Skill Level Needed: This easy recipe is suitable for all experience levels, involving simple steps that beginners can follow without hassle.
  • Special Equipment: A rolling pin and a baking sheet are the primary tools needed, making this recipe accessible to anyone with a basic kitchen setup.

Recipe Overview

  • Difficulty Level: The Cheesy Beefy Rolls are categorized as easy because they require minimal preparation and cooking techniques—primarily browning beef and assembling dough.
  • Category: These rolls serve wonderfully as appetizers, snacks, or main courses for a simple, hearty meal option.
  • Cuisine: The dish takes inspiration from American comfort food traditions with a universal appeal, making it adaptable in various culinary contexts.
  • Cost: Using simple ingredients like ground beef, cheese, and flour, these rolls are budget-friendly while also delivering great taste.
  • Season: Perfect for all seasons, they can particularly enhance fall and winter menus when warm, hearty dishes are most comforting.
  • Occasion: Suitable for casual family meals, game nights, or festive gatherings where convenient finger foods are appreciated.

Why You’ll Love This Recipe

Cheesy Beefy Rolls are a taste sensation that combine beef’s robust flavor with cheese’s creamy indulgence. The dish is perfect for those who appreciate a hearty, flavorful meal with minimal fuss. The roll’s texture is a harmony of soft dough with a rich filling, ensuring a delightful eating experience from start to finish.

Convenience is a key benefit of this recipe. With just a few accessible ingredients and straightforward preparation, you’ll have delicious rolls ready in under an hour. Plus, these rolls can be made ahead of time for easy entertaining or meal planning.

Nutritionally, this recipe offers protein and calcium from the beef and cheese, supporting balanced meals that satisfy without sacrificing taste. The calories can be adjusted by choosing leaner cuts or low-fat cheese options.

Social events are made better with Cheesy Beefy Rolls, providing a versatile dish perfect for sharing. These rolls are a hit at parties and family gatherings, offering an irresistible appetizer everyone will enjoy.

Cost-effectiveness is another advantage, using budget-friendly ingredients without compromising on flavor or satisfaction, making this dish both delicious and economical.

Historical Background and Cultural Significance

The origin of recipes like Cheesy Beefy Rolls can be traced back to the comfort food movements in American culinary history. These dishes evolved to cater to families seeking simple yet hearty home-cooked meals that are both delicious and affordable.

Cheesy Beefy Rolls have become emblematic of the fusion between traditional bread-making practices and modern convenience foods, especially valued in busy households across Western countries. The fusion of beef and cheese within a bread roll is seen in different culinary traditions globally, from European stuffed breads to Asian buns.

Over time, these rolls have become a staple in diverse regions, with variations tailored to local staple ingredients and traditional cooking methods. Each variation tells a story of its cultural backdrop, making the dish a culinary tapestry of tastes and traditions.

The adaptive nature of this recipe is what has allowed it to sustain popularity, with variations ranging from the type of meat, choice of cheese, and seasoning profiles reflective of regional preferences or dietary needs.

Ingredient Deep Dive

Ground beef is a primary ingredient, heralded for its versatile, rich flavor and substantial protein content. History shows beef was a luxurious staple in times past, becoming more commonplace with industrial advancements in farming practices. Selecting beef with a balanced fat ratio ensures a juicy filling, stored well when wrapped tightly and refrigerated. Substitutions like turkey or plant-based crumbles can cater to specific preferences.

Cheese adds indulgence, crucial for its creamy melt that balances beef’s taste. Historically loved in culinary arts for its variation across regions, cheese contributes not only taste but essential nutrients like calcium and vitamin D. Select cheese that melts well, such as cheddar or mozzarella, stored best when sealed in a cool environment. Dairy-free substitutes are increasingly popular among those with dietary restrictions.

Common Mistakes to Avoid

  • Not browning the beef properly: It is crucial to cook ground beef until it is evenly browned to enhance flavor. Otherwise, you might end up with under-flavored rolls.
  • Using wet dough: Ensure your dough is of good consistency to prevent rolls from becoming soggy or falling apart. Knead until you achieve elasticity.
  • Overfilling the rolls: Adding too much filling can lead to leaks and uneven cooking. Stick to recommended measurements for the best outcome.
  • Skipping the rolling pin: A rolling pin helps ensure your dough is evenly flat, crucial for consistent baking and filling distribution.
  • Not sealing edges properly: Sealed edges prevent filling from spilling and ensure the rolls hold their shape during baking.
  • Skipping resting steps: Let the dough sit to help yeast activate fully, crucial for the dough’s texture and rise.
  • Inaccurate oven temperature: Ensure your oven is preheated to achieve perfectly cooked rolls that are golden brown.
  • Cheese choice mistake: Use cheese that melts well to avoid greasy outcomes or uneven texture.

Essential Techniques

Mastering the technique of browning beef is critical; it involves cooking the ground beef over medium-high heat until fully browned, ensuring that the meat develops a rich, umami flavor. Understanding this process helps prevent texture issues and achieves a deep flavor profile. Observing color and noting a firm texture help confirm the beef is ready.

Kneading dough successfully brings about the desired elasticity and pliability crucial for these rolls. Mastering it involves using your palms efficiently, folding the dough over itself, and continuing this motion until smooth. Not kneading properly might lead to tough roll texture.

Pro Tips for Perfect Cheesy Beefy Rolls

Start with room temperature ingredients to ensure even cooking and the best results. Cold butter or dough can significantly impact the texture and cooking time of the rolls.

Incorporate flavorful herb seasoning in your beef to add an extra layer of complex taste that elevates the whole dish without overcomplicating the method.

For a glossy finish, brush a bit of melted butter on top of rolls right before baking—this will give them an appealing golden hue and added moisture.

Consider partially baking the rolls, then pausing to reheat just before serving for fresh, warm servings that taste as though newly baked.

Adjust the cheese type based on flavor preference but ensure it’s a cheese that melts well to bind ingredients and avoid drying out.

Increase or decrease filling according to personal preference while being mindful not to overfill and compromise the roll’s integrity.

Variations and Adaptations

Regional variations might include swapping beef for lamb or chicken, each bringing unique flavors that suit culturally specific dining preferences. Alternatively, cuisines might use herbs and spices native to their regions for a distinct taste.

Seasonal ingredients also influence adaptations—summer versions could incorporate bell peppers, while winter might call for spiced beef filling, adjusting the warmth and taste profile.

Dietary modifications include using gluten-free dough or plant-based cheese, offering satisfying alternatives without compromising the essential flavors of Cheesy Beefy Rolls.

Introduce flavor variations by trying different cheeses. Spicy jalapeño cheese, for example, can add heat that contrasts deliciously with the beef.

Modify texture by brushing the dough with olive oil for crunchier rolls, ensuring rolls hold their shape and exhibit delightful structure balance.

Presentation alternatives include serving the rolls with a dipping sauce of your choice, enhancing their appeal and providing versatile options for guests.

Serving and Presentation Guide

Achieve elegant plating by serving on a wooden platter, offering a warm, rustic feel that complements the dish’s comforting nature. Consider garnishing with fresh parsley or a sprinkle of Parmesan for added allure.

Traditional accompaniments like a crisp side salad or tangy tomato soup can enhance the enjoyment of the rolls, bringing contrast in texture and taste.

For modern gatherings, present rolls in mini form as elegant hors d’oeuvres, offering smaller portions that are ideal for mingling guests.

Mind the temperature—serve these rolls warm to preserve the ideal cheese melt and flavor balance. Cold rolls may overshadow the experience by altering texture.

Portion control tips include slicing each roll in half for lighter servings, perfect for gatherings where varied appetizers are offered.

Wine and Beverage Pairing

Pairing your Cheesy Beefy Rolls with a full-bodied red wine like a Cabernet Sauvignon can accentuate the beef’s rich notes and cheese’s creaminess, creating harmonious layers of flavor.

Non-alcoholic alternatives such as a citrusy lemonade provide a refreshing balance to the rolls’ savory qualities, cleansing the palate between bites.

If your meal extends to brunch, consider pairing with a rich, aromatic coffee. The robust flavors enhance the rolls without overpowering them.

Keep drinks at optimal temperatures: wines slightly cool, non-alcoholics chilled to refresh, and coffee warm enough to evoke comforting aromas.

Serve with standard glasses for easy handling or gourmet cups for an elevated dining experience, heightening the visual and experiential aspects of the meal.

Storage and Shelf Life

Store Cheesy Beefy Rolls in airtight containers to maintain their freshness and prevent ambient moisture from affecting texture. Refrigeration prolongs shelf life but may require reheating for optimal taste.

Containers should be of a durable material that can transition from fridge to microwave, ensuring convenience for short-notice meals or snacks.

Be mindful of spoilage signs, such as an off-smell or mushy texture, indicating potential degradation—consume within three days when refrigerated.

For reheating, use an oven to bring back the rolls’ crisp exterior, achieving fresh-like qualities.

To freeze, tightly wrap individual rolls in plastic wrap, then place in a freezer bag to prevent freezer burn, keeping for up to one month.

Make Ahead Strategies

Prepare your filling a day in advance, allowing flavors to meld overnight. Store it in a sealed container in the fridge, saving time on the day of assembly.

Create dough in advance, refrigerate after kneading, and allow to come to room temperature before rolling—a crucial step for relaxed preparation timelines.

Quality can be retained when stored between preparations by wrapping rolls with cling film before final baking; an efficient method for managing dishes simultaneously.

Assemble rolls ahead and refrigerate; bake right before serving for warm, inviting appetizers perfect for entertaining.

Reheat gently at low oven temperatures to maintain texture integrity without overcooking, ensuring leftovers retain freshness.

Fresh herbs or toppings can be added just before serving, bringing new pops of flavor to already prepared items, offering flexibility and impressive outcomes.

Scaling Instructions

Halving the recipe for smaller gatherings involves adjusting ingredient ratios accordingly and a potentially shorter cooking time, utilizing personal judgment about readiness.

To double or triple, increase ingredient quantities while monitoring dough consistency, adding slight adjustments where necessary to maintain dough properties.

Use appropriately sized equipment to accommodate larger batches without overcrowding, ensuring consistent cooking.

Larger recipes might require staggered cooking, careful time monitoring to prevent over- or undercooking, with a focus on equilibrating textures.

Consider storage space and container availability ahead—increased quantities demand proper allocation to maintain dish quality.

Nutritional Deep Dive

This recipe serves a well-rounded macronutrient profile, rich in proteins crucial for muscle health and metabolism, with fats from cheese contributing to energy needs.

Micronutrient highlights include zinc and iron from beef, vital for immune function, alongside calcium and vitamin D from cheese.

Health benefits encompass sustained energy release, muscle maintenance, and also mood enhancement from delightful taste experiences.

Dietary considerations allow for ingredient swapping to lower fat content or increase fiber, tailoring rolls according to nutritional goals like weight management.

Establish portion sizes aligned with dietary needs—adjust individual serving sizes for balanced meals that contribute positively to daily intake, encouraging moderation.

Dietary Adaptations

Gluten-free adaptation involves swapping traditional flour for a suitable gluten-free alternative, ensuring texture without dietary compromise.

Dairy-free ideas work when plant-based cheese is used, delivering familiar comforts alongside health-conscious adjustments, albeit with some flavor modifications.

Vegan options require meat substitutes like lentils or tofu, maintaining essential nutritional balance while honoring plant-based ethics.

Low-carb adjustments emphasize lean protein and vegetables as filler, discounting carb-heavy dough; adjustable for more conscious eating without sacrificing enjoyment.

Keto-friendly versions maximize toppings like cheese but limit flour type, keeping within engineered dietary macros—offering creativity even in restricted choices.

Low-FODMAP alternatives are possible with precise ingredient selection, focusing on easily digestible items that balance satisfaction with dietary limits.

Troubleshooting Guide

Texture issues often arise from improperly kneaded dough; achieve smoothness via repeated folding to ensure an airy, consistent bake.

Flavor balance may tip when spices are overused—taste-test throughout preparation to maintain harmony between cheese, beef, and herbs.

Temperature problems can detract from the baking process; ensure oven calibration or preheating accuracy to promise the right bake dynamics.

Equipment challenges include dough sticking; ensure proper flouring of surfaces and tools for seamless handling, even in novice hands.

Ingredient substitutions should respect equal parts and function; swapping plant-based cheeses works best in equal measure to maintain cohesion.

Timing concerns manifest in under- or overcooking; invest in timers and consistent practice to be attentive towards developing properly cooked dishes.

Recipe Success Stories

Our community has shared enthusiastic feedback, with many praising the rich, savory balance and quick preparation, becoming a weeknight favorite.

Variations involving spicy peppers or innovative cheeses have found immense appreciation, showcasing the recipe’s adaptability and charm.

Reader suggestions frequently highlight taste combinations, emphasizing the dish’s simple base as adaptive to personal preference, sparking creative impulse.

Photography tips from others suggest capturing rolls’ golden texture against shadowy backgrounds, allowing their appeal to shine through effortlessly.

Community sharing encourages aspiring cooks to maintain this recipe as part of their base repertoire—proof that mastering Cheesy Beefy Rolls is indeed rewarding.

Frequently Asked Questions

Can I prepare these rolls in advance? Yes, the rolls can be prepared and stored in the refrigerator for up to two days before baking, helping you manage your time efficiently.

What is the best way to reheat the rolls? To reheat, use an oven set at a low temperature to crisp the exterior without overcooking. Microwave reheating might render them soggy.

Can I freeze Cheesy Beefy Rolls? Yes, individually wrap each roll before placing it in freezer bags, ensuring airtight storage to keep them fresh for up to a month.

Can I use a different type of cheese? Certainly! Different cheeses can provide unique flavors. Mozzarella offers a mild taste, while pepper jack adds a spicy kick.

How can I make the rolls thicker? Roll the dough to your desired thickness, remembering that the thicker the dough, the longer the bake time necessary for even cooking.

What kind of dipping sauce pairs well? A tangy marinara or savory cheese sauce complements these rolls, enhancing their savory profile with contrasting flavors.

Is gluten-free flour suitable for this recipe? Absolutely! Gluten-free flour substitutes effectively when also using xanthan gum for structure and elasticity in the dough.

How can I ensure even browning? Rotate the baking tray halfway through the baking process; this ensures that all rolls are exposed to consistent heat.

What meat alternatives work well? Ground turkey or plant-based meat crumbles mimic beef texture and flavor while suiting dietary preferences or restrictions.

Are there vegan alternatives for cheese? Plant-based cheeses crafted from cashews or soy provide a vegan swap, though flavors and melting properties might vary slightly.

Additional Resources

Explore related recipes like herbed savory rolls or cheesy stuffed breads that offer a different texture or flavor profile, complementing similar craving needs with a twist.

Technique guides on dough handling or cheese melting inspire confidence in executing each recipe component skillfully, allowing today’s learnings to transcend across other dishes.

Ingredient insights inform selection choices for kitchen staples, educating readers on making informed decisions for nutritional and taste factors.

Incorporating varied seasonal roll fillings offers a dynamic approach throughout the year, continuously aligning the recipe’s comfort with seasonal freshness.

Equipment recommendations center on versatile kitchen tools that streamline processes across multiple recipes, ensuring home-cooking remains a satisfying pursuit.

Join the Conversation

Engage with fellow readers on social media platforms where Cheesy Beefy Roll creations are shared daily, stimulating a tide of culinary interactions.

Discovery of photography tips that keep food presentations appealing further enthuses, sharing visual stories that heighten recipe experiences.

Encouragement to review recipes nurtures a vibrant community ethos amid varying cooking successes, reminding all of the interconnected joy cooking delivers.

Recipes become jumping points for conversation, sparking exchanges over flavor tweaks or adaptations for particular events, enforcing its community-rooted popularity.

Slow Cooker Ground Beef Chow Mein: An Easy and Flavorful Recipe

ground beef chow mein, slow cooker chow mein, crockpot beef chow mein, easy chow mein recipe, beef noodle stir fry

Internal Linking Opportunities for “Slow Cooker Ground Beef Chow Mein”

Based on the provided sitemap from Exorecipes, here are suggested internal linking opportunities:

  • Link to “Slow Cooker Chicken and Gravy Over Noodles” using the anchor text: slow cooker noodle recipes.
  • Link to “Slow Cooker Magic: Unveiling the Ease of Crock-Pot Baked Ziti” with the anchor text: slow cooker pasta dishes.
  • Link to “The Ultimate Comfort Food: Crockpot Potato Soup with Hashbrowns” as hearty slow cooker comfort foods.
  • Link to “Rediscovering Comfort: Sour Cream and French Fried Onion Pork Chops” with the anchor text: comfort food slow cooker recipes.
  • Link to “Crispy Popcorn Shrimp” as side dishes to complement noodle recipes.

Markdown Article

Slow Cooker Ground Beef Chow Mein: A Comfort Food Classic

Slow Cooker Ground Beef Chow Mein combines the savory flavors of classic chow mein with the ease of slow cooking, making it a go-to meal for busy families. With a rich mix of noodles, ground beef, and vegetables, this dish brings both nutrition and flavor to the table. Slow cooking enhances the depth of flavors, while the ground beef ensures a satisfying and hearty bite.

For those interested in other noodle-based dishes, try slow cooker noodle recipes or explore slow cooker pasta dishes for more inspiration.


What is Chow Mein?

Chow Mein is a traditional Chinese stir-fried noodle dish that has gained popularity worldwide. It typically features:

  • Noodles as the base.
  • A medley of vegetables such as cabbage, carrots, and celery.
  • A protein source like beef, chicken, or tofu.
  • A savory sauce made of soy sauce, oyster sauce, and sesame oil.

The slow cooker adaptation of this dish retains its essence while simplifying the preparation process.


Ingredients for Slow Cooker Ground Beef Chow Mein

To create this dish, you’ll need:

Core Ingredients:

  • Ground beef: Opt for lean ground beef to reduce excess fat.
  • Chow mein noodles: Alternatively, spaghetti or ramen can work in a pinch.
  • Vegetables: Use a mix of cabbage, carrots, bell peppers, and celery.

Sauce:

  • Soy sauce, oyster sauce, hoisin sauce, sesame oil, and brown sugar for sweetness.

For a perfect pairing, consider hearty slow cooker comfort foods to round out your meal.


Step-by-Step Instructions

  1. Prep the Ground Beef
    Sauté ground beef with minced garlic and ginger until browned.
  2. Prepare the Sauce
    Mix soy sauce, oyster sauce, hoisin sauce, brown sugar, and sesame oil.
  3. Combine in the Slow Cooker
    Layer beef, vegetables, and sauce in the slow cooker.
  4. Cook
    Set the slow cooker to low for 6-8 hours or high for 3-4 hours.
  5. Add Noodles
    Stir in cooked noodles in the final 30 minutes.

Common Mistakes and How to Avoid Them

  1. Overcooking Noodles
    Always add noodles toward the end to prevent them from becoming mushy.
  2. Excessive Saltiness
    Balance soy sauce with sugar or use low-sodium variants.
  3. Watery Sauce
    Use cornstarch to thicken the sauce if needed.

Variations and Pairings

  • Spicy Kick: Add Sriracha or red pepper flakes.
  • Protein Alternatives: Use ground turkey, chicken, or tofu.
  • Side Dishes: Serve with egg rolls or crispy popcorn shrimp for added crunch.

FAQs

  1. Can I freeze Slow Cooker Ground Beef Chow Mein?
    Yes, allow it to cool completely before transferring to airtight containers. Freeze for up to 3 months.
  2. What vegetables can I use?
    You can include bean sprouts, mushrooms, or water chestnuts for extra texture.
  3. Can I make it vegetarian?
    Substitute beef with tofu and use vegetable broth instead of beef stock.

Why This Recipe Works

  • Ease of Cooking: Minimal prep time with the convenience of slow cooking.
  • Customizable: Adjust ingredients based on dietary needs or preferences.
  • Crowd-Pleasing: Perfect for family dinners or meal prep.

Conclusion

Slow Cooker Ground Beef Chow Mein is an effortless way to enjoy a rich, flavorful meal. By using simple ingredients and letting the slow cooker do the work, you can create a dish that’s both comforting and satisfying. Don’t forget to explore other comfort food slow cooker recipes like Sour Cream and French Fried Onion Pork Chops for more meal ideas.

Irresistible Gooey Chocolate Toffee Dessert Bars: Simple and Delicious Recipe

Gooey Chocolate Toffee Dessert Bars: The Ultimate Easy Dessert Delight

⚖️
Difficulty
Easy

⏲️
Prep Time
15 mins

🕒
Cook Time
25 mins

⏱️
Total Time
40 mins

🍽️
Servings
12 bars

Are you ready to dive into a luscious world of chocolatey goodness? Our Gooey Chocolate Toffee Dessert Bars are more than just dessert; they’re an experience. With rich layers of melted chocolate intermingled with crunchy, buttery toffee pieces, each bite will transport you to a realm of pure indulgence. These easy-to-make bars capture the essence of everything decadent with minimal effort. Whether you’re hosting a party or simply craving something sweet, these dessert bars are the answer to your dessert dreams.

Quick Recipe Highlights

  • Flavor Profile: A balanced blend of rich chocolate with a hint of buttery toffee and a touch of saltiness.
  • Texture: Creamy and gooey with a satisfyingly crunchy top layer that delights in each mouthful.
  • Aroma: Irresistible, warm chocolate mixed with the nutty scent of caramelized toffee.
  • Visual Appeal: A beautiful, glossy chocolate surface speckled with toffee pieces, sure to catch anyone’s eye.
  • Skill Level Needed: Perfect for beginners and seasoned bakers alike, requiring only basic mixing and baking techniques.
  • Special Equipment: A basic baking pan, mixing bowls, and an oven are all you need.

Recipe Overview

  • Difficulty Level: Rated easy for its straightforward preparation and minimal required skills, perfect for all cooking levels.
  • Category: This recipe falls neatly into the dessert category, ideal for sweet lovers.
  • Cuisine: An indulgent fusion of American dessert tradition with a touch of international chocolate finesse.
  • Cost: Affordable; using common pantry staples and a couple of special treat ingredients makes it budget-friendly.
  • Season: Suitable for any season, its comforting richness pairs well with both chilly winters and sunlit springs.
  • Occasion: Ideal for festive celebrations, casual gatherings, or a delightful family dinner dessert.

Why You’ll Love This Recipe


The flavor and texture of these Gooey Chocolate Toffee Dessert Bars are what elevate them to the top of our dessert list. Each bite delivers an explosion of decadent chocolate harmoniously mixed with the buttery crunch of toffee. The simplicity of preparation means you can whip up a batch whenever the sweet craving hits, without a fuss or stress. They’re also an excellent source of entertaining value; watch your guests’ eyes light up with delight as they take their first bite.

With a depth of flavor and a richness that’s surprisingly light on calories, these delicious bars offer great nutritional value – perfect for satisfying your sweet tooth without over-indulgence. Their straightforward preparation is conducive to busy schedules and their versatile nature makes them fantastic for bringing people together whether at family meals or larger gatherings. Not to mention, these bars are an incredibly cost-effective treat. With few ingredients that are easy to find and affordable, they’re a go-to for anyone who wants an economical yet impressive dessert option.

Historical Background and Cultural Significance


Chocolate dessert bars have a long-standing tradition in American culture, partly inspired by European dessert styles. The use of toffee adds a delightful twist that connects British candy-making traditions to these already rich creations. Over the years, dessert bars have evolved and emerged as a staple in bake sales, potlucks, and family gatherings across the globe.

The cultural significance of these little delights is noteworthy, as they have managed to carve a niche in the dessert world thanks to their adaptability and crowd-pleasing qualities. From school events to community gatherings, these bars are a juggernaut of culinary satisfaction. Variations abound, with some regions adding nuts or fruity elements to reflect local tastes and traditions. Yet, what remains universal is their ability to bring joy with their heavenly taste and cultural versatility.

Ingredient Deep Dive


Chocolate has a rich history rooted in ancient Mesoamerican cultures, where it was revered as a divine gift. Besides its cultural significance, chocolate is laden with antioxidants, which are beneficial for health. When selecting chocolate for your dessert bars, opt for high-quality dark or semi-sweet varieties for depth. Store chocolate in a cool, dry place to maintain its integrity.

Toffee, with Anglo-Saxon roots, brings a nostalgic, buttery crunch that contrasts beautifully with the smooth chocolate. Packed with energy and essential sugars for metabolic functions, it’s also a joy to snack on. When shopping for toffee, choose crisp and fresh variants and store them in airtight containers to avoid moisture. These key ingredients transform a simple chocolate bar into a blissful dessert experience.

Common Mistakes to Avoid

  • Avoid overmixing the ingredients as it can lead to a dense and cakey texture instead of a gooey delight.
  • Ensure your oven is preheated correctly to prevent uneven cooking and maintain the perfect soft center.
  • Don’t leave the bars in the oven too long. Slight underbaking ensures the gooey center we’re aiming for.
  • Choosing low-quality chocolate undermines the overall flavor; invest in good chocolate for the best results.
  • Let the bars cool thoroughly before cutting to prevent them from crumbling into a mess.
  • Using too high of a temperature will cook the edges too quickly, leading to hard and burned outsides.
  • Skipping the parchment paper can make removing the bars difficult, risking breakage.
  • Ignoring toffee freshness leads to clumps instead of an even crunchy distribution.

Essential Techniques


Mastering the art of making perfect Gooey Chocolate Toffee Dessert Bars begins with understanding how to melt chocolate properly – a critical step for achieving that luscious, creamy texture. The double-boiler method ensures even melting, preventing scorching and loss of flavor. Watch for a smooth, glossy finish as your cue for success.

Equally important is mastering the right balance of mixing the ingredients. Overmixing introduces too much air and can alter the final texture, making the bars too sponge-like. Gently folding ingredients until just combined preserves the rich, gooey center we crave. Understanding these key techniques ensures your dessert bars are nothing short of amazing each time you make them.

Pro Tips for Perfect Gooey Chocolate Toffee Dessert Bars


Ensure that each butter and sugar layer is evenly spread for consistent texture and flavor throughout the bars. Use fresh, high-quality ingredients for the richest taste and aroma. When melting chocolate, adding a teaspoon of coconut oil can give the bars a glossy, professional finish; it’ll also make slicing easier.

Chill the mixture for a few minutes before baking for better definition in the layers. Consider trying sea salt flakes on top before oven time to create a sweet-salt juxtaposition that elevates the flavor profile. If you enjoy nutty flavors, try adding finely chopped pecans or walnuts evenly between the layers for added richness. Finally, allow cooling time, but not too much, to enjoy them warm, just enough for serving stability but gooey enough for pleasure.

Variations and Adaptations


The beauty of Gooey Chocolate Toffee Dessert Bars lies in their flexibility to adaptations. For regional variations, consider adding native nuts or a touch of spiced warmth from cinnamon or nutmeg in colder months. Seasonal adaptations can involve adding crushed peppermint for a festive winter touch or fresh berries during summer for a fresher twist.

Dietary modifications are possible by using gluten-free flour or dairy-free chocolate for those with specific diets without sacrificing flavor and texture. Explore flavor variations by integrating orange or mint essence into the chocolate for a unique twist. Texturally, experimenting with different chocolates – from bittersweet to milk – changes the final mouthfeel. Presentation can vary; arrange bars in a decorative pattern dusted with powdered sugar for an elegant finish.

Serving and Presentation Guide


Plated beautifully, Gooey Chocolate Toffee Dessert Bars can transform from a casual treat to an elegant dessert with just a few tweaks. Use a sharp knife dipped in hot water before slicing to get clean edges, then dust each slice with a light sprinkle of confectioners’ sugar for a touch of charm. Garnish with a drizzle of caramel or a small scoop of vanilla ice cream for added indulgence.

For a traditional touch, serve these bars warm on a classic dessert plate adorned with a dollop of whipped cream and a sprinkle of finely chopped nuts. Alternatively, for modern flair, present them in a staggered stack on a chic slate board for a more contemporary aesthetic. Ensure the bars are served at room temperature or slightly warmed to fully appreciate their gooey texture.

Wine and Beverage Pairing


A rich dessert like Gooey Chocolate Toffee Dessert Bars deserves an equally opulent wine pairing. Opt for a late harvest Riesling or an ice wine, whose sweetness complements the bar’s rich chocolate textures perfectly. For red wine enthusiasts, consider a deep, bold port that matches the chocolate without overpowering it.

If you’re looking for non-alcoholic alternatives, a creamy hot chocolate transforms this dessert into a warming winter affair. Coffee pairings like a frothy cappuccino can add depth and richness to each bite, highlighting different flavor notes in the dessert. Remember, serving beverages at the right temperature enhances the palatable experience, making them equally crucial as the dessert itself.

Storage and Shelf Life


To maintain the freshness and flavor of Gooey Chocolate Toffee Dessert Bars, store them in an airtight container at room temperature for up to three days. For longer preservation, you can refrigerate them, extending their life for up to a week, while retaining the gooey texture through careful reheating.

Using a soft, airtight container avoids the dessert bars becoming too hard or losing their chewiness. Look for signs of spoilage such as off-smells or visual mold to ensure safety. To reheat, pop them in a low oven or microwave until just warm, avoiding overbaking. The bars freeze well; wrap them individually for easy access to a gooey treat anytime.

Make Ahead Strategies


Maximize your time with make-ahead strategies for these delectable bars. Prepare each layer up to 24 hours in advance, storing each separately to maintain freshness. Assemble them right before baking to keep clear layers intact and gooey.

Store pre-mixed ingredients in sealed, designated containers labeled with content and dates to prevent confusion and maintain organization. For layered pre-baking, store in the refrigerator to firm layers, stabilizing before baking for sharper distinction between flavors. This method saves time without compromising quality, allowing you to effortlessly create these delightful bars, fresh as intended.

Scaling Instructions


Scaling up to accommodate a bigger crowd or just for the sheer joy of more Gooey Chocolate Toffee Dessert Bars? It’s straightforward with a few adjustments. Doubling or tripling the recipe is as easy as adjusting the ingredient quantities proportionally, ensuring that each component balances the others for consistent flavor.

Equipment choices matter; larger pans may require slight timing adjustments, so watch closely to maintain gooey centers. Alternatively, halving the recipe keeps things simple for smaller gatherings, reducing any excess without sacrificing taste. Whatever your batch size, focus on baking times and proportions to capture the perfect blend of gooey and crunch.

Nutritional Deep Dive


Each serving of Gooey Chocolate Toffee Dessert Bars is more than indulgence; it’s a well-balanced nutritional entity. Rich in carbs for quick energy, with fats contributing to satiety, they provide satisfaction without the guilt. High-quality chocolate adds antioxidants linked to heart health and improved mood.

The integration of toffee provides quick sugars for instant vitality, boosting metabolic processes. Portions control is crucial, ensuring nutritional intake aligns with dietary goals. Mindful consumption, tailored to individual energy needs, allows you to appreciate the dessert benefits while savoring every delectable bite. This blend of taste and nutrition enriches the dessert experience without overindulgence.

Dietary Adaptations


To accommodate dietary needs, consider slight modifications. For a gluten-free version, use certified gluten-free flour blends, keeping texture similar with tender bakes. Dairy-free options allow substitutions like coconut oil or dark dairy-free chocolate, maintaining richness while adhering to dietary preferences.

Vegan modifications are viable too, choosing egg-replacements and plant-based chocolate adaptations without compromising flavor. For low-carb diets, experiment with coconut flour alternatives and sugar replacements to maintain nutritional balance. Each tweak maintains the beloved characteristics of Gooey Chocolate Toffee Dessert Bars while aligning with personal nutritional plans and dietary discipline.

Troubleshooting Guide


Texture issues like dry or crumbly bars often indicate overbaking or insufficient moisture in the mix. Ensure perfect results by monitoring bake times and checking oven calibration. Flavor imbalance, such as excessive sweetness, can be adjusted by altering the toffee ratio or adding a touch of salt for equilibrium.

Temperature concerns also impact texture; keep a close eye on oven settings or consider investing in an oven thermometer for precise results. Equipment challenges, like uneven baking, benefit from rotating pans halfway through cook time. With thoughtful ingredient substitutions, maintain the beloved texture, and ensure success by adhering to these detailed solutions.

Recipe Success Stories


The Gooey Chocolate Toffee Dessert Bars have become a staple at countless family gatherings due to their simplicity and universal appeal. Many have shared stories of success in adapting this versatile recipe to match personal tastes or dietary requirements without detracting from its signature gooey delight.

Community feedback has highlighted successful variations such as the addition of caramel swirls or using almond flour for a gluten-free twist. Capturing the beauty of these bars proves simple with basic photography tips shared by users online; a soft natural light enhances their appeal, making them as delightful visually as they are to eat.

Frequently Asked Questions

How do I ensure my dessert bars remain gooey?
To ensure gooey dessert bars, avoid overmixing the batter and ensure you bake at the correct temperature. Watch bake times closely since slight underbaking helps maintain a soft center.

Can I substitute dark chocolate with milk chocolate?
Yes, milk chocolate can be substituted for a sweeter taste; adjust sugar levels accordingly to not overpower other flavors.

Is fresh toffee necessary, or will older toffee suffice?
Fresh toffee ensures the best crunch and flavor quality. Older toffee may become chewy and affect the overall texture.

What’s the best way to melt chocolate?
Using a double boiler or microwaving in short intervals, stirring in between, prevents scorching for a smooth, glossy texture.

How long can these bars be stored?
Store in an airtight container at room temperature for up to 3 days. Refrigerate or freeze for longer storage, ensuring freshness.

Can I add nuts to this recipe?
Absolutely, finely chopped nuts like pecans or almonds can be added for extra texture and depth of flavor.

Is it possible to make these bars vegan?
Vegan adaptations are easy with dairy-free chocolate and subbing eggs with flaxseed or a store-bought egg replacement.

How does changing flour affect the taste and texture?
Using different flours, such as coconut or almond, can alter moistness and density; experiment to find balance that suits taste preferences.

Are there specific plating techniques for optimal presentation?
Slicing with a hot knife ensures clean edges, while sprigs of fresh mint or dusted powdered sugar can add elegance.

My bars turned out dry. What went wrong?
Dry bars may result from excess baking time or temperature. Calibrate your oven and aim for precise timings to retain moisture.

Can I make these bars ahead of time?
Absolutely, prepare different layers separately in advance, then assemble and bake when ready for a fresh outcome.

Could I replace toffee with caramel?
Yes, caramel works as an enjoyable alternative, introducing a softer texture and lighter profile.

Additional Resources


Explore more decadent chocolate recipes to expand your dessert repertoire. Delve into technique guides focused on mastering baking basics to refine your skills further. Discover ingredient information tourism to gain deeper insights into unique variations and adaptations around the world.

Seasonal variations can be adventured with through resources focusing on seasonings and accompanying flavors that elevate chocolate desserts to an exquisite tier. Keep your kitchen well-equipped with recommended tools and gadgets to successfully execute recipes with ease. Utilize these resources to continuously evolve your culinary expertise and craft perfect desserts every time.

Join the Conversation


Share your love for Gooey Chocolate Toffee Dessert Bars and exchange tips with fellow dessert enthusiasts. Connect on social media, where you can post your delicious creations and engage with a community of chocolate lovers. Share photography tips to capture your creations beautifully and inspire others through your artful presentation.

Encourage friends and family to leave their reviews and suggestions, fostering a dynamized space where ideas thrive. Experiment with recipe variations and challenge others to do the same, broadening the horizons of creativity through both innovation and tradition. Join a vibrant community celebrating the sweet pleasures of baking, each dessert contributing to collective joy.

The Recipe

Gooey Chocolate Toffee Dessert Bars

Serves: 12 bars

Prep Time: 15 mins

Cook Time: 25 mins

Total Time: 40 mins

Kitchen Equipment Needed

  • Baking pan (9×9 inch recommended)
  • Mixing bowls
  • Whisk
  • Spatula
  • Knife
  • Oven
  • Parchment paper

Ingredients

  • 1 cup butter, melted
  • 2 cups graham cracker crumbs
  • 1 can sweetened condensed milk
  • 2 cups semi-sweet chocolate chips
  • 1 cup toffee bits
  • 1/2 tsp vanilla extract
  • Pinch of salt

Directions

  1. Preheat your oven to 350°F (175°C) and line a 9×9 inch baking pan with parchment paper.
  2. In a bowl, combine melted butter and graham cracker crumbs until well moistened.
  3. Press the mixture firmly into the prepared baking pan to form an even crust.
  4. Pour sweetened condensed milk evenly over the crust layer.
  5. Sprinkle the chocolate chips and toffee bits uniformly over the milk layer.
  6. Gently press down the toppings to embed them slightly into the milk layer.
  7. Bake for 25 minutes or until the edges are golden and the center appears set.
  8. Remove from oven and let cool completely before slicing into bars.
  9. Optional: Refrigerate for an additional 30 minutes for firmer bars.

Recipe Notes

  • For a nuttier flavor, add 1/2 cup of chopped pecans or walnuts.
  • Use gluten-free graham crackers for a gluten-free variation.
  • Add a hint of sea salt on top before baking to enhance flavor complexity.