Irresistibly Tender Slow Cooker Mongolian Beef Recipe for Busy Days
Slow Cooker Mongolian Beef: An Effortless Savory Delight
⚖️
Difficulty
Easy
⏲️
Prep Time
15 mins
🕒
Cook Time
240 mins
⏱️
Total Time
255 mins
🍽️
Servings
6
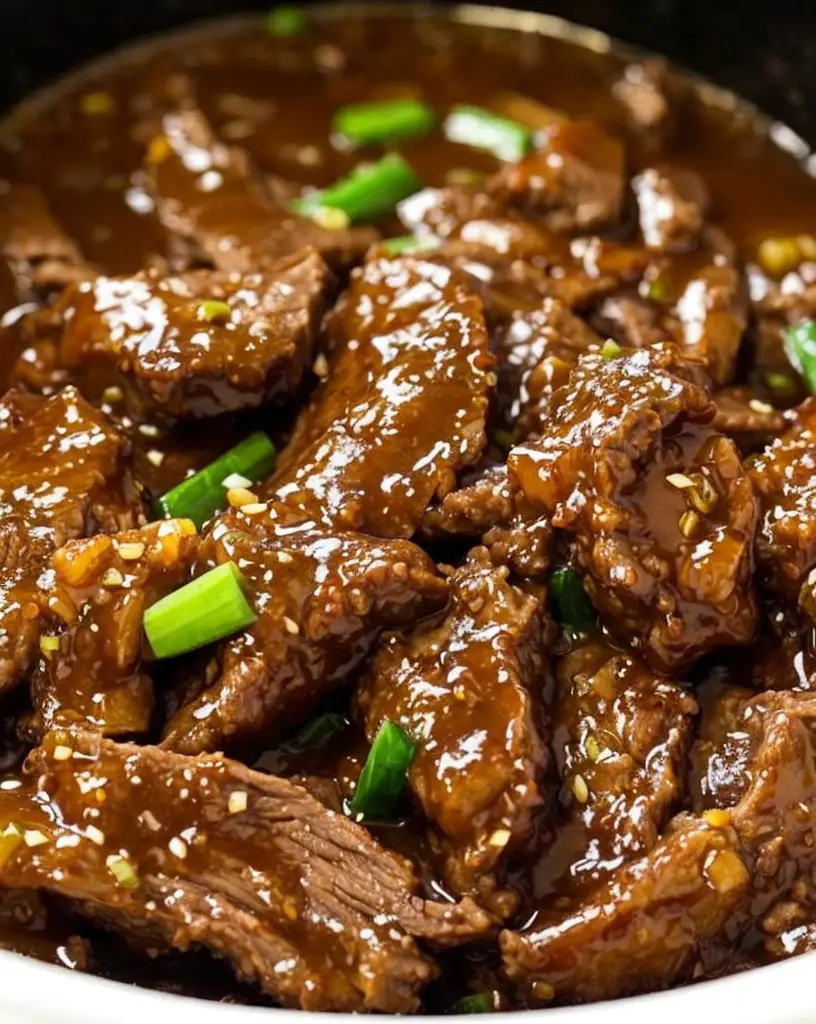
Slow Cooker Mongolian Beef is a tender, savory delight that captures the essence of East Asian cuisine using the convenience of a slow cooker. This dish combines the rich flavors of a soy sauce-based marinade with the sweetness of brown sugar, paired perfectly with spices and aromatics like garlic and ginger. As the beef simmers slowly, it absorbs these wonderful flavors, resulting in a melt-in-the-mouth experience that’s both delicious and satisfying without fuss.
This Mongolian Beef recipe truly exemplifies comfort food at its best. The ease of preparation makes it an excellent choice for busy weeknights or any occasion when you want a gourmet meal without the effort. The slow-cooked beef becomes incredibly tender, and the sauce thickens into a glaze that clings beautifully to each piece, ensuring every bite is as flavorful as the last. With minimal prep and cleanup, you can enjoy more time with family or entertain guests effortlessly while your slow cooker does the work.
Putting this dish together is straightforward and requires surprisingly few ingredients, making it both budget-friendly and accessible. Experience the fusion of classic flavors with modern simplicity, and let this recipe add a touch of culinary delight to your dining table.
Quick Recipe Highlights
Flavor Profile: Slow Cooker Mongolian Beef offers a sweet and savory fusion with deep soy sauce notes combined with subtle ginger and garlic aromas.
Texture: The beef becomes melt-in-your-mouth tender due to the low and slow cooking process, while the sauce thickens to coat each bite satisfyingly.
Aroma: Emit gentle fragrances of soy and sesame with a hint of ginger spice as it simmers away.
Visual Appeal: Featuring a glossy, caramelized finish that glistens on every piece of beef, serving it up with bright green onions makes a visually stunning dish.
Skill Level Needed: An easy recipe that requires basic prep of ingredients and the patience to allow them to cook slowly for maximum flavor extraction.
Special Equipment: A reliable slow cooker is the singular tool necessary to achieve this dish’s perfect texture.
Recipe Overview
Difficulty Level: This meal is categorized as easy due to its straightforward preparation and reliance on the slow cooker to perform most of the culinary work.
Category: A hearty main course perfect for casual family dinners or meal prep for the week.
Cuisine: Rooted in Asian culinary traditions but adapted for Western slow-cooking techniques, achieving an international favorite.
Cost: Reasonably priced as it utilizes affordable beef cuts and pantry staples to create a rich, gourmet meal feel without overspending.
Season: Year-round appeal but especially comforting during the fall and winter months when warm, aromatic meals are most revered.
Occasion: Ideal for intimate family meals, potlucks, or when you have guests over and want to offer tasty and comforting fare.
Why You’ll Love This Recipe
Slow Cooker Mongolian Beef offers an incomparable taste and texture with its soft, flavorful beef enhanced by the magical mix of soy, ginger, and garlic. Each morsel is bathed in a sweet-savory glaze that captures the perfect balance of Asian-inspired flavors, making every bite satisfying and fulfilling.
The next benefit is convenience. With minimal prep time and only a few core ingredients—like beef, brown sugar, and soy sauce—your slow cooker takes charge. This process grants you more time to relax while the kitchen fills with delightful aromas that herald the feast to come.
From a nutritional standpoint, this recipe uses high-quality proteins and allows effortless integration of additional vegetables for added nutrients. This flexibility can cater to dietary needs without sacrificing the taste experience.
Socially, this dish is a stunner at gatherings with its luscious presentation that garners compliments. It’s a true conversational piece when you reveal how little intervention was required to create such engaging flavors, making Slow Cooker Mongolian Beef a go-to for entertaining.
Finally, its cost-effectiveness coupled with accessibility ensures that you can enjoy this gourmet recipe without breaking the bank. Simplicity and flavor come together, making a restaurant-quality meal achievable in any home kitchen.
The Recipe
Slow Cooker Mongolian Beef
Serves: 6
Prep Time: 15 mins
Cook Time: 240 mins
Total Time: 255 mins
Kitchen Equipment Needed
Sharp knife
Cutting board
Mixing bowl
Slow cooker
Ingredients
2 lbs flank steak, sliced thinly
1 cup soy sauce
3/4 cup brown sugar
1 tablespoon garlic, minced
1 tablespoon fresh ginger, minced
1/4 cup cornstarch
3 tablespoons vegetable oil
1/2 cup sliced green onions, for garnish
Directions
In a bowl, combine soy sauce, brown sugar, garlic, and ginger, stirring until the sugar fully dissolves.
Coat sliced flank steak with cornstarch and place it inside the slow cooker.
Pour the soy sauce mixture over the steak, ensuring thorough coating.
Cover and cook on low for 4 hours or until beef is tender.
Before serving, heat vegetable oil in a pan and lightly sauté green onions.
Garnish the cooked beef with sautéed green onions before serving warm.
Recipe Notes
Substitute flank steak with skirt steak if unavailable.
For a richer sauce, reduce liquid by simmering it in a saucepan before adding green onions.
Crock Pot Chicken and Dumplings: Comfort Food Made Easy
Internal Linking Opportunities for Crock Pot Chicken and Dumplings
Based on the sitemap analysis, the following internal linking opportunities align well with the article about Crock Pot Chicken and Dumplings:
Link to “The Ultimate Comfort Food Crockpot Potato Soup with Hashbrowns”: Use rich anchor text like “easy slow cooker recipes for comforting meals” to guide readers to this related content.
Link to “Slow Cooker Magic: Unveiling the Ease of Crock Pot Baked Ziti”: Use anchor text such as “delicious slow cooker meals” to integrate naturally into the content.
Link to “Homemade Chicken and Dumplins Recipe”: Use a descriptive anchor like “classic chicken and dumplings recipes” for a seamless connection.
Article: Crock Pot Chicken and Dumplings
Introduction
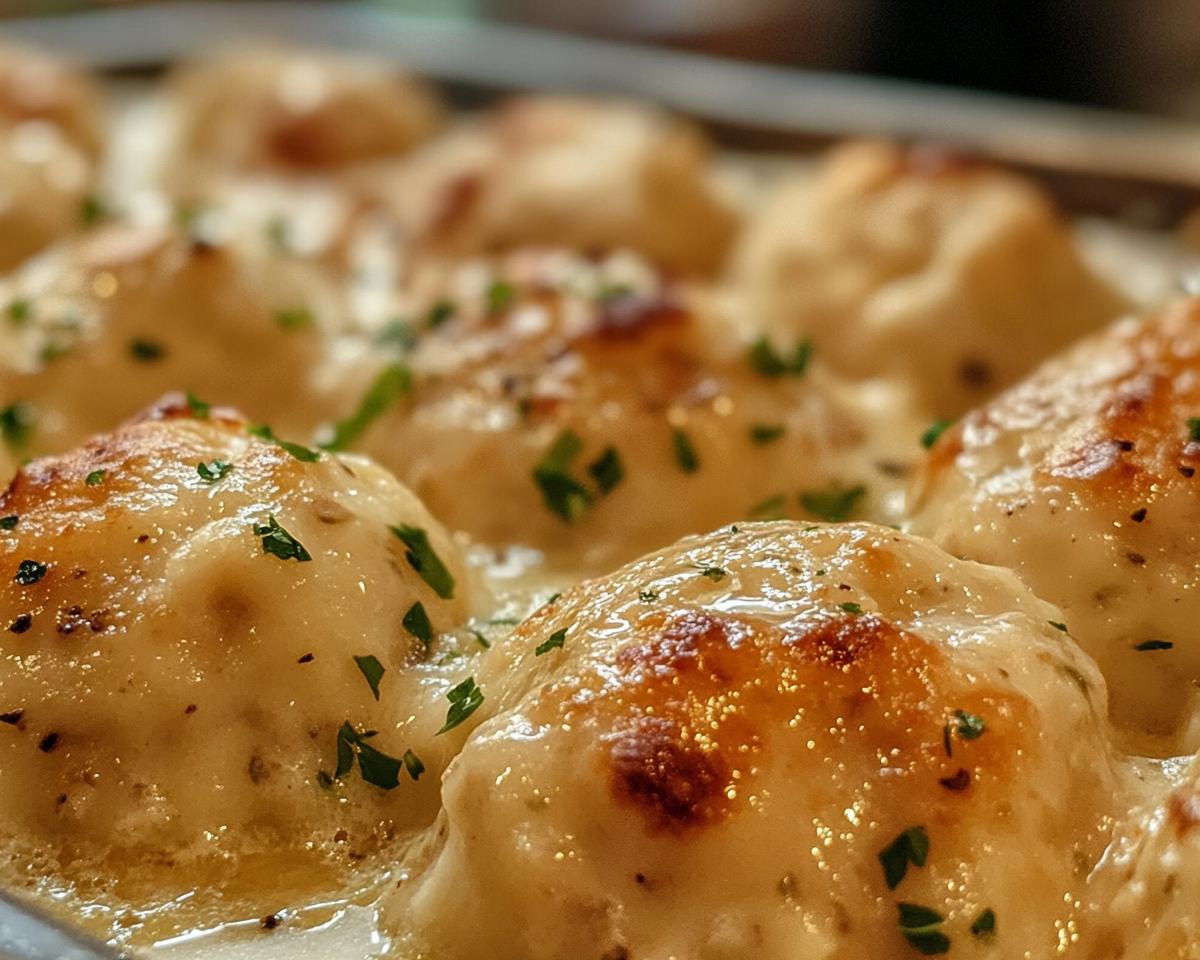
There’s nothing quite like the warm, hearty taste of Crock Pot Chicken and Dumplings on a chilly evening. This dish combines tender chicken, fluffy dumplings, and creamy broth, all simmered to perfection in your crockpot. Whether you’re hosting a family dinner or seeking comfort food, this recipe is an effortless way to create a meal everyone will love. Dive in to discover the secrets of making the perfect chicken and dumplings using minimal effort and maximum flavor.
Why Use a Crock Pot for Chicken and Dumplings? (300 words)
Retains moisture and flavors.
Perfect for hands-off cooking.
Ideal for busy schedules.
Creates a rich, evenly cooked dish.
Ingredients Breakdown (400 words)
Key Ingredients:
Chicken: Boneless thighs or breasts.
Vegetables: Carrots, celery, and onions.
Dumplings: Either homemade or store-bought biscuits.
Tips for Ingredient Selection:
Opt for fresh vegetables for added crunch.
Use organic chicken for a healthier meal.
Homemade dumplings add a rustic touch.
Step-by-Step Guide to Making Crock Pot Chicken and Dumplings (600 words)
Preparation:
Chop vegetables.
Season chicken with salt, pepper, and herbs.
Cooking:
Layer chicken, vegetables, and broth.
Cook on low for 6-8 hours or high for 3-4 hours.
Adding Dumplings:
Drop dumpling batter or biscuits on top.
Continue cooking until dumplings are cooked through.
Final Touches:
Garnish with parsley or thyme.
Serve warm.
Pro Tips for Perfect Results (300 words)
Don’t overfill your crockpot to allow dumplings to rise.
Stir gently to avoid breaking the dumplings.
Use a thickening agent like cornstarch for a creamier broth.
Variations to Try (350 words)
Herb-Infused Dumplings: Add dill or rosemary to the dough.
Spicy Kick: Include chili flakes or paprika.
Vegetarian Version: Substitute chicken with tofu and use vegetable broth.
Nutritional Information and Health Benefits (300 words)
High protein content from chicken.
Rich in vitamins from fresh vegetables.
Lower-calorie option when using skinless chicken breasts.
FAQs About Crock Pot Chicken and Dumplings (400 words)
Can I use frozen chicken?
Yes, but adjust the cooking time accordingly.
What’s the best way to store leftovers?
Store in an airtight container for up to 3 days.
Can I make this gluten-free?
Substitute dumplings with gluten-free biscuit dough.
Pairing Suggestions for Chicken and Dumplings (250 words)
Serve with a side of green beans or roasted vegetables.
Complement with a light salad and crusty bread.
Historical Background of Chicken and Dumplings (350 words)
Originating in the Southern U.S., chicken and dumplings became a staple comfort food.
Over generations, variations have emerged, incorporating regional flavors.
Expert Reviews and Community Feedback (300 words)
Reviews from food bloggers and chefs emphasize the dish’s versatility and ease.
Readers appreciate the convenience of using a crockpot.
Crock Pot Chicken and Dumplings is a timeless dish that brings comfort and flavor to your table. By following the steps above and exploring the tips and variations, you can create a personalized version of this classic meal. Don’t forget to explore related recipes like crockpot baked ziti and homemade dumplings to further elevate your culinary skills.
Suggested Internal Links
“The Ultimate Comfort Food Crockpot Potato Soup with Hashbrowns” – Explore more comforting slow cooker recipes.
“Homemade Chicken and Dumplins Recipe” – Discover variations on traditional chicken and dumplings.
“Slow Cooker Magic: Unveiling the Ease of Crock Pot Baked Ziti” – Try another delicious crockpot recipe.
Indulge in Irresistible Strawberry Velvet Cheesecake Truffles Delight
Irresistible Strawberry Velvet Cheesecake Truffles: A Decadent Delight
⚖️
Difficulty
Medium
⏲️
Prep Time
30 mins
🕒
Cook Time
0 mins
⏱️
Total Time
30 mins
🍽️
Servings
12
Indulge your senses with these Irresistible Strawberry Velvet Cheesecake Truffles that encapsulate the rich, creamy essence of cheesecake paired with the fruity zing of fresh strawberries. Perfectly sized for a delectable treat, each truffle offers a symphony of textures and flavors that delight the palate. With its melt-in-the-mouth consistency, this Strawberry Velvet Cheesecake Truffle recipe is bound to become a favorite for special occasions and quiet indulgences alike.
Imagine the joy of biting into these delicacies, where buttery, velvet cheesecake meets the refreshing taste of ripe strawberries. Every truffle is a mini-celebration, bringing forth a burst of sweetness complemented by the subtle tang of cream cheese. Perfect for desserts or as a delightful sweet gift, these truffles are designed to impress with both taste and aesthetics.
Creating these Strawberry Velvet Cheesecake Truffles is a rewarding adventure in your culinary journey. Thanks to their no-bake nature, preparation is a breeze, making it accessible even to those who are not seasoned chefs. The recipe combines minimal effort with maximum flavor, ensuring that the final results are nothing short of sensational.
Quick Recipe Highlights
Flavor Profile: These truffles offer a balanced taste, harmonizing the creamy richness of cheesecake with the light, fruity nuances of strawberries.
Texture: A delightful dual texture of a creamy, dense cheesecake center wrapped in a slightly crisp shell.
Aroma: Inviting notes of fresh strawberries and vanilla add an aromatic allure to this sweet treat.
Visual Appeal: Eye-catching pastel pink tones complemented by the elegant dusting of finely grated white chocolate.
Skill Level Needed: Ideal for novice to intermediate chefs, offering straightforward steps that yield professional-looking truffles.
Special Equipment: A food processor for blending the ingredients smoothly and a melon baller or small scoop for forming the truffles.
Recipe Overview
Difficulty Level: Medium due to the need for precise ingredient mixing and forming the truffles uniformly.
Category: These truffles fall under the dessert category, providing a lush finish to any meal.
Cuisine: Represents a fusion of classic dessert techniques with a modern twist, blending American cheesecake influences with fruity elements.
Cost: Relatively economical, using readily available ingredients, with the main costs being cream cheese and strawberries.
Season: Best enjoyed in spring or summer, aligning with strawberry harvest seasons for the freshest flavors.
Occasion: Perfect for celebrations, holiday gatherings, or as an elegant after-dinner treat.
Why You’ll Love This Recipe
The Irresistible Strawberry Velvet Cheesecake Truffles boast an appealing taste and texture that truly captivates. These luxurious treats present a creamy, light center with a delicate chocolate coating, delivering a sophisticated balance in every bite. The incorporation of fresh strawberries imparts a natural sweetness without overwhelming the palate, making it a delightful indulgence.
Convenience is a prime feature of this recipe, requiring no baking yet delivering a gourmet dessert experience. The truffles can be prepared in advance and stored, making them perfect for busy schedules or as a make-ahead treat for gatherings. This recipe exemplifies simplicity and efficiency, minimizing kitchen time while maximizing enjoyment.
These truffles also offer nutritional benefits due to the use of fresh strawberries, which are high in vitamins and antioxidants. By mastering portion control, these delectable treats can be enjoyed guilt-free, contributing to a balanced diet. The potential for health-conscious adjustments, such as reduced sugar options, widens their appeal.
The social and entertaining value of Strawberry Velvet Cheesecake Truffles is significant, as their impressive presentation and unique flavor make them a conversation starter. They fit effortlessly into a variety of settings, from family dinners to sophisticated soirées, offering a touch of elegance and warmth.
Cost-effectiveness and accessibility are key benefits, with most ingredients being pantry staples or easily procured at local stores. The flexibility to scale the recipe further enhances its practicality, allowing you to cater to both intimate gatherings and large celebrations without excessive cost or effort.
Historical Background and Cultural Significance
The origins of cheesecake can be traced back to ancient Greece, where it was considered a prized delicacy served to athletes during the first Olympic Games. Over centuries, the recipe evolved across regions, gaining popularity as a versatile dessert suitable for various adaptations, such as these Strawberry Velvet Cheesecake Truffles.
Strawberries have a rich cultural heritage, historically revered in Native American traditions as a symbol of love and purity. When combined with the universally adored cheesecake, they create a harmonious blend respected in culinary traditions across the world, particularly popular in recent decades within Western kitchens.
The evolution from traditional cheesecake to bite-sized truffles represents a modern adaptation, catering to contemporary tastes and schedules. These truffles maintain the essence of cheesecake, while the strawberry incorporation provides a refreshing twist that aligns with health-focused eating trends.
Regions across the globe have embraced the style of cheesecake truffles, customizing flavors to reflect local palates. In the U.S., the addition of strawberries plays into the country’s love for fresh, seasonal fruits, making these truffles a testament to the diverse culinary landscape.
Ingredient Deep Dive
The cream cheese is crucial in providing the rich, tangy base that defines these truffles. Originating from 19th-century American culinary innovation, cream cheese has become indispensable in desserts for its smooth texture and balanced flavor. When selecting, opt for full-fat versions for best results, and store it sealed in the fridge to maintain freshness.
Strawberries bring vibrant color and natural sweetness, essential for the truffles’ signature appeal. Rich in vitamin C and antioxidants, they offer health benefits alongside their flavor contributions. Choose firm, ripe strawberries for the best taste and store them in a single layer in the fridge to avoid bruising.
White chocolate serves as both a sweetener and a decorative element, offering a luscious coating that complements the cheesecake center. With origins in early 20th-century Switzerland, white chocolate has grown in popularity. Store it in a cool, dry place and handle gently to prevent melting or blooming.
Vanilla extract is the subtle enhancer that elevates the truffle profile. Harvested from vanilla beans, this extract adds depth and floral notes. Use pure vanilla extract for the most authentic taste, and ensure it is tightly sealed after use to preserve its aromatic qualities.
Powdered sugar adds sweetness without additional texture, creating a seamless mixture with the other ingredients. A staple in dessert recipes, it’s derived from finely ground sugar, making it ideal for quick dissolving. Store in an airtight container for longevity.
Common Mistakes to Avoid
Avoid using low-fat cream cheese, as it may not set properly and compromise the rich texture of the truffles.
Ensure strawberries are dry before blending to prevent excess moisture, which could affect the firmness of the mixture.
Do not over-process the mixture, as it could become too liquid, making it difficult to form truffles.
Avoid skipping the chilling step post-formation, as this step is crucial for maintaining shape when coating.
Never melt white chocolate at high heat; use gentle heat to prevent scorching or seizing.
Don’t overcrowd the storage container; give truffles space to avoid sticking together.
Steer clear of stale strawberries, as they affect both flavor and texture negatively.
Do not shortcut the vanilla extract; it adds crucial depth to the overall flavor balance.
Essential Techniques
Precision in blending is key for these truffles to achieve that smooth, silky texture, so pay attention to processing times. Over-blending can result in a runny mixture, so check often for consistency. This technique ensures the truffles’ interior is perfectly creamy and lush.
Chilling the mixture is a pivotal technique. Do not rush it; instead, allow adequate time for the mixture to set firmly. This step ensures ease in forming truffles and robustness for subsequent handling, leading to the perfect bite-sized delights.
Successful melting of white chocolate requires patience. Use low, consistent heat and stir frequently until smooth. This technique prevents seizing, creating an even coating that complements the creamy center without cracks or unevenness.
Truffle formation relies on uniformity for both aesthetic appeal and even cooking (or setting, in this case). Utilize a melon baller for equally sized portions and a light touch to shape rounds without pressing too hard, maintaining the delicate texture.
Coating the truffles involves careful timing and temperature control; ensure the chocolate is warm enough for a smooth coat but not too hot to melt the center. Mastering this technique results in a beautifully even, glossy truffle exterior.
Pro Tips for Perfect Irresistible Strawberry Velvet Cheesecake Truffles
Ensure your cream cheese is at room temperature before starting; this facilitates smoother blending and incorporates air for a lighter finish. This preparation step alone can dramatically influence the texture quality of your truffles.
Chill your mixing bowl alongside the mixture for better consistency. This method retains the mixture’s coolness, making it an essential step for professional-looking results that maintain their shape without melting during formation.
For an extra burst of flavor, consider adding a dash of almond extract into the mix. This flavor enhancer subtly complements the vanilla notes while boosting the fruity essence of the strawberries, offering a nuanced depth to your truffles.
Dip truffles using a fork and tap gently to remove excess chocolate, ensuring a velvet-smooth coat. Place on parchment paper to set, preventing any sticking and ensuring the sheen remains uninterrupted for an upscale presentation.
Emphasize presentation by garnishing with a tiny whole strawberry atop or authentic strawberry powder for a sophisticated, gourmet twist that elevates both visual appeal and flavor profile.
Pack truffles carefully in decorative boxes if giving as gifts. Use liners to prevent them from moving around, guaranteeing recipients enjoy them looking as spectacular as when made.
Variations and Adaptations
Explore regional variations by incorporating different berries available locally. Blueberries or cherries can replace strawberries for a satisfying twist, aligning the recipe with seasonal and geographical fruit availability.
Adapt this recipe for varying seasons by adding caramel drizzle for an autumn-themed treat or mint for a refreshing summer version. Experiment with seasonal ingredients to tailor the truffles year-round, enhancing their relevance.
For dietary adjustments, use gluten-free cookies for the coating instead of traditional graham cracker crumbs, ensuring the recipe remains accessible to gluten-sensitive individuals without compromising on texture or flavor.
Flavor variations can be achieved by substituting white chocolate with dark chocolate for a sophisticated, bittersweet contrast, introducing a complex taste profile well-suited to mature palates or chocolate connoisseurs.
Create texture modifications by incorporating nuts or crisped rice into the coating, providing a satisfying crunch. This adjustment adds a delightful contrast and an additional flavor layer to the smooth, creamy interior.
Presentation alternatives such as utilizing colored melting wafers provide thematic decor for events or holidays. Simply match the color theme, adding a personalized touch that enhances the visual impact of your truffles.
Serving and Presentation Guide
For plating, consider using tiered dessert stands, allowing these truffles to take center stage at gatherings, showcasing their elegance. Arrange in concentric circles to craft a visually appealing centerpiece that enhances any dessert table’s allure.
Garnish with edible flowers or fresh mint leaves to add a touch of sophistication and a burst of natural color. This addition not only enhances the visual presentation but also contributes a subtle aromatic dimension.
Traditionally, these truffles can be paired with a glass of chilled Riesling or a shot of espresso for a delightful complementary finish. Both options offer balancing notes that cut through the creamy richness.
Serving modern adaptations could involve pairing these truffles with nitro cold brew or artisanal flavored teas. These contemporary pairings offer trendy, refreshing alternatives appreciated by a younger or diverse audience.
Maintain optimal serving conditions by chilling the truffles slightly before enjoyment, allowing the flavors to meld while preventing valuable aromas and textures from dulling. Always serve cold to enhance the creamy bite.
Portion control is an easy consideration; aim for two to three truffles per person to ensure a satisfying but not overwhelming tasting experience. This guideline accommodates enjoyment while maintaining elegance and restraint.
Wine and Beverage Pairing
Pair these truffles with a sweet dessert wine, such as a late-harvest Muscat, perfectly complementing the strawberry notes they envelop. This pairing highlights the truffles’ sweetness without overpowering their delicate undertones.
Non-alcoholic alternatives include pairing with a sparkling berry-infused water, offering a refreshing effervescence that complements the creamy truffle textures. This option provides a crisp, clean taste that is mouth-cleansing.
Consider a cappuccino for a robust coffee pairing, with its creamy, frothy texture seamlessly aligning with the cheesecake center, providing a harmonious taste synchronization and an energizing aftertaste.
Temperature plays a role; serve all pairings moderately chilled (except coffee) to ensure the truffles’ texture remains ideal. A consistent serving blueprint allows the pairing experience to be elevated and cohesive.
When serving, consider elegant crystal glasses or artisanal ceramic mugs for a touch of class. Each choice enhances the tasting journey, providing meaningful visual appeal that matches the delicacy of the truffles themselves.
Storage and Shelf Life
Store truffles in a sealed, airtight container to maintain freshness and flavor. Utilize parchment paper between layers to prevent sticking and ensure the delicate exterior remains intact over time.
Refrigerate truffles, keeping them quitely chilled to preserve their creamy texture and pronounced flavors. A temperature of about 4°C (39°F) is optimal, keeping them just cool enough to hold their structure without altering taste.
Utilize clear plastic or glass containers that allow for visibility without unnecessary opening, limiting exposure to air and kitchen scents that might interfere with truffle aromas.
Signs of spoilage include a change in aroma or the appearance of moisture droplets; both suggest truffles nearing expiry. Discard at these indicators to avoid an unpleasant dining experience.
Reheating is not applicable for truffles; instead, focus on serving them at their optimum temperature for ideal taste and texture. Bringing them to room temperature for brief periods is permissible for serving.
If freezing, wrap individual truffles in parchment or wax paper, followed by storing in freezer-safe bags. This technique prevents freezer burn and maintains the integrity of each perfectly formed truffle.
Make Ahead Strategies
Plan ahead by preparing the truffle mixture and storing it in the refrigerator for up to two days before forming and coating. This advance step ensures quality remains pristine without last-minute rush.
Between forming and coating, refrigerate truffles to firm them up, ensuring the chocolate coating process is seamless. A minimum refrigeration time of 30 minutes is recommended for optimal setting.
Assess how storage impacts the truffles’ humidity and texture quality, ensuring the best environmental conditions are met ahead of serving. This consideration prevents moisture build-up and flavor compromise.
Assemble truffles completely a day ahead, allowing them to mature in flavor if refrigerated correctly. Allow a short time at room temperature right before serving to bring out the complexity of flavors.
Consider reheating, not in terms of temperature, but in elevating presentation. Allow already-made truffles brief air exposure for a glossy coat effect, enhancing visual allure prior to presentation.
Add freshness by sprinkling with freshly grated zest or a touch of sea salt just before serving, adding nuanced complexity and starting each bite with a crisp note that refreshes as it tantalizes.
Scaling Instructions
Halve the recipe when smaller quantities are required for intimate settings or single servings. Adjust ingredient portions with precision to maintain balance in flavor and texture integrity.
To double or triple the batch, ensure mixing bowl and equipment space accommodate larger volumes without affecting consistency. This adjustment requires larger pans or bowls and possibly batch processing.
When increasing quantities, timing modifications include extending chill time for larger batches, ensuring distribution of coolness throughout. Factor in additional time for coating if chocolate solidification slows from increased batch size.
Storage considerations necessitate additional containers or creative stacking solutions when scaling up. Proper layering of parchment paper ensures truffles maintain separation and quality uniformly.
Nutritional Deep Dive
For a balanced macro breakdown, these truffles rely primarily on fats from cream cheese and chocolate, alongside healthy carbs from strawberries, offering a delightful energy boost per serving.
Micronutrient analysis highlights the vitamin C contribution from strawberries, paired with calcium and vitamin A from cream cheese, creating a surprisingly nutrient-rich treat.
Health benefits stem from antioxidants in strawberries, offering a nutritional edge not typically associated with indulgent desserts. This natural boost supports overall wellness when enjoyed responsibly.
Dietary considerations suggest moderating consumption due to sugar content; however, these truffles can fit into healthier, balanced diets when consumed in mindful moderation.
Portion control is key – one or two truffles per serving allows enjoyment without excessive caloric intake, balancing satisfaction with health awareness.
For those focused on weight management, opt for part-skim cream cheese and experiment with lower-sugar chocolate alternatives, maintaining core flavor profiles while reducing overall calorie impact.
Dietary Adaptations
To make the recipe gluten-free, replace traditional coating ingredients with certified gluten-free cookies or biscuits, eliminating gluten without compromising the delightful taste and texture of the truffles.
For a dairy-free adaptation, choose vegan cream cheese options and substitute regular white chocolate with dairy-free varieties. These swaps maintain flavor while supporting lactose-free dietary preferences.
Vegans can enjoy these truffles by using plant-based cream cheese and coconut-based white chocolate, integrating delightful flavors and textures compatible with vegan lifestyles.
For a low-carb variation, utilize sugar-free sweeteners and focus on using strawberries sparingly for flavor bursts, transforming the recipe into a ketosis-friendly dessert.
The keto adaptation parallels low-carb requirements; however, ensure the net carb total aligns with daily allowance, usually necessitating reduced chocolate and strawberry components.
For a paleo-friendly version, opt for raw cacao and nut-based coatings, alongside almond-derived cream cheese substitutes, aligning with the paleolithic nutritional philosophies while maintaining appeal.
In a low-FODMAP adaptation, choose specific brand cream cheeses and chocolate options marked as low-FODMAP. This adaptation supports digestion-focused dietary needs without limiting enjoyment.
Troubleshooting Guide
For texture issues involving softness or melting, check refrigeration settings and extend cooling time before the coating process to ensure firmness and shape retention. Ensure covered chilling for truffle solidity.
In cases of unbalanced flavor, adjust vanilla or almond extract additions to your taste, using a small trial quantity to test preferred levels before full ingredient integration. This technique achieves preferred palate alignment.
Temperature problems, particularly in white chocolate coating, require constant stirring over gentle heat. Use heat-proof bowls and all utensils to manage even temperature distribution, avoiding lumps and clumps.
If equipment challenges arise, ensure each piece involved is properly calibrated and adjusted according to batch size to avoid inconsistencies in blending or forming within truffle batches.
To confidently navigate ingredient substitutions without altering outcomes, employ small-scale testing with unfamiliar swaps to acclimate to variations that influence ultimate taste and integrity.
Timing concerns relate directly to each step’s recommended duration, emphasizing it is better to wait and chill longer than rush steps likely to influence truffle resilience and quality negatively.
Recipe Success Stories
Community feedback echoes positive reviews, highlighting the balance in sweetness and decadence that these Strawberry Velvet Cheesecake Truffles provide, coupled with lasting impressions and eager requests for second attempts.
Variations shared by readers landed new creativity, such as dipping halves in dark chocolate or decorating with crushed nuts, personalizing adaptations and introducing enjoyable twists revamping the original concept.
Adaptation stories foster innovation, with a noted reader achieving dairy-free success using coconut cream bases and berry compotes. These testimonials inspire dietary exploration and integration benefiting diverse palates.
Reader suggestions propose an enriching ganache centre filling, contributing an excellent textural contrast and luxurious appeal, showcasing simple yet sophisticated ideas bringing fresh angles to the truffle tradition.
Photography tips included light use and natural backgrounds highlighting the pastel hues and chocolate luster, teaching creative angles enhancing online presentation. Capture these truffles artfully allows them to shine visually.
Frequently Asked Questions
Can I use frozen strawberries instead of fresh ones?
Yes, you can. However, ensure they are thoroughly thawed and well-drained to prevent excess moisture that might affect the truffle’s consistency.
How long can I store these truffles?
Truffles can be stored in the refrigerator for up to a week. For best flavor, consume within the first few days to ensure freshness.
What can I use if I don’t have a food processor?
A high-powered blender or a hand mixer can serve as alternatives. Work in batches if needed, ensuring thorough mixing for a smooth texture.
Can I freeze these truffles for longer storage?
Yes, wrap each truffle individually and store in airtight containers for up to three months. Thaw in the fridge overnight before serving.
What can I use if I’m allergic to strawberries?
Substitute with other fruits like raspberries, blueberries, or peaches, adjusting sweetness levels to account for the natural sugar variations.
Is there a vegan version of this recipe?
Absolutely! Opt for vegan cream cheese and dairy-free chocolate to achieve a plant-based take on these delicious truffles.
How can I make a smaller batch than the recipe suggests?
Halve all ingredients and employ small-batch techniques to guarantee proportional flavor outcomes and reliable consistency.
Do I have to use white chocolate for coating?
While white chocolate offers a sweet complement, feel free to use dark or milk chocolate varieties to tailor the flavor profile as desired.
What’s the best way to package these as gifts?
Use decorative tins or gift boxes with personal touches like ribbons or silk paper liners, ensuring truffles remain secure in transit and visually captivating.
Can these truffles be used as wedding favors?
Absolutely, their elegant appearance and host-friendly preparation make them ideal for weddings. Customize coating colors or decorations to match theme elements, adding bespoke charm.
Additional Resources
Explore related recipes such as classic cheesecake tarts and strawberry mousse for diverse variations on the truffle’s essence. Integrate similar flavors or textures, broadening your dessert repertoire effortlessly.
Techniques like chocolate tempering or efficient fruit preparation are further detailed in accessible guides, enabling refinement of truffle-making processes and new skills acquisition as culinary interests expand.
Ingredient information about alternative sweeteners or cream cheese options assists in understanding mixing purpose, availability, and best practices, supporting global ingredient inconsistencies and dietary variety.
Equipment recommendations tackle both basic and innovative tools, ensuring successful truffle preparation while fostering curiosity in helpful kitchen aids extending potential beyond ordinary gadgets.
Seasonal variation discussions direct attention to cyclical ingredients, maintaining relevancy throughout annual changes. Emphasizing lead times and market availability boosts practical application.
Join the Conversation
Engage with the community regarding successes and challenges faced during the truffle-making journey, prompting beneficial exchanges in versatile culinary expressions and connection building.
Encourage social media sharing through the use of specific hashtags, inspiring creative layouts, and narrative twists, making your truffles a compelling subject in digital storytelling mediums internationally.
Photography tips mention harnessing natural lighting for illustrating colors truthfully, positioning your creations as visually inspiring phenomena that entice delightful engagement and future experimentation.
Recipe reviews, both positive or constructive, foster mutual growth, adding essential dimensions to your adaptive skill ensemble and community collaborations evolving all participants’ culinary journeys.
Delve into an array of submitted variations through reader interactions, enabling reciprocal learning about diverse adaptations cherishing culinary curiosities and innovation, crafting a global truffle appreciation.
1/2 cup graham cracker crumbs (or gluten-free alternative)
Directions
In a food processor, blend cream cheese, strawberries, powdered sugar, and vanilla extract until smooth.
Refrigerate mixture for 20 minutes until firm enough to handle.
Use a melon baller to scoop out the mixture and form into small balls.
Roll each ball in graham cracker crumbs to coat.
Melt the white chocolate gently in a double boiler or microwave, stirring until smooth.
Dip each truffle in the melted chocolate, letting excess drip off.
Place on parchment paper to set and refrigerate for additional 10 minutes to firm up the coating.
Recipe Notes
Use fresh, ripe strawberries for the best flavor.
Experiment by substituting white chocolate with dark chocolate for a different taste.
The truffle mixture may be prepared a day in advance to save time.
Master the Art of Perfectly Seared Scallops in Creamy Curry Sauce
Perfectly Seared Scallops in Creamy Curry Sauce: A Flavorful Delight
⚖️
Difficulty
Intermediate
⏲️
Prep Time
15 mins
🕒
Cook Time
20 mins
⏱️
Total Time
35 mins
🍽️
Servings
4
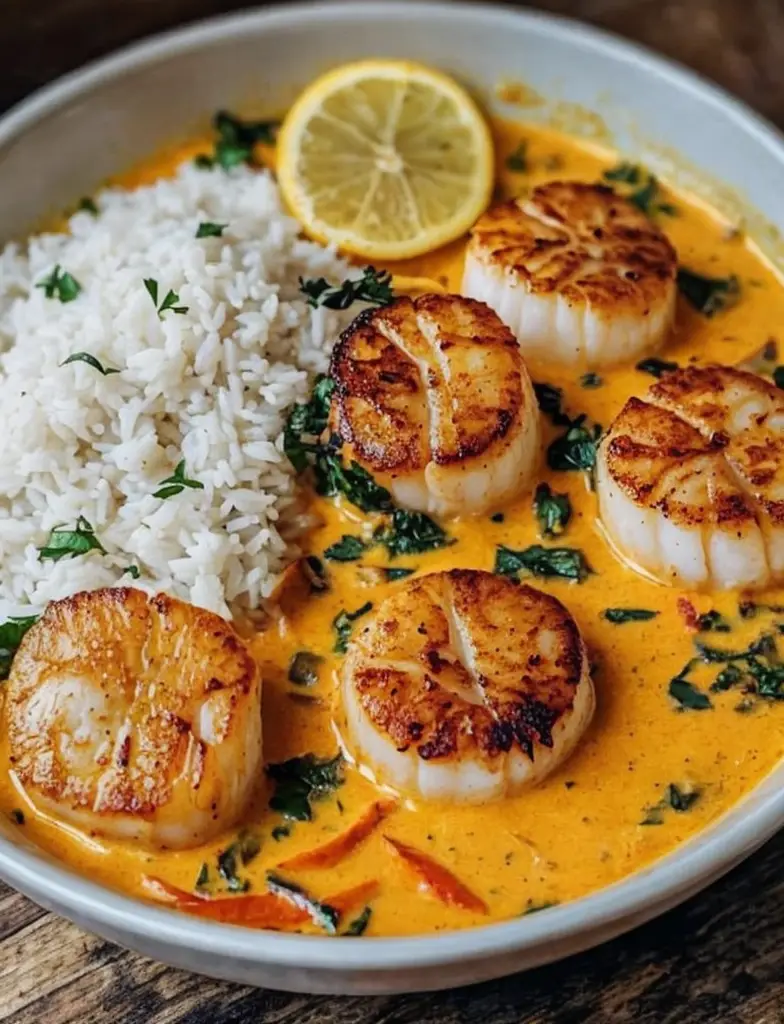
Imagine tender, buttery scallops perfectly seared to golden-brown perfection, sitting atop a bed of lush creamy curry sauce. This dish enchants with an intoxicating mix of savory and subtle sweet notes, balancing the rich texture of the creamy sauce with the delicate sea flavor of the scallops. An absolute show-stopper for any special occasion, these Perfectly Seared Scallops in Creamy Curry Sauce promise to tantalize every taste bud.
Crafting this delightful dish requires some finesse with timing and heat, ensuring a delightful crunch on the scallops while maintaining their sumptuous, juicy interior. The creamy curry sauce complements this, providing a symphony of aromatic spices that elevate this seafood delicacy into the realm of fine dining. Whether you’re cooking for loved ones or treating yourself, this recipe brings both elegance and warmth to the table.
The beauty of these seared scallops lies not only in their delectable flavor but in their simplicity. Surprisingly easy to prepare, these scallops are an ideal recipe for home chefs ready to venture into the world of gourmet dishes. Prepare to impress with bold flavors and a sophisticated presentation that perfectly captures the spirit of a luxurious dining experience.
Quick Recipe Highlights
Flavor Profile: A delightful blend of savory, sweet, and mild spices gives these scallops a unique and refreshing taste.
Texture: Expect a perfect mix of crispy sear and tender interior with the scallops enriched by the creamy smoothness of the sauce.
Aroma: Experience a fragrant allure from the curry-infused sauce, enhanced by the subtle sea essence of the scallops.
Visual Appeal: Golden scallops rest on a bed of sauce with vibrant colors, making the dish as beautiful as it is delicious.
Skill Level Needed: Suitable for those with moderate culinary skills, focusing on precise timing and heat control.
Special Equipment: A good quality non-stick pan and spatula are essential for achieving the perfect sear on your scallops.
Recipe Overview
Difficulty Level: The recipe requires an intermediate skill level due to the precise searing technique and the nuanced balance in the spicy curry sauce.
Category: These scallops fit beautifully as a sophisticated main course or an extravagant appetizer.
Cuisine: This dish reflects a fusion of Western seafood traditions with an exotic Indian flair, blending different culinary worlds.
Cost: Ingredients may be on the pricier side, owing to the scallops and spices, yet they promise a restaurant-quality outcome.
Season: Best prepared during spring and summer when fresh scallops are more readily available, enhancing the dish’s flavor.
Occasion: Perfect for romantic dinners, celebrations, or anytime you wish to impress guests with a gourmet meal.
Why You’ll Love This Recipe
The taste and texture of these Perfectly Seared Scallops in Creamy Curry Sauce will delight anyone who craves a twist on traditional seafood dishes. The subtle heat from the curry is well balanced by the sauce’s creaminess, providing a robust, rounded delight. Unlike ordinary scallop recipes, this one promises a symphony of flavor in every bite.
Preparing this recipe offers a satisfying culinary adventure. The steps are clear and concise, enabling you to create a dish of impressive quality. Moreover, this recipe suits various occasions, whether a date night or a holiday feast. Its complexity in flavors makes it stand out on any table, ensuring enjoyment for both cooks and diners.
Additionally, the nutritional advantages align with dietary preferences focused on lean proteins and healthy fats. Scallops are protein-rich, low in calories, and when paired with a carefully curated sauce, maintain a healthful balance without excessive guilt. It’s decadence without extravagance.
Your social gatherings will benefit as this recipe is a conversation starter, encouraging discussions about flavor profiles and cooking techniques. It’s a perfect dish to open up bonds over shared gourmet interests, elevating both the meal and the company.
Finally, the affordability of such an exquisite dish is remarkable. With thoughtful ingredient choices and preparation, you can enjoy a restaurant-style meal at home, potentially saving costs while delighting in an effortlessly elegant dining experience.
Historical Background and Cultural Significance
The concept of serving scallops dates back centuries, with this seafood revered since ancient times in coastal communities worldwide. Traditionally seized fresh from the ocean, scallops have been prized for their delicate flavor and rich meat, making them a valuable and luxurious ingredient.
Culturally, scallops hold significance in many culinary traditions ranging from French to Asian cuisines. Their inherent versatility allows them to be adapted into numerous dishes, each encompassing regional flavors and techniques. Scallops in a curry sauce is somewhat of a modern invention, integrating Asian spice palettes into Western cuisine trends.
Over the years, the recipe has evolved, with chefs continuously experimenting with different spice blends and preparation techniques to perfect the balance of flavors and textures. This version plays on robust spices commonly found in Indian curry, merged with the preparation methods of classic French cuisine.
Regional variations of this dish exist, with coastal regions adding their signature local flavors to enhance this exquisite seafood. These adaptations often follow the availability of spices and other fresh ingredients, creating a rich tapestry of flavor profiles all celebrating the humble scallop.
Ingredient Deep Dive
The star of this recipe, scallops are globally renowned for their succulence and mild sweetness. Historically, scallops have been a favorite among coastal communities, cherished for their rich taste and versatile nature. Nutritionally, they are high in protein yet low in calories and fat, offering a nutritious option for seafood lovers.
When selecting scallops, freshness is crucial. Opt for scallops that have a fresh, mild scent and a firm, slightly moist texture. If fresh scallops are unavailable, dry-packed frozen scallops are an acceptable alternative. Store them in the coldest part of your refrigerator and use them promptly to enjoy their full flavor.
Curry powder, the key component of this sauce, traces its roots back to Indian cuisine. Traditionally used for its aromatic and rich characteristics, curry powder typically includes turmeric, cumin, coriander, and other spices. It’s rich in antioxidants and has numerous health benefits.
To ensure high-quality flavor, choose a fresh, aromatic curry powder. Store it in a cool, dry place to maintain its potency. While different blends offer varying heat and flavor profiles, start with mild alternatives if experimentation is your goal. You can easily adjust the heat with complementary spices like cayenne or pepper.
Common Mistakes to Avoid
Overcooking Scallops: Avoid a rubbery texture by watching the time and heat carefully, aiming for a perfect sear.
Inadequate Seasoning: Ensure a proper balance of flavors by tasting and adjusting seasoning levels throughout.
Choosing the Wrong Pan: Use a hot, quality pan to achieve an even crust without burning or uneven cooking.
Improper Sauce Thickening: Monitor sauce thickness carefully; a thin sauce will not cling well to the scallops.
Buying Wet-Packed Scallops: Opt for dry-packed to avoid excessive moisture and improve searing.
Failing to Dry Scallops: Pat scallops dry before cooking to ensure a crisp, brown crust.
Using Low Heat: High heat is necessary for a quick, even sear—do not crowd the pan with too many scallops.
Neglecting Freshness: The dish’s quality is deeply dependent on the freshness of both scallops and spices.
Heavy-handed Spice Usage: Balance curry flavors with the cream to avoid overwhelming the dish’s delicacy.
Skipping Rest Time: Allowing scallops to rest briefly after cooking will maintain juiciness and flavor.
Essential Techniques
Searing scallops perfectly is paramount. Achieving a golden-brown crust requires high heat and patience. Ensure the pan is adequately heated and avoid moving scallops prematurely. Look for a rich color before flipping to guarantee a crispy, flavorful exterior.
Curry sauce must be well-balanced, creamy, and aromatic. Stir consistently to avoid scorching and ensure ingredients meld seamlessly. Look for a slightly thickened sauce that clings to the back of a spoon. Visual cues like a rich, golden hue and intoxicating aroma will indicate the sauce is ready.
Pro Tips for Perfect Scallops in Creamy Curry Sauce
Allow scallops to reach room temperature before cooking. This ensures even cooking and superior searing. Use a non-stick or stainless-steel pan for the best sear, paying attention to heat levels and scallop spacing.
Clarifying your butter allows for a higher smoking point, enhancing the searing process without burning. To amplify the scallop’s natural flavor, finish with a squeeze of fresh lemon juice before serving.
When choosing curry powders, starting with mild and medium flavors lets you control the heat as you adjust to taste preferences more confidently. The sauce should remain creamy without losing any of its aromatic intensity or spice richness.
Variations and Adaptations
Regional variations might see the addition of local spices or heat levels. For instance, Thai influences might introduce lemongrass or kaffir lime leaves for an exotic touch. Adjust the heat of your curry to suit seasonal climates, favoring milder versions in warm weather.
Dietary modifications include substituting heavy cream with coconut milk for a non-dairy version. Introduce flavor variations by switching traditional curry powders with specific blends like Madras or Masala, each offering distinct, exciting profiles.
Modern serving suggestions might see scallops resting on a bed of zucchini noodles or spinach for a fresh, light alternative. These ideas highlight the dish’s versatility, accommodating both presentation and flavor.
Serving and Presentation Guide
For an inviting presentation, consider using white or light-colored plates to make the colors of the dish pop. Garnish with cilantro or microgreens for an aromatic and vibrant touch. Balance servings with accompaniments like jasmine rice or crusty bread, which enhances the dish’s versatility and enjoyment portfolio.
Consider temperature and timing. Scallops should be served immediately to maintain their delicate warmth and texture. Carefully portion the scallops, adjusting according to your crowd size for an exquisite balance of flavors, color, and texture.
Wine and Beverage Pairing
For wine pairings, a crisp white wine like Chardonnay enhances the dish’s creamy attributes, while maintaining enough brightness to cut through the richness. If avoiding alcohol, consider a sparkling water or lightly brewed iced tea with a squeeze of citrus.
A light herbal tea would complement the curry without overpowering it, while an oolong or jasmine tea enhances the aromatic complexity. Serve beverages at a chilled temperature to offer a refreshing counterbalance to the meal’s warm richness.
Storage and Shelf Life
Store any leftover scallops and sauce separately in airtight containers. Refrigerate promptly and use within 2 days for optimal freshness. If freezing, scallops can maintain quality for up to 2 months, but ensure a thorough and gentle reheat, avoiding overcooking.
Signs of spoilage include an off-odor or significant texture change—consume only when confident in freshness. Reheated scallops should be gently warmed to prevent overcooking, and stored sauce gently reheated to maintain a creamy consistency.
Make Ahead Strategies
The curry sauce can be made ahead of time and stored in the fridge, allowing for flavors to meld overnight. Scallops, however, are best seared fresh to retain their texture. Prepare all ingredients ahead of time and store them appropriately, facilitating stress-free assembly.
For an organized approach, prep your cooking station by gathering needed equipment and ingredients beforehand. This preparation aids in efficiency and quality, maintaining the highest standards for your meal.
Scaling Instructions
For intimate or expanded gatherings, adjust ingredient quantities keeping all proportions consistent. Doubling the recipe might necessitate cooking in batches, ensuring each scallop receives adequate pan space for the best sear.
Equipment, like additional pans or larger cooktops, might be necessary for larger adjustments. Consider how storage and reheating practices change, ensuring quality remains uncompromised with increased volume.
Nutritional Deep Dive
This recipe offers a balanced macro profile with protein-rich scallops and a flavorful sauce low in refined sugars. Micronutrients, including selenium and vitamin B12, add nutritional value, supporting overall health.
Those focusing on portion control can enjoy this meal’s hearty composition without excess calories, aided by its satiating qualities. Understanding each nutrient’s contribution encourages mindful, healthful dining.
Dietary Adaptations
For gluten-free adaptations, ensure curry powders and all accompaniments, such as rice or breads, meet dietary requirements. Dairy-free versions benefit from coconut cream, while vegan editions can substitute scallops with tofu or mushrooms, maintaining the dish’s essence.
Low-carb and keto diets can adapt by using full-fat creams or cheeses in the sauce, eliminating sugars entirely. Paleo adherents might consider a ghee or coconut oil base, ensuring complete compliance.
Troubleshooting Guide
Texture issues might arise from incorrect searing temperatures—fix this by ensuring a very hot pan and minimal scallop movement. Flavor balancing requires tasting frequently and adjusting spices incrementally, ensuring neither overpowers the other.
Temperature concerns should be addressed by investing in a reliable cooking thermometer to maintain accuracy. Equipment challenges might involve necessary updates or substitutions with available tools.
Recipe Success Stories
Community feedback consistently praises the dish’s rich, balanced palate and inviting warmth. Enthusiasts have shared successful adaptations with regional spices, extending its reach across varied palate preferences.
Engagement is widespread on social platforms, with shared adaptations and striking presentations. Feedback often highlights the recipe’s blend of complexity and simplicity, appreciating its restaurant-quality appeal from home kitchens.
Frequently Asked Questions
1. Can I use frozen scallops for this recipe? Yes, thaw them properly before use. Look for dry-packed versions to avoid excess moisture.
2. How do I know when the scallops are cooked perfectly? Look for a golden crust and opaque center. Avoid overcooking to maintain tenderness.
3. Can I substitute the cream for a dairy-free alternative? Absolutely, coconut milk makes an excellent alternative to accommodate dairy-free needs.
4. What should I pair this dish with? Pair with light white wines or herbal teas, complementing the dish’s delicate, spiced aromas.
5. How do I store leftovers? Store scallops and sauce separately in the refrigerator, consuming within two days for best results.
6. Are there any other spices I can add to this dish? Customize your curry sauce with additional spices like lemongrass or kaffir lime for a varied profile.
7. Can I prepare parts of this dish ahead of time? Yes, prepare the curry sauce ahead, refrigerating it to meld flavors; scallops should be fresh.
8. How do I avoid making my scallops rubbery? Control cooking time, ensuring a very hot pan and limiting scallop movements during searing.
9. Is this dish suitable for special diets? With modifications, it can suit gluten-free, dairy-free, keto, and paleo diets.
10. What is the best way to reheat scallops? Gently reheat in a warm pan or oven, avoiding microwaves to preserve texture.
Additional Resources
Explore related recipes like our Garlic Butter Shrimp or Lemon-Infused Baked Cod, each sharing complementary flavors and techniques. Our comprehensive guide on seafood selection offers insights for various preferences, enhancing your understanding and enjoyment.
Discover equipment recommendations for achieving perfect sears with non-stick and stainless pans, ensuring professional outcomes from home kitchens. Align your seasonal cooking pursuits with our collection of fresh, vibrant options, each capturing culinary specificity yearlong.
Join the Conversation
Engage in our community through social media by sharing your own recipe adaptations. Provide honest reviews and suggestions, or pick up new culinary tips. We encourage open conversation and recipe variation, each step enhancing our shared dining experience.
Contribute to vibrant forums, sharing your culinary triumphs and photography. Whether finding inspiration or providing guidance, each interaction strengthens our shared passion for flavorful, elegant cooking.
The Recipe
Perfectly Seared Scallops in Creamy Curry Sauce
Serves: 4
Prep Time: 15 mins
Cook Time: 20 mins
Total Time: 35 mins
Kitchen Equipment Needed
Non-stick or stainless-steel skillet
Spatula
Mixing bowls
Whisk
Knife
Cutting board
Ingredients
12 large sea scallops
2 tablespoons olive oil
1 tablespoon unsalted butter
Salt and pepper to taste
1 cup heavy cream
1 tablespoon curry powder
1 teaspoon minced garlic
2 teaspoons lemon juice
Chopped cilantro for garnish
Directions
Pat scallops dry with a paper towel and season with salt and pepper.
Heat olive oil in a skillet over medium-high heat. Add butter and allow it to melt.
Sear scallops for 2-3 minutes on each side until golden brown. Remove from skillet and set aside.
Reduce heat to medium. Add garlic to the skillet and sauté until fragrant.
Stir in curry powder, mixing well with the garlic.
Gradually whisk in heavy cream, letting the sauce simmer and thicken.
Add lemon juice, tasting and adjusting seasoning as needed.
Return scallops to the skillet, gently stirring to coat them in the sauce.
Garnish with cilantro before serving warm.
Recipe Notes
For a milder sauce, reduce the curry powder or use a fresh blend tailored to your heat preference.
Substitute olive oil with ghee or clarified butter for an enhanced flavor profile.
For a dairy-free option, use coconut cream instead of heavy cream.
Instant Pot Chicken and Rice: Easy One-Pot Recipe for Busy Nights
Markdown Article: Instant Pot Chicken and Rice
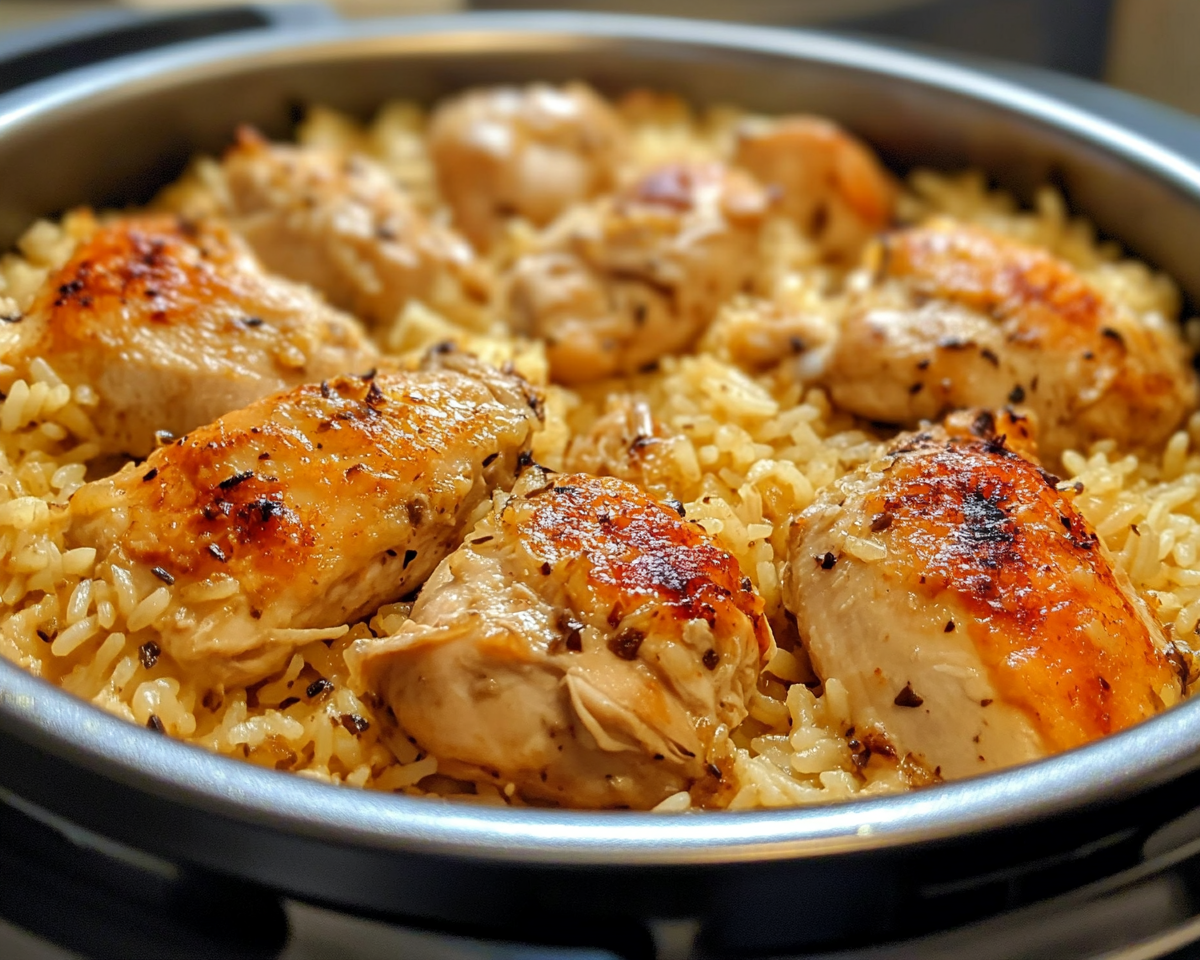
Instant Pot Chicken and Rice: A One-Pot Comfort Meal
Cooking delicious, wholesome meals doesn’t have to be time-consuming. Instant Pot Chicken and Rice combines convenience, taste, and nutrition into one dish that is perfect for weeknight dinners or meal prep. Using an Instant Pot, this recipe saves time without sacrificing flavor, making it a family favorite.