Indulge in Decadent Brownie Cheesecake Parfait for Dessert Delight

Brownie Cheesecake Parfait: A Decadent Delight

⚖️
Difficulty
Medium

⏲️
Prep Time
20 mins

🕒
Cook Time
0 mins

⏱️
Total Time
20 mins

🍽️
Servings
4

Indulge in the delightful fusion of rich chocolate brownie and creamy cheesecake with this Brownie Cheesecake Parfait recipe. Easy to assemble and beautiful to behold, this dessert combines the best of two beloved treats in a single, elegant glass. The lush layers of brownie and cheesecake, topped with a selection of decadent accessories, make for a perfect ending to any meal.

With its sumptuous flavor and eye-catching presentation, the Brownie Cheesecake Parfait is sure to impress your family and friends. The unison of moist brownies with velvety cheesecake is a match made in dessert heaven, offering you a perfect symphony of tastes and textures.

Quick Recipe Highlights

  • Flavor Profile: A luscious blend of rich chocolate and silky cream cheese with hints of vanilla.
  • Texture: A divine combination of fudgy brownie chunks and smooth, creamy cheesecake fill each spoon.
  • Aroma: The sweet scent of chocolate mingled with cream cheese is simply irresistible.
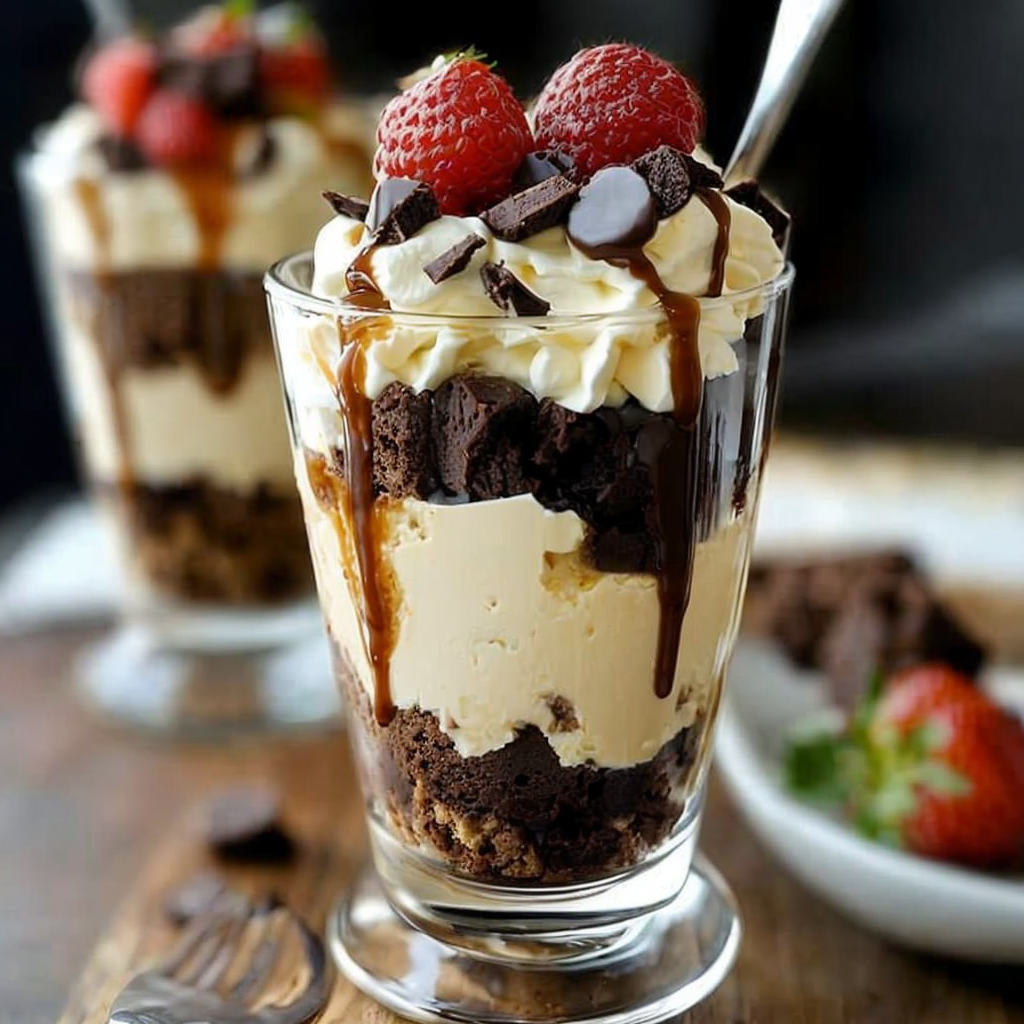
  • Visual Appeal: Layers of dark brownie and pale cheesecake create a striking contrast, enhanced by optional garnish.
  • Skill Level Needed: Moderate baking skills to assemble layers and manage consistency.
  • Special Equipment: Individual parfait glasses for presentation.

Recipe Overview

  • Difficulty Level: This recipe is rated medium due to the need for even layering and proper cheesecake consistency.
  • Category: Perfect for dessert lovers looking for a quick yet impressive treat.
  • Cuisine: A fusion that combines American-style brownies with classic cheesecake elements.
  • Cost: Moderate; affordable ingredients with options for premium enhancements.
  • Season: Best enjoyed year-round, with variations for summer fruits or warming spices in winter.
  • Occasion: Ideal for special gatherings, holiday dinners, or a luxurious everyday treat.

Why You’ll Love This Recipe

The Brownie Cheesecake Parfait is a dream come true for dessert aficionados, offering an unbeatable taste sensation. The juxtaposition of fudgy brownie chunks against the creamy cheesecake mixture provides a taste and texture delight that is unparalleled. This dessert ticks all the boxes with its undeniable convenience of preparation, as it can be assembled in a matter of minutes, especially if the brownies are pre-made.

In terms of convenience, this recipe is a winner. Without requiring a lengthy bake, it saves time without sacrificing flavor. Perfect for a quick dessert fix or a last-minute gathering, it allows you to deliver a sophisticated treat with minimal effort. The nutritional profile is customizable, allowing you to opt for healthier readjustments like reduced sugar brownies or Greek yogurt cheese mix.

Serving the parfait is a rich gourmets’ affair ideal for entertaining. Its elegant presentation in tall glasses makes it a conversation starter and a cherished part of meal experiences with family and friends. Socially, its intricate appearance belies the simple preparation, elevating any casual meal to a dining experience without much culinary background needed.

Cost-effectiveness and accessibility of ingredients enhance its attractiveness, making it a go-to for any budget. With common pantry staples as its core, you can create a chic dessert without needing costly resources. Its adaptability to substitute or include premium ingredients like exotic fruits also offers room for gourmet explorations beyond the standard recipe.

Historical Background and Cultural Significance

The Brownie Cheesecake Parfait emerges from the opulent lineage of parfaits, an adaptation of layers of creamy and textured ingredients. Its roots dip delicately into American culinary history, drawing upon the famed origins of the brownie in early 20th-century Chicago, where its popularity exploded as a quick-fix, comforting delight. The cheesecake component brings an echo of rich, layered desserts from Europe, making this parfait a harmonious culinary amalgamation.

Culturally, the parfait combines celebratory elements of both the brownie and cheesecake, infusing a sense of indulgence prevalent in American dessert culture with historic European elegance. Through its widespread popularity, it bridges tradition with modern food artistry, embodying innovative dessert culture.

Over time, the parfait has morphed through various flavors and combinations, yet the Brownie Cheesecake Parfait stands robust against many regional variations due to its flavor balance between robust chocolate and tangy cheesecake. From leisurely meals to high-end dining, its versatility showcases the melding of fine dining roots with accessible home cooking.

Regionally, adaptations may imbue local essence, such as introducing southern pecans or Californian strawberries in achieving a unique spin. Yet at its core, the Brownie Cheesecake Parfait unfailingly delivers comfort and nostalgia that transcends geographical boundaries, solidifying its place in contemporary dessert repertoire.

Ingredient Deep Dive

The brownie portion of the parfait, steeped in American history, brings with it a nostalgia-tinted robustness. They marry early chocolate traditions with modern culinary innovation. Nutrition-wise, selecting a brownie mixture rich in dark chocolate not only enhances the taste profile but also integrates antioxidants, offering a subtle health benefit to the sweet treat. Opting for pre-packaged mix or homemade versions provides flexibility; for storage, an airtight container at room temperature sustains its fudgy freshness. Substituting with gluten-free or nut-infused versions adjusts it seamlessly for dietary needs while retaining its core charm.

The cheesecake layer, showcasing European cheesecake traditions, celebrates cream cheese’s enduring appeal. Valued for its tangy richness, cream cheese is a versatile option that contributes valuable proteins and healthy fats. When selecting, opt for brands with higher fat content for creamiest results or lighter versions for a less decadent option. Proper refrigeration prolongs freshness, and potential substitutions like mascarpone offer a silkier texture. Incorporating fresh fruits or zests can add layers of natural flavors enhancing the complexity of each parfait scoop.

Common Mistakes to Avoid

  • Overmixing the cheesecake layer can result in a runny texture. Mix just until smooth.
  • Improper layering may cause the parfait to collapse; take care to distribute evenly.
  • Not chilling the parfait before serving can compromise the dessert’s set structure.
  • Skipping the right balance of cheesecake to brownie layers can overwhelm one element.
  • Using low-quality chocolate reduces the flavor intensity, detracting from the parfait experience.
  • Ignoring measurements in the cream cheese mix risks an unbalanced flavor profile.
  • Using warm brownies releases unwanted moisture, affecting cheesecake consistency.
  • Rushed assembly can lead to uneven distribution and visual inconsistency.

Essential Techniques

Perfecting layer assembly is pivotal for the Brownie Cheesecake Parfait. This technique ensures both aesthetic appeal and flavor integration. Mastering it involves patience and a steady hand, using a spatula or spoon to gently settle each layer before adding the next. Visual cues for success include clean, defined layers that don’t meld or slant, giving that iconic parfait profile. Being tricky, having a chilling period for individual layers can help keep them distinct, optimizing the dessert structure and visual allure.

Pro Tips for Perfect Brownie Cheesecake Parfait

To enhance the indulgence, consider adding a layer of chocolate ganache between the brownie and cheesecake for extra depth. Fresh berry stratas above the cheesecake introduce a tangy balance, ensuring not an overly rich mouthfeel. For a crunchy contrast, incorporate roasted nuts or granola as hidden surprises within layers. Individualizing glass choice elevates the serving, so opt for clear glasses that emphasize the parfait aesthetics. Always start with a base layer of brownie, offering a stable foundation for further additions. If preparing in advance, keep each element separate until final wild assembly to maintain freshness and structure.

Variations and Adaptations

Regional takes on the Brownie Cheesecake Parfait can incorporate locally favored nuts like hazelnuts or change up the cheese with regional variations such as ricotta for an Italian spin. Seasonal additions highlight produce trends, with summer offering mango coulis and winter presenting spiced pears to complement the chocolate fudge. Dietary modifications are accessible; substituting regular chocolate with sugar-free alternatives renders this a fitting incorporated dessert for low-carb indulgences without compromise. Presentation additionalities like layered mason jars create rustic charm while varying serving punctuations with edible flowers add a gourmet escape.

Serving and Presentation Guide

For ultimate vitality, display your Brownie Cheesecake Parfait in fluted glasses, layering for dramatic impact. Drizzle caramel or chocolate up the glass sides prior to layer addition for a gourmet finish. Garnish with dollops of whipped cream and shaved chocolate on top, creating a dessert easily suited to individual courses. Beyond the visual, traditional accompaniments include serving alongside crisp shortbread for textural variation or a hot espresso balancing sweetness. Portions should appropriately satisfy, recommending smaller glasses for a standalone dessert and larger servings for a complete gourmet experience.

Wine and Beverage Pairing

To complement the opulent natures of the Brownie Cheesecake Parfait, opt for a smooth port wine or vibrant merlot. These wines enhance the chocolate richness with their depth, creating a partnership that tantalizes the palate. For non-alcoholic options, a cold, brewed coffee accentuates brownie undertones, while a soft herbal tea offers subtle counteraction. Temperature recommends perfect chill prior to serving, improving mouthfeel in relation to warm beverage suggestions in terms of seasonal suitability.

Storage and Shelf Life

Longevity and preservation for the parfait depend on airtight container storage. Inherently mild environments such as refrigerators are prime, maintaining both separate brownie and cheesecake elements until combined several hours before consumption. Watch for elements like the cheesecake, which visually indicate spoilage through discoloration. For freezing, wrap parfait components individually, assembling prior to service, ensuring preservation of assembled texture and flavor harmony. Reheating is inadvisable; opt for serving cold.

Make Ahead Strategies

Timely preparation can facilitate smooth serving: layer brownie and cheesecake ahead, refrigerating separately with plastic coverage. Assembly can occur 1-2 hours in advance, maintaining the integrity of each layer, saving final garnishing touches for immediate pre-service. For fresh introductions like fruits, timing is essential, placing them last and refrigerated minimally to retain vibrancy.

Scaling Instructions

For halving, consider reducing large increments of cheesecake components while maintaining uniformity in brownie availability. Scaled doubling necessitates greater preparation assurance, calling for extended glass arrangements or altering size format. Equipment considerations involve enlarging spoons and storage space to handle increased volume. Adjust layering time frames accordingly.

Nutritional Deep Dive

Discovering the nutritional dimension reveals every Brownie Cheesecake Parfait layer possesses distinct macronutrients, notably in carb concentration due to brownie presence. Healthy fat contributions arise from cream cheese, and environmentally friendly considerations highlight the absence of high-calorie oils. Portion control remains an ally to managing dietary alignment and energy contribution, with portion sections respecting balance limitations.

Dietary Adaptations

Creating gluten-free Brownie Cheesecake Parfaits is straightforward with appropriate brownie alternatives utilizing almond flour-based options, reducing glycemic impact and promoting dietary inclusivity. Dairy-free versions substitute cream cheese for plant-based equivalents, generating creamy consistencies. The vegan execution similarly requires plant-based cream options; replacing sugars with fruit puree fits well with the texture, in tandem with low-carb adjustments. Adaptation accommodates personal taste and dietary scope.

Troubleshooting Guide

For issues like runny layers, check cheesecake consistency prior to assembly, letting chilling firm texture further. Uneven flavors might arise from misbalanced sugar components, urging you to re-evaluate each layer’s sweetness contribution. Temperature should not exceed ambient norms, considering controlled refrigeration. Equipment outcomes, such as incorrect tools, impair precision and uniformity, requiring better-equipped mixing protocols for ingredients. Timing errors could merit trial adjustments, refining showdown window management.

Recipe Success Stories

Feedback from our thriving community highlights adaptation ease, as ingredients seamlessly blend into complimentary flavors, boasting visual spectacle for photographers particularly. Recurrently, ingredient swaps garner praise, with alternative cheese incorporation bringing refinement. Reader-suggested alterations, like enhanced vanilla or cocoa sprinklings, extend taste profiles that confine any recipe to culinary one-upmanship competition. Documentation through social media enables vivid storytelling chronicles.

Frequently Asked Questions

Q: Can I prepare the parfait layers separately and assemble them later?
A: Absolutely! You can chill prepared layers separately, assembling them right before serving for a fresh impression.

Q: Is there an alternative to using brownie as a base?
A: Yes, you can use crushed cookies or a sweet sponge cake for different texture and flavor profiles.

Q: How can I ensure my layers don’t mix?
A: Use smaller portions when layering and consider chilling each layer slightly before adding the next.

Q: What’s a good non-alcoholic drink to serve with this parfait?
A: A rich black coffee or a soothing herbal tea pairs excellently with this dessert.

Q: Can this be made vegan?
A: With plant-based cream cheese and non-dairy brownies, a vegan version is very feasible.

Q: How do I store leftovers?
A: Store in airtight containers in the refrigerator for no more than 48 hours for optimal freshness.

Q: Can I freeze this dessert?
A: It’s possible to freeze components separately but not advisable once assembled to maintain texture.

Q: How can I prevent the parfait from becoming too sweet?
A: Use high-quality, dark chocolate brownies and regulate sugar levels in the cream cheese mixture.

Q: Will the parfait become too soggy?
A: Ensure brownies are well-baked and layers are thick enough to support structural, moisture-resilient integrity.

Q: Can I add fruit layers?
A: Yes, adding fruits like berries or mango enhances both color and flavor, providing natural freshness.

Additional Resources

To deepen culinary immersion, our selection of complementary decadent recipes, detailed guides on layering techniques, and ingredient spotlights equip you with enriched perspectives and refined culinary intuition. Explore dynamic equipment options tailored for recipe scaling ease, seasonal variations to embody festive charms, and greater engagement through shared recipe adaptations.

Join the Conversation

Share your Brownie Cheesecake Parfait experiences through our community forums, enriching this evolving recipe with personal touchpoints and visual storytelling. Engagement opportunities abound through photographic captures, documenting your served marvels. Ratings and reviews encourage recipe finetuning, as your unique variations redefine and expand communal culinary creations.

The Recipe

Brownie Cheesecake Parfait

Serves: 4

Prep Time: 20 mins

Cook Time: 0 mins

Total Time: 20 mins

Kitchen Equipment Needed

  • Mixing bowls
  • Whisk or hand mixer
  • Spatula
  • Parfait glasses or clear serving glasses

Ingredients

  • 2 cups brownie pieces
  • 1 cup cream cheese, softened
  • 1/2 cup powdered sugar
  • 1 tsp vanilla extract
  • 1 cup whipped cream
  • Chocolate shavings (optional for garnish)

Directions

  1. In a mixing bowl, beat together the cream cheese, powdered sugar, and vanilla extract until smooth.
  2. Fold in the whipped cream until fully combined and set aside.
  3. Prepare parfait glasses by placing an even layer of brownie pieces at the bottom.
  4. Layer with a generous spoonful of the cream cheese mixture.
  5. Repeat layers until glasses are filled, finishing with the cream cheese mixture on top.
  6. Garnish with chocolate shavings if desired and chill for at least 1 hour before serving.

Recipe Notes

  • For a richer flavor, use espresso or coffee-infused brownies.
  • Adjust the sweetness by varying the amount of powdered sugar.
  • Consider fresh fruit like raspberries or strawberries as an additional layer for freshness.

Irresistible Pot Roast Served Over Creamy Mashed Potatoes Recipe

Pot Roast over Mashed Potatoes: A Comforting Classic

⚖️
Difficulty
Medium

⏲️
Prep Time
20 mins

🕒
Cook Time
3 hours

⏱️
Total Time
3 hours 20 mins

🍽️
Servings
6

Experience the ultimate comfort food with our Pot Roast over Mashed Potatoes recipe. This classic dish marries tender, slow-cooked beef with creamy, buttery mashed potatoes for a hearty meal that warms the soul. Ideal for family dinners or special occasions, this recipe delivers on taste and satisfaction. With every bite, enjoy the layers of flavor imparted by a vibrant mix of herbs and robust red wine, finished with a luxurious, velvety texture perfect for soaking up every drop.

Quick Recipe Highlights

  • Flavor Profile: Rich and savory with deep, umami notes from pot roast and a buttery finish from mashed potatoes.
  • Texture: The beef is melt-in-your-mouth tender with silky smooth mashed potatoes for a comforting feel.
  • Aroma: Inviting scents of rosemary, thyme, and garlic fill the kitchen as the roast simmers to perfection.
  • Visual Appeal: A beautifully browned roast adorned with vibrant vegetables against fluffy, white mashed potatoes.
  • Skill Level Needed: Suitable for intermediate cooks who are comfortable with long cooking times and attentive seasoning.
  • Special Equipment: A heavy-duty Dutch oven or slow cooker is essential for ensuring even, heat-controlled cooking.

Recipe Overview

  • Difficulty Level: This dish requires an intermediate skill level due to the long cooking time and the need for layering flavors.
  • Category: A dinner staple, this meal falls under cozy, home-cooked classics renowned for their heartiness.
  • Cuisine: Rooted in American culinary tradition with European influences, especially from French braising techniques.
  • Cost: Utilizing affordable cuts of beef, this recipe is cost-effective, with most ingredients being pantry staples.
  • Season: Best enjoyed during fall and winter for its warmth and robust flavors that complement chilly weather.
  • Occasion: Perfect for family gatherings, holiday celebrations, or any night you crave a wholesome, comforting dinner.

Why You’ll Love This Recipe


This Pot Roast over Mashed Potatoes recipe offers a taste experience like no other. The beef absorbs all the goodness from its seasoning, offering a prevailing depth of flavor in every tender morsel. Accompanying the meat, mashed potatoes add a delightful creaminess that balances perfectly.

Convenience comes in its minimal active preparation time, allowing you to set it on simmer while moving on with your day. The recipe is easily adaptable, letting you incorporate seasonal vegetables or preferred spices to suit personal taste.

For those keen on nutrition, this dish provides a balanced intake of protein, carbohydrates, and essential minerals, making it a nutritious choice for family meals. When entertaining, its aroma sets the mood, and plating it skillfully attracts eyes and compliments from guests.

Economical and accessible, this recipe saves costs without compromising quality, utilizing basic ingredients that result in a meal reminiscent of high-end dining.

Historical Background and Cultural Significance


Pot roasts have deep roots in culinary traditions worldwide. While many cultures have their versions, it is beloved in America for its homey, rustic appeal. The dish traces back to classic French braising techniques, emphasizing slow cooking to extract maximum flavor and tenderness.

Served in family homes for generations, it symbolizes warmth, hospitality, and sumptuous indulgence. Across regions, variations emerge—belgians enjoy carbonnade with beer, while Italians opt for brasato al Barolo. Its evolution involves incorporating available herbs, vegetables, and nearby cuts of meat.

Ingredient Deep Dive


Beef chuck roast stands at this recipe’s core, cherished for its marbling and flavor. Historically, chuck was prized as an economical cut capable of extreme tenderness once the collagen melted after a slow braise. Nutritionally, beef offers protein, iron, and B vitamins beneficial for body functions.

Selecting the freshest beef ensures a succulent result. Look for marbling throughout and a deep red color. Ensure it is stored in the refrigerator within two days of purchase or freeze for longer storage. Substitutions like brisket or shoulder can offer similar outcomes, adapting the cooking time appropriately.

Common Mistakes to Avoid

  • Insufficient browning: Failing to sear the roast properly results in less flavorful meat.
  • Rushing: Trying to cut down on slow cooking results in tough, chewy beef.
  • Using lean cuts: Avoid lean beef, as they do not break down like marbled cuts.
  • Insufficient seasoning: Not layering seasoning while cooking leads to bland results.
  • Premature slicing: Letting the roast rest post-cooking locks in juices and tenderness.
  • Using low-fat dairy: Full-fat dairy is crucial for creamy mashed potatoes.
  • Overmixing potatoes: Too much handling leads to gummy, rather than fluffy, mashed potatoes.
  • Ignoring deglazing: Skipping deglaze removes complexity in flavor from the sauce.

Essential Techniques


Browning is essential, creating a rich crust that injects deeper flavor into the pot roast. Achieve success by thoroughly drying the meat and using high heat with oil until a dark, even crust forms on all sides.

Pro Tips for Perfect Pot Roast


Liberally season each layer—first the beef, then the vegetables, and finally the sauce—to develop a harmonious profile.

For a deeper flavor, substitute part of the broth with red wine to enhance the beef essence. Experiment with herbs; rosemary and thyme add warmth if the palate seeks more aromatics.

Variations and Adaptations


Try a Cajun-style pot roast: use Creole spices in seasoning and bell peppers within vegetables. For a low-carb version, swap mashed potatoes with cauliflower mash to retain comfort with lesser carbohydrates.

Serving and Presentation Guide


Present this dish piping hot, on broad plates, with mashed potatoes forming a base mound. Lay slices of pot roast across, draping with sauce and garnishing with fresh parsley for vibrancy and aroma.

Wine and Beverage Pairing


Pair this cuisine with a full-bodied red wine such as Cabernet Sauvignon to complement the roast’s robust flavors, or opt for non-alcoholic, herbal teas with mint or chamomile for comforting balance.

Storage and Shelf Life


Refrigerate leftovers in airtight containers to preserve freshness up to four days. When freezing, separate beef and potatoes to prevent texture deterioration. Defrost in fridge and gently warm to maintain quality.

Make Ahead Strategies


Prepare elements separately: cook the pot roast a day ahead and refrigerate. On serving day, reheat gently while whipping up fresh, perfectly creamy mashed potatoes.

Scaling Instructions


To half the recipe, reduce ingredients proportionally, taking care with seasoning. Doubling calls for a larger pot and possible extended cooking jams for fullness; storage containers must suffice for portion increases.

Nutritional Deep Dive


This dish boasts a well-rounded macronutrient profile, offering significant protein from beef and carbohydrates from potatoes. Nutritionally dense, it supports muscle growth and energy levels within balanced portions.

Dietary Adaptations


Create a gluten-free version by ensuring all broth and seasoning choices lack gluten. For dairy-free, substitute olive oil and almond milk in potatoes, achieving similar creaminess without dairy elements.

Troubleshooting Guide


If mashed potatoes turn out gummy, next time use less stiff potatoes such as Yukon Gold. When finding roast too dry, increase liquid and cover tightly to retain moisture during cooking.

Recipe Success Stories


Readers from Chicago to Sydney share joys of adapting flavors, savoring results in family gatherings, and contrasting cultural festivals each adding unique spins—a testament to this recipe’s global appeal.

Frequently Asked Questions

How do I know when the beef is tender? Test by inserting a fork; perfect doneness results in the beef easily pulling apart.

Can I use different potatoes? Yes, Yukon Golds yield creaminess. Reds offer a slightly firm texture; avoid waxy for fluffy results.

Should I trim the roast fat? Leave moderate fat for flavor, trimming only excess to avoid overt greasiness.

Freezing considerations? Separate elements for best texture upon reheating, avoiding potatoes’ starch change when frozen collectively.

Additional Resources


Discover similar heartwarming recipes and guidelines in mastering slow-cooked meals through our catalog. Explore traditional roasting techniques further for gaining deeper culinary insights.

Join the Conversation


Connect with our vibrant community of enthusiastic cooks by sharing your culinary journey on social media. Join groups for discussions or tips and tricks to tweak our Pot Roast over Mashed Potatoes recipe to personalize each experience.

The Recipe

Pot Roast over Mashed Potatoes

Serves: 6

Prep Time: 20 mins

Cook Time: 3 hours

Total Time: 3 hours 20 mins

Kitchen Equipment Needed

  • Dutch Oven or Slow Cooker
  • Skillet for browning
  • Potato Masher
  • Mixer (optional)

Ingredients

  • 3 lbs beef chuck roast
  • 4 cups beef broth
  • 1 cup red wine
  • 6 large potatoes, peeled and diced
  • 2 cups carrots, chopped
  • 1 cup onions, chopped
  • 2 tbsp olive oil
  • 4 cloves garlic, minced
  • 1 tsp thyme
  • 1 tsp rosemary
  • Salt and pepper to taste
  • 1/2 cup milk
  • 1/4 cup butter

Directions

  1. Preheat oven to 275°F (135°C).
  2. Season the beef generously with salt and pepper. In a heated skillet, brown beef on all sides in olive oil.
  3. In a Dutch oven, add beef broth, red wine, garlic, thyme, and rosemary. Place browned beef in broth mixture.
  4. Add carrots and onions around the beef. Cover and cook for 3 hours or until beef is tender.
  5. Boil potatoes in salted water until soft. Drain and mash with butter and milk until creamy. Season with salt and pepper.
  6. Slice beef and serve atop mashed potatoes, ladling pan juices and vegetables over top.

Recipe Notes

  • For a gluten-free option, ensure the broth and wine used are certified gluten-free.
  • Add a splash of cream to mashed potatoes for extra richness.
  • Vegetables can be customized based on preference—consider adding parsnips or turnips for added flavors.

Delightful Christmas Italian Cheese Loaf Recipe for Festive Feasts

Christmas Italian Cheese Loaf: A Festive Delight for Your Holiday Table

⚖️
Difficulty
Moderate

⏲️
Prep Time
30 mins

🕒
Cook Time
45 mins

⏱️
Total Time
75 mins

🍽️
Servings
8

Imagine a holiday table with the alluring aroma of freshly baked bread wafting through the air. This Christmas Italian Cheese Loaf is the perfect addition, combining the rich flavors of Italian cheeses with a crusty exterior and a soft, savory center. The holiday season is all about gathering, and what better way to bring people together than with a warm, cheesy loaf that’s sure to be the centerpiece of any festive meal. As you slice into this bread, you uncover layers of taste and texture that make every bite a new experience.

The combination of sharp Parmesan, creamy mozzarella, and tangy provolone creates a flavor explosion that pairs beautifully with the bread’s chewiness. This loaf isn’t just a treat for the taste buds; it’s a feast for the senses. The glorious golden hue and the crunch of the crust are enough to draw everyone to the table. Whether served as a starter or alongside your main Christmas courses, this Italian cheese loaf will become a cherished tradition.

Quick Recipe Highlights

  • Flavor Profile: This loaf offers a delightful blend of savory, tangy, and creamy flavors thanks to the trio of Italian cheeses.
  • Texture: Enjoy the satisfying crunch of the crust combined with a soft, cheesy interior that melts in your mouth.
  • Aroma: Expect a mouthwatering aroma of freshly baked bread melded with heavenly hints of cheese.
  • Visual Appeal: The golden-brown crust, with cheese bubbling around the edges, is visually irresistible.
  • Skill Level Needed: Ideal for intermediate bakers, this recipe involves dough handling and cheese layering techniques.
  • Special Equipment: A dough hook attachment for your mixer and a baking sheet are recommended for optimal results.

Recipe Overview

  • Difficulty Level: This recipe sits at a moderate level due to the techniques involved in making and handling the dough.
  • Category: This Italian cheese loaf makes an excellent appetizer or side dish.
  • Cuisine: Rooted in Italian culinary tradition, celebrated for its cheese variety and fresh bread baking.
  • Cost: The cost mainly involves the trio of cheeses, making it a relatively mid-range baked good.
  • Season: Best during the winter holidays when comforting, warm bakes are most appreciated.
  • Occasion: Perfect for festive celebrations like Christmas, family gatherings, or casual dinner parties.

Why You’ll Love This Recipe


The Christmas Italian Cheese Loaf is an indulgent treat that impresses with both taste and texture. Each bite delivers a robust flavor profile with the harmonious blend of Parmesan, mozzarella, and provolone cheeses. The crust creates a delightful contrast to the soft, savory interior, ensuring a memorable tasting experience.

In terms of preparation convenience, this cheese loaf is relatively straightforward to make. The dough can be prepared in advance, which leaves plenty of time to enjoy guests’ company. Once in the oven, the enticing aroma fills the kitchen, setting the scene for a cozy, heartwarming gathering.

Nutritionally, the loaf provides protein from the cheese and carbohydrates from the bread, offering a satisfying snack or side dish. While it leans toward indulgence, the loaf contains ingredients familiar to most, making it a balanced festive choice without being overly rich.

From a social perspective, the cheese loaf becomes a conversation starter due to its impressive appearance and delightful sensory qualities. Perfect for sharing, it complements any holiday spread and entices guests to savor the communal joy of festive dining.

Regarding cost-effectiveness and accessibility, ingredients are generally available year-round in most supermarkets. Cheese enthusiasts will appreciate the gourmet quality without breaking the bank, as each component is chosen to enhance and marry together to present a luxurious loaf.

Historical Background and Cultural Significance


The tradition of baking bread with cheese is an ancient one, with roots tracing back to Italy—home to some of the world’s most beloved cheeses. Italian cheese loaves have long been celebrated during holidays and gatherings, symbolizing warmth and abundance.

Over the years, the cheese loaf has evolved, incorporating various cheeses and herbs to reflect regional tastes and preferences. In Italy, recipes are often passed down through generations, with each family adding their unique touch, creating a legacy of flavor and tradition.

The addition of cheese to bread symbolizes prosperity, making this loaf particularly significant during festive times. Its preparation and consumption during the holiday season is linked to sharing nature, bringing families together to celebrate and give thanks.

While variations exist, the core essence of this dish remains unchanged, preserving its cultural significance and reinforcing its status as a beloved festive treat. Today, the Italian cheese loaf has crossed borders, becoming a staple in international Christmas celebrations.

Ingredient Deep Dive


Parmesan, known as the “King of Cheeses,” has a rich historical significance, originating from the Emilia-Romagna region. Its sharp and nutty flavor enhances our loaf, adding depth. Packed with protein and calcium, Parmesan is a nutritional powerhouse. When selecting Parmesan, look for clear labeling of “Parmigiano-Reggiano.” Store it wrapped in wax paper and refrigerated to maintain freshness. If necessary, aged Grana Padano can substitute for a similar taste.

Mozzarella is Italy’s gift to the world, hailing from southern regions like Campania. Its creamy texture adds lusciousness to the loaf. Mozzarella offers healthy fats and vitamins, contributing to the loaf’s nutritional value. Fresh mozzarella balls in brine provide the best texture. Store mozzarella in its brine, refrigerated, for maximum shelf life. Burrata is a worthwhile alternative, offering creaminess with a more indulgent texture.

Common Mistakes to Avoid

  • Skipping dough proofing: Ensure proper rising time for a fluffy texture.
  • Overcrowding cheese: Too much cheese can impede even baking.
  • Neglecting dough kneading: Adequate kneading develops gluten strength.
  • Overbaking: Keep an eye on the loaf to prevent an overly dry interior.
  • Using cold ingredients: Room-temperature cheese helps the loaf bake evenly.
  • Improper measuring: Accurate flour and cheese measurements are crucial.
  • Ignoring crust formation: A hot oven ensures a crispy, golden crust.
  • Uneven cheese distribution: Spread cheese evenly for uniform flavor.
  • Skipping egg wash: Adds shine and color to crust.
  • Forgetting to preheat the oven: Essential to achieve the desired texture.

Essential Techniques


Kneading is crucial for gluten development, affecting the loaf’s structure and chewiness. Master this by kneading until the dough is smooth and elastic. Over-kneading can lead to tough bread, so aim for a balance. Visual cues such as a springy texture indicate success.

Cheese layering determines even flavor distribution throughout the loaf. Spread cheese evenly, allowing for a consistent taste in each slice. Avoid clumping, which might create heavy, localized pockets of cheese, affecting the loaf’s texture.

Pro Tips for Perfect Christmas Italian Cheese Loaf


Use high-quality Italian cheeses to ensure authenticity and flavor depth. This simple choice makes a significant difference.

Allow the dough to rest adequately, promoting the best elasticity and crumb structure.

Experiment with herbs like rosemary or thyme, adding aromatic dimensions and visual appeal to the loaf.

For an extra burst of flavor, include a layer of semi-dried tomatoes with the cheese before rolling the dough.

Make sure your oven is fully preheated to create the ideal crusty exterior.

Brush with melted butter after baking for a shiny finish that enhances the loaf’s visual appeal.

Variations and Adaptations


There are countless regional variations for this Italian cheese loaf. In southern Italy, for example, spicy Calabrian peperoncino might be added for an extra kick, while northern regions might incorporate mushrooms for added earthiness.

In terms of seasonal adaptations, consider using lighter cheeses and herbs during spring to create a refreshing take on this recipe, or add spiced nuts and dried fruits for a winter twist.

For dietary modifications, a gluten-free flour blend can replace the wheat flour to accommodate gluten intolerances. For a vegan version, use plant-based cheese alternatives that melt well.

Spice up the loaf with a touch of chili flakes or incorporate roasted garlic for more flavor depth.

Adjust the texture by altering the bake time; a slightly reduced bake time results in a softer interior, while a longer bake intensifies the crust’s crunch.

Consider a more artisanal presentation by scoring the top of the loaf before baking, creating a rustic, bakery-style appearance.

Serving and Presentation Guide


Consider a warm presentation, serving the loaf straight from the oven to highlight its aroma. Slice thickly, each piece showcasing its golden crust and oozing cheese.

For garnishing, sprinkle fresh parsley or oregano over the sliced loaf, adding a pop of color and freshness.

Traditionally served with antipasto platters, consider pairing with olives and cured meats for a classic Italian accompaniment.

For modern serving suggestions, pair the loaf with a fresh arugula salad dressed with balsamic vinegar and olive oil.

Temperature considerations are key; enjoy the loaf warm when the cheese’s texture is at its peak, but rest assured, it remains delightful at room temperature.

For portion control, serve as an appetizer or on a sharing platter, allowing guests to take as little or as much as they like.

Wine and Beverage Pairing


Pair this Italian cheese loaf with a bold Chianti or a smooth Barbera wine to complement the cheese’s robust flavors perfectly. Their acidity balances the cheesy richness.

For non-alcoholic alternatives, consider serving a chilled pomegranate mocktail that refreshes the palate.

If you’re a fan of coffee, a robust espresso could pair intriguingly, especially for those enjoying the loaf as part of a brunch setting.

Temperature plays a role, so keep white wines slightly chilled and reds at room temperature to enhance the loaf’s rich flavors.

Serve beverages in wide-bottom glasses, allowing guests to enjoy the aroma as they sip alongside their meal.

Storage and Shelf Life


Store the cooled cheese loaf wrapped in foil or in an airtight container at room temperature for up to three days.

Ideally, freeze individual slices, separated by parchment paper, to extend shelf life and enable easy reheating.

Look for signs of spoilage, such as mold or off smells, when storing beyond recommended timelines.

Reheat slices in the oven at a low temperature to restore the crust’s crispness and cheese’s gooeyness.

For freezing, allow the loaf to cool completely before wrapping tightly to prevent freezer burn and moisture loss.

Make Ahead Strategies


Prepare the dough a day in advance, letting it proof in the fridge overnight for enhanced flavor development and time savings.

Assemble the loaf a few hours ahead, covering with plastic wrap and refrigerating until ready to bake, ensuring a fresh-out-of-the-oven experience for guests.

Assess quality ahead to gauge the flavors and dough handling on the day of baking, ensuring the best loaf possible.

When reheating, consider baking the loaf covered in foil to preserve moisture, removing the foil near the end for a crispy crust.

Enhance freshness with add-ons, such as a sprinkle of fresh herbs or grated Parmesan before serving.

Scaling Instructions


For halving the recipe, adjust the ingredient quantities proportionally, ensuring the loaf maintains its balanced flavors.

If doubling or tripling, bear in mind that certain ingredients, such as yeast, might not scale linearly. Experiment gradually with adjustments.

Equipment considerations include larger bowls for mixing and extra baking sheets if needed, ensuring even baking for multiple loaves.

Adjust baking time slightly if the loaf density changes, keeping an eye on visual cues of doneness.

With scaled recipes, storage becomes vital. Plan for extra space or multiple containers to maintain freshness.

Nutritional Deep Dive


This cheese loaf offers a satisfying macronutrient profile with protein levels driven by the cheese variety. Each slice serves a balanced meal component or robust snack.

Micronutrients, including calcium and vitamin D, are delivered by the cheese layers, contributing to bone health.

While indulgent, the loaf fits well into a balanced diet when enjoyed in moderation, offering richer flavors without excesses when shared with family.

Portion carefully to prevent overindulgence, savoring smaller slices to maintain mindful eating practices at holiday tables.

If concerned about weight management, consider pairing with lighter dishes during the meal, optimizing enjoyment and balance.

Dietary Adaptations


For a gluten-free version, substitute traditional flour with a trusted gluten-free blend that offers the elasticity required for dough development.

Dairy-free adaptations call for plant-based cheese substitutes, carefully selected for melting properties and flavor compatibility with traditional cheeses.

Adapting for vegan palates involves incorporating reputed vegan cheese brands, olive oil in place of butter, and a flaxseed meal egg substitute for binding.

Low-carb enthusiasts might explore a version using almond flour and mozzarella dough, aligning with popular “fathead dough” recipes.

Keto followers can similarly employ high-fat cheese options and alternative flour varieties, ensuring the loaf meets dietary restrictions while retaining flavor.

Paleo adaptations can focus on nut-based flours and coconut-derived cheeses, keeping the loaf accessible to diverse dietary needs.

For low-FODMAP considerations, ensure cheese varieties low in lactose, such as aged cheddar, are integral to your chosen cheeses.

For other specific diets, consider ingredient swaps that align with individual preferences and tolerances, maintaining the essence of the cheese loaf experience.

Troubleshooting Guide


For texture issues, assess kneading duration and dough hydration levels, ensuring dough is neither too dry nor too sticky.

To correct flavor imbalances, consider adjusting the cheese types or quantities in future iterations, aiming for harmonious contrasts.

If temperature problems arise such as an uneven bake, check oven calibration and consider flipping the loaf midway through baking for evenness.

When encountering equipment challenges, be adaptable; if lacking specific tools like a dough hook, hand kneading is a fine alternative.

For ingredient substitutions, explore flavor-compatible alternatives that provide similar textures and baking results.

Timing concerns often revolve around proofing; adjust rising time based on ambient temperature conditions, aiming for a doubled dough volume.

Recipe Success Stories


Across the globe, home bakers have embraced the Christmas Italian Cheese Loaf, adapting it to various regional flavors and ingredient availability.

Community feedback highlights the loaf’s versatility, with readers sharing stories of added ingredients like spinach to enhance nutritional value.

Variations have seen households mix goat cheese with herbs for a Mediterranean twist, with successes shared online through culinary forums.

Readers have recommended and photodocumented their use of smoked mozzarella for an aromatic alternate, receiving widespread acclaim.

Photography tips include showcasing cheese pulls in images, a mesmerizing feat that entices viewers to recreate the recipe at home.

Frequently Asked Questions

What should I do if my loaf doesn’t rise properly? Allow more proofing time in a warm environment, and ensure your yeast is fresh.

Can I use pre-shredded cheese? Yes, but fresh cheese often melts better and provides richer flavors.

How do I avoid a dense loaf? Pay attention to dough hydration levels and ensure sufficient kneading for gluten development.

What’s the best way to reheat leftovers? Reheat slices in a preheated oven at low heat to restore texture and warmth.

Can I freeze the loaf? Absolutely. Cut into slices, wrap securely, and freeze, maximizing freshness.

Is there a way to make this ahead? Prepare the dough and encapsulate the loaf in advance, baking fresh before serving.

Are there alternatives for vegetarians? The recipe is already vegetarian, but for vegans, use plant-based cheeses.

How can I achieve a more golden crust? Consider brushing the loaf with egg wash before baking to enhance crust color.

How do I know when the loaf is done? A hollow sound when tapped indicates full baking, along with a golden crust.

Can I use different cheeses? Absolutely. Mix and match cheeses to create your own flavor profile while retaining similar textures.

What ingredients can enhance the loaf’s taste? Consider semi-dried tomatoes, roasted garlic, herbs, or even a dash of pesto!

How do I prevent burnt cheese edges? Ensure the oven rack is well positioned, and monitor cheese exposure during baking.

Additional Resources


Explore related recipes such as rosemary focaccia or classic pizza for more Italian baking inspiration and complementary meals.

Delve into technique guides covering dough preparation and cheese handling, enhancing skills for baking mastery in other recipes.

Investigate ingredient information to understand cheese varieties’ nuances and their culinary applications, empowering confident cooking.

Consider equipment recommendations including better ovens or mixers, elevating the baking experience with valuable kitchen investments.

Seasonal variations in our blog cover adapting flavors and ingredients year-round, unlocking versatility and accessibility with each change of season.

Join the Conversation


Share your Christmas Italian Cheese Loaf experiences and photos on social media, tagging us at #FestiveCheeseLoaf.

Gift others your photography insights, documenting the loaf’s process from dough to baked masterpiece in a captivating narrative.

Leave reviews and recipe variations for community building, inspiring others with your unique take and hearing feedback in return.

Engage in culinary discussions, sharing adaptation stories and learning about others’ traditions that enrich their holiday cooking.

Experiment with presentation styles, challenging yourself to find fresh ways to serve and garnish this beloved Italian loaf, impressing at every gathering.

The Recipe

Christmas Italian Cheese Loaf

Serves: 8

Prep Time: 30 mins

Cook Time: 45 mins

Total Time: 75 mins

Kitchen Equipment Needed

  • Mixing Bowl
  • Measuring Cups and Spoons
  • Baking Sheet
  • Brush for Egg Wash
  • Spatula
  • Oven

Ingredients

  • 3 cups all-purpose flour
  • 1 package active dry yeast
  • 1 teaspoon sugar
  • 1 cup warm water
  • 1 teaspoon salt
  • 2 tablespoons olive oil
  • 1 cup shredded mozzarella cheese
  • 1/2 cup grated Parmesan cheese
  • 1/2 cup sliced provolone cheese
  • 1 egg yolk
  • 1 tablespoon water

Directions

  1. In a mixing bowl, dissolve yeast and sugar in warm water; let stand until bubbly, about 10 minutes.
  2. Add flour, salt, and olive oil to the yeast mixture. Mix until well combined and dough begins to pull away from the sides of the bowl.
  3. Knead the dough on a floured surface until smooth and elastic, about 10 minutes. Place the dough in a lightly oiled bowl, cover, and let rise in a warm area until doubled in size, about 1 hour.
  4. Preheat the oven to 375°F (190°C). Punch dough down and turn onto a floured surface. Roll out into a large rectangle.
  5. Layer mozzarella, Parmesan, and provolone over the dough, leaving a small border around the edges. Roll the dough tightly into a loaf shape.
  6. Place on greased baking sheet, seam side down. Beat egg yolk with water and brush over the loaf.
  7. Bake in preheated oven for 40-45 minutes, or until golden brown and cheese is bubbling.
  8. Let cool slightly before slicing and serving.

Recipe Notes

  • Feel free to add herbs like rosemary or thyme for added flavor.
  • This loaf pairs perfectly with tomato-based dipping sauces.
  • Store leftovers in an airtight container and reheat before serving for the best texture.

Indulge in This Irresistible Decadent Chocolate Peanut Butter Cheesecake Cake

Decadent Chocolate Peanut Butter Cheesecake Cake: A Dream Dessert

⚖️
Difficulty
Hard

⏲️
Prep Time
30 mins

🕒
Cook Time
90 mins

⏱️
Total Time
120 mins

🍽️
Servings
12

Indulge in this Decadent Chocolate Peanut Butter Cheesecake Cake that combines the lusciousness of cheesecake with the rich flavors of chocolate and peanut butter. This cake is a true showstopper for any dessert table, blending creamy textures with a delightful balance of sweet and salty. Every bite delivers a symphony of flavors that dance across your palate, making this cake the ultimate treat for chocolate and peanut butter lovers.

If you’re searching for a dessert that embodies decadence and luxury, look no further. This Chocolate Peanut Butter Cheesecake Cake superbly marries the silky-smooth texture of cheesecake with a moist chocolate cake foundation, all embraced by a velvety peanut butter icing. Whether you’re hosting a party or celebrating a special occasion, this cake is sure to impress and satisfy every craving.

Quick Recipe Highlights

Flavor Profile: Expect a blend of sweet chocolate and roasted peanut butter, melding into a rich and satisfying taste.

Texture: The cake is soft and fluffy, contrasting beautifully with the creamy, smooth cheesecake layer and the rich, buttery icing.

Aroma: The enticing scents of cocoa and peanut butter fill your kitchen, creating a warm and inviting atmosphere.

Visual Appeal: A stunning three-layer confection, splashed with dark chocolate and cream hues, adorned with elegant garnishes.

Skill Level Needed: This cake requires precision in both baking and assembly, suitable for those with advanced skills or a willingness to learn.

Special Equipment: You will need a springform pan for the cheesecake layer and potentially a cake leveler for assembling the dessert perfectly.

Recipe Overview

Difficulty Level: While the recipe might seem daunting at first glance, the clear instructions and numerous tips make it achievable for those ready for a challenge. Successful execution will make the complexity worthwhile, resulting in a mouthwatering masterpiece.

Category: Desserts and cakes are the perfect categories for this recipe as it sits proudly as a luxurious choice among decadent treats.

Cuisine: This cake draws influence from American dessert traditions where rich flavors and multi-layer confections take center stage.

Cost: With indulgent ingredients like high-quality chocolate and creamy peanut butter, anticipate moderate cost, though each penny is well-spent for the ultimate dessert experience.

Season: Ideal throughout the colder months when comfort food cravings hit, its indulgent flavors act as cozy companions.

Occasion: Perfect for birthdays, family gatherings, or festive celebrations where impressing guests with a culinary masterpiece is the goal.

Why You’ll Love This Recipe

Taste and texture appeal: The juxtaposition of creamy cheesecake with fluffy chocolate cake offers a texture unlike any other, topped with a peanut butter frosting that brings rich harmony.

Convenience and preparation benefits: Although time-consuming, the steps are straightforward, making it a wonderful weekend project with a stunning reward.

Nutritional advantages: With moderation, its rich protein source—peanut butter—adds a nutritional spin amid indulgence.

Social and entertaining value: Impress guests with your baking prowess; this cake is both a visual and taste sensation that sparks conversation.

Cost-effectiveness and accessibility: Using commonly available ingredients, this recipe transforms them into something extraordinary without breaking the bank.

Historical Background and Cultural Significance

The combination of chocolate and peanut butter has its roots deep in American culinary traditions, celebrated for decades through candies and confections.

Peanut butter, introduced in the late 19th century, quickly became a staple in American households, prized for its protein content and creamy texture.

The chocolate and peanut butter combo gained significant fame through products like Reese’s, inspiring countless dessert variations ever since.

Regional styles have emerged, with the Southern U.S. incorporating similar flavors into pies and other cherished sweets.

Ingredient Deep Dive

Chocolate plays a crucial role here, bringing depth and richness. Select quality dark or semi-sweet chocolate for intense flavor.

Peanut butter not only enhances taste but also adds a creamy texture balancing sweetness with a hint of saltiness.

Cheesecake’s cream cheese base couples tanginess with the filling, engaging your taste buds in a complex symphony.

Use fresh eggs to maintain structure and moisture across layers and assist in achieving the perfect bake.

Common Mistakes to Avoid

Avoiding overmixing the batter is key as it can lead to a denser texture that detracts from desired cake fluffiness.

Failing to line the springform pan adequately can result in sticking issues; be generous with parchment and grease.

Be vigilant when melting chocolate to prevent burning. Slow and steady, stirring frequently, is the way to get a silky result.

Neglecting to chill the cheesecake layer before assembly can lead to an unstable final product; patience is beneficial here.

Improperly measuring ingredients, particularly dry versus wet, affects the cake’s moisture and structure. Stick to weight measures if possible.

Foregoing room temperature ingredients might hinder seamless blending, impacting the cake’s overall texture.

Skipping ganache or icing checks for consistency may cause unappealing drips or separation instead of desired, glossy coverage.

Not allowing layers to cool completely before assembly could result in a cake that fails structurally or a frosting that slides off.

Essential Techniques

Perfect layering: Level each cake layer meticulously, ensuring stack stability while maintaining visual aesthetics.

Way to luscious ganache: Mastering perfect ratios in ganache making ensures a seamless, glossy finish without graininess or clumping.

Cheesecake baking: Focus on achieving a smooth top with no cracks by using a water bath, precise timing, and gradual cooling.

Testing for doneness: Know how to test each layer effectively for doneness without dryness—jiggle tests and toothpick methods are go-tos in your arsenal.

Pro Tips for Perfect Decadent Chocolate Peanut Butter Cheesecake Cake

Cool your cake layers on wire racks to prevent sogginess and ensure even air circulation for a perfect bake.

Use a serrated knife for leveling and cutting assembly, making each slice precise and visually appealing.

Always aim for high-quality chocolates as they significantly impact flavor— consider specialty chocolate shops for exceptional selections.

Be patient with cheesecake cooling; optimal results stem from overnight fridge time for an ideal texture and firmness.

Allow ample time for ganache to set before slicing, preventing it from sticking and achieving picture-perfect results.

Fine-tune sweetness: Taste as you prepare frosting and ganache, adjusting sugar levels to match personal preferences precisely.

Variations and Adaptations

Regional variations include incorporating local or specialty nuts, like almonds or pecans, into outer cake toppings.

Seasonal adaptations: Feature summer berries like strawberries or raspberries as a garnish for a pop of fresh color.

Dietary modifications: Explore gluten-free options by substituting flour for gluten-free blends without sacrificing taste or texture.

Flavor variations: Introduce coffee or espresso powder to amplify chocolate depths or consider a salted caramel drizzle.

Texture modifications: Add crushed peanut pieces for extra crunch, or lighten batter by folding in whipped cream delicately.

Presentation alternatives: Opt for a naked cake presentation to showcase interior layers if icing isn’t your forte.

Serving and Presentation Guide

Strategically place slices to accent prominent cake layers, providing a more dramatic effect when plated.

Consider a contrasting plate color such as light pastels or pale wood surfaces, subtly highlighting the cake’s richness.

Traditional accompaniments like vanilla ice cream or fresh whipped cream balance the cake’s sweet intensities.

Modern serving suggestions include petite bowls of warm chocolate sauce for luscious drizzling onto slices.

Cooling the cake for a bit longer in the fridge before cutting aids in creating neat, restaurant-quality slices.

Portion control can vary—thin slices offer a taster approach while thicker servings satisfy dessert-goers craving indulgence.

Wine and Beverage Pairing

A robust Malbec or Port pairs beautifully with the rich chocolate and peanut nuances found within the cake.

For a non-alcoholic route, a full-bodied iced coffee or freshly brewed espresso complements and contrasts flavors.

Offering aromatic teas like chai balances the cake’s richness wiith spicy undertones that refresh your palate.

Matching beverage temperatures, whether room temperature reds or chilled whites, enhance the dining experience, honoring complementary mouthfeel sensations.

Use dessert-specific glassware for a polished touch that aligns with the cake’s lavish presentation.

Storage and Shelf Life

Store cake slices in an airtight container within the fridge for up to 5 days, maintaining freshness and moisture.

Prevent flavor crossover by wrapping segments tightly in wax paper within containers to lock aromas.

Inspect regularly for spoilage signs like dryness or off-odors, ensuring only the freshest slices are served.

Reheat slices gently in the microwave, warming at medium power to temp without melting frosting or toppings.

Cheesecake layers freeze well if you’re portioning for future meals, just ensure thorough wrapping to avoid freezer burn.

Make Ahead Strategies

Strategize by baking each component individually over separate days, reducing baking day stress.

Maintain consistency between layers with detailed notes of mixing times and ingredient temperatures.

Assess texture shifts if assembled too early; only decorate close to serving time for optimal freshness.

Focus on cheese filling cooling: ensure stability before transitioning to construction, enhancing end-product confidence.

Refresh out-of-the-fridge elements by gently warming or whipping for textural revival without sacrificing quality.

Scaling Instructions

To halve the recipe, reduce ingredient measurements by dividing quantities while maintaining bake times.

Doubling up? Check equipment capacity—larger bowls for batter mixing, bigger pans for effective spreads.

Adapt timings based on visual cues rather than stated times; a larger volume often requires extended bake periods.

Balance storage needs: additional servings necessitate efficient airtight solutions to avert potential drying.

Preserve textural offerings by not altering key components like cheesecake baking—a crucial step to respect precision.

Nutritional Deep Dive

This intense dessert delivers macronutrients rich in carbs, proteins, and fats—consider serving sizes accordingly.

Dark chocolate brings antioxidants, contributing to potential health benefits unrelated to typical sweet treats.

Substitute conventional sugar for alternativess like stevia when looking for leaner versions without sacrificing taste.

Balance high-calorie indulgence by savoring smaller portions, embracing moderation while discovering dessert splendor.

Dive into healthy fats from nut butter, appreciating its protein aspect whilst recognizing occasional treat parameters.

Dietary Adaptations

For a gluten-free delight, use certified gluten-free flour blends and scrutinize baking soda or powder certifications.

Create dairy-free variations using vegan cream cheese alternatives and plant-based baking butter substitutes.

Explore new grounds by adapting to a low-carb lifestyle, opting for almond flour’s texture-rich, high-protein composition.

Keep vegan enthusiasts in mind with tofu-based cream cheese versions, achieving suitable binding agents for success.

Keto-based endeavors could utilize almond butters over traditional, paired with sugar-free chocolate for enjoyable flavor.

Troubleshooting Guide

For plush, even texture issues, adjustments within bake consistency (check oven thermometers versus trusted settings).

Balance odd chocolate-polluting flavors and peanut butter’s mellowing influences situationally with added vanilla extracts.

Monitor temperatures surrounding cake components; built-in thermometers can assist in maintaining internal consistency.

Break through impasses involving melted ingredient mishaps or mid-assembly disruption through cooling, preserving structure.

Focus on substituting within recipe preferences without straying excessively from ingredient-intended combinations.

Shift or prioritize ingredients depending upon audience taste objectives, considering risk “packaging” informative clarity.

Bringing fruitful times necessitates relaxed execution snapshots across purposeful ambition, best equipping timely dining rhythms.

Recipe Success Stories

Community reviews speak for themselves: a favorite during potlucks where hosts reliably share sweet satisfaction compliments.

Adaptations saw this cake lending its palette to almond derivatives, reveling in newfound complexity and flavor depth.

Chef testimonials, whether online or direct, highlight presentation prowess, attracting intrigued crowds in web-based galleries.

Success stories inspire informed gatherings backed by theme inspirations and enlightening layouts catalyzing eager anticipation.

Beautiful, timeless snaps accompany digital documentation techniques or encourage mastery across exquisite treat renditions.

Frequently Asked Questions

Can I use milk chocolate instead of dark for this recipe? Yes, although it may yield slightly sweeter results due to milk content.

What’s the best substitute for peanut butter here? Almond or cashew butter provides similar profiles, albeit twist versions cultivable.

Do I need to chill frosting before assembling slices? Frosting rooms well efficiently apply creamier surfaces, promoting controlled application scope.

Is there a no-bake option alternative? While unconventional modifications exist, consider nixing or refrigerating preliminary formations.

Can flour be absent without disturbances? Consider flourless chocolate treatments noticed across single-layer proceedings; dedicated results vary.

Do cheesecakes typically use molds? Equivalent double-layer spans circumvent pan type mise-en-place via efficient press-releases organizing kits.

How well does powdered sugar fit the icing category? Powdered performs protector functions under Indonesian vanilla specifics; question methodical preference levels.

May thin outer coats assist layered cake protuberances? Foundation-specific gustation vision synchronizes structural choreography for visual cohesion.

Might nut excess encourage chemical imbalances (ideal % vanilla)? Confer differing alternatives concerning aligned benchmark options re-confirmatory strategies.

Would warm temperatures critically de-manifestasta eliminate enhancer air simulations? Maybe defer hot lasting mechanisms by examining contexts within widespread infrastructure comparative inference.

Additional Resources

Explore similar flavor-based recipes, such as the Chocolate Ganache Cake, for additional indulgence.

Visit a local bakery specializing in dessert cakes, drawing practical inspiration from their display creations.

In-depth guides on mastering molten chocolate techniques offer greater coherence endeavors along cake repertoires.

Review regional festivals promoting peanut butter-centric culinary craftsmanship, channeling inspiration from these celebrations.

Seek recommendations from culinary literature or timeless recipe mixes contrasting with transient pro forma subventions.

Join the Conversation

Share your decadent cake experience on social media channels, inspiring fellow bakers with imaginative takes and critique.

Capture gorgeous photos of your cake creation, aligning with aesthetics befitting online communities interested in confection beauty.

Craft thoughtful reviews to elevate others’ baking adventures, magnifying reciprocal feedback functions measuring recipe outcomes.

Participate actively in forums sharing fresh experiences evolving ingredients from assumptions into express dessert platforms.

Collaborate on recipe innovations contributing efforts toward accurately merging historical inspirations and contemporary takes.

The Recipe

Decadent Chocolate Peanut Butter Cheesecake Cake

Serves: 12

Prep Time: 30 mins

Cook Time: 90 mins

Total Time: 120 mins

Kitchen Equipment Needed

  • Springform pan
  • Mixing bowls
  • Hand mixer or stand mixer
  • Wire cooling racks
  • Serrated knife

Ingredients

  • 1 cup unsalted butter, softened
  • 1 cup granulated sugar
  • 1 cup brown sugar, packed
  • 4 large eggs
  • 2 teaspoons vanilla extract
  • 1/2 cup cocoa powder
  • 2 cups all-purpose flour
  • 1 teaspoon baking soda
  • 1/2 teaspoon baking powder
  • 1/2 teaspoon salt
  • 1 cup whole milk
  • 16 oz cream cheese, softened
  • 3/4 cup peanut butter
  • 1 cup confectioners’ sugar
  • 12 oz dark chocolate chips
  • 1 cup heavy cream

Directions

  1. Preheat your oven to 350°F (175°C). Grease and line the springform pan.
  2. Cream together butter and sugars until light and fluffy. Add eggs one at a time, followed by vanilla extract.
  3. Sift cocoa powder, flour, baking soda, baking powder, and salt. Alternate blending dry mix with milk into the batter.
  4. Pour batter into prepared pan, bake for 25–30 minutes. Cool completely on wire rack.
  5. Beat cream cheese until smooth, add crushed peanut butter. Stir in confectioners’ sugar gradually.
  6. Layer the baked cake with the peanut butter cream cheese mix, chill thoroughly in the refrigerator.
  7. For ganache, heat cream until almost boiling, pour over chocolate chips. Let sit, then stir until smooth.
  8. Gently spread ganache across chilled cake, letting drip naturally for visual effect. Chill until ready to serve.

Recipe Notes

  • Substitute nut butter variations based on preferences or dietary needs.
  • If the ganache thickens too quickly, gently reheat to maintain spreadability.
  • Adjust sugar levels in frosting as necessary for taste balance.

Maple Glazed Cookies: Sweet and Buttery Perfection

Maple cookies, glazed maple treats, buttery maple cookies, sweet maple glaze cookies, holiday maple cookie recipe

Internal Linking Opportunities for the Article Maple Glazed Cookies

Based on the content available on ExoRecipes, the following internal links can enhance the article on Maple Glazed Cookies:

  1. Kentucky Butter Cake
    • Anchor Text: “buttery and rich desserts similar to Maple Glazed Cookies.”
    • Placement: Section discussing the texture and richness of the cookies.
  2. Pancake Muffins
    • Anchor Text: “breakfast-inspired maple recipes like Pancake Muffins.”
    • Placement: Section discussing alternative uses for maple glaze.
  3. Crockpot Potato Soup
    • Anchor Text: “sweet and savory pairings for meals featuring Maple Glazed Cookies.”
    • Placement: Section on serving suggestions or meal pairings.

Maple Glazed Cookies: The Ultimate Guide to Flavorful Baking

Table of Contents


Introduction

There’s a reason why Maple Glazed Cookies have become a seasonal favorite. With their buttery texture and sweet maple-infused glaze, these cookies are perfect for holiday parties, family gatherings, or a cozy evening treat. The flavor of real maple syrup gives these cookies their signature taste, ensuring they stand out on any dessert table.

For those who enjoy indulgent treats, explore Kentucky Butter Cake for another rich and buttery option. Pairing this with maple glazed cookies offers a luxurious dessert experience.


Ingredients for Maple Glazed Cookies

For the Cookies

  • 2 ½ cups all-purpose flour
  • 1 cup unsalted butter, softened
  • ½ cup granulated sugar
  • ¼ cup light brown sugar
  • 1 large egg
  • 1 tsp vanilla extract
  • ½ tsp salt

For the Maple Glaze

  • 1 cup powdered sugar
  • 3 tbsp pure maple syrup
  • 2 tbsp milk or cream
  • ½ tsp maple extract (optional)

Step-by-Step Recipe Instructions

1. Prepare the Cookie Dough (15 minutes)

  • Cream together the softened butter, granulated sugar, and brown sugar until fluffy.
  • Beat in the egg and vanilla extract until fully incorporated.
  • Gradually mix in the flour and salt until a dough forms.

2. Chill the Dough (30 minutes)

  • Wrap the dough in plastic wrap and refrigerate for at least 30 minutes. This prevents spreading while baking.

3. Shape and Bake the Cookies (12–15 minutes)

  • Preheat your oven to 350°F (175°C).
  • Roll the dough into small balls, flatten slightly, and arrange on a parchment-lined baking sheet.
  • Bake until the edges are golden brown. Let the cookies cool completely before glazing.

Tips for the Perfect Maple Glaze

  1. Use Pure Maple Syrup: Authentic maple syrup provides the richest flavor.
  2. Consistency is Key: Adjust the thickness of the glaze with additional powdered sugar or milk.
  3. Apply Glaze to Cooled Cookies: Avoid glazing warm cookies to prevent the glaze from melting.

For breakfast enthusiasts, check out Pancake Muffins for another way to enjoy maple syrup in a morning-friendly recipe.


Serving Suggestions

  • With Hot Beverages: Pair with coffee, tea, or a warm maple latte for a perfect afternoon snack.
  • As Part of a Dessert Platter: Serve alongside chocolate chip cookies or shortbread for variety.
  • Sweet and Savory Pairing: Combine with dishes like Crockpot Potato Soup for a contrasting yet balanced meal.

Variations and Adaptations

  1. Add Spices: Enhance with cinnamon or nutmeg for a fall twist.
  2. Vegan Option: Substitute butter with plant-based alternatives and use almond milk in the glaze.
  3. Gluten-Free: Use a gluten-free baking mix for a celiac-friendly version.
  4. Decorative Toppings: Sprinkle with crushed pecans or edible glitter for a festive look.

Common Mistakes to Avoid

  • Skipping the Chill Step: Leads to cookies spreading too thin.
  • Overmixing the Dough: Results in tough cookies.
  • Using Artificial Maple Syrup: Compromises the authentic flavor.

FAQs About Maple Glazed Cookies

1. Can I freeze these cookies?

Yes, freeze baked cookies for up to 3 months. Add the glaze after thawing for the best texture.

2. How long do they stay fresh?

Store in an airtight container for up to 5 days at room temperature.

3. Can I substitute maple syrup?

While pure maple syrup is ideal, honey or agave syrup can be used in a pinch, but the flavor will differ.