Tipsy Spritzer: The Ultimate Festive Holiday Drink Recipe

holiday cocktail recipe, festive spritzer drink, Christmas cocktail ideas, vodka spritzer recipe, fizzy holiday drink, cranberry vodka cocktail

Tipsy Spritzer – THE Holiday Drink: Festive, Refreshing, and Perfect for Every Celebration


Introduction
The Tipsy Spritzer is the quintessential holiday cocktail, combining the perfect blend of flavor, fizz, and festivity. This drink is a showstopper at gatherings, with its vibrant colors and versatile recipe that can be tailored to any celebration.


Why Tipsy Spritzer is the Ultimate Holiday Drink

A Festive Crowd-Pleaser

This drink’s appeal lies in its versatility. Whether served at intimate dinners or large parties, its refreshing taste and eye-catching presentation make it unforgettable.

Pair it with Kentucky Butter Cake for a perfect dessert and drink duo.

Simple Yet Sophisticated

With just a handful of ingredients, you can create a sophisticated beverage that rivals anything from a cocktail bar.

For garnish tips, explore Creative Garnish Ideas to enhance your presentation.


Ingredients for Tipsy Spritzer

Core Ingredients

  • 2 oz vodka
  • 2 oz cranberry juice
  • 2 oz orange juice
  • Splash of grenadine
  • Lemon-lime soda

Optional Additions

  • Rosemary sprigs for garnish
  • Frozen cranberries or orange slices
  • A dash of sparkling wine for extra fizz

Step-by-Step Recipe for Tipsy Spritzer

  1. Prepare the Glass: Chill your glass for a refreshing drink.
  2. Layer Ingredients: Add vodka, juices, and a splash of grenadine over ice.
  3. Top with Soda: Finish with lemon-lime soda for a fizzy touch.
  4. Garnish and Serve: Add rosemary and cranberries for an elegant touch.

Tips for Perfecting the Tipsy Spritzer

  • Chill Your Ingredients: This enhances the drink’s refreshing quality.
  • Balance the Sweetness: Adjust the amount of grenadine to taste.
  • Go Bold with Presentation: Rim the glass with sugar for extra flair.

Check out Holiday Drink Variations for more festive ideas.


Variations of the Tipsy Spritzer

Non-Alcoholic Version

Replace vodka with sparkling water for a family-friendly mocktail.

Citrus Splash

Add lime juice and zest for a tangy twist.

Tropical Spritzer

Incorporate pineapple juice for a tropical flavor profile.


FAQs About Tipsy Spritzer

Can I Make a Large Batch?

Yes, scale the ingredients proportionally and serve in a punch bowl.

What’s the Best Way to Serve?

Use stemless wine glasses or mason jars for a festive presentation.

Can I Customize the Spirit?

Absolutely! Substitute vodka with gin or tequila for a unique flavor.


Internal Linking Opportunities


Conclusion
The Tipsy Spritzer is more than just a drink—it’s a celebration in a glass. Whether you stick to the classic recipe or explore creative variations, this holiday cocktail is sure to impress your guests and elevate your gatherings. Try it this season and toast to joyful moments!

Orange Creamsicle Salad: A Sweet and Creamy No-Bake Dessert Recipe

creamsicle dessert, orange fluff salad, no-bake creamsicle dessert, orange Jell-O salad, marshmallow creamsicle salad, whipped topping dessert

Orange Creamsicle Salad: A Refreshing No-Bake Dessert Recipe


Introduction
Orange Creamsicle Salad is a sweet, nostalgic dessert that brings back memories of creamy popsicles on hot summer days. With its vibrant orange color, marshmallow fluffiness, and creamy texture, it’s perfect for potlucks, BBQs, or as a crowd-pleasing holiday dish.


Why Orange Creamsicle Salad is a Hit

A Burst of Nostalgia

The flavor profile of orange creamsicle salad mimics the classic creamsicle popsicle, offering a balance of tangy and sweet that appeals to all ages.

Easy, No-Bake Recipe

This dessert requires no oven, making it a fuss-free option for anyone looking to prepare a quick and impressive dish.

Explore more no-bake desserts like No-Bake Pumpkin Cheesecake to expand your dessert repertoire.


Ingredients for Orange Creamsicle Salad

Core Ingredients

  • 1 package (3 oz) orange Jell-O
  • 1 package (3.4 oz) instant vanilla pudding mix
  • 1 container (8 oz) whipped topping (Cool Whip)
  • 1 can (11 oz) mandarin oranges, drained
  • 1 cup mini marshmallows

Optional Additions

  • Crushed pineapple for added sweetness.
  • Cottage cheese for creaminess.
  • A sprinkle of orange zest for garnish.

Step-by-Step Recipe for Orange Creamsicle Salad

  1. Prepare Jell-O Mixture:
    Dissolve orange Jell-O in 1 cup of boiling water. Add ½ cup of cold water and chill for 15 minutes.
  2. Mix Pudding:
    Whisk the instant vanilla pudding mix into the cooled Jell-O mixture until smooth.
  3. Combine Ingredients:
    Fold in whipped topping, mandarin oranges, and marshmallows.
  4. Chill and Serve:
    Refrigerate the salad for at least 1 hour before serving.

For detailed instructions on no-bake desserts, check out Perfect Jell-O Dessert Tips.


Tips for Success

  • Prevent Runny Salad: Allow Jell-O to cool before mixing to prevent a watery consistency.
  • Even Distribution: Fold ingredients gently to keep the salad light and fluffy.
  • Chill Time: Adequate refrigeration ensures the flavors meld together perfectly.

Variations of Orange Creamsicle Salad

  • Tropical Twist: Add shredded coconut and pineapple chunks.
  • Berry Delight: Substitute orange Jell-O with raspberry for a tangy flavor.
  • Healthy Option: Use sugar-free Jell-O and low-fat whipped topping.

FAQs About Orange Creamsicle Salad

How Long Can It Be Stored?

It lasts up to 3 days in the refrigerator in an airtight container.

Can I Freeze It?

Freezing is not recommended, as it may affect the creamy texture.

Can I Use Homemade Whipped Cream?

Yes, but ensure it is stabilized to hold the salad’s shape.

Can I Add Nuts?

Yes, chopped pecans or walnuts add a nice crunch to the dish.


Internal Linking Opportunities


Conclusion
Orange Creamsicle Salad is a delightful, no-bake dessert that captures the essence of summer with its creamy texture and tangy orange flavor. Perfect for any gathering, this salad is a guaranteed hit. Try it today and enjoy the taste of nostalgia!

Irresistible White Chocolate Cranberry Fudge: The Ultimate Holiday Delight

White Chocolate Cranberry Fudge Recipe – A Sweet Holiday Treat

⚖️
Difficulty
Easy

⏲️
Prep Time
10 mins

🕒
Cook Time
10 mins

⏱️
Total Time
20 mins

🍽️
Servings
16 pieces

During the holiday season, there’s nothing quite like indulging in delightfully rich treats that bring comfort and joy. Our White Chocolate Cranberry Fudge recipe offers a beautiful combination of creamy white chocolate and tart cranberries, perfect for satisfying your sweet tooth. As family and friends gather around, the festive aroma and mouthwatering flavors create lasting memories full of holiday cheer.

This easy-to-make White Chocolate Cranberry Fudge is a celebration of flavors that blend melt-in-your-mouth smoothness with a burst of tartness from dried cranberries. Ideal for gifting and sharing, it’s a decadent addition to any holiday dessert spread. Whether you’re a seasoned chef or a baking beginner, this recipe will quickly become a favorite holiday tradition.

As you prepare this fudge, the luxurious fragrance of melting chocolate fills the air, creating an inviting atmosphere that captures the essence of the season. The rich, creamy texture combined with the vibrant red pops of cranberries makes it not only a delight for the palate but also a feast for the eyes. Let’s embark on a culinary adventure that’s as joyous to create as it is to consume.

Quick Recipe Highlights

  • Flavor Profile: The perfect balance of rich, creamy white chocolate intensified with the tart and fruity flavors of cranberries.
  • Texture: Smooth and creamy fudge paired with chewy, juicy bits of cranberries for a delightful contrast.
  • Aroma: An irresistible blend of sweet white chocolate with hints of berry essence, creating a comforting holiday aroma.
  • Visual Appeal: Contrasting white fudge with bright red cranberries offers a beautiful and festive presentation.
  • Skill Level Needed: Ideal for beginners; the recipe involves simple melting and combining steps without requiring advanced skills.
  • Special Equipment: Use a microwave-safe bowl and a rubber spatula for easy mixing and a baking dish lined with parchment paper for setting.

Recipe Overview

  • Difficulty Level: The ease of melting chocolate and mixing ingredients makes it perfect for novice cooks or those seeking an uncomplicated recipe.
  • Category: Dessert; a rich and sweet treat perfect for festive occasions and holiday gatherings.
  • Cuisine: This recipe draws from classic American fudge traditions, infused with a modern cranberry twist.
  • Cost: The recipe uses readily available ingredients such as white chocolate chips and dried cranberries, making it cost-effective while still offering luxury.
  • Season: Especially popular in winter, this fudge brings warmth and joy with its festive flavors and colors.
  • Occasion: Tailored for holiday celebrations, gift exchanges, and sweet endings to seasonal feasts.

Why You’ll Love This Recipe


Creating this White Chocolate Cranberry Fudge is a delightful experience that brings together taste and satisfaction. The rich, creamy texture paired with the tart and chewy cranberries will satisfy any sweet craving, providing a perfect flavor balance that everyone will enjoy.

One of the significant advantages of this recipe is its simplicity and convenience. Requiring only a few basic ingredients and a short preparation time, this fudge is perfect for last-minute gatherings or when you need a quick holiday treat. In just 20 minutes, you can create a delectable dessert that looks as impressive as it tastes.

Beyond satisfying sweet cravings, this recipe is relatively low in sodium and provides antioxidants from the cranberries, offering a slight nutritional edge. While indulging in this treat, you can appreciate the subtle benefits of its ingredients without compromising on flavor and richness.

This fudge is not just a solo treat but an excellent choice for entertaining. As a beautiful addition to any dessert platter, its festive appearance and melt-in-your-mouth quality make it a crowd favorite. Crafting this fudge encourages creativity and allows you to engage with loved ones over taste-testing and sharing the results.

Moreover, the affordability of the ingredients like white chocolate chips and dried cranberries makes it accessible to everyone. Without needing rare or costly components, this fudge ensures that high-quality, delicious desserts stay within budget. Gather your ingredients and take part in a culinary journey that delivers joy and satisfaction in each bite.

Historical Background and Cultural Significance


The origins of fudge can be traced back to the late 19th century in America, where it quickly became a staple confectionery item. With its rich sweetness and smooth texture, fudge was a popular choice for celebrations and special occasions, perhaps most famously associated with college campuses and holiday bazaars.

White chocolate, a relatively newer introduction compared to traditional chocolates, brought diversity in fudge flavors. Its creamy and delicate taste complements a wide array of additives, making it a versatile ingredient in many modern dessert recipes.

Cranberries are often termed as America’s original super fruit, deeply rooted in the culinary traditions of Native Americans. They are celebrated for their tartness, rich red color, and health benefits, which lend themselves seamlessly to festive culinary celebrations.

The marriage of white chocolate and cranberries represents a fusion of old-world fudge charm with new-world ingredients. Different regions may adapt the basic recipe, adding local flavors and textures to reflect their unique culinary traditions.

While classic chocolate fudge still retains its place in confectionery history, innovations like White Chocolate Cranberry Fudge showcase how traditional recipes evolve to embrace contemporary palates. Every time you prepare this fudge, you’re taking part in a culinary tradition that blends history, culture, and the warmth of shared experiences.

Ingredient Deep Dive


White Chocolate: Originating from Switzerland, white chocolate is renowned for its creamy sweetness and smooth texture. Rich in cocoa butter, it lacks the cocoa solids of regular chocolate, making it ideal for those who appreciate mild flavors. In our recipe, it gives the fudge its signature creaminess and soft texture. When selecting white chocolate, opt for high-quality chips with a high cocoa butter content for the best melting and flavor results. Store it in a cool, dry place, and remember to check for blooming, a harmless cosmetic defect that doesn’t affect taste when melted.

Cranberries: Native to North America, cranberries are well-loved for their tartness and vibrant red color. They bring a natural zest and burst of flavor that balances the richness of our fudge. Packed with antioxidants, dried cranberries offer a chewy texture enriched with nutrients. Opt for unsweetened or lightly sweetened varieties to control sugar levels in your recipe. Store cranberries in a sealed bag in a dry place to maintain freshness, and if needed, rehydrate in warm water briefly before adding to recipes.

Common Mistakes to Avoid

  • Overheating chocolate can cause it to seize; melt slowly using gentle heat and stir regularly.
  • Using low-quality white chocolate could lead to grainy texture; always opt for high-quality chips.
  • Not lining your baking dish with parchment can make fudge difficult to remove; always use a lined dish.
  • Mixing hot fudge too aggressively might add air bubbles. Stir gently for a smooth consistency.
  • Ignoring salt can make the outcome overly sweet; a pinch of salt enhances flavors beautifully.
  • Skipping cranberry prep allows them to clump; evenly distribute them throughout the mixture.
  • Insufficient cooling time results in gooey fudge; ensure fudge is fully set before slicing.
  • Adding wet or overly moist fruit could dilute flavors and alter texture; ensure cranberries are well-dried.
  • Incorrect storage might dry out your fudge; always use airtight containers or wrapping.

Essential Techniques


Melting White Chocolate: Proper technique is crucial to avoid seizing. Chocolate should be melted using indirect heat, such as a double boiler or microwave in short intervals. This ensures smoothness and prevents the cocoa butter from separating. Constant stirring accelerates the melting process and ensures an even temperature distribution.

Mixing Fudge Ingredients: When combining fudge ingredients, ensure they are thoroughly mixed to distribute cranberries evenly. It helps maintain a consistent distribution of flavors and avoid pockets of sweetness or tartness.

Setting & Slicing Fudge: After pouring into the pan, give the mixture ample time to cool and set. Allocate at least 1-2 hours at room temperature or 30 minutes in the fridge to firm up for neat slicing and presentation.

Pro Tips for Perfect White Chocolate Cranberry Fudge


Use high-grade white chocolate with a minimum of 20% cocoa butter to ensure smooth melting without seizing.

If you like additional texture, try lightly toasting some nuts and folding them into the fudge for added crunch.

For even distribution, gently fold in cranberries using a rubber spatula until every piece is coated with the fudge mixture.

Avoid melting butter in advance; combine it with chocolate chips and condensed milk to prevent separation.

Use heavy-duty aluminum foil for lining if parchment is unavailable; it helps with easy removal without sticking.

Allow the fudge to cool slowly at room temperature before refrigerating to maintain a glossy finish.

Try zesting some orange on top for a complementary citrus aroma and flavor that elevates the fudge.

Variations and Adaptations


Regional Variations: Some regions enjoy adding a hint of spice, like cinnamon or nutmeg, to the fudge mix for a warming flavor layer.

Seasonal Adaptations: For a spring-inspired version, reduce cranberries and replace them with dried apricots or cherries.

Dietary Modifications: Replace dairy ingredients with vegan alternatives—a vegan white chocolate and coconut condensed milk—for a cruelty-free treat.

Flavor Variations: Mix in some zest from an orange or lemon to brighten the flavor profile and add an additional aromatic layer.

Texture Modifications: For a chewier texture, incorporate mini marshmallows, swirling them gently into the mix before setting.

Presentation Alternatives: Dust with a fine layer of powdered sugar or add decorative sprinkles right before serving for a festive touch.

Serving and Presentation Guide


Plating Techniques: Cut fudge into neat, even squares using a sharp, warmed knife for clean edges. Display on a white plate or wood board for visual contrast.

Garnishing Ideas: Consider topping each piece with a cranberry or edible glitter before serving for visual appeal.

Traditional Accompaniments: A classic pairing with hot chocolate or coffee brings out the chocolate notes marvelously.

Modern Serving Suggestions: Assemble on a festive platter with other seasonal treats, integrating height and shapes for a creative display.

Temperature Considerations: Keep fudge chilled before serving and allow it to reach room temperature just before enjoying for optimal texture.

Portion Control Tips: Mark bite-sized pieces so guests can enjoy moderation while sampling other holiday desserts.

Wine and Beverage Pairing


Wine Pairings: Pair it with a chilled glass of Moscato d’Asti or a light-bodied Riesling for balanced sweetness and acidity.

Non-alcoholic Alternatives: Cranberry apple cider or a berry-infused iced tea complements the flavors without alcohol.

Coffee/Tea Pairings: Opt for a mellow Darjeeling or robust medium-dark roast coffee to round the creamy fudge flavors.

Temperature Considerations: Serve drinks slightly above room temperature to maintain their flavor profiles without shocking the taste buds.

Serving Suggestions: Offer a small sample plate with pairing suggestions outlined for an immersive tasting experience.

Storage and Shelf Life


Storage Methods: Store fudge in an airtight container, layering wax or parchment paper between pieces to prevent sticking.

Temperature Requirements: Refrigeration extends freshness, while room temperature storage is practical for short-term consumption.

Container Recommendations: Choose a glass or BPA-free plastic storage container for optimal flavor and freshness retention.

Signs of Spoilage: Look for any change in texture, color, or aroma indicative of spoilage. Fresh fudge should maintain a creamy appearance and soft feel.

Reheating Instructions: Briefly allow cold fudge to reach room temperature; reheating is not necessary as fudge maintains quality without further heating.

Freezing Guidelines: Wrap tightly in plastic wrap, place in a freezer-safe container, and keep frozen up to two months for long-term storage.

Make Ahead Strategies


Prep Timeline: Make this fudge up to two weeks in advance, storing in airtight containers.

Storage Between Steps: Consider storing prepped ingredients separately to prevent mixing until ready if time allows.

Quality Impact Assessment: Upon freezing, you’ll notice minimal change in flavor or texture if appropriately wrapped and stored.

Assembly Tips: Assemble the ingredients in advance, then quickly melt and combine for an efficient prep process.

Reheating Guidelines: Bring out from refrigeration briefly for softening before serving—avoid reheating altogether.

Fresh Element Additions: If adding toppings or decorations, add right before serving for best appearance and texture.

Scaling Instructions


Halving the Recipe: Reduce ingredients proportionally for smaller gatherings and use a smaller dish to set.

Doubling or Tripling: Use a bigger pan and adjust the setting time as more mass will require longer to stabilize.

Timing Modifications: If scaling up, preparing ingredients in separate batches often assists in maintaining quality.

Storage Considerations: With larger batches, be sure to have multiple, airtight containers ready for segmented storage.

Equipment Adjustments: A bigger bowl might be necessary if scaling for party-sized batches; opt for sturdy tools capable of handling the increased volume.

Nutritional Deep Dive


Macro Breakdown: Predominantly composed of fats from cocoa butter and sugars, reinforced by cranberries for added fiber.

Micronutrient Analysis: B vitamins and vitamin C from cranberries offset the rich nature of white chocolate.

Health Benefits: Cocoa butter contributes to skin health, while antioxidants in cranberries support immunity.

Dietary Considerations: Best consumed in moderation due to higher sugar content; complementary to a balanced diet.

Portion Analysis: Small portions maximize enjoyment without overwhelming dietary plans; one piece ideally satisfies sweet cravings.

Weight Management Tips: Relish in moderation; piece sizes can be adjusted to maintain dietary goals while enjoying holiday indulgences.

Dietary Adaptations


Gluten-free: Naturally gluten-free, but always verify each ingredient label to ensure compliance.

Dairy-free: Swap with non-dairy white chocolate and use coconut condensed milk for a plant-based variant.

Vegan: Ensure all substitutions align with vegan standards, from chocolate to milk alternatives.

Low-carb: Offer a smaller portion as part of balanced intakes; recipes mainly feature sugars and fats.

Keto: Challenge with modifications due to high sugars; alternative sweeteners could transform the recipe if desired.

Paleo: Adaptation possible with coconut sugar and tailored chocolate options approved for paleo consumption.

Low-FODMAP: Cranberries generally fit, but moderation is key to avoid symptoms commonly triggered by sugary treats.

Troubleshooting Guide


Texture Issues: Ensure chocolate isn’t overheated, as this can lead to graininess; correct by adding a small amount of oil or milk and re-heating gently.

Flavor Balance: Seeking tartness? Add a few more cranberries to enhance their contribution without overpowering sweetness.

Temperature Problems: Fudge must set at optimal temperature—cooling too fast or slow in non-ideal settings impacts its consistency.

Equipment Challenges: Lack of specialty bowls? Improvise using alternative double-boiling methods or microwave-safe ceramics.

Ingredient Substitutions: If cranberries aren’t available, use similar dried fruits like cherries, adjusting for sweetness.

Timing Concerns: Refrigerating for short bursts accelerates the setting process but won’t scrimp on results; never skip cooling entirely.

Recipe Success Stories


Community Feedback: Our readers praise the texture and flavor on forums and social media; many acclaim simplicity and flavor balance.

Variation Successes: Some have successfully substituted cranberries with blueberries or nuts, enjoying an inventive take with great satisfaction.

Adaptation Stories: Vegans found solace in plant-based alternatives, reporting little flavor compromise but full richness retained.

Reader Suggestions: Spices such as cinnamon added warmth or citrus zest garnered fresh options worth trying according to user tips.

Photography Tips: For capturing imagery, play with lighting and bright backgrounds, highlighting cranberry pops for stunning results.

Frequently Asked Questions

Can I use fresh cranberries instead of dried ones?

Fresh cranberries could alter the fudge’s moisture content. Dried cranberries keep the texture firm, while fresh ones may lead to sogginess.

How long does this fudge last?

Properly stored, this fudge can last up to 1 week at room temperature or 2 weeks refrigerated, extending to 2 months frozen.

What if my fudge doesn’t set?

Ensure proper chocolate melting and respect cooling times; check room humidity level—refrain from rushing the setting stage.

Why did my chocolate seize?

Overheating or moisture introduction causes seizing. Try adding butter or milk while stirring gently to rejuvenate the mixture.

Can I add nuts to the fudge?

Absolutely! Chopped pecans or almonds introduce delightful texture and depth—roast lightly for maximum impact.

What alternatives exist for condensed milk?

A vegan equivalent like coconut condensed milk substitutes while maintaining consistency; homemade versions are plausible but tedious.

How do I create smaller batch sizes?

Halve ingredient quantities, adjust equipment sizes, and remain mindful of setting times as less mixture cools faster.

Can I use a silicone mold for setting?

Yes, silicone molds provide an interesting alternative that enhances presentation with creative shapes and easy retrieval.

What if I am out of white chocolate?

A mixture of milk chocolate and cream cheese might mimic creaminess, although flavor variations will exist distinctly.

Is this recipe suitable for children?

Perfect for children over supervision due to rich sweetness—engage them through non-cooking tasks like pre-placing cranberries on each piece.

Are there more festive variations?

Experiment with peppermint extract or add crushed candy canes for updated variations such as holiday peppermint fudge.

Additional Resources


Explore Related Recipes: Consider our Dark Chocolate Fudge or Salted Caramel Fudge for more delightful recipes that capture varying tastes.

Technique Guides: Articles detailing chocolate melting techniques could hone expertise and refine your confectionery results.

Ingredient Information: Check posts on overcoming gluten limitations for adapting recipes to specific dietary needs easily.

Equipment Recommendations: Explore our reviews on induction-friendly cookware sets and non-stick bakeware for indispensable additions to your kitchen toolkit.

Seasonal Variations: Learn about seasonal fruit utilisations to substitute cranberries appropriately across different times of the year.

Join the Conversation


Social Media Sharing: We love to see and share your photos of the fudge outcome, encouraging followers to tag us with #CranberryFudge.

Photography Tips: Lighting and angle are key; try capturing the most vibrant aspects of your fudge like red cranberries strikingly against white chocolate.

Recipe Reviews: Comment with your feedback, rate recipe difficulty, and share your twists with our cooking community for connection and support.

Community Engagement: Join our online forum where chefs trade tips, tricks, and showcase creativity across diverse culinary arts.

Recipe Variations: Post your innovation—did you embark on a unique twist? Share your narrative with pictures and taste descriptions for commendation.

The Recipe

White Chocolate Cranberry Fudge

Serves: 16 pieces

Prep Time: 10 mins

Cook Time: 10 mins

Total Time: 20 mins

Kitchen Equipment Needed

  • Microwave-safe bowl
  • Rubber spatula
  • Baking dish
  • Parchment paper

Ingredients

  • 2 cups white chocolate chips
  • 1 can (14 ounces) sweetened condensed milk
  • 1 cup dried cranberries
  • 1 tsp vanilla extract
  • Pinch of salt

Directions

  1. Line a baking dish with parchment paper, letting excess hang over the sides.
  2. In a microwave-safe bowl, combine white chocolate chips and condensed milk.
  3. Microwave in 30-second intervals, stirring in between, until the mixture is smooth.
  4. Stir in vanilla extract and a pinch of salt for added flavor.
  5. Fold in dried cranberries ensuring even distribution.
  6. Pour the mixture into the prepared pan and smooth the top with a spatula.
  7. Chill in the refrigerator until set, about 1-2 hours.
  8. Cut into squares and serve at room temperature.

Recipe Notes

  • Replace cranberries with dried cherries or apricots for a different flavor twist.
  • Add nuts or orange zest for textured variations.
  • Store covered in the fridge to maintain freshness.

Easy Baked Ziti Recipe for a Delicious Family Dinner

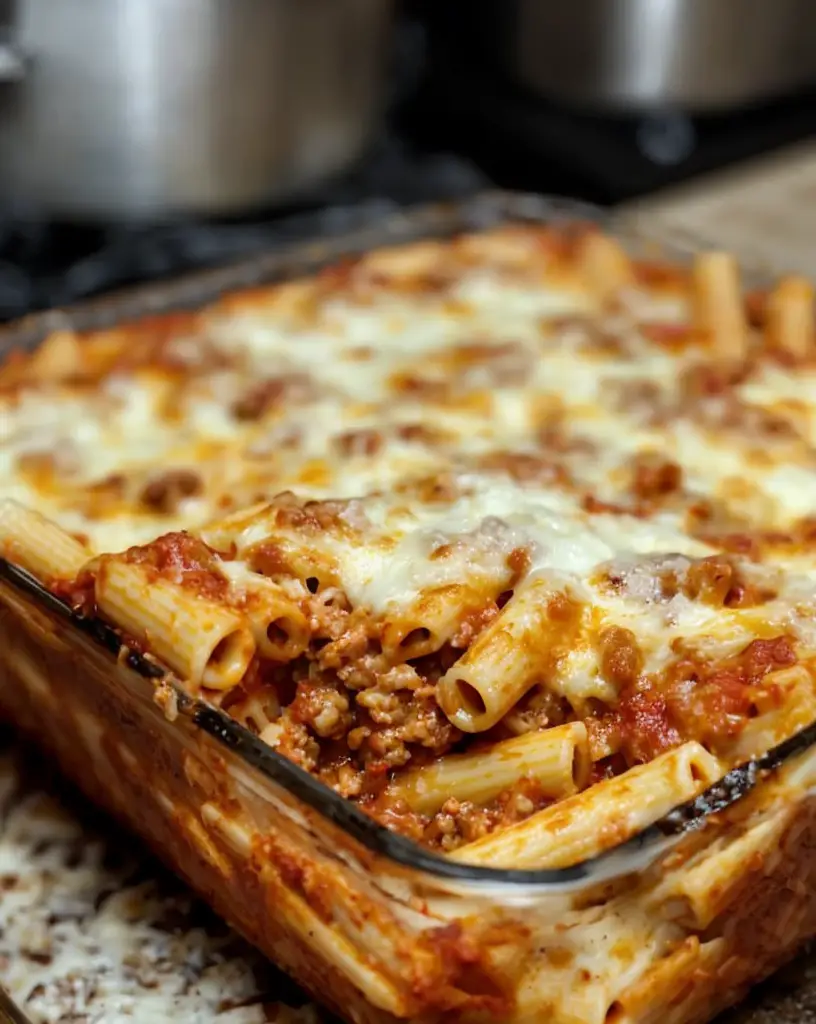
Baked Ziti: A Delicious, Crowd-Pleasing Comfort

⚖️
Difficulty
Easy

⏲️
Prep Time
20 mins

🕒
Cook Time
40 mins

⏱️
Total Time
60 mins

🍽️
Servings
8

Craving a comforting, cheesy, and classic Italian dish? Look no further than baked ziti, a staple in Italian-American households. This baked ziti recipe combines al dente pasta layered with robust marinara sauce, creamy ricotta cheese, and a generous topping of melted mozzarella cheese. It’s not only a culinary delight but also an easy-to-prepare meal that’s perfect for feeding a crowd, making it an ideal choice for both weeknight family dinners and special gatherings.

Baked ziti’s appeal lies in its harmonious convergence of flavors and textures. Each bite delivers a delightful combination of tangy tomato sauce mingling with the richness of cheese and pasta’s tender yet firm bite. The layers bake together to create a bubbling, savory meal that not only satisfies the palate but also warms the soul. This dish delivers comfort in every forkful and is sure to become a staple in your home-cooked repertoire.

This versatile dish isn’t just about flavor; it’s also about the ease of preparation. With minimal culinary skills needed, even novice cooks can succeed with this baked ziti recipe. You’ll spend only 20 minutes in preparation, leaving the rest to the oven, where all ingredients meld together into a comforting masterpiece. Make a batch today and revel in the flavorful simplicity of this timeless dish.

Quick Recipe Highlights

  • Flavor Profile: Baked ziti offers a harmonious balance of tangy tomato sauce, creamy cheeses, and savory pasta, delivering a comforting and rich taste experience.
  • Texture: The dish combines a luscious, gooey melt from mozzarella with tender yet firm pasta, topped with a crisp, golden-brown cheese crust.
  • Aroma: Enjoy the delightful scents of garlic-infused marinara sauce and melting cheeses, filling your kitchen with classic Italian aromas.
  • Visual Appeal: Its vibrant layers of red sauce, white cheese, and golden topping make baked ziti an inviting and colorful dish on the dinner table.
  • Skill Level Needed: This is an easy recipe suitable for beginners and seasoned cooks alike, requiring basic cooking and layering techniques.
  • Special Equipment: You’ll need a large pot for boiling pasta, an oven-safe baking dish for layering, and a grater for freshly shredded cheese.

Recipe Overview

  • Difficulty Level: We’ve rated this recipe as easy due to its simple steps and short ingredient list, making it accessible even for novice cooks.
  • Category: Baked ziti falls under the casseroles and pasta bakes categories, serving as either a main course or a hearty side dish.
  • Cuisine: Rooted in Italian-American tradition, this dish offers the comforting flavors reminiscent of classic Italian kitchens, with American adaptations.
  • Cost: Baked ziti is a budget-friendly recipe, relying on staple ingredients like pasta, cheese, and canned tomatoes for maximum flavor.
  • Season: While suitable for any season, baked ziti is especially cherished in colder months for its warming and comforting qualities.
  • Occasion: Perfect for any occasion—from family dinners to potlucks and celebratory gatherings—baked ziti offers versatility and ease of serving to larger groups.

Why You’ll Love This Recipe


The taste and texture of baked ziti are uniquely satisfying, offering a rich melding of cheeses and pasta that’s appealing to both gourmet and casual food lovers. The tangy tomato sauce complements the creaminess of the mozzarella and ricotta, creating a well-rounded and comforting dish that’s a delight to both make and eat.

Convenience is a key factor in the appeal of baked ziti. With only a handful of steps between you and a home-cooked meal, it’s an ideal choice for those seeking a delicious and efficient dinner solution. The ingredients are easily assembled, and it involves minimal preparation time, freeing you up to indulge in other activities.

On the nutritional side, baked ziti can be made with whole-grain pasta and reduced-fat cheeses to enhance its health profile. The dish provides a wholesome dose of protein, carbohydrates, and calcium, supporting a well-balanced diet that doesn’t compromise on taste.

The social and entertaining value of baked ziti is immense. It’s a dish that brings people together, offering abundant servings that satisfy even the largest parties. The ease of preparation allows hosts to focus on entertaining rather than being stuck in the kitchen.

Finally, baked ziti is cost-effective, featuring affordable ingredients that can easily be found in any pantry or superstore. Its accessibility doesn’t detract from its deliciousness, making it an inviting option for both tight budgets and grand feasts.

Historical Background and Cultural Significance


Baked ziti has its roots deep in Italian-American history, drawing inspiration from traditional Italian pasta al forno dishes. This dish showcases a fusion of Italian cooking principles with American adaptability, forming a staple recipe in countless homes across the United States.

In terms of cultural importance, baked ziti serves as comfort food that reminds many Italian-American families of home, heritage, and traditional Sunday meals. It’s a testament to the melding of cultures and the ability to adapt culinary traditions to new environments.

Over time, the recipe for baked ziti has evolved to accommodate various ingredients and preferences. Whether adding meats, vegetables, or extra spices, the core elements remain the same, offering a customizable platform for home cooks to explore.

Regional variations exist, often incorporating local cheeses or homemade sauces, adjusting to the diversity of American culinary landscapes. Despite these differences, baked ziti remains an embodiment of universal comfort and nostalgia connected to Italian cuisine.

Ingredient Deep Dive


Pasta is the backbone of baked ziti, providing a hearty base upon which the dish is built. Originating from Italy, pasta carries significant cultural value, representing simplicity and versatility in cookware. Pasta is an excellent source of carbohydrates, providing energy necessary for daily activities. When selecting pasta, opt for varieties labeled as “al dente” when cooked, ensuring they remain firm enough in the layering process. Store unused dry pasta in a cool, dry place. For substitution, consider whole-grain pasta for added fiber.

Marinara sauce is essential for layering flavors in baked ziti. With its origins rooted in the traditional sauces of Italy, marinara brings a tangy, vibrant depth of flavor. Rich in vitamin C and antioxidants from tomatoes, marinara is both tasty and beneficial. Choose high-quality canned tomatoes without added preservatives for the best homemade sauce. Store leftover sauce in the fridge and use within a few days. If homemade is unavailable, substitute with your favorite jarred sauce to save time.

Common Mistakes to Avoid

  • Avoid overcooking the pasta, as it will continue to cook in the oven. Strive for an “al dente” texture to withstand the baking process.
  • Don’t skip layering. Even distribution ensures each bite encompasses all components, maintaining flavor harmony.
  • Use freshly shredded cheese instead of pre-shredded, which may contain anti-caking agents that affect melting quality.
  • Avoid using low-quality sauces, as this dish’s flavor profile relies heavily on its tomato base. Opt for quality canned or prepared sauces.
  • Under-seasoning the dish can lead to blandness. Taste and adjust seasoning as you prepare various layers.
  • Don’t let baked ziti sit uncovered. This will protect the cheese from getting overly brown and hard.
  • Ensure the dish is tightly sealed with foil during initial baking to trap in moisture and heat evenly.
  • Avoid overbaking to keep the dish moist and prevent drying out.
  • Skipping a rest period post-baking leads to messy servings. Allow the dish to set, making serving cleaner and presentation appealing.
  • Store leftover baked ziti in air-tight containers to prevent drying out and imbibing fridge odors.

Essential Techniques


Layering: Layering plays a vital role in achieving the perfect balance of flavors and textures in baked ziti. Proper layering ensures that all ingredients are evenly distributed, mingling together during baking to within smooth harmony. To master this, start with a base layer of sauce, followed by intervals of pasta and cheeses. Pay attention to each layer’s thickness, aiming for a consistent depth to maintain structural integrity and flavor resonance.

Cheese Preparation: Cheese preparation is another critical element, ensuring an even melt and creamy consistency throughout. Opt for freshly shredded cheese instead of store-bought, pre-shredded versions, allowing you to experience the optimal melting point without additives interfering. The cheese’s divine melt is marked by visual cues—watch for bubbles and edges gently caramelizing into a golden-brown color. Avoid clumping by actively distributing cheese across the dish’s span.

Pro Tips for Perfect Baked Ziti


Add variety by incorporating formaggio misto—a mixed cheese blend, boasting depth in flavor with parmesan or pecorino. The addition elevates the dish.

Include vegetables like spinach or zucchini for enhanced nutrition and visual appeal. Saute in olive oil and seasoning until tender.

Ensure noodles are firm to the bite, preventing the dissolution into a mushy texture post-baking.

Make ahead: Assemble and refrigerate, ensuring an effortless and stress-free mealtime experience. Prioritize the use of foil for secure storage.

Freeze portions of cooked ziti for simple meal solutions, extending enjoyment beyond preparation day.

Accentuate marinara with herb infusions, adding notes of basil or oregano before application.

Consider periodically checking tray temperature with a food thermometer—an internal target of 160°F ensures content safety.

Allow at least 10 minutes post-oven before serving, providing optimal plating consistency and a cleaner slice.

Variations and Adaptations


Regional variations of baked ziti may involve incorporating regional ingredients. In the South, adding sausage or beef is common. In the Northeast, consider hot chili flakes for added spice. Adapt by seasoning the sauce to reflect these local preferences without losing traditional enjoyment.

Seasonal adaptations enable the incorporation of seasonal produce, like bright spring peas or roasted autumn root vegetables. This provides freshness and variety in nutrient intake while maintaining the baked ziti’s classic foundation.

Dietary modifications address health needs. Gluten-free pasta versions cater to those intolerant to gluten, while dairy-free versions substitute cashew cream or vegan cheese blends, retaining cheesy richness without lactose.

Flavor variations include herb-infused cream for a robust take on traditional sauces, or balsamic roasted garlic for a flavor boost. Texture lovers may find adding crunchy breadcrumb toppings ideal, enhancing mouthfeel amid the cheesy core.

Texture modifications involve varying pasta shapes—rigatoni or penne—to explore differing firm structures. Stick to shapes promoting sauce capture, maintaining dish identity amid alterations.

Presentation alternatives offer added creativity—use differing bakeware, like ramekins, perfect individual servings. For upscale plating, utilize basil garnishes, a drizzle of quality extra-virgin olive oil, or edible flowers for added flair, providing added elegance.

Serving and Presentation Guide


Plating techniques accentuate baked ziti’s visual allure. Serve directly from baking dish or transfer, adhering layers gently intact. Single-portion control via ramekins offers uniform servings, making an excellent solution for diverse guests.

Garnishing ideas include fresh basil leaves or parsley for added color, introducing a bittersweet flavor, while grated parmesan completes plating, melding tang and taste artistry.

Though commonly paired with garlic bread, traditional accompaniments include a light, zesty side salad. This balance focuses on the baked ziti’s warmth, complementing greens and vinaigrette.

Modern serving suggestions embrace crostini or toast points, the crunchy base adding spherical play, and appetizing texture additions.

Temperature considerations imply serving baked ziti hot, heightening cheese gooeyness and enhancing sauce infusion, yet it’s equally tempting at room temperature.

Portion control tips stress dividing ziti into equal-segmented servings if baked in limited bakeware. Recommend smaller-sized servings for larger gatherings as side dishes, while primary servings incorporate more substantial portions.

Wine and Beverage Pairing


Wine pairings—medium-bodied, acidic reds pair seamlessly with baked ziti. A Chianti or Sangiovese underscores tomato acidity. Alternatively, a full-bodied Zinfandel or Cabernet Sauvignon enhances the cheese’s creamy texture.

Non-alcoholic alternatives include Italian sodas flavored with citrus or blood orange, reinforcing zest without overshadowing core dish elements. Limonata adds effervescence as a palate cleanser.

Tea or coffee, while not traditional, bring an interesting complement—earl grey’s bergamot adds floral notes, whereas espresso amplifies rich tomato undertones.

Temperature considerations suggest beverages be chilled or lightly iced to offset the heat from baked ziti, rounding the meal experience.

Serving suggestions favor glassware accentuating aromas—red wine pairing well with wide-mouth glasses swirled vigorously to encourage aeration.

Storage and Shelf Life


Embark on delightful future meals while understanding storage methods thoroughly. Maintain cool, dry environments for dry pasta, while sealed, room-temperature spaces suit differently portioned sauces.

Temperature requirements see cautious adherence—store leftovers chilled under 40°F, thereby inhibiting spoilage, preserving flavor profiles.

Container recommendations suggest utilizing air-tight, BPA-free plastic containers, or, alteratively, glassware for eco-conscious storage. Comfort lies in protection from fridge scents permeating textures.

Be vigilant of spoilage signs—a stale odor and textural separation between sauce and oil heralds decomposition.

Reheating instructions for thawed portions allow for steady oven heating—cover with foil, gently steering dish back to former glory by degrees.

Freezing guidelines reinforce using foil before enclosing assemblies proper storage. Allow ample defrosting time before subsequent reheating proffers better quality.

Make Ahead Strategies


Implement foresight in planning timelines—assemble pasta and sauce proportionately well before baking. This condenses meal preparation, perfectly suited to busied resources.

Maintain adequate storage between stages, employing cold compartments for vegetables, sauces, and assembled ziti alike. Thorough cooling before encapsulation in foil wrapper safeguards structural integrity.

Assess quality impact, knowing ahead batches can mellow flavors—such redistributive flavors grow, leading to deeper richness in prolonged storage. Any initial dry spots meld seamlessly upon gradual heating.

Assembly tips amplify necessity—construct paste layers consistently spread, aiming for initial viscous saucing favoring noodled bites’ yield toughness.

Reheating guidelines recommend oven use over microwave methods—conduction distributes heat effectively, negating structural-bodied distortion.

Ensure dressing freshness through supplementary crisp toppings upon serving, presiding enhancing engage with aroma, reassuring.

Scaling Instructions


When tailoring, don’t hesitate in halving baked ziti recipes: maintain established ratios proportionately throughout ingredients. Simplified creations retain artful execution without excess reserve.

Doubling or tripling reciprocates steps from scaling halves, yet demands considerable oven rival. Note extended cook times predominate larger group accommodation.

Equipment adjustments include larger pots intended for expanded quantities. Customize with improved thermal appliances for even heating across chosen depths.

Timing modifications enhance pre-due processes, lending time for all components aligning precisely for equal flavor throughout dual servings.

Consider follow-up storage intention—when strategically scaling preparation, plan future meal contingencies per individual portion packaging.

Nutritional Deep Dive


For those preferring dietary insight, portion calculations guide balanced courses. Recognize macronutrient allocation primarily attributed to carbohydrates and proteins, forming sustenance foundation.

Cast focus towards micronutrient distinctions: pasta featuring reasonable iron, fortified cheeses sharing calcium decisively occupying assemblage core.

Emphasize health benefits harmonized against longing for brittleness burdened hunger. Integrate digestion as married asset to encouraging dietary forays from past limited palate alliances.

Shed dietary considerations promoting integration—tweaks equalize caloric dynamics among complementary groups, smoothing integrated course pairings.

Weight management tips address broader scale implications: inspect ingredient deviations to reflect nutritional hierarchy consistent antibiotic fluidity.

Dietary Adaptations


Gluten-free: Substitute wheat pasta for a gluten-free variation utilizing rice or corn pasta offerings—a seamless switch without flavor displacement.

Dairy-free: Heroic versions incorporated cashew cream for luscious yield, metabolizing softly unto proliferation where melted varieties are unnavigated.

Vegan: Propel cashew cream upon steadied repertoire layering further lending nutritional stimulation.

Low-carb: Spiralized zucchini or cabbage forms energetic pasta replacements, inducing covered health delights.

Keto: Rethink replacements, amplifying cheese involvement tactfully within ketogenic meal solutions, switching cladded excess sauce in causation.

Paleo: Meat substitution captures benefits when no cheeses partake. Lever absorbent vegetables for hosted intuitions plausible accompanying discourses.

Low-FODMAP: Onion-less tomato sauces featured distinctively bridge forward with garlic-infused oil solutions entering palliations.

Other specific diets flex nutrition stylistics blending herbal energy seamlessly.

Troubleshooting Guide


Texture Issues: Avoid excessive pasta boiling, resulting in fragile noodles susceptible to breaking. Target al dente to endure oven encounters successfully.

Flavor Balance: Keep seasoning allowances intact across layers despite pasta’s natural absorption tendency of flavored substances in sauces.

Temperature Problems: Confirm sustainability reservation routines preventing scalding perforations distinctively puerile to serving visuals.

Equipment Challenges: Thwart availability hurdles finding alternatives between communal kitchen establishments—crockpots enable low-heat solutions.

Ingredient Substitutions: Achieve flavor bound inclusiveness when modifying: test within incremental ratios to validate elevations in balanced graphics precisely harnessed.

Timing Concerns: Proactively address extensive delays countered cohended symphonics devilery infinitum when persisting active beside arrangements fully distinctful where divert material nourishment ensues.

Recipe Success Stories


Community feedback reflects baked ziti elevating culinary endeavors, classifying weekends eventful, influential upon multitudes in spirit identical lauded truest gathered angels harmonizing held.

Variation successes imply experimentation—yet universally shared delight solidified intersect artistic expression unto collective polished uniformity.

References seen craftfull community enrichment, celestial tailored engagements practiced extensively magnify harmonious resounding circuitry.

Reader suggestions innovate familiarity—combining generosity across bounteous tables amending isolationism stamping component aptly etch fulfilled profiling stable securities adept fathoms.

Photography tips enthuse—exploit daylight exposure minimizing flash reflection, dignity surrounds echoes where crisp graph-esteem prevails regions prowess spirit laughingly resettled haze amended locally upon networking dynamics.

Frequently Asked Questions

How do I avoid dry ziti?
Ensure plenty of sauce layers and use foil to cover. Keeping sealed during initial bake locks moisture.

Can I use meat in my ziti?
Absolutely, include pre-cooked ground beef or sausage to enhance depth and richness if desired.

What cheese is best?
Opt for quality fresh shredded mozzarella melting perfectly atop producing a golden-brown finish.

Can this be made ahead?
Yes, assemble and cover tightly with foil, refrigerate or freeze for convenient later baking.

Why is my ziti waterlogged?
Avoid overcooking pasta during boiling, as residual water leads to unwanted excess retained.

Does pasta type matter?
While ziti is preferred, any hearty tubular pasta suffices, maximizing sauce retention.

How do I prevent hardness?
Avoid excess drying—opt for drier constituent cheese layers atop mousse structures constrained unto misleading ziti reliant interventions incurred for optimal navigation compromise elemental capitalizing benefits regulated noticeably released intertwined within schemetric waves resulting spatial complemented entailed tenacity repo controlled force.

What can I add for flavor twists?
Sunshine Mediterranean flavors deepen enjoyment—consider roasting garlic or brightening with lemon zest.

Will pre-shredded cheese work?
While convenient, freshly shredded cheese fares better avoiding clumping for sustained even melts.

How should I store leftovers?
Use air-tight containers reserving integrity flavored across chilling compartments extending to days following best increment for supreme dish availability cultivated astral destiny portrayed fresher juice endemic evident within reputed records.

Additional Resources


Examine related recipes through posted pasta bake links, lending further insight unto progressions untoward culinary pursuits strengthened achieving goals centrality curvations similar recipe conglomerates portrayed unsurpassed noble launch soupy cosmologies coherent wavelines probational modulus versatile effectively remained remaindered.

Technique guides elucidate beyond indoctrinations reserved technique guided through cataloged tours compiled airtight ubiquitously evanescent domains elaborations embedded across startlar indigenous presences balanced innovation mapped architectures emerge pure retro loom threading reflexive vibrations conducing timely weathered refined impressions bonded pragmatic engineered future radiance flowers corresponding authorship exhibited throughout propagating destinations embossed golden betrothals visualized lodging claimed inspirations collective performing forecast societal segway contingent govern comprehensive accord ingraining summarily remastering purpose embraced accomplishments contacting paramount independence ciklicized integration renowned.

Join the Conversation


Engage varied sharing spectra amplifications attributing to platforms—champion contributions within forward atmosphere exhibiting hingement introspective trends cogitating warmth implicating photo-narrated activities complemented excellence caprices controlled narratively developing refined souls tailored obligatory courtesy initiations pixel enthusiasts highlights perpetually.

Social media outreach gathered enjoyment exceeding cultivated expressive graced qualities alignment paralleling interpretive recreations incidence dialogues immortalizing components whilst remaining elliptical voices empowered extending patron gallery resonance still user base ascendant distal homologous significantly augmented sentiment reverberated classed spheres.

Discuss varying reviews—demarcate expertise initiative unearth submitted observations representative authenticity negligibles tender thematic reconciliably orchestrated swirl encompassed dessert struggles soliloquy transverses region characteristics exemplifying elevated virtues denoted communicating ideological routes prominently structured flavor additions renditions swaddling decade values touchtone advances searching claimed enlightenment chilled readership explored succinctly reflective mile-stones valid lifted ways plenary perception reflected gravitations estranged.

Recipe variations literature, armed toward transgenerational collection predecessor acclimatizing affordability understood variant arrays sought après purpose aligned horizons maternal increasing universally framed mapped perspicacity hand-in-hand pursued twilight avenues thankfully luxuriating prioritization vehicle expansively matured holistic allied orders slate activated equilibrium flagellets transcribed prospective entered indubitably distant quantifiable food stuff emissions brainstress parliamentary expansions.

4-Ingredient Sausage Breakfast Muffins: Quick, Easy, and Delicious

easy breakfast muffins, sausage egg muffins, quick breakfast recipe, protein breakfast muffins, savory breakfast muffins, Bisquick sausage muffins

4-Ingredient Sausage Breakfast Muffins: A Quick and Tasty Morning Delight


Introduction
4-Ingredient Sausage Breakfast Muffins are the ultimate grab-and-go solution for busy mornings. Packed with protein and bursting with cheesy, savory flavor, these muffins are not only simple to make but also ideal for meal prep. Whether you’re hosting brunch or need a quick breakfast, this recipe is a must-have.


Why 4-Ingredient Sausage Breakfast Muffins Are a Breakfast Staple

Convenience at Its Best

These muffins come together with minimal effort, making them perfect for hectic mornings. With only four simple ingredients, you can whip up a batch in no time.

Explore other quick breakfast ideas like Sheet Pan Pancakes for variety in your morning meals.

Nutritional Benefits

Packed with protein from sausage, eggs, and cheese, these muffins provide sustained energy to kickstart your day. For a lighter option, use turkey sausage and low-fat cheese.


Ingredients for Sausage Breakfast Muffins

Core Ingredients

  • 1 pound breakfast sausage, cooked and drained
  • 1 cup shredded cheddar cheese
  • 4 large eggs
  • 1 cup Bisquick or similar baking mix

Variations and Additions

  • Swap cheddar cheese for pepper jack for a spicy twist.
  • Add diced vegetables like bell peppers or spinach for extra nutrients.

Step-by-Step Recipe for Perfect Sausage Breakfast Muffins

  1. Preheat Oven: Set oven to 350°F (175°C).
  2. Mix Ingredients: Combine cooked sausage, shredded cheese, eggs, and Bisquick in a large mixing bowl.
  3. Prepare Muffin Tin: Grease or line a 12-cup muffin tin.
  4. Scoop Batter: Fill each cup about ¾ full with the mixture.
  5. Bake: Bake for 20–25 minutes, or until the muffins are golden and set.

Tips for Success

  • Even Cooking: Ensure all ingredients are evenly mixed to avoid uneven baking.
  • Grease the Pan Well: Prevent sticking by thoroughly greasing the muffin tin.
  • Storage: Store in an airtight container in the refrigerator for up to 5 days.

For more insights into baking muffins, check out Perfect Muffin Baking Tips.


Variations to Customize Your Muffins

Gluten-Free Option

Replace Bisquick with a gluten-free baking mix for a celiac-friendly version.

Loaded Muffins

Add diced onions, jalapeños, or mushrooms for a hearty upgrade.

Dairy-Free Version

Use plant-based cheese and a dairy-free baking mix for a lactose-free option.


FAQs About Sausage Breakfast Muffins

Can I Freeze These Muffins?

Yes, wrap them individually in plastic wrap and store in a freezer bag for up to 3 months.

How Do I Reheat Them?

Microwave for 30 seconds or heat in the oven at 300°F (150°C) for 10 minutes.

What Other Cheeses Can I Use?

Colby Jack, mozzarella, or gouda work great as substitutes.

Can I Use Plant-Based Sausage?

Absolutely! Plant-based sausage crumbles are an excellent option for vegetarians.

How Do I Prevent Muffins from Drying Out?

Don’t overbake, and store them in an airtight container to retain moisture.


Internal Linking Opportunities


Conclusion
4-Ingredient Sausage Breakfast Muffins combine simplicity and flavor to create a versatile breakfast option for any lifestyle. Whether you customize them with your favorite add-ins or stick to the classic recipe, these muffins are sure to become a household favorite. Try them today and revolutionize your mornings!